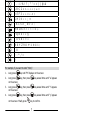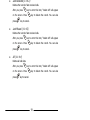
1
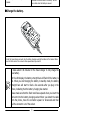
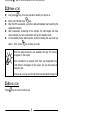
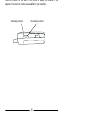
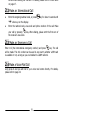
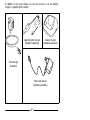
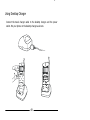
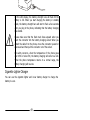
GSM810
GSM 900 system
User’s Manual
Disclaimer
Audiovox Communications Corp. makes no representations or warranties, either
expressed or implied, with respect to the contents hereof and specifically
disclaims any warranties, merchantability or fitness for any particular purpose.
Further, Audiovox Communications Corp. reserves the right to revise this
publication and to make changes from time to time in the contents hereof
without obligation of Audiovox Communications Corp. to notify any person of
such revision or changes.
with special care. If you lose it, please contact your dealer or service provider
as soon as possible.
Turn the phone over and locate the SIM card socket of the handset. Follow the
steps below to install the SIM card.
The metal contact of the SIM card can be easily damaged by
scratches. Pay special attention to the SIM card when you handle and
install it.
Insert the bevelled end of the SIM card into the
SIM card socket. Make sure the metal contact
faces down when you insert it.
Push the SIM card completely into the hollow.
Slide the metal SIM card stopper as shown to secure the SIM card.
i
Place the top end of the battery on the
handset.
Hold down the bottom side of the battery. You will
hear a click when the battery is secured.
# Charge the battery.
Insert the travel charger connector into the battery charging socket at the bottom of the handset. Make
sure the flash mark on the connector faces upward when you insert it.
It takes about 130 minutes for the travel charger to fully charge the
new battery.
On the LCD display, the battery strength bars will flash till the battery is
full. When you start charging the battery in standby mode, the battery
strength bars will start to flash a few seconds after you plug in the
phone, indicating that the battery charging has started.
Please make sure that the flash mark faces upward when you insert the
connector into the battery charging socket. When you detach the cable
from the phone, move the connector upward or downward and then
pull the connector out of the socket.
ii
What is PIN?
PIN (Personal Identification Number) is a password provided by your network
service provider. With this PIN, you can use the SIM card and access the
services from the network service provider.
You can enter your PIN with the alphanumeric keys. If you have typed
a wrong letter, please press
key.
When entering a wrong PIN more than three times, your phone will
become locked. Please contact your dealer to solve this problem.
&
'
After your PIN is accepted, the phone automatically starts
searching for the designated network. This may take a few
seconds.
When completed, you can start to dial the number
(including area code) using the digit keys; then press
key to make the call.
(
When you finish your telephone call, press
the call and return to standby mode.
iii
key to end
iv
1.1 TURN THE PHONE ON ....................................................................... 9
1.2 TURN THE PHONE OFF...................................................................... 9
1.3 MAKE A CALL.................................................................................. 9
1.4 END A CALL .................................................................................... 9
1.5 ANSWER A CALL ............................................................................ 10
1.6 ADJUST THE EARPIECE VOLUME ....................................................... 10
CHAPTER 2. BASIC CALL FUNCTIONS................................................. 11
2.1 ONE-TOUCH DIALING .................................................................... 11
2.2 MAKE AN INTERNATIONAL CALL ...................................................... 11
2.3 MAKE AN EMERGENCY CALL ............................................................ 11
2.4 MAKE A VOICE MAIL CALL .............................................................. 11
2.5 MISSED CALL MESSAGE.................................................................. 12
2.6 ABBREVIATED CALL ....................................................................... 12
2.7 PHONE BOOK SHORTCUT ................................................................ 12
2.8 ADD NEW ENTRIES ........................................................................ 12
2.9 LAST 10 NUMBER REDIAL .............................................................. 12
2.10 INCOMING CALL WAITING ............................................................ 12
2.11 DIAL EXTENSION NUMBER ............................................................ 13
2.12 CALL OPTIONS ........................................................................... 13
Mute call .............................................................................................13
* End call ............................................................................................13
* Swap call..........................................................................................13
* Hold call ...........................................................................................13
* Unhold call .......................................................................................14
* Join call............................................................................................14
* Private call........................................................................................14
* Messages .........................................................................................14
2.13 KEY LOCK .................................................................................. 14
v
All (1-1-4-4).................................................................................18
Find Record (1-2) ................................................................................19
By Name (1-2-1) ..............................................................................19
Add Record (1-3) .................................................................................19
Delete Record (1-4) .............................................................................19
Delete By Name (1-4-1) ...................................................................20
Delete All (1-4-2) .............................................................................20
Memory Selection (1-5)........................................................................20
Own Number (1-6) ..............................................................................20
3.2 MESSAGES
(2) .......................................................................... 21
Inbox (2-1) .........................................................................................21
Delete Message ...............................................................................21
Edit Message ...................................................................................21
Reply Message.................................................................................21
Send Message..................................................................................22
Use Number ....................................................................................22
Write Message (2-2) ............................................................................22
Outbox (2-3) .......................................................................................23
Delete Message ...............................................................................23
Edit Message ...................................................................................23
Send Message..................................................................................23
Use Number ....................................................................................23
Listen to Message (2-4)........................................................................24
Cell Broadcast (2-5) .............................................................................24
Receive Broadcast (2-5-1) ................................................................24
Topics (2-5-2) ..................................................................................24
Language (2-5-3).............................................................................24
Message Settings (2-6) ........................................................................25
Message Center (2-6-1)....................................................................25
Valid Period (2-6-2) ..........................................................................25
vi
If No Reply (3-1-3)...........................................................................28
If Unreachable (3-1-4) .....................................................................28
Cancel All (3-1-5).............................................................................28
Call Restrict (3-2).................................................................................29
Restrict All Out (3-2-1) .....................................................................29
Restrict Int’l Out (3-2-2) ...................................................................29
Restrict IntExtH Out (3-2-3)..............................................................29
Restrict All In (3-2-4) .......................................................................30
Restrict Roaming In (3-2-5) ..............................................................30
Cancel All (3-2-6).............................................................................30
Call Waiting (3-3).................................................................................31
Activate (3-3-1) ...............................................................................31
Cancel (3-3-2) .................................................................................31
Status (3-3-3) ..................................................................................31
Call Information (3-4) ..........................................................................31
Last Call (3-4-1)...............................................................................31
Call Duration (3-4-1-1) .................................................................31
Call Cost (3-4-1-2)........................................................................31
All Calls (3-4-2)................................................................................31
Call Duration (3-4-1-1) .................................................................31
Call Cost (3-4-1-2)........................................................................32
Clear Cost (3-4-2-3) .....................................................................32
Clear Duration (3-4-2-4) ...............................................................32
Call Rate (3-4-3) ..............................................................................32
Currency (3-4-3-1) .......................................................................32
Charge Unit (3-4-3-2) ...................................................................32
Cost Limit (ON/OFF) (3-4-4) ............................................................32
Line in Use (3-5)..................................................................................33
Next Call (3-6).....................................................................................33
Voice ...............................................................................................33
Data................................................................................................33
Fax..................................................................................................33
vii
Manual Selection (5-2) .........................................................................36
3.6 SECURITY SETTINGS
(6) ............................................................. 36
Set Code Status (6-1) ..........................................................................36
PIN code (6-1-1)..............................................................................36
Phone Code (6-1-2) .........................................................................36
Change Password (6-2) ........................................................................37
PIN Code (6-2-1) .............................................................................37
PIN2 (6-2-2) ....................................................................................37
Phone Code (6-2-3) .........................................................................37
Network Password (6-2-4) ................................................................37
Fixed Dial (6-3)....................................................................................38
View (6-3-1) ....................................................................................38
Set Status (6-3-2) ............................................................................38
Modify (6-3-3) .................................................................................38
SIM Lock (6-4) ....................................................................................38
Set Status (6-4-1) ............................................................................39
Change Code (6-4-2)........................................................................39
3.7 AUDIO SETTINGS
(7).................................................................. 39
Ring Volume (7-1)............................................................................39
Ring Type (7-2)................................................................................39
Keypad Tone (7-3) ...........................................................................39
Alarm Type (7-4)..............................................................................40
3.8 CLOCK & CALENDAR (8) ............................................................. 40
Set Alarm (8-1)....................................................................................40
Set Time (8-2).....................................................................................40
Calendar (8-3) .....................................................................................40
View Day.........................................................................................41
viii
CHAPTER 6. ACCESSORIES................................................................. 47
6.1 BATTERIES ................................................................................... 47
Battery Charger ...................................................................................47
10.2 HANDS-FREE .............................................................................. 51
Portable Hands-Free Kit........................................................................51
Simple Car Kit......................................................................................51
Car Holder...........................................................................................51
CHAPTER 7. TROUBLESHOOTING ....................................................... 53
ix
x
• Switch off your cellular phone before you board an aircraft.
Dangerous Areas…
Turn off your phone when you are near the following places:
• Refueling station
• Fuel depots
• Chemical plants
• Blasting operation area
And These Electronic Devices…
Your cellular phone may cause interference or malfunctioning of electronic
equipment that is not adequately shielded from radio frequency energy. Beware
of interference which usage of your phone may cause to the following devices:
• Medical devices, e.g., pacemakers, hearing aids
• Electronic fuel-injection systems
• Electronic anti-lock braking systems
• Electronic cruise control systems
• Other electronic systems (Consult the dealer of your electronic devices about
possible interference)
• The electromagnetic emission of wireless telecommunication devices may
result in a negative effect to human health.
Failure to follow these instructions may lead to suspension or
denial of cellular phone services to the offender or legal action or
both.
1
desktop PC to transmit data, fax and access the Internet.
We know that you demand more than what a mobile phone can offer for
mobility. The advanced EFR (Enhanced-Full-Rate) sound technology optimizes
the sound quality of your phone calls, allowing you to clearly distinguish the
speaker’s tone. If you are surprised at what you hear, you will be even more
surprised at what you see – the electroluminescent LCD display frees you from
the nightmare of groping between pixels. You will see clearly each and every
character displayed on the screen.
Why not take your phone along as a personal secretary? With the built-in
calendar function, you can jot down important notes on different dates and
remind yourself with the alarm when it’s time to go. If you prefer a silent
reminder, the built-in vibrator ringer can certainly save you from embarrassment
in a meeting.
There are more features to discover. Now please follow us and make the
acquaintance of your new and versatile partner.
Audiovox
2
*For a detailed description of the function of each key, please refer to page 6.
Side View
Volume adjustment Earphone jack
key
*Under standby mode, you can press the volume adjustment key to enter the
Phone Book directly.
*You can connect the optional hands-free kit to the earphone jack.
3
*The data transmission & car kit connector can be used to connect the data
service cable and the optional hands-free kit.
Rear View
External antenna
connector
Battery contact
SIM card socket
4
The table below describes the meaning of each icon:
Signal
Strength
Roaming
The more bars displayed, the better the signal
strength.
When your phone is not used under your home
network, this icon will appear.
Short
Message
This icon will appear on the screen when a short
message is received by the phone. When the
message storage memory is full, this icon will flash.
Speaking
This icon appears when you speak on your phone.
Line in use Displays the current line in use (Please refer to page
33).
This icon will appear when vibrator ringer mode is
Vibrator
on.
Battery
Status
Key Lock
Data Call
Fax Call
It shows four levels of strength of the battery. The
more bars, the greater the strength.
When charging the battery, you can see the strength
of battery on the screen and the bars flash till the
battery is full.
This icon indicates that the key lock mode is ON.
This icon will appear if you set the next call as data
call (Please see page 33 for details).
This icon will appear if you set the next call as fax
call (Please see page 33 for details).
5
Key
Function
Power On/Off Key
Long press this key to turn the handset power on or off. To access
the menu functions, you can use this key to return to a previous
screen of the menu.
Send Key
Press this key to make your call or confirm menu selections.
Selection Key
This key is used to navigate and select among function items in the
menu or submenu. For example, to access the Phone Book, you can
press the key downward to enter the Phone Book item.
6
Key
Characters
, . : 1 % ! ? ; “ ‘ < > ( ) @ &
A B C 2 Å Ä å ä à Ç æ ß
D E F 3 è é É £ Æ $
G H I 4 ï î ¿ )
J K L 5 ∆ _ Φ Γ Λ Ω
M N O 6 Ñ ñ ò Ö ö ∅ φ
P Q R S 7 ¥ §
T U V 8 ü Ü ù
W X Y Z 9 Π Ψ Σ Θ Ξ 1)
_ 0
+ - * / =
#
For example, if you want to enter “Mary”:
1.
Long press
key until “M” displays on the screen.
2.
Long press
on the screen.
key, then press
key several times until “a” appears
3.
Long press
on the screen.
key, then press
key several times until “r” appears
4.
Long press
key, then press
key several times until “y” appears
on the screen. Finally press
key to confirm.
7
8
Long press
key for a few seconds to turn the phone off.
1.3 Make a Call
key for a few seconds to switch your phone on.
!
Long press
"
#
key.
Enter your PIN and press
After the PIN is accepted, your phone will automatically start searching the
designated network.
After successfully connecting to the network, the LCD display will show
which network you have connected to and go into standby mode.
In this standby mode, dial the phone number including the area code you
$
%
desire. Then, press
key to make your call.
When the network service is not available, the sign “No Service”
will appear on the screen.
When connected to a network other than your designated one,
“Limit Service” will appear on the screen. You can only make an
emergency call.
During a call, you can use the call functions described on page 13.
1.4 End a Call
Press
key to end or cancel a call.
9
Press the buttons on the side of the phone to adjust the volume of the
earpiece. Five levels of volume are available for your selection.
Increasing volume
Decreasing volume
10
screen when sending out the call. For details, please refer to Phone Book
on page 17.
2.2 Make an International Call
♦
Enter the outgoing national code, or press
♦
“ ” shows up on the display.
Enter the national code, area code and phone number of the call. Make
+
your call by pressing
the receiver’s area code.
key for about 1 second until
key. When dialing, please omit the first zero of
2.3 Make an Emergency Call
Enter 112 (the international emergency number) and press
key. The call
will be made. This 112 number can be used in any country whether a SIM card
is available or not, as long as you are included in a GSM network.
2.4 Make a Voice Mail Call
Long press 0 and you will link to your voice mail center directly. For details,
please refer to page 24.
11
key to dial it.
2.7 Phone Book Shortcut
Under standby mode, you can press the volume adjustment keys to enter the
phone book and browse the entries. You can press
key to select and
press
key to dial.
2.8 Add New Entries
Under standby mode, you can add new entries to the phone book by first
entering the number and long pressing
key. You will then be prompted to
enter the name, number and record number (i.e., the location of that entry).
When finished, press
key.
2.9Last 10 Number Redial
♦
♦
Press
Press
key to access the last number dialed.
key to scroll through the last 10 numbers dialed.
♦
Press
key to send the call if the number shown is correct.
You can long press
directly.
key to send out the last number dialed
2.10 Incoming Call Waiting
An incoming call number and call-waiting message will appear on the screen
when a new incoming call arrives while you are on a call.
12
After you key in the telephone number, long press
key for a second, then
”P” will display on the LCD screen. Enter the extension number and press
key to make the call.
2.12 Call Options
When you are on a telephone call, you can press
key to enter the options
key to select. The options are listed as follows:
and press
The options marked “*” are only available if you have subscribed
to your network service provider.
Mute call
When no sound wants to be heard by your interlocutor when you are on a call.
You can choose the Mute function to do so.
* End call
Under a circumstance of multi-party call, you can end up one of them by
selecting this function.
* Swap call
This function is available when you have both active calls and calls on hold.
Swap transfers the active call to hold and vice versa, so that you may converse
with the other party.
* Hold call
This function allows you to put a currently active call on hold, so that you can
initiate a new call.
13
* Messages
You can read or write messages under this function. Please refer to page 21 for
details.
2.13 Key Lock
You can long press
key to initiate the key lock function to prevent turning
on or off your phone unintentionally. When the key lock function is initiated, the
icon will appear on the screen.
To unlock, press
key and then press
14
key.
♦
Press
key to return to standby mode.
For example, when you want to change the language setting:
key downward 4 times to enter item 4: “Handset Settings”, then
Press
press
key to confirm.
♦ Press
key downward 4 times to enter item 4-5 “Language” and
press
key to confirm.
♦
Select a desired language item with
confirm.
♦
Press
key, then press
key to
key or volume adjustment keys to return to standby mode.
15
♦
Select the desired language item with
confirm.
♦
Press
key and press
key to
key to return to standby mode.
You will see the function codes listed after each function item in the
following sections. Type the function code to enter the function
through shortcut access.
16
You can find the record for the latest calls you made in various situations.
Last Dialed (1-1-1)
Displays the last 10 calls you dialed.
After you press
key to enter this item, you can press
key to
browse the number you dialed. Select a number and press
key to
key to choose to dial that number (Send), save
enter, then press
that number to Phone Book (Save) or see the details of that call (Details).
Finally, press
key to confirm.
Last Received (1-1-2)
Displays the last 10 calls you received.
After you press
key to enter this item, you can press
key to
browse the calls you received. Select a call and press
key to enter,
then press
key to choose to dial that number (Send), save that
number to Phone Book (Save) or see the details of that call (Details).
Finally, press
key to confirm.
Last Missed (1-1-3)
Displays the last 10 missed calls.
After you press
key to enter this item, you can press
key to
browse the calls you missed. Select a call and press
key to enter,
key to choose to dial that number (Send), save that
then press
number to Phone Book (Save) or see the details of that call (Details).
Finally, press
key to confirm.
17
♦
Last Received (1-1-4-2)
Deletes the record of last received calls.
After you press
key to enter this item, “Delete All” will appear
on the screen. Press
press
♦
key to delete the record. You can also
key to cancel.
Last Missed (1-1-4-3)
Deletes the record of last received calls.
After you press
key to enter this item, “Delete All” will appear
on the screen. Press
press
♦
key to delete the record. You can also
key to cancel.
All (1-1-4-4)
Deletes all call data.
After you press
key to enter this item, “Delete All” will appear
on the screen. Press
press
key to delete the record. You can also
key to cancel.
18
choose from the options below:
Send: press
Edit: press
key to dial that number.
key to edit that record.
Delete: press
Move: press
key to delete that record.
key to move that record to another location.
Add Record (1-3)
This function allows you to add new record to the Phone Book.
After selecting this function, you will be prompted to enter the name.
Enter the name and press
key, then enter the telephone number. If
key for about one
you want to enter an extension number, press
second until “P” appears on the screen, then key in the extension
number. When completed, press
key.
Your handset will assign a
location to save this record automatically. Press
key to confirm, and
“Record Saved” will appear on the screen. If you want to add more
records, please repeat the steps above.
Delete Record (1-4)
You can erase the records which are no longer needed here.
After you enter this item, you can press
below. You can press
key to display the options
key to enter each option:
19
After you select this item, press
Book.
to clear all records in the Phone
Memory Selection (1-5)
You can select the memory where the phone book records can be saved. Two
options are available: the memory in the SIM card or the memory in your
handset.
After you enter this item, press
key. “SIM” and “Phone” will display on the
screen. Press
key to select which memory you wish to use, then press
key to confirm.
Own Number (1-6)
Sets or displays the current SIM card number.
If there is no own number data saved in the memory, the message ”No
Records. Add Record?” will display on the screen when you enter this function.
You can press
key to enter your name and your SIM card number, then
specify a location for this number (1 or 2).
If you have previously entered your own number data in this function, you can
press
key to add, edit or delete the data:
Add Record: press
key, then enter the name, number and record number.
Finally, press
Edit Record: press
Delete Record: press
key to confirm.
key to edit the number. When completed, press
key to delete.
20
key.
key to choose from the following:
Delete Message
Delete current message.
key to delete the message. When deleted, “Deleted, Read
Press
Next?” will display on the screen. If you want to read the next message,
please press
key. If you want to exit, please press
key.
Edit Message
Edit current message.
Press
key to start editing the message. When completed, you can
press
key to choose from the following options:
Send: press
key to select this item and send the message to another
person. Enter the receiver’s phone number and press
Save: press
press
key.
key to save the message. Enter the number and then
key.
Reply Message
Reply to current message.
Press
key to enter this item, then enter the reply message and phone
number. When completed, press
) key.
21
Send: press
key to dial that number.
Save: press
key, then enter the name for that number. Finally, press
key to save the number to Phone Book.
Write Message (2-2)
You can write short messages with this function.
After you press
key to enter this function, key in the message you want to
send and press
key, then choose “Send” or “Save”:
Send: press
or press
key, then enter the receiver’s number and press
to send
key to cancel.
Save: press
save, or press
key, then enter the receiver’s number. Finally, press
key to cancel.
22
key to
please press
key. If you want to exit, please press
key.
Edit Message
Edit the selected message.
Press
key to start editing the message. When completed, you can
press
key to choose from the following options:
Send: press
key to select this item and send the message to another
person. Enter the receiver’s phone number and press
Save: press
press
key.
key to save the message. Enter the number and then
key.
Send Message
Send the selected message.
Press
key to enter this item and enter the receiver’s phone number.
When completed, press
key to confirm.
Use Number
Display the number in the selected message.
Display and use the number in the message.
After you press
key to enter this item, the following options will
appear on the screen:
Send: press
key to dial that number.
Save: press
key, then enter the name for that number. Finally, press
key to save the number to Phone Book.
23
choose preferred topics and languages. You can press
the following options:
key to choose from
Receive Broadcast (2-5-1)
Receive the cell broadcast provided by your network service provider.
key to enter this item, you can press
key to
After pressing
choose “ON” or “OFF” to decide whether to receive or not. Finally, press
key to confirm.
Topics (2-5-2)
Display the topics of the broadcast message.
key to enter this item, you can press
After you press
key to
choose to add a topic or delete a topic. When completed, press
to confirm.
key
Language (2-5-3)
You can choose the language used to display the broadcast message.
After you press
screen. Press
key to enter this item, the options will display on the
key to choose the language you want and press
key to confirm.
24
network service provider. When completed, press
key to confirm.
Valid Period (2-6-2)
You can set the length of time that your text messages are stored at the
message center while the message center attempts to deliver them.
Press
key and use
Finally, press
key to select a desired valid period.
key to confirm.
Voice Mail Box (2-6-3)
Within this submenu, you can store the phone number of your voice
or enter 2-4 Listen Message to dial.
mailbox. You can long press
Press
key, then enter the voice mailbox number provided by your
network service provider. Finally, press
key to confirm.
Reply Path (2-6-4)
You can ask the network to set the route of the reply message via your
own message center.
Press
key and then use the
Finally, press
key to confirm.
25
key to select “On” or “Off”.
Finally, press
key to confirm.
Message Format (2-6-7)
You can ask the network to convert your text message into different
formats.
Press
key and then use the
key to select from the following
formats: Paging, E-mail, Fax, Voice, ERMES, Telex and G4 Fax. When
completed, press
key to confirm.
Delete All (2-7)
Delete all the messages. If you just want to delete certain messages,
please refer to pages 21 and 23 for details.
Press
key, and “Delete All” will appear on the screen. If you want to
key. You can also press
delete all message data, press
cancel.
26
key to
number without any condition.
Press
key to display the following options:
Activate: after you press
key to enter this function, you will be
prompted to enter the number to divert to. When you finish
entering the number, press
key to activate the function.
Cancel: press
key to cancel the function.
Status: press
screen.
key, and the status of this function will appear on the
If Busy (3-1-2)
You can send your calls to a designated phone number when your phone
is busy.
Press
key to display the following options:
Activate: after you press
key to enter this function, you will be
prompted to enter the number to divert to. When you finish
entering the number, press
key to activate the function.
Cancel: press
key to cancel the function.
Status: press
screen.
key, and the status of this function will appear on the
27
Status: press
screen.
key, and the status of this function will appear on the
If Unreachable (3-1-4)
When the network is unavailable, your calls will be sent to another
designated number.
Press
key to display the following options:
Activate: after you press
key to enter this function, you will be
prompted to enter the number to divert to. When you finish
entering the number, press
key to activate the function.
Cancel: press
key to cancel the function.
Status: press
screen.
key, and the status of this function will appear on the
Cancel All (3-1-5)
You can cancel all the diverting functions here.
key, and “Cancel All” will appear on the screen. Press
Press
again to confirm.
28
key
provider. When you finish entering the password, press
to activate the function.
key
Cancel: press
key to cancel the function.
Status: press
screen.
key, and the status of this function will appear on the
Restrict Int’l Out (3-2-2)
Restrict all outgoing international calls.
key to enter this function, you will be
Activate: after you press
prompted to enter the password provided by your network service
provider. When you finish entering the password, press
to activate the function.
key
Cancel: press
key to cancel the function.
Status: press
screen.
key, and the status of this function will appear on the
Restrict IntExtH Out (3-2-3)
Restrict outgoing international calls except calls that connect to your
home network.
key to enter this function, you will be
Activate: after you press
prompted to enter the password provided by your network service
provider. When you finish entering the password, press
to activate the function.
Cancel: press
key to cancel the function.
29
key
Cancel: press
key to cancel the function.
Status: press
screen.
key, and the status of this function will appear on the
Restrict Roaming In (3-2-5)
Restrict incoming calls when roaming.
key to enter this function, you will be
Activate: after you press
prompted to enter the password provided by your network service
provider. When you finish entering the password, press
to activate the function.
key
Cancel: press
key to cancel the function.
Status: press
screen.
key, and the status of this function will appear on the
Cancel All (3-2-6)
Cancel all restrict settings.
Press
key to enter this function, then press
30
key again to confirm.
Cancel (3-3-2)
Cancel call waiting function.
Press
key to cancel this function.
Status (3-3-3)
Check the status of call waiting function.
Press
key to check the status of the call waiting function.
Call Information (3-4)
This function records the information of the call duration and call cost.
key to display the following options:
Press
Last Call (3-4-1)
♦
Call Duration (3-4-1-1)
Press
key, and the duration of the last call in hours, minutes &
seconds will be displayed on the screen.
♦
Call Cost (3-4-1-2)
Press
key, and the duration of the last call will be displayed on
the screen (Network support required).
All Calls (3-4-2)
♦
Call Duration (3-4-1-1)
31
♦
Clear Duration (3-4-2-4)
Press
key to clear the call duration data.
Call Rate (3-4-3)
♦
Currency (3-4-3-1)
Press
key to enter a preferred currency base to calculate the
cost of your calls (PIN 2 is required).
♦
Charge Unit (3-4-3-2)
Press
key to enter the unit price to calculate the cost (PIN 2
is required).
Cost Limit (ON/OFF) (3-4-4)
You can set limits to the total call cost. If the call cost goes over the limit
, the handset can’t be used to dial a pay call. When this function is
activated, the remaining cost will appear on the screen.
Press
On: press
Off : press
key, and the following options will appear on the screen:
key to activate the cost limit function (PIN2 is required).
key to cancel this function.
32
Next Call (3-6)
Your handset can receive voice, data and fax calls. Depending on your network
service provider, you may have to select among the voice, data and fax calls
under this option before you can receive them correctly. This scenario only
applies to one number scheme network service providers (i.e., the voice, data
and fax calls are all transmitted via a single telephone number).
Consult your network service provider to decide if you need to do such a
setting.
Press
key, and the following options will appear:
Voice
Press
setting).
key to set the next call as a voice call (This is the default
Data
Press
key to set the next call as a data call.
Fax
Press
key to set the next call as a fax call.
After you receive a data or fax call, you will need to change the setting back to
“Voice” in order to receive ordinary voice calls.
33
Auto Redial (4 2)
There are two ways to redial a call.
Press
key, and the following options will appear on the screen:
Automatic: after you press
key to select this mode, the handset redials the
number continuously.
key to select this mode, the handset will request
Prompt: after you press
your confirmation before redialing the phone number
Off: you can press
key to select this item and cancel all redialing modes.
Answer Options (4-3)
Three options are available for you to answer incoming calls.
Press
key, and the following options will appear on the screen:
Auto: after you press
key to select this mode, the incoming call will be
automatically answered after it rings once. This mode is effective only
when the portable hands-free kit is connected to the handset.
key to select this mode, the incoming calls can be
Any key: after you press
answered by pressing any key.
Answer key: after you press
answered by pressing
key to select this mode, the calls can be
key.
34
language and press
key to confirm and select.
Time Alert (4-6)
Your phone will beep once a minute when you make a call after you initiate this
function.
Press
key to enter this function and use
“Off”, then press
key to select “On” or
key to confirm.
Restore (4-7)
Reset all settings to default setting.
key, you will be prompted to enter
After you enter this function by pressing
the phone code (The default setting for the phone code is 1234). Enter the
phone code and press
key. Press
3.5 Network Selection
key again to confirm.
(5)
When turning on your mobile phone, the phone automatically selects the home
network for you. You can also do network selection by manual modes.
Auto Selection (5-1)
This mode automatically searches the available services when the phone is
turned on.
After you enter this function by pressing
confirm.
35
key, press
key again to
Set Code Status (6-1)
The code status includes:
PIN code (6-1-1)
You can activate/deactivate the PIN code function here.
key, press
After you enter this function by pressing
and the screen will display two options: “On” and “Off”. Use
key again
key
to select and press
key to confirm. When you change the PIN code
status, you will be prompted to enter PIN.
Phone Code (6-1-2)
You can activate/deactivate the Phone Code function here.
key, press
After you enter this function by pressing
and the screen will display two options: “On” and “Off”. Use
key again
key
to select and press
key to confirm. When changing the
Activate/Deactivate status, you have to enter your phone code. (The
default phone code is 1234).
36
PIN2 (6-2-2)
What is PIN2?
PIN2 is a second set of PIN that is mainly used to control limited services such
as call cost limitation and fixed dialing numbers.
You can change PIN 2 the same way as described in 6-2-1.
Phone Code (6-2-3)
You can change your phone code the same way as described in 6-2-1.
Network Password (6-2-4)
You can change the network password the same way as described in 6-21.
37
Press
key, and the numbers will appear on the screen.
Set Status (6-3-2)
Switch on/off the Fixed-Dial function.
After you enter this function by pressing
select “On” or “Off” and press
key, press
key to
key to confirm.
Modify (6-3-3)
You can add or change records of your fixed-dial numbers.
Press
key, and the numbers will appear on the screen. You can press
key again to add, edit or delete numbers.
SIM Lock (6-4)
With this function, you can prevent unauthorized usage of the handset with
unknown SIM cards.
After you set this function ON, if the SIM card in your handset is not the one
used to enable this function, you will be prompted to enter the unlock code
when you power on your handset. If the unlock code entered is correct, the
handset will recognize the SIM card automatically. The next time you power on
your handset with this newly recognized SIM card, you will not be prompted to
enter the unlock code again. However, if the unlock code entered is incorrect,
the display will show “Insert Correct SIM”, and the handset will function as if
the SIM card was not inserted. The handset can recognize up to 3 different SIM
cards. After you enter this function by pressing
options will appear on the screen:
38
(or
) key, the following
After you select this item, press
key and you will be prompted to
enter the original unlock code. Enter the original unlock code and the
new unlock code, then press
3.7 Audio Settings
key.
(7)
Ring Volume (7-1)
You can select the ring volume level here. A total of five levels are
available.
key to change the ring volume
After you enter this item, press
level. The more bars appear beside the bell icon, the louder the ring
volume. Finally, press
key to confirm.
Ring Type (7-2)
You can choose the ring type of your phone from 5 ring types, 13
melodies and 2 vibration types.
key to choose the ring type to be
After you enter this item, press
used. Finally, press
key to confirm.
Keypad Tone (7-3)
You can control the on/off of your keypad tone by using this function.
key to choose from “On” or
After you enter this item, press
“Off”. Finally, press
key to confirm.
39
Set Alarm (8-1)
After entering this function, you can choose to set the alarm function On or Off.
If you choose “On”, “Set Alarm” will appear on the screen. You can press
key or press alphanumeric keys directly to set the alarm time, then
press
disabled.
key to confirm. If you choose “Off”, the alarm function will be
Set Time (8-2)
You can set the current time in this function. A total of two options are
available:
On: you can choose this item to display current time in standby mode and set
current time. To set current time, enter year, month, day and time, then
key. If you want to clear a number, press
press
Off: neither sets nor displays current time.
key.
Calendar (8-3)
When you enter this function the current time will be shown on the screen. If
you haven’t set current time and date yet, please do it in function 8-2--Set
key to select the date, forward or backward, then
Time. You can press
press
key to enter from the following options:
40
enable the alarm function to remind you, you can press
the alarm time. If you don’t need the alarm, press
notes.
key to set
key to save the
Erase Notes
You can choose “Erase One By One” and press
key to select and
erase notes individually, or choose “Erase All” and when “Erase All
Notes?” appears on the screen, press
key to erase all notes.
View All
You can press
key to display the notes. When you have finished
reading the notes, you can press
key to enter and choose to erase,
edit the notes or forward the notes to another date.
Select Date
You can enter the date of the note you want to read. When done, the
screen will display the date you input. Press
that day.
Date Mode
to display the note of
You can choose from three date display mode options: day/month/year,
year/month/day or month/day/year.
41
42
43
6-4 SIM Lock
6-3 Fixed Dial
6-1 Set Code Status
6-2 Change Password
6
Audio Settings
Security Settings
7-1 Ring Volume
7
8-1 Set Alarm
8-2 Set Time
7-2 Ring Type
7-3 Keypad Tone
7-4 Alarm Type
8-3 Calendar
Press
SIM
9
4
1
1-4 Delete Record
2-4 Li
2-3 Outbo
2-2 Write Mess
2-1 Inbox
3
2
Messages
Phone Book
1-1 Last Number
1-2 Find Record
1-3 Add Record
5-2 Manual Selection
4-7 Restore
4-6 Time Alert
4-5 Language
3-1 Call Divert
3-2 Call Barring
3-3 Call Waiting
3-4 Call Infor
4-1 Back Light
3-5 Line I
Network
4-2 Auto Redial
3-6
Selection
4-3 Answer by
5-1 Automatic Selection
4-4 Key Lock
8
5
r
9-1 SIM
key to start
1-6 Own Number
1-5 Memory Selection
44
♦
Do not use or store your phone in dusty or dirty areas if possible.
♦
Do not disassemble the phone.
♦
Do not use harsh detergents to clean the phone.
♦
If your mobile phone or its accessories are not working properly, contact
your dealer immediately.
45
46
In addition to the travel charger, you can also choose to use the desktop
charger or cigarette lighter charger.
Cigarette lighter charger
(Available separately)
Desktop charger
(Available separately)
Travel charger
(Included)
Fast travel charger
(Available separately)
47
Using Desktop Charger
Connect the travel charger cable to the desktop charger and the power
outlet. Put your phone on the desktop charger as shown.
Audiovox
Audiovox
48
On the LCD display, the battery strength bars will flash till the
battery is full. When you start charging the battery in standby
mode, the battery strength bars will start to flash a few seconds
after you plug in the phone, indicating that the battery charging
has started.
Please make sure that the flash mark faces upward when you
insert the connector into the battery charging socket. When you
detach the cable from the phone, move the connector upward or
downward and then pull the connector out of the socket.
For safety concerns, when the temperature of the phone goes
over 45°C or below 5°C, the battery charging will come to a halt.
When the phone temperature returns to a normal range, the
battery charging will resume.
Cigarette Lighter Charger
You can use the cigarette lighter and in-car battery charger to charge the
battery in a car.
49
1000 mAh
Li-ion battery
260 minutes
180 minutes
50
280 minutes
hands-free set.
Simple Car Kit
The simple car kit includes a speaker and a microphone that can be installed in
your car. For details, refer to the instructions included with the simple car kit.
Car Holder
You can also use the car holder (available separately) with your handset to
secure your handset in your car.
Audiovox
Use only genuine batteries, battery chargers and accessories to
ensure the proper function of your phone and battery life. Any
malfunction or damage caused by the use of any third-party
accessories will void the product warranty.
Keep battery contacts and the battery charging socket at the
bottom of your handset from direct contact with conductive objects.
Otherwise it will cause a short-circuit and result in danger.
51
52
Echo or
noise
The
standby
time
becomes
short
2. You are using your mobile phone
at a call-crammed time (e.g. rush
hour).
3. You are too far from the base
station of your network service
provider.
1. Due to the quality of the network
trunk of your network service
provider.
2. Poor local telephone line quality.
1. The standby time can depend on
the system settings of your
network service provider.
2. The battery life is over.
3. If the phone can not get connected
to a network, it will continue
searching for the signal from the
base station, which consumes
battery capacity.
Unable to The battery is used up.
power on
SIM card 1. SIM card is out of order.
error
2. SIM card is not installed properly.
3. SIM card contact is contaminated.
53
Avoid using your mobile
phone at such time.
You can ask your network
service provider for a
service range map.
Hang up the phone and
then dial again. You can be
switched to a better-quality
network trunk or line.
If you are in a location
where the signal is weak,
turn
off
your
phone
temporarily.
Use a new battery.
Change your location or
turn
off
your
phone
temporarily.
Check the battery capacity.
Send it to your network
service provider to check.
Install SIM card correctly.
Clean the SIM card
contact.
make a call
Wrong PIN You have entered the wrong PIN three
times.
Unable to 1. The battery or charger is out of
charge the
order.
battery
2. The phone temperature goes
under 5°C or above 40°C.
3. Poor connection.
Contact
your
network
service provider.
Contact your dealer.
Change
the
battery
charging environment.
Check if all connectors are
connected properly.
Delete some data from the
phone book.
Unable to The phone book memory is full.
input data
into the
phone book
Unable to Your network service provider doesn’t Contact
your
choose a support such function.
service provider.
certain
function
54
network
Cut along the dotted line
*
Press the phone book number
and then press ”#”.
Make international call
Long press ”*” until ”+” appears
on the screen, then key in the
national code, area code and
telephone number.
Manual network selection
Press the selection key to enter
“Network Selection” and choose
“Manual Selection”. The screen
will display all available network
connections. Press “Send” key
to select.
Set phone code
Press the selection key to enter
“Security Settings”, then choose
“Phone Code”.
Adjust earpiece volume
Press the volume adjustment
keys during a call.
Adjust ring volume
Press the selection key to enter
“Audio Settings” and choose
“Ring Volume”.
Select ring tone
Press the selection key to enter
“Audio Settings” and choose
“Ring Type”.
Voice mail box shortcut
Long press ”0” key.
hold current call and connect to
the waiting call.
Hold call
Press ”0” and “Send” key to end
the call on hold.
Press ”1” and “Send” key to end
current call and connect to the
call on hold.
Press “2” and “Send” key to
hold current call and connect
the call on hold.
Key lock
Long press “#” key to activate
the key lock function. To answer
calls, press “Send” key. To
unlock, Press “Send” key, then
press “Send” key again and
finally press “*” key.
Read messages
Press ”Send” key. When the
message receive time and
source displays on the screen,
press “Send” key again.
Delete messages
Press selection key to enter
“Messages” function and then
choose “Read Messages”. Push
“Send” key thrice and “Delete
Messages” will display on the
screen.
r
ap
rm
7
1-6 Own Number
1-5 Memory Selection
1-4 Delete Record
1-3 Add Record
2-7 Delete All
1-2 Find Record
2-6 Message Settings
2-5 Cell Broadcast
1-1 Last Number
2-4 Listen Message
2-3 Outbox
2-2 Write Message
2-1 Inbox
2
Messages
Phone Book
3
3-1 Call Divert
3-2 Call Barring
3-3 Call Waiting
3-4 Call Information
3-5 Line In Use
3-6 Next Call
4-4 Key Lock
4-5 Language
4-2 Auto Redial
4-3 Answer by
4-1 Back Light
1
key to start
4
9
9-1 SIM
SIM
8
5
Network
Selection
5-2 Manual Selection
5-1 Automatic Selection
4-7 Restore
4-6 Time Alert