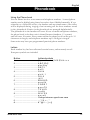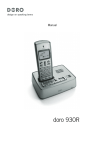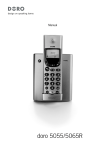
1
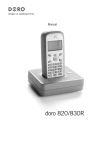
Manual
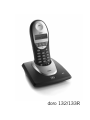
doro 132/133R
1
2
3
4
5
6
11
10
9
8
7
English (see page 6-32)
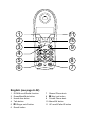
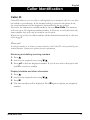
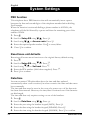
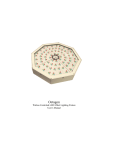
1 DOWN scroll/Redial function
7 Shared Phone book
2 Erase/Back/Mute button
8
3 Hands free button
9 Private Phone book
4 Talk button
10 Menu/OK button
5
11 UP scroll/Caller ID button
*
/Ringer on/off button
6 Recall button
#
/Key lock button
Index
Installation
6
Unpacking............................ 6
Connection.......................... 6
Belt clip................................ 7
Battery................................. 7
Battery indicator.................. 8
Range.................................. 8
The display.......................... 9
Operation
10
Making a call........................ 10
Receiving a call................... 10
Volume control..................... 10
Timer.................................... 10
Redial function..................... 11
Mute button.......................... 11
Key lock............................... 11
Hands free function............. 12
Paging.................................. 12
Phonebook
13
Menu
16
Caller ID
17
Settings
19
Handset ringer..................... 19
Warning tones..................... 19
Language............................. 20
Reset handset defaults........ 20
www.doro.com
System settings
English
21
PIN number.......................... 21
Dialling method (UK only).... 21
Recall time........................... 21
PBX function........................ 22
Reset base unit defaults...... 22
Date/time
22
Expanded System
23
General information............. 23
Intercom calls...................... 23
Transferring calls between
Handsets............................. 24
Conference.......................... 24
The answering machine 25
Recording an outgoing
message.............................. 25
Using the answering
machine............................... 26
Setting up the answering
machine............................... 27
Voice control........................ 28
Automatic disconnect.......... 28
Out of memory..................... 28
Remote activation . ............. 28
Remote control.................... 29
Other
30
Troubleshooting
in general............................. 30
Specific Absorption Rate
(SAR)................................... 31
Guarantee............................ 32
English
Installation
Unpacking
The package contains:
- Handset
- Mains adapter (6VDC 300mA)
- Base unit
- Line cord
- 2 AAA batteries (Ni-MH 1.2V 600 mAh) - Belt clip
Expanded versions (e.g. +1) also include an additional handset, batteries, chargers and
adapters.
Important!
Only use original adapter (6VDC 300mA G060030D22)!
Connection
1. Connect the mains adapter to the F socket on the base unit and to an electrical
wall socket.
2. Carefully remove the handset battery cover. Insert the batteries into the handset
ensuring correct battery polarity is observed, and replace the battery cover.
3. Place the handset in the base unit, with the keypad facing outwards. Once the
handset is correctly positioned in the base unit, a beep will be heard.
4. Leave the handset to charge for 24 hours before using it for the first time.
5. Connect the line cord to the telephone plug and the T socket on the base unit.
6. Plug into the telephone network wall socket.
7. To set the time/date please refer to page 23.
Only for models with an extra handset (+1):
8. Connect the charger’s mains adapter to the F socket on the charger and to an
electrical wall socket.
9. Place the extra handset in the charger, with the keypad facing outwards.
10. Leave the handset to charge for 24 hours before using it for the first time.
Important!
Only use original adapter (6VDC 300mA G060030D22)!
Under power failure conditions the telephone will not operate. Please ensure that a separate telephone not
dependant on local power is available for emergency use. The earpiece of the handset may attract small
ferromagnetic objects such as staples or pins, care should be taken when placing the handset near these
items. Do not place the base unit close to other electrical equipment such as TV sets, computer screens,
telecom equipment, fans, etc. This will minimise the risk of interference. Do not place the base unit in
areas where it will be exposed to direct sunlight or other major heat sources!
www.doro.com
Installation
English
Belt clip
The belt clip enables the handset to be attached to a belt, waistband or similar.
Battery
The telephone is supplied with environmentally-friendly nickel metal hydride
(NiMH) batteries – 2 x AAA 1.2V. As with all batteries, performance may
degrade over time; should you notice that talk and standby times have dropped
considerably or there are signs of leakage, the batteries should be replaced.
Fully-charged batteries will last for approx. 100 hours in standby or 10 hours call
time. These operation times apply at normal room temperature.
Full battery capacity will be achieved once the batteries have been charged 4-5
times, completely discharged batteries will take about 10 hours to fully recharge.
Please note that the battery indicator in the handset display rotates while
charging and will stop when the battery is fully charged.
The base unit has an automatic charging mechanism that prevents the batteries
from being overcharged or damaged by prolonged charging.
Please note!
To ensure and maintain good charging of the handset batteries we recommend that the base
and handset charge contacts are cleaned regularly, ie monthly, with a pencil eraser and/or soft
dry cloth. The recharging system used in this model may result in the handset and the batteries
heating up. This is normal and will not harm the equipment.
When the telephone is installed for the first time, the batteries must be charged for 24 hours
before using the telephone. Use original batteries only. The guarantee does not cover any
damage caused by incorrect use of batteries. Please dispose of any batteries in a responsible and
environmentally friendly manner.
www.doro.com
English
Installation
Battery indicator
The symbol
in the display indicates when it is time to recharge the
batteries. The indicator has three segments, which disappear as the battery
charge decreases. When the battery is running low
is displayed and a
warning tone will be heard. If the handset is not recharged at this time, the
phone will cease to function until it is recharged.
The symbol
will be displayed only when the battery is actually fully
charged.
Range
The range of the telephone varies depending on different factors in the
surrounding environment. Radio waves transmitting the call may be hindered
by obstructions or signal reflections that can reduce the range.
Specified ranges require unobstructed transmission between the handset and the
base unit. In such ideal conditions the telephones range can be up to 300 metres.
In densly populated areas, houses, apartments, etc. the range will be reduced.
Try to get the best range by relocating base unit, the ideal location is a high and
unobstructed place.
www.doro.com
Installation
English
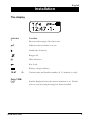
The display
Indicator
6
Function
Shown within range of the base unit.
q
Indicates that a handset is in use.
Hands free Function
Ringer off.
z
Mute function.
Key Lock
Battery charge indicator
12:47
-1-
Only 133R:
a
www.doro.com
Current time and handset number (if >1 handset is used).
Symbol displayed when the answer machine is on. Flashes
when a new incoming message has been recorded.
English
Operation
Please note!
When programming all references to press = to press once and then immediately release the
button.
Making a call
1. Enter the required telephone number. Mistakes can be erased by pressing C .
2. Press q the telephone number will now be dialled.
3. Press q again to terminate the call.
Receiving a call
1. Wait for the handset to ring.
2. Press q to answer the call.
3. Press q to terminate the call.
Please note!
If the telephone cannot connect to a line, a warning tone will be heard. The problem may be
due to the batteries running low, the handset being too far from the base unit or all of the
transmission channels being engaged.
Volume control
1. The speaker and earpiece volume may be adjusted during a call using }/{ .
2. Press 0 to save your settings.
Timer
Within approximately 10 seconds of the connection of a call, a timer will be
shown on the display. The timer is a simple way to help you keep track of how
long the call lasts.
10
www.doro.com
Operation
English
Redial function
The 10 most recently dialled numbers can easily be redialled using the redial
function.
1. Press }, scroll to the desired telephone number using }/{ .
2. Press q, the displayed telephone number will be dialled. Alternatively you
can press:
0 to delete or store the telephone number into the phonebook, or:
C to return to standby.
Mute button
The microphone can be muted during a call by pressing C . Press C again to reactivate the microphone.
The display will show z as long as the function is active.
Key lock
This function locks the buttons on the handset to prevent unintentional usage.
1. Press and hold N until the display shows
.
2. To deactivate the key lock press and hold N once again.
Calls can still be received, even if the key lock is active. When the call is
finished, the handset returns to locked mode.
www.doro.com
11
English
Operation
Hands free function
1. Enter the required telephone number. Mistakes can be erased by pressing C .
2. Press . The hands free function will be activated and the conversation can
be heard over the speaker.
3. Place the handset on a flat surface, e.g. a table.
4. Speak through the microphone on the lower front edge of the handset (max
1 metre away).
5. The volume may be adjusted during a call using }/{ . Press 0 to save your
settings.
6. To switch to normal handset conversation press .
7. Press q to terminate the call.
Please note!
In hands free speaker mode it is only possible for one person at a time to talk. The switchover
between speaker and microphone is automatic and dependent on the sound level of the incoming
call and the microphone respectively. It is therefore essential that there are no loud noises in the
immediate vicinity of the telephone, as this will disrupt the speaker function.
Paging
Pressing j on the base unit will activate the paging signal on the handset. This
function is used to help locate the handset or to page the person carrying the
handset. The signal will stop automatically after a while or q on the handset is
pressed. The page can also be cancelled by pressing j on the base unit again.
12
www.doro.com
Phonebook
English
Using the Phone book
Use the Phone book to store names and telephone numbers. A stored phone
number can be dialled using fewer keystrokes than if dialled manually. If you
subscribe to a Caller ID service, the number and associated name of the caller
will be displayed during ringing of an incoming call for those numbers stored
in the phonebook. Entries in the phonebook are arranged alphabetically.
The phonebook in the handset will store 20 sets of names and phone numbers,
the phone book in the base unit is shared between handsets (+1 systems)
and will store 10 entries. Every name within the phone book can be up to 12
characters in length, and telephone numbers up to 20 digits in length.
Some units may have pre-programmed practical phone numbers.
Letters
Each number key has been allocated certain letters, unfortunately not all
European symbols are included.
Button
Letters/symbols
1........................................... [Space character] 1 € £ $ % & < > ¤
2........................................... A B C 2 Ä Ç
. ........................................... a b c 2 ä ç
3........................................... D E F 3
. ........................................... d e f 3
4........................................... G H I 4
. ........................................... g h i 4 1
5........................................... J K L 5
. ........................................... j k l 5
6........................................... M N O 6 Ö
. ........................................... m n o 6 ö
7........................................... P Q R S 7
. ........................................... p q r s 7 ß
8........................................... T U V 8 Ü
. ........................................... t u v 8 ü
9........................................... W X Y Z 9
. ........................................... w x y z 9
*........................................... Change between upper/lower case
0........................................... . , ? ! 0 + - : ‘ “
#........................................... # * @ \ / - ( ) = §
www.doro.com
13
English
Phonebook
Storing names/numbers in the handset
1. Press
.
2. Press 0: New will be displayed.
3. Press 0.
4. Enter the telephone number, including the area code. Press 0.
5. Enter name. Press the corresponding number button one or more times for
the first letter (refer to the table on the previous page). Use C to erase or
change an entry.
6. Press 0.
7. If you want to store more numbers press 0, or press C to finish.
Storing entries in the shared phone book
1. Press
.
2. Scroll to Empty or to the memory to be replaced using }/{ . Press 0.
3. Scroll to Change using }/{ . Press 0.
4. Enter the telephone number, including the area code. Press 0.
5. Enter name. Press the corresponding number button one or more times for
the first letter (refer to the table on the previous page). Use C to erase or
change an entry.
6. Press 0.
Please note!
If you need to insert a pause in the telephone number, press and hold # until the display shows
P. If you need to change a number, store the new number in the same location as the old one.
14
www.doro.com
Phonebook
English
Dialling from the Phone book
1. Press either
or
.
2. Scroll through the entries in the phone book using }/{ . To perform a
quick-search press the corresponding number button one or more times for
the initial letter (refer to the table on the page 12).
3. Press q the displayed number will now be dialled.
Changing phone numbers/names
1. Press either
or
.
2. Scroll to required entry. Press 0.
3. Scroll to Change using }/{ . Press 0.
4. Edit/delete the displayed telephone number using C and the handset keypad.
Press 0.
5. Edit/delete the displayed name using C and the handset keypad (refer to the
table on page 12.). Press 0.
6. Press C to return to standby mode.
Deleting a phonebook entry
1. Press either
or
.
2. Scroll to required entry using }/{ . Press 0.
3. Scroll to Delete using }/{ . Press 0.
4. Press 0 again to confirm.
5. Press C to return to standby mode.
www.doro.com
15
English
Menu
Description of the menu system
The telephone has a menu system controlled by buttons directly under the
display.
w /0
}/{
C
Accesses the menu system, move one step forward and/or
confirm your selection.
To scroll through the menu options.
Used to delete, move back one step or hold down to exit the menu
system.
The menu contains the following main headings:
Redial Displays the most recently dialled number. Please also refer to redial on
page 10.
Calls log Displays the most recently missed calls (Caller ID).*
Call intern Intercom calls between different handsets.
Setup HS Setting the ringer, language, button sound, etc.
Setup BS Setting the PBX function, PIN number, etc.
Date/Time Setting the time and date.
Ans. machine (only 630R) Setting and operating the answering machine.
*Only functions in certain countries and also requires special subscription.
16
www.doro.com
Caller Identification
English
Caller ID
Caller ID allows you to see who is calling before you answer a call or to see who
has called in your absence. If the number calling is stored in the phone book,
the associated name will be displayed. Answered calls are not stored.
New calls are indicated in standby mode by the text New Calls. The memory
will store up to 10 telephone numbers/names, if there are several calls from the
same number they will only be saved in one location.
When the log is full, the oldest number will be deleted automatically as the new
call is logged.
Please note!
In order for numbers to be shown, you must subscribe to the Caller ID service provided by your
network operator. Contact your operator for more information.
Retrieving and dialling incoming numbers
1. Press { .
2. Scroll to the required entry using }/{ .
3. Press q to dial the displayed number. If you do not wish to dial press and
hold C to return to standby.
Display time/date and other information
1. Press { .
2. Scroll to the required entry using }/{ .
3. Press #.
4. The time and date will be displayed. Press # again to display the telephone
number.
www.doro.com
17
English
Caller Identification
Caller ID messages
In addition to showing telephone numbers, the display can also show:
Unavailable It is an International call or a call from a PBX (no information
received).
Withheld
A blocked or withheld number. The call could also be from a
PBX.
End
of list.
------------Deleting numbers
1. Press {
2. Scroll to the required entry using }/{ .
3. Press 0, scroll using }/{ to Delete or Delete list.
4. Press 0 to confirm.
Storing numbers in the handset phonebook
1. Press {
2. Scroll to the required entry using }/{ .
3. Press 0, scroll using }/{ to Store No.
4. Press 0. Name registration is completed as discribed in Phone book (refer to
page 12).
18
www.doro.com
English
Settings
Handset ringer
The handset has several different ringer volumes and melodies which can be
selected.
1. Press w .
2. Scroll to Setup HS using }/{ . Press 0.
3. Scroll using }/{ to Ring volume or Ring melody. Press 0.
4. Scroll to required setting using }/{ . Press 0 to confirm.
To turn the ringer off, press and hold * in standby until
Simply repeat this procedure to turn ringer back on.
is displayed.
Warning tones
The unit incorperates various warning tones which can be switched on or off.
Battery low
Heard when the battery is running low.
No coverage
Heard if the handset is taken out of range.
Key beeps
Heard when you press the buttons and when charging
commences.
1.
2.
3.
4.
5.
Press w .
Scroll to Setup HS using }/{ . Press 0.
Scroll using }/{ to Tones. Press 0.
Scroll to required signal using }/{ . Press 0.
Scroll to required setting using }/{ . Press 0 to confirm.
www.doro.com
19
English
Settings
Language
Display texts can be shown in different languages.
1. Press w .
2. Scroll to Setup HS using }/{ . Press 0.
3. Scroll using }/{ to Language. Press 0.
4. Scroll to required setting using }/{ . Press 0 to confirm.
Reset handset defaults
Resetting will return most functions to the original manufacturer default
setting.
1. Press w .
2. Scroll to Setup HS using }/{ . Press 0.
3. Scroll using }/{ to Set back. Press 0.
4. Press 0 to confirm.
20
www.doro.com
System Settings
English
PIN number
The PIN code is a four-digit number that you can select and protects against
unauthorised use of certain functions. The PIN code must be changed to allow
remote activation/access.
1. Press w .
2. Scroll to Setup BS using }/{ . Press 0.
3. Scroll using }/{ to Change PIN. Press 0.
4. Enter the current PIN number (0000 at default). Press 0.
5. Enter your new number. Press 0.
6. Enter your new number again. Press 0 to confirm.
Dialling method (UK only)
The type of dialling method (tone or pulse) can be selected dependant on your
network requirements, the unit should normally be left in tone mode.
1. Press w .
2. Scroll to Setup BS using }/{ . Press 0.
3. Scroll using }/{ to Dial mode. Press 0.
4. Scroll to required setting using }/{ . Press 0 to confirm.
Recall time
In normal domestic use, this setting should not require changing. In some
advanced PBX systems the recall timing may need adjustment.
The standard setting is 100 ms for UK/AUS. For New Zealand set to 600ms.
1. Press w .
2. Scroll to Setup BS using }/{ . Press 0.
3. Scroll using }/{to Flash time. Press 0.
4. Scroll to required setting using }/{ . Press 0 to confirm.
www.doro.com
21
English
System Settings
PBX function
This telephone has a PBX function that will automatically insert a pause
between the first and second digits of the telephone number before dialling.
For Example:
When the function is activated dialling a phone number ie: 0123456, the
telephone will dial 0 followed by a pause and then the remaining part of the
number 123456.
1. Press w .
2. Scroll to Setup BS using }/{ . Press 0.
3. Scroll using }/{ to Access code. Press 0.
4. Enter the required prefix number. Use C to erase/delete.
5. Press 0 to confirm.
Reset base unit defaults
Resetting will return most functions to the original factory default setting.
1. Press w .
2. Scroll to Setup BS using }/{ . Press 0.
3. Scroll using }/{ to Set back. Press 0.
4. Enter the PIN number (0000 when supplied). Press 0.
5. Press 0 to confirm.
Date/time
In some countries CID subscribers have the time and date updated
automatically when a call is received, in other countries the time and date must
be set manually.
The time and date must be reset in the event of a power cut or if the base unit
has been disconnected. However, the time/date is retained even if the batteries
are discharged.
The time and date only requires setting on one of the handsets.
1. Press w .
2. Scroll to Date/time using }/{ . Press 0.
3. Enter the year using the handset keypad (20XX). Press 0.
4. Enter the date using the handset keypad (DD.MM). Press 0.
5. Enter the time using the handset keypad (HH:MM). Press 0 to confirm.
22
www.doro.com
Expanded system (+1...)
English
General information about Expanded system (+1...)
The following functions only apply to +1 systems. It is NOT possible to add
additional handsets at a later time.
The base unit should be centrally positioned so that the area covered is roughly
equal for both handsets.
Intercom calls
Calls can be made internally between the handsets referred to as internal calls,
or intercom.
1. Press w .
2. Scroll to Call intern using }/{ . Press 0.
3. Enter the allocated number of the handset that you wish to call, 1 - 4
Should an external call come in while an intercom call is in progress, a tone will
be heard. You can then terminate the intercom call by pressing q, to receive
the external call press q.
www.doro.com
23
English
Expanded System (+1...)
Transferring calls between handsets
An external call can be transferred from one handset to another.
1. With an external call connected and the timer displayed.
2. Press w .
3. Scroll to Call intern using }/{ . Press 0.
4. Enter the allocated number of the handset that you wish to call, 1 - 4.
5. To transfer the external call, press q on the calling handset.
If you decide not to transfer the call or put the internal party on hold.
1. Press w on the calling handset.
2. Scroll to Brokering using }/{ . Press 0.
3. You can then switch between the two calls using this procedure.
Conference
It is possible to have two handsets and an external caller on line at the same
time, this is known as a Conference call.
1. With an external call connected and the timer displayed.
2. Press w .
3. Scroll to Call intern using }/{ . Press 0.
4. Enter the allocated number of the handset that you wish to call, 1 - 4.
5. Press w on the calling handset.
6. Scroll to Conference using }/{ . Press 0.
Press q to disconnect one party, any one of the handsets can terminate the
conference call allowing the other continue the conversation with the external
caller.
24
www.doro.com
English
The Answering Machine (133R)
Explanation of the answering machine (only 133R)
The answering machine has to be turned on in order to be able to receive
messages. On incoming calls the answering machine will respond after the
selected number of rings (refer to page 27).
When the answering machine answers the incoming call the caller will hear
your outgoing message (OGM) followed by a tone, at this point they can leave
an incoming message (ICM) up to 3 minutes in length. Should the caller exceed
this limit the call will be terminated. The memory can store approximately 15
minutes of incoming messages.
Recording an outgoing message (OGM)
The OGM is your announcement to the caller and may be up to 2 minutes in
length. If you choose not to record your own OGM, the caller will hear a prerecorded OGM in English.
If you do not wish incoming callers to leave an ICM message you can record an
Answer only (ANN) message, this function is not used for normal answering
operation.
An example OGM message:
“Hello, we are unable to take your call right now, please leave a message at the
sound of the beep, and we’ll return your call as soon as possible. Thanks for
calling.”
An example ANN message:
“Hello, we are unable to take your call right now, you will be unable to leave a
message so please call later.”
1.
2.
3.
4.
5.
Press w .
Scroll to Ans. machine using }/{ . Press 0.
Scroll using }/{ to Ans settings. Press 0.
Press 9.
Record your OGM. Speak clearly towards the handset from a distance of
approximately 30 cm with the keys upwards.
6. Press # to stop recording .
7. Your OGM will be repeated after a few seconds. Repeat this procedure if
you want to change the message, any old OGM will automatically be erased
when the new one is recorded.
8. Press and hold C to return to standby.
www.doro.com
25
English
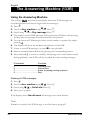
The Answering Machine (133R)
Using the Answering Machine
The symbol will flash in the display when new ICM messages are
recorded. Playback will always begin with new messages.
1. Press w .
2. Scroll to Ans. machine using }/{ . Press 0.
3. Scroll using }/{ to Play message. Press 0.
4. The number of new ICM messages will be announced. Before each message
the day/time the message was received will be announced.
5. You can listen to ICM messages either on the handset or speaker by simply
pressing .
6. The display will show the number, day and time of the ICM.
7. Listen to your ICM messages, or press 2 to stop playback.
8. Select a command (from below) by pressing the corresponding button.
9. Press and hold C to return to standby. All messages are saved (unless erased
during playback), new ICM’s will be recorded after any existing messages.
Command
Function
2........................................... Playback/Stop
4........................................... Repeat/Skip
5........................................... Erase a message during playback
6........................................... Skip
Deleting all ICM messages
1. Press w .
2. Scroll to Ans. machine using }/{ . Press 0.
3. Scroll using }/{ to Del all old. Press 0.
4. Press 0 to confirm.
If the display shows No old mess, all messages have been deleted.
Note:
Remember to regularly delete ICM messages to avoid the memory getting full!
26
www.doro.com
English
The Answering Machine (133R)
Setting up the answering machine
1.
2.
3.
4.
Press w .
Scroll to Ans. machine using }/{ . Press 0.
Scroll using }/{ to Ans settings. Press 0.
You can listen to any voice prompts either on the handset or speaker by
simply pressing
5. Select a command (from below) by pressing the corresponding button one or
more times.
6. Press and hold C to return to standby.
Command
Function
1........................................... To hear the main menu, (press 2 to stop)
7........................................... Select normal answering mode/Answer only
8........................................... OGM playback
9........................................... Record new OGM, (press # to stop)
0........................................... Switch the answering machine on ( a lit)/off
#........................................... Select the number of rings
Please note!
The unit incorparates a remote activation facility, if the answering machine is switched off it
will still answer after 10 rings. Please refer to the remote activation chapter on the next page.
Number of rings
The number of rings before the answering machine answers can be selected
between 2, 4, 6, 8 or Toll Saver * by pressing # repeatedly.
*The Toll Saver function (TIME SAVER) will answer calls after six rings until the
first new ICM message has been recorded. The answering machine will then answer after
approximately two rings. This feature is useful when using the remote control; if you call
home and after four rings the answering machine does not answer, then no messages have been
recorded and you can terminate the call without incurring any charges. If on the other hand
themachine answers after two rings new messages have been recorded.
www.doro.com
27
English
The Answering Machine (133R)
Voice control (VOX)
The answering machine will record a message as long as the caller keeps
speaking (max. 3 minutes). When the caller stops speaking the answering
machine will disconnect after a few seconds.
Automatic disconnect
You can interrupt the recording of an ICM message by lifting the handset of any
parallel-connected telephone.
Out of memory
The answering machine can record up to 11 minutes in total (this includes the
outgoing message). If the memory is full, no new messages will be accepted
until the existing messages have been played and erased.
When the memory is full the answering machine will respond with the ANN
message to allow remote playback and deletion of messages.
Note:
Remember to regularly delete ICM messages to avoid the memory getting full!
Remote activation of the answering machine
The unit incorparates a remote activation facility, if the answering machine
is switched off it will still answer after 10 rings (Australia 16 rings) allowing
remote access.
1. Dial the telephone number to which the answering machine is connected,
the answering machine will answer after 10 rings (Australia 16 rings). If the
PIN number is still 0000 the answering machine will not answer.
2. Enter your PIN number (see page 21).
3. The number of ICM messages will be announced and playback will begin.
Press 2 to stop playback.
4. To switch the answering machine ON press 0.
5. Replace the handset.
28
www.doro.com
The Answering Machine (133R)
English
Remote control
This model can be remotely controlled using the keys of an ordinary tone dialling
telephone.
For the remote function to work, the PIN number has to be changed from the
preset 0000 code (see page 21).
The answering machine functions can be remotely accessed using the keys of an
ordinary tone dialling telephone. Dial the telephone number to which the answering
machine is connected, enter your remote code after the OGM message has played.
Once the code is accepted, several remote options are available.
NOTE!
If the PIN number is still 0000 the answering machine will not answer (see page 21).
Remote control
1. Dial the telephone number to which the answering machine is connected.
2. While the OGM message is playing press *.
3. Enter your PIN number.
4. The number of ICM messages will be announced and playback will begin. To
stop playback and hear the menu press 1.
5. Select the required remote command from below.
6. Replace the handset.
Command
Function
1........................................... To hear the main menu
2........................................... Play all messages
3........................................... Play new messages
4........................................... Repeat
5........................................... Erase single message during playback
6........................................... Skip
7........................................... Select answer function(preset to Answer and record)
8........................................... OGM playback
9........................................... Record a new OGM, (press # to stop)
0........................................... Switch the answering machine on/off
Please note!
If the machine doesn’t respond correctly to the remote control commands, try pressing the telephone
buttons for a longer or shorter time. In general, the answering machine should react to tones
approximately 0.5 – 1 second in length, but longer tones may be necessary on certain telephone
networks. If you do not enter any remote control command, the answering machine will disconnect
after a few seconds.
www.doro.com
29
English
Other
Troubleshooting
Check that the telephone cord is undamaged and properly plugged in.
Disconnect any additional equipment that may be connected. If the problem is
resolved, the fault is with the other equipment.
Test the equipment on a known working line. If the product works then the fault is
with the line. Please inform your local telephone company. Check that charge contacts
in handset and base unit are clean.
No number shown in display when ringing
- In order for this feature to function, you must subscribe to the Caller Identification
service provided by your network operator.
- If a text message is shown on the display, the call may be an international call (no
data received), or from a private or withheld number.
- It may not be possible to receive Caller ID information if the phone is connected to
a PBX system.
Warning tone while talking/cannot connect
- The batteries may be running low (recharge the handset).
Telephone does not work
- Check the adapter. Is it correctly connected to the base unit and to the mains
power?
- Check that the telephone cord has been correctly connected to the base unit and to
the line socket.
- Check the charge status of the handset batteries.
- Try connecting another telephone, known to be in working order, to the line
socket. If that phone works, then it is likely that the equipment is faulty.
30
www.doro.com
Other
English
The answering machine is not answering
- Memory may be full. Listen to your messages and erase them.
- Check that the unit is switched on.
- Check that the telephone cable and the mains adapter are correctly
connected.
The answering machine does not respond to remote control
- Check that the telephone you are using to remotely control the answering
machine is a tone dialling telephone.
- Some telephones only emit a short tone beep when buttons are pressed,
and this may not be enough to activate remote control. Use a separate tone
transmitter in these cases.
- Also try holding the buttons down longer, approximately 1 second per digit.
If the telephone still does not work, contact the place of purchase. Don’t forget
the receipt or a copy of the invoice.
Declaration of conformity
Doro declares that the apparatus ’Doro 132 & Doro 133R’ complies with the
essential requirements and other relevant positions of Directive 1999/5/EC.
A copy of the Declaration of Conformity can be found at www.doro.com/dofc
Specific Absorption Rate (SAR)
This equipment meets current international safety requirements for exposure to
radio waves.
This telephone measures 0.1 W/kg (measured over 10g tissue).
The limit value set by the WHO is 2W/kg (measured over 10g tissue).
www.doro.com
31
English
Other
UK
If you cannot resolve the fault using the faultfi nder section, technical support is
available on the Premium Rate Number: 0906 302 0114. Calls cost 50 pence per
minute (prices correct at the time of going to press), and is operational between
9AM - 5PM Monday-Friday excluding Bank Holidays. Alternatively, E-mail on:
[email protected] You can contact us in writing: Consumer Support Group,
Doro UK Ltd., 22 Walkers Road, North Moons Moat, Redditch, Worcestershire,
B98 9HE, (regarding any Spares or Technical query), or Telephoning (Spares
only): 01527 584377 Web site: www.doro-uk.com
Guarantee
This product is guaranteed for a period of 12 months from the date of purchase.
Proof of purchase is required for any service or support required during the
guarantee period.
This guarantee shall not apply to a fault caused by an accident or a similar
incident or damage, liquid ingress, negligence, abnormal usage, not reasonably
maintained or any other circumstances on the purchaser’s part. Furthermore,
this guarantee shall not apply to a fault caused by a thunderstorm or any other
voltage fluctuations.
This guarantee does not in any way affect your statutory rights. (As a matter of
precaution, we recommend disconnecting the telephone during a thunderstorm.)
32
www.doro.com
Other
English
Australia and New Zealand
Products permitted for connection to the telephone network are marked with
in Australia and
in New Zealand. These marks indicate the
products comply with the regulations and can be used without concern in the
country of purchase.
If you believe this product is malfunctioning, please refer to the relevant section
and/or consult the troubleshooting guide in this manual to ensure that you have
followed the instructions carefully. As an alternative you can visit our web site
for FAQ’s or send an e-mail for a prompt reply.
Electro Magnetic Radiation (EMR)
This telephone complies with applicable safety requirements for exposure to
radio waves.
The mean power of this telephone is not greater than 12 mW.
This is below the 20mW limit at which testing is required.
Guarantee
This product is guaranteed for a period of 12 months from the date of purchase.
Should you experience difficulties with the product, please contact us for
assistance. If the product is then found to be faulty you will be asked to return
it directly to us with a copy of the purchase receipt. This guarantee shall not
apply to a fault caused by an accident or a similar incident or damage, liquid
ingress negligence, abnormal usage, not reasonably maintained or any other
circumstances on the purchaser’s part. Furthermore, this guarantee shall not
apply to a fault caused by a thunderstorm or lightning, excessive or any other
voltage fluctuations or faults on the telephone line. (As a matter of precaution,
we recommend disconnecting the telephone during a thunderstorm).
This guarantee does not affect your statutory rights.
AUSTRALIA
DORO Australia Pty Ltd
PO Box 6760
Baulkham Hills BC NSW 2153 Australia
Consumer Support
Ph: Ph: 1300 885 023 Fax: (02) 8853-8489
Email: [email protected]
Web site: www.doro.com.au
www.doro.com
NEW ZEALAND
Atlas Gentech (NZ) Limited
Private Bag 14927
Panmure
Auckland
New Zealand
Consumer Support
Ph: 0900-500-25 (Toll Call)
Fax: (09) 574-2722
Email: [email protected]
33
English
Version 1.1