1
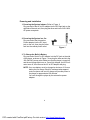
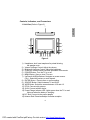
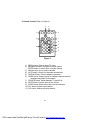
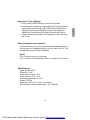
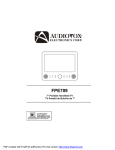
FPE709
7" Portable Handheld TV
PDF created with FinePrint pdfFactory Pro trial version http://www.fineprint.com
Important Safety Instructions
Some of the following information may not apply to your particular product;
however, as with any electronic product, precautions should be observed
during handling and use.
l Read these instructions.
l Keep these instructions.
l Heed all warnings.
l Follow all instructions.
l Do not use this apparatus near water.
l Clean only with dry cloth.
l Do not block any ventilation openings. Install in accordance with the
manufacturer’s instructions.
l Do not install near any heat sources such as radiators, heat
registers, stoves, or other apparatus (including amplifiers) that produce heat.
l Do not defeat the safety purpose of the polarized or grounding-type
plug. A polarized plug has two blades with one wider than the other.
A grounding type plug has two blades and a third grounding prong.
The wide blade or the third prong is provided for your safety. If the
provided plug does not fit into your outlet, consult an electrician for
replacement of the obsolete outlet.
l Protect the power cord from being walked on or pinched particularly at plugs, convenience receptacles, and the point where they
exit from the apparatus.
l Only use attachments/accessories specified by the manufacturer.
l Use only with the cart, stand, tripod,
bracket, or table specified by the
manufacturer, or sold with the apparatus.
When a cart is used, use caution when
moving the cart/apparatus combination to
avoid injury from tip-over.
l Unplug this apparatus during lightning storms or when unused for
long periods of time.
l Refer all servicing to qualified service personnel. Servicing is required when the apparatus has been damaged in any way, such as
power-supply cord or plug is damaged, liquid has been spilled or
objects have fallen into the apparatus, the apparatus has been exposed to rain or moisture, does not operate normally, or has been
dropped.
2
PDF created with FinePrint pdfFactory Pro trial version http://www.fineprint.com
3
PDF created with FinePrint pdfFactory Pro trial version http://www.fineprint.com
English
Additional Safety Information
l Apparatus shall not be exposed to dripping or splashing and no
objects filled with liquids, such as vases, shall be placed on the
apparatus.
l Always leave sufficient space around the product for ventilation. Do
not place product in or on a bed, rug, in a bookcase or cabinet that
may prevent air flow through vent openings.
l Do not place lighted candles, cigarettes, cigars, etc. on the product.
l Connect power cord only to AC power source as marked on the
product.
l Care should be taken so that objects do not fall into the product.
l Do not attempt to disassemble the cabinet. This product does not
contain customer serviceable components.
l Do not use the unit immediately after transportation from a cold
place to a warm place; condensation problems may result. Wait
for about one hour till the moisture evaporates before operating
the unit.
l When using your TV, do not sit or stand too close to the screen.
l To use a headset safely, please keep the following in mind:
- Do not play your headset at a high volume. Hearing experts
advise against continuous extended play.
- If you experience ringing in your ears, turn down the volume or
stop using the headset.
- Do not use a headset while driving a motorized vehicle or riding
a bike. It may cause a traffic hazard and is illegal in many areas.
- Even if your headset is an open-air type designed to let you hear
outside sounds, don’t turn up the volume so high that can’t hear
sounds around you.
l CAUTION! Danger of explosion if battery is incorrectly replaced.
Replace only with the same or equivalent type.
l Warning: Your TV contains a battery and charging system which
is designed to work in temperatures that do not exceed 50oC
(122oF). Leaving this product in a closed automobile or in the
trunk of an automobile where temperature may exceed 50oC may
result in permanent battery damage, fire, or explosion. Please
remove your product from the automobile when you exit, do not
place your product in the trunk of your automobile, and do not
leave your product in any location where temperature may exceed 50oC.
CAUTION
WARNING: TO PREVENT FIREOR ELECTRICAL SHOCK HAZARD,DO NOT
EXPOSE THIS PRODUCT TO RAIN OR MOISTURE.
FCC Information
This device complies with part 15 of the FCC rules. Operation is subject
to the following two conditions: (1) This device may not cause harmful
interference, and (2) This device must accept any interference received,
including interference which may cause undesired operation.
This equipment has been tested and found to comply with the limits for a
Class B digital device, pursuant to Part 15 of the FCC Rules. These
limits are designed to provide reasonable protection against harmful
interference in a residential installation. This equipment generates, uses
and can radiate radio frequency energy and, if not installed and used in
accordance with the instructions, may cause harmful interference to radio
communications. However, there is no guarantee that interference will
not occur in a particular installation.
If this equipment does cause harmful interference to radio or television
reception, which can be determined by turning the equipment off and on,
the user is encouraged to try to correct the interference by one or more
of the following measures:
- Reorient or relocate the receiving antenna.
- Increase the separation between the equipment and receiver.
4
PDF created with FinePrint pdfFactory Pro trial version http://www.fineprint.com
- Connect the equipment into an outlet on a circuit different from that to
which the receiver is connected.
- Consult the dealer or an experienced radio / TV technician for help.
Service Information
This product should be serviced only by those specially trained in appropriate servicing techniques. For instructions on how to obtain service,
refer to the warranty included in this user manual.
For Your Records
Keep your sales receipt for proof of purchase to obtain warranty parts
and service.
In the event that service should be required, you may need both the model
number and the serial number. In the space below, record the date and
place of purchase, and the serial number:
Model No.
Date of Purchase
Place of Purchase
Serial No.
5
PDF created with FinePrint pdfFactory Pro trial version http://www.fineprint.com
English
In accordance with FCC requirements, changes or modifications not
expressly approved by manufacturer could void the user’s authority to
operate this product.
Content
Introduction ............................................................................. 7
Contents ................................................................................... 7
Powering and Installation ....................................................... 8
Controls, Indicators, and Connectors ................................... 9
Settings Menu .........................................................................11
Setting Up Channels ............................................................. 12
Selecting Digital Channels .................................................... 12
Using External Antenna ........................................................ 12
Using Your TV as a Monitor .................................................. 13
Using Headphone (not supplied) ......................................... 13
Specifications ........................................................................ 13
Troubleshooting .................................................................... 14
6
PDF created with FinePrint pdfFactory Pro trial version http://www.fineprint.com
Introduction
Contents
1.
2.
3.
4.
5.
6.
7.
8.
9.
1 x 7’’ Portable Handheld TV
1 x Remote Control with Battery (CR2025)
1 x Audio/Video Cable
1 x AC to DC Adapter
1 x Automotive Power Adapter
1 x Instruction Manual
1 x Product Registration Card
1 x eMusic Card
1 x External Antenna
7
PDF created with FinePrint pdfFactory Pro trial version http://www.fineprint.com
English
Thank you for choosing the FPE709 Portable Handheld TV. Please
read the entire instruction manual supplied with this product prior to
using. The documentation will assist you in using the system properly to obtain the best equipment performance. Please save this manual
for later use.
Powering and Installation
1. Powering the System Indoors (Refer to Figure 1)
Plug one end of the AC to DC adapter into the DC input jack on the
right side of the main unit, then plug the other end into the 100~240V
AC power receptacle.
2. Powering the System in a Car
Plug one end of the Automotive
Power adapter into the DC input
jack on the unit, then plug the other
end into the vehicle power outlet.
Figure 1
3. To Charge the Built-in Battery
Plug one end of the AC to DC adapter into the DC jack on the side
of the player, as shown in Figure 1, then plug the other end into the
100~240V AC power outlet. Make sure that the player is turned off,
and the red charge light turns on. Once fully charged, the LED indicator turns off, then remove the AC to DC adapter wall plug.
NOTE: Your new battery must be charged a minimum of 8 hours
before the first usage. Each full recharge takes approximate five hours and one full charge can provide power to
the player for approximate 100 minutes.
You can’t charge the player by the automotive power
adapter.
8
PDF created with FinePrint pdfFactory Pro trial version http://www.fineprint.com
Controls, Indicators, and Connectors
1. Unit View (Refer to Figure 2)
15
English
11
1
12
2
13
3
14
4
5
6
7
8
9 10
Figure 2
1) Headphone Jack: Insert earphone for private listening.
the speaker mute.
2) Volume Up/Down Control: Adjust the volume.
3) Brightness Up/Down Control: Adjust the brightness.
4) IR Sensor: Infrared sensor receives information from remote.
5) POWER Button: Turn the TV on or off.
6) MENU Button: Open or close TV menu.
7) Up/Down/Left/Right Buttons: Navigate on-screen menus.
CH+/-: Select the previous or next channel.
8) ENTER Button: Execute item or confirm setting.
9) SOURCE Button: Switch between TV and AV IN.
10) WIDE Button: Switch the screen between 16:9 and 4:3.
11) RF IN: Connect with antenna.
12) AV IN: Connect with AV device.
13) Power/Charge Indicator LED: Lights green when the TV on and
lights red when the battery is charging.
14) DC Jack: Connect to the power adapter.
15) Antenna Rod: Extend and adjust for better reception.
9
PDF created with FinePrint pdfFactory Pro trial version http://www.fineprint.com
2. Remote Control (Refer to Figure 3)
4
5
1
6
2
7
8
9
3
10
11
Figure 3
1) MENU button: Open or close TV menu.
2) Navigation buttons: Navigate on-screen menus.
ENTER button: Execute item or confirm setting.
3) Number keys: Use to select channels.
4) AUTO button: Search for channels automatically.
5) DISPLAY button: Press to display information.
6) GUIDE button: Display the list of available channels and the
corresponding channel information.
7) SOURCE button: Switch between TV and AV IN.
8) MUTE button: Press to shut off the volume.
9) AUDIO button: Select one of the audio soundtracks.
10) CH+ button: Selects next channel.
11) CH- button: Selects previous channel.
10
PDF created with FinePrint pdfFactory Pro trial version http://www.fineprint.com
Settings Menu
Press MENU button to enter the Main menu, use the navigation
buttons to select and set the items and press ENTER to select.
OSD Duration: Select the duration of the on-screen display.
Sleep Timer: The TV turns of if inactive for amount of time.
Time Zone: Select your time zone.
Day Saving Time: Turn Daylight Saving On/Off.
2. Setup
Language: Select different languages.
Transparent: Make the menu transparent.
Closed Caption: Select a closed caption.
TV Display: Switch among Auto, Wide, Zoom, Cinema.
Restore Setting: Reset settings to factory default.
3. Channel Setup(only on TV)
Antenna: Switch between air and CATV.
Auto Scan: Scans for channels to save to memory. Erases
previously saved channel information.
Auto Scan Add CH: Scans for channels to save to memory, but
does not erase previously saved channel information.
Channel Skip: Set the TV to skip specific channels.
Channel NO: Switch the channel, but remains in Menu mode.
Channel Label: Lets you edit the program label that appears when a
channel is selected.
NOTE: Press MENU button to exit the setting menu.
11
PDF created with FinePrint pdfFactory Pro trial version http://www.fineprint.com
English
1. Clock
Setting Up Channels
You must scan for available digital channels when you setup your TV.
If you do not scan for channels, the Channel Up and Down buttons
will not function.
To scan for channels:
1. Turn on your TV and press the SOURCE button to set the input
to TV.
2. Press MENU. The Menu screen appears.
3. Press the RIGHT button twice to access the Channel Setup
menu.
4. Select Auto Scan. Then choose Start to Scan. The TV begins to
scan for available channels. You can interrupt the scan by press
ing the MENU button.
5. When the scan is complete, you can adjust the antenna, select
Auto Scan Add CH to add more channels to those scanned.
6. Press MENU again to exit the setting menu.
Selecting Digital Channels
You can select specific digital TV stations using your remote control.
To select a digital station, enter the channel number followed by “-1”.
For example, enter “11-1” for the digital channel 11. If available, the
digital channel appears.
Some digital stations provide multiple broadcasts on a single channel.
To access these directly, enter higher numbers after the channel
number. For example, “11-2” “11-3” etc. for digital broadcasts of channel 11. If available, these digital channels appear.
Using External Antenna
If the picture is not clear with the built-in rod antenna, try placing your
TV near a window or connecting an external antenna to the TV to
improve reception. If you are in an area with weak TV signals or inside
a concrete building, you might need an external antenna to improve
reception. The supplied external antenna provides convenience and
flexibility for receiving digital signals.
12
PDF created with FinePrint pdfFactory Pro trial version http://www.fineprint.com
Using Your TV as a Monitor
Using Headphone (not supplied)
For private listening, you can connect an optional headphone with a 1/
8-inch plug to the Headphone jack on the left side of the TV. This
automatically mutes the built-in speakers.
NOTE:
The TV will not work when it is moving.
The TV will shut off automatically if there is no signal for 15 minutes.
Specifications
Signal system: ATSC
Panel size: 7 inch
Panel resolution: 480 x 234
Power source: DC 9V, 1.5A
Operating temperature: 5~35oC
Weight: 0.575 kg
Dimensions (W x D x H): 185 x 148 x 34 mm
Built-in battery: Lithium polymer type, 7.4V, 2100mAh
13
PDF created with FinePrint pdfFactory Pro trial version http://www.fineprint.com
English
1. Firstly, Press SOURCE Button to choose AV IN mode.
2. Connect the AV Cable plugs to the out jack of AV Device as below:
Yellow plug: Connect to the VIDEO OUT jack on the AV Device.
Red plug: Connect to the AUDIO IN R jack on the AV Device.
White plug: Connect to the AUDIO IN L jack on the AV Device.
3. Finally, Connect the AV cable’s 1/8-inch plug to the AV IN jack on
the TV unit.
Troubleshooting
PROBLEM
SOLUTION
The player won’t
turn on
- Charge the battery.
- Check that the AC power cord is conncted.
- Test the outlet by plugging in another
appliance.
- Connect to another power outlet.
Poor picture
- Adjust the antenna.
- Move to a window (if inside a structure).
- Use an external antenna.
- Move your portable TV away from other
appliances that cause interference.
- Make sure the TV and connected antenna
are in a fixed position and not used within a
moving vehicle.
No sound
- Check the speaker settings. Turn up the
volume.
- Press MUTE on the remote control to turn
off mute.
- Unplug the headphones.
Remote control
doesn’t work
- Remove any obstacles between the remote
and the TV.
- Use the remote control near the portable TV.
- Point the remote at the IR sensor on the TV.
- Replace the battery in the remote control.
The descriptions and characteristics in this owner’s manual are for
the purpose of general reference only and not as a guarantee.
In order to provide you with the highest quality product, we may make
changes or modifications without prior notice. The English version
serves as the final reference on all product and operation details should
any discrepancies arise in other languages.
14
PDF created with FinePrint pdfFactory Pro trial version http://www.fineprint.com
90 DAY LIMITED WARRANTY
Applies to Audiovox Video Products
To obtain repair or replacement within the terms of this Warranty, the product is to be delivered
with proof of warranty coverage (e.g. dated bill of sale), specification of defect(s),
transportation prepaid, to the Company at the address shown below.
This Warranty does not extend to the elimination of externally generated static or noise, to
correction of antenna problems, to costs incurred for installation, removal or reinstallation of
the product, or to damage to digital memory/media devices, gaming devices, discs, speakers,
accessories, or electrical systems.
This Warranty does not apply to any product or part thereof which, in the opinion of the
Company, has suffered or been damaged through alteration, improper installation, mishandling, misuse, neglect, accident, or by removal or defacement of the factory serial number/
bar code label(s). THE EXTENT OF THE COMPANY'S LIABILITY UNDER THIS WARRANTY IS
LIMITED TO THE REPAIR OR REPLACEMENT PROVIDED ABOVE AND, IN NO EVENT, SHALL
THE COMPANY'S LIABILITY EXCEED THE PURCHASE PRICE PAID BY PURCHASER FOR THE
PRODUCT.
This Warranty is in lieu of all other express warranties or liabilities. ANY IMPLIED WARRANTIES, INCLUDING ANY IMPLIED WARRANTY OF MERCHANTABILITY, SHALL BE LIMITED TO
THE DURATION OF THIS WRITTEN WARRANTY. ANY ACTION FOR BREACH OF ANY
WARRANTY HEREUNDER INCLUDING ANY IMPLIED WARRANTY OF MERCHANTABILITY
MUST BE BROUGHT WITHIN A PERIOD OF 12 MONTHS FROM DATE OF ORIGINAL
PURCHASE. IN NO CASE SHALL THE COMPANY BE LIABLE FOR ANY CONSEQUENTIAL OR
INCIDENTAL DAMAGES FOR BREACH OF THIS OR ANY OTHER WARRANTY. No person or
representative is authorized to assume for the Company any liability other than expressed
herein in connection with the sale of this product.
Some states do not allow limitations on how long an implied warranty lasts or the exclusion
or limitation of incidental or consequential damage so the above limitations or exclusions may
not apply to you. This Warranty gives you specific legal rights and you may also have other
rights which vary from state to state.
Audiovox Electronics Corporation, 150 Marcus Blvd., Hauppauge, New York 11788
1-800-645-4994
128-5556G
15
PDF created with FinePrint pdfFactory Pro trial version http://www.fineprint.com
English
AUDIOVOX ELECTRONICS CORP. (the Company) warrants to the original retail purchaser of
this product that should this product or any part thereof, under normal use and conditions,
be proven defective in material or workmanship within ninety (90) days from the date of original
purchase, such defect(s) will be repaired or replaced with reconditioned product (at the
Company's option) without charge for parts and repair labor. A game controller, if supplied,
is similarly warranted for ninety (90) days.