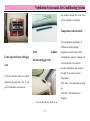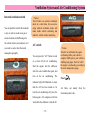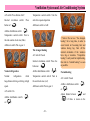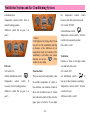
1
Contents Safety belt precautions ...................................... 13 Chapter 1 Brief Introduction 1 Protection of safety belt .................................... 15 Safety protection ................................................. 2 Pregnant woman ............................................... 15 Environmental protection .................................... 2 Child restraint system ....................................... 16 Regulations of break-in period for new vehicle .. 3 Three-point type seat belt.................................. 16 Matters needing attention during new car break-in Using the seat belts ........................................... 17 period: ................................................................. 3 Power window switch ....................................... 18 Explanation on Regular Reminder Indicators of Glass forbidden switch...................................... 19 Motor Vehicle...................................................... 5 Outside rearview mirror .................................... 20 Chapter 2 The Need-to-Know before Driving 7 Inside rearview mirror ...................................... 21 Keys .................................................................... 8 Safty airbag ....................................................... 21 Door lock ............................................................ 8 Airbag for the driver ......................................... 23 Central control door lock system......................... 9 Front passenger airbag ...................................... 23 Safety lock for children use ............................... 10 Engine compartment hood ................................ 24 Front seat sliding adjustment............................. 11 Open trunk lid ................................................... 25 Chapter 3 Operation and Equipment inside Vehicle 28 Adjustment of front seat angle .......................... 11 Head restraints .................................................. 11 Folding the rear seat backrest ............................ 12 Adjustment of Adjustment of steering wheel ........................... 29 -1- Brief Indroduction Horn button Sun visor ....................................... 29 Turn engine on/off ............................................ 41 Sun visor ........................................................... 29 Warming the engine up ..................................... 42 Vanity mirror ..................................................... 30 Operation of automatic transmisssion错误!未定 Auxilary handle ................................................. 30 义书签。 Interior light ...................................................... 31 Operation of hand brake.................................... 46 Rear ceiling lamp .............................................. 32 Braking system ................................................. 47 Front cup holder ................................................ 32 Operation guide ................................................ 47 Front ashtray ..................................................... 33 Brake servo unit ................................................ 49 Cigarette lighter................................................. 33 Brake fluid ........................................................ 49 Front armrest box .............................................. 34 Check brake fluid level ..................................... 49 Glove box .......................................................... 35 Replacement of brake fluid ............................... 50 Rear ashtray ...................................................... 35 Parking .............................................................. 50 Stand-by power supply interface ....................... 36 Anti-lock brake system (ABS) .......................... 51 Rear armrest box / cup holder ........................... 36 Braking with anti-lock brake system................. 52 Chapter 4 Starting up and Operating 38 ABS self check ................................................. 52 Fuel ................................................................... 39 Steering system ................................................. 53 Ignition switch .................................................. 39 Driving through water ....................................... 53 Before starting the engine ................................. 40 Ternary catalytic converter................................ 53 -2- Contents How to save fuel and make your vehicle last Front fog light/rear fog light switch .................. 67 longer, too?........................ 错误!未定义书签。 Turn signal lamp switch .................................... 68 Chapter 5 Instruments and Controls 58 Headlight switch ............................................... 68 Warning lights system ....................................... 60 High beam switch ............................................. 69 Speedometer ...................................................... 60 Meeting lamp switch ......................................... 69 Odometer .......................................................... 60 Windshield wiper switch ................................... 69 Engine coolant temperature gauge .................... 61 Windshield washer switch ................................ 70 Fuel gauge ......................................................... 61 Headlight beam adjustment switch ................... 71 Fuel warning light ............................................. 62 Danger warning light switch ............................. 71 Engine malfunction indicator light .................... 62 Rear Window Defroster Switch ........................ 71 Low Oil Pressure Warning Light ....................... 63 Digital clock...................................................... 72 Chapter 6 Ventilation Conditioning System 73 Brake system warning lamp .............................. 64 ABS warning light ............................................ 65 System and Air Generator warning light .................................... 65 Control panel .................................................... 76 Safety belt warning light ................................... 66 Ventilation and warm air ................................... 76 Safety airbag warning light ............................... 66 Central vent....................................................... 76 Turn signal warning light/danger warning light 66 Bypass vent ....................................................... 76 High beam indicator light.................................. 67 Front wiper defroster /defogger vent................. 77 -3- Brief Indroduction Front window defrostter/defogger vent ............. 77 Performance ...................................................... 97 Temperature control switch ............................... 77 Overall .............................................................. 97 Airblower switch ............................................... 78 Case .................................................................. 97 Airflow distribution switch ............................... 78 Caring for your cassette player and tape ........... 97 Internal circulation switch ................................. 79 Operation method ............................................. 98 A/C switch ........................................................ 79 Cassette player operation ................................ 101 A/C system ........................................................ 80 Radio reception ............................................... 101 Operating tips .................................................... 83 CD changer mode operation method............... 103 Chapter 7 Audio System 84 RPT (Repeat) .................................................. 104 VDO Audio System .......................................... 85 Random........................................................... 104 VDO Audio Panel Function .............................. 86 Specifications.................................................. 104 Audio system .................................................... 88 Baisc operation of record changer for 6 CD.... 105 Radio ................................................................. 89 Operating guide .............................................. 106 Cassette player .................................................. 90 Specifications.................................................. 107 CD (Compact Disc) ........................................... 91 Use of CD ....................................................... 107 Clock setting ..................................................... 92 Caring for your compact disc player and discs 108 Audio System for Songs (Optional) .................. 94 Error display ................................................... 109 Audio panel function (optional) ........................ 95 Trouble-shooting ..............................................110 -4- Contents Chapter 8 Maintenance and Upkeep 112 Maintenane of battery ..................................... 126 Engine compartment ....................................... 113 Brake pedal ..................................................... 127 Maintaining & protective measures ................ 114 Clutch pedal .................................................... 127 Safety attention ............................................... 115 Hand brake ...................................................... 127 Checking list for the driver.............................. 115 Ternary catalytic converter.............................. 127 You should check the engine oil level by the Wheels and tires .............................................. 128 following steps ................................................ 116 Tire inflating ................................................... 129 Replacement of engine oil and filter ............... 118 Tire condition .................................................. 130 Coolant level ................................................... 119 Exchange of tires ............................................ 131 Engine overheating ......................................... 119 Ignition system................................................ 132 Brake fluid ...................................................... 120 Central electronics box ................................... 132 Gearbox oil...................................................... 121 Replacement of fuse........................................ 133 Power steering fluid level................................ 122 Engine compartment relay/Fuses box ............. 133 Air filter .......................................................... 122 Fuse box.......................................................... 134 Spark plug ....................................................... 123 Front relay box 1 ............................................. 135 Drive belt ........................................................ 124 Front relay box 2 ............................................. 135 Chapter 9 Car Light Windshield washer fluid.................................. 125 Wind shield wiper ........................................... 125 136 Combination headlight .................................... 138 -5- Brief Indroduction Front/rear fog lamp ......................................... 138 Common technical characters ......................... 154 Brake lamp, the third brake lamp .................... 139 Wheel .............................................................. 155 Reversing lamp /vehicle plate lamp ................ 139 Tire pressure ................................................... 155 Rear turn signal lamp ...................................... 140 Official VIN of vehicle ................................... 157 Side turn signal lamp ....................................... 140 Engine No. ...................................................... 157 Chapter 10 In Case of an Emergency 141 Vehicle data plate ............................................ 157 Tools in the trunk and spare tire ...................... 142 Replacement of wheel ..................................... 142 Procedures of replacement .............................. 143 Jump starting the engine.................................. 145 Towing vehicle ................................................ 147 Emergency towing .......................................... 147 Save yourself after being caught in spongy ground ............................................................. 148 Chapter 11 Technical Requirements and Data 150 Dimension of vehicle ...................................... 152 Parameters of engine ....................................... 153 -6- Brief Indroduction Chapter 1 Brief Introduction -1- Brief Indroduction Don‘t touch electrical components; don‘t touch the high-temperature parts (such as exhaust system), with the ignition on. Safety protection The car runs at a high rotational speed as well as high-speed, therefore, while driving, in order to avoid attention to the following matters. The driver and passengers should wear safety belt while driving. ☆ Be sure not to drive when drunk. ☆ Comply with the adopt appropriate moment to upshift. ☆ Environmental protection traffic regulations. ☆ Pay attention to make way for pedestrian or other vehicles while the car door is open. ☆ Pay attention to avoid being burnt and electrical shocked while inspecting the car. For example (e.g.): Running engine may lead to injury, scald and electric shock. Do not treat the waste fuel container as the domestic garbage, the occurance of danger; you should pay ☆ environmental pollution, if you please have it disposed by your The earth is our living homeland; every local Chery authorized waste one has an unshirkable duty to protect disposal institution. the environment. Making use of ☆ Engine oil, brake fluid, vehicle accurately and putting varies of anti-freeze fluid and tires after abandoned rational having being used, can only be disposal are critical moves towards disposed by professional waste achieving this aim. disposal institution or you can ☆ You should avoid that the engine consult your Chery Authorized works high Service Station for assistance, and is do not treat it as household advantageous for economy of fuel, rubbish or drain it to the public decrease drainage system. materials at rotational to unnecessary speed. of -2- noise It and Brief Indroduction ☆ Battery after having being used Regulations of break-in period contains sulphur and lead. You should not abandon it as common *Avoid full-speed drive for every gear. Break-in regulations between 1000 km and 1500 km: for new vehicle household rubbish. You should deliver it to local waste material disposal station for assistance. ☆ gasoline, you are recommended to use high-grade unleaded gasoline. If your car is equipped with ternary catalytic converter, please inspect it at regular intervals, according to local road and your vehicle‘s condition, to avoid overexhaust of waste air. friction resistance of every components of the new car is much Under the circumstance of using regulated The stronger at the initial stage than that of You can speed up gradually while driving; it is OK for the engine working at top speed in a short time. normal stage. The future service life, reliability and economy of your Matters needing attention vehicle shall be largely determined by break-in result of your new car at initial stage, therefore, you should use during new car break-in period: your new car in accordance with regulations of break-in period. Break-in regulations within 1000 km: * Do not run the engine at full speed. * Do not drive over 100 km/h You are strictly forbidden to step on the accelerator, whenever the engine is cold. It is not good for you to speed up the engine suddenly. You should start -3- Brief Indroduction to drive when the coolant temperature influence the normal use of engine. Drive the vehicle safely! goes up to normal state, otherwise the It is necessary to drive at low speed, !Notice: Pay attention to the break-in engine will be worn at an earlier stage. during the first 100 km. You should period during the first 200 km, after The acceptable top engine speed in a take special care, for the tires of new replacing brake friction disc, and drive short time is 4000 r/min. In manual car do not have the best friction force the vehicle safely. shifting case, you should upshift when for roadway, which will result in brake The wheel nuts should be retightened the force not enough and brake distance after the new car driving 800 km. indicating pointer of the tachometer gets into the red zone. And enlarged. !Notice: The wheel nuts should be avoid the high-speed running of the engine. It is advantageous for economy ! Notice: Drive the vehicle safely retightened after driving 800 km, if the of fuel, decrease of engine noise and during the first 100 km after replacing tires have been replaced or the wheel environmental pollution if you upshift the tires. nuts have been loosened before. without delay. Brake friction disc of new car does not It is not necessary for engine speed have the best frictional force; therefore being too low, while normally driving. it also needs break-in period. You It is easy for the engine to accumulate should drive cautiously during the first Carbon if the engine speed is too low 200 km; heavily apply the brake pedal frequently, and furthermore it will with the parking brake depressed. -4- Brief Indroduction Explanation on Regular Reminder Symbols Definition Door Indicators of Motor Vehicle Symbols Definition Symbols Definition Anti-lock open Parking lamp warning light brake system (ABS) warning light Glass moving Audible alarm forbidden switch Brake system warning light Low fuel level Rear fog lamp warning light Danger warning light Parking/position Front fog lamp indicator light Seat belt reminder light Cigarette lighter A/C Air conditioner Airbag self- check/malfunction -5- arning light Brief Indroduction Symbols Definition Symbols Malfunction indicator light/ Definition Head light switch Symbols Definition Wiper switch indicator engine self-check Rear light windshield heating-up indicator Horn switch !Notice radiator fan Interior Discharge warning light switch indicator Low oil pressure Outside warning light rearview mirror heating-up Headlight beam light Front indicator beam light windshield defrosting/defogging Headlight Windshield washer indicator high indicator light Coolant temperature indicator low indicator -6- The Need-to-Know before Driving Chapter 2 The Need-to-Know before Driving -7- The Need-to-Know before Driving Keys with keys from outside. You can turn !Notice: Do not leave the key in the vehicle. Your vehicle is supplied with three 1. Lock the door while you leave the kinds of key (There is a spare master vehicle. key with spanner sign on it. This key 2. Please carry the key with you all the will not work for the trunk). Your key time. the key counter-clockwise to unlock the door, and turn the key clockwise to lock the door. !Notice: Be sure to lock all the doors and the trunk lid before you leave the vehicle number is shown on the plate. Keep Lock the key number plate in a safe place, Open not in the vehicle, in order to ensure safety of your vehicle. You should also . put a copy of the key number with your important papers, but not keep it in the vehicle either, in case other people copy the key after acquiring the number. Door lock You can lock or unlock the front door -8- You can lock or unlock the door from inside through secured handle by the The Need-to-Know before Driving side of car window. You can lock all the doors except driver‘s side door from outside, by means of pressing the secured handle, and then close the door. Driver‘s side door is in open condition while the secured handle is on; at this very moment, do not try to press on the switch, in case system components are damaged. You can lock the left front door from outside only with the key, while leaving the vehicle. Open Lock It is OK to pull the outside door handle outward, if you want to open the door from outside. Central !Notice: Do not keep the children or pets in the vehicle, if there is no body looking after them. control door lock system Driver side door (left front door) has the central door lock under control. It is OK to pull the inside door handle 1. In order to avoid suffocation, especially in hot weather. 2. They may cause the accidental moving of the vehicle. outward if you want to open the door All the doors and luggage trunk can be locked or unlocked simultaneously, if you lock or unlock the driver side door (left front door) with key or by pushing from inside. -9- The Need-to-Know before Driving the button of door lock. tongue mounted on lower position of two rear doors‘ locks if you don‘t want !Notice: Please lock all the doors and the trunk lid if no body is on watch, before you leave the vehicle. to open the rear door from inside. Inside door handle is fixed in the ―locked‖ position, that is to say, safety lock for children use is on, and it is impossible to open the door through inside door handle. Safety lock for children use Safety locks for children use are mounted on both sides of rear doors. Lock This lock can prevent rear row passengers, especially children, from opening the rear door accidentally by means of inside door handle. Pull downward the metallic lock - 10 - Open The Need-to-Know before Driving will stop the seatback at that position !Notice: Please use this device when there is a child sitting in the rear row. For it is very dangerous for child opening the rear door accidentally, esp. while driving. 1. Leave the safe lock for children in ―on‖ position. 2. Do not move the inside door handle with the safe lock for children on in order to avoid handle damage. Front seat sliding adjustment and make sure the seatback is locked properly. !Notice Adjustments should not be made while the vehicle is moving, so as to avoid vehicle out of control before wearing the safety belt. Do not put objects under the seats as they may interfere with the seat-lock mechanism. Pull the adjusting lever up and hold it, try sliding it forward and backward, to Head restraints Adjustment of front seat angle make sure it is in requested position, release the lever, to make sure it is locked properly. !Notice Do not adjust the seatback while driving, for it will divert the driver‘s attention, resulting in vehicle out of control. You should avoid reclining the seatback any more than needed, for it is possible for passengers wearing the seat belts provided to slide during driving. You should have the seatback upright, in order to ensure maximum safety protection. To reduce the possibility of neck injury, Move the adjusting lever in the desired head restraints is recommended, pull it direction. Releasing the adjusting lever up or push it down can raise or lower - 11 - The Need-to-Know before Driving it. · It is ok to take the head restraint out, Folding the rear seat backrest by means of pushing button of the left guide casing set Fold the backrest down to expand the luggage compartment space, if you want to accommodate large objects. Folding procedures: !Notice Head restraint protects your head and neck from being injured in the event of a collision; therefore, adjust it properly before driving. Adjust the top of the head restraint, so that it is closest to the top of your ears. After adjusting the head restraint, make sure it is locked in proper position, before driving. · Lift the seat cushion up; move forward slightly, it is ok to raise the cushion from the rear. !Notice For your safety, adjust the head restraint before driving, make sure it is in proper position, and do not disassemble it at will. Disassemble the head restraint: · Pull the damping cushion up to the highest position - 12 - The Need-to-Know before Driving !Notice ·Do not pile up objects on rear row seat, doing so will obstruct the view of the driver, furthermore, it is possible to hurt the occupant while the objects is moving. · Take off the head restraint from the seat backrest ·Pull up the locking button of seat backrest, so as to relax the seat backrest, fold it frontward and · In order to make the seat backrest upright again, please observe the followings: downward. · In order to make the seat return to its original position, please pull it backward, and then push it until it is locked properly. 1. Lock the seat and seat backrest by means of pushing or pulling them. 2. Make sure the seat belt is not twisted or pinched in the backrest, at the same time; please put the seat belts on suitable place. Safety belt precautions · In order to make the seat backrest upright, please pull the backrest up, then push it to the ―locked‖ position, Chery recommends that the driver and and confirm it is locked properly. passengers in the vehicle be properly restrained at all times with the safety - 13 - The Need-to-Know before Driving belts provided. Use the belt for only one person at a time. Do not use a single belt for two or more people, even children. It is not suitable for child under 6 years old to use safety reequip safety belt privately, do not attach any equipment which will influence the operation of safety belt. Damaged safety belt could not be used once more; replace it immediately, because it maybe hurt you. Avoid safety belt system being squeezed to damage by door and seat. belt. Child‘s seat or auxiliary cushion should be installed for child to use. !Notice: The passengers may be hurt because of inertia in the event of emergency braking or a collision, so you should use safety belt whenever you are driving. Do not use a single belt for two or more people simultaneously. Do not hold hardware or breakables in clothes keeping close to safety belt, especially gas lighter. If gas lighter explodes during process of squeezing, severe accident maybe take place. Failure to use safety belt correctly could lead to severe injury. Do not While using the safety belt: In order to lower the chance of injury, in the event of emergency braking or a collision, please use and maintain safety belt and child restraint system according to accurate method. !Notice: Failure to wear safety belt correctly could result in personal injury even death. Place backrest of seat upright as possible as you can. Avoid reclining the seatback any more than needed - 14 - while driving. Do not wear safety belt if it is twisted, make it smooth before use, or contact your Chery Authorized Service Station for assistance, excellent technical personnel of Chery will help you to solve these problems. Do not fasten diagonal seat belt under your arm, you should fasten it in the middle of your chest, the belt should be kept away from your neck. You should wear the seat belt securely, and as low as possible over the hips and not on the waist. You will be sliding under the safety belt if the safety belt is excessive loose, the risk of personal injury and death may increase. Button of buckle should be placed outward, insert the tab into the buckle. Do not insert anything in the safety belt protective plate opening, in order to avoid safety belt being pinched, if pinched, you have no choice but wrap all the belt to the reel, then take out requested length accordingly (This work should be performed by Chery Authorized Service Station). Please do The Need-to-Know before Driving not disassemble or modify the safety belt system privately. Protection of safety belt soon as possible. Over tensioned safety belt in accident must be replaced, Chery recommends to replace the belt assembly, if it has been used in a severe impact. You should check the Keep the belts always clean and dry. belt assembly to see if they need Avoid safety belt being stained by replacing, even if they has not been polishing compound, oil and chemicals, used in accident, but there is especially acid fluid of battery. If the something wrong with them. belts need cleaning, use a mild soap solution or lukewarm water. Never use bleach, dye, or abrasive cleaners- they may severely weaken the belts, result in hidden trouble of safety. You should avoid safety belt touching sharp objects. Check to see if the safety belt is damaged, at regular intervals; replace the damaged components as !Notice: Damaged safety belt will lose protective function without replacement. You had better inspect the belt assembly at regular intervals. Please contact your Chery Authorized Service Station for seat belt inspection and replacement, according to the request, after a collision. Replace belt assembly if it has been damaged, stained or used improperly. - 15 - The entire assembly used in a severe impact should be replaced, even if damage is not obvious. If the safety belt is not suitable, it may be lead to more severe injury. Do not disassemble or modify the safety belt at will. Pregnant woman Chery suggests that the pregnant woman should ask her doctor for specific recommendations before using a seat belt. !Notice: The pregnant woman and unborn baby may be hurt during trip. Therefore: If possible, please use three-point type diagonal lapping safety belt (please consult your doctor). The Need-to-Know before Driving Child restraint system You should use suitable child restraint system if you carry baby or child. We recommend that you should choose secured in a rear seat, using a child properly secured in a rear seat, using restraint system. Do not use a rear the seat belt. You had better not let the –facing child restraint system in the child use diagonal type seat belt if front seat, because the force of the possible. If the child use diagonal type rapid inflation of the passenger airbag seat belt, the seat belt is close to the may cause severe injury to the child. child‘s face or neck, please let the suitable child type seat installed in vehicle, in accordance with concrete weight and height of the child. Accident statistic material indicates that it is safer to install children restraint system in the rear seat, than the front seat, so we recommend you had better install the child restraint system in the rear seat. child in centre position, that is to say !Notice Always the inside position of seat belt. read the manufacturer‘s instructions, before installing child Three-point type seat belt restraint system. · Fasten it with seat belt or take it away from the vehicle if you do not use it. · Do not hold a child in your arms while driving. Chery vehicles are all equipped with three-point type seat belt with brake limiter. Though adjustable seat belt is always next to your body, your body !Notice If a child is too big to use a child Baby or little child should be properly restraint system, the child should be - 16 - can move freely while steady driving. The Need-to-Know before Driving Seat belts with an adjustable scroll sure the seat belt are not twisted. Insert Authorized Service Station),Please insert tab (1)into the buckle after releasing the rear row seat belt, take care that the seat belts do not get caught or pinched in the side doors, in order to avoid side doors or seat belts being damaged. Push the red button if you want to tab (1) into the buckle (2). remove the seat belt. The seat belt will Using the seat belts device, it will be used to lock the seat belt in event of sudden acceleration and deceleration. Please do not try to push forward with the upper part of the body to test it, to see if it is locked or not. Adjustment of length is not Pull the seat belt out of the retractor smoothly, then fasten your belt, make retract automatically. necessary for this type of seat belt. You can adjust the scroll device position to your size, if your vehicle has equipped with this device, but the seat belt will ⑴ ⑵ be self-locked to prevent the occupant‘s body from moving, so as to protect the occupants, in event of sudden collision or impact. !Notice If the seat belts get caught or pinched, rewrap it once more, then take it out until you get desired length (this work should be performed by Chery - 17 - The Need-to-Know before Driving Adjustment of seat belt altitude: move the tab to the suitable position, You can slide the adjustable anchor up fasten your belt. and down, to adjust the seat belt If the belt is not short enough for you, altitude. move the tab to the suitable position, !Notice For your safety, do not place the seat belt too high or too low, it will tie your neck if the seat belt is too high, it will move under your shoulder if it is too low, for your safety, please adjust the seat belt to suitable position. Lapping the seat belt fasten your belt. Press the lap buckle-release button and allow the belt to retract, if you want to release the seat belt. The tab and buckle of rear seat belt is marked with CENTRE. Please check the mark before you wear the seat belt. !Notice Failure to use seat belt correctly could increase the chance of severe injury. The belt should be kept away from your belly, keep the lap belt as low on your hip bone as possible. It maybe results in severe injury if the seat belt is damaged or too tight. Do not work hard to insert unsuitable tab into the buckle. Insert the tab into the buckle properly, in order to provide maximum protection of the seat belt system, please put seat belt to the original position after disassembling the rear seat. Power window switch Install the seat belt in the middle of rear row seat. Insert the tab into the buckle. You will hear a click when the With the ignition in ―2‖ position, you tab locks in the buckle. can If the belt is not long enough for you, - 18 - operate the power windows The Need-to-Know before Driving through the switch. Push the button If the switch is locked, only the driver down if you want to open the window. can control window glass elevation, Pull the switch up if you want to close window glass of the passenger side the window. Release the switch when and rear row are all no longer have any the window moves in the requested effect. position. !Notice · Make sure to turn off the ignition key in order to avoid unnecessary injury to the child, while you leave the vehicle. Release the button when the window fully closed, in order to avoid electric motor damage. · Keep your hand, head or other objects inside the window. · Do not let the child play with power window switch, for power window unexpectedly close will result in severe injury. Glass forbidden switch This switch is mounted in the driver‘s side armrest, push it down (yellow) if you want to lock it, push it once more if you want to return to Free State (green). - 19 - The Need-to-Know before Driving rearview mirror is a convex mirror Outside rearview mirror with a curved surface. Any object seen in a convex mirror will look nearer Adjust the mirror so you can see both than when seen in a flat mirror; you side of your vehicle in the mirror, can see the roadway behind the vehicle suitable position rearview mirror is much wider. The rear view mirrors can helpful for you to make sure the position of objects you see in the mirror. be folded backward for parking in To adjust the rearview mirror in proper restricted areas or while vehicle being position, use the switch: washed. To fold the rear view mirror, 1. Place the switch at ―L‖ to select the push backward. This feature will left one to be adjusted, push the switch minimum width of vehicle; let it easy in the desired direction. to get through. 2. Place the switch at ―R‖ to select the right one to be adjusted, push the switch in the desired direction. 3. After adjustment, please push the switch to centre shut position. Right - 20 - !Notice: It will increase the possibility of accident if you adjust the rearview mirror not properly for field of vision of the driver is limited, therefore, you should adjust the angle of rearview mirror before you drive. In order to The Need-to-Know before Driving ensure driving safely, please see the back field of vision with outside rearview mirror and inside rearview mirror simultaneously. There are two positions of day and night. Place the lever at ―day‖ position while daylight driving, place the lever at ―night‖ position while night driving, so as to reduce glare from the headlights of the vehicle behind you !Notice In order to keep rear version range of the driver, you can select daylight position and carry out adjustment in order to get the best version. It is possible to weaken the clarity of rearview mirror and limit the version range, if you select night position. during night driving (The lever is mounted on the lower part of inside Safety airbag rearview mirror). The SRS (Supplemental Restraint System) airbag are designed to protect Day the driver and front passenger in case of collision; reduce injury by inflating Inside rearview mirror in order to decrease the likelihood of the driver‘s or front passenger‘s head In order to get the best field of vision, inside rear view mirror can be moved up and down, left and right. or chest hitting the steering wheel or Night dashboard. - 21 - The Need-to-Know before Driving In a severe frontal collision or collision means it is not necessary for the airbag personal from the side, the airbags inflate, they to activate, because the vehicle has components of airbag system. It is very produce fairly loud noise and release already borne the large amount of dangerous to modify, remove or open some smoke, and the smoke is not impact force. In other accidents, when the safety airbag without permission; harmful. When severe collision occurs, severe collision occurs, such as chassis doing so may cause personal injury. injury even death maybe occur even if collision, it is not in a large scale that You should have the airbag disposed you wear seat belts, even if the the chassis maybe damaged, but it and replaced by Chery Authorized deployment of airbag is normal, so it is maybe results in airbag explosion. Service Station. Do not put objects on very important for you to be careful to drive and pay attention to the safety! In case of a severe collision, there is no system can provide overall protection. After collision, it is impossible for you to see whether or not the airbag has inflated with your eyes. In accident which airbag doesn‘t inflate, the vehicle body is over damaged, that injury, do not modify or in front of the dashboard or steering !Notice: wheel pad that houses the airbag For the safety of all occupants, be sure to always wear seat belts. The SRS airbag system is designed only as a supplement to the primary protection of seat belt systems of the driver and front passenger. components of Do not airbag remove without permission, doing this may cause - 22 - system, they might restrict inflation or cause personal injury. The airbag will not work under the following conditions: Two vehicles collide with other each, impact from the side, vehicle rollover and not enough impact force. The Need-to-Know before Driving Airbag for the driver Driver airbag The driver‘s airbag is located in the influence the driver‘s normal driving. In some vehicle type, airbag is located The SRS airbags will inflate with in the frontal instrument panel of front considerable speed and force; the passenger. This airbag system is big airbag can give full play to its function enough, it will inflate very rapidly, if if you adjust the driver‘s seat and front passenger is not in a suitable backrest properly. position and front passenger don‘t !Notice Do not repair the steering wheel, steering axle and airbag without authorized permission, you should have these work done by Chery Special Service Centre. center flange of steering wheel pad. The airbag inflate within several wear seat belts, it is possible for the passenger to be hurt severely by the airbag. Move the seat backward as possible as you can, and seated yourself backward as possible as you can. Front passenger airbag seconds, in order to form a safe buffer !Notice air cushion for the driver. After the Do not use a rear-facing child restraint airbag inflate to the full, gas will Passenger airbag system in the front seat, because the disappear, so as not to block field of force of the rapid inflation of the vision to the driver, so as not to passenger airbag may cause severe - 23 - The Need-to-Know before Driving injury to the child, so a child should be Engine compartment hood properly secured in a rear seat using a child restraint system. You should secure a front-facing child restraint system in rear seat, if your child is too big to use the child 1.Pull the handle mounted in left lower part of instrument panel; unlock the engine compartment hood. 3. Insert the supporting lever to the restraint system, let the child be seated hole of engine compartment, so as to in rear seat wearing the seat belt. support the engine hood. !Notice Do not repair the instrument panel without authorized permission, you should have these work done by Chery Special Service Centre. 2. Push the buckle backwards; lift the engine hood, shown illustrations. - 24 - as the The Need-to-Know before Driving 4. Take the supporting lever out, before operate the open handle of engine following matters while checking the closing the engine hood, press the hood while driving, because not only bottom of engine compartment hood: spacer, in order to avoid vibration of the driver‘s field of version will be Put the transmission to neutral gear, supporting lever and producing noise. influenced, windshield pull up the parking brake. When the 5. Let the engine hood be falling freely window glass maybe crashed to be engine is running, running components from 30 cm (1feet) high, close the broken, is of engine will be uncovered if you engine hood, finally pull up edge of unexpected opened while high-speed open the engine compartment hood, do engine compartment hood, to make driving, resulting in personal injury. not wear loose clothing, keep hands sure that the engine hood is locked Do not drive the vehicle while the and hair away from the running parts properly. engine hood is open, because the and vehicle maybe moves from the static high-temperature parts maybe cause !Notice state with the engine hood open. Be unnecessary personal injury. While driving, do not open the engine sure that the ignition key is taken off, compartment hood. Before driving, put the transmission to gear 1 or pull the hood edge; check it to see reverse gear and make the parking whether or not the engine compartment brake ready for use. When the engine hood is completely locked. Do not is running, pay attention to the if but the also engine - 25 - hood exhaust manifold, Open trunk lid for the The Need-to-Know before Driving Open Lock Insert the key to trunk key hole, the vehicle with the trunk lid open. trunk lid will be opened if you turn the Fuel filler port is located in right side wing of the vehicle. key counter-clockwise, the trunk lid will be closed if you turn the key clockwise, pull the trunk down to ―lock‖ position, check to see the lid is securely locked Turn the key and push the lock core upwards to lift the trunk lid if you want to open the trunk (it is impossible for you to open the trunk lid using maintenance key, maintenance key is marked with spanner) !Notice While driving, it maybe blocks the driver‘s field of version if the trunk lid is opens, increasing the possibility of incident. Therefore: Do not drive the - 26 - Open the fuel tank outer cap. The Need-to-Know before Driving Unlock the interior cap of fuel tank clockwise if you want to open the fuel paint surface, please wash the paint with vehicle key. trunk cap, turn it clockwise if you want surface with cold water as soon as to close the fuel trunk cap. 4. After refueling, turn the fuel tank cap clockwise, tighten it (until you hear a click), and then close the fuel filler cap. possible, if the paint surface is !Notice slowly, then completely unscrew the Fuel fumes are inflammable, turn off the engine while refueling, do not smoke, keep away from fire and spark, Pay attention to the following matters while refueling: 1. Turn off the engine. 2. Push down the front side of fuel tank cap, shown as the illustrations; it is ok for you to open the tank cap. 3. Insert the key; turn it counter do not use microwave communication tools (such as mobile phone), in order to avoid fire disaster. Do not apply leaded gasoline to unleaded gasoline vehicle, in order to avoid engine and exhaust system damage. The gasoline will damage the - 27 - spattered with gasoline. Fuel in fuel tank maybe in compression condition, you should turn the fuel tank cap fuel tank until there is no ―hissing‖ sound. It is impossible for you to open the fuel refueling cap in cold weather, pushing or knocking the refueling cap slightly will be helpful for you to open it, because there maybe remaining fuel in the fuel tank, total amount of fuel every time you refill should be lower than the standard capacity. Operation and Adjustment of Equipment inside Vehicle Chapter 3 Operation and Adjustment of Equipment inside Vehicle - 28 - Operation and Adjustment of Equipment inside Vehicle Sun visor Adjustment of steering wheel This equipment is designed according to requests from drivers of different height, bodily form and hobbies. Adjustment: Pull down the adjustment switch, !Notice: Adjusting steering wheel is strictly forbidden while driving. You can drive only after the adjustment is performed and the steering wheel is locked properly, otherwise it may cause severe traffic accident. Sun visor can be rotated up and down, or can be rotated laterally, protect driver and occupants against strong irradiation. Horn button Sun visor Pull down the sun visor if you want to keep the front sunshine away, sun visor move the steering wheel up and down on the left can be took out of the fixed to suitable position, then pull up the Horn button on both sides of the steering switch to ―lock‖ position, shake the wheel, wherever the ignition switch is, steering wheel to see if it is locked the horn can bark. clamp buckle on the right of the sun visor. Rotate to left side glass regarding the left axle as the center, in properly. order to keep left side sunshine away. It is ok for you to buckle the sun visor and straighten it up while taking the sun visor back. - 29 - Operation and Adjustment of Equipment inside Vehicle Vanity mirror Auxiliary handle The vanity mirror is mounted on the back of right side sun visor. Auxiliary handle is mounted on the The right side sun visor has same upper position of right front door and function and operation methods as the back left one but not like the left one, the convenient for the passengers. row door, it right sun visor is mounted with vanity mirror. The vanity light comes on when you open the cover, providing you with illumination. - 30 - make things Operation and Adjustment of Equipment inside Vehicle Interior light Door control Open lamp Passenger‘s reading light is on the right: In order to make things convenient for the passenger, passenger‘s reading light is installed, press to the left if you want to turn it on, press to the right if you want to turn it off. Open The interior light has two switches: The door light has automatic delayed The big interior light switch is on the function, after all the doors are closed, left: Press to the left is ―ON‖, that is to keep light on all the time, no matter whether or not the door is open. this light will still be on for a while, Press to the right is door control light; the light will be on when the door is open. Middle position: It is in the ―close‖ position, even if the door is open; the light will not be on. - 31 - and it will go out after 7 seconds. Operation and Adjustment of Equipment inside Vehicle Rear ceiling lamp Front cup holder Shown as the illustration, push the outer cover of cup holder; you can open it. In order to make things convenient for The cup holder is mounted on the front rear row passengers, rear personal light controls panel; it is designed for are designed, it is the door light holding cups fit snugly in its holes. simultaneously. If you press the ―door‖ !Notice: button, the light will be on if the door If the lid is forcibly pulled up, the is open; the light will be off if the door drink may spill over the seat occupants, is closed. If you press the ―open‖ so do not leave the cup lid open, while button, the light will be always on, driving. therefore, we recommend you press the ―door‖ button. Push it in completely; you can close it. Operation: - 32 - Operation and Adjustment of Equipment inside Vehicle Front ashtray it open completely, shown as the !Notice: illustrations. To remove the ashtray, Do not touch the heating wire of the pull the ashtray upward. Install the cigarette lighter for it may be catching ashtray in reverse orders. fire while the lighter is heated. Do not let children play with the lighter. Do not depress the lighter by hand. Do not regard the lighter slot as power supply socket; otherwise it will increase the Front ashtray is mounted under the chance front control panel. To use the ashtray, damage or appliance circuit malfunction. push the outer cover. Cigarette lighter Cigarette lighter is mounted under the ashtray. To use the cigarette lighter, press in the lighter. When it becomes heated, it automatically pops out ready If you want to empty the ashtray, make of for use. - 33 - electrical Operation and Adjustment of Equipment inside Vehicle B Front armrest box A Front armrest box is located between the front seats; you can make the armrest slide backward, both according forward to and different occupant‘s requests. Push the armrest frontward or backward; you can change its position. Armrest box is bi-level, push switch A, shown as the illustration, turn it upward, the handrail box can be opened; you can accommodate small Push down switch B, turn it upward or thin objects in it. simultaneously, the lower layer of armrest box can be opened, and there is enough space for you to accommodate larger objects in it. !Notice The handrail box doesn‘t have reliable locking system, therefore, please do - 34 - Operation and Adjustment of Equipment inside Vehicle not leave the valuables in it. Make sure to lock the door and take the valuables all with you while you leave the vehicle. Glove box Switch To close: Close the glove box shown as the illustration. !Notice: Glove box has no reliable locking mechanism, therefore never leave anything valuable inside the glove box. You should always carry the valuables with you when leaving the vehicle; meanwhile, you should lock the door. Rear ashtray ashtray, pull the switch backward, shown as the illustration. Pull the ashtray out if you want to clean it, shown as the illustrations. Install the ashtray in reverse orders. !Notice: If cigarette butts have not gone out, do not try to remove the ashtray, in order to avoid being burned. Glove box is mounted by the side of instrument panel. To open: pull the lever down, shown as the illustrations. Rear ashtray makes things convenient for passengers of rear row. To use the - 35 - Operation and Adjustment of Equipment inside Vehicle Stand-by power supply !Notice This power interface only supports interface D.C. electrical appliance of 12V (Power 120 W), please check the rated voltage and power of the electrical appliance which you want to join up, in order to avoid dangerous accident. Shown as the illustration, push on the lid if you want to open the armrest box, Rear armrest box / cup holder there is a rear cup holder, and you can accommodate small and light objects Stand-by power supply interface is There is a hidden rear armrest box used for inserting electrical equipment between the rear seats, shown as the of other vehicles. It is ok to insert the illustration, pull down it if you want to plug of electrical appliance after use the armrest. uncovering the interface, please cover it after use. - 36 - in it. Switch Operation and Adjustment of Equipment inside Vehicle vehicle, take the valuables all with you and lock the door. If the lid is forcibly pulled up, the drink may spill over the seat occupants, so do not leave the cup lid open while driving. To use the cup holder, pull the cup holder forward. !Notice The armrest box has no reliable locking device, please let it return to its original position, if you leave the - 37 - Starting up and Operating Chapter 4 Starting up and Operating - 38 - Starting up and Operating by use of improper fuels is not covered accidentally, leaded gasoline filler tube should not be inserted into unleaded gasoline filler port. It is impossible for Chery to use fuel containing methyl alcohol (ethyl alcohol). The vehicle performance will be not good and fuel system elements will be damaged, if you use this kind of fuel. Fuel system damage and performance problems are not covered by Chery‘s new vehicle warranty. If you drive your Chery in other under Chery‘s new vehicle warranty. countries, be sure to pay attention to Make sure to select premium gasoline the following matters: with a Research Octane Number of 93. · Comply with relevant laws and safety Fuel Select premium gasoline with a Research Octane Number of 93 or higher for optimum engine performance. Engine damage caused especially if you use non-professional refueling equipment. Under certain pressure, while fuel is flowing, if the hose (especially plastic hose), which is mounted on fuel distribution pump does not connect the very ground; it is possible to generate large amount of static electricity. Grounding pump recommended. In and pipe are the case of non-professional fuel filler operation, fuel container should be connected to regulations. !Notice: Do not select leaded gasoline for unleaded gasoline vehicle in order to avoid engine and exhaust system damage. Damage caused by use of improper fuels is not covered by Chery‘s new vehicle warranty. In order to avoid filling leaded gasoline container, · Confirm the availability of the correct ground appropriately, too. fuel. In order to ensure safety, fuel pump Ignition switch and pipe must be connected to ground, while refueling with fuel drum or fuel - 39 - Steering wheel lock hole position: Starting up and Operating Position 1-Turn off the ignition switch turn the steering wheel slightly, in and the steering wheel is locked. order to relax the locking mechanism In order to lock the steering wheel, of steering wheel. please turn the steering wheel pull out the key, until you hear a click. The Position 3- Start the engine radio and horn no longer work in this When the lock hole is in this position, position. front headlight and electric appliance with heavy power consumption are all !Notice cut off. Do not pull out the key before parking Anti-repeat starting device is installed the vehicle properly, in order to avoid in the ignition switch. This device will locking prevent the starter from misstarting, the steering wheel accidentally. once the starter is running, so as to avoid flywheel of engine and starter Position 2-Complete the ignition being damaged. If you fail to start the electric circuit. engine, please let the ignition key If it is hard or impossible for you to return to position 1 before restarting, turn the key to this position, you can then turn the ignition key to position 2. - 40 - Before starting the engine 1. Make sure that all occupants fasten seat belts properly. 2. Turn off unnecessary lights and accessories. 3. Make sure pulling hand brake up. Starting up and Operating 4. Check warning lights of instrument · Check engine oil level. 2. If the engine can not start within 15 panel to see if they flicker shortly. If · Check coolant level. seconds not, please contact your nearest Chery · Check brake fluid level. temperature is lower than -12C, you Authorized Service Station for service. · Check power steering fluid level. should turn the key to ―1‖ position, 5. Lock all doors and trunk lid · Check windshield washer fluid level. restart it after 10 seconds. Release the at first time and the properly. key when the engine starts. 6. Make sure lights and turn signals are 3. For automatic transmission type in good condition. Turn engine on/off 7. Make sure performance of brake is reliable. 8. Make sure fuel is enough. 9. Make sure that cleaning degree of window glass and lampshade glass are up to the standard. 10. Make sure tire and tire pressure are up to the standard. It is not necessary to have some items vehicles, after the engine starts, idling for several seconds, depress the brake 1. Turn the ignition to ―3‖ position with your foot off the accelerator pedal. pedal, release hand brake; hold it to the floor until driving off. Release it when the engine start, turn 4. For manual transmission type the key to ―2‖ position. If the engine vehicle, make it idling for several cannot start within 5 seconds at first seconds after the engine starts, depress time, the temperature is more than the clutch, hold it to the floor until -12C, you should turn the key to ―1‖ driving off, and release parking brake. position, restart it after 10 seconds. 5. Release acceleration pedal first checked every time, such as: - 41 - Starting up and Operating while stop the car. Turn of ignition !Notice: For the vehicles with CVT P = Parking switch while the engine is idling. transmission, the gearshift lever must R = Reverse Gear be shifted to N or P position to start the N = Neutral Gear vehicle normally. D = Drive Gear 6.You should not turn off the engine immediately, after long-distance Manual Gearshift Mode driving at high speed, let the engine idling for 1 to 2 minutes, make things convenient for the engine temperature + = Up shift Operation of Continuously Variable Transmission ( With 1.6 CVT) fall gradually. - = Downshift 1. The manual gearshift mode can only be shifted to when the gear selector lever is at position D. Warming the engine up 2. Shift the gear selector lever into position when want to shift to manual In cold weather, let the engine idling gearshift mode. for some time after it starts, (let the 3. Under the manual gearshift mode, engine warm up for a few minutes shift the gear selector lever towards + before driving), and then speed up gradually. mark to up shift the transmission to the Function of Gearshift Lever Position nearest high gear; shift the gear Gear Selector Lever Position selector lever towards – mark to - 42 - Starting up and Operating downshift the transmission to the shift the gear selector lever to nearest low gear. whichever drive gear. 4. Under manual mode, the up shift The vehicle will travel itself slowly can be performed at any vehicle speed; after the brake is released. Step down however, the downshift can only be the accelerator pedal to increase the performed once the vehicle speed vehicle speed. Drive out Sand and Snow If the drive wheel is entrapped in the sand or the snow, try to shake the vehicle by repeated forward/backup. lowered to allowable scope. ! Notice: The vehicles with automatic 5. When to shift the gear selector lever transmission can‘t be started by trailing from P to R, from N to R, or from R to or pulling the vehicles. Please conduct P, the limit button on the gear selector jumper start by means of connecting lever must be pushed down to release the jumper cable to the support battery. Shift the gear selector lever between D and R and step down the accelerator slightly. In order to enhance the effects, it can shift to R when the vehicle is still moving forward and vice versa. Avoid the gear selector lever lock. It‘s no necessary to push down the limit Under special conditions, it may shift button when shift the gear selector to manual mode gear 2 as the start gear lever at other positions. on the ice & snow covered roads. the long period gearshift (shaking) between forward and backup, which may result the excessive worn-out of the transmission. The shaking period should not exceed 1 Start min. Try best to keep the engine at low Keep the engine running at idling speed during the vehicle shaking. speed, step down the brake pedal, and - 43 - Starting up and Operating Forced Downshift The automatic transmission can supply enhanced torque at upward steep slopes or at overdrive. In order to achieve the forced downshift effects, hold under gear D and step down the accelerator pedal completely. When the engine reached max speed, the Driving Essentials of Vehicle with Automatic Transmission under Various Road Conditions Midway Parking predominant acceleration capability. Notice: For small gradient flat roads, it‘s recommended to use gear D. It can achieve immediate acceleration performance by stepping down the 1. The vehicle will shock slightly at the same time when downshift for acceleration, which is the effects of forced downshift instead of the engine accelerator pedal rapidly. transmission will shift to the next lower gear. speed and gear so as to achieve acceleration tremble. All above are Stepping down accelerator rapidly: related to the rapid stepping down of The driver steps the accelerator pedal accelerator, which are the important completely rapidly. The effects of driving essentials the driver must stepping down accelerator rapidly are master. Release the accelerator pedal and step to down the brake pedal. Keep the gear mechanism from original gear with the selector lever at its original position. purpose of increasing the torque before Release the brake pedal when to increasing the speed to higher engine downshift the transmission 2. It‘s difficult to downshift for acceleration if stepping down the accelerator slowly. If stepping down the accelerator to the half or two third restart. - 44 - Starting up and Operating of stroke, it‘s impossible to obtain please use gear 1 * under manual mode overheating. At that time, the engine sufficient horsepower and do not use gear D. It can obtain brake * should be fully utilized to slow (torque), even though it can obtain the immediate acceleration performance the vehicle. increasing by stepping down the accelerator acceleration of some horsepower (torque).That‘s the cause why the customers complained low horsepower during driving. In addition, when stepping down the accelerator slowly for acceleration, the engine tremble will even get bigger. Therefore, it should be avoided. rapidly. 6. The engine brake refers to brake effects achieved through the engine 5. The driver should shift to gear 2 or deceleration and gear ratio of low gear gear D manually for normal driving when shift the transmission to low gear based on the variation of gradient, during instead of using gear 1 during entire accelerator pedal. journey. The long period use of gear 1 instead of shifting to the gear D for and release engine brake effects is. normal it‘s recommended to use gear 3 or gear transmission, 2 under manual mode. It can obtain specially noticed. driving of the vehicle, the shift to During the downward slopes, the long the low gear will apply great period of sustained braking may result impact on the engine and the the by stepping down the accelerator rapidly *. 4. For the roads with large gradient, which weakening performance of due - 45 - to should the be the 7. The lower the gear is, the better the 3. For the roads with medium gradient, immediate acceleration performance driving may damage driving ! Notice: During the high speed the brake transmission, which may result the brake the damage of engine and Starting up and Operating transmission. The low gear can be Operation of manual shifted to only when the vehicle speed is lowered to the speed neutral big gradient, please use the manual gearshift mode and shift to the lowest gear before the downward slopes in order to achieve max brake effects. then shift to the clutch pedal, downshift can be This vehicle is equipped with full done. synchronous mechanical transmission, used for front wheel driving. There are Operation of hand brake 6 gears in all: 5 are forward band, and 1 is reverse gear. In order to avoid vehicle unexpected When you step on the clutch pedal, the vehicle disconnect the drive between moving, you should pull the brake lever tightly upward, after parking. two shafts, release the clutch, connect · With the ignition on, the brake suitable gear, step on the accelerator, warning light will be on if you pull you can drive. While gear changing, hand brake up. step on the clutch pedal completely, Neutral gear, corresponding low-speed gear, release transmission allowed for downshift. On the downward slopes with much on the clutch pedal, shift the lever to the whole process of gearshift will finish. If it is downshift, after you step ·Pull hand brake lever upward if you want to use hand brake. ·Slightly pull hand brake lever upward, - 46 - Starting up and Operating push releasing button of lever top Braking system down if you want to release hand that the pad will not obstruct movement of the pedals and the pad brake. should not be sliding easily. The movement of every pedal should · Hand brake is used for rear wheel not have any resistance, so you should parking. be sure not to put anything easy to roll · It is easy for you to pull the hand over or slide on in that very space. brake up if you step on brake pedal · Brake pedal travel may be enlarged if while pulling the hand brake up. there is something wrong with the !Notice: Be sure to pull hand brake up, braking system. before you leave the vehicle. · Under any circumstances, clutch pedal good and accelerator should be stepped on circumstance, you can recover braking to the full. effect, only by means of depressing the Operation guide · New brake gasket cannot be in the best braking condition, until it passes the break-in period. In the first 200km, braking performance is not in very · For the above-mentioned reasons, you had better not put pad or other things condition, under this pedal greatly; it is applicable for the new gasket after replacement. on the pedal surrounding floor, if · There may be something wrong with indeed necessary, you should be sure dual return circuit braking system, if - 47 - Starting up and Operating the pedal travel is enlarged · While driving down the hill, you the salt will be adhesive on surface of immediately. At this time, the vehicle should make full use of engine braking brake disc or brake gasket, resulting in can still have braking performance, if performance, braking performance is not good, so you depress the pedal, and the braking necessary, give the braking system less you should clean the salt off in time. distance will enlarge. pressure. At this time, you should not !Notice · Check brake fluid level at regular intervals, according to the request. · Brake gasket wear mainly due to driving style, as to vehicle mainly used in urban driving, working condition of brake gasket is rather harsh, for frequent starting and parking. So, you should be sure to have the disc checked or replaced by Chery Authorized Service Station, according to the regulated mileage in the maintenance manual. downshift when continue to step on the brake pedal, If your vehicle is equipped with the even if braking is needed. front spoiler, you should ensure the air · After driving through water, rainstorm or vehicle being washed, the brake gasket is wet or frozen, braking performance will be to front brake unblocked, otherwise the braking system may be overheated because of friction. obviously weakened, at this time, you should step · It indicates ABS is in self-check mode on the brake pedal slightly, let brake and ABS system works normally, if the gasket touching warning light is on first, after several together to generate heat, in order to seconds, it is off, while the vehicle let the moisture evaporate and recover with ABS system is started. the braking performance. · It is normal that the motor makes · After driving on road containing salt, some sound and the pedal vibrates and brake - 48 - disc Starting up and Operating after ABS is assisting the braking Brake servo unit Brake fluid · Do not step on the pedal repeatedly The brake servo unit usually use Brake fluid tank is mounted on the left while braking vacuum to work, this apparatus work side of engine compartment. performance, for ABS system will only when the engine is working, so adjust braking pressure more quickly you should not turn the engine off than you. while driving down a hill. · Do not forget steering, in order to If there is something wrong with the Brake fluid level should accord with avoid front obstacles, while ABS is vehicle and vacuum servo, vacuum the regulations, in order to satisfy assisting braking performance. tube damage or leakage, or one-way demand of brake system and ensure ·ABS warning light will be on if there valve damage, the brake servo unit can driving safely. The level should be is something wrong with ABS system, not work; you should depress the pedal between ―MAX‖ and ―MIN‖ lines. at this time, conventional braking greatly to recover the supplement performance is still exist, but you performance of the brake servo unit. performance. ABS is assisting Check brake fluid level Braking system of Chery vehicle is equipped with friction gasket braking should have the vehicle checked by adjustment Chery Authorized Service Station, as mechanism, this mechanism can adjust the clearance soon as possible. automatically after the gasket being - 49 - Starting up and Operating worn, therefore, the brake fluid level lowered, it will severely influence may be lowered during process of use, braking effect and safety. For the it is normal, do not worry, but the level above-mentioned causes, you should is obvious lowered or fluid leaks in a replace the brake fluid every 2 years or short time, you should have braking having driven 5000 km. system checked and repaired by Chery !Notice: Brake fluid is poisonous! Be Authorized Service Station, as soon as sure to store it in the original sealing possible. container; keep it away from children. Parking · With the brake pedal pressed down, fully depress the parking brake pedal to apply the parking brake securely. ·Shift the selector lever to neutral gear if you park the vehicle on the level surface; shift the selector lever to reverse gear if you park the vehicle Replacement of brake fluid Brake fluid is corrosive to the body paint! down the hill; shift the selector lever to position ―1‖ if you park the vehicle Brake fluid has hygroscopicity, it will Brake fluid disposal is a very absorb moisture during process of use professional work, SST is necessary, successively, if brake fluid contains and so you had better have it replaced too much moisture, braking system by Chery Authorized Service Station. when climbing a gentle slope. · Keep all windows and skylight closed. · Turn the ignition key to position ―1‖, will be damaged, at the same time, pull the key out. boiling point of brake fluid will be ·Lock all the doors and trunk lids. - 50 - Starting up and Operating ·Bring the vehicle to a complete stop. !Notice: It may cause fire because the exhausting parts are very hot, before parking, make sure that there is no flammable objects around the vehicle such as grassland or straws. The vehicle may unexpectedly move while being parked, therefore: 1. Fully depress the parking brake pedal to apply the parking brake securely.2. Park the vehicle on solid road. 3. Do not make the vehicle aligned while parking on the slope.4. Using parking brake will cause rear brake damage while driving.5. Parking brake maybe frozen on cold weather, if the vehicle fords water while driving (brake components get wet) or vehicle being washed, it is easy for this circumstance to occur. If the rear brake is frozen, you should: 1. Pull up the parking brake pedal; shift the selector lever to gear 1 or reverse gear. 2. Lock up the rear wheel, in order to avoid vehicle moving. 3. Release the parking brake. 4. Drive the vehicle slowly for a while. operative after the vehicle has accelerated to a speed, it stops operating when the vehicle decelerates Anti-lock brake system (ABS) to a speed, and ABS makes use of sensor to react the speed difference. The system inspects the locked wheel The anti-lock brake system is a kind of advanced electric braking system, it can prevent vehicle from sliding while speed being corresponding at hand, brake and force has under control through electric signal. braking. ―ABS‖ warning light will come on The anti-lock brake system is designed to automatically prevent lock-up of the wheels during sudden braking or braking on slippery road surfaces. This assists in providing directional stability and steering performance of the vehicle under these circumstances. The anti-lock brake system becomes - 51 - when the ignition key is turned to the ―ON‖ position. After several seconds, the light will go off. If the light comes on while you are driving or the light remains on when the ignition key is turned to the ―ON‖ position, it warns that there is a problem somewhere in your anti-lock brake system. Even if Starting up and Operating the anti-lock brake system should fail, adjusting braking pressure of every the brake system will still operate wheel, at the same time, this assists in conventionally. Contact your Chery providing directional stability and Authorized Service Station as soon as steering performance of the vehicle. possible. Braking with anti-lock brake and hear a noise, in this situation, let the anti-lock brake system work for you, just hold the brake pedal down more firmly, whatever the road surface conditions are. ABS system is designed to maintain maximum braking effect, by means of ABS self check You may hear a sound along with The anti-lock brake system is in the slight vibration. This means that the self-check mode, when the engine is anti-lock brake system is working started. normally. You may hear a slight mechanical In case of emergency, when the sound, while the anti-lock brake anti-lock brake system function is in system is in the self-check mode, and action, put forth your strength to step does not indicate a malfunction. on brake pedal and clutch pedal, doing !Notice: Parking distance changes much considerable, according to road and driving condition, therefore: 1. Always maintain a safe distance from the vehicle in front of you. 2. Avoid high speeds on wet or slippery road. The anti-lock brake system cannot system You may feel the brake pedal pulsating braking capacity for your vehicle. this will have the steering system fully under control. We recommend you should go up with the ABS brake technique as soon as possible, in order to provide better - 52 - overcome accident resulting from Starting up and Operating careless or incorrect operation, Maximum steering angle of the left Water entering the intake pipe of therefore: 1. You should be careful to front wheel is: 30º engine may cause severe damage to drive. 2. Decelerate while making a Maximum steering angle does not the engine. If you drive through deep turn. 3. Press the brake pedal firmly exceed 40.0° water; and remain on. If the ―ABS‖ warning light comes on while you are driving, it warns that there is a problem somewhere in your anti-lock brake system. Therefore: 1. Parking the car and contact your Chery Authorized Service Station as soon as possible. 2. Before driving, have the system checked by professional personnel. water will enter the transmission through the vent, causing Driving through water damage to the transmission. While driving through water, be sure Drive the vehicle cautiously and slowly, if you have to drive through water, especially you do not know condition of the water. !Notice: Do not drive forward, if the water floods the rims. to drive the vehicle slowly while lightly pressing the brake pedal for several times, to dry the brakes, for the brakeage will be weakened if the brakes are wet. Steering system While driving through water, the Ternary catalytic converter parking brake will not hold the vehicle Power steering oil tank is located on the left and front side of engine compartment, near the battery. securely, the vehicle is hard to be towed, and furthermore, the vehicle has a possibility of going out. - 53 - Leaded gasoline is harmful to the catalytic converter and electrical Starting up and Operating control system, do not use leaded engine power is not in good Have all maintenance work done by gasoline. condition or any other abnormal Chery Authorized Service Station. All In the case of vehicle with catalytic phenomenon components converter, fuel filler port of fuel tank is system malfunction occurs, you system, injecting system and ignition too small for the leaded gasoline filler should drive at low engine speed in system work normally, will reduce gun to insert. a short time. emission pollution and extend catalytic indicating ignition of electrical control converter life. · Frequently cold start the engine. Recommended save fuel · Working hour of engine is too long, How to save fuel mainly depends on while restarting (fuel injecting hour, in your operation mode. starting stage, is postponed) Here are some specific tips on how to You should avoid: !Notice Do not use leaded gasoline, in order to avoid damaging the catalytic converter. The catalytic converter and vehicle may be damaged if you do not observe the following tips: ·If the engine can not start, the engine works abnormally after cold starting, · The fuel tank becomes empty operation to save fuel as possible as you can: (abnormal fuel supply will result in · Start driving steadily, engine overheated) slowly and smoothly. accelerate · Start the engine by means of towing · Avoid engine idling (unburn · Do not use air conditioning, unless it gasoline will catalytic converter) - 54 - enter the is necessary. Starting up and Operating ·Drive at low speed on uneven road Electrical Cruise Control surface. ·Keep your tires inflated at the correct the idle running status unless the System ( clutch ) ·Keep a proper distance from other pedal is stepped down; otherwise the engine will run at high pressure, in order to avoid wasting fuel, in order to make the tire last longer. of cruise control system, do not shift to In order to relieve the burden of speed or even may be damaged. driver to step down the accelerator and The cruise control system can be vehicles, to avoid sudden braking, on the condition that it‘s allowed by started only when at ―D‖, ―3‖ and ―2‖ doing so can reduce wear on your the engine power, the cruise control gear. If shifted to other gear (―P‖, ―R‖, braking friction discs. (You can save system can drive the vehicle stably at ―N‖ or ―1‖) during the driving, then fuel because it is not necessary for you certain approximate speed above 45 the last saved speed will be cleared and to refuel for acceleration) km/h. the cruise control system will by fully · Do not carry unneeded weight in your vehicle. · Do not rest your foot on the brake pedal, this causes unnecessary wear, even damage the brakes and causes greater fuel consumption. !Note: It‘s not allowed to use the turned off. cruise control system in heavy traffic The operation of slide switch A and regions and under adverse driving button switch B on the handle by conditions (such as driving on smooth means of the turn signal and the roads, the vehicle skid condition or fast alternating signal can operate the rolling condition).During the working cruise control system. - 55 - Starting up and Operating Button switch B Button switch A Also, driver can increase the vehicle Deceleration Setup speed by stepping down the accelerator pedal as driver would normally. After the accelerator pedal is released, the cruise control system will control the It can change the speed setting by pressing the button switch B. vehicle to drive stably at the preset speed. Speed Setup If the period when the vehicle speed is above the preset speed more than If the vehicle has reached the desired 10km/h exceeded 5 min, then the speed, press the slide switch once originally preset speed will fail and the towards ―O/I‖ direction. At that time, cruise speed must be re-set. "-‖ direction will decrease the cruise Notice: speed by 1.5 km/h. the cruise indicator light in the instrument cluster will flash and at the same time press ―+‖ or ―-― once on If the saved speed is not high enough the switch B to enter into cruise system. compared Then the driver may remove the foot conditions, then the cruise speed from the accelerator pedal. should be re-set. with current - 56 - traffic Each press of button B towards If sustained for certain period, the cruise system will decrease the cruise speed by reducing the accelerator opening automatically. After the button B is released, the cruise speed setting will be saved. Starting up and Operating If the button B is released, the Temporary Turn-Off and memory will be cleared if the cruise speed is lower than 45 km/h. It can direction and then the vehicle will drive at constant speed in accordance Resumption re-set the vehicle speed by means of slide switch A only when the vehicle speed is increased to above 45 km/h. the slide switch A towards the ―RES‖ with the preset vehicle speed. It can temporarily turn off the cruise control system by means of stepping Turn Off down the brake pedal or pushing the Acceleration Setup slide switch towards ―O/I‖ direction When the vehicle is under cruise status, (not to limit position). After the push the slide switch towards ―O/I‖ Each press of button B towards brake pedal or slide switch is released, direction (to limit position) to fully "+‖ direction will increase the cruise if the vehicle speed is above 45 km/h, exit the cruise control; or turn off the speed by 1.5 km/h. If sustained for push the slide switch A towards the ignition switch while the vehicle is still certain period, the cruise system will ―RES‖ direction for the driving at to fully turn off the cruise control. increase the cruise speed by increasing constant speed in accordance with the the accelerator opening automatically. preset vehicle speed. If the vehicle After the button B is released, the speed is lower than 45 km/h, step the cruise speed setting will be saved. accelerator pedal to increase the vehicle speed to 45 km/h before push - 57 - Instruments and Controls Chapter 5 Instruments and Controls - 58 - Instruments and Controls Head light switch Turn Combination meter signal switch Wiper switch Front fog switch Hazard warning light switch Lighting regulation Rear switch switch - 59 - fog lamp Instruments and Controls please have it checked by your Chery Authorized Service Station. If some Warning lights system warning light is still on or flickering Warning system is used to see if there is a problem serious enough to cause damage or injury; it is used for you to know the vehicle‘s working state. after the engine is started, please have the corresponding system checked by your Chery Authorized Service Station as soon as possible. Corresponding warning light will be on or flickering to indicate a Speedometer Odometer malfunction somewhere in the parts monitored by the warning light system. Some of the warning lights will be on shortly when the ignition switch is turned to the ―ON‖ position, to carry out system self-checking, then the Speedometer shows driving speed of The upper counter of the odometer the records the total driving mileage; the vehicle. You should drive according to the regulations on new lower vehicles in break-in period. (Unit: mileage. And the last digit indicates km/h) the unit is 100 meters (tenth of one one kilometer). lights will go off. If certain warning light that should be working is not on, - 60 - records short-distance Instruments and Controls Engine coolant temperature gauge The gauge indicates the engine coolant as soon as possible. ignition is not on. After filling the fuel !Notice: When the needle gets into the red zone, it shows that the engine maybe successive hot. You should pull your vehicle up in order to cool the engine, and then have coolant level checked immediately. tank, the fuel gauge reading will get temperature when the ignition switch into the new level slowly, when the ignition switch is on. The needle would not remain at the same point when braking, accelerating or steering, which is caused by fuel vibration in is on ―2‖ position. fuel tank. The needle should within the normal H:Hot range while driving normally. The C:Cold · Capacity of fuel tank: 55 liters needle maybe drift off the normal range if the outside temperature is very high and engine is loaded heavily. In spite of this, you can still drive normally if the coolant warning light is F:Full Fuel gauge E: Empty not on. But you must turn off the engine if the coolant warning light is The gauge indicates the level of the on, and have cooling system checked remaining fuel in the tank. The gauge will not show fuel level when the - 61 - Instruments and Controls Fuel warning light Door Open Warning Light Engine malfunction indicator light This light remains on until all the doors are completely closed. Please This light comes on when the fuel in the tank becomes nearly empty. It will check if all the doors are closed properly once the light comes on. come on if the remaining fuel is no more than 10 liters in the tank. When this happens, the fuel tank needs to be refilled as soon as possible. !Notice: If the fuel approaches empty, catalytic converter and fuel system will not work properly; therefore, fill the fuel tank as soon as possible when the fuel warning light comes on. The light will come on when the ignition switch is turned on, and the light will go off after seconds. If the light comes on, it indicates a malfunction somewhere in the engine. When this happens, you can still drive for a short time, because the electric injection - 62 - system switches to the Instruments and Controls emergency working procedure. if the oil level is normal. Nevertheless, you should contact with !Notice Chery Authorized Service Station for If oil pressure warning light remains on, troubleshooting immediately. it indicates malfunction. You should Engine Malfunction Indicator Light check it to see whether or not it is lack of may comes on briefly and then goes oil. Please refuel if necessary; if the oil is out, which is normal. normal, have the vehicle checked by the !Notice If Engine Malfunction Indicator Light stays on for a long time, it indicates a malfunction somewhere; you should contact your Chery Authorized Service Station for troubleshooting. nearest Chery Authorized Service Station. The light will come on with ignition on; it will go off after the engine being started. If the light flickers or stays on while you are driving, you should check the oil level immediately. Fill the recommended engine oil to normal oil level position promptly, if the level is lower than Low Oil Pressure Warning Light regulated minimum value. Please have the lubricating system checked by your nearest Chery Authorized Service Station, - 63 - Instruments and Controls Brake system warning lamp Release hand brake to the full before brake can not work normally, please driving. If the warning light is still on contact Chery Authorized Service after you fully release hand brake, it Station for assistance in time. indicates that brake fluid is in badly need to be added. At that time, you should: ·Stop the car immediately. ·Check brake fluid level. If necessary, add Chery recommended brake fluid, and let the level between ―MAX‖ and ―MIN‖ lines. · If you are sure that the brake works normally and braking system is safe Brake system warning light will be on if you pull hand brake with the ignition on; the light will be off if you release hand brake. !Notice Turn ignition on and pull hand brake. If the brake system warning light is not on, it indicates something is wrong with the system. You should check the electric bulb to see if it is of malfunction. If the bulb is normal, you should check the brake system. It indicates brake fluid level is low if the brake fluid warning light is always on, which will influence braking performance. You should decelerate gradually and stop the car to check the vehicle as follows: enough, have your vehicle checked by the nearest Chery Authorized Service Station. 1. Check the brake fluid tank. If the level is too low, add the appointed · If you find that brake fluid leaks and warning light is always on, or the - 64 - brake fluid. 2. Check the brake to see whether or Instruments and Controls not it is in good condition. 3. You should drive cautiously and then go off after seconds when the you should have the brake system ignition is on. checked by the nearest Chery slowly to Chery Authorized Service Authorized Service Station as soon as Station for inspection, if the brake is possible. normal. 4. Contact Chery Authorized Service Generator warning light Station as soon as possible, if the warning light is always on and the brake is abnormal, or brake fluid leaks. 5. Braking distance, braking force and If the light is not on with the ignition pedal travel will be enlarged, if the on, or it is always on, please contact brake fluid level is too low. Chery Authorized Service Station for assistance. ABS warning light If the light is on while driving, it warns that there is a problem somewhere in ABS warning light will come on and ABS system. But the brake system can still operates normally. In spite of this - 65 - It indicates that the battery is discharging, if the generator warning light is on. The warning light will be on with ignition on; the light should be off after the engine is started. If the light is on while driving, you should: ·Park the car on the roadside. · Check the generator belt to see whether or not it is loose or cracked. ·If the belt is normal, there may be something wrong somewhere in the charging system. you should have the system checked by the nearest Chery Instruments and Controls Authorized Service Station as soon as possible. Safety belt warning light !Notice The generator may be overheated if the generator belt is too loose, causing generator damage. So you should have the generator belt checked frequently. Safety airbag warning light It shows airbag system is normal if the light comes on and then goes off after seconds when the ignition is on. If the light is not on or the light keeps flickering or stays on long, there must be wrong with the airbag system. You should have your vehicle checked by Chery Authorized Service Station as When the ignition is in position ―2‖, soon as possible. safety belt warning light will be on, if the driver does not wear the seat belt Turn signal warning light/danger securely. warning light - 66 - Instruments and Controls but the green arrow is not on. Position 2: turn on both front fog light and rear fog light, or only turn on the High beam indicator light rear fog light. When the switch is in position 2, the For high beams, turn the headlamp on, indicator light will be on. the high beam indicator will come on After the ignition is turned on, front then. fog light can work only if the parking light is on. It can work simultaneously After the turn signal warning light or danger warning light switch has been turned on, if the indicator flickers, it indicates turn signal light or danger warning light works. If the flicker frequency is quite short, it indicates that there is a problem somewhere in the electric bulb of turn signal light. !Notice If the bulb is damaged, replace it as soon as possible in order to avoid accident. Please check the fuse and bulb to see whether or not they are burned out, if you send out turn signal, with the high-low beam headlights. The rear fog lamp can work simultaneously only with the front fog lamp. You are allowed to use the rear fog lamp, only if they are needed when the Front fog light/rear fog light switch visibility is very poor, for the rear fog light is very dazzling. (Visibility is Position 1: turn on front fog light. - 67 - within 50m) Instruments and Controls Turn signal lamp switch Turn signal can work only if the ignition is turned on. Move the switch upward, if you want to send out right turn signal. Move the switch downward, if you Headlight switch want to send out left turn signal. !Notice The battery will become flat, if you turn on the light after the engine is off. Low beam of headlight is not symmetrical so as to broaden your field of vision. In left-side driving countries, you should put a black cover on 15 degree division of headlight glass. After turning is performed, the switch The headlight will come on, only if the should return to its normal position, ignition is turned on. Move the lever and turn off the turn signal light. once; the fog light will be on. Move While changing the vehicle lane, move the lever twice; the headlight for high the switch partly (do not reach the beam will come on. That is to say, you bottom line); hold it firmly, the switch can adjust the high-low beams through will return to its normal position after the adjustable lever. you release it. - 68 - Instruments and Controls At that time, the light switch should be Be sure to comply with relevant traffic always in ― regulations, ‖position. while you use the above-mentioned turn signal light and illumination equipments. High beam switch After the headlight for high beams comes on, move the lever towards the Meeting lamp switch dashboard direction if you want to turn the headlight for high beam on. At the Move the operating lever towards the same time, headlight for high beam steering wheel. Let the high beam indicator light will be on. headlight come on, then release the Recover the lever to its original lever. After releasing, the level will position; the headlight for low beam return to its normal position. The high will come on. beam headlight is still on, if you have !Notice not released the lever yet. - 69 - Windshield wiper switch Instruments and Controls The wiper has 4 gears, from top to bottom; there are automatic updrift, automatic downshift, offdrift windshield is dry. It may scratch the glass and will result in wiper blade wear too early. and intervalshift. Windshield washer switch From left to right, interval control of wiper has 4 gears; the wiping time interval of every gear will be prolonged gradually. Turn ignition on and move the lever towards steering wheel direction, and fluid of the washer will squirt on the windshield. If you pull the lever for a very short time, fluid of washer will squirt on the windshield first, then the wiper will stop after running for several turns. If you hold the lever firmly, windshield wiper will continue !Notice Damaged wiper blade cannot work normally. It will block your vision. So you should replace it immediately. Do not operate the wipers if the to work until you release the lever. The wiper stops working automatically. - 70 - !Notice If there is no water, rear windshield will scratch surface of the glass, resulting in wiper blade wear too early, hindering front field of version. Please do not use windshield wiper, if the windshield is dry. Instruments and Controls Headlight beam adjustment switch Danger warning light switch Press the danger warning light switch on the dashboard, then you can turn Turn on the low beam headlight, adjust the danger warning light on, all the the light beam range to see clear the turn signal lights will come on front way. simultaneously. Press it again, these Night adjustment switch is used to lights will be off. No matter whether or adjust the light intensity of the not the ignition is on, the danger instrument panel. warning light can be operated. You Rear Window Defroster Switch should warn the other drivers while emergent braking or the traffic being blocked by means of using danger warning light. Of course, you should avoid parking on the traffic lane as possible as you can. - 71 - To defog or defrost the rear window, you should push the switch with ignition in the ―2‖ position. Instruments and Controls An indicator light will illuminate to indicate the defroster is operating. Push the switch once again to turn the defroster off. clear.When it snows,wipe snow off the the hour digital will flicker frequently. window first,then turn on the rear The digital will increase one hour window defroster, for the defroster is every time you depress the button. !Notice not designed for melting snow. After reset the hour, wait 5 seconds; the The thin heater wires is on the inside of the rear window, if it is damaged, it Minute digital will flicker automatically. The digital will increase Digital clock one minute every time you depress the will lose defroster function, therefore, button. be careful not to scratch or damage the After adjustment, wait several seconds; heater wires while cleaning the inside the digital display will not flicker any surface of rear window, do not use longer, it shows that time is set sharp tools or corrosive detergent. properly. Defroster will consume much more power, causing the battery to discharge, The digital clock indicates the time so do not use defroster while the with ignition on. While you want to vehicle is started or the engine does reset not work yet. Make sure you turn the corresponding button on the digital defroster off when the window is clock: Push the button 4 seconds, then the time, you - 72 - can push !Notice After battery is disconnected or fuse is replaced, time should be reset once again. 第六章 通风和空调系统 Chapter 6 Ventilation System and Air Conditioning System - 73 - Ventilation System and Air Conditioning System Front windshield defrosting vent Front vent window defrosting Side vent Central vent Foot vent Control panel - 74 - Ventilation System and Air Conditioning System - 75 - Ventilation System and Air Conditioning System on the air-blower. 1 Control panel Central vent 1. Airblower switch 2. Temperature control switch Air after adjustment can flow in the 3. Airflow distribution switch vehicle through two central vents; you 4. A/C switch can 5. Internal circulation switches through changing the angle of in-take change direction of airflow 2 grille. Ventilation and warm air Knurl wheel 1 turn upward- vent is Bypass vent open A/C system adjusts temperature by means of mixing cold and warm air; furthermore, temperature remains the former state at any speed. Airflow speed is decided by the air-blower. If necessary, you can turn Knurl wheel 1 turn downward- vent is Air after adjustment can flow in the closed vehicle through two bypass vents. Knurl wheel 2 Turn to left- airflow is towards left Knurl wheel 2 Turn to right- airflow is towards right - 76 - Ventilation System and Air Conditioning System side window through this vent; it can get rid of moisture on the glass. Temperature control switch You can adjust the temperature of out-flow air stepless through Front window Front wiper defroster /defogger defroster/defogger vent vent temperature control switch. When cold-producing system is working, turn switch to the left if you want to increase refrigeration; turn switch to the right if you want to decrease It can lead cold and warm air to front refrigeration. windscreen through this vent. It can To the right – The temperature is going get rid of moisture of windscreen. up. To the left – The temperature is dropping. It can lead cold and warm air to - 77 - Ventilation System and Air Conditioning System while driving, if you want to feel more comfortable. Airblower switch Airflow distribution switch is used to select direction of airflow. Airblower switch has airblower speed under control (There are 4 gears in all), Airflow distribution switch There are 4 positions on this switch: Panel turn the switch in ―0‖ position if you Bi-level want to turn off the airblower. You can Floor make use of air blower to adjust the Windshield windspeed. Turn on the airblower - 78 - Ventilation System and Air Conditioning System Internal circulation switch You can push this switch (the indicator is on), in order to avoid waste gas or !Notice: You‘d better use internal circulation mode in a short time, for successive using internal circulation mode will make inside vehicle sweltering and make the vehicle window atomizing. steam of outside world flowing into the vehicle in dusty environment, or if A/C switch you want to cool or heat the inside atmosphere promptly. You can press the ―A/C‖ button to turn on or turn off the air conditioning. Start the engine; turn the airblower !Notice: Turn A/C on will make the engine overheating while your vehicle is caught in traffic jam or your vehicle is climbing long slope. Turn A/C off if the engine is overheating, according to the water temperature gauge. switch to select suitable fan speed, and turn on the air conditioning. The Panel( ) indicator light will illuminate to show that the A/C has been turned on. To Air turn the air conditioning off, press the instrument panel vents. button again. A/C compressor will not work while the airblower is turned off. - 79 - flows out mainly from the Ventilation System and Air Conditioning System A/C system Ventilation, warm air and cold-producing components form a Bi-level( ) Windshield( ) Air flows out from both the floor vent Air flows out mainly from front and the instrument panel vents. windshield defroster vent and front window defogger vent. control system. This system provides you maximum comfortableness all the time during one year. (Under any cold weather condition and ambient temperature condition). Cold-producing unit of A/C system can cool the atmosphere; it can get rid of moisture and dust. Floor( The strongest refrigeration ) To cool off your Chery after it has Air flows out mainly from the floor been exposed in the sun. Make the vents. windows open for a few minutes, which vents the hot air. - 80 - Ventilation System and Air Conditioning System A/C switch: Press button of A/C Internal circulation button of ( switch: Temperature control switch: Turn the Press ) Airflow distribution switch: ( switch to requested position Airblower switch: at will ) Temperature control switch: Turn to the end counter clock-wise (blue) Airblower switch: Put on gear 4 The strongest heating A/C switch: Closed Internal circulation switch: Press the button on ( Airflow distribution switch: ( Normal refrigeration Normal refrigeration ) while Temperature control switch: Turn to long-distance driving or driving at high the end clock-wise (red) speed. Airblower switch: Put on gear 4 or( Normal heating A/C switch: Closed Airflow distribution switch: ( or( A/C switch: On Airflow distribution switch: ( ) !Notice: Do not use ―the strongest heating‖ for a long time, in order to avoid inside air becoming foul and window having fog. Turn off the internal circulation if the windows have fog or moisture. ―Compulsive heating‖ is only used for rapid heating, then turn to ―normal heating‖ as soon as possible. ) Adjust button between ( ) ( ) - 81 - ) ) and ) if there is steam on the Ventilation System and Air Conditioning System windshield glass. the Temperature control switch: Turn to between cold (blue) and warm (red). desired heating position A/C switch: ON/OFF Airblower switch: Put on gear 1 or Air distribution switch: ( gear 2 !Notice: It will improve the defog effect if you turn A/C on. The windshield could fog up because of the difference in air temperature inside and outside of the windshield, it will affect your vision; therefore, do not use ( ), if the weather is very damp. temperature control switch ) Temperature control switch: Turn the switch to the requested position Fan switch: at will Ventilation Outside air flows in through central vent and both sides vents. Defroster A/C switch: On Panel and floor A/C switch: OFF They are used just transitionally, when Air distribution switch: ( the outside temperature of vehicle is tune-up to other position accordingly. necessary, turn to heating position low and there is no sunshine. Warm air Temperature control switch: Turn the Airblower switch: Put on gear 2 or flows into the bottom zone of vehicle switch to the end gear 3 and cold and normal air flows into the Airblower switch: at will Airflow distribution switch: ( Temperature control switch: ) If upper space of vehicle, if you adjust - 82 - ) or Ventilation System and Air Conditioning System Operating tips In order to cool off your Chery after it has been exposed in the sun, you should open the window before turning on the air conditioning system. Refrigeration of cooling system may be not enough because of frequent parking and braking, while you drive in heavy traffic area. If you have not used the air conditioning system for one month or more than one month, you should turn on the air conditioning at least once a month run it for minutes with the engine idling to maintain the lubrication and sealability of the compressor and prolong the service life of the whole system. air conditioning consumes power of The compressor of air conditioning the does not work when the airblower is consumption. In order to minimize the turned off. running time of air conditioning Make sure the air intake grilles in front system, you should pay attention to the of the windshield are not blocked by following matters: ice, snow and leaves, which ensures 1. To cool off your Chery after it has heating and ventilation system work been exposed in the sun, you should normally. open the windows or doors for a short It is normal that there could be time, which vents the hot air and allow condensed water from the drainpipe of the air conditioning to cool the interior evaporator more quickly. when the ambient engine, causing greater fuel temperature and humidity are high. We 2. Do not turn on the air conditioning recommend that you should keep away system while driving with the window from the cold air. open. Economic Operation of air conditioning system While refrigerating, the compressor of - 83 - Audio System for Songs (Optional) Chapter 7 Audio System - 84 - Audio System VDO Audio System - 85 - Audio System VDO Audio Panel Function - 86 - Audio System 1. Preset key 1 RANDOM : CD random play/stop 2. Preset key 2 3. Preset key 3 REPEAT:CD repeat/stop 4.SOURCE:Sound source 5.SOUND short-time press:Sound effect mode SELECT : Long-time press:Audio setting mode 6.MUTE: 7. Volume 8. Power switch 13. Preset key 5 9. Display 14. Preset key 4 DISC+ : Select backward 10.BAND:Wave band SCAN : Radio frequency scan/CD programme scan ◄► : High and Low Terminal Searching (Play) Previous/Next Programme (CD box) Music searching system 11.AST:Automatic store 12. Preset key 6 DISC-:Select disc forward - 87 - disc 15.►►FF 16.◄◄REW 17.▲Eject the cassette tape Short-time press : Reverse cassette Long-time press:Eject the cassette tape 18. Cassette Audio System music you are listening to, such as jazz, Audio system On/off · Push POWER key to turn the audio system on or off. Volume · Use this knob adjust the volume. Warning: Make sure that you can still hear the traffic signals (Steam whistle or alarm whistle…) Mute · Press MUTE key if you want to make audio system mute or cancel mute. Sound effect · SOUND (sound effect) key can make you satisfied, no matter what kind of select sound effect mode you like. pop music, vocal, classical or rock music. —BASS (in BASS-TREB mode) · Short-time press SOUND key, if you —TREBLE (in BASS-TREB mode) want to select a kind of sound effect —BALANCE:Volume balance preset by the manufacturer. —FADER (front and rear horn control) —BASS-TREB:You can set bass or —LOUDNESS (off, bass, alto, treble, treble by yourself. in BASS-TREB mode) —JAZZ: · Turn the knob, if you want to adjust —VOCAL: the selected sound effect mode. The —POP: display screen will return to the —CLASSIC: previous mode after 5 seconds. —ROCK: Sound source Audio setting Press SOURCE key, if you want to · Press SOUND key at least 2 seconds, select the sound source: if you want to enter audio setting —Radio mode. —Cassette · Press SOUND key or SELECT key to —CD (if connected) - 88 - Audio System Radio Wave band Press BAND key, if you want to select the wave band you like. FM1→FM2→FM3→FMAST→FMAZ→MW(AM)1→MW(AM)2→MW (AM)AST→LW. !Notice plays the next station up or down the known the frequency of desired radio station band. station) Automatic seeking ·If you want to enter manual tune-up To seek a station, push the ―∧‖or ―∨‖ mode: see item ―TUN‖ of ―SETTING‖ side of ―TUNE/SEEK‖ until you hear for reference, set it as ―MAN‖. Let the a beep. radio in manual tuning mode, until you The flexibility of seeking (FM only) come to ―AUTO‖ mode. · Flexibility of seeking can be adjusted, see the item ―SRCH‖ of ―SETTING‖ To preset a station for reference. Store the radio station using manual You can cancel wave band of MW (AM)or LW out, if you do not like. You can cancel them out accordingly, if you do not want too much preset radio station of FM or MW(AW) Automatic seeking In the seek mode, the radio finds and preset key Frequency scan Preset keys (from 1 to 6) are used to The local radio station will play preset and tune in radio station. present wave band for 10 seconds. · Tune in the desired station ·Press SCAN key at least 2 seconds, if ·Push and hold down the button at you want to turn on/off the frequency least 2 seconds, for the station you scan features. want, this will set the station to the Manual tuning (if you have already preset key. - 89 - Audio System While setting FM radio station, again. REW/FF (Rewind/Fast forward) corresponding RDS information and —You can begin to listen to the radio ·Press ►►to fast forward a cassette AF mode (on/off) are set together. station set in preset key 1. tape: Listen to the preset station —Sometimes, perhaps, you cannot find exactly 6 stations. ·Press◄◄ to rewind a tape. · Push the button (from 1 to 6); you can listen to the preset station you want. Automatic station storing will come on again. If the tape rewind Cassette player You can store 6 strongest FM radio stations on wave band of FM AST or wave band of MW(AM)AST. The stations which are stored in wave band of FM AST or MW (AM) AST previously, will be covered, if you use automatic station storing performance. —If the radio was previously on, it to the end, it will play again. Music · You can turn on the cassette player by inserting a cassette tape. · If the cassette tape is already in the player, press SOURCE key to select the cassette as sound source. Let it go. Changing side searching system-previous/next Select how many songs you want to ignore, from the current programme. ·Press◄key for previous ·Press ►key for next —It is mute until you get desired · Push AST key to enter automatic ·Push ▲ key to change side. programme. It can only recognize storing, then —One side of the tape finishes, it will programme at least having 3 seconds —You hear a beep, and then mute. —After storing, you hear a beep once change to other side automatically. intervals. Eject the cassette - 90 - Audio System ·Press ▲key to eject a cassette. regularly (once or twice every ·Press ◄key or►key, if you want to month). select desired programmes. —It begins to play from the selected Caring for your cassette tapes CD (Compact Disc) Only use good-quality cassette with a total playing time 60 minutes or 90 minutes. Store cassettes in their cases, in order to keep dirt and dust away from them, in order to avoid cassettes being got stuck or tangled in the cassette player. Do not let the cassette being heated, being shined by the sun directly and being affected with damp. A dirty tape head should be programme. REW/FF CD player (CD box, if connected) · It has VDO CD box. —CDC 401 A or CDC1001 A. · Press SOURCE key, if you want to select CD (CD changer as the sound ·Press ◄key or►key to fast forward or rewind the disc. —It will recover to normal play if you release it. Programme scan This feature makes you scan every source: · Press DISC+or DISC-key to select programme several seconds. · Press SCAN key to activate or turn off desired CD. —The compact disc player will play the next track automatically. If there is empty disc position, it will skip over it. Previous/next programme cleaned by a cleaning tape the scan features. Random playing · Press and hold RANDOM key at least 2 seconds, in order to activate or turn off random playing. - 91 - Audio System Repeat feature hours mode) or ―AM 12:00‖ (12 hours You may change the original setting of · Press and hold RANDOM key at least mode) the player if you like. 2 seconds, in order to activate or turn —Hour digital begins to flicker. · Press SETUP key, if you want to enter off random playing. · Press SETUP key, if you want to SETUP Eject the disc adjust the hour. · Press ◄key ►key, if you want to · Press ▲key, if you want to eject a ·Press ►key to select minute digital select item you want to change compact disc. —Minute digital begins to flicker. · Press SETUP key, if you want to ·Press SETUP key, if you want to change the setting adjust the minute. · Press SETUP key at least 2 seconds, if · The clock begins to work from the you want to log off SETUP menu. adjusted time. The player will log off SETUP mode · Press SETUP key at least 2 seconds, if automatically, approximate 1 minute you want to log off SETUP menu. after your last operation. Clock setting · Press SETUP key at least 2 seconds, if you want to enter SETUP menu. ·Press ►key to ―TIME‖ item. · Press SETUP key, if you want to —If clock mode is activated, the select ―12H‖ or ―24H‖ display will show the time, after any ·Press ►key to select hour digital key operates 10 seconds setting. —Display shows that:―0000‖ (24 Setting - 92 - Audio System for Songs (Optional) ◄or► [Setting] RADIO [EUROPE,LATAM AMERICA,ASIA] Select the tuning according to European, Latin American, American and Asian standards. FM [6,12,18] Select quantity of preset station, in FMA mode. MW(AM) [ON,OFF] Select ‗OFF‘ if you want to turn MW (AM) off. MW(AM) [6。12] Select quantity of preset stations in MW(AM)mode. TUN [AUTO,MAN] Select automatic tuning or manual tuning. SRCH [LO,DX] Select ‗LO‘ if you want to search for frequency of only powerful station while automatically tuning. TAPE [-2,-1,0,+1,+2] Cassette player volume has something with the tuning. CDC [-2,-1,0,+1,+2] CD player volume has something with the tuning. BEEP [-2,-1,0,+1,+2] Select and confirm volume of ―beep‖. TIME [OFF,12H,24H] Select desired clock mode. Note: See the user‘s manual for reference. - 93 - Audio System Audio System for Songs (Optional) - 94 - Audio System for Songs (Optional) Audio panel function (optional) Cassette tape slot Display - 95 - Audio System for Songs (Optional) 1.Up and down( and ) key station)key DISC key 16.RPT(Repeat)key 9.( ) Exit key 17.SCN ( Beginning programme scan)key 2. Function key 10.REW(◄◄Rewind) 3. Knob 18. Preset key 11. PROG 4.A-M(Frequency mode) key 5.FNC(POWER key 19. Function key 2 12.FF(►►Fast Forward) 13.Play/ Pause (► / key ) 6.BAND(Tuning mode)key 14.DISP(Display selector) 7.Z-EHCR(Z-Enhancer) 8.PS/AS ( Preset station scan/Auto-storing 15.RDM(Random play) key - 96 - or Audio System for Songs (Optional) Performance Lock FF/REW Holographic liquid crystal display Permalloy double crack cassette head Monitor mode DIN case Tuning Electric quartz locks PLL tuning Audio frequency Electric frequency control AM/FM wave band-: one AM wave band, four FM wave bands. 20 FM radio station/5 AM radio station touching key memory Searching for tuning towards high frequency/low frequency (VOL/BASS/TREB/BAL/FADE) 4-track balance control Z-enhancer with 3-mode selector 160W ( 40W*4 ) maximum power Case DIN case with ISO supporting capacity Dimensions: 178mm height*50mm width*152mm thickness output Preset radio station scan (PS) Automatic radio station store (AS) FM reception system Caring for your cassette player Overall and tape Cassette player Night illumination Auto-reverse Digital quartz clock 1. Tighten the tape before you insert it, Active antennal starting trigger for loose one may hinder the operation. - 97 - Audio System for Songs (Optional) You should pay special attention while Operation method using C-90 or prerecording cassettes. using cassettes with a total playing time longer than C-120.The tape used in these cassettes is thin and could get stuck or tangled in the cassettes player. Basic operation !Notice: Be careful to tune-up the volume, for engine noise will damage your ears, if the volume becomes maximum, while power supply gets through. keep anything magnetic or hard away from the tape head. 4. Do not put oil in the mechanism. !Notice: The operation mode will not be selected if you fail to connect the parts. ―CASS‖ will appear if you fail to insert the cassette, ―DISC‖ will appear if you fail to insert CD in CD changer. 3. Turn knob 3 to increase the volume 3. Please clean the tape head by using a cleaning tape, at regular intervals, Player→CD Changer→radio 2. Please use cassettes with a total playing time of C-30 to C-90. Avoid Radio→cassette 1. Press FNC of key 5. !Notice: Push POWER key for 1 second or more, if you want to turn the power supply off. of sounds clockwise; turn it counter clockwise to decrease the volume of sounds. * Volume from 0 (MIN) to 33 (MAX). Frequency mode adjustment 5. Do not leave a cassette in the player if you are not listening to it, especially 2. Press FNC of key 5, if you want to if it is very hot or cold outside, for the select operation mode. Every time you cassette is very easy to be damaged. push, the mode is switched as follows: Press A-M of key 4, if you want to select the adjustment mode, every time you press, mode is switched as follows: - 98 - Audio System for Songs (Optional) BASS→TREB→BAL→FAD-previous 1. mode Press A-M of key 4, if you want strengthen sound of the left to select ―TREB‖. loudspeaker. 2. Turn knob 3 to increase the TREB BASS adjustment clockwise; Turn it counter clockwise to 1. Press A-M of key 4, if you want to decrease TREB. select ―BASS‖. clockwise, if you want to decrease the !Notice: Factory default setting is ―0‖. (Range of adjustment is from -6 to +6) 3. After adjustment, press A-M of key bass. 4 for several times, until it is in 2. Turn knob 3 clockwise, if you want to increase the bass; turn it counter !Notice: Factory default setting is ―0‖. (Range of adjustment is from L9 to R9) 2. After adjustment, press A-M of key 4 until it is in operational mode. FADE adjustment 1. ―FAD‖. functional mode !Notice: Factory default setting is ―0‖. (Range of adjustment is from -6 to +6) 3. After adjustment, press A-M of key 4 for several times, until it is in operational mode. 2. Turn knob 3 clockwise to BAL adjustment strengthen sound of front speaker; 1. Press A-M of key 4 to select turn it counter clockwise to ―BAL‖. strengthen sound of rear speaker. 2. Turn knob 3 clockwise to strength sound of the right loudspeaker; TREB adjustment Press A-M of key 4 to select turn it counter clockwise to - 99 - !Notice: Factory default setting is ―0‖. (Range of adjustment is from F9 to R9) Audio System for Songs (Optional) →―Z-ENHANCER OFF‖ 3. After adjustment, press A-M of key →―Z-ENHANCER 1‖…… 4 until it is in operational mode. Z-ENHANCER 1:Bass enhanced 2 : High Z-ENHANCER display mode. 1. time, press DISP of key 14 for at pitch Z-enhancer setting enhanced This device is equipped with 3 kinds Z-ENHANCER 3:Both enhanced tone effects stored in the memory, Z-ENHANCER OFF:No sound effect Press BAND of key 6, at the same least 2 seconds, clock editing mode is started. It will flicker for you to edit. 2. select whichever you like. Use up (hour) and down (minute) of key 1, if you want to move !Notice: Factory default setting is ―Z-EHCR OFF‖. Press BAND of key 6, at the same time, press DISP of key 14,if you want to enter clock display mode. Every time you press Z-EHCR of key Main display→Clock display→Main 7, tone effect changes according to the display following orders: ―Z-ENHANCER between hour and minute. Change display Clock setting 1‖→―Z-ENHANCER 2‖ Press BAND of key 6, at the same time, →―Z-ENHANCER 3‖ press DISP of key 14 to enter clock - 100 - 3. Press BAND of key 6, if you want to store clock setting. !Notice The clock setting will be cancelled out if you select other operation mode, before you complete the above-mentioned operation; the clock will turn to 1:00, if you take the battery out for check and repair, at this time, please set the clock once again. Audio System for Songs (Optional) Press stop key 9, and the cassette will Cassette player operation Radio reception be ejected. *The audio system will in radio mode Insert cassette 4 seconds after cassette being ejected. You can turn on the cassette player by inserting a cassette tape. It plays automatically. *Auto-reverse mechanism starts, if one side of cassette is over, it play the other side automatically. !Notice: Insert the cassette to the slot completely. In order to improve the reception effect, the tuning contains signal stimulous REW/FF Use FF of key 12 and REW key of 10 ►►:Fast forward a cassette tape. ◄◄:Rewind a cassette tape You can listen to the radio, during the process of REW/FF or searching mode, it automatically. begins to play Change the other side Press PROG of key 11, FF of key 12 and REW of key 10 simultaneously; Ejecting cassette noise reducer return circuit. Listen to radio 1.Press POWER of key 5 to select radio mode. The radio is turned on. FM1, FM2, FM3, FM4 or AM, if you Press FUNC key 5 to select cassette player stereophonic sound and multichannel 2.First BAND of key 6,then select operation. Listen to inserted cassette FM reception the cassette player will reverse to the other side of cassette automatically. - 101 - want to tune desired preset radio station, every time you press BAND key, wave band changes as follows: FM1→FM2→FM3→FM4→AM→ FM1 Audio System for Songs (Optional) 3. Use corresponding preset key 18, if you want to select desired radio selected. 3. station. 3. Press corresponding preset key 18 Use up or down key 1 to select for at least 2 seconds; store the desired high or low frequency. station in the memory. 1. Press BAND key 6, select wave Searching for tuning Preset radio station band of station you want to store. 1. Press BAND key 6 to select desired You can preset 25 radio stations in all, Press and hold AS key 8 for 2 wave band. wave band of FM1, FM2, FM3, FM4 seconds or more. Station with 2. Press up or down key 1 for or AM, each has 5. good reception will be stored in 5 searching towards high frequency or low frequency. Tuning will stop automatically if you find a station. Manual tuning 1. Press BAND key to select desired !Notice: The previous stored station memory will be canceled out if you preset station once again. Manual preset station 1. wave band. 2. Press VAND key 2 seconds or more ―MENU‖ will appear on the Press VAND key 6, select wave band of your desired station. 2. Use up or down key 1 to tune-up the station you desire to preset. display, manual tuning mode is - 102 - preset key 18 automatically (from 1 to 5). !Notice: If there are no 5 stations whose reception is good, previously stored stations on the remaining keys will not be canceled out. Preset scan (Preset station scan) Audio System for Songs (Optional) →Programme Press PS key 8,preset memory number Programme will flicker; stations will be tuned in at time→Programme number REW/FF PS key again to cancel the preset scan Stop (pause) :Fast forward mode out. Press play/pause of key 13 !Notice: Press play/pause of key 13 for * Press up/down of key 1 one second Auto-stored mode is set if you press recovery. or more to forwards or rewind the disc, number from the previous song. 7 seconds interval, accordingly. Press :Rewind PS key for 2 seconds or more. CD changer mode operation method it is 5 times faster than the common Selection of CD one, if you press it 1 seconds or more, Press disc key 8 of disc selection to it will be 30 times faster than the select CD you want to play. common one, if you press it 3 seconds or more. Audio mode Programme selection (songs) 1. Press POWER of key 5 to select CD Up/down key 1 Scan (Beginning of programme changer mode, CD player is turned on. *Press DISP of key 14, programme current it Push ―SCN‖ of key 17, ―SCN‖ will time will appear on the display. again; CD will begin to play appear on the display, the compact disc :Play from next song. scan) : Play from beginning of programme. - 103 - Press Audio System for Songs (Optional) player will play the next track for 10 seconds. This process will programme. process will be continued until you be continued until you push the key again push the button again to turn off the RPT (Repeat) repeat feature. Push ―RPT‖ of key 16, ―RPT‖ will Random to turn off the scan feature. *It will begin to play after the current progrmme. CD player scan Push ―SCN‖ of key 17 for at least 2 seconds, ―DISC‖ and ―SCN‖ will appear on the display. This process will be continued until you push the Press RDM key 15, ―RDM‖ will button again to turn off the repeat appear feature. programmes will be random played. on the display; all the It will exit from random mode, if you press RDM of key 15 once again. CD repeat appear on the display. The compact disc player will play 10 seconds the Push ―RPT‖ of key 16 for at least 2 previous of all the programmes. This seconds, ―DISC‖ and ―RPT‖ will process will be continued until you push the key again to turn off the scan feature. appear on the display, the repeat feature will automatically replay the current compact disc track. This * It will begin to play after the current - 104 - Specifications FM tuning Frequency 107.9MHz range: 87.9MHz to Audio System for Songs (Optional) Actual flexibility: 11dBf 8kHz(0+2/-7 dB) 50dB non-noise flexibility: 17dBf Power amplifier Alternation selection: 70dB Maximum Stereophonic sound separation power output: *50mm*152mm 160W (40W*4 way) (400Hz): 25dB Preset amplifier AM tuning Bass control (100Hz: Frequency range: 531 kHz to 1,602 Treble control (10 kHz): !Notice This regulation is up to the EIA standard, we will not inform you separately, if the design and regulation are changed because of updating the products. 6 dB Basic 6 dB operation of kHz Actual flexibility: 25uV changer for 6 CD Overall Power voltage: 14.4Vdirect current Cassette player (from 10.8Vto 15.6V is permitted) Trembling degree (WRMS):0. 4% Power consumption: less than 10 A 1.1 Open the door upward. Signal way separation degree (1 kHz): Loudspeaker resistance:4 35dB Signal-to-noise ratio: 120us (common): 10.8V 40 dB weight:1.3Kg Frequency response 125Hz(0 3dB) 1. Take the box out to Dimensions 15.6V : is permitted ) 178mm - 105 - ( from width record Audio System for Songs (Optional) Do not touch the signal side with your finger, while taking CD out. Seat 1.2 Eject the CD from the box. 2.2 Put CD in the slot with label side Eject disk Door Operating guide CD box 2. Insert CD 2.1Buckle the releasing handle with finger, and pull the disc seat out. 1. up. For safety, insert a cassette tape or compact disc into the slot, after 2.3 Push the seat in until it is ok. the vehicle parks securely. In !Notice: If you make too strenuous efforts, CD seat may get out of the box. At this time, please press the delivery staff to make it ok. You should put even strength, and two edges of seat should match the box. order to avoid accident, vehicle inside volume should not exceed vehicle outside sound. 2. Clean the vehicle bodies with a soft, lint-free cloth. Do not use sand paper, benzene, diluent or 3. Take CD out Pull the seat out, and take CD out alcohol. You can dampen the cloth with water, if the body is very dirty. And wipe it gently. !Notice - 106 - Audio System for Songs (Optional) 3. The slot is very important for the wires while audio system is working, player. The parts will be damaged for it will damage the parts. if there is so much dirt in. So, you 5. Keep direct sunlight, heater or other should be sure not to keep the heating source away from the player. player door open for a long time. When inside vehicle is cold, if moisture will get into your CD player. Your compact disc player cannot work normally. (moisture) Wipe the CD with a clean and soft cloth if moisture gets in. It will dry naturally after one hour, then the player can work normally again. Use of CD 1. Specifications you turn on the player soon after you turn on the heater, the Weight: 1.65Kg If inside vehicle is very cold, do not use CD player soon after you turn the heater on, for the moisture will Sample frequency: 44.1 kHz get into your compact disc or optical Frequency response: 5Hz - 20kHz parts of CD player, causing CD player ( cannot work normally. Please wipe the 1dB) Signal-to-noise ratio: 105dB(1kHz) moisture off with soft and clean cloth, IHE.A if there is moisture on CD surface. Trembling rate: less than minimum Stop it for one hour, and wait until it volume travel dries, then CD player can work Power supply: DC14.4V(10.8-15.6V) normally. negative(-)connecting ground Power consumption: less than 1A 4. Be sure not to pull the cable and - 107 - 2. Bumpy roads may make your compact disc player skip. Audio System for Songs (Optional) !Notice Caring for your compact disc Do not play any other discs, for this player is designed only for CD with They may be pressed inside the player and discs disc mark. 1. Handle compact discs carefully, especially when you are inserting them. Hold them on the edge and do not bend them. Avoid getting fingerprints on them, particularly on the shiny side. 2. Wipe dirt and fingerprint off CD with a soft, lint-free cloth, wipe along middle of CD to the edge straightly. 3. A new disc may have rough edges. Remove the rough edges by pressing the side of a ball-point pen, for this kind disc cannot be used or it will skip over while playing. or CD with stabilization apparatus. 1. Do not put label on the CD surface; do not make marks with pencil or pen on the CD surface. 2. Do not clean a CD with any solvent, such as detergent, anti-static electricity sprayer or diluent. 3. Do not use CD with rough edges, deformation and being curled. It will cause malfunction or damaging to the player. 4. Keep CD away from direct sunshine or heating source. !Notice Do not use the protective paper of CD - 108 - mechanism and damage the CD player. Audio System for Songs (Optional) Error display In order to protect the system, this player has self-check function. If there is malfunction, it will warn you by means of various error display. Please correct it accordingly to fix the breakdown. Error display Troubleshooting It indicates that there is a malfunction of mechanism of mainframe or CD changer (such as, you cannot Er2 change discs or discs cannot pop out.) →Check the mainframe and CD changer. It indicates that the adapter head cannot pick up signals, for the disc is scratched or there is something Er3 wrong with the mainframe or CD player. →Check the disc. Er6 It indicates TOC of CD cannot be read, such as: The selected disc is inserted reversely. - 109 - Audio System for Songs (Optional) Trouble-shooting Phenomenon Cause Power supply The fuse is blown out. Troubleshooting Replace the burnt fuse; use a new one of same amperage. malfunction (or there is no There is something wrong with the wiring. sound) Tone quality is poor. Magnetic head is dirty. Check the connections of the wires. Clean the magnetic head with cleaning tape. Turn off power supply of this player; disconnect all wires There is no sound There is connecting which connect the active antenna; put the power supply while ground short circuit of the through, then connect all wires to the active antenna one by active antenna. one. If there is still no sound, please check the last wire you player. operating the connected. - 110 - Audio System for Songs (Optional) Phenomenon No power supply Cause Troubleshooting There is something wrong with the wiring. There is something wrong with the disc box inserting Please check the wiring. Insert it correctly. Disc box cannot method. be inserted. Disc box has already been inserted in the player. Let it exit, and insert another one. Deformation of disc box Please buy a new CAA-397 disc box. ―NO DISC‖ appears while searching programmes Noise, skip See ―CD inserting‖ for reference. Insert disc The disc is inserted reversely. correctly once again. There is moisture or dirt on the disc. Wipe moisture or dirt off. CD is too dirty. Clean the disc. Compare with other discs. If it is damaged, Deformation and severe damage of CD abandon it. Disc box exits after being See ―CD inserting‖ for reference. Insert the seat Failure to insert disc box to the seat. correctly. pushed in. - 111 - Maintenance and Upkeep Chapter 8 Maintenance and Upkeep - 112 - Maintenance and Upkeep Engine compartment - 113 - Maintenance and Upkeep 1.Power steering liquid bank 2. Front bin relay box 1 3. Front bin relay box 2 4. Expansion tank 5.Washer fluid reservoir 6. Oil dip-stick 7. Oiling port cover 8. Fuse box 9. Air filter 10. Battery Maintaining & protective Always use solid supports for safety, if it is necessary for you to be under the vehicle. In addition, measures somebody should be with you for When you perform maintenance by yourself, utmost care should be taken to prevent unnecessary personal injury or vehicle damage. Here are a few precautions that you should be especially careful to assistance, in order to avoid any contingency. ▪Do not allow smoke flame or anything may be cause sparks around the battery and fuel, in order to avoid any accident. ▪While connecting battery cable, pay observe: ▪If the engine is successive hot, turn off the engine immediately, so as to make it cool, otherwise it is possible to damage the engine. ▪Do not get under your vehicle with just the body jack supporting it. special attention to the poles. Do not connect positive cable to negative cable column or negative cable to positive cable column. Generally speaking, positive and negative poles are marked with ―+‖ (positive) or ―-‖ (negative) - 114 - Maintenance and Upkeep distinctively. accident taking place, unless it is ▪ Be sure to maintain ignition cables, necessary for the ignition to be on. high-pressure cables and high load When the engine is running, keep vehicle cables, otherwise it is easy hands, to have possibility of fire. ribbon-like from the moving fan clothing and anything ▪ If you want to check underneath of and engine driving belts while you engine hood while the engine is are working under the engine hood. running, park the vehicle on level For these things may be wrapped road surface; put transmission in moving parts to hurt you or lever in neutral gear position, and damage parking brake the vehicle. Failure watch, bracelet and ring. the vehicle. Remove to do so will lead to unexpected accident for vehicle unexpectedly furthermore, pull out the key before you work under the engine hood, in order to avoid unexpected !Notice: Running engine will cause injury, scald or electrical shock. Be careful not to touch the hot parts, such as exhaust manifold. Checking list for the driver Before driving, you should carry out safety maintenance and careful checks on reliability of vehicle Safety attention moves. ▪ Be sure that the ignition is off, it may be running suddenly. Be careful not to touch the running parts with the ignition on. operation, recommended checkings are introduced as follows: Cooling fan may be running at all Exterior times. Be careful in order to avoid ▪ Tire pressure and state (cold tire personal injury while checking it. Cooling fan is controlled by ECU, so only). - 115 - Maintenance and Upkeep ▪Wheel nuts‘ degree of tightness ▪ Check the instrument or warning Engine compartment ▪ Sensitivity of vehicle operation light of the indicator. ▪ Check the engine oil level. ▪Check to see whether or not there is ▪ Check the fuel gauge, for ▪ Check the engine coolant level. oil, coolant or fuel leaks. confirmation of the amount of fuel in ▪ Check the battery. the fuel tank. ▪ Check the windshield wiper fluid Interior ▪ Check the position of the rearview level. ▪ Check to see if the steering system mirror. ▪ Check brake fluid level. works normally or not; check to see ▪ Check the door lock system. ▪ Check steering pump oil level. if there is some difficulty in operating ▪ Check self stroke of clutch pedal, ▪ Check oil level of the clutch servo the steering wheel. (Steering wheel check the clutch pedal to see if it is in unit feels much more heavier while the good condition. engine is turned off than the engine is ▪ Check self stroke of brake pedal, started.) check the brake pedal to see if it is in ▪ Check the stroke of parking brake good condition. (You should step on lever and reliability of parking brake. the pedal much heavier while braking ▪Check horn, windshield wiper and than starting the engine.) It is a good idea to keep the engine turn signal to see if they are in good ▪ Check the safety belt for the driver oil level in proper range in order to condition. to see, if it is in good condition. ensure there are enough lubricating - 116 - You should check the engine oil level by the following steps Maintenance and Upkeep oil for your vehicle engine. A certain amount of oil is consumed while the engine is running; therefore you You should also check the cleaness of should check the engine oil level at oil on the dipstick; replace oil if the regular intervals. The vehicle should cleaness degree is not up to the be on a level ground. After turning standard. off the engine, and wait a few If the oil level is blow ―MIN‖ level minutes for the oil to drain back into line, add engine oil in order to make the oil pan. Pull out the dipstick and the oil level between ―MIN‖ and Please use oil of same specifications, wipe it clean with a cloth, then ―MAX‖. while adding the oil. reinsert the dipstick and push it in as The oil level should not above far as it will go. ―MAX‖ level line; otherwise it may Pull the dipstick out once more and be cause malfunctions such as oil check it to see if the oil level is being consumed too much; spark between ―MIN‖ (minimum) and plug accumulates carbon; and cooling ―MAX‖ (maximum) level lines of the effect is not good (engine oil is dipstick. foaming) and engine power is not good. - 117 - Special attention: If the oil warning light is on, but you still let the engine running, as a result, the engine is damaged. This is not covered by our quality guarantee. Maintenance and Upkeep Replacement of engine oil and maintenance). Maintenance Capacity intervals filter Filter elements should be replaced, Replace it too, at the same time. every 5,000 Replace engine oil according to time km or 6 and mileage intervals, for engine oil months, every changes along with the running of 3,000 km or 3 engine. It will go bad gradually and months in lose lubricating features. harsh 1.6DOHC-EE479: 3.75L TRITEC1.6L477: 4L conditions. Under special road conditions, such The adverse circumstances include: as frequent cold starting, on obvious ·Outer temperature is always below urban traffic condition and sudden the freezing point. stop and drive by turns, engine oil ·Continue to be idling and/or and filter should be replaced at much frequent low-speed running (stop and shorter intervals (comparing with drive by turns). recommended · Drive in dusty area. time schedule of - 118 - Maintenance and Upkeep Coolant level When the engine is cold, the coolant level is satisfactory if it is between the ―MAX‖ and ―MIN‖ lines on the reservoir. The coolant level in the reservoir will vary with engine ―MAX‖ and ―MIN‖ lines. !Notice Boiling coolant and vapor will spout out under pressure, causing severe injury. To prevent burning yourself, do not remove the coolant reservoir cap when the engine and water tank are hot. The engine coolant maybe burns your skin and eyes, please take precautions to keep the coolant away from your skin and eyes. Always use the same type of coolant as already in the cooling system. To mix with soft water, do not mix too much. Please contact your nearest Chery Authorized Service Station for assistance, if you want frequent refilling. Please check the cooling system. Please use the recommended anti-freezing agent and coolant by Chery. Engine overheating If your engine coolant temperature gauge indicates overheating or you suspect that the engine has probably overheated, please stop the car and have a check. Turn off the air conditioning to let the engine idling for several minutes. Check the cooling fan to see whether or not it is operating. If it is not, turn ignition off, and contact your Chery Authorized Service Station for assistance as soon as possible. If the cooling fan is operating, and steam is temperature. If the level is below the not boiling out of the engine ―MIN‖ line, add coolant between the compartment, please open the engine - 119 - Maintenance and Upkeep hood to let the engine idling until it is cooled. If the electric cooling fan is operating, but the temperature keeps high, you should stop the engine to make it cool. Then check the coolant level. If the level is low, look for obvious coolant no steam, keep all people escape from the vehicle, turn the engine off. When there is no steam, you can open the engine hood. ―MAX‖ and ―MIN‖ lines of the Special attention: Do not attempt to remove the radiator cap when the engine and radiator are hot. Serious injury could result from scalding hot fluid and steam blown out under pressure. indicates brake system leak or leaks from the radiator hoses, water tank hoses, water tank, and water Brake fluid pumps and under the vehicles. If the engine is leaking, stop the engine immediately; contact the nearest Chery Authorized Service Station for consultation as soon as possible. Brake fluid is hygroscopic, the presence of moisture in the brake fluid will do harm to hydraulic brake system. Therefore, the brake fluid should be changed according to this !Notice To help avoid personal injury, keep the engine hood closed until there is manual‘s instruction. Fluid level should be between - 120 - reservoir. If the level is low, it probably consumption; you had better have it checked by the nearest repair shop. Maintenance and Upkeep Maintenance intervals Capacity clean water. If you still feel pain, Replace brake fluid every please go to a doctor for help. Have 50000 km or 24 months. brake But in harsh condition, 0.45L fluid changed by Chery Authorized Service Station or repair replace it every 30000 shop. Thoroughly clean the cap km or 12 months. surroundings before you open it, for brake system maybe polluted, and as Make it clean before filling brake a result, the performance is not good. fluid. Remove the cap, fill brake fluid You should use Chery recommended until it reaches ―MAX‖ line of the brake fluid, for brake fluid of any reservoir, other brands will damage the brake and then screw the system. !Notice Special attention: Brake fluid can damage paint surface. If fluid splashes on the paint surface, please flush the paint surface with clean water. eyes, so keep your hands and eyes away from the brake fluid. If fluid You can check the gearbox oil level, only if the engine is off, the car is parking on the horizontal road surface and the gearbox is cold enough for you to touch its outer shell. Remove the oil filler plug; check the oil level; add oil in small quantities at a time. If the level is too low, add the reservoir cap backward tightly. Brake fluid can harm your hands and Gearbox oil oil when the level reaches within the gets in your eye, flush your eyes with - 121 - correct range, and install the filler plug hand-tight. Maintenance and Upkeep !Notice After driving, oil temperature of gearbox may be very high. Please let the gearbox oil and oil filler plug cool before you check the oil level. In order to protect the environment, please deposit the waste oil and container properly to the appointed place. You have no choice but use regulated oil of the schedule. Check the Power steering fluid level gearbox shell to see whether or not it leaks or being damaged, after you install the oil filler plug. Maintenance intervals When the engine is cold, power steering Capacity fluid level should be between ―MAX‖ and ―MIN‖ lines of Air filter the reservoir. If the level is below Replace it after the first 5,000km, then replace it every 3,000km. 1.8L ―MIN‖ line, please add the fluid in Air filter should be cleaned or time. replaced in time, if the vehicle is always in the environment with too much dust or dirt. - 122 - Maintenance and Upkeep !Notice If the air filter is not replaced for a long time, engine performance will not be in a good condition, some components may be damaged, and even the engine will be severely damaged. Maintenance intervals Replace it every 15000 km or half a year. Clean it every 5000 km or 3 months had better check the sparking plug, at the spark plug with spark plug regular intervals and remove the spanner. carbon. You can use sparking plug ·Install the new plug or cleaned one brush from in the engine and run it in by hand, sparking plug electrodes, and then turn it clockwise several turns. If it is use a little file to remove carbon on not ok, take it out, have another try, the insulator layer carefully. Blow it so as to ensure spark plug thread is clean with compressed air; upper up to the standard of cylinder head insulator layer should be cleaned, thread. too. · Tighten the spark plug with spanner; to remove carbon Maintenance interval 15000km or 18 months do not let it too tight. Make sure spark plug cable is installed in correct order. Clip the Spark plug Replacement of sparking plug ·Wipe any dirt and grease from the Carbon, which forms on the sparking plug, will weaken the combustion capacity of the sparking plug, so you spark plug box aligned with the seat tightly. cylinder head plug seats. · Loosen the spark plug through pulling the spark plug box. Remove - 123 - !Notice Maintenance and Upkeep The engine will work unsteadily and using high-tension line. 5. Do not use tension of drive belt can ensure the components wll even be damaged spark plugs of any other else brands. normal if the spark plugs are installed not 6. Do not pollute the spark plug hole. conditioning and other performance. properly or spark plugs of any other 7. Pay attention to the safety, while Please replace the drive belt as soon else brands are installed. In order to the engine is hot, the spark plugs are as possible, if it is worn, cracked or avoid engine and other components hot, but you want to remove the inflated. being damaged, the following tips plugs. In order to check tension of drive belt, should be observed: 1. Tighten the spark plugs according to standard working of engine, air press the middle of pulley properly with your thumb to see whether or Drive belt torque, do not let it too tight, it will not the displacement of belt is about damage the cylinder head thread if 10mm. If the belt is too loose, please you let it too tight. 2. While have it adjusted and repaired by the removing or tightening the spark nearest Chery Authorized Service plugs, make the sockets aligned with Station. the spark plugs rightly. 3. Install the plugs in the engine and run them by hand at first. 4. Loosen the plugs Correct installation through pulling them, instead of - 124 - and suitable !Notice Be sure not to start the engine while checking the belt, otherwise it will cause moving parts squeezed, separated or twisted together. It may Maintenance and Upkeep cause personal injury, too. wiper blade in time, for outer dirt of Wind shield wiper them will obstruct the view. If the Windshield washer fluid wiper blade cannot work normally, It will broaden your field of version Please use appointed windshield washer fluid. !Notice Washing system will do harm to the paint, therefore: 1.Do not use anti-freezing fluid within the windshield washer. Do not mix water with the detergent, water may be cause the solution being frozen, damaging the other components of the washing system.3. The washing system may be damaged, if you do not use appointed detergent. So please use Chery recommended detergent. and improve the driving safety greatly, if you use windshield wiper correctly. Please check the wiper blade at regular intervals. Replace the hardening, crisp or dirty blade if necessary. blade with light cleanser first, then wash them with clean water thoroughly. You had better use good washer. If necessary, replace the wiper blade. While replacing the blade, press the blade holder, pull the Because there is no ways to wipe the silicone please wash the window and wiper trace off the glass wiper blade from the wiper arm, and then push the new one in directly. successfully, do not use polishing compound on your vehicle windscreen; polishing compound will produce strip trace, which influences your field of version. You should clean the window or - 125 - !Notice Solvent, fuel and paint diluent will all damage the wiper blade, so you should keep these matters away from the wiper blade. Maintenance and Upkeep Maintenance of battery Different vehicle needs different battery. Your vehicle may be use maintenance free battery, as well as battery that need maintenance. So it is necessary for you to check and In order to maintain the battery pay attention flammable, therefore: 1. Keep the fire, · Install battery firmly and surely. spark and smoke away from the · Keep the top of the battery clean and battery. 2. Avoid spilling acid on any dry. part of vehicle body, paint surface · Keep connecting column and parts and your clothing. 3. In order to clean and tight. protect the environment, have the · If electrolyte leaks, please wash with waste battery disposed by Chery water and soda solution immediately. Authorized Service Station or place · If you do not use the vehicle the waste battery on an appointed and successively, the safe place. 4. Make the cable connecting column of battery, in connections in the right order, such as order to avoid battery discharging, corresponding you should charge the battery every 6 positive and negative ones; do not weeks. make mistakes. Failure to so will disconnect connections cause severe accident. maintain the battery. properly, following matters: to the !Notice Batteries contain sulfuric acid which is poisonous, corrosive - 126 - and of Maintenance and Upkeep driving on Brake pedal Clutch pedal Check the free movement of the Clutch pedal does not have free brake pedal. movement; if you feel it has, please Turn the engine off, step on the brake have it checked by Chery Authorized pedal for several times, so as to make Service Station or repair shop. the vacuum escape from the braking Maximum system. Press the brake pedal slightly travel by hand, until you can feel slight 165mm steep slope. If the frequency of ―click‖ you can hear ,is less than the regulated one, please resistance force. Measure by the nearest Chery Authorized Service Station in time, if the free movement of the brake pedal does not accord with your driving habit. repair shop. Travel There are 3-5 times of ―click‖ under 20 kg force. 300N Ternary catalytic converter Hand brake pedal. Please have it checked and adjusted Chery Authorized Service Station or Pedal force the movement distance of the brake have the hand brake adjusted by Leaded gasoline is harmful to the You can check the hand brake travel, catalytic converter and electrical by means of recording the frequency control system, so do not use leaded of ―click‖, from releasing position to gasoline. applying totally position. You should In the case of vehicle with catalytic apply hand converter, fuel filler port of fuel tank brake - 127 - firmly while Maintenance and Upkeep is too small for the leaded gasoline in good condition or any other Have all maintenance work done by filler gun to insert. abnormal phenomenon indicating Chery Authorized Service Station. ignition system malfunction occurs, All components of electrical control you should drive at low engine system, injecting system and ignition speed in a short time. system work normally, will reduce emission pollution and extend catalytic converter life. !Notice Do not use leaded gasoline, in order to avoid damaging the catalytic converter. The catalytic converter and vehicle may be damaged if you do not observe the following tips: You should avoid: · Frequently cold start the engine. while restarting (fuel injecting hour, in starting stage, is postponed) · The fuel tank becomes engine works abnormally after cold starting, engine power is not (abnormal fuel supply will result in ·Start the engine by means of towing (unburn gasoline will enter the catalytic converter) - 128 - The manufacturer‘s equipped tires fit in with needs of the chassis, so as to empty engine overheated) · If the engine can not start, the Wheels and tires · Working hour of engine is too long, ensure the maximum comfortableness and safety of driving. Using any other size or type of tires or wheels may cause serious accident. Contact your Chery Authorized Maintenance and Upkeep Service Station for consultation and every two weeks at least. And do not hot. After checking, you should be technical support, before you replace forget the spare! Check the tire sure to reinstall the tire inflation with tires and wheels or any other pressures before a long journey, too! valve caps tightly. type. The tire pressure should be checked Incorrect tire pressure may quicken using an accurate tire pressure gauge, tire wear, reduce fuel economy and when the tires are cold. make your vehicle less safe, easy and !Notice Using any other size or type of tires may seriously affect handling between the body and tires. So you should be sure not to use tires of different size in one vehicle. comfortable to drive. Tire pressure kpa (PSI) Condition Tire inflating Front Rear Low tire pressure results in tire Spare tire 200 220 350 Full load 210 260 350 safe while driving, also in order to extend tire life, it is necessary to keep the tire pressures at the proper level. You should check the tire pressure The pressure maybe fall blow the regulated and possibility of blowouts or leak from over heated Hidden wound of tire cannot be eliminated through adjusting the load In order to make you comfortable and loss tires, while driving at high speed. Empty load/Half interior minimum value; the pressure will not fall when the tire is - 129 - refilling pressures. Maintenance and Upkeep Tire condition It will cause tire hidden wound if you drive on the cliff border, you will find it later, and the tire has the possibility of leakage. You should be driving cautiously and slowly on uneven road surface (at a suitable angle if possible). Do not let the tires press concave and convex edge, while you stop the car. Check the tires regularly for damage such as impurities, leakage, cuts splits and lateral convex, tire damage can result in the possibility of blowouts. Check the rims to see whether or not they are damaged. If position will be shown through any damage or abnormal wear is longitudinal marks of the tires. found, For safety, we recommend you contact Authorized your Service Chery Station for replace the tires if the wear down tread consultation. longitudinal Abnormal wear is usually caused by approximate 1mm of indicator mark. incorrect tire pressure, failure to Chery recommends at least both of rotate wheel the front or rear tires be replaced at a tires, time as a set. When replacing the tire, tires, alignment, improper out-of-balance severe braking and harmful driving use habit. construction, the same type and tread, The tires on your Chery have built-in as originally installed. tread wear indicators to help you know when the tires need replacement. When the tread depth wears to a certain degree, the indicator will appear in two or more adjacent grooves, the indicator‘s - 130 - only the same size below and Maintenance and Upkeep Exchange of tires Working conditions of front and rear tires are different; conditions of their wears are different, too. It mainly depends on road surface condition !Notice Do not mix radial, bias belted or bias ply tires on your vehicle; do not use any other tires which are not appointed by Chery, because it will cause loss of vehicle control, it may hurt the vehicle if you use tires of different sizes. You should use only the same size and same type as originally installed by the manufacturer. Never use wear tires, second-hand tires or damaged tires on your Chery, for it is very dangerous. It will result in accident. and your driving habits. To equalize tire wear and help extend tire life, Chery recommends that you rotate your tires approximately every 5,000 K.m, at the same time, adjust tire pressure and check the wheel nuts to see whether or not they are tight enough. Arctic tires Arctic tires should be installed on all wheels. If you use snow tires, observe permissible maximum speed for your arctic tires and the legal speed limit, you must observe the manufacturer‘s recommended tire pressure. !Notice It may be disadvantageous for safety and flexibility of vehicle operation if - 131 - Maintenance and Upkeep you use snow tires. You should use standard tires of same size and same model. As long as the road surface condition permits, do not use snow tires. Install the chains on the front tires. Ignition system Don not use chains on the rear tires. Retighten chains after driving Electronic 0.5~1.0KM. ignition system has stronger energy than the conventional Snow chain Regulations regarding the use of tire chains vary according to location or type of road, so always check them before installing chains. When installing chains on your tires, carefully you should follow the instructions of the chain manufacturer. If wheel covers are used, they will be scratched by the chain band, so remove the covers before putting on !Notice It may be disadvantageous for vehicle handling if you use snow chain, so do not exceed 50km/h (30mph) or the chain manufacturer‘s recommended speed limit, whichever is lower. If you hear the chain touches the vehicle body or chassis, you should stop the car and retighten the chain as soon as possible. Drive carefully avoiding sharp turns, bumps and holes. You should avoid locked-wheel braking; or observe instructions of the manufacturer. Incorrect use of snow chain may adversely affect vehicle handling between chain and body. the chains. - 132 - ones; therefore, do not touch the dangerous ignition components. Central electronics box Maintenance and Upkeep Central electronics box is located in replace with a good one of same miscellany box rear part of the amperage. driver‘s instrument panel. 5.Electrify The circuit all has fuse for protection, we recommend you carry some spare fuses to make things convenient for replacement. Replacement of fuse 1.Turn the engine and corresponding 10A 20A 30A 15A 10A 10A equipment and check it. 15A 15A 20A 6.Install the miscellany box properly. 10A 30A 30A !Notice If the new fuse immediately blows out, contact your nearest Chery Authorized Service Station for assistance. Fuse is non-reusable, if blown, it cannot be used again, do not use the blown one for it will damage the electrical system. 15A 10A 10A 10A 20A 10A the corresponding side of miscellany box, using SST. 3.Check the suspected fuse to see if it Center electronics box fuse location diagram 15A 15A 10A 15A 20A 20A There are 3 relay and fuse boxes: one fuse box is located on the connecting place of positive boom and the is blown. 4.Pull the blown fuse straight out, compartment relay/Fuses box electric component off. 2.Remove the screws fixed on both Engine battery; the other two relay and fuse boxes are located on front fender of - 133 - Maintenance and Upkeep engine rear part. Fuse box 60A 60A 120 Total power supply ABS/ ECU Engine Starter - 134 - Maintenance and Upkeep Front relay box 1 Front relay box 2 Lamp relay A/C relay A11-3735035 A11-3735015 Left Left Left Right Right Right high position low high position beam lamp beam beam lamp 10 lamp lamp 10 A A 10 10 A A Fan Fan high-speed low-speed low relay relay lamp beam 100 10 lamp A Upshift 30A 10 A - 135 - 53 Downshift 30A Car Light Chapter 9 Car Light - 136 - Car Light Rear turning lamp/ brake lamp Side turning lamp high-level The third brakelamp lamp Combination headlamp Front fog lamp Vehicle plate lamp Reversing lamp/rear fog lamp - 137 - Car Light Combination headlight (containing low beam light, high beam light/driving light, and front turning lamp) 1 High beam light/driving light road lamp is in good condition), so as Turn on the high beam headlights if they are needed when driving at night, for you to keep abreast of road condition at long distance, or for you to meet another vehicle at short range, while the visibility is not good, (the light flashes shortly while you meet another one). 3 Front turn signal lamp ! Notice: You should observe corresponding traffic regulations. Driving light is used at dusk, daybreak or in environment whose visibility is not good. 3 2 1 2 Low beam light to ensure safety of driving. It is convenient for other drivers to know well your vehicle‘s information, while you make a detour or make a turn. !Notice: Please let the front turn signal lamp flash, while entering a crooked road and cross roads, 50-100 meters ahead, it is convenient for drivers behind you and pedestrian of either side, know driving direction of your Chery clearly, in order to avoid traffic accident. Front/rear fog lamp It is used to help you driving at night, for you to keep abreast of road Front fog lamp can provide you front condition at long range, (when city illumination, which possess a certain - 138 - Car Light of penetrability, while the visibility is not good (such as in bad fogs), it will provide guarantee for you and other Reversing lamp The third brake lamp people‘s personal safety. Rear lamp Rear brake lamp fog ! Notice: Please use fog lamp correctly, according to the traffic regulations. In order to avoid unnecessary traffic !Notice: Check brake light to see if there is any malfunction, before driving in order to ensure you and other people‘s personal safety. Repair or replace the damaged parts, in order to avoid unnecessary traffic accident. Brake lamp, the third brake lamp Reversing lamp /vehicle plate confusion, you can make use of rear fog lamp to remind the other drivers Brake lamp is used to remind other and pedestrian behind you of your drivers and pedestrian behind you to Chery‘s information. make clear the road ahead. lamp The third brake lamp is used for Reversing lamp reminds other drivers supplement. and pedestrian behind you, to know - 139 - Car Light your Chery‘s driving direction, in rear side know your driving direction. direction. order to avoid unnecessary traffic confusion. You‘d better get out of the vehicle to see road surface condition behind you while backing the vehicle, in order to avoid unnecessary collision or being caught in soft roadbed. Vehicle plate lamp provides other drivers and pedestrian with your Chery‘s information. Side turning lamp Rear turning lamp !Notice: Please use reversing lamp and vehicle plate lamp correctly, according to traffic regulations. Side turn signal lamp Rear turn signal lamp Let drivers and pedestrian of both your sides know Let drivers and pedestrian of your - 140 - your driving In Case of an Emergency Chapter 10 In Case of an Emergency - 141 - In Case of an Emergency Tools in the trunk and spare tire a rubber ribbon. Tools in the trunk include jack, wheel spanner, screwdriver, open very jack; 3 Be sure not to start the engine after lifting the vehicle, in case accident takes place; 4 Be sure to use suitable bracket to support the vehicle if you must work under the car. wrench (10×13mm) and metallic hook (used for disassemble wheel hood). Type of jack Maximum working load Tools in the trunk and spare tires are Type of grease Telescopic type 1200kg exception. Spare tire is fastened under the bottom panel through a bolt. Tools in the trunk are put in a fixed bracket which is fixed on the spare tire through Replacement of tires Please comply with the following tips Lithium in order to avoid unexpected accident while replacing tires: placed in spare tire carrier under the luggage trunk bottom panel without Replacement of wheel ! !Notice: 1 Be sure to make spare tire and tools in the trunk fixed properly, in order to avoid injury of occupants during emergency braking or accident taking place; 2 Jack provided for this vehicle to use is only applicable for this vehicle, be sure not to lift other vehicles or heavy things else with this - 142 - - Move cautiously off the road to a safe place well away from the traffic. - Park on a level place with firm ground. - Put the transmission in ―P‖ position. - Turn off ignition switch; pull out In Case of an Emergency ignition key. Procedures of replacement - Turn on your emergency flashers, jackscrew clockwise by hand, firmly set the parking brake, if until jack top touches the vehicle necessary, put into gear 1 or reverse gear. direction of the flat tire. Rotate bottom. Tighten Loosen - Put a cuneiform spacer or something can be used as obstacle to hold the wheel, on the rear or front direction of the wheel diagonally opposite the flat tire. - Set a warning triangular signpost, 10 - Pry off rim cap. - Loosen every wheel bolt for one circle with wheel spanner, but do M away from the vehicle. not remove the bolts yet, just - Have everyone get out of the vehicle unscrew them about one-half turn, on the side away from traffic, to a before raising the wheels. safe place. - Position the jack at the correct jack point as shown. Put jack vertically close to front or back - 143 - Insert the jack handle into the jack and turn it clockwise, so as to raise vehicle, until top of jack embedded in concave groove firmly and the wheels depart from the ground (about 3 CM). In Case of an Emergency !Notice: Do not raise the vehicle too hand. Reinstall the wheel ornament high - Rotate jack handle counter clockwise, If you fail to use the wheel bolts or so as to make the vehicle come back to bolts not being tightened properly, will the ground. lead to wheel too loose or being lost, Descend result in vehicle lose out of control. Tighten the wheel bolts according to Ascend ―diagonal line‖ mode ( 1-2-3-4 ) , - Use suitable wheel bolts. shown as the following illustration. - Make sure the right position of wheel bolts, and tighten the bolts As the jack touches the vehicle and 4 reliably. 1 - begins to lift, double check that it is Do not smear oil or lubricating grease on the wheel bolts. properly positioned in case of slippery. -Turn the wheel set bolts counter clockwise, so as to remove the bolts, !Notice: 2 3 The vehicle may be unstable, even has possibility of accident while using jack, and then remove the wheel. therefore: 1.you should put the jack on - Install the spare tires properly; right jacking point .2. Make the jack tighten the wheel bolts clockwise by - 144 - In Case of an Emergency vertical to the ground while installing place to replace the tires. you should pay attention to the the jack. 3. Never get beneath the !Warm hints: If you are not sure to following matters: vehicle when supported by a jack, do replace the tire safely, please contact not start or run the engine while your the nearest Chery Authorized Service vehicle is supported by a jack. 4. Have Station for assistance. the occupants get out of the vehicle on the side away from traffic, in a safe - or spark. - support the vehicle using jack on bevel or slippery surface. 7. You should vehicle for electrolyte of battery hold the diagonal wheel opposite to the flat tire. 8. Make sure parking brake is on, before supporting, put transmission on gear 1 or reverse gear if necessary. contain sulfuric acid, which will If the battery is flat, you can make use result in injury if you touch it of power of other vehicle‘s battery to directly. start the engine. position the jack on side which is the closest to the flat fire, at the same time; Avoid spilling battery acid on your eyes, skin, clothing or Jump starting the engine place. 5. Jack is only used for replacement of wheel. 6. Do not Do not make battery close to fire - which helps you to start the Any incorrect operation will result in engine is the same as voltage of battery explosion, causing personal your vehicle battery (12V). injury or property loss, furthermore, electrical system of vehicle will be - - 145 - Do not disconnect battery while it is low but not flat. damaged to some extent, and therefore 9. Keep away from the heavy traffic Make sure that voltage of battery Shut all unnecessary load of In Case of an Emergency - - - electrical appliance. but not flat. Vehicle engine which provide jump Don‘t touch the battery while · Connect one end of the second starting can be normally working jump starting. jumper cable to the negative (-) on during period of jump starting. Do not make two conducting booster battery. Start the vehicle whose battery is flat wires which help to start, short · Connect the other end of second within on e minute as possible as you connect. jumper cable to engine block of other can, lasting time shall be within 12 Pull parking brake, place gear bar vehicle or bolt connecting wire which seconds. You shall disconnect the to neutral gear. is supported by the engine. connection without delay after starting. Jump starting procedure: Do not connect the jumper cable to Connect one end of the first jumper negative connecting wire column of cable to the positive (Marked with ―+‖ flat battery. on outer shell of battery of connecting The recommended connecting point wire column which helps to start the shall be far away from the flat battery engine) as possible as you can. · Connect the other end of the first Make the jumper cable aligned in jumper cable to positive ―+‖ marking order to avoid touching the adjustable on outer shell of battery which is low components in engine room. - 146 - !Notice; Turn off all lights and accessories while jump starting the engine, in order to avoid other systems or components being damaged, do not start your vehicle by means of pushing and pulling, to do so, maybe damage ternary catalytic converter and other electrical components. In Case of an Emergency Towing vehicle If towing is necessary. We recommend you contact your nearest Chery Authorized Service Station or Professional Rescue Centre for assistance. It is necessary for you to follow appropriate lifting and towing procedures, in order to avoid damage to your vehicle. When towing with wheel lift type truck, you should: -Turn on the warning light of the two vehicles. - Put the ignition switch on ―I‖ position. - Put the gear bar on neutral gear position. · Release the parking brake. · The vehicle should be towed under the !Notice: Never tow from the rear with the front wheels on the ground, for this may cause serious damage to the transmission. Therefore you should adopt lifting front wheels to tow the vehicle. The vehicle can be towed by means of sling transportation equipment, use flat board or wheel as lifting auxiliary equipment. Open the hook cover. Towing hook cover - Buckle the cable tightly on the Emergency towing towing hook. While emergent towing, it is possible to use towing auxiliary equipment. There is a towing hook in your vehicle which is mounted on the bumper of front and rear part of vehicle. Front towing hook circumstances of driving wheel (front ground. wheel) depart from the While towing the vehicle with towing -Turn the warning lights of the two hook and cable: vehicles on. - 147 - In Case of an Emergency fixed on the towing hook tightly. Pull the towing cable to check if it is tight enough. 3. Use rear towing hook to tow other vehicles. -Put gear lever to neutral gear position, release hand brake. -Place ignition switch on ―II‖ position, so as to loosen lock of steering bearing, make brake lamp,horn and windshield Save window wiper normally working. -Only driver can be in the vehicle to yourself after being caught in spongy ground steer it and operate the brakes. - Shut window of vehicle being towed; turn on button of interior circulation mode, in order to avoid exhausted gas gets in. - Avoid sudden starting or bumping and vibration. !Notice: The vehicle may lose control while being towed. Therefore, if transmission, axles, steering or brakes are damaged, please do not tow the vehicle. At the same time, pay attention to the following matters: 1. Do not pull out ignition key for it will lock the steering system and make vehicle unable to move. 2. Make sure two ends of towing cable - 148 - When your vehicle is troublesome for it being caught in spongy pit, at this time, it is necessary for you to rock the vehicle in order to escape from the hazard, please shift gear 1 to reverse gear, and then shift reverse gear to gear 1repeatedly. At the same time, step on the accelerator gently. Do not make the engine idling, so as to avoid damaging other components, because of engine being overheated. You should ask for rescue if you fail to save yourself. In Case of an Emergency !Notice: The vehicle may be caught while driving on snow, sand or mud field. Under this circumstance, idling engine will damage the driving elements; therefore, do not drive your vehicle at high speed. - 149 - Technical Requirements and Data Chapter 11 Technical Requirements and Data (Data in common use, only for reference) - 150 - Technical Requirements and Data Oils for vehicle use: Engine oil Oil viscosity for this vehicle use is 10W-30 (not lower than grade SG); selected oil viscosity for vehicle use in winter is 5W-30 (not lower than grade SG). We recommend shell brand engine oil according to the actual condition in China at present. Don‘t confuse engine oil of different brands from different manufacturers together. Please select suitable engine oil according to recommended one and actual conditions as possible as you can. Failure to do so will result in engine being over worn or other more severe malfunction. Fuel You should select premium unleaded gasoline with a Research Octane Number of 93 or higher for optimum engine performance for this vehicle to use. It is sure to hasten life of engine if you select gasoline with low octane number or gasoline of poor quality. Transmission gear oil Transmission gear oil for this vehicle to use: for manual transmission is GL-4, SAE 75W-90 or Fuchs 75V, do not confuse gear oil of different brands together. Coolant Recommended by the User‘s Manual for this vehicle, we select coolant of ESSEX or Shell brand. Soft and hard water are forbidden to use as coolant. - 151 - Technical Requirements and Data Dimension of vehicle Length mm 4573 Minimum ground clearance Width mm 1682 Approach angle 14.0° Height(Empty vehicle) mm 1424 Departure angle 18.0° Wheelbase mm 2648 Camber angle (front wheel) -30′±20′ Front suspension mm 884 Kingpin caster angel 1°30′±30′ Rear suspension mm 1041 Front wheel toe in 0′±10′ Front tread mm 1425 Camber angle (rear wheel) -1°30′±10′ Rear tread mm 1419 Rear wheel toe in 20′±10′ - 152 - mm 125 Technical Requirements and Data Parameters of engine Paramenters of performance Model SQR480ED Type SQR480EC TRITEC1.6L 4-cylinder, in-line, water 4-cylinder, in-line, 4-cylinder, in-line, cooling, in-line overhead water cooling, in-line water cooling, camshaft overhead camshaft 16-valve, single overhead camshaft SQR477F 4-cylinder, in-line, water cooling, 16-valve, single overhead camshaft Cylinder diameter mm 79.96 79.96 77 77.4 Piston stroke mm 79.52 79.52 85.8 79.52 L 1.596 1.596 1.598 1.497 9.75:1 9.75:1 10.5:1 10.5:1 Displacement Compression ratio - 153 - Technical Requirements and Data Rated power kw Maximum torque N.m Rotational speed of rated power r/min 65 65 85 80 132 132 149 140 5500 5500 6000 6000 Common technical characters Vehicle model SQR7162L SQR7162TL Fuel capacity(L) 55 55 Cooling system capacity(L) 8 8 Engine oil capacity(L) 4 4 Maximum speed(km/h) 160 160 - 154 - Technical Requirements and Data Kerb weight(kg) 1130 1170 Total weight(kg) 1505 1545 Wheel Tire model Rim model 185/60 R14 82H 6J 14 Tire pressure kPa Item Front Rear Spare Small spare Empty load/Half 200 220 350 420 210 260 350 420 load Full load - 155 - Technical Requirements and Data !Notice: You should check the tire pressures at least once a month; tire pressure is especially important while high-speed driving. Pressure values listed in the schedule are applicable for cold tire pressure; it is not necessary to reduce the pressure if the pressure slightly goes up while tire being heated. - 156 - Technical Requirements and Data Official VIN of vehicle Engine No. Vehicle data plate VIN CODE Vehicle data plate It is mounted on the main body of right Engine No. Engine No. Official VIN Vehicle Identification Number is front wheel hood. Engine No is printed on the lower part There is also vehicle data in the of engine cylinder. planning schedule of maintenance service. printed on the enclosing plate in engine room (chassis No.) - 157 -