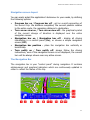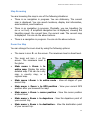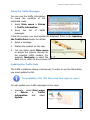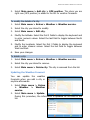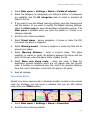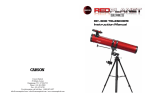
1
ROUTE 66 MINI & MAXI User Manual
Version 2.0
April 2008
Copyright © 1993-2008 ROUTE 66. All rights reserved. ROUTE 66 and the
ROUTE 66 logo are registered trademarks. Data copyright © NAVTEQ B.V.
IMPORTANT REMARK: No part of this publication may be multiplied, be
stored in a databank and electronically, mechanically, through
photocopying, on sound carriers or in any other way be copied, without
the explicit written approval of ROUTE 66. All other marks are the property
of their respective owners. The information contained in this document is
subject to change without prior notice.
2
ROUTE 66 MINI & MAXI User Manual
Contents
Welcome ___________________________________________________________________ 9
WHAT SHOULD I DO FIRST? ___________________________________________________ 10
Preparing Your Device _______________________________________________________ 11
Launching the Application ____________________________________________________ 11
Detecting Your GPS Position___________________________________________________ 12
Common Buttons ___________________________________________________________ 13
The Keyboard ______________________________________________________________ 14
Using Filters in Lists _________________________________________________________ 15
Options in the Main Menu ____________________________________________________ 16
Options When the Cursor is Enabled ____________________________________________ 17
Options in a List _____________________________________________________________ 18
Options in the View Menu ____________________________________________________ 19
HOW CAN I START NAVIGATING? ______________________________________________ 21
Navigate Menu _____________________________________________________________ 22
Search a Location and Start Navigating _________________________________________ 22
Navigate to the Cursor Position ________________________________________________ 23
Select a Saved Trip and Start Navigating ________________________________________ 23
Stop Navigation_____________________________________________________________ 23
Travel Mode _______________________________________________________________ 23
What’s on the Screen ________________________________________________________ 24
The Navigation Screen _______________________________________________________ 25
Navigation screen layout _____________________________________________________ 27
The Navigation Bar __________________________________________________________ 27
The Progress Bar ____________________________________________________________ 28
Route Description ___________________________________________________________ 29
Full Screen Driving Instructions ________________________________________________ 30
Enabling and Disabling Notifications____________________________________________ 31
Combining Navigation Options ________________________________________________ 31
Define Road Block ___________________________________________________________ 31
POI Alerts __________________________________________________________________ 33
3
ROUTE 66 MINI & MAXI User Manual
Favourites Alerts ____________________________________________________________ 33
Safety Cameras Alerts________________________________________________________ 33
Speed Alarm _______________________________________________________________ 34
Exit Information ____________________________________________________________ 34
GPS Information ____________________________________________________________ 34
Statistics __________________________________________________________________ 36
Voice Instructions ___________________________________________________________ 36
Sound Intensity _____________________________________________________________ 37
HOW CAN I BROWSE THE MAP? _______________________________________________ 38
Map Browsing (No Navigation) ________________________________________________ 39
Zoom the Map ______________________________________________________________ 39
The Information Bar _________________________________________________________ 40
Show on Map ______________________________________________________________ 42
Map Display________________________________________________________________ 42
Sending Information _________________________________________________________ 42
Saving Information __________________________________________________________ 45
HOW CAN I FIND THE PLACE I NEED? ___________________________________________ 47
Search Menu _______________________________________________________________ 48
Searching Location __________________________________________________________ 48
Searching Points-of-Interest ___________________________________________________ 49
Searching the History Records _________________________________________________ 50
Searching Favourites ________________________________________________________ 51
Adding, Renaming, Deleting Favourites _________________________________________ 51
Your “Home” Address ________________________________________________________ 52
Your “Office” Address ________________________________________________________ 53
Searching the List of Favourites ________________________________________________ 54
Searching Contacts __________________________________________________________ 54
Searching Coordinates _______________________________________________________ 56
HOW CAN I PLAN MY TRIPS? __________________________________________________ 57
Plan a New Trip _____________________________________________________________ 58
What Can I Do with My Trips? _________________________________________________ 60
4
ROUTE 66 MINI & MAXI User Manual
Simulate Route _____________________________________________________________ 62
HOW CAN I USE MY PHONE? __________________________________________________ 63
Phone Capabilities __________________________________________________________ 64
Enabling and Disabling the Bluetooth Connection _________________________________ 65
Connecting Your Device to a Phone _____________________________________________ 65
Disconnecting Your Device from a Phone ________________________________________ 66
Importing Contacts from a Phonebook __________________________________________ 66
Making Phone Calls _________________________________________________________ 67
Receiving Phone Calls ________________________________________________________ 68
Checking the Phone Reports __________________________________________________ 69
HOW CAN I USE MY FM TRANSMITTER? _________________________________________ 70
What Is the FM Transmitter? __________________________________________________ 71
How to Use the FM Transmitter _______________________________________________ 71
HOW CAN I ADD OTHER FEATURES TO MY APPLICATION? __________________________ 73
Extras - Overview ___________________________________________________________ 74
Enter voucher code __________________________________________________________ 75
Accessing the Online Shop via the ROUTE 66 Sync Application _______________________ 75
Accessing the Online Shop via USB/LAN _________________________________________ 75
Buying and Downloading Content via ROUTE 66 SYNC _____________________________ 76
Status of Digital Content _____________________________________________________ 76
Options for Digital Content ___________________________________________________ 78
Synchronize License Keys _____________________________________________________ 78
Synchronize Content _________________________________________________________ 79
Delete Content _____________________________________________________________ 80
Maps – Overview ___________________________________________________________ 80
Traffic Information - Overview _________________________________________________ 82
Using the Traffic Messages ___________________________________________________ 83
Updating the Traffic Data ____________________________________________________ 83
Safety Cameras - Overview ___________________________________________________ 84
Using the Safety Cameras ____________________________________________________ 85
Updating the Safety Cameras Data _____________________________________________ 86
5
ROUTE 66 MINI & MAXI User Manual
Weather - Overview _________________________________________________________ 86
Using the Weather Service ____________________________________________________ 87
Adding Cities for Weather Forecasts ____________________________________________ 87
Updating the Weather Forecast _______________________________________________ 88
Weather Reports ____________________________________________________________ 89
Today _____________________________________________________________________ 89
Day list ____________________________________________________________________ 90
Current conditions___________________________________________________________ 90
Normal graph ______________________________________________________________ 90
Extended graph _____________________________________________________________ 91
Travel Guides - Overview _____________________________________________________ 91
Using the Travel Guides ______________________________________________________ 91
Voices - Overview ___________________________________________________________ 92
Changing the Language of the Voice Instructions _________________________________ 92
Colour Schemes - Overview ___________________________________________________ 93
Update - Overview __________________________________________________________ 94
HOW CAN I CHANGE THE “LOOK-AND-FEEL” OF MY APPLICATION? __________________ 95
Settings ___________________________________________________________________ 96
General settings ____________________________________________________________ 96
Interface Language __________________________________________________________ 96
UI Colour Scheme ___________________________________________________________ 97
Voice Language _____________________________________________________________ 97
Map Language _____________________________________________________________ 97
Volume ____________________________________________________________________ 98
Sound when Touching the Screen ______________________________________________ 98
Dynamic Volume ____________________________________________________________ 99
FM Transmitter ____________________________________________________________ 100
FM Frequency _____________________________________________________________ 100
Backlight _________________________________________________________________ 101
Units _____________________________________________________________________ 101
USB Connection Mode ______________________________________________________ 102
6
ROUTE 66 MINI & MAXI User Manual
Map Settings ______________________________________________________________ 102
Night Colours ______________________________________________________________ 102
Colour Scheme_____________________________________________________________ 103
2D Perspective _____________________________________________________________ 103
Viewing Angle _____________________________________________________________ 104
Show Scale ________________________________________________________________ 104
Rotate Map _______________________________________________________________ 104
Map _____________________________________________________________________ 105
Show Favourites ___________________________________________________________ 105
Show Points-of-Interest _____________________________________________________ 106
Navigation Settings_________________________________________________________ 106
Driving Type_______________________________________________________________ 106
Avoid Motorways __________________________________________________________ 107
Avoid Toll Roads ___________________________________________________________ 107
Avoid Ferries ______________________________________________________________ 108
Automatic Zooming ________________________________________________________ 108
Alarm Speed ______________________________________________________________ 109
Alarm Type _______________________________________________________________ 109
Navigation Bar Transparency ________________________________________________ 110
Speed ____________________________________________________________________ 110
Configure Alarm ___________________________________________________________ 111
Configure Alarm for Points-of-Interest _________________________________________ 111
Configure Alarm for Favourites _______________________________________________ 112
Configure Alarm for Safety Cameras ___________________________________________ 113
Extras Settings _____________________________________________________________ 114
Traffic Interval _____________________________________________________________ 115
Weather Interval ___________________________________________________________ 115
Safety Cameras Interval _____________________________________________________ 116
Usage in Roaming __________________________________________________________ 117
Source for traffic information ________________________________________________ 117
Activate TMC Pro __________________________________________________________ 118
7
ROUTE 66 MINI & MAXI User Manual
Legend ___________________________________________________________________ 119
Cities/Symbols (Legend) _____________________________________________________ 119
Roads/GPS (Legend) ________________________________________________________ 119
Areas (Legend) ____________________________________________________________ 120
Editing Colours in Legend ____________________________________________________ 120
Date & Time ______________________________________________________________ 121
Calibrate Screen ___________________________________________________________ 122
HOW CAN I USE MY DEVICE AS A PHOTO VIEWER? _______________________________ 123
Photo Viewer - Description ___________________________________________________ 124
Copying Your Photos on the Memory Card ______________________________________ 124
Browsing for Image Files ____________________________________________________ 125
Viewing Images ____________________________________________________________ 125
Viewing Image Details ______________________________________________________ 127
Sending Your Photos to Your Friends ___________________________________________ 127
Disclaimer ________________________________________________________________ 128
8
ROUTE 66 MINI & MAXI User Manual
Welcome
Hi! My name is MINI & MAXI!
I’m the youngest member of the ROUTE 66 product family.
I’m smart! I’m friendly!
I can help you do many things:
set your next journey in a few seconds, no matter the distance
find any location and start navigation at once
enjoy your ride and let me avoid certain roads or make sure you
don’t exceed speed limits
select those advanced features that fit your needs best
know beforehand useful information on the road you are about to
cover
plan your trips knowing everything about the weather worldwide
for the next two weeks
visit wonderful locations around the world, using the Lonely
Planet travel guides
trust the latest professional maps, voices or colours
call your beloved easily
feel the magic of loading amazing collections of images and forget
about boredom
Ready! Steady! Go!
From now on, I’m your driving companion! Let me do it for you. Trust my
experience and instincts!
I’M ON MY WAY
9
ROUTE 66 MINI & MAXI User Manual
WHAT SHOULD I DO
FIRST?
10
ROUTE 66 MINI & MAXI User Manual
Preparing Your Device
To start using the application, you
have to carry out the following
steps:
1. Charge
device.
the
battery
of
the
2. Insert the memory card into
your device.
3. Switch on your device and wait
for a fixed GPS position.
Calibration
To ensure that the touchscreen of your device works properly, you must
first calibrate your screen. Calibrating means adjusting the precision and
reaction of the screen.
Refer to Main Menu>Settings>Calibrate screen for details.
Launching the Application
When you switch on your
device, the application starts
automatically.
When you start the
application for the first time, you
must select the interface language.
Scroll up or down to choose the
language you prefer. Go to the next
screen.
11
ROUTE 66 MINI & MAXI User Manual
Read and then accept the
terms and conditions of use.
An animation is displayed. The
application zooms in from the entire
globe to the street level. If you
want to interrupt this animation,
select the skip icon.
Decide if you want to see the
disclaimer the next time you launch
the application.
The application determines
your GPS position.
Detecting Your GPS Position
Depending on the strength of the GPS signal and the performance of the
GPS receiver, the time needed to get a GPS fix varies from a few seconds
to a few minutes.
Two scenarios are possible:
12
ROUTE 66 MINI & MAXI User Manual
GPS position detected
A valid GPS position is established.
The application zooms from the
entire map to the street level.
Your current GPS position
indicated by a red dot.
is
GPS not detected
The GPS position could not be
detected.
You can either retry to get a GPS
fix, or work without a GPS.
The last known GPS position is
indicated on the map (gray dot).
Common Buttons
The most frequently used buttons are:
Open the main modules (Search, Photos, etc.) or open the
main options of a module.
Open the contextual menu.
Confirm a choice, start an action, go to the next screen, save
changes.
Abort operation or discard changes.
Black tick. This list item is not selected.
Blue tick. This list item is selected.
Green tick (used only for the All categories item in a list).
Some (but not all) items in the list are selected.
13
ROUTE 66 MINI & MAXI User Manual
Return to the previous screen.
Go to the next screen.
Scroll up to the beginning of the list.
Scroll down to the end of the list.
Filter results by entering keywords.
The Keyboard
The keyboard is displayed when
you intend to type alphanumeric
characters or symbols.
The keyboard contains all numbers
and letters.
“Face” icon. Display a list of symbols.
“Letter” icon. Return to the alphanumeric list.
Backspace
Delete characters.
Space
Enter a blank space.
“Hand” icon. Switch to the handwriting mode.
“Keyboard” icon. Return to the regular writing mode.
“EN”
Switch to other writing systems (for example, Chinese, if
available).
14
ROUTE 66 MINI & MAXI User Manual
Using Filters in Lists
When there are too many results in a list you can filter the list by entering
an additional keyword. Click on the upper-right icon
filter.
to activate the
List of results (filter is not
activated).
List of results
activated).
(filter
is
15
ROUTE 66 MINI & MAXI User Manual
Options in the Main Menu
The main menu contains:
the main modules of the
application: searching, route
planning, photo viewer, phone
calls,
additional
services,
customization, etc.
the most frequently used options
during navigation: zooming, activating
navigation, etc.
advanced
To open the main menu, select the menu icon
corner of the screen.
options
for
in the lower left
Main menu options (always):
Search – Select a database
and find the places you need.
Navigate – Select a database
and find the places you need.
Travel mode - Select the
travel mode for your current
navigation.
Extras – Buy and download additional content and services.
Photos – View your favourite images.
Phone – Connect your navigation device to a mobile phone.
Zoom – Increase and decrease the map details.
View menu – Access navigation-specific features.
Send – Send to other users a map image, the route description, your
GPS position or your cursor position.
Save – Save in the application a map image, your GPS position or
your cursor position.
Trips – Create and use your personal trips.
16
ROUTE 66 MINI & MAXI User Manual
Settings – Customize the behaviour of the application.
Help – Open the contextual help.
Main menu options (during navigation):
All options above plus:
Stop navigation - Interrupt the current trip.
Nearby - Search for points-of-interest around your current route and
start navigating towards one of them.
Define road block - Avoid a part of the planned route.
Options When the Cursor is Enabled
When you browse the map and
select the screen, or when you
choose Show on map, a cursor
is displayed above that location.
To open the contextual menu, select
the contextual icon
in the
lower left corner of the screen.
Cursor options:
Navigate to - Start a (new) navigation. The cursor position is the
destination.
Call – Dial the phone number
of the selected item. If a phone
number is not available for that
location, this option is disabled.
Zoom to cursor - Zoom to
street level, with the cursor
placed in the centre of the
screen.
Show information - Display the text box (“the balloon information”)
for any point on the map, including streets, water areas and land
areas.
17
ROUTE 66 MINI & MAXI User Manual
Send cursor position - Send the cursor position to other users.
Refer to the sending methods for details.
Save cursor position - Save the cursor position as a contact / as a
favourite / as your home address / as your office address, or update
an existing contact.
Search for Points-of-interest around cursor – Select a category
and search points-of-interest around the cursor position.
Add to route - Add the cursor position to a (new) trip.
Options in a List
When you are in a list, select the Main menu
options relevant for this context.
and open the list of
List options:
Navigate to - Start a (new)
navigation. The list item is the
destination.
Show on map – Display on the
map the selected item.
Add to route - Add the list item
to a (new) trip.
Call – Call the list item. If a phone number is not available for that
location, this option is disabled.
Search Points-of-interest around - Select a category and search
points-of-interest around the list item.
Mark/Unmark – Select or deselect an item / several items / all items
from the list. For example, you
can select and then delete an
entry.
Save - Save the selected item
as a contact / as a favourite / as
your home address / as your
office address, or update an
18
ROUTE 66 MINI & MAXI User Manual
existing contact.
Send - Use a Bluetooth connection and a phone to send information
to other users.
Map display - “Fly” on the map, from one item in the list to another.
Other options, like Delete, Rename, etc. are available in certain
contexts. For example, you can delete a history record but you cannot
delete a search result. You can rename a trip or a favourite but you cannot
rename a history record.
Options in the View Menu
From the View menu you can easily access those options you frequently
need during navigation or map browsing.
To open the View menu:
select Main menu > View.
select the navigation bar.
select the information bar.
View options (always):
Night colours / Day colours Choose the brighter colours
when you drive during the day.
Choose the dimmed colours
when you drive during the night
or in tunnels, forests, cloudy
weather conditions.
2D
perspective
/
3D
perspective - View the map from above, as you look at a printed
map (2D). Have a panoramic view, as you are actually seeing the road
ahead of you (3D).
Navigation screen layout - Modify the look and behaviour of the
screen.
GPS information - Check the status of the GPS receiver, whether
you are navigating or not.
19
ROUTE 66 MINI & MAXI User Manual
Volume - Set the sound intensity for the voice instructions. From here
you can also switch off the sound.
Statistics - Get statistical information about your current trip and all
previous trips: speed, distance, time, etc.
FM transmitter on / FM transmitter off - When the FM
transmitter is started, your navigation device sends (“broadcasts”) the
driving instructions to your audio system.
About - View the technical details of your device: software version,
engine version, device ID (IMEI number), operating system version,
etc.
View options (during navigation):
All options above plus:
Route description - Find out all the significant details of your current
trip: total length of route, estimated duration, travel mode, etc.
Play last instruction - If you missed or didn’t understand the last
driving instruction, select this button to repeat it.
20
ROUTE 66 MINI & MAXI User Manual
HOW CAN I START
NAVIGATING?
21
ROUTE 66 MINI & MAXI User Manual
Navigate Menu
Use this section to start navigating to a place. After you choose a location,
you can start navigating towards it, save it, send it to somebody else, or
add it to a trip.
Navigate options:
Locations - Search for a
location by typing a city name, a
street name, or a house
number.
Favourites – Search in the list
of your favourite places.
History – Search in the list of
history records (locations you visited or used recently).
Points-of-interest – Select a category and search points-of-interest
located along the current trip, around the departure or the destination
of the current journey, around the cursor position, or around the GPS
position.
Contacts – Search in the list of personal contacts.
Latitude / Longitude – Search for a location by entering its
geographical coordinates (latitude and longitude).
For a more detailed description of these features, refer to the Searching
section.
Search a Location and Start Navigating
1. Select Main menu > Search.
2. Select the relevant database: Locations, Favourites, History,
Points-of-interest, Contacts, Latitude / Longitude.
3. Start the search query.
4. Select an item from the list of results.
5. Select Main menu > Navigate.
6. Optionally, select the travel mode in the Travel mode screen.
22
ROUTE 66 MINI & MAXI User Manual
7. The route is calculated and the navigation starts automatically.
Navigate to the Cursor Position
1. Point on the map to activate the cursor.
2. Browse the map and place the cursor over the desired location.
3. Select Main menu > Navigate. Or in the contextual menu select
Navigate to.
4. Optionally, select the travel mode in the Travel mode screen.
5. The route is calculated and the navigation starts automatically.
Select a Saved Trip and Start Navigating
1. Select Main menu > Trips.
2. In the list of defined routes, select a trip.
3. Open the trip.
4. Select Main menu > Start navigation or Navigate to.
5. Optionally, select the travel mode in the Travel mode screen.
6. The route is calculated and the navigation starts automatically.
Stop Navigation
If you want to manually interrupt the current trip, just select Main menu
> Stop navigation.
The current navigation is automatically interrupted when you select a
different destination and choose Navigate to.
Travel Mode
The application can calculate the best possible route to your destination.
Indicate if you drive a car or walk; if you use a personal car or a truck; or
if you prefer to travel along the fastest route or the shortest route. Taking
into account these personal preferences and the information available on
the current map, the route is calculated.
Select Main menu > Travel mode.
23
ROUTE 66 MINI & MAXI User Manual
During navigation, type the travel mode icon. In the Travel mode
screen, select the relevant option.
Fastest (car)
Drive by using a personal car, along the
fastest route (higher speed limits).
Shortest (car)
Drive by using a personal car, along the
shortest route (the shortest distance
from departure to destination).
Fastest (lorry)
Drive by using a truck, along the fastest
route (higher speed limits).
Shortest (lorry)
Drive by using a truck, along the
shortest route (the shortest distance
from departure to destination).
Pedestrian
Walk to your destination (pedestrianonly tracks).
You can change the travel mode anytime during the navigation!
What’s on the Screen
During navigation, the screen of the device is divided into:
1. The navigation screen – it contains the Main menu / Zoom icons, the
map scale and the compass, the current road, the calculated route
and the current change of direction. Also, you can check the map
elements (points-of-interest, road names and codes, buildings and
areas) and the dynamic warnings (POI alarm, Favourites alarm, speed
alarm, safety cameras alarm, etc.)
24
ROUTE 66 MINI & MAXI User Manual
2. The progress bar – this is a graphical overall representation of your
navigation.
3. The navigation bar – it contains all necessary driving instructions: type
of turn, distance to current turn, estimated time of arrival to
destination, remaining travel time and distance, navigation mode (by
car, pedestrian, etc.), and so on.
The progress bar and the navigation bar can be turned on or off when
needed. Check the Navigation screen layout chapter.
The Navigation Screen
The amount of information displayed on the navigation screen varies,
depending on the driving conditions and your personal preferences.
1
Exit information
4
Direction of traffic
2
Current change of direction
5
GPS arrow (“You are here!”)
3
Calculated route
6
Road code
25
ROUTE 66 MINI & MAXI User Manual
1
Zoom out
9
Main menu
2
Street name
10
Contextual menu
3
Destination
11
Text box (information balloon)
4
Map scale
12
Return to the navigation screen
5
Zoom in
13
Compass
6
Area name
14
Details of destination
7
Calculated route
15
POI alarm and remaining distance
to this POI
8
Cursor position
Check the following sections for details.
26
ROUTE 66 MINI & MAXI User Manual
Navigation screen layout
You can easily adapt the application’s behaviour to your needs, by defining
the following options:
Progress bar on / Progress bar off - get an overall perspective of
the current trip: the distance completed, the current position relative
to the entire route, the remaining distance to destination.
Turn arrow view on / Turn arrow view off - the graphical symbol
of the current change of direction is displayed over the entire
navigation screen.
Navigation bar on / Navigation bar off - display all driving
information in a control panel (On); or choose a simple navigation
screen (Off).
Navigation bar position - place the navigation bar vertically or
horizontally.
Turn notify on / Turn notify off- always follow the driving
instructions, even if the navigation screen is not displayed; the current
turn will be always shown over any active screen.
The Navigation Bar
The navigation bar is your “control panel” during navigation. It contains
alphanumeric and graphical indicators which are continuously updated in
order to reflect the status of the trip.
27
ROUTE 66 MINI & MAXI User Manual
1
Battery level
8
Current speed
2
Current change of direction.
9
Travel mode
3
Remaining distance to the
current change of direction
10
Remaining distance to the
next change of direction
4
Estimated time of arrival to
destination
11
Name and code of next
road
5
Remaining travel time to
destination
12
Next change of direction
6
Name and code of current
road
13
Strength of GPS signal
7
Remaining travel distance to
destination
The colour of the navigation bar can be modified. Select Main menu >
Settings > Legend > Areas.
Additional options:
Tap the navigation bar to display the View.
Select the current street area or the next street area to place the
navigation bar horizontally or vertically. The same operation can be
done with the Navigation screen layout > Navigation bar
position option.
The Progress Bar
During navigation, you can have an overall perspective of the current trip:
the distance already completed,
the current position relative to the entire route,
the remaining distance to destination.
To display the progress bar, select Main menu > View > Navigation
screen layout > Progress bar on.
28
ROUTE 66 MINI & MAXI User Manual
To hide the progress bar, select Main menu > View > Navigation
screen layout > Progress bar off.
1
Departure
4
Remaining trip
2
Trip you already completed
5
Destination
3
Current position relative to the
entire route (“You are here!”)
Tap the progress bar if you want to display the Route description
screen.
For a more detailed description of the current navigation,
display both the progress bar and the navigation bar!
Route Description
An alternative to the navigation bar
is the route description. To display
it during navigation, in the View
menu select Route description.
29
ROUTE 66 MINI & MAXI User Manual
You can also select the progress bar.
The route description contains the following information:
total length of route
estimated duration of trip (in hours and minutes)
travel mode
driving instructions
traffic messages
current position (green flag)
destination (chequered flag)
Pick an item from the list and then show that turn on the map.
Full Screen Driving Instructions
An alternative to the navigation bar
is
the
full
screen
driving
instructions. The graphical symbol
of the current change of direction is
displayed over the entire navigation
screen. The symbol is displayed
and hidden dynamically, reflecting
the traffic conditions.
To display the full screen driving instructions, select Main menu > View
> Navigation screen layout > Turn arrow view on.
To hide the full screen driving instructions, select Main menu > View >
Navigation screen layout > Turn arrow view off.
For a more detailed description of the current navigation,
display both the full screen driving instructions and the
navigation bar!
30
ROUTE 66 MINI & MAXI User Manual
Enabling and Disabling Notifications
During navigation, if you open the
main menu or any secondary
screen, the navigation screen is
temporarily hidden behind the
active screen. However, if you don’t
want to lose any driving instruction,
activate the notification option.
Thus, the current turn will be
always displayed over any active screen.
To enable the notification, select Main menu > View > Navigation
screen layout > Turn notify on.
To disable the notification, select Main menu > View > Navigation
screen layout > Turn notify off.
Combining Navigation Options
The application is so versatile that it can be easily customized to your
needs. Thus, you can have:
a simple navigation screen, without navigation bar, progress bar, or
notifications. In this case, you just listen to the driving instructions.
a complex navigation screen, with navigation bar, progress bar, and
notifications. In this case, you have access to all available information.
Define Road Block
This option is available only during navigation!
31
ROUTE 66 MINI & MAXI User Manual
For various reasons (for example,
you know that a crowded area, an
accident or a road work is ahead
along your trip), you decide to avoid
a part of the planned route. Thus,
that road segment is excluded from
your trip, a detour is calculated
automatically, and you can continue
your
navigation
without
any
interruption.
1. Select Main menu > Define road block.
2. Select which part of the trip to
avoid (for example, the next 100
metres). That road segment
(starting from the current
position) will be excluded from
the route.
3. Alternatively, choose Select
from
list.
The
Route
description screen is displayed. Select a driving instruction from the
list.
4. The route is recalculated. The navigation continues.
In some special cases (for example, a motorway segment
without any exits), you can set road blocks but it might not be
possible to find an alternative route. You will continue
navigating on the initial route.
After you avoided or passed by a road block you defined, that
temporary road block is completely removed. No reference to it
is kept on the device. If you want to use again the same road
block for the same road segment, specify this during the
journey.
Remember that a road block is a personal preference, while
the traffic information is an external service managed by
32
ROUTE 66 MINI & MAXI User Manual
specialized organizations and distributed to all drivers.
POI Alerts
During navigation, you
warned in advance that
approaching a specific
interest along or near your
can be
you are
point-ofroute.
For example, you can be notified
that the next restaurant is 50
metres away from you.
Refer to Settings > Alarm > Points-of-interest for configuration
details.
Favourites Alerts
During navigation, you can be
warned in advance that you are
approaching one of your favourite
locations along or near your route.
For example, you can be notified
that your home address is 50
metres away from you.
Refer to Settings > Alarm > Favourites for configuration details.
Safety Cameras Alerts
During navigation, you can be
warned in advance that you are
approaching a traffic control sector
along or near your route.
For example, you can be notified
that the next speed limit sector is
50 metres away from you.
Refer to Settings > Alarm > Safety cameras for configuration details.
33
ROUTE 66 MINI & MAXI User Manual
Speed Alarm
This is a personal preference. You
can set the maximum speed limit
you don’t want to exceed during
navigation. Thus, when you travel
and reach this speed, an acoustic /
visual alarm warns you that you are
driving too fast.
Refer to Main menu > Settings
> Navigation > Alarm speed and Main menu > Settings >
Navigation > Alarm type for configuration details.
Exit Information
When you drive along a motorway,
this warning indicates that you are
approaching a motorway exit. Thus,
you have enough time to reduce
the speed and leave the motorway
in the correct direction.
Exit information is displayed in the
uppermost area of the navigation
screen. It contains the motorway exit number, the road code (if available),
and the next major cities after you leave the motorway.
Exit information is not available in the pedestrian travel mode!
GPS Information
During navigation or while you are stationary, you can check the status of
the GPS receiver.
Select Main menu > View > GPS information. Or select the
navigation bar and select GPS information.
The following information is displayed:
34
ROUTE 66 MINI & MAXI User Manual
First screen
Current date and time. (UTC =
Coordinated Universal Time)
Longitude
Latitude
Altitude
Speed
Direction of travelling
Number of satellites in view
Second screen
Detailed chart of constellation
of satellites in view
Significance of colours:
green – strong GPS signal for
this satellite.
red – weak GPS signal for this
satellite.
Third screen
Signal strength for all satellites.
Significance of colours:
green – strong GPS signal for
this satellite.
red – weak GPS signal for this
satellite.
black (empty) – no GPS signal
for this satellite.
35
ROUTE 66 MINI & MAXI User Manual
Statistics
During navigation, you can view
statistical information about all your
trips (previous and current).
Select Main menu > View >
Statistics. Or tap on the navigation
bar and select Statistics.
The
following
displayed:
information
is
Speed - current cruising speed.
Distance – total travelling distance.
Time – total travelling time.
Average – average cruising speed.
Maximum – maximum cruising speed.
Sunrise – sunrise moment (hours and minutes)
Sunset - sunset moment (hours and minutes)
Select the Reset button if you want to cancel the gathering of statistical
data. All counters start from zero.
Voice Instructions
During navigation, for each change
of direction (“turn”), the application
provides both a visual instruction
and a voice instruction.
A voice instruction is heard:
in advance (the warning
distance is approx. 300 metres
or yards before the actual change of direction).
when the turn must be done (the warning distance is approx. 50
metres or yards before the actual change of direction).
Select the navigation bar to repeat the last voice instruction.
36
ROUTE 66 MINI & MAXI User Manual
The warning distance differs from case to case. The application
takes into account the type of turn (for example, a motorway
exit versus a U-turn) and the current navigation speed, and
estimates the driver’s reaction time. When you drive in the city,
the speed is lower so the warning distance is short; when you
drive on the motorway, the speed is higher so the warning
distance increases.
To change the language of the voice instructions, select Main menu >
Settings > General > Voice language.
The number of available languages depends on the region of
purchase. If you want to have other languages available for
voice instructions, buy new voices from the online shop.
Sound Intensity
During navigation, you can change the sound intensity of the voice
instructions.
1. Select Main menu > Settings > General > Volume.
2. Select the Volume option.
3. Hold and drag the slider to the left (to lower the volume) or to the
right (to increase the volume).
4. Save your changes.
During navigation and for safety reasons, we recommend you
to keep the sound switched on and listen to the voice
instructions and other acoustic warnings! This way, you can
concentrate on the road ahead of you and avoid any
unpleasant driving situations!
For a better navigation experience, combine this option with the Dynamic
volume option.
The Volume option is also available in the View menu during
navigation!
37
ROUTE 66 MINI & MAXI User Manual
HOW CAN I BROWSE
THE MAP?
38
ROUTE 66 MINI & MAXI User Manual
Map Browsing
You are browsing the map in one of the following situations:
There is no navigation in progress. You are stationary. The current
map is displayed. You can search locations, display text information,
save locations, send locations.
There is no navigation in progress. Physically, you are travelling (by
car or on foot). A simplified navigation bar is displayed, showing the
travelling speed, the current time, the current road. The current map
is displayed. You can do the above actions.
There is a navigation in progress. You can do the above actions.
Zoom the Map
You can change the zoom level by using the following options:
The zoom in icon + on the screen. The maximum level is street level.
The zoom out icon - on the
screen. The maximum level is
the globe.
Main menu > Zoom > to
entire map. Display the entire
detailed map. This can be a city
map, a country map, or a
regional map.
Main menu >Zoom > to entire route - View all stages of your
current trip.
Main menu > Zoom > to GPS position - View your current GPS
position after you browsed the map.
Main menu > Zoom > cursor position - View the cursor position
at street level.
Main menu > Zoom > to departure - View the departure point of
your current trip.
Main menu > Zoom > to destination - View the destination point
of your current trip.
39
ROUTE 66 MINI & MAXI User Manual
A digital compass
is always displayed in the upper-right corner of the
screen. The red end indicates the North.
The behaviour of the zoom level during navigation can be controlled
automatically. Select Main menu > Settings > Navigation >
Automatic zooming and set the value to Yes; during navigation, when
you approach a street junction or intersection, the navigation screen will
zoom in to street level (regardless of the current zoom level); after you
cross the street junction, the zoom level will be established to the initial
level.
Zoom levels:
The globe is the graphical representation of the Earth, as seen from
space.
The world map is the geo-political representation of the entire world.
The entire map is the geo-political representation of the current map
and the neighbouring countries.
The street level map is the most detailed zoom level.
You can easily change the way the map is displayed:
Select Main menu > Settings > Map > 3D perspective > Off view the map from above, as you look at a printed map.
Select Main menu > Settings > Map > 3D perspective > On have a panoramic view, as you are actually seeing the road ahead of
you.
Use the options in the View menu.
Refer to the Maps – Overview chapter for details about maps.
The Information Bar
The information bar is your “control panel” when there is no navigation in
progress. This is a simplified navigation bar. It displays your travelling
speed (if you are physically moving), the current time, the current road.
The information bar contains the following elements:
40
ROUTE 66 MINI & MAXI User Manual
1
Battery level
4
Current time
2
Your speed
5
Travel mode
3
Current road
6
Strength of GPS signal
Tap the info bar to display the View menu.
To hide the information bar, select Main menu > View > Navigation
screen layout > Navigation bar off.
To display the information bar, select Main menu > View > Navigation
screen layout > Navigation bar on.
41
ROUTE 66 MINI & MAXI User Manual
Show on Map
When you are in a list, select an
item and select Main menu >
Show on map to view that
location on the map. The location is
displayed in the centre of the
screen.
A text box (“information balloon”) is
also attached to the location. The
text box contains the following information:
Distance from your current position to that place
Address (city, street, etc.)
Contact details (phone number)
POI category
Map Display
This is a dynamic way of visualizing
several list items on the map. You
simply “fly” from one location to
another.
1. Open a list with several items.
2. Select Map display. Each item
is displayed in the centre of the
map. The details of each location are displayed in a text box
(“information balloon”).
3. Scroll up or scroll down to “fly” to another location.
Sending Information
The available options vary, depending on your hardware
capabilities!
You can send the following information to other users:
42
ROUTE 66 MINI & MAXI User Manual
a section of the current map (as an image).
a trip (the current route description).
the current GPS position.
the cursor position.
any list item.
To send a map section:
To send a route description:
1. Select Main menu > Send >
Send map.
1. Select Main menu > Trips.
2. Select a method of sending the
image.
Send via Bluetooth
2. Select a trip.
3. Select Main menu > Send.
4. Select a method of sending
the trip.
Send via Bluetooth
To send the cursor position:
To send the GPS position:
1. In the contextual menu select
Send cursor position.
1. In the contextual menu select
Send > Send GPS position.
2. Select a method of sending the
cursor position.
2. Select a method of sending
the GPS position.
Send via Bluetooth
Send via Bluetooth
43
ROUTE 66 MINI & MAXI User Manual
To send a list item:
1. First, select an item from the list.
2. Select Main menu > Send.
3. Select a method of sending the
item.
Send via Bluetooth
(For PND-phone pairing) The following conditions must be met in order to
successfully send the data:
the Bluetooth connection is activated.
the Internet service is activated.
the MMS service is activated.
a suitable access point is defined.
you have a valid remote mailbox.
Refer to your mobile phone’s User Manual for configuration
details. Contact your mobile phone provider for technical
support.
44
ROUTE 66 MINI & MAXI User Manual
Saving Information
While
using
this
software, you can:
navigation
save a section of the current
map [as an image].
save the current GPS position
[as a favourite / contact].
save the cursor position [as a
favourite / contact].
save any list item [as a favourite / contact].
To save the cursor position:
To save the GPS position:
1. In the contextual menu select
Save cursor position.
1. Select Main menu > Save >
Save GPS position.
2. Select a method of saving the
cursor position. The following
options are available:
2. Select a method of saving the
GPS position. The following
options are available:
Save as contact
Save as contact
Update contact
Update contact
Save as favourite
Save as favourite
Save as home address
Save as home address
Save as office address
Save as office address
3. In the case of a new contact or
new
favourite,
use
the
keyboard to write a name. In
the case of a contact update,
select an existing contact from
the list of contacts.
3. In the case of a new contact or
new
favourite,
use
the
keyboard to write a name. In
the case of a contact update,
select an existing contact from
the list of contacts.
4. Save the changes.
4. Save the changes.
45
ROUTE 66 MINI & MAXI User Manual
To save a list item:
To save a map section:
1. First, select an item from a list
of results.
1. Select Main menu > Save >
Save map as image.
2. Select Main menu > Save.
2. Use the keyboard to write a
name for the new image.
Alternatively, use the pre-filled
name.
3. Select a method of saving an
item. The following options are
available:
Save as contact
Update contact
Save as favourite
Save as home address
Save as office address
3. Save the image. The image is
saved on your memory card.
4. In the case of a new contact or
new
favourite,
use
the
keyboard to write a name. In
the case of a contact update,
select an existing contact from
the list of contacts.
5. Save the changes.
46
ROUTE 66 MINI & MAXI User Manual
HOW CAN I FIND
THE PLACE I NEED?
47
ROUTE 66 MINI & MAXI User Manual
Search Menu
Use this section to find the place
you need. After you find a location,
you can start navigating towards it,
save it, send it to somebody else,
or add it to a trip.
The following options are available:
Locations - Search for a
location by typing a city name, a street name, or a house number.
Favourites – Search in the list of favourite places.
History – Search in the list of history records (locations you visited or
used recently).
Points-of-interest – Search points-of-interest located around the
current route, around the departure, around the destination, around
the cursor position, or around the GPS position.
Contacts – Search in the list of personal contacts.
Latitude / Longitude – Search for a location by entering its
geographical coordinates (latitude and longitude).
Searching Location
You can search locations by city
name, street name, house number
or postcode.
The search action is not limited to
the current map! The matching
results can belong to different
maps, regions or countries. For
example, if you type lond, the list
of results contains London (Great Britain), London (Canada) and
Londerzell (Belgium).
When you search by house number or postcode, either enter at least three
characters, or combine the house number or postcode with the street
48
ROUTE 66 MINI & MAXI User Manual
name or city name. For example, if you type just 17, the list of results is
empty. If you type 174 or 17 lond, the list of results is not empty.
1. Select Main menu > Search > Locations.
2. In the input field enter relevant keywords.
3. Start the search.
4. Scroll the list of results and select an item.
5. Display the location on the map. Select Main menu > Navigate to
start a new navigation.
Searching Points-of-Interest
You can search locations by
selecting the POI category relevant
for your search.
For example, to find all restaurants
around your current position, select
the Eating & Drinking category.
1. Select Main menu > Search
> Points-of-interest.
2. Select at least a category. Go to
the next screen.
You can select several categories.
To select all categories, select the
All categories checkbox. To
deselect all categories, select again
the All categories checkbox.
3. Select an option:
Trip – searches all locations
that are along the calculated
route and which match the
selected category.
Destination – searches all locations that are around the route
destination and which match the selected category.
49
ROUTE 66 MINI & MAXI User Manual
GPS position – searches all locations that are around the current GPS
position and which match the selected category.
Cursor position – searches all locations that are around the current
cursor position and which match the selected category.
Departure –searches all locations that are around the route
departure and which match the selected category.
When there is no navigation in progress (meaning no calculated route),
the options Trip, Destination and Departure are disabled.
Coverage for Trip - The results are physically located on an area of 20 km
along the road (10 km on the left side and 10 km on the right side).
Coverage for the other options - The results are physically located on an
area of 10 km radius around the reference location (destination, GPS
position, cursor position or departure).
4. The search action starts. A list of results is displayed. Scroll the list of
results and select an item.
5. Display the location on the map. Select Main menu > Navigate to
start a new navigation.
Searching the History Records
This option is disabled when the list is empty (no history
records)!
The History list keeps track of all
locations you previously searched
for and then you used for
navigation or map browsing.
The history records are listed as
they occur: the most recently used
item is the first in the list; the
oldest record is the last in the list. 100 records can be stored in this list.
When the list is completely full, the last item in the list is removed and a
new item is recorded.
1. Select Main menu > Search > History.
50
ROUTE 66 MINI & MAXI User Manual
2. Scroll the list of results and select an item.
3. Display the location on the map. Select Main menu > Navigate to
start a new navigation.
Searching Favourites
Your personal list of favourites
contains
those locations
you
frequently use for navigation, map
browsing or route planning. Instead
of searching for a place each time
you intend to use it, you simply pick
it up from your personal list.
When you open the application for
the first time, the list is empty, except for the special favourites Home
and Office, which are not defined yet.
You can save as a favourite any address, history record, point-of-interest
or cursor position.
Select Main menu > Search > Favourites.
Adding, Renaming, Deleting Favourites
To add a favourite:
1. First, search a database and select an item. Alternatively, point to a
location on the map (“cursor position”).
2. Select Main menu > Save. Or, in the contextual menu select Save
cursor position.
3. Select Save as Favourite.
4. Leave the pre-filled name or write a different name.
5. Save the new favourite.
6. The new location is displayed in the list of favourites.
51
ROUTE 66 MINI & MAXI User Manual
To rename a favourite:
1. Select Main menu > Search >Favourites.
2. Select an item.
3. Select Main menu > Rename.
4. In the input field Rename to type a different name.
5. Save your changes.
To delete a favourite:
1. Select Main menu > Search > Favourites.
2. Select an item.
3. Select Main menu > Delete. That item is permanently removed from
the list.
To delete all favourites (to clear the list):
1. Select Main menu > Search > Favourites.
2. Select Main menu > Delete all. All items are permanently removed
from the list, except Home and Office.
Your “Home” Address
Your “home” can be a place you
consider
your
personal
“headquarters”. It can be your
regular home address, or a
temporary “holiday” location.
Your “home” address can be easily
changed when necessary.
52
ROUTE 66 MINI & MAXI User Manual
To choose your “home” address:
1. First, search the databases and select an item. Alternatively, point to a
location on the map (“cursor position”).
1. Select Main menu > Save. Or, in the contextual menu select Save
cursor position.
2. Select Save as home address.
3. The “home” address is saved and ready to be used for navigation,
route planning or browsing.
Your “Office” Address
Your “office” can be a place you
consider
your
business
“headquarters”. It can be your
regular business office, or a
temporary “business trip” location.
Your “office” address can be easily
changed when necessary.
To choose your “office” address:
1. First, search the databases and select an item. Alternatively, point to a
location on the map (“cursor position”).
2. Select Main menu > Save. Or, in the contextual menu select Save
cursor position.
3. Select Save as office address.
4. The “office” address is saved and ready to be used for navigation,
route planning or browsing.
53
ROUTE 66 MINI & MAXI User Manual
Searching the List of Favourites
1. Select Main menu > Search
> Favourites.
2. Scroll the list. The items are
ordered alphabetically.
3.
Scroll the list of results and
select an item.
4. Display the location on the
map. Select Main menu > Navigate to start a new navigation.
Your favourites could belong to different maps! However, you
cannot start navigating to a favourite that doesn’t belong to
the current map!
Searching Contacts
This option is disabled when the list is empty (no contacts
defined)!
This list contains your personal
contacts. You can either call or
navigate towards these contacts.
1. Select Main menu > Search
> Contacts.
2. Scroll the list and highlight an
item.
3. The application checks the address of the contact and, if there are
similar addresses, a list of results is displayed. Select an item.
4. Display the location on the map. Select Main menu > Navigate to
start a new navigation. For other options, select the main menu.
54
ROUTE 66 MINI & MAXI User Manual
To add a contact:
1. First, search the databases and select an item. Or point to a location
on the map.
2. Select Main menu > Save. Or, in the contextual menu select Save
cursor position.
3. Select Save as contact.
4. Enter a name.
5. Save the new contact.
To update a contact:
2. First, search the databases and select an item. Or point to a location
on the map.
3. Select Main menu > Save. Or, in the contextual menu select Save
cursor position.
4. Select Update contact.
5. In the Contacts list, select a contact.
6. Update the contact.
7. Select Yes to save the new value.
To delete a contact:
1. Select Main menu > Search > Contacts.
2. In the Contacts list, select a contact.
3. Select Main menu > Delete. The contact is permanently removed
from your device.
55
ROUTE 66 MINI & MAXI User Manual
Searching Coordinates
You can search a location by entering its latitude and longitude. This is a
more advanced feature and leads you to precise results.
1. Select Main menu > Search
> Latitude / Longitude.
2. In the Latitude section select
each input field.
3. Enter a correct numeric value.
Use Backspace to correct. Save
values.
4. Repeat steps 2 and 3 for the
Longitude section.
5. Start the search. The location
will be indicated on the map.
6. Select Main menu >
Navigate to start a new
navigation. Or, in the contextual
menu select Navigate to.
You may start searching by only adding the latitude numeric values, only
the longitude ones, or any combination.
You can search any place worldwide! The search is not limited
only to the current map. Any location will be displayed at street
level (if you already bought the corresponding detailed map) or
at a higher level of 200 km or 100 miles (if you don’t have a
license of use for that map).
56
ROUTE 66 MINI & MAXI User Manual
HOW CAN I PLAN
MY TRIPS?
57
ROUTE 66 MINI & MAXI User Manual
Plan a New Trip
You can start planning a trip from any section of the application, as
follows:
Select Main menu > Trips > [New trip].
in any list: highlight an item, then select Main menu > Add to
route.
from the map: when the cursor is active (it indicates a location on the
map), select Main menu > Add to route.
To plan a route:
Select Main menu > Trips > [New trip] and go to the next
screen.
In the Save as input field,
type the name of the new trip.
Enter all characters and go to the
next screen.
In the Set departure screen, select the database you need and
search for the departure point. Add
the departure point to this trip.
Now, the Trip planner
screen contains the departure
point. Add the destination point.
Alternatively, select the main menu
to access the available options.
58
ROUTE 66 MINI & MAXI User Manual
Repeat steps 5 to 7 for each
In the Set destination screen,
select the database you need and
search for the destination point. Add
the destination point to this trip.
If the route contains at least
two places, the Add waypoint
message is displayed. Select Yes to
add other intermediary places to
your trip. Select No to allow the
application to calculate your trip.
Now, the Trip planner
screen contains the departure
point and the destination point. Go
to the next screen.
waypoint you want to add.
59
ROUTE 66 MINI & MAXI User Manual
The route is calculated and
displayed on the map. Now, you can
either start the navigation or use the
trip options.
You can add to a route as many places as you need!
All locations added to a route must belong to the current map!
The cross-border navigation is not possible!
What Can I Do with My Trips?
To open the list of trips, select
Main menu > Trips. When the list
of trips is displayed, you can do the
following operations:
create new trips.
open trip.
rename trips.
delete trips.
send trips to other users.
60
ROUTE 66 MINI & MAXI User Manual
Open a trip:
1. Select Main menu > Trips.
2. Select a trip. If the list is empty, it means you didn’t define any trip.
3. Open the trip. The Trip planner screen is displayed.
Rename a trip:
1. Select Main menu > Trips.
2. Select a trip.
3. Select Main menu > Rename.
4. Use the keyboard to write a new name.
5. Save your changes.
Delete a trip:
1. Select Main menu > Trips.
2. Select a trip.
3. Select Main menu > Delete. The selected trip is permanently
removed from the application.
Delete all trips:
1. Select Main menu > Trips.
2. Select Main menu > Delete all.
3. Select Yes. All trips are permanently removed from the application.
When a trip is open, you can:
start navigating along the trip.
start navigating to the waypoint you selected.
calculate the trip (available when at least two waypoints are defined).
61
ROUTE 66 MINI & MAXI User Manual
change the trip content (add other places, delete existing places,
modify the order of places in the trip).
display on the map the waypoint you selected.
“fly” over the map from one place to another.
send the trip details (route description) to other users.
save as contact or as a favourite the waypoint you selected.
search for points-of-interest around the waypoint you selected.
simulate the navigation along the calculated trip, although you are
stationary (available when at least two waypoints are defined).
delete some or all waypoints.
Simulate Route
To simulate a trip means to view a
“fake” navigation to destination,
although you are stationary.
1. Select Main menu > Trips.
2. Select a trip and open it.
3. Select
Main
menu
Simulate route.
>
4. The simulated navigation starts. The navigation bar and the voice
instructions are enabled and refer to the simulated driving
conditions along the calculated route.
During the simulated navigation, you can:
Increase the simulation speed. Select the upper speedometer
.
Decrease the simulation speed. Select the lower speedometer
.
Interrupt the simulation.
Zoom in.
Zoom out.
62
ROUTE 66 MINI & MAXI User Manual
HOW CAN I USE
MY PHONE?
63
ROUTE 66 MINI & MAXI User Manual
Phone Capabilities
This option is available only when the device is hooked into the
optional cradle! The cradle must be connected to a power
supply!
This navigation device supports a Bluetooth connection. By pairing your
navigation device to a mobile phone, you can:
make phone calls.
receive phone calls.
transfer your contacts from your mobile phone to your navigation
device.
connect to the internet (via the GPRS connection).
use your navigation gadget as a hands-free tool for added
convenience and safety while driving.
64
ROUTE 66 MINI & MAXI User Manual
Enabling and Disabling the Bluetooth Connection
To start the Bluetooth connection,
select Main menu > Phone >
Enable Bluetooth. The Connect
to phone option is now available.
To stop the Bluetooth connection,
select Main menu > Phone >
Disable Bluetooth. All options are
disabled.
When you reset or restart your navigation device, the
Bluetooth connection is lost!
Connecting Your Device to a Phone
To connect your navigation device
to a mobile phone:
1. Select Main menu > Phone >
Connect to phone to prepare
your search for Bluetoothcompatible phones in your
proximity (approximately 10
metres / 32 feet).
2. In the Select a device or
search for more devices
screen, select the Search icon
to find any available Bluetoothcompatible phones. If you
previously set a Bluetooth pair,
65
ROUTE 66 MINI & MAXI User Manual
that phone is preserved in the
list.
3. Select the mobile phone you
prefer. Your device will attempt
to connect to your mobile
phone.
4. When prompted, enter 0000
on your mobile phone to
complete the Bluetooth pairing.
5. On your mobile phone, when the connection attempt message is
displayed, select Yes. Your navigation device is communicating with
your mobile phone. Now, your navigation device has phone
capabilities. The phone icon is displayed on the navigation screen.
Disconnecting Your Device from a Phone
To disconnect your navigation device from a mobile phone, select Main
menu > Phone > Disconnect Phone. The Bluetooth connection is
interrupted.
When you restart or switch off your phone, the Bluetooth
connection is lost!
Importing Contacts from a Phonebook
After you connected your navigation device to a mobile phone, you can
import (“download”) all contacts from the mobile phone.
To import all contacts from a phonebook:
1. Select Main menu > Phone > Call.
2. Select Main menu.
3. Select Yes to start transferring all contacts from the phonebook to
your navigation device. The available contacts will be displayed in this
list.
Certain phone models do not allow you to access their
phonebook! In this case, you cannot import those contacts on
your navigation device.
66
ROUTE 66 MINI & MAXI User Manual
Making Phone Calls
Choose a contact:
Select Main menu > Phone
> Call.
Select a number from the list.
Dial the number. The number
being dialled is displayed on the
screen. Your navigation device acts
as a hands-free set. Select End
call if there is no answer or if you
want to abort the phone call.
Type the number:
Select Main menu > Phone
> Call.
Select New number. Open
the keyboard.
Enter the number you intend
to call.
67
ROUTE 66 MINI & MAXI User Manual
Dial the number. The number
being dialled is displayed on the
screen. Your navigation device acts
as a hands-free set. Select End
call if there is no answer or if you
want to abort the phone call.
Select a number from a list of results or point on map:
Start a search query and select
a result with a phone number. Or,
browse the map and find a location
with a phone number (check the text
box of that location).
Select Main menu > Call. The
number being dialled is displayed on
the screen. Your navigation device
acts as a hands-free set. Select End
call if there is no answer or if you
want to abort the phone call.
Receiving Phone Calls
During navigation, map browsing or
trip planning, you can accept
incoming calls using your
navigation device as a hands-free
phone.
Select Yes to answer the incoming
call.
Select No to reject the incoming
call.
68
ROUTE 66 MINI & MAXI User Manual
Checking the Phone Reports
Use this section to view the history
reports of your phone actions.
You can:
view all calls you initiated,
received or missed.
call any contact from the list.
delete any history record.
Missed calls
1. Scroll the list.
2. Select an item.
3. Dial the number. Delete the
number.
Received calls
1. Scroll the list.
2. Select an item.
3. Dial the number. Delete the
number.
Dialled numbers
1. Scroll the list.
2. Select an item.
3. Dial the number. Delete the
number.
69
ROUTE 66 MINI & MAXI User Manual
HOW CAN I USE
MY FM TRANSMITTER?
70
ROUTE 66 MINI & MAXI User Manual
What Is the FM Transmitter?
This option is available only when the device is hooked into the
optional cradle! The cradle must be connected to a power
supply!
You can extend the functionality of your navigation device. The cradle has
a built-in FM transmitter. When you start the FM transmitter, your
navigation device can send (“broadcast”) the driving instructions to your
car radio system and, further on, to your car audio system.
How to Use the FM Transmitter
1. First, mount the navigation device into the optional cradle.
2. Connect the cradle to a power supply (car lighter or wall socket) for
continuous charging.
3. Switch on the device.
4. Switch on the application.
5. Switch on your radio. Use the radio controls to scroll the FM
bandwidth.
Depending on the strength and quality of the signal sent by the
cradle and the local conditions, use:
a “free” frequency (a frequency that is not used by any
radio program) if the signal of the cradle is not strong
enough to overcome the signal of a radio station.
an already used frequency (the frequency of a radio
station) if the signal of the cradle is strong enough to
overcome the signal of the radio station.
6. Select Main menu > Settings > General > FM Transmitter and
select On. Alternatively, select Main menu > View > FM
Transmitter.
7. Select Main menu > Settings > General > FM frequency. Use
the keyboard to type the broadcasting frequency of your car radio.
Save the value.
8. Save all changes in the General settings section. Now, your
navigation device transfers any driving instruction to your car audio
system.
71
ROUTE 66 MINI & MAXI User Manual
When the FM transmitter is started, all controls on your
navigation device are disabled. In this case, use the controls of
your in-car audio system.
72
ROUTE 66 MINI & MAXI User Manual
HOW CAN I ADD
OTHER FEATURES TO
MY APPLICATION?
73
ROUTE 66 MINI & MAXI User Manual
Extras - Overview
Besides navigation, map browsing
and route planning, you can further
expand the application’s capabilities.
The additional services provided by
ROUTE 66 are called Extras and
include the following possibilities:
Maps - download, buy, activate
and load country maps and city maps for 53 countries around the
world.
Traffic information - Get real-time traffic information with automatic
updates and rerouting. The traffic data is available via the Traffic
Information Channel (TMC).
Safety cameras - With the safety camera updates you always have
the latest information.
Weather - Define your specific forecasts around the world for up to
14 days ahead.
Travel guides - download Lonely Planettm travel guides and check
the information on local culture, activities, accommodation, attractions
and more, for 476 destinations around the world.
Voices - Choose from a selection of clear, friendly voices to help you
navigate in your own language and preferred spoken style.
Colour schemes - Download various themes for your maps.
Update - Update your software with the latest online releases.
To access the additional services, select Main menu > Extras.
The digital content is available in the ROUTE 66 online shop. You can
access the online shop in three different ways:
via the ROUTE 66 Sync desktop application.
via the USB port and your LAN connection to the internet.
via the Bluetooth connection to a mobile phone. The phone must
support the GPRS connection to the internet.
74
ROUTE 66 MINI & MAXI User Manual
Enter voucher code
If you have a voucher you want to use, access the Extras section and
select Enter voucher code.
Type the voucher code. The corresponding item will be activated.
The voucher code is a unique serial number! With a voucher
code you can activate only a specific item (file or service)!
Once the voucher code was used on a device it cannot be used
on other devices!
Accessing the Online Shop via the ROUTE 66 Sync Application
1. Start the navigation application.
2. Connect the navigation device to the PC via the USB port.
3. Start the ROUTE 66 Sync application. Select ROUTE 66 Store.
Refer to the ROUTE 66 Sync help for details.
4. Select a category and browse its subfolders.
Accessing the Online Shop via USB/LAN
1. Start the navigation application.
2. Connect the navigation device to the PC via the USB port.
3. Select Main menu > Extras.
4. Browse the list and select a service.
5. When you are inside a section, select the Shop list. It contains all
items you can download and buy.
75
ROUTE 66 MINI & MAXI User Manual
Buying and Downloading Content via ROUTE 66 SYNC
Refer to the ROUTE 66 Sync documentation for details.
Status of Digital Content
Any item you see in the online shop or on your device can be in one of the
following states:
Red padlock
The item is available in the shop but
you must download and then buy a
license of use. There are two exceptions
to this rule: the item is already
downloaded on your device but you
must buy a license of use; or the
content is free-of-charge and you just
download the item.
Yellow padlock
The item is downloaded and you have a
license of use. Select Main menu >
Select to open it.
Blue padlock
The item is in use.
Yellow key
The item was deleted from the
memory card. Select Synchronise
content to recover your lost content.
The
license
key
was
accidentally deleted from the memory
card. Select Synchronise license
keys to recover your lost license key.
76
ROUTE 66 MINI & MAXI User Manual
There is a special case of purchasing online items: Try for free
(evaluate). This means that an item can be downloaded and then used for
a limited period of time (1 week), free-of-charge. After that evaluation
period, the item must be purchased. If you don’t purchase a license after
the expiration date, the item is automatically locked (red padlock).
The availability of this option varies from region to region.
During the evaluation period, an item can have one of the following
states:
Item is in use. Beginning of evaluation period.
Item is in use. Evaluation period will finish soon.
Item is in use. Evaluation period is over.
Item is downloaded but not in use. Beginning of evaluation
period.
Item is downloaded but not in use. Evaluation period will finish
soon.
Item is downloaded but not in use. Evaluation period is over.
Content was initially downloaded but now is missing. Beginning
of evaluation period.
Content was initially downloaded but now is missing. Evaluation
period will finish soon.
Content was initially downloaded but now is missing. Evaluation
period is over.
77
ROUTE 66 MINI & MAXI User Manual
Refer to the options for digital content for the possible actions you can
do to an item or service.
Options for Digital Content
In the online shop or on your device
the following options are available:
Show information – Read all
available details about the
selected item, before or after
you buy it.
Download – Download on your
device the selected item.
Buy license – Buy a license of use for the selected item. The item is
already downloaded.
Enter voucher code – If you have a voucher code for the selected
(downloaded) item, you can use the voucher instead of paying with
the credit card.
Open - Select this option to start using the selected item. This item
must be downloaded and you must have a valid license.
Delete - Physically delete this item from the memory card. The
license is not lost.
Synchronise content - Select this option if you have a license for
the selected item but the physical content was lost or corrupted. The
content is downloaded, free-of-charge.
Synchronise license keys - Select this option if you have the
physical content of the selected item but you lost your license key.
The license is recovered from the server, free-of-charge.
Renew license - The evaluation period (Try for free) for the
selected item is almost over. Buy a full license of use.
Synchronise License Keys
If your license keys are lost or damaged (you accidentally deleted them
from the memory card, or the memory card was formatted), you can
recover all your license keys from the ROUTE 66 server.
78
ROUTE 66 MINI & MAXI User Manual
The content that needs to be synchronised is marked by a yellow key
.
When you select Synchronise license keys, the application
recovers the missing license keys for all items you bought, not
just for the current item!
Synchronizing your (lost / damaged) license keys is free. The
only charges will be done by the network service providers for
the network usage.
1. Select Main menu > Extras.
2. Select a category (for example, Maps).
3. Select Main menu > Synchronise license keys. The license keys
will be retrieved from the ROUTE 66 server and downloaded on your
device.
You can also recover your (lost / damaged) license keys by using the
backup feature in the ROUTE 66 Sync application. Refer to the ROUTE
66 Sync documentation for details.
Synchronise Content
If an item is deleted, lost or damaged (you accidentally deleted it from the
memory card, or the memory card was formatted), you can recover it by
“synchronizing” your own licenses with the corresponding content.
The content that needs to be synchronised is marked by a yellow key
.
When you select Synchronise content, the application
recovers the missing content for all items you bought, not just
for the current item!
Synchronizing your (lost / damaged) content is free. The only
charges will be done by the network service providers for the
network usage.
1. Select Main menu > Extras.
2. Select a category (for example, Maps).
79
ROUTE 66 MINI & MAXI User Manual
3. Select Main menu > Synchronise content. The content is
downloaded on your device.
You can also recover your (lost / damaged) content by using the backup
feature in the ROUTE 66 Sync application. Refer to the ROUTE 66 Sync
documentation for details.
Delete Content
If you want to free some space on your memory card, you can physically
delete some of the items you previously downloaded and bought. The
state of an item you delete will change from “activated”
synchronization”
.
to “needs
In the future, if you need again this item, you can recover it by
“synchronizing” your own licenses with the corresponding content.
When you delete an item you don’t lose the right of using that
item! The license is stored on the ROUTE 66 server. Next time
you need that item, just select Synchronise content; the
content will be downloaded, free-of-charge.
You cannot delete the item in use (blue padlock)!
To delete an item:
1.
2.
3.
4.
Select Main menu > Extras.
Select a category (for example, Maps).
Open the list of items you have on your device (open or active).
Highlight an item and select Main menu > Delete. The state of that
item will change to “needs synchronization”
.
Maps – Overview
There are two types of maps:
80
ROUTE 66 MINI & MAXI User Manual
A world map, covering the entire
globe and showing just a few
details (country borders, capital
city). The world map is always
available.
Detailed maps, for all continents,
countries and regions. A detailed
map contains cities, roads, pointsof-interest of that country or
region. Your product comes with a
pre-installed detailed map. If you
want to buy additional maps, use
the ROUTE 66 SYNC application (or
other methods) to buy and
download other detailed maps.
Refer to Buying and Downloading Content via ROUTE 66 SYNC
chapter for details regarding the downloading, activating, buying or
subscribing to digital content or services.
For navigation, your physical position (latitude, longitude) must
belong to the current map. For example, to navigate in
Benelux, the current map must be Benelux.
For map browsing, route planning or trip simulation, you don’t
have to be physically in the country displayed on the current
map. For example, you are in Benelux, but the current map is
France; you can browse, plan and simulate trips related to
France.
1. Select Main menu > Settings
> Map > Map or Extras >
Maps.
2. Select a map.
81
ROUTE 66 MINI & MAXI User Manual
3. Load and use this map (blue padlock).
When you browse the world map
and start zooming in over a detailed
map for which you don’t have a
license of use, the application
notifies you that you must go to the
online shop and purchase that map!
Traffic Information - Overview
During navigation, you can come across traffic incidents along your route:
road works, an accident or simply a traffic jam. These incidents can affect
or even ruin your holiday or business plans.
The Traffic Message Channel (TMC) service monitors, collects and sends to
your device the latest traffic conditions. Thus, if you know in advance that
an incident is ahead on the route, you can probably avoid it and choose an
alternative route.
Each traffic message contains the following information:
Road code
Major city and region
Date and time when the event
was reported
Description of road segment
Description of incident
Expected duration of incident
Driving suggestions (detours) if possible
Select Main menu > Extras > Traffic information.
Refer to Buying and Downloading Content via ROUTE 66 SYNC
chapter for details regarding the downloading, activating, buying or
subscribing to digital content or services.
82
ROUTE 66 MINI & MAXI User Manual
Using the Traffic Messages
You can use the traffic information
to check the condition of the
calculated route.
1. Select Main menu > Extras
> Traffic information.
2. Scroll the
messages.
list
of
traffic
If the list is empty, you must update the database! Refer to the Updating
the Traffic Data chapter for details.
3. Select a message.
4. Display the incident on the map.
5. You can either select Main menu
to access the options relevant for
the selected traffic incident (for
example, Navigate) or select the
Back icon to return to the previous list.
Updating the Traffic Data
The traffic conditions change continuously. In order to use the latest data,
you must update the list.
The availability of the TMC data varies from region to region!
You can update your traffic messages in two ways:
manually - select Main menu
>
Extras
>
Traffic
information
and
select
Update.
83
ROUTE 66 MINI & MAXI User Manual
automatically
–
Select
Settings > Extras > Traffic
interval and set the frequency
of automatically receiving new
data (10 / 20 / 30 minutes).
When you attempt to update the traffic information AROUND GPS
POSITION, the application searches and retrieves the TMC messages
around your GPS position (an area of 50 km radius).
If there is any traffic data for this area, the information is displayed in
the list.
If there is no traffic information available for this area, [no data] is
displayed.
If you want to update the TMC messages AROUND CURSOR (the cursor
position you selected on the map during map browsing), the application
searches and retrieves the TMC messages around the cursor (an area of
50 km radius). The possible results are similar to those mentioned above.
Safety Cameras - Overview
During navigation, you will drive
through road sections with different
speed limits or other traffic control
methods (crosswalks, traffic lights,
weight / height control, etc.). If you
know in advance which those
sections are, you can better plan
your trips.
The Safety Cameras service monitors, collects and sends to your device all
known traffic control data.
Select Main menu > Extras > Safety cameras.
Refer to Buying and Downloading Content via ROUTE 66 SYNC
chapter for details regarding the downloading, activating, buying or
subscribing to digital content or services.
84
ROUTE 66 MINI & MAXI User Manual
Using the Safety Cameras
The information provided by the
Safety Cameras Service can be used
in two different ways:
during navigation - you can be
warned in advance that there
are traffic control devices or
speed limit road segments.
during map browsing - you can
check in advance which are the
traffic control devices or speed
limit road segments. Thus, you
can plan your trips by taking
into account these limitations
and restrictions.
1. Select Main menu > Extras >
Safety cameras.
2. Scroll the list of services for different regions / countries.
3. Choose a region / country and
open its content.
4. Scroll the list of traffic control
categories.
5.
Choose
a
category
(for
example, Speed 130) and view
the
list
of
locations
corresponding to this category.
6. Scroll the list of results.
If the list is empty, there are two possible reasons: either
there is no data available for this category, or you must
update the database! Refer to the Updating the Safety
Cameras Data chapter for details.
85
ROUTE 66 MINI & MAXI User Manual
7. Choose an item and display on
the map this traffic control.
8. Select Main menu to access
the options relevant for the
selected traffic control (for
example, Navigate).
Updating the Safety Cameras
Data
The database of traffic controls changes continuously. In order to use the
latest data, you must update the list.
The availability of the traffic control data varies from region to
region!
You can update your traffic control data in two ways:
manually - select Main menu > Extras > Safety cameras and
select Update.
automatically – Select Settings > Extras > Safety cameras
interval and set the frequency of automatically receiving new data
(weekly / monthly).
Weather - Overview
During navigation, map browsing, or
route planning, you can receive on
your device the latest weather
forecasts for any place worldwide,
regardless of the map you are
currently using.
The weather data is gathered by
specialized weather-monitoring centres.
You can:
build a list of your favourite cities.
check the weather forecast for your favourite cities.
86
ROUTE 66 MINI & MAXI User Manual
Select Main menu > Extras > Weather.
Refer to Buying and Downloading Content via ROUTE 66 SYNC
chapter for details regarding the downloading, activating, buying or
subscribing to digital content or services.
Using the Weather Service
When you open the weather
service for the first time, the list is
empty. Now you must:
1. Create a list of your favourite
cities.
2. Update (receive) the forecast
for your favourite cities.
3. Check the weather reports available for each city in the list.
Adding Cities for Weather Forecasts
In this section you add those cities for which you intend to receive
weather forecasts.
You can add any place worldwide, regardless of the map you are currently
using. For example, you are using the map of Italy but you can receive
weather reports for Berlin, Amsterdam, Paris, London, etc.
There are 2 methods of adding a city:
Search - search for a location in the available databases.
1. Select Main menu > Extras > Weather > Weather service.
2. Select Main menu > Add city > Search.
3. Start a search query and find the location you need. Refer to the
Searching chapter for details.
4. Select the location and add this place to the list for weather forecasts.
GPS position - add your current GPS position.
1. Select Main menu > Extras > Weather > Weather service.
87
ROUTE 66 MINI & MAXI User Manual
2. Select Main menu > Add city > GPS position. The place you are
right now (GPS position) is added to the list for weather forecasts.
To modify the details of a city:
1. Select Main menu > Extras > Weather > Weather service.
2. Select the city you intend to modify.
3. Select Main menu > Edit city.
4. Modify the latitude. Select the first 3 fields to display the keyboard and
to enter numeric values. Select the last field to toggle between North
and South.
5. Modify the longitude. Select the first 3 fields to display the keyboard
and to enter numeric values. Select the last field to toggle between
West and East.
6. Save your changes.
To delete a city:
1. Select Main menu > Extras > Weather > Weather service.
2. Select the city you intend to remove.
3. Select Main menu > Delete city. The city is removed from the list.
Updating the Weather Forecast
You can update the weather
forecasts when you add a city or
anytime afterwards.
1. Select Main menu > Extras
> Weather > Weather
service.
2. Select Main menu > Update.
During this procedure, the information is updated for all cities in the
list.
88
ROUTE 66 MINI & MAXI User Manual
3. After all data is received, select a city to view all weather details.
You can also receive updates automatically. Select Main menu >
Settings > Extras > Weather interval and set the frequency of
receiving new data (hourly / daily).
Now you have on your device the latest weather forecast for your
favourite cities.
Weather Reports
There are 5 different weather reports for each city:
Today - This report displays the minimum and the maximum
temperature, the comfort value, the wind speed and direction, the UV
and precipitation values.
Day list - This is a list with the minimum and the maximum
temperature for the next 15 days.
Current conditions - This report displays the current temperature,
the wind speed and direction, pressure and visibility values.
Normal graph - This is a graphical representation of the minimum
and the maximum temperature for the next 5 days.
Extended graph - This is a graphical representation of the minimum
and the maximum temperature for the next 15 days.
To open a report, select the corresponding icon.
Today
This report displays the minimum
and the maximum temperature, the
comfort value, the wind speed and
direction, the UV and precipitation
values.
89
ROUTE 66 MINI & MAXI User Manual
Day list
This is a list with the minimum and
the maximum temperature for the
next 15 days.
The
following
available:
information
Day and date.
Average day temperature
Average night temperature.
is
/
Select an entry from the list and check the weather forecast for the
selected day.
Current conditions
This report displays the current
temperature, the wind speed and
direction, pressure and visibility
values.
Normal graph
This is a graphical representation of
the minimum and the maximum
temperature for the next 5 days.
The
following
available:
information
is
Overall weather status for each
day
Day’s average temperature for each day (red graph)
Night’s average temperature for each day (blue graph)
Date
Use the left arrow to view the previous 5 days.
Use the right arrow to view the next 5 days.
90
ROUTE 66 MINI & MAXI User Manual
Extended graph
This is a graphical representation of
the minimum and the maximum
temperature for the next 15 days.
The
following
available:
information
is
Overall weather status for each
day
The highest temperature for each day (red graph)
The lowest temperature for each day (blue graph)
Date
Travel Guides - Overview
During navigation or before you visit new places, it’s useful to know a few
things about local accommodation, transport and entertainment.
First download and then read the Lonely PlanetTM travel guides.
Select Main menu > Extras > Travel guides.
Refer to Buying and Downloading Content via ROUTE 66 SYNC
chapter for details regarding the downloading, activating, buying or
subscribing to digital content or services.
Using the Travel Guides
1. Select Main menu > Extras > Travel guides.
2. Scroll the list of travel guides for different regions / countries / cities.
3. Select a travel guide and open it.
4. When you open a travel guide, the application behaves like a web
browser.
The following content can be found in a travel guide: contact details and
statistics, photo slideshow, culture, history, environment, politics.
91
ROUTE 66 MINI & MAXI User Manual
Voices - Overview
During navigation, you have access to two types of instructions:
Visual instructions: navigation bar, driving directions, route
description, progress bar, GPS information, trip information, speed
alarm, POI alarm.
Voice instructions: for each change of direction (“driving turn”), a
driving instruction is spoken in the preferred language. The number of
languages available on your device depends on the country or region
of purchase, but includes at least a pair (male voice and female voice
in the default voice of the device). You can also download other voices
from the online shop: different languages, dialects, male / female,
famous actors / actresses, funny, etc.
Select Main menu > Extras > Voices.
Refer to Buying and Downloading Content via ROUTE 66 SYNC
chapter for details regarding the downloading, activating, buying or
subscribing to digital content or services.
Changing the Language of the Voice Instructions
If the voice instructions are not
spoken in the language you prefer,
you can pick a different language.
1. Select Main menu > Extras
> Voices.
2. Scroll the list of available
voices.
They
are
listed
alphabetically and in pairs (male voice, female voice).
3. Select a voice and load it. From now on, this voice will be used for all
driving instructions.
92
ROUTE 66 MINI & MAXI User Manual
During navigation and for safety reasons, we recommend you
to keep the sound switched on and listen to the voice
instructions and other acoustic warnings! This way, you can
concentrate on the road ahead of you and avoid any
unpleasant driving situations!
Colour Schemes - Overview
Use various colour schemes (themes) to change the overall look of the
map (solid areas, streets, etc.) during map browsing or navigation. Select
Main menu > Extras > Colour schemes.
Refer to Buying and Downloading Content via ROUTE 66 SYNC
chapter for details regarding the downloading, activating, buying or
subscribing to digital content or services.
You can also set this option in the Settings > Map settings > Colour
scheme section.
To further customize the look of the map, go to Settings > Maps.
If you want to change the overall
look of the map (solid areas,
streets, etc.) during map browsing
or navigation, do the following:
1. Select Main menu > Extras
> Colour schemes.
2. Scroll the list of available
themes. They are listed alphabetically.
3. Select a theme and load it. From now on, all maps will have this colour
scheme.
93
ROUTE 66 MINI & MAXI User Manual
Update - Overview
Not only that you use a powerful navigation solution, but you can also
update the software. From time to time, new updates are released. They
contain new features or improvements.
You simply access the Update section and download a newer version that
is automatically installed on your device. It’s free and fast!
To download and install an update, do the following:
1. Select Main menu > Extras > Update.
2. The application checks if there is any update available. If there is a
version available, select Download to start updating your software. If
you don’t want to install the update, select the Cancel icon and abort
the procedure.
3. The update is downloaded. Depending on the size of the file and the
network speed, the downloading time may vary.
4. When the download completes, the update is automatically installed.
The software updates won’t influence your personal settings
and data. Your trips, contacts, favourites, etc. are preserved.
94
ROUTE 66 MINI & MAXI User Manual
HOW CAN I CHANGE
THE “LOOK-AND-FEEL”
OF MY APPLICATION?
95
ROUTE 66 MINI & MAXI User Manual
Settings
You can modify the behaviour of the application and customize its
operation, based on your personal needs and preferences.
1. Select Main menu > Settings.
2. Check the list of available settings.
3. Select and open a section.
General settings
Customize the general look of the application: sound intensity, languages,
graphical user interface, and so on.
1. Select Main menu > Settings > General.
2. Scroll the list of available options.
3. Select an option and open the corresponding submenu.
Interface Language
Use this feature to modify the language of the graphical user interface. All
menu options and messages will be displayed in this language.
1. Select Main menu > Settings > General > Interface language.
2. Scroll the list of available languages.
3. Select a language.
4. Update the list.
5. In the General settings screen save the value.
Depending on the country and conditions of purchase, the
number of available languages may differ.
96
ROUTE 66 MINI & MAXI User Manual
UI Colour Scheme
Use this feature to change the overall look of the graphical user interface
by using various colour schemes (themes).
1. Select Main menu > Settings > General > Colour scheme of
user interface.
2. Scroll the list of available themes.
3. Select a theme.
4. Update the list.
5. In the General settings screen save the value.
Voice Language
Use this feature to modify the language of the voice instructions.
1. Select Main menu > Settings > General > Voice language.
2. Scroll the list of available languages.
3. Select a language.
4. Update the list.
5. In the General settings screen save the value.
Depending on the country and conditions of purchase, the
number of available languages may differ. Go to the online
shop to download additional languages.
Map Language
Use this feature to modify the language of all objects displayed on the
current map: streets, cities, areas, points-of-interest.
Automatic means that the application selects the best match for the
current map.
Native lang. names means that the application switches to the
“official” language of the current map. For example, English for Great
Britain, French for France, German for Germany.
97
ROUTE 66 MINI & MAXI User Manual
1. Select Main menu > Settings > General > Map language.
2. Scroll the list of available languages.
3. Select a language.
4. Update the list.
5. In the General settings screen save the value.
Volume
Modify the sound level for the voice instructions during navigation.
Select Main menu > Settings > General > Volume.
Scroll left or right to increase or to decrease the volume. There are 10
levels of sound intensity.
Save the selected level.
During navigation and for safety reasons, we recommend you
to keep the sound switched on and listen to the voice
instructions and other acoustic warnings! This way, you can
concentrate on the road ahead of you and avoid any
unpleasant driving situations!
Combine the Volume option with the Dynamic volume
option!
When the FM transmitter option is enabled, the Volume
option is disabled. Use the volume control of the radio or audio
system.
Sound when Touching the Screen
If you want to hear a short sound (“beep”) when you touch the screen,
you must activate this option.
1. Select Main menu > Settings > General > Sound when
touching the screen.
98
ROUTE 66 MINI & MAXI User Manual
2. Toggle between the available options:
On - hear a short sound (“beep”).
Off - no sound (“mute”).
3. In the General settings screen save the value.
Dynamic Volume
Use this feature to create a correspondence between the sound intensity
(of the voice instructions) and your current navigation speed.
1. In the Main menu > Settings > General > Dynamic volume.
2. Select the option to enable or disable this feature.
When the option is enabled, select again to access the following features:
Speed beyond which volume must be increased - When you
navigate and your car speed reaches this value, the sound intensity
starts increasing.
1. Select the option. The keyboard is displayed.
2. Set a value.
3. Update the list.
4. In the Dynamic Volume Settings screen save the value.
5. In the General settings screen save the value.
Maximum volume at speed - When you navigate and your car
speed reaches this value, the sound intensity is switched to the
maximum level (10).
1. Select the option. The keyboard is displayed.
2. Set a value.
3. Update the list.
4. In the Dynamic Volume Settings screen, save the value.
5. In the General settings screen save the value.
99
ROUTE 66 MINI & MAXI User Manual
FM Transmitter
This option is available only when the device is hooked into the
optional cradle! The cradle must be connected to a power
supply!
You can extend the functionality of your navigation device. The cradle has
a built-in FM transmitter. When you start the FM transmitter, your
navigation device can send (“broadcast”) the driving instructions to your
car radio system and, further on, to your car audio system.
1. Select Main menu > Settings > General > FM transmitter.
2. Toggle between the available options:
On - enable the FM transmitter.
Off - disable the FM transmitter.
3. In the General settings screen save the value.
When the FM transmitter option is enabled, the Volume option is
disabled. Use the volume control of the radio or audio system.
FM Frequency
This option is available only when the device is hooked into the
optional cradle! The cradle must be connected to a power
supply!
To send (“broadcast”) the driving instructions to your car radio system,
the broadcasting frequency of your FM transmitter must be identical with
the broadcasting frequency of your radio system.
1. Select Main menu > Settings > General > FM frequency.
2. Use the keyboard to enter a value.
3. Save the radio frequency.
4. In the General settings screen save the value.
When the FM transmitter option is enabled, the Volume option is
disabled. Use the volume control of the radio or audio system.
100
ROUTE 66 MINI & MAXI User Manual
Backlight
Use this feature to specify the illumination of the screen during day
navigation or night navigation.
The illumination intensity can be set:
manually – set the Backlight value during day and the Backlight
value at night options.
dynamically – the built-in light sensor in the optional cradle controls
the screen illumination.
1. Select Main menu > Settings > General > Backlight.
2. Set the values:
Backlight value during day - use the slider to set the intensity of
the backlight during day navigation.
Night backlight value - use the slider to set the intensity of the
backlight during night navigation.
3. Save the values.
4. In the General settings screen save the changes.
Units
Choose the unit of measurement used in all voice instructions, turn arrows
and route descriptions.
1. Select Main menu > Settings > General > Units.
2. Toggle between:
Metric - metres and kilometres.
Imperial - yards and miles.
3. Automatic - the application switches from Metric to Imperial,
taking into account the current interface language. For example, if the
current interface language is English, the current unit of measurement
is Imperial; if the current interface language is German or French,
the unit of measurement is Metric.
4. In the General settings screen save the value.
101
ROUTE 66 MINI & MAXI User Manual
USB Connection Mode
When you connect the navigation device to a personal computer, you can
have:
an active connection (Active Sync) - Connect your device to the
internet. Or use the ROUTE 66 Sync application to remotely control
your device or to access the online shop.
a passive connection (Mass Storage) – View your navigation device
as an additional disk drive. Read data from the memory card. Write
data on your memory card. During the Mass Storage mode, you
cannot use the application. Click Stop to return to the application.
1. Select Main menu > Settings > General > USB Connection
Mode.
2. Toggle between:
Active Sync
Mass Storage
3. In the General settings screen, save the value.
Map Settings
Customize the look and behaviour of the map: colours, perspective,
rotation, and so on.
1. Select Main menu > Settings > Map.
2. Scroll the list of available options.
3. Select an option and open the corresponding submenu.
Night Colours
Select the behaviour of the screen colours during night navigation or in
tunnels.
By using dimmed colours during a night navigation, you can see the onscreen information more easily. Thus, you are not distracted by bright
colours.
1. Select Main menu > Settings > Map > Night colours.
2. Select an option:
102
ROUTE 66 MINI & MAXI User Manual
On – turn on the night colours manually.
Off – turn off the night colours manually.
Automatic – application will switch automatically from day colours to
night colours (and vice-versa) when sunrise or sunset occurs, or when
you enter or exit a tunnel. Map data and GPS data are used to
determine when to change the colour mode.
Colour Scheme
Use this feature to change the overall look of the map (solid areas, streets,
etc.) by using various colour schemes (themes).
1. Select Main menu > Settings > Map > Colour scheme.
2. Scroll the list of available themes.
3. Select a theme.
4. Update the list.
5. In the Map settings screen save the value.
3D Perspective
You can change the way the map is displayed during navigation:
2D perspective - view the map from above, as you look at a printed
map.
3D perspective - have a panoramic view, as you are actually seeing
the road ahead of you.
1. Select Main menu > Settings > Map > 3D perspective.
2. Select an option:
On – the map is displayed in 3D perspective.
Off – the map is displayed in 2D perspective.
3. Update the list.
103
ROUTE 66 MINI & MAXI User Manual
Viewing Angle
When you are navigating in 3D perspective, you can change the
panoramic way (viewing angle) of displaying the road ahead.
1. Select Main menu > Settings > Map > Viewing angle.
2. Scroll left to decrease the panoramic angle. Scroll right to increase the
panoramic angle. Check the screen’s uppermost area to see the
current value.
3. Update the list.
This option is available only in the 3D perspective!
Show Scale
You can display or hide the map scale in the upper-right corner of the
navigation screen. The map scale is a graphical and textual aid on the
map: when you zoom in or zoom out, the displayed value (metric or
imperial) changes accordingly.
1. Select Main menu > Settings > Map > Show scale.
2. Select an option:
On – the scale is displayed on the screen.
Off – the scale is not displayed on the screen.
3. Update the list.
This option is available only in the 2D perspective!
Rotate Map
You can set the behaviour of the map and the GPS arrow during
navigation. During navigation, the GPS arrow indicates your moving
direction (for example, up orientation of the GPS arrow for a northward
104
ROUTE 66 MINI & MAXI User Manual
navigation, left orientation of the GPS arrow for a westward navigation). In
this case, the GPS arrow is mobile, while the map is fixed.
However, when the map rotates, the GPS arrow and the current road are
always oriented towards the uppermost part of the navigation screen.
1. Select Main menu > Settings > Map > Rotate map.
2. Select an option:
On – the map is rotated.
Off – the map is not rotated.
3. Update the list.
Map
Select the map to be used for navigation and for browsing.
1. Select Main menu > Settings > Map > Map.
2. Scroll the list of available maps.
3. Select a map.
4. Update the list.
5. In the Map settings screen upload the selected map.
The number of maps available in this list depends on the
product you bought and the country / region of purchase! Go
to the ROUTE 66 online shop to buy other maps.
Show Favourites
Sometimes, there are too many elements displayed on the map, so the
navigation screen is too crowded. However, because you have full control
over the content of the map, you can display or hide your favourite
locations.
1. Select Main menu > Settings > Map > Show favourites.
2. Select:
On – your favourites are displayed on the map.
105
ROUTE 66 MINI & MAXI User Manual
Off – your favourites are not visible on the map.
3. Update the list.
Show Points-of-Interest
Sometimes, there are too many elements displayed on the map, so the
navigation screen seems too crowded. However, because you have full
control over the content of the map, you can display or hide some or all
points-of-interest.
If you want to see on the map only a category of locations, select that
category.
If you want to see on the map all points-of-interest, select All
categories.
If you don’t want to see points-of-interest on the map, deselect All
categories.
1. Select Main menu > Settings > Map > Show points-of-interest.
2. Scroll the list of categories.
3. Select the relevant categories. Use the All categories button to
simultaneously select or deselect all categories.
4. Update the list.
5. In the Map settings screen save the changes.
Navigation Settings
Set your navigation preferences.
1. Select Main menu > Settings > Navigation.
2. Scroll the list of available options.
3. Select an option and open the corresponding submenu.
Travel mode
Select the method of travelling, or how to reach the final destination.
106
ROUTE 66 MINI & MAXI User Manual
1. Select Main menu > Settings > Navigation > Travel mode.
2. Select to toggle between the following options:
Fastest (car) – travel by car and use the fastest route to destination.
Shortest (car) – travel by car and use the shortest route to
destination.
Fastest (lorry) – travel by lorry and use the fastest route to
destination.
Shortest (lorry) – travel by lorry and use the shortest route to
destination.
Pedestrian – walk to your destination. Only the 2D perspective is
available in this travel mode.
3. In the Map settings save the changes.
Certain speed limits or access restrictions are imposed on
heavy vehicles (lorries). Thus, for the same departure location
and destination location, the car route can be different than
the lorry route (meaning different waypoints, length of trip,
travel time, speed limits).
Avoid Motorways
Include (or exclude) motorways in your trips.
1. Select Main
motorways.
menu
>
Settings
>
Navigation
>
Avoid
2. Select an option:
On – exclude motorways from your route.
Off – do not exclude motorways from your route. In this case, the trip
to a destination can also contain motorways.
3. Save the changes.
Avoid Toll Roads
Include (or exclude) toll roads in your trips.
107
ROUTE 66 MINI & MAXI User Manual
1. Select Main menu > Settings > Navigation > Avoid toll roads.
2. Select an option:
On – exclude toll roads from your route.
Off – do not exclude toll roads from your route. In this case, the trip
to a destination can also contain toll roads.
3. Save the changes.
Avoid Ferries
Include (or exclude) ferryboat crossings in your trips.
1. Select Main menu > Settings > Navigation > Avoid ferries.
2. Select an option:
On – exclude ferryboat crossings from your route.
Off – do not exclude ferryboat crossings from your route. In this case,
the trip to a destination can also contain water segments.
3. Save the changes.
Automatic Zooming
During navigation or map browsing, you can manually zoom in or zoom
out by selecting the corresponding icons in the upper part of the screen.
However, you can use the automatic zooming. When you approach a
street junction or intersection, the application zooms in to the lowest level
(street level), regardless of the current zoom level; after you cross the
street junction, the application zooms out to the initial zoom level.
1. Select Main menu > Settings > Navigation > Automatic
zooming.
2. Select an option:
On – if you want the application to automatically zoom in when
approaching street junctions.
Off – if you want to select the zoom level yourself; the zoom level you
select is preserved during the entire trip.
3. Save the changes.
108
ROUTE 66 MINI & MAXI User Manual
Alarm Speed
This option is just a personal
preference.
It
warns
you
acoustically and visually that you
reached a speed limit you
previously set as too high.
However, it cannot physically limit
your driving speed; it isn’t an in-car
speed control system and it doesn’t
actively change your cruising speed!
1. Select Main menu > Settings > Navigation > Alarm speed to
open the keyboard.
2. Enter a numeric value.
3. Update the list.
4. In the Navigation settings screen save the changes.
The maximum speed limit you can set is 300 km/h or 155 mph.
The minimum speed limit you can set is 60 km/h or 50 mph.
The Alarm speed option is functional only when it is correctly
combined with the Alarm type option (visual, acoustic, both).
If the Alarm type option is set on None, the Alarm speed is
disabled.
Alarm Type
This option must be combined with the Alarm speed feature!
Set the type of alarm you prefer when you reach a speed limit you
previously set as too high.
1. Select Main menu > Settings > Navigation > Alarm type.
2. Select again to select an option. The following options are available:
109
ROUTE 66 MINI & MAXI User Manual
Visual alarm – a blinking warning is displayed on the screen until you
reduce the cruising speed.
Acoustic alarm – a sound is played until you reduce the cruising
speed.
Both - both warnings are used until you reduce the cruising speed.
None - the alarm speed feature is disabled.
3. In the Navigation settings screen save the changes.
During navigation and for safety reasons, we recommend you
to keep the sound switched on and listen to the voice
instructions and other acoustic warnings! This way, you can
concentrate on the road ahead of you and avoid any
unpleasant driving situations!
Navigation Bar Transparency
Select the degree of transparency of your navigation bar.
Move the slider to the left (minimum transparency) or to the right
(maximum transparency).
Speed
Set the speed value for each type of road.
When the application calculates a route, it takes into account not only the
distance to the destination but also the road types that must be reached.
For each type of road there is a default speed value (for example, 110
km/h or 70 mph for motorways).
These default speed values are based on statistical research. However,
because these values can vary from region to region, you can manually
modify each speed in order to reflect the local conditions and limitations.
The new speed values will be taken into account when a route is
calculated.
1. Select Main menu > Settings > Speed.
2. Select a type of road.
3. Select again to open the keyboard.
110
ROUTE 66 MINI & MAXI User Manual
4. Enter a numeric value.
5. Update the list.
6. In the Speed settings screen save the changes.
Configure Alarm
During navigation, you pass by points-of-interest, favourites or safety
cameras located along or near the road.
To know in time that you are approaching one of these locations, activate
this warning method. For example, if you activate the POI category
Eating & Drinking, you will be warned when you are approaching a
restaurant or a coffee shop, and you have plenty of time to decrease the
speed or to take the correct exit.
POI alarm
Favourites alarm
Safety cameras
alarm
1. Select Main menu > Settings > Alarm.
2. Select a database (points-of-interest, favourites, safety camera).
3. Open a category (or several categories).
4. Select the bottom left icon (“bell” icon) to start defining your alarm.
POI Alarm
Specify how to be warned when a
point-of-interest is close to the
current road. For example, select
the category Attractions if you
don’t want to miss a museum or a
cinema located near the road.
111
ROUTE 66 MINI & MAXI User Manual
1. Select Main menu > Settings > Alarm > Points-of-interest.
2. Select the category (or categories) you intend to define. 15 categories
are available. Use the All categories item to select or deselect all
items in the list.
3. If you want to use the default warning settings, save the changes and
exit the section. If you want to modify the default warning settings,
select the Main menu to open the detailed configuration section. The
Main menu is disabled when you open the section or if there is no
category selected.
4. Scroll the list of warning details.
5. Select Visual alarm - during navigation, it shows or hides the POI
icon when the alarm is triggered.
6. Select Warning sound – choose a ringtone or music clip that will be
played as an alarm.
7. Select Warning distance – enter a numeric value. This value
specifies, in metres or yards, the distance between the driver and the
point-of-interest, when the alarm starts. Update the list.
8. Select Warn only along route – when the value is Yes, the
application ignores locations which are not placed near the current
road. A location is considered near the road if the physical distance
from the road to that place is less than 50 metres / 60 yards.
9. Save all changes.
Favourites Alarm
Specify how to be warned when a favourite location is close to the current
road. For example, you can know in advance that you are 500 metres
away from your Office location.
1. Select Main menu > Settings > Alarm > Favourites.
2. Scroll the list of warning details.
112
ROUTE 66 MINI & MAXI User Manual
3. Select Visual alarm - during navigation, it shows or hides the generic
icon for a favourite when the alarm is triggered.
4. Select Warning sound – choose a ringtone or music clip that will be
played as an alarm.
5. Select Warning distance – enter a numeric value. This value
specifies, in metres or yards, the distance between the driver and the
favourite location, when the alarm starts. Update the list.
6. Select Warn only along route – when the value is Yes, the
application ignores locations which are not placed near the current
road. A location is considered near the road if the physical distance
from the road to that place is less than 50 metres / 60 yards.
7. Save all changes.
Safety Cameras Alarm
Specify how to be warned when a
traffic control element is ahead on
the current road. For example,
select the category Speed 130 if
you want to be warned that you are
approaching a road section with a
speed limit of 130 km/h.
1. Select Main menu > Settings
> Alarm > Safety cameras.
2. Select the category (or categories) you intend to define. The number
(type) of categories varies from region to region. Use the All
categories item to select or deselect all items in the list.
3. If you want to use the default warning settings, save the changes and
exit the section. If you want to modify the default warning settings,
select the Main menu to open the detailed configuration section. The
Main menu is disabled when you open the section or if there is no
category selected.
4. Scroll the list of warning details.
5. Select Visual alarm - show or hide the safety camera icon when the
alarm starts.
113
ROUTE 66 MINI & MAXI User Manual
6. Select Warning sound – choose a ringtone or music clip that will be
played as an alarm.
7. Select Warning distance – enter a numeric value. This value
specifies, in metres or yards, the distance between the driver and the
traffic control item, when the alarm starts. Update the list.
8. Select Warn only along route – when the value is Yes, the
application ignores traffic control items which are not placed near the
current road. A location is considered near the road if the physical
distance from the road to that place is less than 50 metres / 60 yards.
9. Save all changes.
Extras Settings
Select Main menu > Settings > Extras.
Configure the following settings with impact on the extra services:
Traffic interval – Based on the frequency you select here, the
application connects to the internet and receives new traffic data.
Weather interval – Based on the frequency you select here, the
application connects to the internet and receives new weather
forecasts.
Safety cameras interval – Based on the frequency you select here,
the application connects to the internet and receives new traffic
control information.
Usage in roaming - Choose the behaviour of your navigation device
when you leave your home (registered) network and reach a different
network.
Source for traffic information - Select the method of receiving
traffic messages.
Activate TMC Pro - Use the professional traffic information channel.
Network connection - Use this option to configure the behaviour of
the application before you establish a network connection to an
additional service.
1. Scroll the list of available settings.
2. Select and open a submenu.
114
ROUTE 66 MINI & MAXI User Manual
3. Save the new settings.
Traffic Interval
This option is available only after you activate the Traffic
information service!
The traffic information used by your navigation device can be updated in
two different ways:
Manually – Connect your device to a PC (via USB / ROUTE 66 Sync
application), open the service and select Update.
Automatically – Use a temporary connection to the internet
(Bluetooth pair / GPRS), download the latest data, and then interrupt
the connection.
Select the frequency of automatic data update for this service.
1. Select Main menu > Settings > Extras > Traffic interval.
2. Specify the frequency of receiving new traffic information on your
device.
3. Scroll the list.
4. Select and save a frequency.
5. Save the change.
To receive automatic updates, you need a connection to the
internet! Traffic information can be also received with an RDSTMC receiver.
Weather Interval
This option is available only after you activate the Weather
service!
The weather information used by your navigation device can be updated in
two different ways:
115
ROUTE 66 MINI & MAXI User Manual
Manually – Connect your device to a PC (via USB / ROUTE 66 Sync
application), open the service and select Update.
Automatically – Use a temporary connection to the internet
(Bluetooth pair / GPRS), download the latest data, and then interrupt
the connection.
Select the frequency of automatic data update for this service.
1. Select Main menu > Settings > Extras > Weather interval.
2. Specify the frequency of receiving new weather information on your
device.
3. Scroll the list.
4. Select and save a frequency.
5. Save the change.
To receive automatic updates, you need a connection to the
internet!
Safety Cameras Interval
This option is available only after you activate the Safety
cameras service!
The safety cameras information used by your navigation device can be
updated in two different ways:
Manually – Connect your device to a PC (via USB / ROUTE 66 Sync
application), open the service and select Update.
Automatically – Use a temporary connection to the internet
(Bluetooth pair / GPRS), download the latest data, and then interrupt
the connection.
Select the frequency of automatic data update for this service.
1. Select Main menu > Settings > Extras > Safety cameras
interval.
2. Specify the frequency of receiving new safety cameras information on
your device.
116
ROUTE 66 MINI & MAXI User Manual
3. Scroll the list.
4. Select and save a frequency.
5. Save the change.
To receive automatic updates, you need a connection to the
internet!
Usage in Roaming
The availability of this option varies, depending on the
hardware specifications of your navigation device!
Set the behaviour of the navigation device when you leave your home
(registered) network and reach a different network. When this option is
enabled, you can use the internet-based services even when you are
“visiting” a different network (with different fees).
This option is relevant only when you travel outside the geographical
coverage area of your home network.
1. Select Main menu > Settings > Extras > Usage in roaming.
2. Select an option:
Yes – if you want to use the roaming protocol.
No – if you don’t want to use the roaming protocol.
3. Save the changes.
Source for traffic information
Your ROUTE 66 product allows you to receive the latest traffic messages
on your device. Thus, you can avoid traffic jams, road works or accidents
that occur along your route.
The traffic information is gathered by specialized traffic-monitoring
centres. Then, the information is broadcast via the Traffic Message
Channel (TMC). Depending on the device you use, you can choose one of
the following solutions to update your list of traffic messages:
117
ROUTE 66 MINI & MAXI User Manual
RDS - Currently, the Radio Data System (RDS) technology is
supported by most Personal Navigation Devices (PNDs), Windows
Mobile smartphones and PocketPCs. The TMC messages are received
by drivers via an RDS receiver (built-in or stand-alone). An external
antenna is also required. The information is continuously updated.
Internet - Most Windows Mobile smartphones and certain PocketPCs
(only in case of Windows Mobile for Pocket PC Phone Edition) use a
GPRS (internet) connection to receive traffic information. The
information is updated at a time interval specified by the user.
Traffic information is available for selected countries and
selected products!
When the RDS is selected, the Traffic interval setting is
disabled. Only for the internet update you can choose the
update interval.
Activate TMC Pro
TMC Pro is available when you use the RDS-TMC channel.
You need an RDS-TMC receiver.
The traffic messages received via the normal RDS-TMC channel are
reliable but not very detailed. However, they are free.
The traffic messages received via the TMC Pro channel (also known as
commercial TMC) are very comprehensive and at the highest industry
standards. You must buy and activate this service.
1. Select Main menu > Settings > Extras > Activate TMC Pro.
2. Select an option:
Yes – if you want to receive professional traffic data.
No – if you want to receive non-commercial traffic data.
3. Save the changes.
118
ROUTE 66 MINI & MAXI User Manual
Legend
When you browse the map or navigate but you don’t know the meaning of
a symbol or a colour displayed on the map, you can check the Legend
section. Here, you can find out:
the graphical symbols for all types of places (urban conglomeration,
town, district, etc.).
the colour and font for all types of roads (motorways, toll roads, oneway traffic, pedestrian, etc.).
the colour of the calculated route and of the GPS arrow.
the colour of all drawn areas
You can change the colour of the map elements. Once saved,
these graphical changes are visible on the navigation screen.
1. Select Main menu > Settings > Legend.
2. Select an icon to open the corresponding section.
Cities/Symbols (Legend)
This section contains all graphical symbols for all types of places displayed
on the map.
1. Select Main menu > Settings > Legend > Cities/Symbols.
2. Scroll the list.
Roads/GPS (Legend)
This section contains all graphical symbols for all road types, turn arrow,
GPS arrow and GPS point.
1. Select Main menu > Settings > Legend > Roads/GPS.
2. Scroll the list.
119
ROUTE 66 MINI & MAXI User Manual
Areas (Legend)
This section contains all graphical symbols for all areas displayed on the
map, including water, buildings and country borders. Moreover, here you
can select the colours of the navigation bar.
1. Select Main menu > Settings > Legend > Areas.
2. Scroll the list.
Editing Colours in Legend
To customize the map elements, do the following:
1. Select Main menu > Settings > Legend.
2. Select a section.
3. Scroll the list and open the Edit colour section.
4. Select a radio button to display the current colour for a graphical part
of this item. The following graphical parts are available:
Sign colour - to set the icon colour (for example, the square icon of a
town).
Name colour - to set the text colour, for example, the name of a
town or lake.
Number colour - to set the code colour, for example, the code
number of a motorway.
Line colour - to set, for
example, the colour of the route
or turn arrows.
Zone colour - to set, for
example, the main colour of
water.
Inner line colour - to set, for
example, the main colour of a railway.
Outer line colour - to set, for example, the edge colour of a railway.
Background colour - to set, for example, the main colour of a
warning.
120
ROUTE 66 MINI & MAXI User Manual
Foreground colour - to set, for example, the text colour of a
warning.
5. Use the red / green / blue sliders to choose a different colour. The
Previous colour box displays the colour currently used on the map.
The Current colour displays the colour that will be used after you
save your changes. Optionally, select the Reset icon
the default settings for this item.
to restore
6. Save the new colour.
7. Save all changes in this section. Optionally, select the Reset icon
to restore all default settings for Legend.
Date & Time
Set the current date and time used by the application and the device. The
time is used when a route is calculated and the estimated time of arrival is
approximated.
1. Select Main menu > Settings > Date & time.
2. In the Time zone section select the correspondent GMT (Greenwich
Mean Time) region. You can browse the time zones by selecting the
side arrows. Use the left arrow to go westwards and the right arrow to
go eastwards. Depending on your current GPS position, the time zone
will be automatically set when selecting Synchronise with GPS.
3. In the Date (yy-mm-dd) section, select the year / month / day index
to specify the current date. Use the up arrow to increase the value.
Use the down arrow to decrease the value.
4. In the Time (h:m:s) section, select the hours / minutes / seconds for
the current time. Use the up arrow to increase the value. Use the
down arrow to decrease the value.
5. Optionally, select the Synchronise with GPS icon to reset your date
and time, based on the current GPS values.
6. Save all changes.
121
ROUTE 66 MINI & MAXI User Manual
Calibrate Screen
To be sure that the touchscreen of your device works properly, you must
calibrate your screen when necessary. Calibrating means adjusting the
precision and reaction of the screen.
1. Select Main menu > Settings > Calibrate screen
2. Tap the centre of the screen (the “cross” icon). Then tap the four
corners.
122
ROUTE 66 MINI & MAXI User Manual
HOW CAN I USE
MY PHOTO VIEWER?
123
ROUTE 66 MINI & MAXI User Manual
Photo Viewer - Description
Besides navigation, map browsing
and route planning, our application
provides a user-friendly image
browser. You can:
copy photos on the memory
card.
browse for image files (from the
memory card).
view images (from the memory card) and map screenshots (saved
from the navigation application).
view image details.
send photos to friends.
The following image formats are supported: BMP, JPEG, JPEG 2000,
animated GIF, PNG, PCX, TIFF, WMF, ICO and TGA.
To open the photo viewer application, select Main menu > Photos.
Copying Your Photos on the Memory Card
You can add your favourite photos on the memory card and then view
them via the built-in photo viewer.
To add photos on the memory card:
1. Exit the application.
2. Switch off the device.
3. Remove the memory card from the device.
4. Insert the memory card into a memory card reader / writer and
connect it to the USB port of a PC.
Copy your favourite images from the PC (for example, hard disk, CD / DVD
drive, etc.) to the memory card. Next time you start the application and
open the photo viewer, you will be able to view your personal image files.
124
ROUTE 66 MINI & MAXI User Manual
The number of photos you can copy on the memory card is
limited only by the amount of free space available!
When you copy or transfer your digital photos from any
medium to the memory card, first check the local or regional
copyright laws, limitations or regulations!
Browsing for Image Files
With this photo viewer you can view
all images you stored on the
memory card. You can also view the
map screenshots you saved from
the navigation application (refer to
Saving Information chapter for
details).
To open the photo viewer
application, select Main menu > Photos.
Browse the tree structure of the memory card to view and display
available images.
Select the Main menu to view the image information or the sending
options for the selected image.
Viewing Images
When you are in the photo viewer application, you can view images in two
different ways:
Individually – select an image and open it.
125
ROUTE 66 MINI & MAXI User Manual
1
Previous image
2
Next image
3
Reduce the image
4
Enlarge the image
5
Restore the image to its original size
6
Start the slide show.
7
Close the image visualization mode and return to the list of
available images.
8
Thumbnail of current image.
When the image is enlarged, you can tap on the screen then hold and
drag the image in the desired position.
Slideshow – open a folder
containing several images and start
the slide show. The images will be
displayed automatically, one after
the other. All buttons will be hidden.
The images will be displayed
continuously, in a carousel.
126
ROUTE 66 MINI & MAXI User Manual
To stop the slide show and to return to the single image visualization,
select anywhere on the screen.
Viewing Image Details
When you are in the photo viewer application, you can check the basic
details of any image.
To view the details of an image:
1. In the photo viewer section select an image.
2. Select Main menu > Information about image.
3. The following details are displayed: file name, image size (in pixels),
colour depth, file size (in kilobytes).
4. Select the OK button to close the Information about image screen.
Sending Your Photos to Your Friends
When you are in the photo viewer application, you can send your favourite
photos to your friends.
To send your photos to your friends:
1. In the photo viewer section select an image.
2. Select Main menu > Send.
3. The following sending procedures are available:
Send via Bluetooth
The following conditions must be met in order to successfully use any of
the available sending procedures:
you have a valid remote mailbox.
the Bluetooth connection is activated.
127
ROUTE 66 MINI & MAXI User Manual
DISCLAIMER
This service is provided by ROUTE 66 and Bibit Global Payments Services.
For any questions please contact [email protected]. By purchasing you
accept the TERMS OF USE & PRIVACY NOTICE, see www.66.com/legal/.
To the maximum extent permitted by applicable law, ROUTE 66, its
subsidiaries and licensors hereby disclaim all liability arising out of any use
of this product, services and its contents.
By using the ROUTE 66 services, you accept the TERMS AND CONDITIONS
FOR SERVICES, see www.66.com/legal/. To the maximum extent
permitted by applicable law, ROUTE 66, its subsidiaries and licensors
hereby disclaim all liability arising out of any use of this product, services
and its contents.
NOTICE AND DISCLAIMER: Digital cartography can be inaccurate and
incomplete to some extent. The availability and accuracy of GPS and
related services are dependent, among other things, on wireless networks
and satellite systems. They may not function in all areas or at all times.
Therefore never rely solely on the aforementioned material and services
e.g. for essential communications like emergencies. This product and its
contents are made for non-commercial private use only. This product
should not be used by the driver of a motor vehicle while driving. Always
keep your hands free to operate a vehicle while driving. Obey all local
laws. Your first consideration while driving should be road safety. To the
maximum extent permitted by applicable law, ROUTE 66, its subsidiaries
and licensors hereby disclaim all liability arising out of any use of this
product and its contents.
128