1
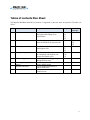
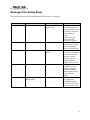
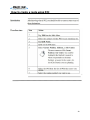
Magellan® RoadMate™ Reference Manual Instructions for Operating the Magellan RoadMate 2000 1 Tables of contents Plan Sheet The Magellan RoadMate 2000 table of contents is organized by the tasks users must perform. The table is as follow: # Chapter Title Purpose Graphics 1 Product Overview Provide a conceptual overview and description of the Budge Tone100 IP Phone. 2 Installation Describes how to properly and safely install and IP Phone on your network. G1 G2 G3 G4 G5 3 Basic Operation Describe how to make, answer and handle phone calls. 4 Configuration guide 5 Software Upgrade 6 7 Restoring factory default setting Headset connection 8 Glossary of terms Provides an overview of procedures for configuring with keypad, web browser and central server. Provide procedures of upgrading through different ways. Provide steps about how to reset factory default setting. Provide diagrams about how to connect the headset. Provide a reference of detailed technical terms. G6 G7 G8 G9 G10 G11 Safety messages C1 C2 C3 C4 C5 2 Audience Analysis plan sheet Audience’s information needs: This Magellan RoadMate 2000 is user friendly. Even some advanced features do not make it hard to use. Hence, the manual should also be usable for every driver who wants to create a route. It is not necessary to read this entire document to begin using the Magellan RoadMate. Most users will find that they can use the Magellan RoadMate right out of the box and just refer to this manual on those rare occasions when a little help on a function is needed. Audience’s technical literacy: Since the Magellan RoadMate 2000 manual is targeted to every driver, I assume that they do not know much knowledge about technical terms. They must have the glossary and clear graphs to help them understand. The content and the language used have to meet the first-level audience’s literacy. Audience’s working environment: The only working environment is the inside environment of the car. Some warning information needs to be provided to ensure the users’ safeties. Audience’s learning preference: Audience prefers learning by performing. Most users would only consult the manual when they need some information. Hence, the manual must be easy to follow and complete. Besides, it should be audience-centered and task-oriented. 3 Task analysis plan sheet Locate Magellan RoadMate Maneuver List Screen Create routes 1.Create a route using POIs a. Create a route to a POI by name b. Create a route to a nearest POI c. Create a route to a POI from an upcoming freeway exit 2. Create a route to go home a. Set the home address b. Change the home Address c. Create a route to the home address 3. Use address book a. Create a route to the previous destination b. Add a previous destination to the address book c. Create a route to an address in the address book d. Edit a route in the address book e. Delete a route from the address book 4. Create a route to the intersection. 4 Use the trip planner 1.Create a multiple destination trip a. Edit the multiple destination trip b. Delete the multiple destination trip Set user options 5 Format Plan Sheet The format for the Magellan RoadMate 2000 manual is the corporate standard for printed documentation and is as follows: Page Element Type and Size Rationale Page size 8 ½ x 11” Cover stock Company trademark upper left. Book title upper right. Company icon in lower right. This manual contains many graphics and photos so that the larger size than the original will be better to read. 60lb is the company standard. Typefaces and type sizes Chapter Headings Subheadings Text Tahoma Bold,16pt. Times New Roman Bold,14pt. Times New Roman Bold,12pt. Times New Roman,12 pt The manual is supposed to be professional. So there should be at least three different types of fonts. Column width 4-1/2” It will follow the traditional singlecolumn format seen in most business documents. Headers Arial Rounded MT Bold, 8pt. Even pages: Chapter number and title on left side. Odd pages: Name of topic on right side. Arial Rounded MT Bold, 8pt. page number on right side. title, company, chapter’s name or page number is expected to be included in the headers. Arial Rounded MT Bold, 8pt. Page number is placed in the footer section. Footers Page numbers Footers will be limited to 1/2” or less since they are only expected to contain page numbers. 6 Access Aids Plan Sheet The access aids in the Magellan RoadMate 2000 manual are as follows: Type of Aid Table of Contents Chapter overview Tabs Index Rationale Simplifies and outlines the information in the manual. Describes the contents of the chapter due to the long chapters Enables users find the information quickly. Help users find information they need quickly Note: The document does not include Color-coded sections and icons for technical publications. 7 Messages Plan Safety Sheet The safety messages in the Magellan RoadMate 2000 manual are as follows: Safety Messages C1 Chapter num and Title #2.Installation Nature of the hazard Possible interference of nearby radio C2 #2.Installation Possible body injury C3 #2.Installation Possible electronic shock C4 #3.Basic operation Possible injury of pins C5 #6. Restoring factory default setting Possible loss of data The risk involved Warning A shielded-type power cord is required in order to meet FCC emission limits and also to prevent interference to the nearby radio and television reception. Warning Connect device during periods of lightning activity would hurt you. Warning To avoid electric shock, do not connect safety extra-low voltage (SELV) circuits to telephone-network voltage (TNV) circuits. Warning Telephone receivers produce a magnetic field that can attract small magnetic objects such as pins and staples. Warning The plug-socket combination must be accessible at all time so that it will not lose date. 8 Source Documents Plan Sheet The sources that I will consult to write in the Magellan RoadMate 2000 manual are as follows: Existing manuals -Magellan RoadMate 1200, Magellan RoadMate 2000, GPS 12 and manual Subject matter experts -Gary Burrell and Dr. Min Kao and experts from Tomtom company. Marketing studies Reviews and tests Garmin 9 Overview Introduction This chapter describes how to use basic knowledge to operate BT 100 series IP phone, which includes making phones, answering phones, handling phones and so on. This chapter also provides phone features. Chapter table of contents 3.Basic operation 3.1Get Familiar with call icon ………………………………………………………… 3.2 Make calls …………………………………………………………………............ 3.3 Answer calls ………………………………………………………………………… 3.4 Hold calls …………………………………………………………………………… 3.5 Transfer calls ………………………………………………………………………. 3.6 Place Conference Call ……………………………………………………………... 3.7 Call Features ………………………………………………………………………... 10 Overview Introduction Provides an overview of procedures for configuring with keypad, web browser and central server. Chapter table of contents 4.Configuration guide 1.1 Configuration with keypad 1.2 Configuration with web browser 1.3 Configuration with a central server 11 Warning of using Magellan RoadMate 2000 Safety rules must be followed to prevent accidents • Do not mount any item to your windshield. • Enter data or program the Magellan RoadMate 2000 only when the vehicle is stopped. • Make every attempt to ensure that the database is accurate. • Keep the Magellan RoadMate 2000 safe from extreme temperature conditions. • Do not remove the battery. • Use only the AC adapter approved for your Magellan RoadMate 2000. • Use only the car charger approved for / supplied with your Magellan RoadMate 2000. The database does not include, analyze, process, consider, or reflect any of the following legal restrictions (such as vehicular type, weight, height, width, load and speed restrictions); road slope or grade; bridge height, width, weight, or other limits; population density; neighborhood quality or safety; availability or proximity of law enforcement, emergency rescue, medical, or other assistance; construction work zones or hazards; road or lane closures; road, traffic, or traffic facilities’ safety or condition; weather conditions; pavement characteristics or conditions; special events; traffic congestion. 12 Specifications Introduction Specification the Magellan RoadMate 2200T is the first rugged, expandable, advanced IPX4-waterproof car system under USD$500 that is upgradeable to provide outdoor navigation and real-time traffic capabilities. The Magellan RoadMate 2000 is the first pocket-sized, durable and powerful car navigation device available from Magellan at under USD$400. Map Coverage: Base Map Pre-loaded - 48 United States Size: 4.28" W x 3.15" H x 1.12" D (W 108.8 mm x H 88 mm x D 28.5 mm) Weight: 7.8 oz / 221 g Display: 3.5" color touch screen display, 2.11" x 2.81" (53.6mm x 71.5mm) Memory: 4 GB hard drive pre-loaded with maps of the 48 United States Mapping Provider: NAVTEQ POI Database: 1.3 million points of interest (POI) Expandable Data Storage: Secure Digital (SD) Card compatible Antenna: Built-in multidirectional patch Temperature Operating Range: 14 to 140°F (-10 to 60°C) GPS Receiver: 20 channels, SiRF Star III Accuracy: 3 to 5 meters (10 - 16 feet) - WAAS/EGNOS, < 7 meters (15 feet) - GPS only Language Support: English Battery Type: Li-Ion rechargeable 1200mA, 12 V AC or 12 vehicle adapter (sold separately) Battery Life: Over 3 hours continuous use 13 Magellan RoadMate 2000 Right Side view Introduction The Magellan RoadMate 2000 uses a touchscreen display for all user inputs. The only readily accessible button that is normally used is the power button located on the right side of the unit. All connections to the Magellan RoadMate are located on the right sides of the unit, protected by a rubber covering to keep out moisture. When you need to access the connectors, simply lift the protective cover from the bottom. Diagram of right side of RoadMate Power - Press and hold to turn the Magellan RoadMate on or off. (Note: The reset switch MUST be in the up position.) USB Connection - (under protective cover) sed for connecting to a personal computer for firmware updates. Headphone Connector - (under protective cover) Please check local laws for use of headphones while driving. External Power Input - (under protective cover) Connects power to the Magellan RoadMate from a cigarette lighter adapter an approved AC adapter. Function table part Power USB connection Headphone Connector External Power Input Function Used to turn the RoadMate on or off. Used for connecting to a personal computer for firmware updates. Used for connecting headphone. Used for connecting power to the RoadMate 14 Magellan RoadMate 2000 Left Side View Introduction The left side of Magellan contains SD Card Slot, Reset button as well as Hold button. SD Card Slot Diagram of the left side SD Card Slot Reset - (under protective cover) Should the Magellan RoadMate not function or during firmware updates you may be required Reset to reset the unit. (The Magellan RoadMate will operate only if the reset switch is in the up position.) Hold Button - (under protective cover) Used to turn off the touchscreen portion of the Hold button display and sets the receiver into a power saving mode. Primarily used for outdoor use where the Magellan RoadMate might be in a pocket or backpack. Function Table Part Function SD Card Slot Used to put SD card Reset Used to start the gps again Hold button Used to make the gps on hold. 15 Magellan RoadMate 2000 Screen Introduction of Map Screen The Map Screen is the most commonly used screen on the Magellan RoadMate. Whether you are getting directions or just driving around town, the Map screen will give you the peace of mind of knowing where you are. Picture of Map Screen Name of the part Name Current street name Zoom out Destination Icon Part 8 4 POI Icon 11 5 6 Location Icon Next Maneuver 12 13 7 Distance to Next Maneuver Part 1 2 3 9 10 Name Time to Next Maneuver Menu Button Next Maneuver Street Name Volume Adjust Zoom In Satellite Status 16 Magellan RoadMate 2000 Main Menu Screen Introduction of Menu Screen The Main Menu has two modes; active trip and normal. When a trip is active the Main Menu provides functions that pertain to the trip. With no active trip, the Main Menu provides access to functions that are used to create a trip. Picture of Menu Screen Table of Function Name 1 Map Button 2 Detour Button 3 Cancel Route Button 4 Satellite Status 5 Re-route Button. 6 Exit POI Button Function Used to access the Map Screen re- routing the trip around traffic problems ahead of you. Cancel the route you are travelling on. Display a bar graph indicating satellite signal strength. Provide a way to re-calculate the route you are on. Name 7 Menu Page 2 8 Options Button Function Access the second page Access the options menu. 9 System Setting Button 10 Menu Page 1 Access system setting features. 11 Active Trip Button provide access to a listing of common POI categories that are near upcoming freeway exits. 12 Trip Computer Provide access to tools to modify the trip you are on. Access the trip computer feature providing information 17 about the trip. Access the first page of the route main menu. How to create Routes Introduction How to create a route to a street address Creating a route involves selecting a destination and choosing how you would like the route calculated. Once this is done, the Magellan RoadMate will calculate the route using the guidelines you provide and displays the Map screen with information guiding you to your destination. Step Action 1 Tap Street Address from the Main Menu. 2 Select Search By City, Search by Zip Code or Previous City. Input the information as requested depending upon your selection in step 2. Select the method to be used to calculate the route. 3 4 Decision Table Use the table below to display the information about creating routes route IF using Search by… THEN spell And THEN spell… And enter City City name Street name Street address number Zip Code Address zip code Street name Street address number Previous City Previously used city Street name Street address number 18 POIs Definition POI (Points of interest) have been preloaded into the Magellan RoadMate for commonly used categories such as banks, restaurants, gas stations, etc. Selecting a restaurant or finding an ATM nearby is at your fingertips. Icon from the Main Menu Category of POI 19 How to create a route using POI 20 How to create a route to a POI from upcoming freeway ex 21 How to create a route to go home Introduction How to set the Home address This function is available whether you are operating on a route or just travelling. Please note that if you are travelling on a route, selecting this will cancel the route and create a new one. You will then need to redo the route, using Previous Destinations in the address book, to finish the original route. Step Action 1 Tap Home from the Main Menu. If you have not entered a home address previously, tap Yes to enter your home address. How to change the Home address 2 Select Search By City, Search by Zip Code or Previous City. 3 Input the information 4 Tap Save to store the home address. Step Action 1 Tap Home from the Main Menu. 2 Tap Change to change your home address. 3 Confirm the change by tapping Yes. 4 Select Search By City, Search by Zip Code or Previous City. 5 Input the information as requested depending upon your selection in step 4. 6 Tap Save to store the home address. 22 How to use the address book 23