1
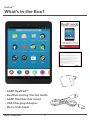
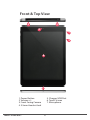
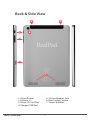
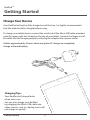
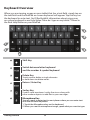
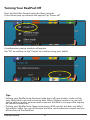
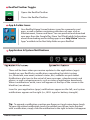
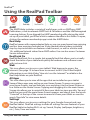
RealGuide
Getting started with your RealPad
User Guide
Get Real. Go Digital.
RealPadTM
Table of Contents
Welcome
Before Using Your RealPad ........................................................................
Questions or Concerns ................................................................................
RealPad Tablet Overview ............................................................................
Specifications of My RealPad ....................................................................
4
4
4
4
4
What’s in the Box?
5
Front & Top View ............................................................................................ 6
Back & Side View ........................................................................................... 7
Getting Started
Charge Your Device ......................................................................................
Keyboard Breakdown ..................................................................................
Turning Your RealPad On ...........................................................................
Unlocking Your RealPad’s Screen ............................................................
Placing Your RealPad on Standby ...........................................................
Turning Your RealPad Off ............................................................................
8
8
9
10
10
10
11
Initial Setup
12
Home Screen Intro
14
Using the RealPad Toolbar
17
Settings - RealPad
Wireless & Networks: Wi-Fi .........................................................................
Wireless & Networks: Bluetooth ..............................................................
Pair Your Tablet to a Bluetooth Device ..................................................
18
19
19
20
RealPadTM
Table of Contents
Settings - Google
Manage Location Access .........................................................................
Change Back-up & Reset Options ........................................................
Add or Remove Accounts .......................................................................
Configure Sync Options ...........................................................................
21
21
22
23
24
Customizing Your Home Screen
25
Changing Your Wallpaper ....................................................................... 25
Rearranging Apps & Folders .................................................................. 25
Removing Apps & Folders ....................................................................... 25
App Basics - Camera, Photos & Videos
26
Camera Shortcuts ...................................................................................... 26
Taking Photos & Videos ........................................................................... 26
Viewing Your Photos & Videos .............................................................. 26
App Basics - Email and Calls
27
Setting Up Your Email ............................................................................... 27
Making Calls with Your RealPad ............................................................ 27
App Basics - Contacts and Calendar
28
Contacts ........................................................................................................ 28
Calendar ........................................................................................................ 28
Safety Tips & Disclaimer
29
Notes
30
RealPadTM
Welcome
Welcome to your RealPad. We’ve put together this helpful guide to introduce
you to the features of your new tablet. If you would like more information about
RealPad, please visit www.aarprealpad.org.
Before Using Your RealPad
Before using your new RealPad, we encourage you to read through this
Getting Started Guide to familiarize yourself with your RealPad’s basic capabilities.
Questions or Concerns
Your RealPad comes with 24/7 FREE Customer Service available through an
800#, email support and remote help sessions. If you have questions
or experience any problems when using your tablet, please contact RealPad
technical support at 866-716-9881 any day of the week or send an email to
[email protected].
RealPad Tablet Overview
RealPad has a touch screen with native resolution of 1024x768 pixels. It is built on
an Intel Clover Trail plus 22520 1.2GHz dual core processor. It has 1GB RAM and
16GB flash storage memory. The operating system is Android KitKat 4.4.2
The product has built-in 802.11b/g/n Wi-Fi, 2.0 MP front-facing & 5.0 MP
rear-facing cameras and is designed to provide a fast and easy-to-use Internet
experience through Wi-Fi.
Specifications of My RealPad
• 16GB Hard Drive
• Intel Processor
• 2MP Front Facing Camera
• Android KitKat 4.4.2
• 5MP Rear Facing Camera
• 1GB RAM
• Micro SD Card Slot
• Wi-Fi
• 7.85” HD Screen
• Bluetooth
• Google Play Store
• 1 Year AARP Membership
Welcome
4
RealPadTM
What’s in the Box?
• AARP RealPadTM
• RealPad Getting Started Guide
• AARP Membership Insert
• USB Charging Adapter
• Micro USB Cable
What’s in the Box?
5
Front & Top View
5
4
3
1
2
6
7
1. Power Button
2. Volume +/3. Front Facing Camera
4. 3.5mm Headset Jack
What’s in the Box?
5. Charger/USB Port
6. Touch Screen
7. Microphone
6
Back & Side View
5
4
1
6
2
3
7
1. Power Button
2. Volume +/3. Micro SD Card Slot
4. Charger/USB Port
What’s in the Box?
5. 3.5mm Headset Jack
6. Rear Facing Camera
7. Stereo Speakers
7
RealPadTM
Getting Started
Charge Your Device
Your RealPad will not be fully charged out of the box. It is highly recommended
that the tablet be fully charged before using.
To charge your tablet device, connect the small end of the Micro USB cable provided
onto the upper right slot located on the top of your tablet. Connect the larger end of
the cable into the charging adapter, and plug the adapter into a power outlet.
It takes approximately 4 hours when using the AC charger to completely
charge a drained battery.
Charging Tips:
• Your RealPad will charge faster
when not in use.
• You can also charge your RealPad
by plugging the Micro USB cable into
other sources such as a laptop, but it will
not charge as quickly.
Getting Started
8
Keyboard Overview
When you are viewing a page on your tablet that has a text field, simply tap on
the text field and the RealPad on-screen keyboard will appear. Tap the keys on
the keyboard to enter text. You’ll find helpful information about using your
on-screen keyboard in our Help Video “How do I type on my tablet?” found in
the Real Help folder on your RealPad.
3
4
1
2
5
6
1
Shift Key
2
Switch between letter keyboard
and the number & symbol keyboard
3
Delete Key
4
Return / Enter Key
5
Smiley Key
6
Microphone Key
Getting Started
Touch once to delete a single character
or hold down to delete words.
Used to send emoticons/smiley face icons along with
other random objects to add flair to your messages.
You can speak to enter text in most places where you can enter text
with the onscreen keyboard.
1. Touch the Microphone key on the keyboard.
2. When you see the microphone image, speak what you want to type.
9
Turning Your RealPad On
To turn on your RealPad, press and hold the Power button located
on the top of the right hand side of the device for 3 seconds.
If it is your first time turning on your RealPad, a setup screen will
appear. Here, you will be guided via on-screen instructions for:
• Selecting Language
• Connecting to the Internet via Wi-Fi (if available)
• Creating/Signing in to your Google Account
• Redeeming your complimentary 1 year membership to AARP
or extending your existing membership by 1 year
POWER
BUTTON
Unlocking Your RealPad Screen
Please note your RealPad will come automatically unlocked.
If you wish to lock your tablet screen, follow the steps below:
1. Tap Settings in your RealPad Toolbar
2. Tap RealPad Settings
3. Tap Security
4. Tap Lockscreen and choose from the available
options for securing your RealPad tablet:
a. None b. Slide c. Pattern d. Pin e. Password
Tap and hold the lock icon on your RealPad and drag in any direction
to unlock the screen. You’ll find helpful information about using
touchscreens in our Help Video “Touchscreen Basics” available in the
Real Help folder on your RealPad.
Placing Your RealPad on Standby
When your RealPad is on, tapping the power button gently will place the
device in standby or sleep mode. Tapping the power button again will wake
the tablet back up. If your RealPad sits idle, the tablet will enter standby
mode automatically to conserve battery life.
Getting Started
10
Turning Your RealPad Off
Press and hold the Power button for three seconds.
A shut down pop-up window will appear. Tap “Power off”.
A confirmation popup window will appear.
Tap “OK” to confirm, or tap “Cancel” to continue using your tablet.
Tips:
• Putting your RealPad into Airplane mode turns off your wireless radio so that
your tablet does not send or receive data. When Airplane mode is on, you will
not be able to send or receive email or browse the Web or use apps that require
an internet connection.
• Putting your RealPad into Silent mode turns off all sounds, but does not affect
the wireless radio. You can still browse the Web, send and receive email, and use
all functions of the ReadPad.
Getting Started
11
RealPadTM
Initial Setup
Your RealPad has been designed for ease of use. When you first turn it on, you will
be guided through a simple set-up process. There are 5 steps with descriptions for
each. Please note: not all steps are required and can be skipped by tapping on the
skip button located at the bottom of each page.
Step 1:
Choose your language and set up your Wi-Fi.
In this step, you will choose your language
and connect to your Wi-Fi network. Choose
your Wi-Fi network from the list of available
networks by tapping on it. Then enter the
password for the network, if required. Not all
Wi-Fi networks require a password. You’ll find
helpful information about connecting to
Wi-Fi networks in our Real Help Video
“Connecting My Wi-Fi” available in the
Real Help folder on your RealPad.
Step 2:
Set up your Google Account or
connect to an existing Account.
A Google Account is a user account that
provides access to Google-owned services
such as YouTube, Google Hangouts, Google
Documents, Gmail and the Google Play Store.
Initial Setup
12
Step 3:
Set up your Entertainment account for downloading and
purchasing apps, books and movies from the Google Play Store.
Google Play is Google’s App Store where
you can download and purchase apps,
books, movies, music and games for your
tablet. You can choose to enter your
credit card information to use for Google
Play purchases during set-up, or skip and
do later when you are ready to purchase
products or services.
Step 4:
Redeem your complimentary
1 Year AARP Membership.
RealPad includes a complimentary 1 year
AARP Membership with your purchase.
You can sign up as a new member or if
you are already an AARP member, an
additional year of membership will be
added to the end of your existing term.
You may also gift this membership to
another person.
Step 5:
Review and accept the AARP
RealPad End User License
Agreement.
Initial Setup
13
RealPadTM
Home Screen Intro
The main screen of your RealPad tablet is called the Home Screen.
On it, you will find a collection of icons for commonly used
applications or “apps” and application folders.
6
1
5
2
4
1. Google Search Bar
2. RealPad Toolbar
3. Navigation Bar
Home Screen Intro
3
4. RealPad Toolbar Toggle
5. Apps & Folders
6. Notification & System Icons
14
1
Google Search Bar:
The Google search bar allows you to easily search the Internet without
opening the internet browser. Type the information you would like to look
up or touch the microphone icon on the right side of the search bar to
speak a command.
2
RealPad Toolbar:
The RealPad toolbar includes folders of information for easy access. Folders
include AARP content and applications; Real Help; RealPad RealQuick Fix, a
simple but powerful tool that helps you identify and fix problems with your
tablet hardware and software with just one click, as well as the Web Browser;
All Apps, showing all the apps that are installed on your tablet; and Settings.
Refer to page 17 for a detailed overview of the RealPad Toolbar
3
Navigation Bar:
Back:
Opens the previous screen you were working in, even if it was in
a different app. Once you back-up to the Home Screen, you can’t
go back any further in your history.
Home:
Opens the Main Home Screen of your RealPad.
Recent Apps:
Opens a list of apps you’ve worked with recently. To open
an app, touch the thumbnail image. To quit and open an
application tap and hold the thumbnail and swipe left to remove.
Home Screen Intro
15
4
RealPad Toolbar Toggle:
Opens the RealPad Toolbar.
Closes the RealPad Toolbar.
5
App & Folder Icons:
Your RealPad Home Screen features icons for commonly used
apps, as well as folders containing collections of apps such as
Entertainment, Games and News. You can purchase and download
new apps from the Google Play Store. You’ll find helpful information
about downloading and installing apps in our Help Video “Intro to
Apps” available in the Real Help folder on your RealPad.
6
Application & System Notifications
There will be times when you receive updates to the applications (apps)
loaded on your RealPad or notifications regarding the tablet system
(i.e., Bluetooth, new email, network status, etc.) available on your tablet.
Notifications alert you to the arrival of new messages, calendar events and
alarms, as well as ongoing events, such as video or application downloads.
When a notifications arrive, icons will appears at the top of the screen in the
black bar (see above).
Icons for your application (apps) notifications appear on the left, and system
notifications appear on the right (i.e., Wi-Fi signal or battery strength).
Tip: To expand a notification, position one finger on it and swipe down slowly.
To open the related notification, touch the related icon. When you’re finished
with a notification, simply slide the notification to the right to make it disappear.
Home Screen Intro
16
RealPadTM
Using the RealPad Toolbar
AARP
The AARP folder includes a variety of useful apps such as: AARP.org, AARP
Publications, a link to relevant AARP Tools & Calculators and the Life Reimagined
Learning Advisor. If you skipped the AARP membership offer during the initial
set-up of your tablet, you’ll find a link to redeem the offer in this folder. To open,
click on the redeem membership app inside the AARP folder.
Real Help
RealPad comes with unprecedented help so you can spend more time enjoying
and less time worrying. Included are 10 pre-loaded tutorial videos including
step-by-step instructions on features used the most, as well as a link to view
10+ additional tutorial videos from AARP online. You can also access Customer
Service information.
RealQuick Fix
RealPad RealQuick Fix is a simple, but powerful tool that allows you to visually
check the status of your tablet and quickly fix hardware and software issues
with just one click.
Web
This icon allows you to access your tablet’s Web browser to access the
Internet. (See page 19 to learn how to connect to Wi-Fi)You’ll find helpful
information in our Help Video “How do I use the Internet?” available in the
Real Help folder on your RealPad.
All Apps
This icon allows you to view all the apps that are installed on your tablet.
Some of these apps may not be on your Home Screen. To move any app to
your Home Screen, tap and hold any icon and drag it to the Home Screen or
to a folder on the Home Screen. Tapping and dragging it to the main Home
Screen also allows you to uninstall it from your tablet or view app info. Tap and
hold the icon until the main Home Screen appears and drag it over the words
“Uninstall” at the top of the screen to remove it from your tablet or over the
words “App Info” to view more details.
Settings
This icon allows you to access settings for your Google Account and your
RealPad tablet. RealPad settings include all settings for core features of your
RealPad tablet including Wi-Fi set up, Sound, Display (wallpaper, brightness,
etc.), Date, Time and more.
Using the RealPad Toolbar
17
RealPadTM
Settings - RealPad
Settings
Settings can be found on your RealPad Toolbar. There are two
categories of Settings on your RealPad - RealPad Settings and
Google Account Settings. Both are accessed by clicking on the
Settings folder in the RealPad Toolbar.
RealPad Settings control core features of your tablet such as
Wi-Fi, screen brightness, security and more. Google Account
Settings include location-based services, data back-up and
restore, accounts and more.
Tip: You can access the AARP Privacy Policy and the
End User License Agreement from the Settings page.
These are the main types of system settings available via RealPad settings:
Wireless & Networks:
Wi-Fi and Bluetooth settings
Device:
Sound, battery, sleep and other display settings
Personal:
Location, language, back-up/reset options
Personal > Security:
Passwords and certificates, app verification, screen lock and encryption
Accounts:
Sync and other account settings
System:
Date, time, accessibility and device information
Tip: Useful settings are also available from the Google Settings (see next page).
Settings - RealPad
18
RealPadTM
Settings - RealPad
Wireless & Networks: Wi-Fi
1. Tap RealPad Settings.
2. Tap Wireless & Networks. Tap Wi-Fi.
3. If Wi-Fi isn’t already on, slide the Wi-Fi switch to the On position.
4. Your tablet scans for Wi-Fi networks. To connect to Wi-Fi, touch a network name.
5. Enter a password, if required. (Most times, a password is required)
Wireless & Networks: Bluetooth
To connect to a Bluetooth device, first turn on your tablet’s Bluetooth. The first
time you use a new Bluetooth accessory, you will need to “pair” it with your tablet
so that both devices know how to securely connect to one another. After the
initial “pairing”, they connect automatically.
To turn Bluetooth On or Off:
1. Tap RealPad Settings.
2. Tap Wireless & Networks.
3. Slide the Bluetooth switch to On.
To change your tablet’s Bluetooth name:
Your tablet has a generic Bluetooth name by default, which is visible to other
Bluetooth devices when you connect them. You can change the name of your
device, so that it is more recognizable.
1. Tap RealPad Settings.
2. Tap Wireless & Networks. Make sure
Bluetooth is turned on.
3. Tap Bluetooth.
4. In the Bluetooth screen, tap Menu.
5. Tap Rename tablet.
6. Type a new name and tap Rename.
Settings - RealPad
19
RealPadTM
Settings - RealPad
Pair Your Tablet to a Bluetooth Device:
You must pair your tablet with a Bluetooth device, before you can connect to it.
Once you pair your RealPad with a Bluetooth-enabled device, they stay paired
until you unpair them.
If the device you want to pair your tablet with isn’t found on the list, ensure that
your tablet is turned on and set to be discoverable.
1. Tap RealPad Settings.
2. Tap Wireless & Networks. Make sure Bluetooth is on.
3. Touch Bluetooth. Your RealPad scans for and displays the IDs of all available
Bluetooth devices in range.
4. If your tablet stops scanning before your Bluetooth-enabled device is ready,
touch Search for devices.
5. Touch the ID of the Bluetooth device in the list to pair your RealPad with it.
6. Follow the on-screen instructions to complete the pairing. If you’re prompted
to enter a passcode, try entering 0000 or 1234 (the most common passcodes)
or consult the manual that came with the device. If the pairing is successful,
your tablet will automatically connect to the device from now on.
Settings - RealPad
20
RealPadTM
Settings - Google
Google Settings
Settings can be found on your RealPad Toolbar. There are two categories of
Settings on your RealPad - RealPad Settings and Google Account Settings.
Both are accessed by clicking on the Settings folder in the RealPad Toolbar.
RealPad Settings control core features of your tablet such as Wi-Fi, screen
brightness, security and more. Google Account Settings include location-based
services, data back-up and restore, accounts and other key ReadPad features.
Manage Location Access
You can use your tablet GPS, Wi-Fi networks and other mobile network
information to estimate your location. Apps that have your permission can use
this information to deliver location-based services, such as the ability to check
and view local traffic or find nearby restaurants.
For Your Tablet
To control what location information your tablet can use, go to
Settings > Personal > Location access.
When the Access to my location switch at the top of the screen is On, you
can select either or both of these check boxes:
GPS Satellites
Your RealPad tablet has GPS capabilities to calculate your location based
on satellite signals.
Wi-Fi & Mobile Network Location
Enabling Google’s location service helps estimate your location faster, with or
without help from GPS. If you turn this option Off, your tablet cannot find your
precise location or share it with any apps.
IMPORTANT: Turning off location access for your tablet also turns it off for
Google Now, other Google and non-Google apps. That means that no
apps can receive your precise location information, and many useful features
will be disabled. For example, in Google Maps, the app will not be able to
provide directions from your current location if this feature is disabled.
Settings - Google
21
For Google Apps
When location access for your tablet is turned on, you can prevent Google apps
from using this information with one easy setting – without affecting access by
non-Google apps. To do so:
1. Go to Settings > Accounts > Google > Location Settings
2. Slide the switch to the Off position
IMPORTANT: When you turn Location settings off, non-Google apps and
Google’s location service will continue to receive your location. To change
these settings, go to Settings > Personal > Location Access.
Change Back-Up & Reset Options
If your tablet has multiple users, only the owner can see the Backup & reset
options. To view the settings described here, go to Settings > Backup & reset.
You can back up settings and other data associated with one or more of your
Google Accounts. If you need to factory reset your device, you can restore your
data for any accounts that were previously backed up.
The following options are available:
Back-Up My Data
If you check this option, a wide variety of your personal data is backed up
automatically, including your Wi-Fi passwords, Chrome bookmarks, a list of the
apps you’ve installed on Google Play, the words you’ve added to the dictionary
used by the onscreen keyboard and most of your customized settings. Some
third-party apps may also take advantage of this feature, so you can restore your
data if you reinstall an app.
If you uncheck this option, your data is longer backed up, and any existing
back-up is deleted from Google servers.
Back-Up Account
Displays the Google Accounts for which data back up is enabled. You must sign in
with one or more of these accounts on a new or reset device to restore from backup.
To add a new account, touch Backup Account > Add Account.
Settings - Google
22
Automatic Restore
Check this option to restore settings and other data when you reinstall an app.
This feature requires that you are backing up your data with your Google Account
and that the app is using the backup service.
Factory Data Reset
Touch this option, then Reset Tablet to erase all your personal data from internal
storage, including information about your Google Account, any other accounts,
your system and app settings, any downloaded applications and your music,
photos, videos and other personal files.
After resetting your tablet, you’ll need to re-enter the same information requested
when you first set up your tablet. If you’ve been backing up your data to an on-line
Google Account, an option during the set-up process allows you to restore it.
Some third-party apps also make use of the back-up service, so if you reinstall one,
its settings and data are restored.
Add or Remove Accounts
If your tablet has multiple users, each has separate account settings.
Add an Account
To add some accounts, you may need to obtain details from the system
administrator about the service to which the account connects. For example,
you may need to know the account’s domain or server address.
1. Go to Settings > Accounts > Add Account.
2. Touch the kind of account to add.
3. Follow the on-screen instructions.
Most accounts require a username and password, but the details depend on the
kind of account and the configuration of the service you’re connecting to.
Depending on the kind of account, you may be asked to configure what kinds of
data you want to sync, name the account and other details.
When you’re finished, the account is added in one of two places:
• Google Accounts show up under Settings > Accounts > Google.
• Other accounts show up under Settings > Accounts.
Settings - Google
23
Remove an Account
You can remove any account and all information associated with it from your
device, including email, contacts, settings and so on. To remove a Google account,
touch its name under Settings > Accounts or Settings > Accounts >Google, then
Menu > Remove account.
For any other type of account go to Settings > Accounts > Account-name
and look for the Remove option.
Configure Sync Options
If your tablet has multiple users, each has separate sync options.
To reach sync settings for Google accounts, start from
Settings > Accounts > Google.
You can configure synchronization options for any of your apps. You can also
decide what kinds of data to synchronize for each account. For some accounts,
syncing is two-directional; changes that you make to the information on your
device are made to the copy of that information on the web. Your Google Account
works this way. Other accounts support only one-way sync: the information on
your mobile device is read-only.
Some apps, such as Gmail and Calendar, have separate synchronization settings
that provide more fine-grained control. For example, to control message syncing
in the Gmail app, ensure you’re viewing your Inbox, then touch
Menu > Label Settings > Sync Messages.
Settings - Google
24
RealPadTM
Customizing Your Home Screen
Changing Your Wallpaper
You can customize the look and feel of your RealPad
Home Screen by changing the wallpaper which is the
image that displays in the background behind the
apps and folders. Simply press and hold any empty
space on the Home Screen until the Choose Wallpaper
pop-up appears. Select from the available options.
Rearranging Apps & Folders
You can rearrange the icons on your RealPad Home Screen by pressing and
holding any icon of any app or folder you’d like to move and dragging it to
a new position on the main Home Screen or one of the secondary screens
to the right or left.
The dots at the bottom of the screen indicate which Home Screen
you are located on.
To create a new folder or add an app to an existing folder, press and drag the app
icon on top of the existing folder to add it to that collection or onto another app
to create a new folder containing both apps. To name your new folder, click on
the new folder icon and click on “Unnamed Folder” to edit the text.
Removing Apps & Folders
To remove an icon or folder, simply press and hold any icon and drag it to the
top of the screen over the word “Remove” and let go when the text turns red.
Note: This does not remove the application from your tablet, only the icon
from your Home Screen. If you accidently remove an app or folder, you can
open your RealPad Toolbar (see page 15) and click All Apps. Press and hold the
icon for the app you inadvertently removed and drag it back to the desktop.
Customizing Your Home Screen
25
RealPadTM
App Basics - Camera, Photos and Videos
Camera Shortcuts
1. Camera Settings
2. Take Photo/Video
1
4
2
3
5
3. Toggle between
Camera & Video
4. Zoom In & Out
(must pinch screen
to show zoom)
5. Camera Features
a. Exposure
b. More Options
c. Switch between
Front/Back Camera
Taking Photos & Videos
1. Point the camera on the back of your tablet at the subject you
want to photograph.
2. Tap the camera icon to take a still image. Tap the video icon
to start to shoot a video. Click the video icon again (now a red
square) to stop filming.
3. To use the zoom feature, simply pinch the screen.
Slide fingers apart to zoom out.
Viewing Your Photos & Videos
To view your photos, tap the Camera & Pictures folder on your Home
Screen. Tap the Gallery icon. Click the photo or video thumbnail you
wish to view or share to bring it full screen. When you view images,
you can zoom in and out by pinching or sliding two fingers apart.
Click the share icon in the upper right hand corner to share it on social
media (Twitter, Facebook, etc.) or to email it to your friends and family.
Click the options icon to delete, edit, crop or set a picture as wallpaper.
You’ll find helpful information about taking and sharing photos and videos in our Real Help Videos
“Photo Basics” and “Video Basics” available in the Help folder on your RealPad.
App Basics - Camera, Photos and Videos 26
RealPadTM
App Basics - Email & Calls
Setting Up Your Email
Follow the on-screen steps to set up your email account.
You’ll find helpful information about setting up your email in
our Help Video “Intro to Email” available in the Real Help folder
on your RealPad.
To set up your email, click the Email icon on your RealPad Home
Screen. If you use Google’s Gmail, click the Gmail app icon which
you will find in the Google folder on the desktop.
Before setting up your email, please ensure that you are
connected to Wi-Fi. If you do not already know your email
settings (POP3, IMAP, etc.) you can obtain them from your
email provider.
Making Calls with Your RealPad
You can use apps like Google Hangouts (pre-installed on
your RealPad) and Skype to make both audio and video calls
to friends and family who also use those apps.
Google Hangouts can be found on the Google folder on your
RealPad Home Screen.
You’ll find helpful information about making calls in our Real
Help Videos section under “Making Calls with Google Hangouts”
available in the Help folder on your RealPad.
App Basics - Email & Calls
27
RealPadTM
App Basics - Contacts & Calendar
Contacts
The People app is your address book. It allows you to store and
manage contact information for your friends and family. The
People app displays contacts from each of your Google Accounts
that you choose to synchronize with your RealPad tablet. You will
be able to add your own contacts as well.
As an added convenience, you can mark a contact as a favorite.
It’s easy, just tap on a contact’s name, then select the “star” icon
up at the top of the contact card. You’ll then be able to see a
combination of these favorite contacts and your frequently
contacted people from the “Favorites” tab of the People app.
Calendar
The Calendar app displays events from each of your Google
Accounts that you choose to synchronize with your RealPad
tablet. You can also:
• Create, edit and delete events.
• View all your calendars at the same time, including
non-Google calendars.
• Quickly email all event guests from a notification with a
customizable message.
App Basics - Contacts & Calendar
28
RealPadTM
Safety Tips & Disclaimer
• It is extremely important that you keep your tablet dry at all times. To avoid
damage, please keep your RealPad, battery and charger away from water and
moisture, and don’t use your tablet or charger when your hands are wet.
• Do not drop or strike your RealPad against a hard surface.
• Never attempt to disassemble your RealPad or its accessories, as this will
immediately VOID any and all warranties you have for your tablet and accessories.
• Never use your RealPad when operating a vehicle.
• In hospitals and areas vulnerable to electromagnetic interference such as an
airplane, please follow the area’s posted rules and regulations regarding the
use of electronic devices.
• To avoid electrical damage, please power off your tablet before entering an
area with unshielded high voltage.
• Subjecting your RealPad to an area with a powerful magnetic field may erase
all data on the tablet.
• This tablet is an Internet-enabled device. Please always supervise children
using the device.
• Please comply with your area’s rules and regulations regarding the use of
electronic devices, and respect others’ privacy and legal rights while using
your RealPad.
Disclaimer
RealPad Technical Support bears no responsibility for any damage or loss
of personal data due to misuse of software and/or hardware, damage to the
player caused by human factors, replacement of battery, or other unforeseen
circumstances. To prevent loss of your data, please backup your data regularly.
Information in the Getting Started Guide is subject to change without notice
and is subject to copyright protection. Copying or otherwise reproducing this
material without prior written consent is prohibited.
Due to hardware and software changes, some of the pictures and functions
described in this manual may not be exactly the same as that which is included
with your tablet.
Safety Tips & Disclaimer
29
RealPadTM
Notes
_________________________________________________________
_________________________________________________________
_________________________________________________________
_________________________________________________________
_________________________________________________________
_________________________________________________________
_________________________________________________________
_________________________________________________________
_________________________________________________________
_________________________________________________________
_________________________________________________________
_________________________________________________________
_________________________________________________________
_________________________________________________________
_________________________________________________________
_________________________________________________________
_________________________________________________________
_________________________________________________________
_________________________________________________________
_________________________________________________________
_________________________________________________________
_________________________________________________________
_________________________________________________________
_________________________________________________________
_________________________________________________________
_________________________________________________________
Notes
30
RealPadTM
Notes
_________________________________________________________
_________________________________________________________
_________________________________________________________
_________________________________________________________
_________________________________________________________
_________________________________________________________
_________________________________________________________
_________________________________________________________
_________________________________________________________
_________________________________________________________
_________________________________________________________
_________________________________________________________
_________________________________________________________
_________________________________________________________
_________________________________________________________
_________________________________________________________
_________________________________________________________
_________________________________________________________
_________________________________________________________
_________________________________________________________
_________________________________________________________
_________________________________________________________
_________________________________________________________
_________________________________________________________
_________________________________________________________
_________________________________________________________
Notes
31
www.aarprealpad.org
Android, Google Play and other marks are the trademarks of Google Inc.
©2014 AARP. AARP and RealPad are trademarks of AARP. All other brands, product names, logos, and icons
depicted herein are intended solely for the purpose of communicating the functionality of the RealPad.
All such images and trademarks remain the property of their respective owners.