1
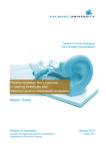
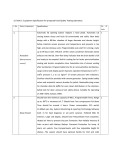
GLUE BINDING MACHINE
OPERATION MANUAL
U K A S
QUALITY
MANAGEMENT
Registra tion No. 14-A
Notice
1.Control section
1).This section consist of control panel , digital screen, key of “confirm”,”
+””-” ,etc .
2)”Txx” on digital screen indicate the environmental temperature before
heating .
2.Setting of temperature controller
1).Press the key of “ok”, video indicate setting temperature ,then adjust
the temperature to around 150 by pressing “+”, “-”.
2).seconds after finish setting ,the showing temperature
1
Notice
will back to current temperature and show
3.Turn on the machine after setting.same .
“HXX” .In the meantime ,relay pick-up and
glue box start heating ,the showing
Phenomena
temperature rise gradually and up to the
setting 150°during 15-20 minutes. The relay
close at this moment .Showing temperature
continue to rise then go down gradually till
1
Indicate:ER-01
2
Indicate:er-02
Reason
Thermal Tube
Malfunction
Thermal couple
malfunction
Solution
Replace thermal
tube
Replace thermal
couple
1-3°under the setting , the relay pick-up and
heating again. Time after time ,the temperature
of melting glue can be maintained .The key
“ok ” should be pressed if temperature need
remain the
2
List
HONEST AND BOON
Thanks for choosing binding machine.
For operation easily and better binding result,
now promote new model of 4 machine, it is
binding, creasing, cutting perfect all in one.
Please read operation manual carefully before
operate. If any problem else, please contact
supplier.
List ......................................................... 1
Packing list and installation .................... 2
Precautious ............................................. 2
Operate parts ..................... . . . . . . . .
3
Operation manual(soft cover) .................
4
Operation manual(hard cover) ..................
8
Adjustment of gluing roller .................... 11
Milling Telmperature Hardback Creasing
Model
cutter
controller
setting setting
3
RD-JB-2
√
√
RD-JB-3
√
√
RD-JB-4
√
√
RD-JB-5
√
√
Adjustment of milling blade ................... 12
Using of creasing setting ........................ 13
Using of hard back setting ...................... 14
Malfunctions, causations and solution .... 16
√
√
√
√
Binding Machine Packing list Installation and Precautios
Installation
Packing list
1.
2.
3.
4.
5.
6.
7.
1 unit of machine
1 set of soft cover template
1 pcs of cable
1 pcs of cross screw-driver
1 pcs of M5 hexagonal socket spanner
1 operate manual
1 bag of glue
Please put this machine onto a stable worktop, avoid
approaching any humidity. Certain space should be kept to
operate the machine
Precaution
1. Connect to the specified power supply(220V/50Hz or 110V/60Hz).Open glue box cover, put in the solid glue. Note:
A.The glue should be clean and without any sundries.B Regularly add the glue particles into the glue box according to glue slurry
consumption. Thus a proper amount of glue slurry can be continuously supplied.
2. Turn on the switch, the glue to be heated under 170 degree about 15-20 minutes. During heating, don’t move the glue
box to avoid damage. Pay special attention to avoid the glue box touching hard thing during operating.
3. Make sure the template on the machine is accordant to the cover of binding file.(e.g. soft cover matches soft cover
template and hard cover file matches hard cover template)
4. Put the paddle on “N” position.
5. During the installation, if the gluing roller on the glue box is not parallel to the spine of the binding book, please adjust it
according to “Adjustment of the gluing roller” section in this manual. (page 11)
6. Milling cutter’s position can be adjusted by adjusting four screws. (page12)
4
OPERATION PARTS
handle
long shaft
milling cutter
cap
short handle
vernier adjust
bolt for gelatinize
front board
clamp plate
temperature
controller
glue box
Height adjust
bolt for gelatinize
glue receiving tray
backing board
allocation shaft
round button
short handle
paddle
pressure plate
front baffle
图A
5
outlet
fuse
adjust bolt for allocation shaft
Height adjust bolt for gelatinize
Height adjustbolt for gelatinize
push board switch
图B
Operation manual(soft cover)
1. Press the handle and draw out the
paper Pressurer
2 .Put the cover in-between the paper
pressurer and platform, and keep it
close to the localizer.The platform
could be raised so that the cover could
be easily placed.
3. Put the paper in-between the cover
and paper pressurer, piling it up neatly.
6
Operation manual(soft cover)
4. Push the paper pressurer down
against the paper and rotate the handle
up, locking the paper in as the picture
shows.
7
5. Press paddle down to “DN”
position, so that a crease can be made
on the bottom cover.And then push
paddle back to “N” position.
6. Push paddle to “UP” position, rotate
the platform upwards and make sure the
bottom side of files is flat.
Operation manual(soft cover)
7. Push the milling cutter back and
forth on the bottom side of files
8. Gelatinize by moving glue box
9. After gelatinizing, Immediately
draught the back cover slightly by left
hand, press the paddledown to “ N ”
position by right hand, and then to
“DN” position, sustaining for around
6---8 seconds.
8
Operation manual(soft cover)
10. Push the paper pressurer down
against the paper and rotate the handle
up, turn the book to back face and put in
again, sustain about 3seconds
9
11. Press the handle down, draw the
paper pressurer open, and take out the
made-book. Cut the untidy edges of the
book to neatly by the paper cutter
Operation manual (hard cover)
Before operation:
① Prepare the hard cover
②Replace the paper pressurer complied for hard cover and allocation shaft.
③Allocate the operation handle to “N” position
1. Press the handle and draw out the
paper pressurer.
2. Put the hard cover in-between the
platform and paper pressurer. Adjust
allocation shaft to press the hard cover
against the front baffle tightly
3. Put two pieces of self-adhibit mount
separately on two sides of the files, tidy
them neatly, and then put them inside
the hard cover. Keep them close to the
allocation shaft, then push the handle
10
Operation manual (hard cover)
4 . Push the paddle to “UP” position,
rotate the platform upwards.
11
5. Push the milling cutter back and
forth movement on the botton side of
files.
6. Press the back cover of hard cover
close to platform document,gelatinize by
moving glue box
Operation manual (hard cover)
7. Draw the paddle back to “N” position 8. Draw out the paper pressurer, turn
and then press it to “DN” position for 2 the book to back face and put in again,
seconds
press the paddle down again to “DN”
position for about 3 seconds.
9. Take out the made-files and tear the
seal paper,back up the mount of the
inside cover, and then make it smooth.
12
Adjustment of the gluing roller
Step 1
Step 2
1. Place a piece of sheet(thickness:0.8mm,320mm*
60mm)on to the platform
2. Place pile of 25mm—thickness paper on the right
position of the binder.
3. Push clamp plate and lock it.
4. Upturn the rotating unit(Platform),until spine of
book is upward.
5. Move the glue box after the glue is heated
6. Watch whether the glue roller is parallel to the
spine of book
7. If not parallel, please adjust bolt(4) until they are
parallel.
8. Loosen the bolt(1)in picture B
9. Adjust bolt(3),until the roller touches the back surface of paper
10. Tighten the bolt(1)
11. Push the glue box to the other side
12. Loosen the bolt(2)in picture B
13. Adjust bolt(5),until the roller touches the back surface of paper
14. Tighten the bolt(2) in the picture B
15. Complete the steps as showed in picture 2( as Showed in the
attached picture)
16. After finishing the adjustment, tack back the sheet, and place another
pile of paper, glue it ,and watch whether the glue is evened,otherwise
more adjustment will be needed, following the same steps as above
图1
13
图2
Adjustment of milling blade
1. The milling depth can be adjusted by adjusting the
depth adjusting bolt Loose the adjusting bolts on milling
blade, move the blade to suitable place, then tighten the
bolt.
2. The milling range can be adjusted by adjusting the range
adjusting bolt. Loose the adjusting bolt on blade, move the
blade to suitable place, then tighten the bolt.
milling range adjusting bolt
milling depth adjusting bolt
14
Using of marking setting
1. Creasing setting is one accessory of 4
there are four kinds of different blades,
creasing blade, undee blade, beeline
blade and breakpoint blade.
3. Blade replacing, twist the blade knob, install right
blade, then twist the blade knob back.
2. As user demand,choosing blade for different
paper bingding efect.
4. Adjusting paper position, press forcibly the blade cover
and slip along the slide rail.
blade cover
blade knob
15
slide rail
Using of hardback setting
(Image one)
(Image two)
(Image three)
1. Ready for hardback operation, take down the pressure plate A. (Image one)
2. Put the cover in between the pressure plate and platform, fixup it by the localizer. (Image two)
3. Put two sheets self adhesive head page as the first page and end page. (Image two)
4. Put the paper in between the cover and the plate against teh localizer .(Image two)
5. Piling the paper up neatly and overturn the platform, gelatinize two or three times by moving glue box, and the timen
is not more than six second. (Image three)
6. Put the fibrillar webbing on the gelatinized spine of a book, and put the cloth on the both book ends. (Image three)
16
Using of hardback setting
(Image four)
(Image five)
(Image six)
7. Overturn the platform, press out the cover and the paper by the pressure plate, take out the book and press out the inverse side.
8. Take out the gelatinized book, rip off the release paper and put the self anhesive head page on the hardback cover s
moothly. (Image four)
9. If there is tectorial cover, heating pressure for tighten binding, the operation as below:
①Install the heating pressure plate andswitch on power
②Waiting for the red light on the plate is ok (Image five)
③Press the gelatinized book 4 second by the heating plate.
④Release the plate, take out the book and press out the inverse side. (Image six)
10. After heating pressure, the hardback book is OK.
17
1. Malfunctions, causations and solution
Malfunctions
I
II
The glue box can������
’�����
t be
heated
The glue is not
layed on evenly or
insufficient
III
It��������������������
’�������������������
s hard to move the
glue box
IV
Th�������������������
e spine of book is
not well formed
V
Poor fastness
of binding
Possible causations
1.the fuse of power source is burned
2.������������������������������
The���������������������������
melting fuse tube is burnt
3.the thermostat doesn�������
’������
t work
4.the electro heat tube is broken
1.the glue in the box is insufficient
2.��������������������������������
The�����������������������������
gluing roller doesn���������
’��������
t rotate
3.the gluing roller doesn������������
’�����������
t average
distance to the spine of book
4.the pressure of gluing roller is
insufficient
1.the glue isn��������������
’�������������
t heated well
2.some sundries is in the box
3.the glue slurry goes bad due to
long idleness
1.���������������������������
T��������������������������
he paper not neatly placed
2.Too short time to push and press
the cover template
3.Misuse the cover template
4.The pressure of two ends of the
cover template isn�����������
’����������
t balanced
1.too slow gluing
2.too slow or too short of pushing
and pressing the cover template
3.poor quality of the glue
4.wrong grain direction of paper
Solutions
R�����������������
eplace a new fuse
R������������������
eplace a new tubes
R������������������������������
eplace a new electro heat tube
Replace a new electro heat tube
Add glue
F������������������������������������
it the roller and tighten the bolt, don���������������������������
������������������������������
’��������������������������
t move the glue box ������
until�
the temperature reaches to the point
Adjustable������������������
the gluing roller
Adjust the gluing roller
Run the glue box when it is heated
Be aware of cleaning the glue particulate
H�������������������������������������������������
eat and clear the remain glue slurry in the box, then
�������������
add new
glue.
M��������
ake the ������
paper �����������
sheet tidy ����
and ����
flat
A������������������������������������������������������
djust the time of pushing and press the cover template
C����������������������������������������������������
heck whether the binding document matches the cover
template
Adjust and correct the pressure on two end
S��������������
peed up gluing
Rapid pushing and pressing, and master the proper time
U�����������������������
se the recommended glue
B����������������������������������������
ind in the same grain direction of paper
18