1
Reconnex inSight / iGuard 7.0.0.4
User Guide
January 18, 2008
Reconnex Corporation
201B Ravendale Drive
Mountain View, California 94043
Reconnex Corporation
Copyright
©2008 by Reconnex Corporation. All rights reserved.
Reconnex™ is the trademark of Reconnex Corporation. All other trademarks are the property of their respective
holders.
Reconnex iGuard, inSight Console, and Discover are Class A digital devices, pursuant to Part 15 of the FCC rules.
These limits are designed to provide reasonable protection against harmful interference when the equipment is
operated in a commercial environment.
This equipment generates, uses, and can radiate radio frequency energy, and if not installed and used in
accordance with the instruction manual, may cause harmful interference to radio communications. In a residential
area, operation of this equipment is likely to cause harmful interference, in which case the user may be required to
take adequate measures. In a domestic environment this product may cause radio interference, in which case the
user may be required to take adequate measures.
This documentation is protected by copyright and distributed under licenses restricting its use, copying,
distribution, and compilation. No part of this help system may be reproduced in any form by any means without
prior written authorization of Reconnex.
The Reconnex Help System is provided "as is" without warranty of any kind, either expressed or implied, including
any kind of implied or expressed warranty of non-infringement or the implied warranties of merchantability or
fitness for a particular purpose.
Reconnex reserves the right to change any products described herein at any time, and without notice. Reconnex
assumes no responsibility or liability arising from the use of products described herein, except as expressly agreed
to in writing by Reconnex. The use and purchase of this product does not convey a license to any patent copyright,
or trademark rights, or any other intellectual property rights of Reconnex.
Reconnex inSight Console Help System, Release 7.0.0.4
Published 2008: Part #11-2140
ii
Release 7.0.0.4
iGuard/inSight User Guide
Contents
The Reconnex Solution .................................................................................................................................... 1
Reconnex Centralization............................................................................................................... 1
Features of Release 7.0.0.4........................................................................................................... 2
Reconnex Architecture ................................................................................................................. 3
Use Cases .......................................................................................................................................................... 4
Find Confidential Documents....................................................................................................... 5
Find Covert Email .......................................................................................................................... 5
Find Data Leaked in the Past........................................................................................................ 7
Find Encrypted Traffic .................................................................................................................. 9
Find FTP Traffic Containing Source Code ................................................................................ 11
Find Postings to Social Networking Sites ................................................................................ 14
Find Traffic to and from Foreign Nationals ............................................................................... 15
Find Traffic to Gambling or Adult-Oriented Sites .................................................................... 18
Find Transmission of Financial Information............................................................................. 20
Get Statistics on Web Sites Visited ........................................................................................... 21
Investigate a User's Online Activity........................................................................................... 22
Tune a Rule to Exclude Approved Business Processes ......................................................... 23
Using the System ............................................................................................................................................ 25
Finding Incidents ......................................................................................................................... 25
Adjust Your Workspace .......................................................................................................................... 25
Custom Dashboard Viewing .................................................................................................................. 26
Incident Viewing Options ....................................................................................................................... 27
Get Incident Details ............................................................................................................................... 28
Sort Incidents ........................................................................................................................................ 31
Incident Examples ................................................................................................................................. 31
Delete Incidents .................................................................................................................................... 33
Filter by Time ........................................................................................................................................... 34
Filter by Group ...................................................................................................................................... 36
Clear Filters Regularly ........................................................................................................................... 37
Filtering Examples ................................................................................................................................. 37
Save a Report .......................................................................................................................................... 40
My Reports ............................................................................................................................................ 41
Schedule a Report ................................................................................................................................ 42
Report Examples ................................................................................................................................... 42
Export a CSV Report ............................................................................................................................. 43
Export a PDF Report ............................................................................................................................. 44
Send Notification of a Report ................................................................................................................ 47
Copy Report Views to Users ................................................................................................................. 48
Delete a Report ..................................................................................................................................... 49
Release 7.0.0.4
iii
Reconnex Corporation
Managing Cases .......................................................................................................................... 49
Create a Case from the Incident List ..................................................................................................... 50
Create a Case .......................................................................................................................................... 51
Assign a Case.......................................................................................................................................... 52
Export and/or Download a Case ............................................................................................................ 53
Delete a Case ........................................................................................................................................... 54
Add to an Existing Case ......................................................................................................................... 54
Change Owner of a Case ........................................................................................................................ 57
Change Priority of a Case....................................................................................................................... 57
Change Resolution of a Case................................................................................................................. 57
Change Status of a Case ........................................................................................................................ 58
Before Searching ......................................................................................................................... 58
Command Line Searching ...................................................................................................................... 58
Command Line Identifiers ..................................................................................................................... 59
Country Codes for Location Searching ................................................................................................ 61
Create Compound Queries ..................................................................................................................... 68
Capture Chat Sessions ........................................................................................................................... 68
Distributed Searching ............................................................................................................................. 69
Search by Concept .................................................................................................................................. 69
Search by Content Type ......................................................................................................................... 70
Search by Digest ..................................................................................................................................... 72
Search by Email Address ....................................................................................................................... 72
Search Email by Domain or Subject ...................................................................................................... 72
Search by File Size .................................................................................................................................. 73
Search by File Type ................................................................................................................................ 73
Search by Filename ................................................................................................................................ 73
Search by IP Address ............................................................................................................................. 74
Search for IP Addresses on a Subnet ................................................................................................... 74
Search by Keywords ............................................................................................................................... 74
Search by Location ................................................................................................................................. 77
Search by Port Number .......................................................................................................................... 78
Search by Protocol ................................................................................................................................. 79
Search by Time ........................................................................................................................................ 80
Search by URL ......................................................................................................................................... 80
Search by User ID ................................................................................................................................... 81
Search for Images ................................................................................................................................... 81
Search for Fleshtone Images ................................................................................................................. 82
Search Limitations .................................................................................................................................. 83
Word Limitations ................................................................................................................................... 84
Search List ............................................................................................................................................... 84
Search Using Standard Templates ........................................................................................................ 85
Search Using Custom Templates .......................................................................................................... 85
Use Keyword Search Shorthand ............................................................................................................ 86
iv
Release 7.0.0.4
iGuard/inSight User Guide
Use Logical Operators ............................................................................................................................ 87
What are Policies? ....................................................................................................................... 88
Standard Policies .................................................................................................................................... 88
Regulatory Policies ............................................................................................................................... 88
Electronic Risk Modules (ERMs) ........................................................................................................... 89
Custom Policies .................................................................................................................................... 89
What is Activation? ................................................................................................................................ 89
Policy-Based Activation ......................................................................................................................... 89
Activation and Inheritance ..................................................................................................................... 89
Activate or Deactivate a Policy .............................................................................................................. 90
Create a Policy ...................................................................................................................................... 90
View a Policy ......................................................................................................................................... 91
Edit a Policy .......................................................................................................................................... 91
Delete a Policy ...................................................................................................................................... 92
Execute a Policy.................................................................................................................................... 92
Publish a Policy ..................................................................................................................................... 92
Unpublish a Policy ................................................................................................................................. 93
Rename a Policy ................................................................................................................................... 93
Use a Policy as a Template................................................................................................................... 94
Change Ownership of a Policy .............................................................................................................. 95
What is a Rule? ....................................................................................................................................... 96
Rule-Based Activation ........................................................................................................................... 96
Activate or Deactivate a Rule ................................................................................................................ 96
View Rules ............................................................................................................................................ 97
Create a Rule ........................................................................................................................................ 97
Tune a Rule........................................................................................................................................... 98
Edit a Rule........................................................................................................................................... 100
Delete a Rule ...................................................................................................................................... 100
What is an Action Rule? ....................................................................................................................... 101
Create an Action Rule ......................................................................................................................... 101
Apply an Action Rule ........................................................................................................................... 103
Delete an Action Rule.......................................................................................................................... 104
What is a Concept? ............................................................................................................................... 105
Standard Concepts ............................................................................................................................. 105
Create a Concept ................................................................................................................................ 108
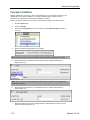
Concept Conditions ............................................................................................................................. 110
Regular Expression Syntax ................................................................................................................. 111
Create a Network Concept .................................................................................................................. 112
What are Templates? ............................................................................................................................ 115
Standard Templates ............................................................................................................................ 115
Create a Template .............................................................................................................................. 116
Delete a Template ............................................................................................................................... 118
Managing the System ................................................................................................................................... 119
Release 7.0.0.4
v
Reconnex Corporation
System Monitor.......................................................................................................................... 119
Alerts ...................................................................................................................................................... 119
Alert Types .......................................................................................................................................... 120
Filter Alerts .......................................................................................................................................... 120
Set Up Alert Notification ...................................................................................................................... 121
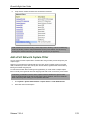
Manage Users and User Groups .............................................................................................. 122
User Group Design ............................................................................................................................... 123
Preconfigured User Groups................................................................................................................. 123
Add a User Group ............................................................................................................................... 124
Assign Permissions .............................................................................................................................. 125
Role-Based Multi-User Access............................................................................................................ 126
View Group Permissions ..................................................................................................................... 126
Tasks Permissions .............................................................................................................................. 126
Policy Permissions .............................................................................................................................. 127
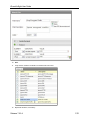
Add a New User ..................................................................................................................................... 127
Change Password or Profile................................................................................................................ 128
Create a Failover Account ................................................................................................................... 129
Find Permissions ................................................................................................................................. 129
Primary Administrator .......................................................................................................................... 130
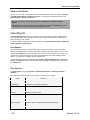
Audit Logs ............................................................................................................................................. 130
Audit Log Actions ................................................................................................................................ 130
Audit Log Editing ................................................................................................................................. 136
Audit Log Filtering ............................................................................................................................... 137
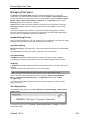
System Administration ............................................................................................................. 138
Host and Network Configuration ......................................................................................................... 138
Setup Wizard....................................................................................................................................... 139
What are Capture Filters?..................................................................................................................... 140
Capture Filter Types ............................................................................................................................ 140
Capture Filter Actions .......................................................................................................................... 140
Standard Content Capture Filters ........................................................................................................ 141
Standard Network Capture Filters ....................................................................................................... 142
Create a Content Capture Filter .......................................................................................................... 143
Create a Network Capture Filter .......................................................................................................... 145
Reprioritize Capture Filters.................................................................................................................. 147
Activate a Capture Filter ...................................................................................................................... 148
Deploy Capture Filters ......................................................................................................................... 149
View Deployed Capture Filters ............................................................................................................ 149
Modify a Capture Filter ........................................................................................................................ 150
Delete a Capture Filter ........................................................................................................................ 150
Filter Out Files by Size ........................................................................................................................ 150
Add an IP Address Network Capture Filter.......................................................................................... 152
Add a Port Network Capture Filter ...................................................................................................... 153
Advanced Utilities ................................................................................................................................. 156
vi
Release 7.0.0.4
iGuard/inSight User Guide
View Objects ....................................................................................................................................... 156
System Logging .................................................................................................................................. 157
Managing Disk Space ......................................................................................................................... 159
Using Directory Services ...................................................................................................................... 160
Set Up Active Directory Services ........................................................................................................ 160
Using an LDAP Server ........................................................................................................................ 161
Managing Devices ............................................................................................................................... 166
Contact Technical Support ....................................................................................................... 169
Create a Technical Support Package .................................................................................................. 169
Power Redundancy ....................................................................................................................................... 170
FCC Advisory ............................................................................................................................. 170
Safety Compliance .................................................................................................................... 170
Index............................................................................................................................................................... 169
Release 7.0.0.4
vii
iGuard/inSight User Guide
The Reconnex Solution
Reconnex iGuards are at the heart of the Reconnex solution. They intelligently capture, classify
and process all information, regardless of protocol or object type, on a network. They are highspeed, non-intrusive, passive security appliances that collect, classify, analyze and store network
data.
Reconnex is the only vendor with a before, during and after approach to information protection.
Five features are core elements of the Reconnex solution to protecting all information assets on a
network:
Monitor:
Provides real-time scanning and analysis of all network traffic, regardless of content
type, protocol or port.
Capture
Stores events related to critical content in an indexed, searchable database,
enabling after-the-fact investigation and improved security.
Control
Defines policies that filter network data, assigns roles to organizational
stakeholders, provides case management and unified reporting tools to establish
workflow processes for remediation of security violations.
Discover
Scans data repositories to identifiy and fingerprint sensitive information to ensure
protection of data at rest.
Prevent
Alert, as well as blocking and filtering techniques in coordination with rules and
policies to control information that is traversing or being stored on the network.
Note: Discover and Prevent are not yet integrated into this release, but can be implemented as
separate products.
iGuards operate efficiently regardless of the size of an organization. For small to medium-sized
businesses, they can be attached directly to the network and operate in standalone mode. In a
large organization, multiple iGuards can be deployed in clusters (managed mode) and their
operation can be controlled by one or more inSight consoles.
Reconnex Centralization
The inSight Console centralizes iGuard operations by redistributing the workload between all
components of the Reconnex system.
The full system coordinates control over all five phases of information protection: Monitor, Capture,
Control, Prevent and Discover.
Release 7.0.0.4
1
Reconnex Corporation
The inSight appliance takes over iGuard tasks like customizing policies and assigning privileges to
users, allowing iGuards to focus on core tasks, such as capturing and analyzing network data. It
also expands iGuard's reporting capabilities to create an enterprise-wide case management
structure.
Features of Release 7.0.0.4
This release contains an extensive list of new features and has a completely redesigned interface.
Filter data to find incidents and violations faster
Generate and export reports
Build concepts and templates
Use captured results to build cases for investigation
Capture relevant data and construct rules
Create action rules to act on violations and block data loss
Manage the system with many new tools
Monitor the health of the system
Create capture filters to manage system performance
Set up alerts
Maintain system logs and user audit logs
Communicate with LDAP and email servers
For more information, consult the Release Notes.
2
Release 7.0.0.4
iGuard/inSight User Guide
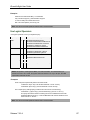
Reconnex Architecture
Reconnex architecture supports essential 32- and 64-bit platforms which includes access to
expanded memory. A single process can share more resources when capturing, analyzing and
searching for data.
iGuard systems are built on 64-bit hardware that can access up to a total of 16 GB of SDRAM, or
32-bit architecture, which is limited to 4 GB.
On a 64-bit system, more memory is available for full reassembly, classification, searching,
indexing and attribute scanning, which means that larger objects and more flows can be handled.
As a result, the system runs faster.
Release 7.0.0.4
3
Reconnex Corporation
Use Cases
The standard policies shipped with iGuard contain rules that automatically capture many of the
incidents generated by direct searches, but you can use one of our sample use cases to deal with
some common scenarios quickly.
Find encrypted traffic
Insiders attempting to conceal illegal activity or steal your intellectual property routinely use encryption. This
use case will help you identify the sources and destinations of encrypted traffic on your network.
Find covert email
Users who deliberately bypass your corporate mail server may be involved in activities they don't want you to
know about. This use case can help you identify unknown or unsecure email services on your network that
you may not have been aware of because non-standard ports were used.
Find confidential documents
Whether accidental or unintentional, confidential documents are often found exposed on corporate
networks. This use case helps you identify how confidential documents are being used and by whom.
Find FTP traffic containing source code
Employees who are leaving the company sometimes feel they have a right to the code they have created.
This use case will help you identify who is sending what source code out of the company using FTP.
Get statistics on web sites visited
Even though users are routinely allowed to use the Internet to complete their job duties, knowing their
activities may help you to adjust corporate security posture or policies. This use case will show you who is
visiting what domains on the Internet.
Identify disgruntled employees
Unhappy insiders can do a lot of damage to your business operations if they are not found and stopped. This
use case will identify users who have participated in email or instant messaging conversations using words
that could indicate discontent.
Investigate a user's online activity
If you suspect unethical or illegal activity, you must take action to protect company assets. This use case will
allow you to examine that activity.
Find data leaked in the past
This process can keep you have having to wade through reams of data to support legal action by allowing you
to examine what content has left the organization.
Find traffic to gambling or adult-oriented web sites
Easy access to the Internet may be too tempting for those who seek distraction from their job duties. This use
will help you identify who may be using corporate network assets for gambling or pornography.
Find transmission of financial information
Even the most dedicated and hardworking employees may not realize the implications of failing to protect
such documents. This use case will help you to see who is sharing your financial information, and with whom.
4
Release 7.0.0.4
iGuard/inSight User Guide
Find traffic to and from foreign nationals
Loss of intellectual property to emerging markets has cost U.S. companies billions of dollars. This use case
helps you identify who your employees are communicating with outside of the country.
Find postings to social networking sites
Employees who are deeply engaged in their relationships on these sites may not realize how much
productivity is lost, or how much sensitive information is leaked when they use Web 2.0 sites in the workplace.
This use case will help you to identify those users.
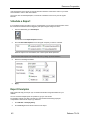
Find Confidential Documents
You can do a simple keyword search to find out if any of your confidential documents are available
on the network or were emailed outside of the company.
1.
Go to Search > Basic.
2.
Type in the words and/or phrases found in the documents.
You can extend a common keyword search by using logical operators.
Because the default operator is the Boolean AND, this query finds documents marked both
"Confidential" and "Proprietary", but not "privileged", which uses the NOT operator.
3.
Click Search.
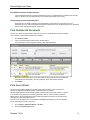
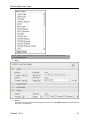
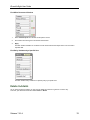
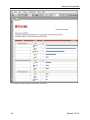
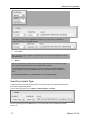
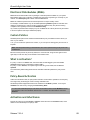
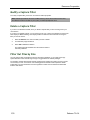
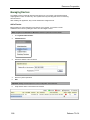
Find Covert Email
iGuard can find email that bypasses corporate mail servers because it is port- and protocolagnostic (it classifies and indexes all traffic, regardless of port or protocol).
Because traffic types are associated with specific numbered ports,using a port number in a search
is an efficient way of pinpointing a specific type of traffic. Port 25, which is usually used by the
SMTP protocol, is the logical place to look for email transmissions, but users can get around this
expectation by using of an alternate port.
The solution to this problem is to set up iGuard to find SMTP transmissions on any non-standard
port by eliminating port 25 from the query.
1.
Go to Capture > Advanced Search > Content.
2.
Select the Content Type element.
Release 7.0.0.4
5
Reconnex Corporation
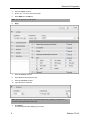
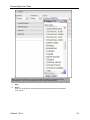
3.
Select the equals condition.
4.
Click on the "?" to launch the values palette.
5.
Select SMTP from the Mail list.
Note: You can just type it in if you prefer.
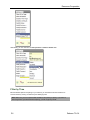
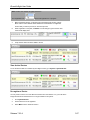
6.
Apply.
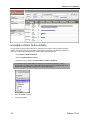
7.
Select the Protocol element.
8.
Select Port from the drop-down menu.
9.
Select the not equal condition.
10. Type "25" into the Value field.
Note: Because the entry is numeric it cannot be selected from a palette. If you select the "?",
the online help for port searches will launch.
11. Click Search.
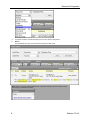
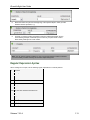
The dashboard will launch displaying your results.
6
Release 7.0.0.4
iGuard/inSight User Guide
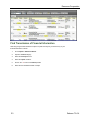
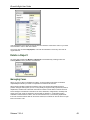
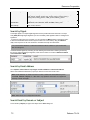
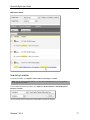
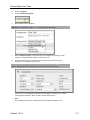
12. Select Group by Detail from the dashboard header.
This will give you a graphical picture of the results.In this case, you can see that port 1 was used
instead of the expected port 25.
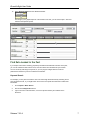
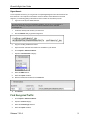
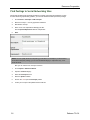
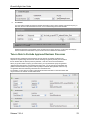
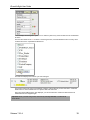
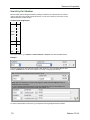
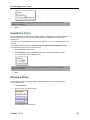
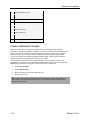
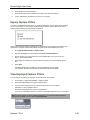
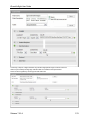
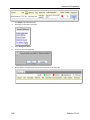
Find Data Leaked in the Past
If you suspect a document containing proprietary information has leaked at some time in the past,
you can use a historical search to find out if, when and where the information left your network.
You can do this by searching for keywords, or you can program a digest search to find one
particular document that you know contains the information.
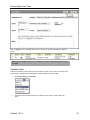
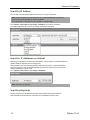
Keyword Search
For example, you may want to locate the source of an Earnings Per Share leak by searching for the
exact projected amount, or you might search for the name of a specific document that contains that
information.
1.
Go to Capture > Basic Search.
2.
Use the default Keywords element.
3.
Type in the name of the document, or a word or phrase that may be contained in the
document.
Release 7.0.0.4
7
Reconnex Corporation
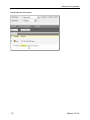
4.
If you have an idea if when the leak may have occurred, select a time period.
5.
Search.
Your results will show you when and where the document was found.
Note: When you search captured data directly, results are reported in an ad hoc search group,
as if the query created its own policy.
8
Release 7.0.0.4
iGuard/inSight User Guide
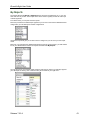
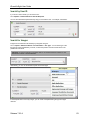
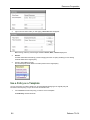
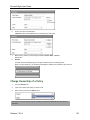
Digest Search
To find a specific document, you can generate a compact digital signature from the document and
then search for it. This requires command line access to iGuard; contact Reconnex Technical
Support if you need help getting to the back end of the machine to execute this process.
1.
Login as root to any Unix-based machine.
This procedure is just one way to generate a signature. You can do it on a Windows or
Macintosh machine by using open source checksum software found on sites like
sourceforge.net.
1.
Locate the directory that contains your document.
2.
Use the md5sum utility to generate a signature.
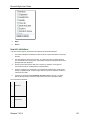
4.
Copy the resulting hexidecimal number.
5.
Open a browser and enter the hostname or IP address of your iGuard.
6.
Go to Capture > Advanced Search.
7.
Open the File Information category.
8.
Select the MD5 element.
9.
Select the equals condition.
10. Enter the hexidecimal number into the Value field.
11. Click Search.
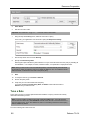
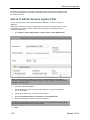
Find Encrypted Traffic
1.
Go to Capture > Advanced Search.
2.
Open the Content category.
3.
Select the Content Type element.
4.
Select the equals condition.
Release 7.0.0.4
9
Reconnex Corporation
5.
Click on the "?" to launch the Values palette.
6.
Select Crypto from the Protocol list.
Note: You can just type it in if you prefer.
6.
Search.
When results are launched, you will see a listing of all encrypted files found.
10
Release 7.0.0.4
iGuard/inSight User Guide
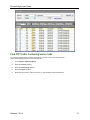
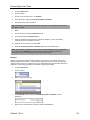
Find FTP Traffic Containing Source Code
If you have an employee who is leaving the company, you may want to check and see if that
person is attempting to take his source code with him.
1.
Go to Capture > Advanced Search.
2.
Select the Content category.
3.
Select the Content Type element.
4.
Select the equals condition.
5.
Define the type of source code by selecting "?" and checking the appropriate boxes.
Release 7.0.0.4
11
Reconnex Corporation
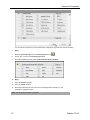
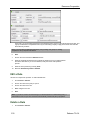
You can narrow the search if you know what kind of compression may have been used on the file(s).
6.
Apply.
7.
Select the green plus sign under the Content Type element.
8.
Click on the "?" to launch the Content Type palette.
9.
Check the possible file type(s) under Compressed and Archive Formats.
10. Apply.
11. Select the Protocol category.
12. Select the equals condition.
13. Define the method the user may have used to send large files by selecting "?" and
checking the appropriate boxes.
Note: You can type in the values if you prefer.
12
Release 7.0.0.4
iGuard/inSight User Guide
FTP is commonly used to transmit large files, but other transport protocols can be selected
from the Protocol palette.
14. Apply.
15. Search.
If a match is found, your dashboard results will be launched. If not, a No Match Found status will be reported
at the top of your dialog box.
Release 7.0.0.4
13
Reconnex Corporation
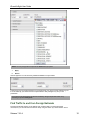
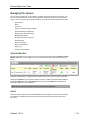
Find Postings to Social Networking Sites
Employees sometimes post personal information to popular online blogs and websites. To keep
this from becoming a productivity problem, you can have iGuard find and report these postings.
1.
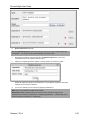
Go to Policies > Concepts > Add Concepts.
2.
Name the concept — use only uppercase characters.
3.
Describe the concept.
4.
Enter one or more expressions identifying the site.
Use the Upload Expressions field for multiple sites.
5.
Save.
NOTE: You can qualify the amount of posting you will allow. For example, if you don't want to
know about infrequent postings, you can use the Count category to report them only if 3 or
more are found.
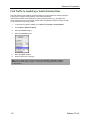
Now you can use this new concept in a search.
1.
Go to Capture > Advanced Search.
2.
Open the Content category.
3.
Select the Concept element.
4.
Enter the equals condition.
5.
Click on the "?" to open the Concepts palette.
6.
Locate your concept on the palette and check its box.
14
Release 7.0.0.4
iGuard/inSight User Guide
NOTE: You can just type the concept into the Value field if you prefer.
7.
Apply.
8.
Search.
Another approach is to use the factory default BLOGPOST concept instead.
Currently it is set to recognize deadspin.com, fuckedcompany.com, digg.com and slashdot.org, but
It can be edited by your technical service representative to find postings to any site you find
problematic.
Transmissions to specific sites can also be revealed by doing a simple URL search.or by
searching for protocol HTTP_Post.
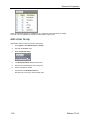
Find Traffic to and from Foreign Nationals
Protecting intellectual property can be difficult when sensitive data is so easily transported
overseas, but you can find such transmissions easily using the Search by Location feature. This is
Release 7.0.0.4
15
Reconnex Corporation
done using Source and Destination IP addresses, whichhelp you to identify where your traffic is
coming from and where it is going.
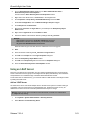
1.
Go to Capture > Basic Search.
2.
Pull down the Input Type menu.
3.
Select Location.
4.
Click on the "?" to launch the Values palette.
5.
Select countries you think may be sending or receiving transmissions.
Note: You can type in the names of the countries if you prefer,
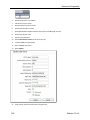
4.
16
Apply.
Release 7.0.0.4
iGuard/inSight User Guide
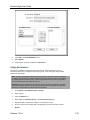
When you find related results, you can filter them to reveal additional patterns and give you a summary view
of the results.
5.
Select Group Detail from the dashboard header.
In this case, the data is divided into content and location, and only the first five entries are shown.
This changes the view of the data so that you can see what type of content was found and where it was sent.
Note: Because IP addresses change continually, you will need to link a DHCP server to a 7.1.x
iGuard to accurately identify a foreign host.
Release 7.0.0.4
17
Reconnex Corporation
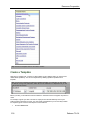
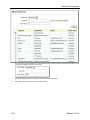
Find Traffic to Gambling or Adult-Oriented Sites
Use of the Internet in the workplace has the potential to be a major distraction, allowing employees
to play games, engage in online gambling, or visit adult-oriented sites.
Some of these activities are automatically covered by standard policies (e.g., Acceptable Use,
Legal, Human Resources), but searching network traffic using iGuard's standard concepts can help
you find evidence of such activity quickly.
1.
To see what concepts are available, go to Policies > Concepts > Factory Default.
2.
Go to Capture > Advanced Search.
3.
Select the Content category.
4.
Select the Concept element.
5.
Select the equals condition.
6.
Enter the name of the concept(s).
Note: You can either type the name (consult the list at Policies > Concepts > Factory
Default for the exact entry), or use the "?" to launch the concepts palette and check the
concept box(es).
18
Release 7.0.0.4
iGuard/inSight User Guide
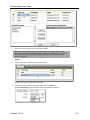
Note: If you select more than one concept, a logical OR condition is implemented. This is
indicated by the use of a comma between the two conceptsin the Value field.
7.
Apply.
8.
Search.
When your results launch, they will include words and phrases found that were defined
in the concept.
Release 7.0.0.4
19
Reconnex Corporation
Find Transmission of Financial Information
Searching using iGuard's standard concepts is a quick and easy way to find out if any of your
financial information is at risk.
1.
Go to Capture > Advanced Search.
2.
Open the Content category.
3.
Select the Concept element.
4.
Select the equals condition.
5.
Click on the "?" to launch the Values palette.
6.
Select the four standard financial concepts.
20
Release 7.0.0.4
iGuard/inSight User Guide
These concepts contain words and phrases that identify a broad range of financial content.
You can get an idea of what is contained in those concepts by going to Policies > Concepts >
Factory Default for a summary of each.
7.
Apply.
8.
Search.
.
Get Statistics on Web Sites Visited
You can do a custom search using any URL to find out how often that site is visited and by whom.
1.
Go to Capture > Basic Search.
2.
Select the Custom input type.
3.
Enter the web site's URL.
4.
Search.
Release 7.0.0.4
21
Reconnex Corporation
Investigate a User's Online Activity
You may need to monitor online activity for an employee if you suspect company policies are being
violated. You can do this by finding a UserID, email address, hostname or IP address to identify the
user, then constructing a search to retrieve all information under that identifier.
Go to Capture > Advanced Search.
Open the Sender/Recipient category.
Identify the user by selecting an Email address, UserID or IP address.
If a UserID is used as an identifier, it must be an Active-Directory username, such as
those found on an LDAP server. Users can have more than one e-mail address alias, so a
UserID does not necessarily correspond to a user's email address.
4.
Select the equals condition.
5.
Type in the identifier.
22
Release 7.0.0.4
iGuard/inSight User Guide
.
6.
Click Search.
You may prefer to target the search for specific elements by using a more complex command line query. In
this case, the user's local hostname is known, so it is entered using the location identifier.
To use the location function (loc:) to identify the user's hostname you must have DHCP
enabled on a 7.1.x iGuard.
Additional information can be added on the command line to narrow the query. In this case, there may be
reason to believe that information may be found in the user's webmail or chat sessions.
Tune a Rule to Exclude Approved Business Processes
iGuard rules are created from saved searches, and the process of creating an efficient rule
depends on experimenting with searches until the resulting rule gathers precisely the information
that is needed. After the search process is perfected, a new rule can be saved and utilized.
When you get the results of a query you have formed, you may find that the query has gathered
"dolphins along with the tuna." By tweaking the original rule, you can exclude any parameter that
gathers extraneous data.Tuning rules in this way helps to eliminate false positives and focus only
on significant data when extracting information from the data stream.
For example, you may want to create a rule that finds financial information in office documents that
may be found on the network in email attachments.
Release 7.0.0.4
23
Reconnex Corporation
But when you get the results of the search you are using to create the rule, you notice that your
Finance department employees have every right to transmit and receive the data that others should
not be touching.
To exclude those employees from the search for sensitive financial information, you create an
email alias under the Sender/Recipient category to represent them (if there were just one or two
employees, you could use their email addresses instead). Then you use the does not contain
condition to create an exception so that Finance Department staffers are not erroneously reported.
When the search is run again, legitimate users are not included in the results, and you can save the
rule for routine implementation.
24
Release 7.0.0.4
iGuard/inSight User Guide
Using the System
If you are using an inSight Console, you are the central management point for multiple iGuards.
The work generally done on standalone iGuards is shifted away from those managed mode
appliances to make your network security easier to manage.
Whether you use an inSight Console or a standalone iGuard, the tasks described here will help you
to find incidents and violations, investigate anomalies, prepare reports, build cases, and set up
othermechanisms to help you protect your business operations.
Start with these core topics.
Before Searching
Create Compound Queries
Custom Dashboard Viewing
Filtering Examples
Incident Examples
Get Incident Details
My Reports
Search by Keywords
Search Using Standard Templates
Managing Cases
What are Policies
What are Templates
What is an Action Rule
What is a Concept
What is a Rule
Finding Incidents
If no incidents are found on your dashboard, your iGuard may not have been up long enough, or it
may not be detecting traffic.
First try clicking on the Monitor tab. Capture may have started while the interface was
loading.
Check your iGuard's status by going to the System Monitor.
If there is no systemic problem, try clearing any existing filters.
If none of these tactics work, contact Reconnex Technical Support.
Adjust Your Workspace
Open and close your navigation bar by double-clicking between frames.
Release 7.0.0.4
25
Reconnex Corporation
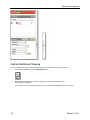
Custom Dashboard Viewing
You can rearrange the columns of the dashboard to give you the information you need at a glance.
1.
On the Monitor dashboard, select the Edit Columns icon.
2.
Use the table that launches to move the categories you consider most important to a
default viewing configuration.
For example, if you are searching for images, you may find the ThumbnailMatch column most useful.
26
Release 7.0.0.4
iGuard/inSight User Guide
Note: The Details column is crucial if you want to drill down into your results to access the
original object that triggered the capture.
Once you have decided on the columns you need, you can change their placement by selecting
and moving them to different positions.
Note: If you customize columns on the dashboard, the configuration will carry over to other
pages. If you save reports, you can preserve those views and use them again.
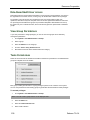
Incident Viewing Options
The dashboard header provides three choices for viewing your incidents.
Incident List gives you an ability to view, sort and manage incidents in detail (default).
Group Detail gives you quick statistical overviews based on filtering choices.
Incident Summary reports incidents in common clickable categories.
In addition, the default views provided in the drop-down menu on the dashboard can give you some
quick variations on these three categories.
These standard configurations are created with filtering and custom dashboard options. You can
use these examples to create your own custom views.
Release 7.0.0.4
27
Reconnex Corporation
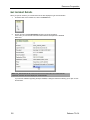
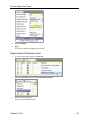
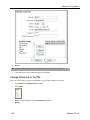
Get Incident Details
When you open an incident, you can drill down into the item displayed to get more information.
1.
On the line item on the Incident List, click on the Details icon.
2.
Click on any link in the Incident Details window to get more information.
In this case, you can see that a Word document has been transported as a Webmail
attachment.
Note: FTP_Data details like file names, file size and user information for incidents that are
captured in real time cannot be displayed in incident details.
If you have the software supporting the object installed, a dialog box will launch allowing you to open or save
the document.
28
Release 7.0.0.4
iGuard/inSight User Guide
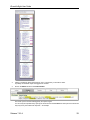
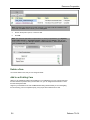
3.
If there is another link within that document, click it. The last link you are able to select
is probably the database object that triggered the incident.
4.
Click on the Match tab above the Incident Details.
This shows you the text that was flagged by the capture engine.
You can verify the captured text by opening the document from the Incident tab. Some part of that document
may tell you why the incident was reported — for example
Release 7.0.0.4
29
Reconnex Corporation
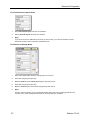
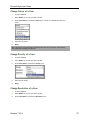
5.
Click on the Concepts tab above the Incident Details.
If a concept was used to flag an incident, this tells you which one.
6.
Click on the Case tab above the Incident Details.
This shows you whether or not a case was filed on this incident, and if so, gives all of the relevant information
about the case.
7.
Click on the History tab above the Incident Details.
This tells you who has looked at this incident and what action they took when viewing it.
30
Release 7.0.0.4
iGuard/inSight User Guide
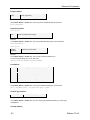
Sort Incidents
Use the Actions menu to sort any incident or group of incidents into a configuration that helps you
to manage them more easily.
When you assign attributes to an incident, you can extend its usefulness.
For example, if an incident requires further investigation, you can assign a case to it and keep its
status up to date by using the Modify Resolution menu.
Tip: You may need to customize columns to get the information you define with these
procedures to show up in your incident list.
Incident Examples
Use the following examples to get a feeling for how to use the dashboard to find relevant incidents.
Find High-Risk Incidents
1.
Select Severity equals from the first two drop-down menus.
2.
Select a severity.
3.
Apply.
This filter can narrow down a wide-ranging field of incidents and violations to only those that are critical.
Release 7.0.0.4
31
Reconnex Corporation
Find Transmissions between Users
1.
Enter DestinationIP equals and enter an IP address.
2.
Filter by SourceIP equals and enter an IP address.
3.
Apply.
If you do not have the IP addresses of the users you want to track, you could use Hostname, Sender,
UserEmail, UserID in place of SourceIP and Destination IP.
Find Posts to a Message Board
1.
Select a time period within which the postings may have occurred.
2.
Add a filter using the green plus sign.
3.
Make the Protocol equal to HTTP_Post using the drop-down menus.
4.
Add a filter using the green plus sign.
5.
Make the Content equal to the web site using the drop-down menus.
6.
Apply.
This filter could be helpful if you have a disgruntled staff member who may be posting gossip about the
company at one of the message boards known for receiving employee complaints.
32
Release 7.0.0.4
iGuard/inSight User Guide
Find Office Document Violations
1.
Select Content equals from the first two drop-down menus.
2.
Check office document types in the window that launches
3.
Apply.
This filter would find whether or not Word or Excel documents with the subject "Price List" are found in
captured data.
Find Policy Violations by a Specific User
This filter would find any violations of a specific policy by a specific user.
Delete Incidents
As you sort through the incidents, you may want to delete some of them to get them out of the way.
To do this, just check their boxes and select Actions > Delete.
Release 7.0.0.4
33
Reconnex Corporation
Alternatively, you can mark them as false positives or mark for deletion later.
Filter by Time
Because iGuard captures everything on your network, you must limit the amount of data to be
scanned. Start any viewing of incidents by first filtering by time.
Note: Make sure you have captured data available for the period you specify. If you select a
date range before your iGuard started capturing, you will not get any results.
34
Release 7.0.0.4
iGuard/inSight User Guide
Tip: If you are not getting results from a query, try resetting your timestamp filter.
Besides selecting approximate dates, you can specify specific date ranges.
Pull down the menu under Timestamp and select Custom Dates, then click on the "?" and select your
starting and ending dates.
Release 7.0.0.4
35
Reconnex Corporation
You can combine timestamp settings with Group by... attributes to expand your options.
Filter by Group
The Group by feature helps you to view your captured data in many different ways. iGuard is
capable of capturing hundreds of different protocols, content types, and attributes.
For example, selecting Content from the Group by menu shows you what file types have been
captured in the current results.
If you then select Group by Detail and select other sorting keys, you can narrow your query.
36
Release 7.0.0.4
iGuard/inSight User Guide
This example shows that the Content grouping has been focused on Filename and Protocol,
producing two hits with those attributes.
You can combine timestamp settings with Filter by attributes to expand your options.
Important: When you finish using a filter, clear them by selecting Clear All, or it will block all
other results.
Clear Filters Regularly
When you finish using a filter, Clear All, or it will block all other results.
Filtering Examples
The filtering utilities on the navigation bar provide many ways of finding exactly the results you
need. The Group by... and Filter by... tools can each be used alone to produce some useful
results, but they are most effective when used together to build increasingly complex queries.
For example, suppose you want to find out if your employees are deliberately or unwittingly
revealing privacy information when they use webmail.
1.
Select the Protocol category under the Group by... utility.
In this example, iGuard has found several possible violations of policy associated with webmail and webmail
attachments.
A cursory glance at the highlighting on the incidents displayed on the dashboard shows that the incidents
being flagged involve Social Security and credit card numbers that are being sent out in webmail and their
attachments.
Release 7.0.0.4
37
Reconnex Corporation
Now that you see these violations listed, you may want to find out additional information - such as where the
numbers are going, when they were sent, and whether or not your HR spreadsheets containing such numbers
were among the documents sent.
Add some options using the Filter by... utility to ask these questions.
2.
Select the green plus sign to add a filter category.
3.
Click on the red question mark to launch a palette of choices. If no palette launches,
you can type in a search term directly.
38
Release 7.0.0.4
iGuard/inSight User Guide
In this example, the user typed in "yahoo.com" to ask the system if any of the numbers went to an addressee
at Yahoo.
This user also clicked on the "?" to launch a content types menu, and selected Excel to find out if any of the
numbers sent were in a spreadsheet attachment.
The final result displays the evidence you were looking for:
This incident shows that an Excel spreadsheet containing a Social Security number was sent in a webmail
attachment to a Yahoo webmail user on a specific date at an exact time.
Using the intranet address that is also displayed, you can track down the violator and take measures to
assure that this never happens again.
Important: When you finish using a filter, clear them by selecting Clear All, or it will block all
other results.
Release 7.0.0.4
39
Reconnex Corporation
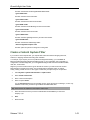
Save a Report
When you save a report, you are either exporting it to save its content or storing the settings you
used to extract data from the captured data.
When you save report settings, the resulting report is essentially a container using your filter and
columnar configurations for viewing future results.
Important: To save the content of your dashboard data, use the export to PDF and export to
CSV features.
1.
To save a report, click on the Save Report button on the dashboard.
2.
Name the report and set an owner.
3.
Check the Set as Home Report box if you are going to use one view on multiple
occasions.
4.
Save.
The Save Options dialog box will launch.
5.
Select New Report if you are creating the report from scratch.
Select Rename Report if you are using another report as a template.
The Reports menu on the dashboard will show you all of the reports you have available with your new report
added at the bottom of the list..
40
Release 7.0.0.4
iGuard/inSight User Guide
My Reports
The reports listed under Monitor > My Reports may have been scheduled for you, or you may
have sent them to yourself. These report views can be used to regularly monitor the events you
consider significant.
From these views, you can print and save reports.
Reconnex provides some default report types that you can use to see how the dashboard views
change when you use filtering and custom configurations.
Using these reports will give you an idea of how to configure so you can save your own report
views.
Each time you reconfigure the dashboard and keep the view by saving a report, you add another
tool to your dashboard. All of these new reports are listed under My Reports.
You may find one or more reports useful enough to pass along to others. For example, suppose
your HR Report is catching a lot of items that may be of interest to your legal team.
Release 7.0.0.4
41
Reconnex Corporation
Just check the box of the report you want to share and check the names of the users on your team
who would like to use it to find new incidents.
Once a new view is saved My Reports, It can also be scheduled or sent to any user at regular
intervals.
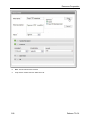
Schedule a Report
If you schedule a report you want to view on a regular basis, you can get an evolving picture of how
the incidents and violations that are flagged by the capture engine change over time.
1.
From the dashboard, go to Save Report.
This will launch the Report Properties window.
2.
Check the Schedule Reports box and the types of reports you want to schedule.
When the report is run as scheduled, one or more reports will be produced.
You can have these reports sent automatically sent by setting up email notification.
3.
Enter the scheduling information.
4.
Apply.
Report Examples
Daily reports will help you keep an eye on sensitive information being transmitted over your
network.
You can use these sample reports as a pattern to get your own results.
For example, suppose you want to monitor any communications discussing employee
compensation. There are two ways to go about this.
1.
Go to Monitor > Group by Policy.
2.
Go to Filter by and enter the time frame for the report.
42
Release 7.0.0.4
iGuard/inSight User Guide
3.
Add a new filter by clicking on the green plus sign.
4.
Enter Policy and equals in the first two fields.
5.
Type Financial Information in the third field.
6.
Apply.
7.
On the dashboard, Save Report.
8.
Enter a report name.
9.
Select Schedule.
10. Add report type, scheduling and notification information.
11. Apply.
Your report will run daily and notify you or the person you designate if it finds anything.
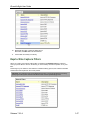
Export a CSV Report
When you save a report, you are either storing the settings you used to extract data from the
dashboard, or you are exporting it to PDF or CSV to save its content.
A report that is exported in CSV (comma-separated values) format can be used in any number of
ways because it is saved in a generic format.
Note: Only results reported in the Incident List can be saved in CSV format. Group Detail
and Incident Summary results contain graphic elements which can only be exported to PDF.
1.
To export a CSV report, select Incident List.
2.
Pull down the Report Options menu.
3.
Select Export as CSV.
Note: You may have to double-click on the navigation bar to widen the display if the Report
Options menu does not appear.
By default, the CSV report will launch in a web browser.
Release 7.0.0.4
43
Reconnex Corporation
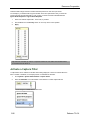
4.
Pull down the File menu and print, save the page, import or send a link to it.
Once you have captured the ASCII output, you can import it into a spreadsheet, database or a word
processing program .
Export a PDF Report
When you save a report, you are either storing the settings you used to extract data from the
dashboard, or you are exporting it to PDF or CSV to save its content.
You can save any of the incident views (Incident List, Incident Summary, Group Detail) as a
PDF report. After the exported reports are launched in Acrobat, you can use any of the utilities
available in the Adobe toolbar to process them (e.g., print, save, zoom in or out, etc.).
If you don't have Adobe Reader installed, you can download it from www.adobe.com.
1.
To start exporting, open an incident view.
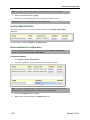
2.
If you want your company name on the report, go to System > System
Administration > Configure > Company Information.
44
Release 7.0.0.4
iGuard/inSight User Guide
3.
Update.
4.
Select Report Options.
5.
Select Export as PDF from the menu.
Note: By default, the PDF launches in a web browser. The browser's navigation bar
functionality can be used, but it is not as powerful as the features available in the Acrobat
toolbar.
Release 7.0.0.4
45
Reconnex Corporation
Your company information appears at the bottom of the report.
46
Release 7.0.0.4
iGuard/inSight User Guide
6.
Save a copy, print, zoom, or process your report using any of the other Adobe toolbar
icons.
Send Notification of a Report
You can schedule a report to run on a regular basis, create PDF or CSV reports, and email the
results.
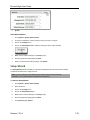
1.
From the dashboard, select a report from the pull-down menu, or create a new report.
2.
Go to Save Report.
2.
In the Report Properties window. check the Schedule Reports box and schedule the
report.
The dialog box will expand.
Release 7.0.0.4
47
Reconnex Corporation
3.
Enter the sender and recipient email addresses. For multiple addresses, use a comma
with no space.
4.
Add a subject and message.
5.
Save.
Your notification will be sent with the report(s) attached.
Copy Report Views to Users
You may find one or more reports useful enough to pass along to others. For example, suppose
your HR Report is catching a lot of items that may be of interest to your legal team.
48
Release 7.0.0.4
iGuard/inSight User Guide
Just check the box of the report you want to share and check the names of the users on your team
who would like to use it to find new incidents.
Once a new view is saved to My Reports, It can also be scheduled or sent to any other user at
regular intervals.
Delete a Report
Any report that is listed under Monitor > My Reports can be deleted by checking its box and
selecting Delete from the pull-down menu above it.
Managing Cases
When you open a case to investigate an incident, you start creating a framework of individual
responsibility that allows your users to cooperate in the resolution of that case.
When IGuard rules flag incidents and violations, that is only the first step toward resolving a
problem. Using the case system you can not only identify its origin but notify supervisors, heads of
departments, and directors of business units that some action must be taken to resolve the issue.
Those managers can add their comments to the case, attach files, change status, ownership and
priority of the case, export or download it, and escalate or reassign it— all the while sending
notification of these actions to others, such as Human Resources, IT, and Security departments.
If the case contains evidence that can be used in a lawsuit, its contents can even be sent to a legal
team to be used in court.
Release 7.0.0.4
49
Reconnex Corporation
Create a Case from the Incident List
1.
To create a case from the Incident List, just select the incidents you want to
investigate.
2.
Pull down the Actions menu and select Assign to Case > New Case.
3.
In the case window, name and describe the problem.
4.
Assign an Owner.
5.
Select a Resolution state.
6.
Define the Status.
7.
Indicate urgency of the case.
8.
Add keywords, if any.
9.
Notify the submitter, if desired.
10. Apply.
50
Release 7.0.0.4
iGuard/inSight User Guide
After you Apply the case, the Case List launches, showing you that the case has been added to
the list.
Note: You can customize columns for your cases if you want to change the configuration of the
information.
Create a Case
Cases are most easily created directly from the Incident List. But you may want to create an empty
case to notify a colleague that an investigation must be started on a certain matter.
1.
Go to Case > Actions > New Case.
2.
Assign the case and make some notes to advise the new owner on what needs to be
done.
Release 7.0.0.4
51
Reconnex Corporation
3.
Apply.
After you Apply the case, the Case List launches, showing you that the case has been
added.
Note: You can customize columns for your cases if you want to change the configuration of the
information.
Assign a Case
You can assign an incident to a case, or you can assign a case to a new owner.
Assigning an incident to a case is essentially the same as opening one.
1.
Select one or more incidents.
2.
Pull down the Actions menu.
3.
Select Assign to Case > New Case.
52
Release 7.0.0.4
iGuard/inSight User Guide
4.
Enter Case Details.
5.
Apply.
The Case List will launch, displaying the new case.
Export and/or Download a Case
1.
To export a case, check its box in the Case List.
2.
Pull down the Actions menu and select Export Selected Cases.
3.
Confirm or cancel the export.
The list of exported files will launch.
Release 7.0.0.4
53
Reconnex Corporation
Note: Processing time depends on the size of the file. If you have to wait for completion of the
export task, the Status column will tell you it is In Progress.
4.
Click on the zip file to open it, or save it to disk.
5.
Click OK.
Note: You must have permission to export cases. To check your permissions, go to System >
System Administration > User Administration > Users and click Details to find out what
group you are in. Then go to Groups > Details > Task Permissions > Case Permissions to
see if the Export Case box is checked.
Delete a Case
You cannot delete a case, but you can change its status.
Add to an Existing Case
While you are evaluating incidents and violations on your dashboard, you may come across some
that are related to a previous case you have filed. If so, you can assign those incidents to a case
that has already been filed.
Suppose you find instances of Visa and MasterCards being released while you are investigating
the hits found by your PCI compliance policy, and you put those incidents into a case.
54
Release 7.0.0.4
iGuard/inSight User Guide
Then you notice that two American Express numbers were located by another regulatory policy,
GLBA Compliance.
You can add those two American Express incidents to the Visa and MasterCard incidents already
in the case.
1.
Go to the Monitor tab.
2.
Select one or more incidents.
3.
Pull down the Actions menu.
4.
Select Assign to Case > Existing Case.
The Case List will launch showing the available cases.
4.
Select the Assign link of the case to which you want to add the incident.
Release 7.0.0.4
55
Reconnex Corporation
The Case Details window will launch under the case to which the incident has been assigned.
5.
Update the case details and add an explanatory note, if desired.
6.
Apply.
7.
Clear Filters. The original case list will reappear.
8.
Select the Details icon of the case.
9.
Scroll down further, below the Case Details, to get more information on the update.
10. Select a tab to see what new information was added to the case.
Selecting the Notes tab will combine the information about the cases.
Selecting the Log tab will tell you when the cases were filed and who filed them.
56
Release 7.0.0.4
iGuard/inSight User Guide
Change Owner of a Case
1.
Go to the Case tab.
2.
Select Details for the case you want to modify.
3.
Under Case Details, pull down the Owner menu. Groups or individual users may own
cases.
4.
Select the new owner.
5.
Apply.
Tip: If the owner you want to select is not listed, add a new user, then return to this window
and complete the reassignment process.
Change Priority of a Case
1.
Go to the Case tab.
2.
Select Details for the case you want to modify.
3.
Under Case Details, pull down the Priority menu.
4.
Select the new priority.
5.
Apply.
Change Resolution of a Case
1.
Go to the Case tab.
2.
Select Details for the case you want to modify.
3.
Under Case Details, pull down the Resolution menu.
Release 7.0.0.4
57
Reconnex Corporation
4.
Select the new resolution.
5.
Apply.
Change Status of a Case
1.
Go to the Case tab.
2.
Select Details for the case you want to modify.
3.
Under Case Details, pull down the Status menu.
4.
Select the new status.
5.
Apply.
Before Searching
Because iGuard captures everything on your network, there are vast amounts of searchable data
available to you. To get meaningful results, you should start by narrowing down the amount of
captured data.
Filtering your results by time and by group before searching will help you to focus your queries.
Filter by Time
Filter by Group
Command Line Searching
If you are more comfortable searching using a command line, you can construct queries using
command line options on the Basic Search > Custom line using logical operators. You can also
use keyword search shorthand to abbreviate your queries.
To do a command line search, go to Capture > Basic Search > Custom.
58
Release 7.0.0.4
iGuard/inSight User Guide
Command line identifiers can be used alone or as part of a complex query.
Example:
Find Word documents containing credit card numbers that originated from Reconnex and left the
United States, but did not go to Germany.
concept:CCN cont:MSWord sloc:Reconnex\ California -dloc:Germany,United\ States.…
Command Line Identifiers
Use the following identifiers on the Basic Search > Custom command line.
Source and Destination Options
loc:
Search transmission sources and destinations by geographic location
sloc: Search transmission sources by geographic source
dloc: Search transmission destinations by geographic destination
Example
loc:US,FR,GB sloc:US dloc:PK
You must use the correct country code when doing a command line location query.
IP Address Options
ip:
Find all traffic entering or leaving this address
sip:
Find traffic sent to this address (source IP)
dip:
Find traffic sent from this address (destination IP)
Examples
On the Basic Search > Custom line, enter the identifier followed by an IP address:
ip:10.1.2.3
sip:10.0.0.0/12
dip:10.0.0.0/24
Use of a net mask is optional; CIDR is supported if you want to use it.
Release 7.0.0.4
59
Reconnex Corporation
Protocol Option
proto:
Search by protocol
Example
On the Basic Search > Custom line, enter the protocol identifier followed by a protocol:
proto:FTP,HTTP
Dimension Options
Size Option
size:
Search by content size or range
Example
On the Basic Search > Custom line, enter the size identifier followed by a size in kilobytes:
size:1024-2000
Time Option
gmtime:
localtime:
Search by time and date
Example
On the Basic Search > Custom line, enter a local or Greenwich Mean time i
n a text format indicating year, month, date, hour:
gmtime:20040101100000-20041225140000
Port Options
port:
Find traffic entering or leaving this port
sport:
Find source of traffic entering this port
dport:
Find destination of traffic leaving this port
Examples
On the Basic Search > Custom line, enter the port identifier following by a port number:
port: 80,8080 sport: 10,20,80-90 dport: 8080
Content Type Options
cont:
content or object type (format)
Example:
On the Basic Search > Custom line, enter the content type identifier followed by a content type:
cont:MSWord
Concept Options
60
Release 7.0.0.4
iGuard/inSight User Guide
concept:
Search by concept
Example
On the Basic Search > Custom line, enter the concept identifier followed by a standard or custom
content type:
concept:SSN,CCN,URL,ZIP
Country Codes for Location Searching
Command line location queries require the following country codes.
North America
Bermuda
BM
Canada
CA
Mexico
MX
Puerto Rico
PR
United States
US
Satellite Provider A2
South America
Argentina
AR
Bolivia
BO
Brazil
BR
Chile
CL
Columbia
CO
Ecuador
EC
Falkland Islands (Malvinas) FK
French Guiana
GF
Guyana
GY
Paraguay
PY
Peru
PE
Suriname
SR
Uruguay
UY
Venezuela
VE
Release 7.0.0.4
61
Reconnex Corporation
Central America and the Caribbean
Anguilla
AI
Antigua and Barbuda
AG
Aruba
AW
Bahamas
BS
Barbados
BB
Belize
BZ
Cayman Islands
KY
Costa Rica
CR
Cuba
CU
Dominica
DM
Dominican Republic
DO
El Salvador
SV
Grenada
GD
Guadeloupe
GP
Guatemala
GI
Haiti
HT
Honduras
HN
Jamaica
JM
Martinique
MQ
Monserrat
MS
Netherlands Antilles
AN
Nicaragua
NI
Panama
PA
Trinidad and Tobago
TT
Turks and Caicos Islands
TC
Saint Vincent and the Grenadines VC
Saint Kitts and Nevis
KN
Saint Lucia
LC
Virgin Islands (British)
VG
Virgin Islands (USA)
VI
62
Release 7.0.0.4
iGuard/inSight User Guide
Middle-East and Asia
Afghanistan
AF
Armenia
AM
Azerbaijan
AZ
Bahrain
BH
Bangladesh
BD
Bhutan
BT
Brunei
BN
Cambodia
KH
China
CN
Georgia
GE
Hong Kong
HK
India
IN
Indonesia
ID
Iran
IR
Iraq
IQ
Israel
IL
Japan
JP
Jordan
JO
Kazakhstan
KZ
Korea, Democratic People's Republic KP
Korea, Republic of
KR
Kuwait
KW
Kyrgyzstan
KG
Lao People's Democratic Republic
LA
Lebanon
LB
Libyan Arab Jamahiriya
LY
Macau
MO
Malaysia
MY
Mongolia
MN
Myanmar
MM
Nepal
NP
Oman
OM
Pakistan
PK
Release 7.0.0.4
63
Reconnex Corporation
Palestinian Territory
PS
Philippines
PH
Quatar
QA
Saudi Arabia
SA
Singapore
SG
Sri Lanka
LK
Syrian Arab Republic
SY
Taiwan
TW
Tajikistan
TJ
Thailand
TH
Turkmenistan
TM
Turkey
TR
United Arab Emirates
AE
Uzbekistan
UZ
Vietnam
VN
Yemen
YE
Asia-Pacific
American Samoa
AS
Asia_Pacific Region
AP
Australia
AU
British Indian Ocean Territory
IO
Cook Islands
CK
Fiji
FJ
French Polynesia
PF
French Southern Territories
TF
Guam
GU
Kiribati
KI
Marshall Islands
MH
Mayotte
YT
Micronesia
FM
Nauru
NR
New Caledonia
NC
New Zealand
NZ
64
Release 7.0.0.4
iGuard/inSight User Guide
Norfolk Island
NF
Northern Mariana Islands
MP
Palau
PW
Papua New Guinea
PG
Samoa
WS
Solomon Islands
SB
Tokelau
TK
Tonga
TO
Tuvalu
TV
United States Minor Outlying Islands UM
Vanuatu
VU
Wallis and Futuna
WF
Africa
Algeria
DZ
Angola
AO
Benin
BJ
Botswana
BW
Brunei, Dar Es Salam
BN
Burkina Faso
BF
Burundi
BI
Cameroon
CM
Cape Verde
CV
Central African Republic
CF
Chad
TD
Comoros
KM
Congo
CG
Cote D'Ivoire
CI
Djibouti
DJ
Egypt
EG
Equatorial Guinea
GQ
Eritrea
ER
Ethiopia
ET
Gambia
GM
Release 7.0.0.4
65
Reconnex Corporation
Ghana
GH
Guinea
GN
Guinea_Bissau
GW
Kenya
KE
Lesotho
LS
Liberia
LR
Madagascar
MG
Malawi
MW
Mali
ML
Mauritania
MR
Mauritius
MU
Morocco
MA
Mozambique
MZ
Namibia
NA
Niger
NE
Nigeria
NG
Reunion
RE
Rwanda
RW
Sao Tome and Principe
ST
Senegal
SN
Seychelles
SC
Sierra Leone
SL
Somalia
SO
South Africa
ZA
Sudan
SD
Swaziland
SZ
Tanzania
TZ
Togo
TG
Tunisia
TN
Uganda
UG
Zambia
ZM
Zimbabwe
ZW
66
Release 7.0.0.4
iGuard/inSight User Guide
Antarctica
Antarctica
AQ
Bouvet Island
BV
Heard Island and McDonald Islands HM
Europe
Albania
AL
Andorra
AD
Austria
AT
Belarus
BY
Belgium
BE
Bosnia and Herzegovina
BA
Croatia
HR
Cyprus
CY
Czech Republic
CZ
Denmark
DK
Estonia
EE
Europe
EU
Faroe Islands
FQ
Finland
FI
Germany
DE
Gibraltar
GI
Greece
GR
Greenland
GL
Holy See (Vatican City State) VA
Hungary
HU
Iceland
IS
Ireland
IR
Italy
IT
Latvia
LV
Liechtenstein
LI
Lithuania
LT
Luxembourg
LU
Macedonia
MK
Release 7.0.0.4
67
Reconnex Corporation
Malta
MT
Moldavia
MD
Monaco
MC
Netherlands
NL
Norway
NO
Poland
PL
Portugal
PT
Romania
RO
Russian Federation
RU
San Marino
SM
Serbia and Montenegro
CS
Slovakia
SK
Slovenia
SI
Spain
ES
Sweden
SE
Switzerland
CH
Ukraine
UA
United Kingdom
GB
Yugoslavia
YU
Create Compound Queries
Each of the Advanced Search categories allows you to do multiple searches.
Click on the green plus icon at the end of the Value line to add another query.
Capture Chat Sessions
iGuard can capture chat sessions lasting up to 4 hours.
The following IM Instant Messaging networks are supported.
68
Release 7.0.0.4
iGuard/inSight User Guide
Yahoo version 8.1.0.421 •
AOL version 4.7.2517 •
MSN/Windows Live messenger 8.1.0178 •
Windows Messenger 4.7.3001
Distributed Searching
On inSight, you can do searches on any of the iGuards attached to your console. The search
procedures used are the same as those used on standalone iGuards.
If you are doing a Basic Search, you are searching all of the iGuards attached to your inSight
Console by default.
If you are doing an Advanced Search, you can select one or more iGuards to run the search on.
The results from the searches that are run on remote iGuards are copied to inSight and displayed
on its dashboard.
Search by Concept
When you use a concept to search network data, you are using pattern-matching to identify
collections of related data quickly. You can select from the standard list of factory default concepts,
or you can create your own.
For example, suppose you are watching your network traffic for evidence of employee discontent.
You could use one or more standard concepts to find specific instances matching that query.
1.
Go to Capture > Advanced Search > Content.
2.
Select an Element.
3.
Select a Condition.
Note: The Conditions menu offers three choices. You can use the equals or not equal
conditions to select or exclude any existing concept from checkboxes on a palette that is
launched from the "?".
Release 7.0.0.4
69
Reconnex Corporation
Alternatively, you can use the expression condition to type in the name of a standard or
custom concept after the concept: identifier.
4.
Add a Value.
Tip: If you prefer to type in multiple concept values, use a comma (logical OR) without a space
to separate them.
5.
Search.
Tip: You can extend any concept search by using logical operators with compound concepts
in the expressions field to construct more complex search scenarios.
The following expression tells iGuard to look for items containing the WIRE-TRANSFER
concept, but report a match only if either a bank account or ABA number is included in the
data.
(concept:WIRE-TRANSFER (concept:BANK-ABA or concept:BANK-ACNT) )
Search by Content Type
Content types are the formats into which iGuard sorts captured data. The objects listed here are all
those that are supported by iGuard.
To do a content type search, go to Capture > Advanced Search > Content.
You can type file types into the Value field or you can select them from the palette that launches
from the "?".
70
Release 7.0.0.4
iGuard/inSight User Guide
Note: If you are entering these content types manually, they must be typed exactly as they
appear in this table. Changing case for a single character would cause the query to fail.
Content Types
Formats
Multimedia
AIFF, ASF, AVI,ICY, MIDI, MIDI_RMI, MOVIE_ANI,MP3, MPEG, MPlayer, NIFF,
QuickTime, RCP, Real Media, RIFF, RMMP, RSTP, Shockwave, SoundFont,
WAVE, SD2
Language Classification
Englishtext, Frenchtext, Germantext, Spanishtext,Japanesetext, Chinesetext,
Koreantext, HindiText, Russiantext, Arabictext, Hebrewtext, Vietnamesetext
Archive Format & Types
BinHex, BZIP2, Compress, Encrypted Zip, GZIP, MSCabinet, RAR, StuffIt, TAR,
TNEF, ZIP
Generic Types
ASCII, Binary, CSV, SMB
Peer to Peer
BitTorrent, DirectConnect, eDonkey, eMule, Gnutella, MP3, MP2P, P2P, Sherlock,
WinMX
Computer/Network
Security
CAP, HackerTools, LIF, MSPassword, MSRegistry, PCAP, RCP
Scripting Language
C_Shell, K_Shell, Bash_Shell, Bourne_Shell
HTML/Web Related
CSS, HTML, HTTP_Error, HTTP_Header, HTTP_Redirect, XML
Office Document
Appleworks, EPS, Excel, EncryptedWord, EncryptedExcel, EncryptedPowerpoint,
EncryptedPDF, Framemaker, Lotus, MacWrite, MSWord, MSWrite, PDF,
PowerPoint, PS, RichText, VCalendar, Visio, WordPerfect, WriteNow
Office Financial
MSMoney, Quicken
Executable Binaries
ELF, IBMApp, MacApp
Image Classification
BMP, GIF, IFF, JPEG, MacDraw, MacPaint, MSMetaFile, PAL, PCX, PICT, PNG,
RDIB, SuperPaint, TIFF
Engineering Design
AccelPCad, AllegroPCB, AutoCad, BSDL, CatiaCad, DXF, FreeHand, Gerber,
MathCad, Mathematica, MatLab, PageMaker, Photoshop, SolidWorks, Spice,
TangoPCad, UnigraphicsCad, VisualCad, ViewLogic
Protocol Types
CITRIX,CMS, CVS, FTP, FTP_Response, IRC, ICQ, Kazaa, PCAnywhere, RDP,
Skype, Telnet, VNC
Protocol User
Configuration
HTTP_Request, HTTP_Response, HTTP_Post, HTTP_Webmail,
HTTP_Webmail_Attach, SMTP_Request, SMTP_Response, SMTP_Attach, POP3,
POP3_Response, POP3_Attach, IMAP, IMAP-Request,
IMAP_Response,IMAP_Attach, FTP, FTP_Request, FTP_Response, FTP_Data,
Telnet, RLogin, SSH, Yahoo_Chat, AOL_Chat, ICY, RTSP, HTTPS, MSN_Chat,
SOCKS, BitTorrent, PCAnywhere, RDP, VCN, SMB, CITRIX, Kazaa, Skype, IRC,
LDAP, DASL_Request, NTLM, VerisignCertificates
Cryptographic
Crypto, HTTPS, SSH, SKR
Reconnex Header
Mail_Header, Flow_Header
Entertainment
iGaming, FuckedCompany, LightReading, Stockdata
Database
SQL, LDAP, DBX, DBF, DBM, BDB
Programming Language
Ada_Source, Assembly_Source, BASIC_Source, BREW, BREWMIF,C_Source,
Release 7.0.0.4
71
Reconnex Corporation
Content Types
Formats
C++_Source, Cobol_Source, FORTRAN_Source, Java_Source, JavaScript,
LISP_Source, Pascal_Source, Perl_Source, Python_Source, Think_C,
Think_Pascal, Verilog_Source, VHDL_Source, XQuery_Source
Mail and Chat
Classification
AOL_Chat, Eudora, IMAP, IMAP_Cache, MIME, MSExchange, MSN_Chat,
MSOutlook, POP3, RFC822, SMTP, WebMail, Yahoo_Chat
GUI Desktop
Icon, Cursor, ACursor
Search by Digest
A message digest is a compact digital signature used to provide assurance that a file is a unique
entity. MD5 (Message-Digest algorithm 5) is the most widely-used algorithm used for creating these
signatures.
To search for a file going over a network, you can generate an MD5 signature of the file and use it
to search all incidences where the file may be involved. You can do this by using the md5sum
utility commonly found on all Unix machines to calculate and verify the md5 hashes.
You can find similar Windows- or Macintosh-based checksum software on open source sites
like sourceforge.net.
iGuard finds MD5 digests by searching for and detecting the hexidecimal numbers generated by
the process. After generating the signature, enter the hex number as a value at Advanced Search
> File Information > MD5.
Search by Email Address
Go to Capture > Basic Search > Input Type > Email to Address or Email from Address.
Add a comma between addresses (no space) to search for more than one at a time.
Note: Email addresses or domain names that contain numbers are searchable if they are in
the mailto, mailfrom, subject, cc or bcc fields. Only alphabetic characters are supported in
the body of email messages.
Note: Attachments are not supported at this time.
Search Email by Domain or Subject
To find email by subject, just type in the subject in the Value dialog box.
72
Release 7.0.0.4
iGuard/inSight User Guide
iGuard assigns three tokens to each email address: the username, hostname, and domain name.
By doing a keyword search, you can find incoming or outgoing email by specifying one or more
components of the email address.
The search terms must be separated by a space, which implicitly denotes the AND logical operator.
Go to Capture > Basic Search > Input Type > Keywords.
This example will find all email from Reconnex and all mail from any address with a *.com domain
extension.
Search by File Size
You may want to search for files of a certain size. If so, you can limit your search using numerical
qualifiers by going to Capture > Advanced Search > File Information > File Size.
For example, file size is often critical when searching for graphics. You might want to target specific
file types of a certain size by defining two parameters at one time.
Note: Currently, file size must be entered in bytes.
Search by File Type
You may want to search for images of a certain type. If so, you can limit your search using file type
qualifiers.For example:
1.
Go to Capture > Advanced Search > File Information.
2.
Select element File Type.
3.
Enter a file type extension using commas to separate multiple entries.
4.
To add another parameter, click on the green plus sign.
Note: You cannot look for .zip files- you can only look for keywords or file types inside the zip
archive.
Search by Filename
If you are searching for a filename, you must enter it as a keyword.
Release 7.0.0.4
73
Reconnex Corporation
Search by IP Address
You can search for individual IP addresses, a subnet, or a range of addresses.
Note: IP address options can take input in the form of individual addresses separated by
commas and ranges separated by commas or dashes
(e.g., sip:192.168.1.1,192.168.1.2 or sip: 192.168.1.1-192.168.1.255).
Go to Capture > Basic Search > Input Type > IP Address and enter an IP address.
For multiple addresses use a comma; for a range of addresses use a dash.
Search for IP Addresses on a Subnet
Subnetting is supported if the network and host portions of an IP address are standard classful IP
(address fields are separated into four 8-bit groups).
CIDR (Classless Inter-Domain Routing)notation improves the efficiency of the IPv4 addressing
scheme by allowing routers to interpret addresses as if they were classful. Use it to enter the IP
address followed by its subnet mask.
Go to Capture > Basic Search > Input Type > IP Address.
Note: IPv6 is not yet supported.
Search by Keywords
Keyword searches use standard search options and a standard set of logical operators.
Search limitations specify that some characters are not available for search syntax.
74
Release 7.0.0.4
iGuard/inSight User Guide
Find all of the words
In this search, the AND operator is implied. Because the query does not utilize the Exact Match
function, the terms may be found in any order.
Find the exact phrase
NOTE: All operators, including Exact Match, are case-insensitive. This means that if you
search for a term in ALL CAPS, the system will return that term not only in all caps, but initial
caps and/or lowercase as well.
Quotation marks are implied in the following Exact Match query:
For example, if you search for an exact phrase, the system will automatically add parentheses and
quotation marks to retrieve this term only.
Release 7.0.0.4
75
Reconnex Corporation
Find at least one of the words
\
76
Release 7.0.0.4
iGuard/inSight User Guide
Without the words
Search by Location
To search by location, go to Capture > Basic Search > Input Type > Location.
Note: You can select countries using the "?" at the end of the dialog box, or you can type them
in using the country codes.
To do an advanced search by location, go to Capture > Advanced Search > Sender/Recipient >
Element > Location.
You can use this option to narrow your search based on sender or recipient.
Release 7.0.0.4
77
Reconnex Corporation
Search by Port Number
Because IANA (Internet Assigned Numbers Authority) maintains a list of well-known port numbers
used by UDP and TCP to identify specific processes, you can use a search by port number to find
data transmitted by certain services.
Common port assignments
Service Port #
FTP
20/21
SSH
22
Telnet
23
SMTP
25
HTTP
80
HTTPS 443
POP3
110
NTP
123
NNTP
144
IRC
6667
To do a port search, go to Capture > Advanced Search > Protocol and select the Port element.
Example
This query searches for SSH and HTTPS traffic in both directions. You could select different items
from the Condition menu to narrow the search to incoming or outgoing transmissions.
Tip: You can use this method to search ports by range.
Note: When you search for a port or a port range, the system will return either a source or
destination port, but not both.
To get a complete result showing both source and destination ports, you must qualify your
search by specifying the port used by sender and recipient, e.g.:
To view the latest update to the port list, go to http://www.iana.org/assignments/port-numbers.
78
Release 7.0.0.4
iGuard/inSight User Guide
Search by Protocol
Searching for a protocol in captured results will return all traffic transmitted using that protocol.
You can get results containing specific subsets of a protocol (e.g., HTTPS, HTTP_post,
HTTP_response, etc.) or all subsets of that protocol.
Note: Some protocols have subsets (e.g., FTP_response, FTP_request, etc.). Of these, only
FTP, SMTP, POP3 and IMAP are supported from the command line. HTTP subsets must be
specified by launching the protocol list from the "?" and checking the relevant boxes.
Example
Note: For multiple queries, separate each search term by a comma; do not add spaces.
Supported Protocols
Supported Protocols
HTTP_Request, HTTP_Response, HTTP_Post, HTTP_Webmail, HTTP_Webmail_Attach
STMP, SMTP_Request, SMTP_Response SMTP_Attach
POP3, POP3_Request, POP3_Response, POP3_Attach
IMAP, IMAP_Request, IMAP_Response, IMAP_Attach
FTP, FTP_Request, FTP_Response, FTP_Data
Telnet, Rlogin, SSH
Yahoo_Chat, AOL_Chat, MSN_Chat, IRC
RTSP, HTTPS, SOCKS, RDP
BitTorrent, ICY, Kazaa, Skype
PCAnywhere, CITRIX
RDF, CVS, CMS
VNC, SMB, NTLM, LDAP
DASL_Request, Verisign Certificates, ICQ
Release 7.0.0.4
79
Reconnex Corporation
Search by Time
All objects captured by iGuard are time-stamped. Defining a time period will narrow down the
amount of information you are querying, so it should be the first step in defining any search.
You can specify a time relative to your current time, or you can specify an exact time.
IMPORTANT: Even if a pull-down menu is set to "Anytime," that search term applies only to
the time span you have already set under Monitor > Filter by... . You cannot search
backwards for a specified period unless that parameter has already been defined.
Use the Basic Search to define a relative time.
Use the Advanced Search to define an exact time.
Note: You can get results before or after a certain time by selecting an option from the
CONDITION menu.
Search by URL
To find a specific URL in captured data, type it into an Advanced Search window under
Sender/Recipient.
80
Release 7.0.0.4
iGuard/inSight User Guide
Search by User ID
If you know a user's handle, you can search for it.
Go to Capture > Advanced Search > Sender Recipient.
You can also add related queries that may help you to locate the user - for example, a mail client.
Search for Images
Images can be searched most efficiently by using their file types.
Go to Capture > Advanced Search > File Information > File Type. You can either type in the
file types as values separated by commas, or select the question mark and check boxes in the
palette that is launched.
Important: To view the results of your image search, you should customize columns on your
dashboard to include a Thumbnail Match.
Alternatively, you can use the default template to find all images.
If that template returns too many images, you can create a template limiting the type of images
returned.
Release 7.0.0.4
81
Reconnex Corporation
Once it is created, you can then use that template repeatedly instead of creating the same query
multiple times.
Search for Fleshtone Images
If you are looking for pornographic content or advertising imagery, you can do a search for
fleshtones.
Note: Because the standard rules used for finding fleshtones may retrieve too many results,
they are deactivated by default. These rules are part of the Acceptable Use policy.
1.
Go to Capture > Advanced Search > Content > Concept.
2.
Select the "?" at the end of the Value line. The Concepts palette will be launched.
3.
Select Fleshtone from the list of concepts.
82
Release 7.0.0.4
iGuard/inSight User Guide
4.
Apply.
5.
Search.
Search Limitations
Like other search engines, iGuard has some capacity and character limitations.
1.
The search limitation for all iGuards is 1000 results at a time.This limitation is shared by
all users.
2.
Only 256 searches can be saved as rules. To create more rules by saving searches,
you must delete some existing rules. This limitation includes the standard rules that are
packaged with each appliance.
3.
Search ignores words that are less than or equal to 3 characters. It also ignores
commonly-used terms, including articles and prepositions.
4.
A search containing only words NOT to be searched will fail because it would consist
entirely of negative results. A search engine that has no point of reference would be in
a less-than-zero state.
5.
A search for words with a non-alphabetic character between them (e.g.,numbers,
spaces) will fail unless it is part of an exact search (enclosed in quotation marks).
Do not use these characters:
.
period
;
semicolon
&
ampersand
|
pipe
`
back tick
<>
less than/
greater than
()
parentheses
\ \\
backslashes
Release 7.0.0.4
83
Reconnex Corporation
/> ]]> markup
*
control characters
/
escape characters
If you enter any of these characters you may get the following error messages:
>>Invalid character(s) in the input for the field; or Search did not
complete.
Word Limitations
The following limitations and exceptions are customizable by Reconnex Service Representatives.
Word Stemming
Incomplete or partial words cannot be searched. Words in their entire form or stemmed are
required.
Examples:
Searching for "basket" in "basketball" will not return a result.
Searching for "run" in "running" will return results.
Stemming is disabled if an exact search is specified (enclosed in quotation marks).
Plurals of a word used in a query will be returned.
Common Word Exceptions
Short words in common usage and proper names get special treatment from the search engine.
Examples:
a, and, this, therefore, else, while, with, and similar parts of speech are ignored.
William, John, Christopher, Lisa, Kim, Nicole and other proper names are supported.
More can be added by your Reconnex Service Representative.
Two- and Three-Letter Word Exceptions
Common two- and three-letter words have been given special treatment depending on the potential
results they may generate.
Examples:
Postal codes are supported [AL,CA,CT,TX,NY...]
Common governmental acronyms are supported [DMV,CIA,DOJ,FAA,NSA,IRS]
Common three-letter words are ignored, e.g.: air, eye, mac, pet, sox, zip
Search List
The search list keeps a record of your last 5 searches.
84
Release 7.0.0.4
iGuard/inSight User Guide
If your search takes more than 30 seconds to complete, the process will be backgrounded and you
will be notified when it is complete. A link to the results is sent to the email address of the user who
is logged in.
The address it is sent to is displayed under System > User Administration > Users > User
Information.
Search Using Standard Templates
Reconnex has made a collection of templates available to expedite searches as well as
construction of rules, concepts and capture filters. To see the list of templates that are available, go
to Policies > Templates.
To search using a template, go to Capture > Advanced Search > <Element> > Template.
Click on the "?" at the end of the dialog box, select a template and Search.
Search Using Custom Templates
Using templates to search can expedite repetitive searching, and creating custom templates can be
very useful when experimenting with searches when developing new rules.
Before using this search method, you must go to Policies > Templates > Options > Create New
Template and create a template.
For example, suppose you want to create a custom template to find traffic to and from the Peoples'
Republic of China.
Release 7.0.0.4
85
Reconnex Corporation
You can develop that template by experimenting with multiple search terms. The following example
contains three separate queries that define the three conditions that make up the concept "China
Traffic".
When the "China Traffic" template is used in the Advanced Search window, the capture engine
will look for all three of these elements before returning a result matching that description.
To use the template, you only have to type it in or select it from the Value "?" palette.
Use Keyword Search Shorthand
You can use shorthand, or anchor queries, in the Keywords field to expedite command line
searching.
These anchors are not case-sensitive.
Supported Anchors
userid:
mailfrom:
mailto:
subject: or subj:
cc:
bcc:
URL: or url: (use only with HTTP_Post protocol queries)
md5:
86
Release 7.0.0.4
iGuard/inSight User Guide
Examples
mailfrom:John AND mailto:Mary + "Confidential"
subj:"Technical Support" || "Administrative Support"
cc:John bcc:Mary && "Human Resources"
URL:"microsoft updates" prot:HTTP_Post
Note: You cannot use AND operators between URLs and email fields.
Use Logical Operators
Use logical operators to form your keyboard query.
Logical Operator Notation Different Ways of Expressing the Same Query
AND
+
&& Confidential Restricted Secret
Confidential AND Restricted AND Secret
Confidential and Restricted and Secret
Confidential + Restricted + Secret
Confidential && Restricted && Secret
OR
or ||
Confidential OR Restricted OR Secret
Confidential or Restricted or Secret
Confidential || Restricted || Secret
NOT
-
Confidential -Restricted -Secret
Confidential !Restricted !Secret
!
Word stemming ~
Confident~ Restrict~ Secret~
Parentheses
()
Confidential AND (Restricted OR Secret)
Exact match
""
"Confidential and Secret"
NOTE: All operators, including Exact Match, are case-insensitive. This means that if you
search for a term in ALL CAPS, the system will return that term not only in all caps, but initial
caps and/or lowercase as well.
Examples
These compound queries will produce the same results:
confidential +”Eyes Only” OR “Do Not Distribute” –secret -security
Confidential "Eyes Only" || "Do Not Distribute" !secret !security
This complex query adds grouping of search terms and use of word stemming:
Confidential + (("Eyes Only" || "Do Not Distribute") || (secret~ or secur~))
This query will find documents containing the word "Confidential" that are also
marked EITHER "Eyes Only" or "Do Not Distribute" OR contain variations of the
words "secret" or "secure".
Note: You cannot use AND operators between URLs and email fields.
Release 7.0.0.4
87
Reconnex Corporation
What are Policies?
Policies are sets of rules that search your data stream for specific incidents or violations. On
iGuard, the standard policies are already created for you and activated by default.
The initial results you see on your dashboard are incidents that were found by the rules in each
policy.
There are two types of policies.
Regulatory policies are provided by the iGuard system and are owned by
administrators. These are Electronic Risk Modules (ERMs), which provide a wide
range of policies for assuring compliance with privacy and fiscal surveillance law.
Custom policies are created by administrators or specified users to address the
special needs of an organization.
Using rules and policies, you can tune your system to perform certain actions when an incident is
found,
find specific concepts that you have programmed in, or create and use templates to expedite your
search processes.
Standard Policies
The standard policies, or Electronic Risk Modules, are installed on each iGuard or inSight
appliance before it ships. They are activated during the installation process, although they can also
be activated later.
You can find the list of policies you have privileges to use on the Policies tab.
Note: All standard policies are all owned by administrative users, who can allocate privileges
to view, execute, modify or delete them to users and user groups.
Regulatory Policies
Reconnex offers specialized sets of rules to assist iGuard customers in complying with complex
business law, fiscal surveillance and privacy regulations.
These rules sets are included in the standard policies, which are known as Electronic Risk Modules
(ERMs).
The following regulatory instruments are just a few of those supported by the ERMs.
The Sarbanes-Oxley Act of 2002 (SOX) requires businesses to provide extensive
financial and accounting disclosure information.
The Gramm-Leach-Bliley Act (GLBA) provides limited privacy protections against the
sale of private financial information.
The California Security Breach Notification Act (CA SB1386) is designed to ensure
that Californians are notified whenever their personal information may have been
misappropriated. The law requires companies that own, or have access to, personal
information of California residents to notify customers if their data has (or may have)
been accessed illegally.
The Health Insurance Portability and Accountability Act of 1996 (HIPAA) protects
a patient's privacy and confidential records, allows persons to immediately qualify for
comparable health insurance when they change employers, mandates the use of
standards for electronic exchange of health care data and requires use of a national
identification system.
The International Traffic in Arms Regulations (ITAR) control the export and import
of munitions articles, technical data, and defense services.
88
Release 7.0.0.4
iGuard/inSight User Guide
Electronic Risk Modules (ERMs)
ERMs Electronic Risk Modules refer to packages of standard policies available on your system.
Each ERM is made up of a collection of related rules that monitor a specific type of activity on your
network. The default policy set is listed under the Policies tab.
ERMs are related to specific areas of business practices or unique industry niches.
For example, medical facilities may use an ERM implementing HIPAA regulations and other rules
relating to medical privacy, while accounting companies institutions may use policies ensuring
compliance with regulatory instruments like Sarbanes-Oxley.
By contrast, a pharmaceutical company may not use ERMs at all. Custom policies may be needed
to secure its patents and unique intellectual property.
Custom Policies
Standard policies (also known as Electronic Risk Modules) may not address all of the issues you
have on your network.
If so, you can create new policies from scratch, or you can open an existing policy and use it as a
template.
Note: Standard policies belong to administrators, but custom policies belong to the person who
created them.
Because custom policies are private by default, the creator should assign access rights to them
right away to make sure they are accessible to the intended users.
What is Activation?
If a policy or rule is in an Active state, that means that the data flagged by the rules will be
reported whenever there is a matching condition ("Hit").
If a policy or rule is Inactive, the capture engine is still using it to find data, but hits are not
reported.
The Inherit Policy State setting determines the activation relationship between a policy and its
rules.
Policy-Based Activation
Unlike the rule-based model, the policy-based activation model makes it possible to use the policy
as a single entity, eliminating the need to manage individual rules.
All standard policies shipped with iGuard have inheritance is enabled by default. It can only be
disabled at the rule level by changing the Inherit Policy State.
If a rule under a standard policy is to be tuned, its inheritance state must be Disabled until the
new definition of the rule is finalized. When tuning is complete, the inherit state is restored to
Enabled.
Activation and Inheritance
Policies and rules can be either Active or Inactive. Rules also have an inheritance state, which
defines a rule's relationship to its policy's state.
Release 7.0.0.4
89
Reconnex Corporation
Think of the inheritance state as a toggler. If a rule's Inherit Policy State is Enabled, it means the
rule reflects whatever state the policy is in. If it is Disabled, the inheritance link between policy and
rule is broken.
There are two models for managing the inheritance properties of rules and policies. One is policybased and the other is rule-based.
Activate or Deactivate a Policy
When the Setup Wizard is used to install iGuard, the boxes that are checked on the Policy
Activation page determine which policies are activated. However, policies can also be activated or
deactivated from the Policies page.
1.
Go to the Policies tab.
2.
Check the box of the policy whose activation state you want to change.
3.
Pull down the Actions menu.
4.
Select Activate or Deactivate.
5.
Look at the State column in the list view that is launched to verify that the state has
changed.
Create a Policy
1.
Go to the Policies tab.
2.
Select Add Policy.
3.
Fill in the name and description.
90
Release 7.0.0.4
iGuard/inSight User Guide
4.
Select an activation state.
5.
Select a publication state by checking a deployment box under Devices.
6.
Save.
A window is launched showing that your new policy has been added to the list of
existing policies.
View a Policy
You can see what rules make up a particular policy if you open it.
1.
Go to the Policies tab.
2.
Select a policy.
3.
Scroll down in the Edit Policy window. The rules for that policy are listed under the
policy definition.
Edit a Policy
If you have permission, you can change a policy's name, description, ownership, activation status,
or the machine to which it is published.
1.
Go to the Policies tab.
2.
Click on the name of the policy. .
3.
Make the desired changes in the Edit Policy window.
4.
Save.
Release 7.0.0.4
91
Reconnex Corporation
Delete a Policy
There are two ways of deleting a policy.
Note: You can delete a policy only if you own it.
1.
Go to the Policies tab.
2.
Select the Trash icon on the line of the policy you want to delete.
or
1.
Check the box of the policy you want to delete.
2.
Pull down the Actions menu and select Delete.
Execute a Policy
The ability to execute a policy is determined by the permissions that are set for the group or groups
to which a user belongs.
If you do not have executive privilege for a policy, you cannot find incidents and violations in the
network data stream and results will not appear on your dashboard.
If you are not finding the violations you expected to see on the dashboard, view the permissions
assigned to your group to see what privileges you have.
Contact your administrator if the execute box for the policy you need access to is not set.
Publish a Policy
Publishing policies tells each iGuard or Discover appliance on your network what policies you want
that machine to use to find incidents and violations.
You can publish different policies to each appliance, or you can unpublish those you do not need.
For example, if you want the rules in the Human Resources policy to monitor your network, you
should publish it to all of the iGuards on your network.
1.
Go to the Policies tab..
2.
Click on the policy you want to publish.
3.
In the Edit Policy window, check a box for either All iGuards or a specific iGuard from
the list of machines available.
92
Release 7.0.0.4
iGuard/inSight User Guide
If you are not seeing the machine you need to publish a policy to, you must first add that
device to the network.
4.
Save.
Unpublish a Policy
If you are administering a system from an inSight appliance, publishing policies tells each iGuard or
Discover appliance on your network what kind of incidents and violations you want its capture
engine to find.
If you wish, you can publish different policies to each appliance, or you can unpublish those you do
not need.
For example, you may not need the ITAR International Trafficking in Arms Regulations policy
on the iGuard serving your financial services branch.
1.
Go to Policies and select a policy.
3.
In the Edit Policy window, select None from the list of machines available if you want
to remove the policy from all added devices.
If you are not seeing the machine you need to unpublish the policy to, you must add that
device to the network.
4.
Save.
Rename a Policy
You can rename a policy, but you will lose the relationship between the original policy and the
incidents already found.
1.
Go to Policies tab.
2.
Select the policy you want to rename.
The Edit Policy window will launch.
Release 7.0.0.4
93
Reconnex Corporation
3.
Type in the new name. When you start typing, a Save As button will appear.
Before saving, make any other changes needed to Owner, State, or Device deployment.
3.
Save As.
A window will be launched warning you that changing the name of a policy will keep you from viewing
incidents related to the original policy.
4.
Cancel or select OK to proceed.
The renamed policy will be listed in the same position as the original policy.
Use a Policy as a Template
You can use a policy to create a similar one. All of the attributes belonging to the original policy will
be saved in the new policy, but you cannot save and edit the rules.
1.
Go to Policies and select the policy you want to use as a template.
The Edit Policy window will launch.
94
Release 7.0.0.4
iGuard/inSight User Guide
3.
Fill in a new name and description.
A Save As button will be added when you start typing the new name.
4.
Before saving, make any other changes needed to Owner, State, or Device
deployment.
5.
Save As.
A window is launched displaying your new policy added to the list of existing policies.
When you open that policy, you will see that although the settings were copied, the rules were not.
Change Ownership of a Policy
1.
Go to the Policies tab.
2.
Click on the name of the policy you want to edit.
3.
Select a new owner from the Owner menu.
If the user you want to own the policy is not listed, you must first create that user, then return to
this menu.
Release 7.0.0.4
95
Reconnex Corporation
3.
Save. The policy list that is launched will show the change in ownership in the Owner
column.
Note: You can change the ownership of a policy if you are not the owner, but only if the owner
has assigned a policy edit permission to the group to which you belong.
What is a Rule?
A rule is a component of a policy that specifies exactly what data is to be found on the network.
All of the standard policies (Electronic Risk Modules) installed on iGuard are made up of rules that
have been tested and verified. They scan network data regularly and return any data that matches
the conditions defined in that rule.
User-defined rules must be assigned to a custom policy. Not only can they be configured to retrieve
incidents and violations that relate directly to specific problems, but they can also be tuned to
retrieve that information quickly and efficiently on a regular basis.
Rule-Based Activation
User-defined rules require finer control than those under standard policies because they address
specific local problems. Unlike the policy-based model used for standard policies and rules, rulebased activation is flexible.
For this reason, a custom policy's activation status does not proliferate down to its rules unless the
Inherit Policy State of the rule is specifically Enabled. By default, the inherit state of user-defined
rules is automatically set to Disabled to maintain independence from the policy to which they
belong.
Activate or Deactivate a Rule
The standard rules that are provided with iGuard usually share the same activation status as the
policies to which they belong (policy-based activation).
They may be activated or deactivated, but they will revert to the state of the policy to which they
belong when they are modified and saved. This happens because their Inherit Policy State is set to
Enabled by default.
User-defined rules can be activated or deactivated more easily (rule-based activation).The user
determines whether or not they mirror their policy's state by setting the Inherit Policy State when
creating or editing the rule.
To activate or deactivate a rule:
1.
Go to Policies.
2.
Click on a policy.
3.
When the Edit Policy window is launched, check the box of the rule whose activation
state you want to change.
4.
Pull down the Actions menu.
5.
Select Activate or Deactivate.
96
Release 7.0.0.4
iGuard/inSight User Guide
Note: Rule state is especially significant because you cannot run more than 256 active rules.
To activate a 257th rule, you must deactivate an active rule.
View Rules
All rules are components of policies. To view individual rules:
1.
Go to the Policies tab.
2.
Click on a policy to open it.
3.
Scroll down (if necessary) to view its list of rules.
4.
To see what is in a rule, click on the rule name.
The Edit Rule window launches, showing the original search conditions set up for the rule.
Create a Rule
You must first find out if you have permission to create rules. Administrative users can create any
type of rule, and they can assign those privileges to any user group.
When you create a new rule, you customize it to your operation so you can get only the information
you need from captured data. You can either add the rule to an existing standard (ERM) policy, or
you can create a custom policy and add the rule to it.
Before you decide whether you are creating rules from scratch or as part of a standard policy, you
should understand the inheritance model.
Best Practice: You can do several iterations of the rule before you finalize it so that you can
tune it to extract the same kind of significant data whenever it is run.
For example, suppose you want to create a rule that will catch all transmissions to and from an
unfriendly country.
1.
Go to Capture > Basic Search or Capture > Advanced Search.
2.
In the search box, enter the names of the countries you want to find.
You can either type them in or use the "?" to launch a list.
Release 7.0.0.4
97
Reconnex Corporation
3.
Save Search.
4.
Give the new rule a name.
Important: The characters * % @ + # ? , ' " cannot be used in name fields.
7.
Using the drop-down Policy menu, attach the new rule to a policy.
In this case, you might file the new rule under a policy like Suspicious Activity.
7.
Use the drop-down menu to set the Severity.
8.
Specify the Inherit Policy State.
Selecting this option will tell the system whether or not you want to bind the rule to the policy by inheriting all
of its attributes — for example, its owner, inheritance state, or its publication or deployment status.
Note: When you add a rule to one of the standard policies, it will automatically inherit the state
of the policy to which you assign it. Even if you decide to disable it, once you modify the rule its
state and SAVE, it will default to the state of the parent policy.
9.
Save.
10. To verify the new rule, go to Policies > Policies.
11. Click on the policy name.
12. Verify that your new rule is listed under the policy.
If you have disabled the Inherit Policy State, the Status column will show that it is
Inactive.until you resave the rule.
Tune a Rule
Tuning rules can help you search captured data with variations of a query until the rule routinely
returns the information you want.
Note: If you are creating or editing a rule under a standard (ERM) policy, you must first save
the rule with the Inherit Policy State Disabled. This will ensure the rule is not active even if it is
part of an active policy. For a user-defined rule, this is not necessary because the inherit policy
state is disabled by default.
To tune an existing rule or add a new one:
98
Release 7.0.0.4
iGuard/inSight User Guide
1.
Go to the Policies tab.
2.
Click on a policy.
3.
Click on a rule you want to tune, or Add Rule.
4.
If not already set, change the Inherit Policy State to Disabled.
5.
Define the rule by setting conditions.
Tip: Each iteration of the rule should reflect your "best guess" of the parameters that will yield
the results you want.
6.
Save.
7.
Click on the rule to launch the Edit Rule window.
8.
To start testing the rule, Execute search.
9.
When the incidents window launches, evaluate the results. If you are not satisfied,
modify the search and repeat the process.
10. When the rule is performing correctly, Save.
11. Reset the Inherit Policy State to Enabled (optional for user-defined rules).
Note: The procedure is the same for a rule under a user-defined policy except for the fact that
it can remain in the Disabled state. Its parent policy will be an inactivate state anyway
because the user will be managing the rule by explicitly activating it.
Example
Suppose you want to find Social Security numbers in circulation on your network, but you are
getting too many false positives — results that technically match the rule, but do not violate your
company's privacy rules. For example, they may be transmitted during routine Human Resources
operations, or the numbering pattern may resemble a product part number.
1.
Go to the Policies tab.
2.
Click on a policy.
3.
Select a rule under the policy.
4.
In the Edit Rule window, change the Inherit Policy State to Disabled, if it is not
already set.
5.
Edit the rule to exclude traffic to and from certain email addresses
.
Release 7.0.0.4
99
Reconnex Corporation
In this case, you are excluding the Director of Human Resources, anyone on the Human Resources alias, and
a group of addresses in a department that may be transmitting company 9-digit part numbers that resemble
Social Security numbers.
Note: You might want to abbreviate this task by using existing user groups or creating
templates to set up departmental aliases.
6.
Save.
7.
Click on the rule to launch the Edit Rule window.
8.
When the incidents window launches, evaluate the results to see if your false positives
have been eliminated. If you are not satisfied, modify the search and repeat the
process.
9.
When the rule is performing correctly, Save.
10. Reset the Inherit Policy State to Enabled.
Edit a Rule
All rules are components of policies. To edit individual rules:
1.
Go to Policies > Policies.
2.
Click on the name of the policy to open it.
3.
Click on the name of the rule.
4.
Make changes to the rule.
5.
Save.
Note: If you edit an inactive rule that belongs to a standard (Electronic Risk Module) policy, it
will activate as soon as you save it because it automatically inherits that policy's properties.
Delete a Rule
1.
100
Go to Policies > Policies.
Release 7.0.0.4
iGuard/inSight User Guide
2.
Click on the name of the policy to open it.
3.
Click on the name of the rule.
4.
Select the Trashcan icon of the rule you want to delete.
5.
Confirm or cancel the deletion when prompted.
What is an Action Rule?
An action rule is an extension of an active rule that defines some action that will be taken if a rule
produces a Hit. It is enabled by Active Directory.
Action rules are essentially templates that can be used whenever a situation arises that needs
special handling.
You can use an action rule to
send email notifications using dynamic variables to multiple recipients
create log entries in a syslog server
delegate responsibility for an incident
assign a status to an incident, or
prevent data loss.
Once you have defined an action, you can apply it to many different rules.
Create an Action Rule
An Action Rule triggers an action when a Hit is triggered by an existing rule. After it is created, it
must be activated by applying it to one or more rules it modifies.
1.
Go to the Policies tab.
2.
Click on Create New Action.
3.
Name the new action rule.
Important: The characters * % @ + # ? , ' " cannot be used in name fields.
4.
Define the actions you want to apply.
5.
To send an automatic email notification, start by entering one or more addresses in
the "To" field.
Release 7.0.0.4
101
Reconnex Corporation
6.
If you have a pre-configured Prevent setup, you may capture identities of Manager,
Reviewer, Sender and/or Recipients by checking one or more boxes under the "To"
field. Consult your administrator to find out if this feature is available to you.
7.
You can plug dynamic variables into the Subject and Message fields to cover a
variety of situations.
8.
Add Subject and Message lines using dynamic variables, or just type in the information
you want to convey.
9.
Enable or disable notification to a syslog server if you have one and want to provide a
record of the action.
10. Let any other concerned parties know about the violation by selecting a Reviewer.
14. Assign a status, if needed.
102
Release 7.0.0.4
iGuard/inSight User Guide
15. If you have a pre-configured Prevent setup, you may extend notification by assigning a
Prevent Policy. Consult your administrator to find out if this feature is available to you.
16. Save.
The new action rule will be displayed in the window that is launched.
17.
Apply the action rule.
Apply an Action Rule
To activate an action rule, you must apply it to an existing rule.
1.
Go to the Policies tab.
2.
Click on a policy to launch the Edit Policy window.
3.
Click on the name of the rule under the policy.
The Edit Rule window will launch.
4.
Select the Actions tab.
5.
Click on the Add Action plus sign:
This will offer you a list from which to choose.
Release 7.0.0.4
103
Reconnex Corporation
6.
Click on the Action you want to apply.
7.
Save.
The new action rule is immediately added under the rule's Actions tab.
Note: The rule must be in an Active state to perform the action. If it is not, activate it.
Delete an Action Rule
You can either delete an action rule, or you can just delete the application of the action rule.
Delete an action that is applied to a rule
1.
Go to the Policies tab.
2.
Click on a policy to launch the Edit Policy window.
3.
Click on the rule to which the action has been applied.
4.
In the Edit Rule window, select the Actions tab.
5.
Click on the "X" to remove the applied action.
6.
Confirm or cancel the deletion.
7.
Save.
Delete an action rule
1.
Go to Policies > Action Rules.
2.
Check the box of the action rule you want to delete.
3.
Pull down the Actions menu and select Delete or just select the trash can icon.
104
Release 7.0.0.4
iGuard/inSight User Guide
4.
Confirm or cancel the deletion.
What is a Concept?
Concepts are pattern-matching devices that use text patterns and/or regular expressions to pull
related objects out of captured data.
For example, credit cards use a wide range of different numbering patterns. When all of those
patterns are collected into a single concept and applied against captured data, any credit card
number on the network can be easily recognized.
iGuard users do not need any special programming skills to use concepts when searching or
creating rules. Standard concepts can be implemented just by selecting them from a palette, and
users who a little more background will find it easy to use iGuard to construct custom concepts.
Standard Concepts
These are the concepts that are available for use in searches, rules, templates and other features.
You can type them in as values, or select them from the palette that launches from the "?".
ADMISSIONDISCHARGE
Terms common to admission and discharge forms – e.g., Admission Date, Discharge Date,
Service Date
AMEX
Non-numeric terms pertaining to American Express credit cards
BANK-ABA
Expressions pertaining to American Bankers Association routing numbers
BANK-ACNT
Bank account formats – account/routing numbers, account activity, etc.
BANK-STMT
Terms found routinely on bank statements - e.g., deposits, credits, balances, account
activity, etc.
BOARD-MEETING
Board meeting terms - e.g., Board Meeting Minutes, notes, transcripts, action items
Blacklist
Persons or organizations to be boycotted or penalized
BLOGSPOT
Concept that identifies blog websites
CCN
Numerical pattern for credit card numbers
COMMON-DISEASE
List of common diseases
COMP-BENEFITS
Terms pertaining to Compensations and Benefits – e.g.,compensation, stock option,
401k, 401(k), 401-k, vesting period, salary, wages, across-the-board increase, acrossthe-board wage change, base wage rate, Bona Fide Occupational Qualification, career
ladder, Compa Ratio, cost-of-living adjustment, hiring rate, incentive plan, knowledgebase pay, lump sum increase, pay adjustment, plan, payment plan, pay range, accrual
leave plans, apprentice rate, average hourly rate, back pay, pension, pensions,
compensatory leave, signing bonus, copayment, deductible, deferred earnings, deferred
profit sharing, dental plan, disability retirement, disability insurance, dismissal pay,
severance, employee benefit plan,stock grant, fringe benefit,medical leave, paid vacation,
personal leave, probationary period, retroactive pay, retirement plan, sabbatical, stock
bonus, stock purchase, year-end bonus
COMPLIANCEREPORT
Concepts that help identify Compliance report Terminology found in compliance reports –
e.g. CAMELS (Capital, Asset Quality, Management, Earnings, Liquidity and Sensitivity),
compliance report, creditworthiness assessment system
CONFIDENTIAL
Common indicators of confidential information - e.g., Do Not Distribute, Not for Distribution,
Internal Distribution, For your eyes only, Not for External Distribution, Not for Public
Release 7.0.0.4
105
Reconnex Corporation
Consumption
CREDIT-REPORT
Credit report information identifying agencies
DATE-OF-BIRTH
Terms pertaining to Date of Birth – used with other attributes to detect personal information
DINERS
Non-numeric terms pertaining to Diners Club credit cards
DISCONTENT
Key phrases used to indicate frustration and discontent.
DISCOVER
Non-numeric terms pertaining to Discover credit cards
DRIVERS-LICENSE
Non-numeric term pertaining to Drivers License expressions
DRIVERS-LICENSENUMBERdocs
Pattern to identify Drivers License Numbers in documents
DRIVERS-LICENSENUMBERmessage
Pattern to identify Drivers License Numbers in messages
DocReg
Expressions relating to document registration
EIN
Non-numeric terms pertaining to Employee Identification Number
EIN-NUMBER
Pattern to identify Employee Identification Number
ENROUTE
Non-numeric terms pertaining to credit cards en route
ETHNICITIES
List of various ethnicities
EXECJOBSEARCH
Tracks executive-level job searches
FINANCIAL-AUDIT
Terms found in financial audit documents
FINANCIAL-REPORT
Financial reporting acronyms and terminology, e.g. - TDF, FFIEC (Federal Financial
Institutions Examination Council), financial report, thrift financial report, report of assets
and liabilities, report of indebtedness, country exposure report, foreigh branch report of
condition, report of condition and income
FINANCIAL-STMT
Terms found in financial statements - e.g. financial statement, assets, cash,
investment(s), prepaid expense, accrued, accumulated depreciation, goodwill, payroll,
common shares, preferred shares, depreciation, Accounts Payable, Accounts
Receivable, liabiities, real estate
FINANCIAL-STMT1
Terms often used in financial statements
FIRST-NAME
Terms pertaining to First Name identifiers to detect large lists of people – used with other
combinations of attributes.
Fleshtone
Concept to identify fleshtones or skintones in Images
GAMBLING
Typical gambling phrases that, when set with a threshold, can detect most gambling sites.
Gnutella
Concept to identify Gnutella traffic
GRADES
Terms that refer to Grade Point Average
HATE-RACISM
Hate-Racism related terms. Common racial and sexual orientation slurs.
iEXPLORER
Concept to identify Internet Explorer traffic
ILLEGAL-DRUGS
List of illegal drugs
INSTRUCTIONS
Concept that looks for documents containing common instruction terminology
106
Release 7.0.0.4
iGuard/inSight User Guide
JCB
Non-numeric terms pertaining to JCB credit card expression
LAST-NAME
Terms pertaining to last name identifiers to detect large lists of people. This is used with
other combinations of attributes.
LEGAL
Concept that helps detect Legal activity; includes legal terms, such as
Attorney Client Privilege
LIMEWIRE
Concept to help detect Limewire traffic
MASTERCARD
Non-numeric terms pertaining to MasterCard credit cards
MEDICAL-DIAGNOSIS
Medical diagnosis terminology used in conjunction with other attributes to identify personal
health information – e.g., diagnosis, symptoms, case history, medical history, prognosis
MEMO
Terms used in Memoranda - e.g., Internal Memo, Employee Memo, etc.
MERGERACQUISITION
Terms used in a Mergers and Acquisition context
MOZILLA
Concept to identify Mozilla traffic
MRN
Terms that identify the use of Medical Records Numbers
NETSCAPE
Concept to identify Netscape traffic
NETWORK-SECURITY
Concept to identify commonly-used network security terms
PASSWORD
Common terms used to identify computer access, e.g., password, passwd, passcode
PRICE-LIST
Terms routinely found in price lists - e.g., End of Life, MSRP, Price List, Terms and
Conditions, Discount, License Agreement, Annual, pricing, price
PRICE_LIST1
Other terms used in Price Lists
PROFIT-LOSS
Terms often used in Profit and Loss statements – e.g. P&L, Pro Forma, depreciation,
rent, interest, income statement, balance sheet, revenue forecast, cash flow statement,
income statement, net sales, cost of goods sold, other income, other expense
PROFIT-LOSS1
Other terms used in Profit and Loss statements
PRO-EARNINGS
Projected Earnings terminology, e.g. - projected earnings, earnings projection, sales
forecast, forecasted earnings, earnings per share, forecasted revenue, revenue per
share, earnings forecast
PROFANITY
Common profane words and phrases
PROGRAMSCHEDULE
Terms often found in program schedules
RESUME
Terms commonly found in resumes - e.g, Job, Position, Qualifications, Education,
Experience, Curriculum Vitae, Professional, References
SALES-FORECAST
Terms found in Sales Forecast documents
SAR
Non-Numeric terms pertaining to Suspicious Activity Reports – e.g., SAR-SF, FinCen
SAR-NUMBER
Numeric patterns found in Suspicious Activity Reports
Release 7.0.0.4
107
Reconnex Corporation
SECURITY-AGENCIES Terms that identify mention of security agency domains, e.g. – nsa.gov, cia.gov, etc.
SENSITIVE-DISEASES List of sensitive diseases
SEXUAL-LANGUAGE
Common sexual words and phrases
SOCIAL_SECURITY
Non-Numeric terms pertaining to Social Security Numbers
SOXF
Terms to negate Sox compliance false positives
SPAM
Common terms identifying unsolicited email
SPAM1
Other terms identifying unsolicited email
SPORTS
Common sports terminology typically associated with sports web sites
SSN
Pattern to identify Social Security Numbers(delimited)
SSNdocs
Pattern to identify Social Security Numbers in documents
SSNmessage
Pattern to identify Social Security Numbers in messages
SUBSTANCE-ABUSE
Substance abuse related expressions
USERNAME
Terms used to identify individual computer access, e.g., username, login, User Name
VIOLENCE
Common violent words, phrases and threats
VISA
Non-numeric terms pertaining to VISA credit cards
WEAPONS
Common terms for a variety of weapons
WIRE-TRANSFER
Terms often used in Wire Transfer transactions – e.g. dates, types, origins, etc.
Create a Concept
When you create a new concept, you are using text and/or regular expressions to define one or
more patterns for a particular kind of data that you want iGuard‘s capture engine to recognize and
protect.
Suppose you want iGuard to ensure that no data containing your internal part numbers, product
IDs, or document numbers ever leaves your site to ensure the integrity of your intellectual property.
This could be done by identifying all of your numbering systems in a PART-NUMBER concept.
1.
Go to the Policies tab.
2.
Click on Concepts.
3.
Click on Add Concept.
4.
Name the concept (use uppercase only).
5.
Describe the concept.
108
Release 7.0.0.4
iGuard/inSight User Guide
6.
Upload expressions (optional).
Tip: The Upload Expressions function will save you a lot of time if your concept requires a lot
of definitions — for example, a list of email addresses you want to match.
7.
Add regular expressions using the short list in the Add Concept window, or the more
comprehensive list in the regular expressions topic.
8.
Validate your regular expressions against a real part, product or document number.
iGuard will respond by letting you know whether or not your pattern matches the real-world
example you have used to construct it.
9.
You can now extend your new concept by applying conditions to it.
Note: Up to 37 user-defined concepts can be created.
Best practice: Build a template using your custom concept. This will not only save you
keystrokes when searching, creating rules, and building capture filters — it will also help you to
retrieve exactly the information you need quickly.
Release 7.0.0.4
109
Reconnex Corporation
Concept Conditions
Applying conditions to concepts you have constructed help you to exert greater control over your
queries. When you impose conditions on a concept, iGuard will report a match only if the
expressions you defined are found under the conditions you define.
Before you impose conditions on a concept, you must edit an existing one or add a new one.
1.
Go to the Policies tab.
2.
Click on Concepts.
3.
Click on the Concept Name you want to modify (or select Add Concepts and create a
new one).
4.
Define or redefine the Expression(s), if necessary.
Note: You may use one or more or none of the following conditions to define your Concept.
5.
Define the number of instances you want iGuard to find in captured data before it
reports results, e.g.:
Note: The "?" pops up a menu allowing you to select from the expressions you created when
building your Concept.
6.
Define the percentage match you want iGuard to find in a captured object before it
reports results, e.g.:
7.
Define the number of lines from the beginning of the captured object in which you want
iGuard to find the expression, e.g.:
110
Release 7.0.0.4
iGuard/inSight User Guide
8.
Define the number of bytes from the beginning of the captured object in which you want
iGuard to find the expression, e.g.:
9.
Compare a concept to another expression to define a relationship between the two.
In the following example, iGuard will report a match only if a part number is found
within exactly 1000 bytes of a Visa number.
Note: You can impose multiple conditions on your Concept, but because conflicts could arise,
you must carefully consider what they will do before implementing them.
Regular Expression Syntax
When creating new concepts, use the following regular expressions to construct patterns.
\n
line feed
\r
carriage return
\f
form feed
\b
backspace
\a
bell
\e
escape
\t
tab
\0xN the hex ascii character equivalent to N
\nnn
the octal character of value nnn
\d
digit 0-9
\D
not digit 0-9
\c
any alpha A-Z or a-z
\C
not any alpha A-Z or a-z
Release 7.0.0.4
111
Reconnex Corporation
\w
any alphanumeric \c or \d
\W
not alphanumeric ^\w
\s
any space [\ \f \n \r \t]
\S
not any space ^\s
\p
any space or field delimiter [\ -\\ :-@ \[-‗ {-~ ]
\P
not any space or field delimiter ^\p
\i
case sensitivity off
\I
case sensitivity on
[…]
character sets, e.g. [3-6a-c] = 3,4,5,6,a,b,c
x-y
character ranges T-X = T,U,V,W,X
^
invert, e.g. ^\0x0 are all characters except NULL
Create a Network Concept
Network concepts allow you to identify expressions and concepts within protocol header
information, including HTTP headers. This allows you to identify session-related information about
flows on your network, including what end user agents are in use for HTTP. Once you know the
agent's user string, you can use it to build a concept that will flag all objects using that agent.
In the case of HTTP, this is helpful for identifying spiders, robots, crawlers, types of webmail,
browser versions, and operating systems in use on your network.
You can also look for specific host information in headers. This can tell you if you how much
productivity you are losing to blog websites like Deadspin. Because the network concept tags all
objects going to that host, you can get an idea of how much of a problem it is.
1.
Go to Policy Concepts.
2.
Click on Add Concept.
3.
Name the network concept (use uppercase only).
4.
Describe the concept.
Note: There is a BLOGPOST standard concept that finds traffic to multiple blog websites. In
this example, that concept is being limited to only one of those sites and extended to find all
objects going to that site.
112
Release 7.0.0.4
iGuard/inSight User Guide
5.
Enter the hostname as it will be found in the header.
6.
Save.
7.
Verify that the new concept is added to your list of user-defined concepts.
Now you can use the concept in a search or rule so you can stay on top of the problem on a daily basis, if
needed. You may want to combine this concept with a search for office documents to capture the content that
is being posted.
Example
1.
Go to Capture > Advanced Search.
2.
Select Content > Element > Concept.
3.
Select your concept from a palette that launches from the "?" at the end of the
Concept value line.
Release 7.0.0.4
113
Reconnex Corporation
Now you can add a new element to use your BLOGPOST search in combination with a query for Microsoft
Word documents that may be going going to the Deadspin website.
4.
Add an element by clicking on the green plus sign.
5.
Select Content Type and equals from the element menus.
6.
Add a value to define the type of documents you think might be posted. You can either
type in a format, or select one or more from the palette that launches from the "?".
7.
Search or Save Search. The latter will create a rule.
Search will start running, and results will be returned as soon as they are available, e.g.:
114
Release 7.0.0.4
iGuard/inSight User Guide
To view any incidents that are generated by the rule, go to Monitor and Group by Rule. When you find a
matching incident, you can verify that it is returned from the BLOGPOST_DEADSPIN concept by selecting it
and clicking on the Concept tab.
What are Templates?
Templates are used to save keystrokes when searching, adding rules or creating capture filters.
They contain collections of elements that would otherwise have to be typed in repetitively.
You may want to use one of the many standard templates already available, or you may want to
create your own.
Best practice: Use custom concepts with customized templates to create powerful but easy-touse queries, rules, and capture filters.
Templates are especially useful when building rules. They cut down on the repetitive typing needed
when experimenting with queries before saving a search as a rule.
Standard Templates
Reconnex has made a collection of templates available to expedite searches and assist in the
construction of rules, concepts and capture filters.
For example, when you search using a template, you can click on the "?" at the end of the dialog
box and select a template from the popup list.
To see the list of templates that are available, go to Policies > Templates.
Release 7.0.0.4
115
Reconnex Corporation
Tip: Click on the template name to see what it contains.
Create a Template
Searching or creating rules, concepts or capture filters can be a tedious task if you have to enter
related terms repetitively. You can save keystrokes by distilling repetitive operations into a
template.
Tip: You can use a template to extend any repetitive operation. For example, you can create
an alias for a range of IP addresses, define all of the IP addresses in a department so you can
refer to them as a group.
Before you start, you should have several conditions in mind that need to act together to produce a
result.
For example, suppose you want to monitor an employee at a national laboratory who may be
selling sensitive information to China. You could create a template that you can use daily to watch
for a specific type of conduct in the suspect's communications.
1.
116
Go to the Policies tab.
Release 7.0.0.4
iGuard/inSight User Guide
2.
Click on Templates.
3.
Click on Create New Template.
4.
Name and describe the template.
Important: The characters * % @ + # ? , ' " cannot be used in name fields.
5.
Select a Component Type. This selection puts your template into a category so that
iGuard can recognize the type of data you want to focus on.
6.
Construct the elements and conditions of the template to tell iGuard what you are
watching for in the subject's transmissions.
Tip: To add elements, use the green plus icon at the end of the Value field.
In this case, you are identifying an individual by email address and asking to be notified
if he transmits information to China or visits a Chinese search engine.
7.
Save.
The Templates list will launch, showing that the new template is available for use.
Release 7.0.0.4
117
Reconnex Corporation
Now that your template is defined, you can pick it up from the "?" palette launched
from the end of Value lines when searching, building rules or creating capture filters.
Delete a Template
1.
Go to Policies > Templates.
2.
Check the box of the template you want to delete.
3.
Pull down the Action menu and selected Delete.
Alternatively, you can click on the template's Trashcan icon.
118
Release 7.0.0.4
iGuard/inSight User Guide
Managing the System
You can use the System tab on your inSight or iGuard to monitor the health of your systems, tune
them for better performance, monitor and manage traffic, and administer users and user groups.
To get a start on learning how to manage the system, try to become familiar with these core topics.
Add a Device
Alerts
Audit Logs
Create a Technical Support Package
Host and Network Configuration
Manage Users and User Groups
Managing Disk Space
Set Up Active Directory Services
System Monitor
User Group Design
Using an LDAP Server
Using Logs
What are Capture Filters
System Monitor
Monitoring the health of your system is now a point-and-click operation from the System > System
Monitor dashboard. The main page gives you a quick summary of the health of the machine you
are on.
This quick visual summary is supplemented with links that can give you more in-depth information.
Selecting the Details link gives a quick summary of general, system and network system statistics.
Selecting the More link offers a Check Status link at the top of the Utilities list. It expands the
information displayed on the dashboard.
Note: Numerous advanced utilities are also accessible from the More link.
Alerts
Alerts are regularly reported to the events database, which is polled every 2 minutes. Every alert in
the database is available within this interval through the GUI, and the timestamp is reported for
each alert.
Release 7.0.0.4
119
Reconnex Corporation
When iGuard interfaces are silent, no data is flowing through the capture ports. If this is being
reported repetitively, the problem may be solved by restarting the system from the System >
System Monitor > More > Utilities > Restart/Shutdown.
Alert Types
Any alert type can be set up and reported to any user on a regular basis. If different types of alerts
are set up to notify a user, they are combined and sent according to the alert with the highest
priority.
Critical alerts are reported instantaneously. For warning or informational alerts, the system waits
30 minutes before reporting.
Filter Alerts
You can use the Filter by... feature in the navigation bar to sort the alerts according to alert level,
type, device or date and time.
1.
Go to System Monitor > Alerts.
The current alerts are listed in descending order.
2.
Go to Filter by... and select a time period from the first pull-down menu.
3.
Select the green plus sign to add a new sorting qualifier.
4.
From the second filtering group, select one of the sort categories from the first pulldown menu.
5.
Select equals or not equal from the second pull-down menu.
6.
Click on the "?" to launch the selection palette.
120
Release 7.0.0.4
iGuard/inSight User Guide
7.
Check one or more boxes from the palette to define the alert subcategory.
8.
Click on the palette's Apply button.
9.
Click on the Apply button on the Filter by... title bar.
Important: After you have finished using the filter, clear it so that you can get a new set of
results.
10. Click on Clear All.
Set Up Alert Notification
To set up an alert notification, first check the list of available recipients at System Monitor > Alerts
> Actions > View Alert Recipients.
If the user you need to notify is not listed, you must first define the alert types you want to send.
Then you can set up alert notification.
1.
Go to System > System Monitor > Alerts > Actions > View Alert Recipients.
2.
Select Add Alert Recipient.
3.
Add an email address.
4.
Select the alert types you want to send to the user.
Release 7.0.0.4
121
Reconnex Corporation
5.
Save.
6.
Verify that the alert notification is added to the list of recipients that is launched.
When an alert is sent, the format of the email received is based on type of alert sent.
This message is notification of a critical alert, and it is sent as soon as the alert is received by the system.
Manage Users and User Groups
Reconnex inSight and iGuard are role-based, multiuser systems.Creating user accounts and
groups is one of the first tasks of administrators who are setting up the system.
As an administrator, you will have to perform the following tasks:
1.
Design a user system or use the default one provided with inSight and iGuard.
Tip: Using the default user groups may facilitate this process. You can edit the preconfigured
groups instead of creating new ones.
122
Release 7.0.0.4
iGuard/inSight User Guide
1.
Create users and user groups.
2.
Add an LDAP server (optional).
3.
Create LDAP users (optional).
4.
Set permissions.
User Group Design
Before creating a new user group scheme, it would be a good idea to familiarize yourself with the
task and policy permissions that are the basis for assigning inSight and iGuard privileges.
You can design a brand-new user system that will fit your existing organization, or you might use
the preconfigured user groups as a starting point and redefine them to meet your company's needs.
Example
A CSO of a large company may login as primary user and create administrative groups to manage
the inSight Console. These groups might include the following:
System Administrators
Network Administrators
Installation and Setup Administrators
Policy Administrators
Each of those administrators may then create Forensics and Analyst users.
Organizational Example
The inSight Console administrator may decide that user groups should reflect user roles in existing
departments. New groups like the following might be created to reflect the current organization of
the company.
Engineering Users
HR Users
Marketing Users
Sales Users
In such a case, the privileges for each of these groups could be defined to match departmental
functions.
Preconfigured User Groups
Several preset configurable group templates are supplied by factory default.
Release 7.0.0.4
123
Reconnex Corporation
These role-based user groups are supplied only as a suggested uniform framework for multiple
user roles. You can redefine them, add other named groups, or ignore them.
Add a User Group
Administrator status is required to add new user groups.
1.
Go to System > User Administration > Groups.
2.
Pull down the Actions menu.
3.
Select Create New Group.
4.
The Group Information dialog box will launch.
5.
Add the name and description of the new group.
6.
Add an email alias, if needed.
7.
Add users from theAvailable Users box.
Hold down the control key to select multiple users.
124
Release 7.0.0.4
iGuard/inSight User Guide
8.
Click Add to the Current Members pane.
9.
Select Update.
10. Verify that the new group is added to the Groups list.
Assign Permissions
All resources available for assignation are listed under the Tasks Permissions or Policy
Permissions tabs. They are assigned only through groups, so the user group design initially
determines all privileges.
Note: All users inherit the permission levels of the groups to which they have been assigned.
To change user permissions, change the permissions of the group to which the user belongs
or reassign the user to another group. If neither of these solutions work, add a group with a
new set of permissions and assign the user to it.
Important: If a user's permissions are changed, other users who are members of the same
group will be affected. After the group's permissions have been changed, all of its members
will have to re-login before the new permissions take effect.
1.
Go to System > User Administration > Groups.
2.
Select a group.
3.
Select the Details icon.
4.
Select either the Task Permissions or the Policy Permissions tab.
5.
Expand the lists of resources by clicking on the drop-down arrow.
6.
Check or clear boxes corresponding to the privileges you want to allocate or restrict.
7.
Update.
Release 7.0.0.4
125
Reconnex Corporation
Role-Based Multi-User Access
Role-based multi-user access allows assignation of varying levels of access based on user roles in
the organization. Each class of users, or user group, can be allocated a different set of privileges.
For example, some user groups may be allowed to view only reports relating to their own
operations, while others may have complete control of all of an organization's tasks and resources.
Six preconfigured role-based user groups are provided as templates. Administrators who set up
the system may use or edit this structure, but it could also be ignored or replaced with customized
groups.
View Group Permissions
If you have permission to assign privileges, you can see how each group's role is defined by
viewing their permissions..
1.
Go to System > User Administration > Groups.
2.
Select a group.
3.
Select the Details icon for that group.
4.
Go to the Task or Policy Permissions tab.
5.
Note which boxes have been checked under each category.
Tasks Permissions
Tasks are resources that are divided into five distinct collections of permissions. The Administrators
group has complete access to all tasks.
Each group of tasks gives all users in a group privilege to perform a set of actions on the system.
You can view permissions of the existing groups to get familiar with the allocation of task privileges.
To set task privileges:
1.
Go to System > User Administration > Groups.
Note: You must create a group before it can be displayed here.
2.
Select the Detail icon.
3.
Select the Task Permissions tab.
4.
Select a task collection.
126
Release 7.0.0.4
iGuard/inSight User Guide
5.
Click the down arrow to display the permissions list.
6.
Check or clear the boxes corresponding to the permissions you want the user group to
have.
7.
Save.
Policy Permissions
All of the policies and rules shipped with the inSight or iGuard system are owned by administrators,
who have complete privileges to manage all policies, rules, action rules, concepts, and templates.
The available policies are the ERMs Electronic Risk Modules your organization has requested.
To get familiar with the allocation of a group's policy permissions view permissions of the
existing groups to get familiar with the allocation of policy privileges.
Important: Execute permission must be assigned to any group that is going to be viewing
incidents on the dashboard because the incidents are sorted by policy by default.
1.
Go to System > User Administration > Groups.
Note: You must create a group before it can be displayed here.
2.
Select the Detail icon.
3.
Select the Policy Permissions tab.
4.
Click the down arrow to display the Policies permissions list.
5.
Select the policy you want to edit.
6.
Check or clear the View, Edit, Execute and/or Delete boxes.
7.
Save.
Add a New User
You must have at least administrator permission to add new users. Check your permissions to
verify your privilege to add users.
1.
Go to System > User Administration > Users > Actions > Create Local User.
You can also add multiple users by importing them from an LDAP server.
2.
Enter the user's login ID, name, email address and password.
3.
A new user is Active by default.
4.
Define the user's visibility to other users by selecting the Private or Public radio
button.
5.
Assign the user to a group by selecting from the available groups and clicking Add.
This is important because users inherit all privileges from groups.
Release 7.0.0.4
127
Reconnex Corporation
6.
Update.
Tip: If the user doesn't fit logically into the available groups, you must add a new group.
7.
Verify that the new user is added to the list that is launched.
Change Password or Profile
After your user account is set up by an administrator, you can make changes in your profile.
1.
Go to System > User Administration > Users.
2.
Select Details.
3.
Make the needed changes in the User Information dialog box.
4.
Update.
128
Release 7.0.0.4
iGuard/inSight User Guide
Create a Failover Account
If the link between the inSight Console and its iGuards is broken, the default failover account can
be used to login to the iGuards.
Note: The failover account is enabled by default for your convenience. If you do not want to
have backdoor access from inSight to your iGuards, you can disable it by disallowing logins.
If logins are not allowed and a login attempt is made, an error message will be launched
advising that the capability has been turned off.
1.
Go to System > User Administration > Failover Account.
2.
In the User Information dialog box, provide a username and password for the
account.
The username and password for this account are the same as that of the primary
administrator. If you want to allow login to this account, it is advisable to change the password.
3.
If you want to turn the account off to tighten security on your iGuards, pull down the
Allow Login menu and select Off.
4.
Update.
Find Permissions
All of your permissions are inherited from your group affiliation, so you must know what group you
are in to find out what they are.
Note: If your permissions have been changed, you must re-login for the change to register. It
doesn't matter if you're an LDAP or local user.
1.
Go to System > User Administration > Users.
Release 7.0.0.4
129
Reconnex Corporation
2.
Select the Detail link opposite your username in the navigation bar.
3.
Note your Current Group Membership.
4.
Go to System > User Administration > Groups.
5.
Select the Detail link opposite your user group(s) in the navigation bar.
6.
Select the Task or Policy Permissions tab.
7.
Expand the lists of resources by clicking on the drop-down arrow.
8.
Note the boxes checked indicating the privileges allocated to your group(s).
Note: Administrator status is required to set permissions for groups.
Primary Administrator
The primary administrator has complete access to all task and policy permissions and essentially
owns the inSight Console.
If you need primary administrator login information, contact Reconnex Technical Support.
As primary administrator, you may want to share administrative duties by creating additional
administrators. To do this, create new groups (e.g., administrative sub-groups like system or
network administrators) to allow specialization in those areas, then create user accounts for those
administrators and assign them to the appropriate groups.
Tip: If you are the primary administrator, you should create an equivalent user immediately
after logging in to preserve the integrity of the default login. You should also consider setting
up a failover account.
Audit Logs
User audit logs on the inSight Console make it possible to monitor all user activity on any of the
iGuard systems. iGuard standalone systems also have user audit logs, but they log activity on that
iGuard only.
Each of the columns in the log can be sorted by clicking the header, and the log itself can be
filtered to find the most pertinent results.
Audit Log Actions
The User Audit Log page gives specific information on the actions each user executes on the
iGuard and records the date and time each action was taken. Further, each login session is
preserved and identified.
130
Release 7.0.0.4
iGuard/inSight User Guide
Any of the following actions may be cited on the User Audit Log page.
Recognized User Activities
1.
View device list
2.
Add a device
3.
Edit a device
4.
Delete a device
5.
View statistics
6.
View statistics details
7.
View system logs
8.
Delete system logs
9.
View Alias list
10. Create Alias
11. Modify Alias
12. Delete Alias
13. View DHCP server list
14. Create DHCP server
Release 7.0.0.4
131
Reconnex Corporation
15. Modify DHCP server
16. Update DHCP server
17. Delete DHCP server
18. View Capture filter list
19. Create Capture filter
20. Modify Capture filter
21. Update Capture filter
22. Apply Capture filter
23. Delete Capture filter
24. Restore Factory defaults
25. Show system configuration
26. Modify system configuration
27. Modify Management IP
28. Modify Wiping policy
29. View Utilities
30. View kernel version
31. View system uptime
32. View application version
33. View user audit logs
34. Delete user audit logs
35. View user accounts
36. View user groups
37. Add local user
38. Add LDAP user
39. Add user
40. Add LDAP user
41. Modify user
42. Search a user
43. View a user
44. Delete a user
45. Add user group
46. View Group list
47. Add user group
48. Modify user group
49. Display group members
132
Release 7.0.0.4
iGuard/inSight User Guide
50. Delete user group
51. View group permissions
52. View group task permissions
53. View group policy permissions
54. View user permissions setup
55. Update user/task permissions
56. View LDAP servers
57. Add LDAP domain
58. Modify LDAP server
59. Delete LDAP server
60. Export/Import policy rule
61. Modify info (My Info)
62. View Failover setup
63. Update Failover setup
64. Export/Import policy rule manually
65. View runtime rules on iGuard
66. View config rules on inSight
67. View policy deployment status
68. View policy deployment error
69. View runtime policies on iGuard
70. View config policies on inSight
71. View search list
72. View object
73. View search details
74. Create document search link clicked
75. Create image search link clicked
76. Create mail search link clicked
77. Create ftp search link clicked
78. Create search
79. View search result detail
80. View search result list
81. View schedule search page
82. Schedule a search
83. De-schedule a search
84. View policy schedule page
Release 7.0.0.4
133
Reconnex Corporation
85. Schedule a policy
86. De-schedule a policy
87. View export schedule search page
88. Download exported file
89. Fetch document
90. View adhoc keyword search page
91. Adhoc keyword search
92. View adhoc mail search page
93. Adhoc mail search
94. View adhoc image search page
95. Adhoc image search
96. View adhoc ip address search page
97. Adhoc ip address search
98. View create policy page
99. Create policy
100. View modify policy page
101. Modify policy
102. Delete policy
103. Advanced document search
104. Advanced image search
105. Advanced mail search
106. Advanced FTP search
107. Process cart results
108. Show export results page
109. Export results
110. View exported files
111. Delete exported file
112. Modify results per page
113. Attach file
114. Fetch document
115. Export dashboard
116. Open case on incident
117. View incident matches
118. View incident attributes
119. View incident history
134
Release 7.0.0.4
iGuard/inSight User Guide
120. View incident annotations
121. View incident cases
122. Modify case
123. Mark incident as read
124. Mark incident as unread
125. Mark incident as false positive
126. Mark incident for deletion
127. Delete incident /Re-Incident Delete
128. Show create dashboard views page
129. Display dashboard view
130. Delete dashboard view
131. Save dashboard view
132. Show file upload page
133. Upload file
134. Cancel file upload
135. View scheduled reports
136. Show create schedule reports page
137. Create new scheduled report
138. Login to inSight
139. Show help
140. Logout from inSight
141. Login to iGuard
142. Logout from iGuard
143. View version info
144. View status
145. Show disk capacity (wiping status)
146. Display flow stats
147. View scheduled reports
148. Show create schedule reports page
149. Create new scheduled report
150. View reports
151. View executive summary
152. View incident summary
153. View user summary
154. View location summary
Release 7.0.0.4
135
Reconnex Corporation
155. View risk summary
156. View network summary
157. View case summary
158. View case list
Audit Log Editing
You can edit the audit log so that you can isolate the actions you want to inspect and eliminate
those that do not provide any useful information.
Note: You can keep users from deleting their own records by setting their permissions.
Assigning such users to groups without administrative privileges would achieve this aim.
For example, you may decide to delete repetitive login and logout records because they do not
constitute significant activity.
1.
Select one or more records you want to delete.
To select or deselect all records at once, you can use a shortcut — just check the box in the
table header.
2.
Click on the Action column header to sort the records.
3.
Check the boxes of the records you want to delete.
4.
Pull down the Actions menu and select Delete.
4.
Confirm or cancel the action.
Tip: Because user audit logs are always accumulating, you may also want to delete some of
the older ones from time to time. Using the Select All on One Page feature will help you to
136
Release 7.0.0.4
iGuard/inSight User Guide
keep them up-to-date.
Audit Log Filtering
If you are an inSight administrator, you will want to maintain control over the system at all times.
The user logs tell you who has logged into each iGuard and when, and each action taken by the
user is recorded. You can also edit the log to focus on specific user activities.
For example, the user log may tell you that user Bob logged on, looked at a report, and did some
searching. Then you may notice that he created or edited a policy, published the new search policy
to an iGuard, and activated it before logging off. From the timing of the information, you may also
be able to figure out whole sequences of activities that may indicate that significant changes have
been made to the system.
Example
Suppose you have noticed that a policy you added to the system is producing unexpected results.
You can consult the log to see if any of your colleagues modified or added rules that may be
gathering additional information.
1.
Go to System > User Administration > Audit Logs.
2.
Pull down the Timestamp menu under Filter by... and select a period during which
you suspect there may have been modifications.
3.
If you know which iGuard is producing the unexpected results, add a filtering category
by selecting the green plus sign.
4.
Pull down the filter menu and select Device.
5.
Select equal or not equal.
6.
Type in the hostname of the machine just as it is listed in the Device column. You can
cut and paste it from the log if you prefer.
7.
Repeat the action for any of the other elements listed in the log.
Release 7.0.0.4
137
Reconnex Corporation
Note: If you want to add more than one item, separate them with a comma (no space).
8.
When you have finished filtering, Apply.
9.
Review the log and repeat the action until you get the information you need.
Important: Don't forget to Clear All before creating another filter.
System Administration
Administering your system is now a point-and-click operation from the System Administration
dashboard.
To make changes, select the Configure or the Advanced link.
Host and Network Configuration
You can change the host and network configuration by editing the System Configuration
window, or by launching and editing the Setup Wizard.
Configuration Method
1.
Go to System > System Administration.
2.
On the list of appliances, find the inSight or iGuard you want to configure.
Note: If you are on an inSight Console, you will see all of the devices being monitored on this
page. If you are on a standalone iGuard, you will see only your own iGuard.
3.
Click on the Configure link for the system.
4.
Make host and network changes in the Network dialog box.
138
Release 7.0.0.4
iGuard/inSight User Guide
5.
Update.
Setup Wizard Method
1.
Go to System > System Administration.
2.
On the list of appliances, find the inSight or iGuard you want to configure.
3.
Click on the Configure Link.
4.
Click on the Setup Wizard button (above the dialog box at the right-hand side).
5.
Make host and network changes on the Step 2 page.
6.
Click through the remaining pages with Next.
7.
When you have finished making changes, click Submit.
Setup Wizard
The Setup Wizard includes the ability to change the administrator setup and the policies activated
on different iGuards from the inSight Console.
Note: If you are setting up a new iGuard and the setup remains the same as the last
installation, you can select Cancel to expedite the setup process.
To start the Setup Wizard:
1.
Go to System > System Administration.
2.
Select an iGuard.
3.
Click on the Configure Link.
4.
Click on the Setup Wizard button.
5.
Make host and network changes on the Step 2 page.
6.
Click through the remaining pages with Next.
7.
On the Review page, Submit.
Release 7.0.0.4
139
Reconnex Corporation
What are Capture Filters?
There are two capture filter types. They are generally used to define significant portions of network
traffic that do not need to be analyzed by the capture engine. Eliminating processing of this
extraneous traffic improves iGuard's performance.
Although capture filters are most often used to screen out classes of information that can obscure
significant content, they are sometimes used to scan for and store critical data.
Capture Filter Types
Capture filters save processing time by allowing iGuard to focus only on significant traffic. There
are two types of capture filters, and they allow different types of capture actions.
Content capture filters act on data that is transmitted through the Application layer (Layer 1).
These filters can instruct the capture engine to ignore large stores of content which may not
produce any meaningful results.
Network capture filters act on data that is transmitted through the Transport layer (Layer 3). It
uses up resources but may not need to be recognized by the capture engine. This flow carries
distinct protocol information, and a network capture filter can be used to eliminate some of this data
from recognition by the capture engine.
Capture Filter Actions
Capture filter actions tell iGuard's capture engine what types of information are important enough to
processs.
Content and Network capture filters allow different types of capture actions.
Content capture filter actions include dropping certain elements from the data stream, ignoring
whole sessions containing those elements, or storing just the metadata of those elements.
When you Drop elements or sessions, the iGuard capture engine ignores that information in
the data stream.
Network capture filter actions either ignore or store entire transport sessions.
Store actions must come last in a list of network capture filters because that action concludes the filter
construction process. It instructs the capture engine to store everything that has NOT been defined.
Store adds all of the defined data to the database.
For example, you may want to identify FTP sessions found on the network and capture all of the content
being transmitted.
Catalog adds only metadata to the database.
For example, you may only want to know what kind of data is moving through the network data stream without
storing its content. This lets you can keep incidental information, like the source and destination of the data,
data types being transmitted, protocols being used to transmit it, and so forth.
140
Release 7.0.0.4
iGuard/inSight User Guide
Drop Element excludes all data associated with an element.
For example, your network may have a large cache of video files that you know are not a security threat
because you have controlled them with configuration management software. You can set up a filter that will
pass over any of these secure files, saving time and resources for analyzing data at risk.
Drop Session excludes an entire session from the data stream.
For example, your employees may be authorized to send or receive any SMTP content as long as it is moving
through your company's mail server. You can eliminate these sessions, which will improve the performance of
the capture engine.
Standard Content Capture Filters
Some content types transmitted through the Application layer may need not be analyzed by the
capture engine. If they are not eliminated from the data flow, they can slow iGuard's performance
unnecessarily. A set of standard content capture filters are provided to keep the capture engine
from processing them.
Note: Unlike network capture filters, the order of the list of content capture filters is not
significant.
Ignore Flow Headers
This filter excludes flow headers.
Ignore Small JPG Images
This filter excludes JPG images smaller than 4 MB. This eliminates insignificant images from the data stream.
Ignore Binary Traffic
This filter excludes all binary files.
Ignore Crypto Traffic
This filter excludes encrypted traffic.
Ignore P2P Traffic
This filter excludes all peer-to-peer traffic.
Ignore HTTP Headers
This filter excludes HTTP headers.
Ignore BMP and GIF Images
Release 7.0.0.4
141
Reconnex Corporation
This filter excludes images in BMP and GIF formats.
Ignore HTTP Gzip Responses
This filter excludes HTTP Gzip responses. This keeps the system from opening compressed files more than
once.
Standard Network Capture Filters
Transport (level 3) traffic can slow iGuard's performance unnecessarily, so a set of standard
network capture filters is provided to keep the capture engine from processing it.
For example, most businesses are interested in monitoring the traffic carried to or from external
IP addresses. The IANA Internet Assigned Numbers Authority has provided a special set of
addresses for internal use only, and these addresses (beginning with 10, 172, and 192) are listed in
RFC Request for Comments 1918.
Because only external addresses need analysis by iGuard, Reconnex created a network filter
named after this document to exclude intranet addresses from consideration by the capture engine.
Note: Depending on the objective, it may not matter where some network capture filters are
placed, while the placement of others may be crucial and may need to be reprioritized. When
you create a network capture filter, you must carefully consider the flow of traffic and use best
practices to figure out a sequence defining the search engine's treatment of your transport
traffic.
Important: Always keep in mind that the Base capture filter must run last.
Ignore RFC1918 Destinations
This filter excludes traffic routed to 10.0.0.0-10.255.255.255, 172.16.0.0-172.31.255.255 and 192.168.0.0192.168.255.255.
Ignore HTTP Responses
HTTP Response status codes are program output sent from a server after receiving and interpreting an
HTTP Request.
Ignore Unknown Protocols
This filter excludes traffic using any unknown protocol. In some cases it may be useful to analyze these
protocols, but these instances are exceptions to the rule.
Ignore SMB Traffic
142
Release 7.0.0.4
iGuard/inSight User Guide
This filter excludes Server Message Block/NETBIOS traffic.
Ignore SSH Traffic
This filter excludes secure shell traffic.
Ignore POP3 Traffic
This filter excludes Post Office Protocol traffic.
Ignore IMAP Traffic
This filter excludes Internet Message Access Protocol traffic.
Ignore HTTPS Traffic
This filter excludes secure HTTP traffic.
Ignore LDAP Traffic
This filter excludes Lightweight Directory Access Protocol traffic.
Ignore NTLM Traffic
This filter excludes NT LAN Manager traffic.
Base Configuration Capture Filter
This filter opens the system for storage of incoming data.
Create a Content Capture Filter
If you create a content capture filter, your capture filter actions are limited to dropping elements,
sessions, or dropping elements but storing their metadata.
For example, if you suspect you have a problem with illegal downloading, you could store all
BitTorrent traffic transporting filetypes like MP3 and AAC. If your organization has a vast library of
configuration-controlled image files, you could ignore all filetypes with extensions like MPEG, BMP,
JPG, GIF, TIF and PNG.
Suppose you want to create a filter to ignore all traffic to and from your web server that contains
RTP Real-time Transport Protocol files. This would eliminate a significant portion of network
activity, making it easier to focus on other types of traffic that you suspect may be compromised.
1.
Select System > System Administration > Capture Filters.
2.
Select Create Content Filter.
3.
Enter a name and description.
4.
Select a capture Action.
You can Drop Element (ignore the specified content), ignore the session containing it, or store only
metadata. In this case, you want to ignore MPEG and related RTP files.
Tip: These actions are explained in the Capture Actions topic.
5.
Select the iGuard on which you want to install the filter. Select None if you don't want
to deploy it yet.
6.
Save.
7.
Define the filter.
Release 7.0.0.4
143
Reconnex Corporation
8.
Define the protocol.
In this example, you are eliminating video file types that are being transmitted via the Web.
7.
Add any other qualifications, like size of the files, date and time transmitted, and source
and destination of the traffic.
8.
Select Save.
9.
Verify that your new filter appears in the Filters List.
The list is launched after you save.
10. Activate the new filter.
144
Release 7.0.0.4
iGuard/inSight User Guide
Create a Network Capture Filter
Designing a network capture filter requires experimentation, but taking the time to streamline the
capture process can save iGuard a lot of processing time.
If you create a network capture filter, your capture filter actions are limited to storing or ignoring
entire sessions.
Best practice: Before creating a network capture filter, select the All Element in the Network
Filter dialog box. This action either captures or cuts off all traffic, depending on the capture
action you choose, so that you can observe a limited pool of data before deciding what to filter.
Network elements are arranged in top-down order to establish a specific filtering sequence — but
the order is not always significant. Depending on the objective, it may not matter where some filters
are placed, while the placement of others may be crucial.
Important: In every case the Base filter must run last, because it instructs the system to store
all data that is NOT ignored.
1.
Make a list of the sessions you want the capture engine to store or ignore.
2.
Go to System > System Administration > Capture Filters.
3.
Select Create Network Filter.
4.
Name and describe the filter.
5.
Select the device(s) for deployment. If you select None, the filter will be created but not
deployed.
6.
Select a capture action.
7.
Select the sessions you want to single out for special treatment by the capture engine.
Release 7.0.0.4
145
Reconnex Corporation
8.
Save. The list of filters will be launched.
9.
Verify that the new filter has been added to the list.
146
Release 7.0.0.4
iGuard/inSight User Guide
10. Reprioritize the order in which the filters will run.
Remember, the Base filter must be listed last.
11. Test the filter and modify if necessary.
Reprioritize Capture Filters
When you create a new network capture filter, it is added to the Network Filters list. However,
when you put the filters to work on an iGuard, you must carefully consider the position of any new
filter.
Positioning may not matter if it does affect the cumulative filtering process, but a filter that modifies
another filter must be placed in the correct position.
Important: The final filter must be the BASE filter because it concludes the filtering process by
specifying that the system will store all traffic that has not been specifically ignored.
Release 7.0.0.4
147
Reconnex Corporation
Filters that define larger amounts of traffic should be placed at or near the top of the list.
For example, if you added a filter to ignore all traffic to and from ports 80 and 453, you would be
ignoring all HTTP and HTTPS traffic. In such a case, you would not need individual filters like
Ignore HTTP Responses or Ignore HTTP Requests.
1.
Add a new network capture filter - in this case, a port filter.
2.
Use the UP arrow in the Priority column to move it up to the correct position.
3.
Apply.
Tip: Move the new filter up until it is in a position to filter out more traffic than the filters below
it, but less than those above it.
Activate a Capture Filter
A capture filter can be added to an iGuard without being deployed. If "None" is selected when the
filter is created or modified, it is not deployed, but it is available for activation.
1.
Go to System > System Administration > Capture Filters.
2.
Select the Add Filter icon at the bottom of the network or content capture filter list.
A list showing the available filters is launched.
148
Release 7.0.0.4
iGuard/inSight User Guide
3.
Select the filter you want to activate.
4.
Verify that the filter has been added to the bottom of the list of active filters.
5.
If it is a network filter, reprioritize to run it in the correct order.
Deploy Capture Filters
If you are on a standalone iGuard, when you create a capture filter you can either deploy the filters
on your own machine, or check "None" to indicate that you want to deploy it later. If you want to
wait and deploy it later, just modify the filter at that time.
Use the same method to deploy a different set of capture filters from inSight to each iGuard. After
deployment is complete, each iGuard is listed along with the list of filters deployed on each.
1.
Go to System Administration > Capture Filters.
2.
Pull down the Views menu and select the Content or Network Filters list.
3.
Click on the filter you want to install. It may be a default filter, or it may be a new one
that you have recently added.
4.
In the deployment dialog box, check the device on which you want to install the capture
filter.
5.
Select Save.
A message will alert you to whether or not the modification was successful.
If so, the filters list that is launched shows that the filter has been modified.
View Deployed Capture Filters
You can find out which filters are deployed on each iGuard on your network.
1.
Go to System > System Administration > Capture Filters.
2.
Each iGuard listed displays two types of capture filters.
3.
If you are on an insight Console, you can scroll down the list to get complete
information on your managed systems.
Each iGuard listed displays two types of capture filters.
If you are on a standalone iGuard, you will see only the filters deployed on your own machine.
Note: If you are viewing one of the multiple iGuards lists, you can get back to this window by
pulling down the View menu and selecting Filter By iGuard.
Release 7.0.0.4
149
Reconnex Corporation
Modify a Capture Filter
To modify a capture filter, just click on its name and edit its properties.
Note: Default system filters cannot be modified, but they can be saved under another name
and edited to create a new filter. If you try this, you will be prompted to do so.
Delete a Capture Filter
If you are on a standalone iGuard, when you delete a capture filter you are removing it from your
own machine.
If you are on an inSight Console, you can remove it from one or more of the iGuards to which it has
been deployed. Before deleting, View deployed filters to determine which iGuards are using the
filter you want to remove.
1.
Select the Remove icon next to the filter you want to delete.
2.
A confirmation popup will launch.
3.
Select OK or cancel the deletion.
The capture filter will be deleted from the iGuard to which it
has been published.
Filter Out Files by Size
You may want to filter out images that are too small to be significant, or you might want to pay
special attention to files that are large enough to suggest abuse of network privileges.
For example, network data streams typically transport large numbers of images, but many of them
are used only for user convenience or as small signposts to facilitate certain operations. Small
images like icons or thumbnails do not have significant content and can therefore be eliminated
from the data stream.
150
Release 7.0.0.4
iGuard/inSight User Guide
Conversely, transport of large-sized files may indicate inappropriate usage of network resources.
Users may be routinely sending large video files that are unrelated to their job functions.
These can be recognized by content type as well as file size.
Release 7.0.0.4
151
Reconnex Corporation
To identify such a problem, it would only be necessary to store the metadata indicating that large
files are being transported. If the content of those files became an issue, a rule or template could
be created to find them.
Add an IP Address Network Capture Filter
You can create a network capture filter for individual IP addresses, a subnet, or a range of
addresses.
Suppose you want iGuard to monitor outgoing email, but to ignore all incoming email. You could
accomplish this by creating a network capture filter that would ignore all traffic going to the
IP address of that server.
1.
Go to System > System Administration > Capture Filters > Create Network Filter.
Note: IP address options can take input in the form of individual addresses separated by
commas, or ranges separated by commas or dashes (e.g., sip:192.168.1.1,192.168.1.2 or sip:
192.168.1.1-192.168.1.255).
2.
Add a filter name and description.
3.
Indicate the device on which you want the filter deployed. If you want to decide later,
you can check None.
4.
Indicate what capture action you want the filter to perform.
5.
Select the IP Address Element and Condition under Sender/Recipient.
6.
Enter the IP address(es), subnet or range of IP addresses.
Subnetting is supported if the network and host portions of an IP address are standard classful
IP (address fields are separated into four 8-bit groups).
7.
152
Save.
Release 7.0.0.4
iGuard/inSight User Guide
8.
Verify that the new filter is listed in the window that is launched.
CIDR Classless Inter-Domain Routing notation improves the efficiency of the IPv4 addressing
scheme by allowing routers to interpret addresses as if they were classful. You can use it by
entering the IP address followed by its subnet mask. [IPv6 is not yet supported.]
Add a Port Network Capture Filter
You can create a network capture filter to exclude traffic using a certain port from analysis by the
capture engine.
Suppose you want iGuard to exclude traffic from port 443, which is primarily used for encrypted
data, but because port 443 is also used by AOL America Online, significant data could be lost by
filtering out all traffic using that port.
To retain the AOL traffic while excluding all encrypted data, you could create a multiple capture
filter to routinely save significant data while dropping traffic that would not reveal any useful results.
In this case, you will want to use the "store" capture action first because the "ignore" action
works on whatever traffic is left after the AOL traffic is saved. However, even if you create the
filters in the wrong order initially, you can reprioritize them later.
1.
Go to System > System Administration > Capture Filters > Create Network Filter.
2.
Add a filter name and description.
Release 7.0.0.4
153
Reconnex Corporation
3.
Indicate the device on which you want the filter deployed. If you want to decide later,
you can check None.
4.
Select the capture action you want the filter to perform.
5.
Select the Port Element and Condition under Protocol.
Note: When you define a port or a port range, the system will return either a source or
destination port, but not both. To get a complete result showing both source and destination
ports, you must qualify your search by specifying the port used by both sender and recipient.
6.
Enter the port or port range.
To view the latest update to the port list, go to http://www.iana.org/assignments/port-numbers.
7.
Save.
8.
Verify that the new filter is listed in the window that is launched.
9.
Create the second port filter.
154
Release 7.0.0.4
iGuard/inSight User Guide
10. Save.
11. Verify that the new filters are listed in the window that is launched.
12. Reprioritize the filters, if necessary.
Release 7.0.0.4
155
Reconnex Corporation
Advanced Utilities
You can run Linux, SQL or RFS Reconnex File Systemcommands in real time by going to System
> System Administration > Advanced > Utilities. You can get the same information from the
System Monitor > Advanced > More link.
Tip: This information is neatly summarized under the Details link at System > System
Monitor.
Important: You can reboot the system from the links at the bottom of the Utilities page. You
can also shutdown iGuard or restart the JBoss application server.
View Objects
The Show Objects feature helps you to examine the number, sizes, and types of objects tagged
by the capture engine. This summary will help you get a comprehensive picture of what type of
traffic is flowing on your network.
To view a summary of objects in the capture database, go to System Administration > Advanced
> More > Utilities > Show Objects.
Flow Reports
TCP implements flow control at the transport layer, where the transmission and receipt of data
packets is coordinated. Reconnex taps that activity to display a real-time snapshot of current flows.
Using the Flow Reports can help to identify heavy users of network resources. For example, you
may discover that some flows are processed by several different hosts. After examining these
patterns, you may want to consider memory management.
You can get a sampling of these flow reports at System > System Administration > Advanced >
Utilities > Counters.They are produced by SQL commands that are triggered when you click on
the Advanced link.
Flow Statistics
The Flow Reports are found at System > System Administration > Advanced > Utilities >
Counters. ]
This table identifies the information you will find in the columns in the reports.
Statistic
Description
SourceIP
Port number of transmission source
DestinationIP
IP Address of transmission destination
Destination Port
Port number of transmission destination
Packets
Number of packets in flow
TCBcount
Task control block count.
Bytes
Size of flow in bytes
Maximum Bytes
Number of bytes actually sent [including retransmission]
MLink
Number of memory links
156
Release 7.0.0.4
iGuard/inSight User Guide
Statistic
Description
Life
Seconds since the flow was created
Stale
Seconds since the last packet in the flow arrived
Managing Memory
Network congestion is handled by buffering. Reconnex iGuard continually processes data in
memory and stores each packet as it arrives at its destination. Examining the Flow Profile
Reports can help you to get a detailed picture of traffic on your network.
For example, the mlinkCount column in these reports may show an excessive number of links
being used by a single IP address. If you are a highly skilled network administrator, you may be
able to use that information to reallocate resources or reassemble TCP sessions.
However, before you attempt any operations to optimize network performance, you should first
consult Reconnex Technical Support.
System Logging
Reviewing the system logs can show exactly what a system was doing at a particular time. They
can be used to figure out whether or not an inSight or iGuard system is working properly.
All events and exceptions for all subsystems are reported to system logs. They can be viewed
along with the other Advanced Utilities at System > System Administration > Advanced > Logs.
Note: You can enlarge the type size on the log list page with a browser feature, Control-+. It
may not be available on all browsers.
Using Logs
You can click on any log and copy its contents to troubleshoot your system yourself — or a
technical support representative may determine that one or more logs may hold relevant
information for solving a problem.
1.
Go to System > System Administration > Advanced > Logs > View iGuard Logs.
This will launch a window containing a list of the available logs.
Release 7.0.0.4
157
Reconnex Corporation
2.
Click on the name of a log to launch it.
3.
Copy and paste the contents of a log into a text editor and save it, or paste it directly
into an email message.
Note: Logs are especially useful for technical support. To facilitate problem resolution, you
may want to generate a group of standard logs before you even contact technical support.
158
Release 7.0.0.4
iGuard/inSight User Guide
Managing Disk Space
The Reconnex File System (RFS) divides the iGuard disk (depending on your machine's
configuration, you may have between 500 GB and 3 TB) into Capture and Non-Capture partitions.
You can find out how much disk space remains on iGuard partitions by going to System > System
Monitor > More or System Administration > Advanced. In the Application section, click on
Show rfs_df (Reconnex File System - disk free).
Capture partitions hold all of the data captured by the iGuards and is organized by content type.
Non-Capture partitions contain the operating system and the results partitions (A-Z), which fill
sequentially.
Re-use of disk space on these partitions is determined by standard wiping policies. However,
Reconnex Technical Support can create custom wiping policies to prioritize wiping depending on
the type of data your organization considers most significant.
Standard Wiping Policies
iGuard's current disk capacity is .5 to 3 TB, depending on the configuration of your machine. Wiping
policies ensure that iGuard can keep capturing data when its disk fills up.
Space-Based Wiping
Space-based wiping is the default policy. It erases the earliest results after 80% of the iGuard disk
is used.
When that threshold is reached, the system erases data to the 70% watermark.
Time-Based Wiping
Time-Based wiping erases captured results one day at a time after it reaches its 30th day.
If the disk fills to the 80% threshold before that time, space-based wiping will take precedence.
No Wiping
If No Wiping is selected, the disk will capture as many results as will fit on the disk, and then stop
capturing.
The data on the disk will be preserved, but no more can be added.
Note: iGuard database tables and tags are wiped whenever capture data is wiped.
You can see which of these wiping policies is active by going to System > System Monitor >
More or System Administration Advanced. In the Application section, click on Show
rfs_wipe_config.
If you need a special wiping configuration, Reconnex Technical Support can create a custom
wiping policy for you..
Set a Wiping Policy
Three standard wiping policies are available: No wiping, Time-Based wiping, or Space-based
wiping (default).
To change the wiping policy, go toSystem > System Administration > Configure and select a
different radio button.
Release 7.0.0.4
159
Reconnex Corporation
WARNING: Changing a wiping policy can have unpredictable results. Before doing this,
consult Reconnex Technical Support.
If none of these policies suit your purposes, or you have special needs like saving data for court
cases, you will need a custom wiping policy.
Custom Wiping Policies
Three standard wiping policies fit the needs of most organizations, but a custom wiping policy can
accommodate a wide variety of specialized operations. For example, you may want to recycle as
much disk space as possible, or wipe only partitions with a particular type of data.
In some cases, especially those involving legal actions, adjustments to the standard wiping policies
should be made to help retain certain types of captured data for a longer period of time.
If you need to have your iGuard fine-tuned to meet specific wiping objectives, contact Reconnex
Technical Support.
Metadata And Wiping
As new objects are captured by iGuard, database tags that provide information about each of the
new entries are added to the system. This collection of tags describes the data and is therefore
considered metadata.
Because metadata occupies disk space, the proliferation of these tags and other metadata may
cause the database to fill before the default wiping threshold is reached.
The following tuning techniques will prevent this.
Create a network capture filter to eliminate flow headers, which can generate a
profusion of tags. This default filter should already be activated on your appliance.
Baseline the system during the first day or two after any installation or upgrade.
Remove any high volume, small size objects to stem database growth that outpaces
RFS storage.
Tune the system periodically to make sure the increasing size of the database is not
overriding the wiping process.
These tasks are normally done by Reconnex field engineers. If you want to take them on
yourself,Reconnex Technical Support can guide you.
Using Directory Services
You can use Directory Services to add Active Directory and LDAP services.
If you are working on an inSight console, you can also use directory services to manage devices.
Set Up Active Directory Services
To integrate iGuard with Active Directory, you have to install logon.bat and rwl_client.exe
to your Active Directory Server using the following procedure.
1.
Enter the following URL into a web browser:
https://<your iGuard hostname or IP address>/activedir/ADintegration.zip.
2.
When prompted, save the zip file to your desktop.
3.
Extract the two files to your desktop.
160
Release 7.0.0.4
iGuard/inSight User Guide
4.
On your Active Directory Server desktop, go to Start > Administrative Tools >
Active Directory Users and Computers.
This launches the Active Directory Users and Computers window.
5.
Right-click on the domain name, reconnex.net, in the navigation bar.
6.
Go to Properties > Group Policy > Default Domain Policy and select Edit.
7.
Under User Configuration, click on Windows Settings > Scripts > Logon.
8.
On the Scripts tab click Show Files.
9.
Drag the rwl_client.exe and logon.bat from your desktop to the Group Policy Object
Editor window.
10. Right-click the logon.bat file and select Edit and Run.
11. Add the IP address of the iGuard in this file by adding it after rwl_client.exe.
Example:
REM Substitute the following 'hostname.example.org' argument
REM with the hostname or IP address of your Reconnex iGuard
rwl_client.exe iGuardHostname.reconnex.net
When this batch file gets executed, iGuard is notified that a user has logged in.
13. Save.
14. Close the window containing the rwl_client.exe and logon.bat files.
15. Click OK on the Scripts tab of the Logon Properties dialog box.
16. Close the Group Policy Object Editor window.
17. Click OK on the Group Policy tab of the reconnex.net Properties dialog box.
18. Close the Active Directory Users and Computers window.
Using an LDAP Server
Reconnex can utilize account information from any LDAP (Lightweight Directory Access Protocol)
server to add users and user groups to the inSight Console quickly and efficiently. User restrictions
and permissions are controlled through a standard LDAP authentication module.
To add users from an LDAP directory, you must first create an LDAP domain in the inSight Console
by adding the LDAP server.
Add an LDAP Server
An LDAP server can be used to add multiple users to the Reconnex systems in a batch mode type
of operation. This can only be done by an administrative user, because the server can only be
defined from a service account in which the password doesn't expire or change.
Warning: If the account used is not able to access the domain, all LDAP user authentication
on inSight will stop working.
1.
Go to System > System Administration > Directory Services.
2.
Select Actions > Create Directory Server.
Release 7.0.0.4
161
Reconnex Corporation
3.
Add the server name or IP address.
4.
Add the server port number.
5.
Add the timeout interval in seconds.
6.
Add the retry interval in seconds.
7.
Add loginID attribute: sAMAccountname (Security Accounts Manager account).
8.
Add the login domain name.
9.
Add the server password.
10. Add the Base Domain Name (dc=reconnex,dc=net).
11.
Check the SSL box if appropriate.
12. Select a Scope radio button.
13. Select Update.
14. Verify that the new server is listed in the navigation bar.
162
Release 7.0.0.4
iGuard/inSight User Guide
15. To edit the settings, select Detail.
The Server Information dialog box will launch. It shows that the LDAP server is now active; the Action box
shows that the connection to the server can be deactivated by selecting Delete.
Add LDAP Users
The quickest way to add multiple users is to add an LDAP server and import existing user
accounts.
Before you add LDAP users, you should have already decided on a user group design. Users are
classified by the group attributes they inherit, and when you add them from an LDAP server, you
will be assigning them to groups you have already added to the system.
1.
Go to System > User Administration > Actions > Create LDAP User.
If you get the message "NO LDAP DOMAINS EXIST.... PLEASE CREATE LDAP DOMAIN
FIRST" you need to add an LDAP server before proceeding.
2.
If the LDAP server is available, you can enter a Login ID or username.
It is usually more productive to do a wildcard search. Entering an asterisk in the User Name field will show
you a list of all users on the LDAP server.
Release 7.0.0.4
163
Reconnex Corporation
You may want to narrow that query by using metacharacters combined with text. This will retrieve all the users
on the server related to the name you specify.
Users with names like the one you specify will be returned by the system.
3.
164
Select radio buttons next to the users you want to add.
Release 7.0.0.4
iGuard/inSight User Guide
4.
Select one or more groups for the new user(s) and Add.
Note: User permissions are assigned by membership in a user group. When a user's
permissions have been changed by addition or subtraction of membership in a group, he
or she has to re-login for the change to register in the login. This is true for both new
LDAP or local users.
5.
Update.
6.
Verify that the user is added to the list that is launched.
The list shows that the LDAP user is now active.
7.
If you want to make changes to the user's status, select the Detail icon.
The User Information box shows that the user can be disabled or deleted.
Release 7.0.0.4
165
Reconnex Corporation
Managing Devices
The inSight Console controls all other Reconnex devices on your network. This includes iGuards
capturing data in motion as well as any other systems that may be finding data at rest or interacting
with mail servers.
After installing new appliances, they must be added to the inSight Console.
Add a Device
Before inSight can control other Reconnex devices on the network, a connection must be
established. This is done by adding the device from the inSight Console.
Note: Integration with Prevent and Discover machines is planned for a later release.
1.
Go to System Administration.
2.
Add New Device.
3.
Add the IP address of the new device.
4.
Enter the system's password.
5.
Add.
Important: Adding an iGuard wipes the current configuration of that machine.
6.
166
Verify that the device is in the list that is launched.
Release 7.0.0.4
iGuard/inSight User Guide
Note: It takes a few minutes to register the device.
The Registration icon
7.
shows that registration is in progress.
Before registration begins, a message is launched stating that all rules, policies,
DHCP servers and IP aliases will be deleted from iGuard before it is registered.
Confirm that you want to proceed, or cancel the process.
8.
When registration is complete, the Status icon will change to green and the other
columns will display data.
9.
Verify that the device has been added to the list.
View Active Devices
To see the devices that are controlled by the inSight Console, go to System > System Monitor.
De-register a Device
You may need to remove one of the Reconnex devices from the network. If so, you must let the
inSight Console know that the device is no longer resident on the system.
1.
Go to System Monitor.
2.
Find the device to be de-registered.
3.
Select More from the Advanced column.
Release 7.0.0.4
167
Reconnex Corporation
The Utilities page will be launched.
3.
Scroll down to the bottom of the page.
5.
Select De-register iGuard.
6.
Confirm or cancel de-registration.
7.
Confirm that the de-registered iGuard has been removed from the device list.
168
Release 7.0.0.4
iGuard/inSight User Guide
Contact Technical Support
For troubleshooting assistance, you can contact Reconnex Technical Support by telephone or
email.
Phone: (866) 940-4580 or (650) 940-1430
Email: [email protected]
Customer Support Portal: www.reconnex.net/support/support_portal.php
http://www.reconnex.net/portal
Create a Technical Support Package
If you need help from Reconnex Technical Support, the fastest way to get a problem resolved is to
download and send a technical support package.
The tar file that is created by this process will have all of the relevant data for your system, allowing
a support engineer to troubleshoot your system remotely.
1.
Go to System > System Administration > Advanced > Logs > Create Tech
Support Package.
The package will be placed under the log heading.
Note: It may take a few minutes to complete the request.
2.
Download the compressed tar file (*.tgz).
3.
Open the file to verify its contents or save it.
4.
If you are satisfied with the results, email the file to [email protected].
Depending on the situation, your Reconnex Technical Support engineer may ask you to select
some of the other links on the Utilities, Alerts or Logs pages to provide other specific information.
Release 7.0.0.4
169
Reconnex Corporation
Power Redundancy
To ensure redundancy on the 1650 and 3650 appliances, both power supplies must be active to
share the load while operating at nominal power.
Additional protection is provided if more than one wall outlet is used.
Should one power supply fail, a back-up fan automatically turns on, an alarm sounds and a warning
LED is illuminated. If this occurs, contact Reconnex Technical Support for a replacement unit.
If the appliance loses power for any reason, it will not come back up unless you change the
BIOS setting in advance. The motherboard default is set to ―off‖.
Note: The 2600 appliance has only one power supply; the 3300 and 3600 have three each.
FCC Advisory
Any modifications to Reconnex iGuard equipment, unless expressly approved by the party
responsible for compliance, could void authority to operate the equipment.
Reconnex iGuard hardware has been tested and found to comply with the limits for a Class A
digital device, pursuant to Part 16 of the Federal Communications Commission Rules.
Operation of Reconnex iGuard is subject to the following two conditions:
the device may not cause harmful interference, and
the device must accept any interference received, including interference that may
cause undesired operation.
These limits are designed to provide reasonable protection against harmful interference when the
equipment is operated in a commercial environment.
Reconnex iGuard equipment generates, uses, and can radiate radio frequency energy. If not
installed and used in accordance with the instruction manual, it may cause harmful interference to
radio communications. If operation of this equipment in a residential area causes harmful
interference, it must be corrected at owner expense.
Safety Compliance
Reconnex iGuard hardware should be used in compliance with safety standards. It must be rackmounted and installed according to the following instructions.
Note: Disconnect all power supply cords before servicing.
Elevated Operating Ambient Temperature
When installed in a closed or multi-unit rack assembly, the operating ambient temperature of the
rack environment may be greater than room ambient. Therefore, consideration should be given to
installing the equipment in an environment compatible with the maximum ambient temperature
(Tma) specified by the manufacturer [operating temperature range: 10 - 35°C (50° to 95° F)].
Reduced Air Flow
Installation of the equipment in a rack should be such that the amount of air flow required for safe
operation of the equipment is not compromised.
170
Release 7.0.0.4
iGuard/inSight User Guide
Mechanical Loading
Mounting of the equipment in the rack should be such that a hazardous condition is not created due
to uneven mechanical loading.
Circuit Overloading
Consideration should be given to the connection of the equipment to the supply circuit and the
effect that overloading of the circuits might have on overcurrent protection and supply wiring.
Appropriate consideration of equipment nameplate ratings should be used when addressing this
concern.
This unit has a replaceable lithium battery. There is a risk of explosion if the battery is
replaced by an incorrect type. Dispose of used batteries responsibly.
Reliable Earthing
Reliable earthing of rack-mounted equipment should be maintained. Particular attention should be
given to supply connections other than direct connections to the branch circuit (such as use of
power strips).
Release 7.0.0.4
171
User Guide for inSight/iGuard
Index
download, 52
A
export, 52
from incident list, 49
Account Information, 126
Action Rules
create, 99
managing, 49
Compliance
FCC, 167
define, 99
Concepts, 103
delete, 102
Anchor Command, 108
modify, 101
create, 106
Active Directory, 157
standard, 103
Alerts, 118
syntax, 109
Filter, 118
Configuration
Listings, 117
Network, 135
Notification, 119
D
C
Device Management, 163
Capture Filters, 137
Add, 163
actions, 137
Delete/de-register, 164
activate, 145
View devices, 164
add a network port, 150
add IP Address, 149
Disk Space, 156
Managing Metadata, 157
by size, 147
create, 140, 142
E
default network, 139
default standard, 138
ERM, 86
definition, 137
F
delete, 147
deploy, 146
Failover Account, 126
modify, 147
FCC Compliance, 167
reprioritize, 144
view, 146
Cases
add to existing, 53
Features
iGuard, 2
Filter Examples, 31
Filters
assign, 52
Clear, 37
change owner, 56
Group, 36
change priority, 56
Multilevel, 37
change resolution, 56
Time, 34
change status, 57
Flow Profiler
create, 51
How it Works, 153
delete, 53
Statistics, 153
Release 7.0.0.4
171
Reconnex Corporation
I
Default, 86
Delete, 89
iGuard
Edit, 89, 90, 91
Architecture, 3
Publish, 90
features, 1
Reconnex Solution, 1
Incidents
customize report, 26
Regulatory, 86
Standard, 86
Unpublish, 91
View Rules, 89
delete, 33
Details, 28
R
examples, 31
finding, 25
Reports
Sort, 31
Delete, 49
Installation
Safety Compliance, 167
Examples, 42
Export CSV, 43
Export PDF, 44
L
LDAP Service, 158
Add or Edit, 158
My Reports, 41
Notify, 47
Save, 40
Schedule, 42
add users, 160
add users | Default.ScreenOnly,
160
Live Traffic
Rules, 93
Create, 95
Delete, 98
Flow Profiler, 153
Edit, 98
Memory Links, 154
Inheritance and activation, 94
View, 95
M
S
mlink
Searching
Manage, 154
Attribute Options, 59
N
Navigation Bar, 25
P
Permissions, 123, 124,
127
privileges, 127
User Groups, 123
Policies, 85
Activate, 88
Change Ownership, 93
create, 88, 92
Custom, 87
172
by concept, 68
by digest, 70
by email, 71
by file size, 71
by file type, 72
by filename, 72
by IP address, 72
by keyword, 73
by location, 76
by object types, 69
by port number, 76
by protocol, 77
by time, 78
by URL, 79
Release 7.0.0.4
User Guide for inSight/iGuard
U
by user ID, 79
Command Line, 57
compound queries, 67
country codes, 60
distributed, 67
User Account
Add User, 125
Create User Group, 122
Group Design, 121
filters, 57
User Audit Logs, 128
fleshtone images, 80
images, 79
Actions, 128
Edit, 133
keyword shorthand, 84
limitations, 81
Using, 134
User Groups
logical operators, 85
Search List, 83
Administrator, 120
Permissions, 123
using custom templates, 83
using standard templates, 83
Setup Wizard, 136
System Administration,
135, 157
Preconfigured, 121
Role-Based, 123
Utilities
Advanced, 153
Counters, 153
T
Logs, 166
System Monitor, 117
Technical Support
Contacts, 165
Using Logs, 154
Using Logs, 154
Create Package, 166
Templates, 113
W
Create, 114
Delete, 116
Using, 113
Wiping, 157
Finding Current Setting, 156
How Disk Space is Managed, 156
Set Standard Policy, 156
When to Use Custom, 157
Release 7.0.0.4
173