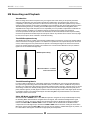
1
2-Channel Analog Mic/Instrument Pre-Amp
User’s Guide
v1.0 - November 2003
2-Channel Analog Mic/Instrument Pre-Amp
User’s Guide
v1.0 - November 2003
Mini-MP – User’s Guide
APOGEE ELECTRONICS
Warnings
FCC warning
This equipment has been tested and found to comply with the limits for a Class A digital device, pursuant to Part 15 of the FCC
rules. These limits are designed to provide reasonable protection against harmful interference when operated in a commercial environment. This equipment generates, uses, and can radiate radio frequency energy and, if not installed and used in accordance
with the instruction manual, may cause harmful interference to radio communications. Operation of this equipment in a residential
area is likely to cause harmful interference, in which case the user will be required to take whatever measures necessary to correct the interference at his own expense.
Registration and Warranty Information
Be sure to register your Mini-MP, either by filling in the enclosed Registration Card or by completing the on-line registration
form at our Web site: http://www.apogeedigital.com/register.html. If you do so, Apogee can contact you with any update
information. As enhancements and upgrades are developed, you will be contacted at the registration address. Please address
any inquiries to your dealer or directly to Apogee at:
APOGEE ELECTRONICS CORPORATION,
3145 Donald Douglas Loop South, Santa Monica, CA 90405, USA.
TEL: (310) 915-1000, FAX: (310) 391-6262
email: [email protected]. Web: http://www.apogeedigital.com/
APOGEE ELECTRONICS CORPORATION warrants this product to be free of defects in material and manufacture under
normal use for a period of 12 months. The term of this warranty begins on the date of sale to the purchaser. Units returned for
warranty repair to Apogee or an authorized Apogee warranty repair facility will be repaired or replaced at the manufacturer’s
option, free of charge.
ALL UNITS RETURNED TO APOGEE OR AN AUTHORIZED APOGEE REPAIR FACILITY MUST BE PREPAID, INSURED
AND PROPERLY PACKAGED, PREFERABLY IN THEIR ORIGINAL BOX. Apogee reserves the right to change or improve
design at any time without prior notification. Design changes are not implemented retroactively, and the incorporation of design
changes into future units does not imply the availability of an upgrade to existing units.
This warranty is void if Apogee determines, in its sole business judgment, the defect to be the result of abuse, neglect,
alteration or attempted repair by unauthorized personnel.
The warranties set forth above are in lieu of all other warranties, expressed or implied, and Apogee specifically disclaims any
and all implied warranty of merchantability or of fitness for a particular purpose. The buyer acknowledges and agrees that in
no event shall the company be held liable for any special, indirect, incidental or consequential damages, or for injury, loss or
damage sustained by any person or property, that may result from this product failing to operate correctly at any time.
USA: Some states do not allow for the exclusion or limitation of implied warranties or liability for incidental or consequential
damage, so the above exclusion may not apply to you. This warranty gives you specific legal rights, and you may have other
rights which vary from state to state.
Service Information
The Mini-MP contains no user-serviceable components: refer to qualified service personnel for repair or upgrade. Your
warranty will be voided if you tamper with the internal components. If you have any questions with regard to the above, please
contact Apogee.
In the event your Mini-MP needs to be upgraded or repaired, it is necessary to contact Apogee prior to shipping, and a Return
Materials Authorization (RMA) number will be assigned. This number will serve as a reference for you and helps facilitate
and expedite the return process. Apogee requires that shipments be pre-paid and insured — unless otherwise authorized in
advance.
IMPORTANT: ANY SHIPMENT THAT IS NOT PRE-PAID OR IS SENT WITHOUT AN RMA NUMBER WILL NOT BE
ACCEPTED.
d
Mini-MP – User’s Guide
APOGEE ELECTRONICS
Declarations of Conformity
Declaration of Conformity—FCC
Apogee Mini-MP
This device complies with Part 15 of the FCC Rules. Operation is subject to the following two conditions:
(1) This device may not cause harmful interference, and
(2) This device must accept any interference received, including interference that may cause undesired operation.
This equipment has been tested and found to comply with the limits of a Class B digital device, pursuant to Part 15 of the FCC
Rules. These limits are designed to provide reasonable protection against harmful inteference in a residential installation. This
equipment generates, uses and can radiate radio frequency energy and, if not installed and used in accordance with the instructions, may cause harmful interference to radio communications. If this equipment does cause harmful interference to radio
or television reception, which can be determined by turning the equipment off and on, the user is encouraged to try to correct
the interference by one or more of the following measures:
1. Re-orient or relocate the receiving antenna.
2. Increase the separation between the equipment and receiver.
3. Connect the equipment into an outlet on a different circuit from that to which the receiver is connected.
4. Consult the dealer or an experienced radio/TV technician for help.
NOTE: The use of non-shielded cable with this equipment is prohibited.
CAUTION: Changes or modifications not expressly approved by the manufacturer responsible for compliance could void the
user’s authority to operate the equipment.
Apogee Electronics Corporation, 3145 Donald Douglas Loop South, Santa Monica, CA 90405.
Betty Bennett, CEO.
Industry Canada Notice
This Class B digital apparatus meets all requirements of the Canadian Interference-Causing Equipment Regulations. Cet appareil numérique de la classe B respecte toutes les exigences du Règlement sur le matérial brouilleur du Canada.
Declaration of Conformity – CE
Apogee Electronics Corporation hereby declares that the product, the Mini-MP to which this declaration relates, is in material
conformity with the following standards or other normative documents:
• EN50081-1/EN55022; 1995
• EN50082-1/IEC 801-2, 3, 4; 1992
following the provisions of:
• 73/23/EEC – Low Voltage Directive
• 89/336/EEC – EMC Directive
Declaration of Conformity – Japan
Apogee Electronics Corporation hereby declares that the Mini-MP, to which this declaration relates, is in material conformity
with the VCCI Class A standard.
Declaration of Conformity – Australia
Apogee Electronics Corporation hereby declares that the Mini-MP is in material conformity with AN/NZS standard requirements.
e
Mini-MP – User’s Guide
APOGEE ELECTRONICS
OWNER’S RECORD
The serial number is located on the rear panel of the unit. We suggest you record the serial number
in the space provided below. Refer to it whenever you call an authorized Apogee Electronics repair
facility or the manufacturer. Please be sure to return your
completed warranty card immediately!
Mini-MP Serial No.
Purchase Date
Dealer
Phone
Address
User’s Installation Notes:
CAUTION:
Any changes or modifications not expressly approved by APOGEE ELECTRONICS
CORPORATION could void your authority to operate this equipment under the FCC rules.
f
Mini-MP – User’s Guide
APOGEE ELECTRONICS
User’s Guide
Table of Contents
Introduction .....................................................................................................2
Getting Started Quickly ................................................................................3
Navigating the Front Panel ........................................................................4
48 V ...........................................................................................................4
High Pass Switches ..................................................................................4
Polarity Switches ......................................................................................4
GAIN controls ...........................................................................................4
Level meters .............................................................................................4
OUTPUT control .......................................................................................4
POWER switch .........................................................................................4
Connections on the Rear Panel ................................................................5
POWER.....................................................................................................5
L-R OUT ....................................................................................................5
L-R IN ........................................................................................................5
MS Recording & Playback ............................................................................6
Introduction ...............................................................................................6
The MS Microphone Array ........................................................................6
The MS Decoding Matrix ..........................................................................6
Using MS Mode on the MiniMP.................................................................6
Advanced Techniques ...............................................................................7
Internal Adjustments ...................................................................................7
Polarity Jumper ........................................................................................7
Features & Specifications ............................................................................8
1
Mini-MP – User’s Guide
APOGEE ELECTRONICS
Introduction
Apogee Electronics’ Mini-MP is a two-channel microphone pre-amplifier with superb performance in a
convenient, portable package. The MiniMP has the following features:
•
•
•
•
•
Up to 70 db of gain in the Mic-pre section, with an additional 6 db in the Output section
+18 dBu Maximum input level; 26 dBu maximum output level
High impedance instrument inputs provids Direct box functionality
MS Decoding Matrix
Phase, High-Pass and 48 Volt Switches
Included Accessories: The following items are shipped with the Mini-MP. Please save the box and foam to safely
transport the unit:
• Universal 12-volt power supply and AC power cable
• Operation manual/warranty card
• Allen wrench (for internal adjustments)
Optional Accessories:
• Carrying case –A rugged black nylon carrying case is available for all Mini series devices, complete with
strap,extra pockets and purpose-built cable access ports.
• “Mini-Rack”- A 1U rack frame for securing all three Mini-Series products.
2
Mini-MP – User’s Guide
APOGEE ELECTRONICS
Getting Started Quickly
2
3
1
4
6
5
(1) Connect the included power supply to the POWER connection on the back of the Mini-MP and to
a convenient AC Outlet. As the power supply’s AC input voltage is automatically sensed, it may be
connected to virtually any AC power outlet found worldwide without concern for voltage settings or
fuse ratings.
(2) Connect either a microphone or instrument to either the L(Left) or R(Right) IN connection on the rear
panel. If using a microphone that requires phantom power, press and hold the corresponding 48v
switch to the right until the blue led comes on .
(3) Connect the corresponding OUT connection to an analog line input such as the Apogee Rosetta 800
A/D converter
(4) Set the POWER switch to ST(Stereo).
(5) Set the OUTPUT control to 0.
(6) While the connected sound source is active, turn the corresponding GAIN control clockwise until the
+6 LED lights; if the CLIP LED lights, adjust the GAIN control counter-clockwise.
3
Mini-MP – User’s Guide
APOGEE ELECTRONICS
Navigating the Front Panel
7
5
5
1
1
R
L
L
R
3
2
R
L
3
L
1)
2)
3)
4)
4
L
4
R
6
2
R
48 V (Left and Right) – These switches engage 48 volt phantom power on the corresponding IN connections, for
powering of microphones which require this voltage. To avoid inadvertently switching 48V, the switches must be
pressed to the right for approximately 1 second before the function is actually engaged or disengaged.
High-Pass
(Left and Right) – These switches engage a high-pass filter on the corresponding channel; the filter
has a corner frequency of 80 Hertz and rolls off with a slope of 18dB per octave. Set the switch to IN (by pushing UP)
to engage the high-pass filter.
Polarity
(Left and Right) – These switches reverse the polarity of the corresponding channel; Set the switch to
180º (by pushing UP) to reverse the polarity.
GAIN Controls (LEFT / MID - RIGHT / SIDE) – These controls set the amount of gain applied to the corresponding
channel, and may be set to a value between 0 and 70 dB of gain. When the unit is in MS mode, the stereo width of the
output may be adjusted by modifying the balance between the LEFT / MID and RIGHT / SIDE controls. Though the gain
needed in any particular situation may vary greatly, FIGURE 1 gives a few typical values as a point of departure.
SOURCE
TRANSDUCER
GAIN
close-miked drums
dynamic mic
10-25 dB
close-miked electric guitar
condenser mic
10-25 dB
active electric bass
instrument input
20-30 dB
close-miked vocal
large diaphram condenser mic
35-40 dB
distant-miked acoustic ensemble
small-diaphram condenser mic
50-60 dB
distant-miked string quartet
ribbon mic
60-70 dB
FIGURE 1
5)
6)
7)
Level Meters (Left and Right) – These 3 LEDs employ VU meter characteristics to display the level of the
corresponding channel; thus, an RMS Average level is displayed, and the 0 LED corresponds to a level of 0 VU, or +4
dBu. The CLIP LED indicates a level within 2 dB of clipping.
When the unit is in MS mode, the Left meter displays the sum of the inputs (M+ S) while the Right meter displays the
difference of the inputs (M-S). The CLIP LEDs always display the onset of clipping in the corresponding channel only.
OUTPUT control – This control sets the amount of attenuation or gain applied at the output stage of the unit. The
control has been designed to operate like a fader on a mixing console, where the output level can be adjusted from
full attenuation
through the 0 gain position to +6 dB of additional gain. When initially setting the GAIN control,
set the OUTPUT control to 0.
POWER switch – This switch not only applies power to the unit, but also selects the stereo mode, ST(stereo) or
MS(Mid-Side). When power is correctly applied to the unit, a soothing blue glow emanates from behind the OUTPUT
control.
When set to ST, each channel operates independently
When set to MS, both inputs are configured to accept an MS microphone array, and an MS decoding matrix is
applied to the signals. For more information on the MS position, please consult the section of this manual entitled
“MS Recording & Playback”.
4
Mini-MP – User’s Guide
APOGEE ELECTRONICS
Navigating the Rear Panel
1
1)
2)
3)
3
2
DC POWER - The Mini-MP operates from a high quality external switching power supply, included with the unit.
The power supply’s cable may be secured to the unit with the adjacent strain relief tab and thumbscrew.
Alternatively, any regulated 6-14 volt DC power supply capable of providing 1.25 amps of current will properly
power the Mini-MP
L-R OUT – These XLR balanced Line outputs are able to supply a maximum output level of +26 dBu into
a balanced load, and +20 dBu into an unbalanced load. No special precautions are needed when driving
unbalanced loads. Units are shipped so that the polarity is pin 2 “Hot”, but may be set to pin 3 “Hot” with an
internal jumper.
L-R IN. – These XLR Mic connections are low-impedance balanced inputs capable of accepting levels up to
+18dBu, while the 1/4” Instrument connections are ultra-high impedance unbalanced inputs capable of accepting
levels up to +23 dBu
5
Mini-MP – User’s Guide
APOGEE ELECTRONICS
MS Recording and Playback
Introduction
When recording with a stereo microphone array, the engineer has a wide variety of microphone placement
schemes at his disposal, each with specific strengths and weaknesses. One placement may ensure mono
compatibility of the recording but result in a rather narrow stereo image, while another placement may create a
spacious stereo image but result in phase cancellations and comb filtering when the recording is played in mono.
The MS Recording technique, consisting of the MS Microphone Array and the MS Decoding Matrix, offers
adjustable stereo image width and perfect mono compatibility. It’s even possible to adjust stereo width after the
recording has been completed, or re-adjust the width of an existing stereo program when mastering.
As mono reproduction is still quite common in the broadcast, film and video worlds, MS techniques are widely
used in these productions. MS techniques can also prove useful in any situation where a stereo mic array might
be used, such as piano, drum overhead or ensemble recording.
The MS Microphone Array
The MS Microphone Array consists of two identical variable pattern microphones, one set to the cardioid pattern
and the second set to the figure 8 pattern. The cardioid mic is positioned so its capsule directly faces the sound
source, while the figure 8 mic is positioned so its capsule is at a 90 degree angle to the sound source and as
close to the cardioid capsule as possible. The cardioid mic is connected to the Mini-MP’s Left input, while the
figure 8 mic is connected to the Right input.
MS Microphone Array
MS Polar Patterns in relation
to the sound source
The MS Decoding Matrix
In order to obtain a standard Left – Right stereo signal from an MS Mic Array, the two inputs described above
must pass through a decoding matrix in the Mini-MP. Indeed, if one were to listen to the MS Mic Array without
decoding, one would hear a direct signal on the left side, a diffuse signal on the right, and pretty much no precise
stereo image. Instead, the cardioid (or Mid) signal is routed to both the Left and Right channels equally and in
phase, while the figure 8 (or Side) signal is routed to both channels equally but with a 180 degree phase reversal
on the Right channel. A more advanced analysis of the Decoding Matrix is presented below in the “Advanced
Techniques” section of this manual
Using MS Mode on the Mini-MP
When the Mini-MP’s POWER switch is set to MS, the inputs are configured to accept an MS Microphone Array,
the Decoding Matrix described above is applied to the two signals, and a standard Left-Right Stereo signal
is routed to the outputs. The stereo width of the Left-Right output may be adjusted by modifying the balance
between the LEFT / MID and RIGHT / SIDE controls. To better hear the characteristic of the Mid and Side
components of the Left-Right output, decrease the RIGHT / SIDE control to minimum, leaving the center mono
Mid signal; next decrease the LEFT / MID control to leave only the “phasey” unstable Side signal. In practice, a 3
to 1 ratio of Mid to Side signal is considered an appropriate point of departure.
6
Mini-MP – User’s Guide
APOGEE ELECTRONICS
MS Recording and Playback -
continued
Advanced Techniques
To better understand the behavior of signals when employing MS Techniques, the manner in which these
signals are routed and summed may be expressed as formulae. For example, the MS Decoding Matrix may be
expressed as:
Left Output
Right Output
=
=
Mid Input + Side Input
Mid Input + (-Side Input)
or more generically as:
L
R
=
=
M+ S
M-S
Thus, when the Left and Right Output are summed to mono, the result may be predicted using these formulae:
L+R
=
(M + S) + (M – S)
= 2M
The stereo component has cancelled out while the mono component has added together, resulting in a perfect
mono reproduction of the stereo signal.
With a Mini-MP it’s also possible to encode Left –Right stereo signals to Mid – Side by inputting the Left – Right
signal while the unit is in MS Mode. Keeping in mind that a 6 dB drop in level occurs between ST and MS modes
(thus the 0.5 multiplication), the Mini-MP’s output may be expressed thusly:
L Out
R Out
=
=
0.5 (L) + 0.5 (R)
0.5 (L) - 0.5 (R)
By substituting the L and R values above with their MS expressions and doing the math, it is shown that a Mid
– Side signal is output when the decoding matrix is applied to the Left-Right input:
L Out
R Out
=
=
0.5 (M+S) + 0.5 (M-S)
0.5 (M+S) - 0.5 (M-S)
=M
=S
Now that the Mid and Side signals have been extracted from the Left – Right signal, it’s possible to re-apply an
MS decoding matrix and re-adjust stereo width
Internal Adjustments
The polarity of the L(Left) and R(Right) OUT connections is determined by internal jumper P12:
when P12 is installed, Pin 2 is the “Hot” or positive pin;
when P12 is removed, Pin 3 is the “Hot” or positive pin.
To access jumper P12, remove the two top screws on the front and rear panels and carefully lift the top cover.
P12 may be found directly behind the L-R IN connections.
The L(Left) and R(Right) IN connections are always Pin 2 “HOT”, as are virtually all microphones.
7
Mini-MP – User’s Guide
APOGEE ELECTRONICS
Features & Specifications
• Superb two-channel microphone preamplifier with phantom power and HI-Z instrument inputs
• Low distortion pre-amps with 75dB of gain. THD+N: –105 dB at unity, -85 dB at 60 dB of gain
• Ultra-linear gain control
• Mid-Side (M-S) feature
• 80 Hz Hi Pass filter with a roll off of +18dB/oct
• Low power consumption allowing the use of several types of batteries and third party power packs
INPUTS:
2, combi-jack mic/line inputs (HI-Z)
OUTPUTS:
2, XLR analog out
SPECS:
• Pre-amp gain: 0–70 dB
• Output gain: -∞-+6 dB
• Max input level: +18 dBu
• Max output level
( all @ THD+N <= -98 dB ):
26 dBu in 100k Ω
24 dBu in 600 Ω
21 dBu in 300 Ω
• THD+N:
-105 dB at 0 dB of gain
-96 dB at 40 dB
-85 dB at 60 dB
• Bandwidth:
2.5 - > 200kHz(-.5 dB) at 0 dB gain
4 – 160 kHz (-3 dB) at 40 dB
4 – 92 kHz (-3 dB) at 60 dB
• EIN: <124 (22-22 kHz) 150Ω
• Input impedance: balanced: 1.6k Ω
• Unbalanced HI-Z: 2.2 M Ω
• Output Impedance: 25 Ω
• HPF: 18 dB/oct ( 3rd order Butterworth )
-3dB at 80 Hz
• Phantom power: 48 Volt
• Power: 6–14 VDC
3W
8
Mini-MP USER’S GUIDE - v.1.0 - November 2003
Text conceived and delivered by: Roger Robindore
Graphics and product illustration by: Sean McArthur