1
OralChroma
OralChroma DataManager
User’s Guide
for Windows
Version 3.5
Introduction
This is a user’s manual for the OralChroma DataManager.
Copyright
Copyright (C) 2008- ABIMEDICAL CORPORATION. All Rights Reserved.
Reproduction or reprinting of all or part of any document found in this manual without prior consent from
Abilit is expressly prohibited.
Trademark
Windows 2000, Windows XP and Windows Vista are the registered trademarks of Microsoft Corporation in
the United States and/or other countries.
All other company names and OralChroma DataManager mentioned herein are trademarks or registered
trademarks of their respective owners.
Note
Screenshots shown in this manual may differ from the screens displayed on your PC.
Product specifications and the contents of the manual are subject to change for product improvement
without prior notice.
July 2010
Printed in Japan.
1
Notation
In this manual, the user interfaces on the screen are described as follows:
Name of Menu and Window
The names of menus and windows are enclosed in square brackets [ ].
Windows are described as ‘the [ ] window’ in the text.
Command Button and Others
Bold letters shows the names of command buttons and others in the window.
Screen Examples
Only the necessary part of the screen may be shown as screen examples in this manual.
The screen examples may be different from the screens displayed on your PC, depending on the data or
settings of your PC.
Note
This manual does not contain any explanations of the operations of Windows itself. For basic operations of
Windows, please refer to the instruction manual supplied with your PC or Windows package.
2
Index
Introduction ................................................................................................................................................................................................................................ 1
Notation ........................................................................................................................................................................................................................................ 2
INDEX..................................................................................................................................................................................................................... 3
PRODUCT FUNCTIONS ................................................................................................................................................................................ 4
BEFORE USE ..................................................................................................................................................................................................... 6
System Requirements ......................................................................................................................................................................................................... 6
Operations of OralChroma ................................................................................................................................................................................................ 6
SETUP ................................................................................................................................................................................................................... 7
Installing Software.................................................................................................................................................................................................................. 7
Connecting OralChroma to a PC .................................................................................................................................................................................. 7
Uninstalling Software ........................................................................................................................................................................................................... 7
STARTING AND ENDING THE ORALCHROMA DATAMANAGER .............................................................................................. 8
Starting the OralChroma DataManager ..................................................................................................................................................................... 8
Setting Communication Port Number ......................................................................................................................................................................... 9
Setting Device ID.................................................................................................................................................................................................................... 9
Ending the OralChroma DataManager ...................................................................................................................................................................... 9
RECEIVING MEASUREMENT DATA ...................................................................................................................................................... 10
Registering Number ............................................................................................................................................................................................................11
Starting Measurement .......................................................................................................................................................................................................12
Completing Measurement ...............................................................................................................................................................................................12
Completing Measurement ...............................................................................................................................................................................................13
Saving Measurement Data .............................................................................................................................................................................................13
Saving Measurement Data .............................................................................................................................................................................................14
Displaying Judgment ..........................................................................................................................................................................................................14
Suspending Measurement ..............................................................................................................................................................................................14
Setting Display .......................................................................................................................................................................................................................15
Displaying Measurement Records .............................................................................................................................................................................15
Printing .......................................................................................................................................................................................................................................15
JUDGMENT ...................................................................................................................................................................................................... 16
Displaying the [Judgment] Window............................................................................................................................................................................16
Method of Judgment ...........................................................................................................................................................................................................17
Printing .......................................................................................................................................................................................................................................17
DISPLAYING MEASUREMENT RECORDS ......................................................................................................................................... 18
Controlling Graph Display ...............................................................................................................................................................................................19
Printing Measurement History ......................................................................................................................................................................................21
Exporting Measurement History ..................................................................................................................................................................................21
Displaying Measurement Data .....................................................................................................................................................................................22
Exporting Measurement Data .......................................................................................................................................................................................23
FILE MANAGEMENT .................................................................................................................................................................................... 24
Editing Personal Properties ............................................................................................................................................................................................24
Importing and Exporting Personal Properties ......................................................................................................................................................25
Editing Measurement History ........................................................................................................................................................................................26
SYSTEM SETTINGS ..................................................................................................................................................................................... 27
[System] tab.............................................................................................................................................................................................................................27
[Device ID] tab........................................................................................................................................................................................................................28
[Judgment] tab .......................................................................................................................................................................................................................29
[Mark] tab ..................................................................................................................................................................................................................................31
APPENDIX ........................................................................................................................................................................................................ 32
File Format ...............................................................................................................................................................................................................................32
Data conversion software ................................................................................................................................................................................................36
3
Product functions
OralChroma DataManager is data management software for OralChroma, a halitosis-measuring device.
By running OralChroma DataManager on a PC connected to OralChroma, management of the collected
data and their graphical representation are enabled with easy operation.
The following are the major functions of OralChroma DataManager.
Judging functional halitosis level of measurement data
The concentrations of three volatile gases measured by OralChroma are compared with the 'cognitive
thresholds' as criterion to judge functional halitosis level.
Types of volatile gases
(1) Hydrogen sulfide [H2S] (2) Methylmercaptan [CH3SH] (3) Dimethyl sulfide [(CH3)2S]
User Information Column
Sample of the [Judgment] window
4
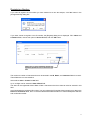
Managing measurement data
The ID numbers and names of the test subjects are registered, so that the measurement data are
controlled by the ID number as the key.
Such data searches become possible and are easily displayed as “Transition of gas concentrations of
Mr. A” or “Measurement data of Ms. B on the specific day.”
The window display can be printed as it is.
Sample of the [Measurement history] window that displays transition of the gas concentrations
Managing personal properties of test subjects
To identify the test subjects, such data as ID numbers and names are registered as personal
properties.
Personal properties consist of five components: ID, name, comment, sex, and date of birth. A list
created with spreadsheet software can be imported.
5
Before Use
System Requirements
This software runs on computers with Windows 2000 or later. Therefore, it needs hardware that meets the
following requirements. Be sure to check the system environment and the settings of your computer before
use.
OS
Computer
Memory
Hard disc
Display
CD-ROM drive
COM port
Windows 2000,XP, VISTA
IBM PC/AT or compatible computer
16MB or more
30MB or more
1024 x 768 pixels, 256 colors or more
1 unit
One RS-232C
(Hereinafter, computer is referred to as PC and the OS as Windows.)
Operations of OralChroma
Please read the manual of OralChroma about the operation.
6
Setup
Note
Only the user with administrator privilege may install/un-install OralChroma DataManager.
For Windows Vista, you need to turn off User Account Control(UAC) in Vista
Installing Software
(1) Power on the PC and start Windows.
(2) Insert the installation CD-ROM into the CD-ROM drive.
(3) The installation program is automatically started on the PC where automatic execution (autorun) of the
CD-ROM is supported. Otherwise, double-click [setup.exe] in the root directory of the CD-ROM.
Follow the directions displayed on the window to proceed with the installation.
Connecting OralChroma to a PC
OralChroma DataManager communicates with OralChroma via a serial port compliant with RS-232C.
Before you transfer data measured by OralChroma to OralChroma DataManager, connect the PC and
OralChroma with the connecting cable (*).
(*) If the connecting cable included does not fit your PC, purchase an expanded board or conversion cable,
which is commercially available.
Uninstalling Software
(1) Click the Windows Start button and choose [Settings] - [Control Panel].
(2) Choose [Add or Remove Programs] in the [Control Panel] dialog box.
(3) Choose ‘OralChroma DataManager’ from the application list and click ‘Add or Remove‘ button. A
dialog box is displayed to confirm the deletion. Click Yes button.
Note
This procedure uninstalls the software but does not delete the saved measurement data.
7
Starting and Ending the OralChroma DataManager
Starting the OralChroma DataManager
Note
If the OS of the computer on which you run OralChroma DataManager is Windows 2000, XP, or Vista, log on
to the computer as Administrator or Power User. For Windows XP or Vista Home Edition, log on not as User
but as Administrator.
(1) Click Start button and choose [OralChroma DataManager], or double-click the OralChroma
DataManager icon on the Windows desktop.
(2) The [OralChroma DataManager] window is displayed following the startup window.
8
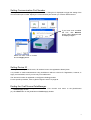
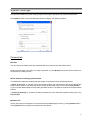
Setting Communication Port Number
When you first activate the program after installation, a dialog box is displayed to trigger the setting of the
communication port number. Specify the communication port number you connect OralChroma to.
If you have once cancelled
the box, click Measure
button and the dialog box will
be displayed again.
Select one from a set of choices
and click Apply button.
Setting Device ID
When you use multiple OralChroma’s, ID numbers have to be registered to identify them.
It is possible to make measurements using OralChroma without a device ID. Registration, however, is
highly recommended, even if you use only one OralChroma.
The device ID number is registered on the [System Setting] window.
For the specific procedure, refer to “[Device ID] tab” section on page 26.
Ending the OralChroma DataManager
(1) End all operations including “Measure” and “View records” and return to the [OralChroma
DataManager] window.
(2) Click Exit button on the [OralChroma DataManager] window.
9
Receiving Measurement Data
The program receives measurement data (sensor voltage and gas concentration) from OralChroma.
The value of the sensor voltage is plotted on the window.
Click Measure button on the [OralChroma DataManager] window.
The [Measure] window is displayed and then the [Select a measured person] window is displayed.
When you enter a number, which has not been registered, the [Unregistered ID] dialog box is displayed. If it
is a new registration, follow the procedure as described below.
When you enter a registered number, personal properties including name, etc. are displayed.
Confirm the information, select one from Device ID pull-down list, and click OK button.
When two or more measuring equipments are
registered, please be sure to choose the right one.
10
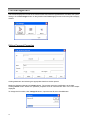
Registering Number
If you want to register the ID number you have entered as a new test subject, click Yes button in the
[Unregistered ID] dialog box.
If you have chosen to register a new ID number, the [Register] dialog box is displayed. Fill in Name and
Comment fields, choose one option in Device ID field, and click OK button.
When two or more measuring devices are
registered, please be sure to choose the right
one.
The maximum number of characters that can be entered in the ID, Name, and Comment fields is 30 each.
These fields are not case sensitive.
Select either male or female for Sex field.
Up to 10 digits can be entered in Date of Birth field.
The data can be registered without Date of Birth. Characters other than date can also be entered in this
field.
Avoid duplicating the registered ID number. You can register the ID number without entering any data in the
Name and Comment fields, but it is recommended that all fields be filled in to make subsequent selection
and confirmation easier.
11
Starting Measurement
A dialog box is displayed to confirm whether you wish to start the measurement. Click OK button. The
system is now ready for receiving measurement data from OralChroma.
If you click Cancel button, the measurement is suspended while the [Measure] window is open. To re-start
the measurement, click Start button.
While the system receives data from OralChroma, it updates the graph approximately every second.
Completion of reception of all data ends measurement.
Reception of data blinks this
green indicator.
Plot of sensor voltage
Properties of the test subject
12
Completing Measurement
When the data reception process is completed, the [Measure] window displays the peaks and values of gas
concentrations as shown below.
Displays 'Received completely' and its date/time
Miscellaneous gases included in expiration
Peak of 'H2S'
Peak of 'CH3SH'
Peak of '(CH3)2S'
Value of gas concentration
13
Saving Measurement Data
When the measurement data is received, a dialog box is displayed to ask if you want to save the data. To
save it, click OK button.
If you click Cancel button, the data is not saved. However, you will have a chance to save it later by clicking
Save button.
If you close the [Measure] window by clicking Close button or if you reset the graphic display by clicking
Start button, the received data is lost and cannot be saved.
For your reference:
If you notice that you have chosen wrong test subject after data reception is started, click Cancel button in
the dialog box shown above. (Click Cancel button, when the confirmation for measurement results is
displayed.)
Click Save button on the [Measure] window. Now you are ready to specify the right test subject.
Select the right test subject and save it.
Displaying Judgment
Following the dialog box that asks if you want to save the data when the measurement is completed,
another dialog box is displayed to choose display of the [Judgment] window. Click OK button. The
[Judgment] window is displayed.
The [Judgment] window can also be displayed if you click Judgment button after completing measurement.
For details of the [Judgment] window, refer to the “Judgment” section on page 14.
Suspending Measurement
Click Stop button if you want to suspend the measurement before completing data reception. Clicking Yes
button in the [Stop Receiving] window suspends data reception and clears the graphic chart.
Note
Even if receiving data is suspended on the OralChroma DataManager side, OralChroma continues sending
measurement data. Click Start button after measurement is completed on the OralChroma side, if you want
to restart data reception.
Note
When measurement data were not received completely for the mistake of the operation order, an error of
the communication setting or the malfunction of the communications cable normally, you can store gas
density displayed by 'OralChroma' as a measurement record. Please refer to "Appendix - Input of the
measurement result" in detail.
14
Setting Display
If the graph of the measurement data is too large for the screen or too small to see changes, it can be
adjusted. Click Setting button on the [Measure] window and choose an option from ‘Vertical Scale’ menu.
The scale can be adjusted even while the system is receiving the data.
Colors for the plot can also be changed by choosing the ‘Specify Color of
the Graph’ menu and then choosing a new color in the [Color] window.
Displaying Measurement Records
The records of past measurement data can be graphed during or after the measurement.
Click ‘View records’ button on the [Measure] window and the [Records] window is displayed. For details,
refer to the “Displaying Measurement Records” on page 16.
Printing
Screenshot of the [Measure] window can be printed on the printer.
Click Print button and choose the ‘to Printer’ menu; the [Measure] window is printed.
If you need to set paper size, etc., choose ‘Page Setup’ menu before printing. Please note that the printer
setting specified here is applied to the printing of the [Judgment] window and the [Records] window.
Clicking the ‘to File’ menu saves the window in the form of a bitmap file.
15
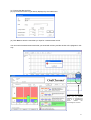
Judgment
Measurement values and halitosis cognitive threshold are compared and the judgment of the functional
halitosis level is displayed.
Personal
properties of the
test subject
Data of the last measurement
[Name of gas: Measurement
value (Judgment)]
Measurement
value
Switching units
Judgment of functional halitosis
level (Green background blinks)
Displaying the [Judgment] Window
Either of the following procedures opens the [Judgment] window.
From the [Measure] window
・ When measurement is completed, a dialog box is displayed to check if you want to save the
measurement data, followed by another dialog box to choose the display of the [Judgment] window.
Clicking Yes button opens the [Judgment] window for the data.
・ Clicking Judgment button on the [Measure] window displays the [Judgment] window. Judgment
button cannot be clicked before or during measurement.
From the [Records] window
・ Select the measurement date from the history list on the [Records] window and click Judgment
button; the [Judgment] window is displayed.
16
Method of Judgment
Judgment process of the measurement value is described as follows:
① Measurement values of the three gases are compared with 'Cognitive thresholds'. If the value is
above the threshold, ‘+’ is given. If it is below the threshold, ‘-' is given. 'Cognitive threshold' is the
lowest level of concentration where people can identify what kind of smell it is. As there are
differences between individuals in the level of the olfactory sense, it should be regarded as a
“guideline.”
② The combination of ‘+’ and ‘-' is compared with the judgment patterns and the one with the same
combination is the judgment given.
There are seven judgment patterns as follows:
Judgment sentence
Sulphur compounds are not present in this sample.
Breath odours may be present from products other
than sulphur compounds – e.g., lactic or acetic acid.
Hydrogen sulphide will contribute to breath odour in
amounts close to or over base line.
All three sulphur compounds are present.These
compounds, if present in sufficient amounts, will
combine and contribute to breath odour.
Hydrogen sulphide and dimethyl sulphide, if present in
sufficient amounts, will combine and contribute to
breath odour. r if present in amounts close to or over
baseline.
Methyl mercaptan can contribute to breath odour if
present in amounts close to or over baseline.
Methyl mercaptan and dimethyl sulphide, if present in
sufficient amounts, will combine and contribute to
breath odour.
Dimethyl sulphide is a cabbage-like odour that bacteria
commonly produce. It can sometimes be digestive in
origin.
H2S
CH3SH
(CH3)2S
-
-
-
+
-
-
+
+
+ or -
-
+
-
+
-
+
-
+
+
-
-
+
The default 'Cognitive thresholds' and ‘Judgment sentences’ have been specified. The values and contents,
however, can be altered at your discretion.
For the procedures, refer to the ”[Judgment] tab” section in ”System Setting” on page 25.
Printing
Clicking Print button prints the [Judgment] window.
The size and direction of the paper can be set by pressing ‘Page Setup’ button. Please note that the printer
settings specified here are applied to the printing of the [Measure] window and the [Records] window.
Clicking Print button while pressing Shift key on the keyboard saves the [Judgment] window in the form of
a bitmap file.
17
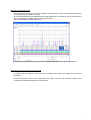
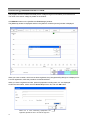
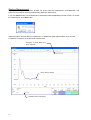
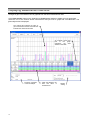
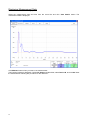
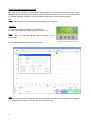
Displaying Measurement Records
Changes in gas concentrations can be graphed from the saved measurement data.
Click ‘View records‘ button on the [OralChroma DataManager] window to display a list of saved data.
Select the row of the number whose measurement data you want to graph and click OK button. The
[Records] window is displayed.
The vertical axis indicates the value of
gas concentration and the horizontal axis
indicates the measurement date.
An indicator shows this
part
of
the
graph
represents
the
data
clicked on the table.
Personal properties
of the test subject
18
Table that displays the
date and value of
measurement
Display
setting
Controlling Graph Display
Clearing the check button on the left of the gas name in the measurement date/value table hides the graphic
display of the gas.
Check
button
that
switches
between
display and non-display
Clicking Setting button displays the menu shown as below.
Scale menu alters the scale of the vertical axis of the chart. Autoscale automatically adjusts the scale
according to the data to be displayed on the graphic chart.
Unit menu switches the unit of gas concentration between ng/10 ml and ppb.
Color menu alters the colors of the graphic display.
19
In the lower right of the window, the following functions are displayed for setting.
It is enabled when ng/10 ml is chosen
for the unit and Line Graph for type.
The type of graphic chart is chosen in Type. Select either Bar Graph or Line Graph.
The Show 'Total' with 'Bar' graph option becomes enabled when [ng/10 ml] is chosen for the unit and
Line Graph for Type.
Only the total amount is displayed in the bar graph when checking this option.
Checking ‘Chart all records’ displays the gas concentration value of all measurement data in the form of a
graphic chart.
If you clear ‘Chart all records’, ten measurement data are displayed at once. If you have more than ten
data, the next data will be displayed by moving the scroll bar at the bottom of the table.
If you click a part of the table, an indicator is displayed in the graphic chart that corresponds to the data
clicked.
Checking/unchecking ‘Show the scale of the X-axis’ turns on/off the display of scales on an X-axis.
The alterations to the settings are saved in the program and a graph based on the same setting is displayed
when you next open the [Records] window.
20
Printing Measurement History
Screenshot of the [Records] window can be printed on the printer.
Click Print button and choose the ‘to Printer’ menu displayed; the [Records] window is printed.
If you need to set paper size, etc., choose the ‘Page Setup’ menu before printing. Please note that the
printer setting specified here is applied to the printing of the [Measure] window and the [Judgment] window.
Clicking the ‘to File’ menu saves the window in the form of a bitmap file.
Exporting Measurement History
A list of measurement dates and values can be saved as a text file in CSV format.
Click Save button; specify the file in the [Save as] window, and Click OK button. All measurement dates and
values are saved in a file.
The unit for the measurement value will be the one chosen in the ‘Setting display’ process. The non-display
gas concentration values are also saved.
For the details of file formats, refer to the appendix at the end of this manual.
21
Displaying Measurement Data
Each measurement data can be graphed.
Select the measurement date and time from the record list and click ‘View details’ button. The
measurement data is displayed.
Click Measure button when you start a new measurement.
The [Confirm] window is displayed. Confirm ID, Name and other fields, select Device ID, and click OK. Start
the measurement following the procedure for the ‘Measure.’
22
Exporting Measurement Data
Sensor voltage data can be saved as a text file in CSV format.
Click Export button and specify the file name in the [Save as] window.
For details of the file formats, refer to the appendix at the end of this manual.
23
File Management
This function displays the records of the measurement data, edits the registered data, and alters the system
settings. Click ‘File manager' button on the [OralChroma DataManager] window to show the [File manager]
window.
Editing Personal Properties
Clicking List button and selecting the appropriate data from the list opened.
Modify the displayed data and click Apply button. The process saves the modifications to the data.
Clicking Delete button deletes the personal properties and all measurement data of the test subject
displayed.
To change the ID number, click 'Change ID' button, input the new ID, then click OK button.
24
Importing and Exporting Personal Properties
The personal properties of the registered test subject can be saved as a text file in CSV format.
The program can also import personal properties from a text file in CSV format.
●Export
Click Export button and specify the file name in the [Save as] window.
●Import
Click Import button and select the file to be imported in the [Open] window.
In the window shown 'Is the first line a title?’, clicking Yes button ignores the first line of the file.
If the imported personal properties are for an unregistered test subject, then register it as a new entry. If a
test subject with the same ID has already been registered, the personal properties are updated while the
measurement data remain as they are.
File formats are shared by import and export of personal properties. For details of the file formats, refer to
the appendix at the end of this manual.
25
Editing Measurement History
Enter the ID number in the ID field and click Search button, or click List button and select one from the list
displayed to specify the test subject.
Select the measurement data and click ‘Delete record’ button. The selected data is deleted.
For your reference:
If you use multiple OralChroma and more than one device ID has been registered, you can change the
device ID of the measurement data only.
Select the measurement data from the list and check the ‘Enable to change device ID’.
Select ‘Device ID’ and click Replace button. The device ID is changed.
26
System Settings
This process enables the system settings required for program operation and restores deleted data.
Click Options button on the [File Manager] window to display the [Options] window.
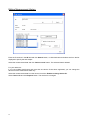
[System] tab
Folder
You can specify the folder where the registered data and measurement data will be saved.
Enter the folder name in the entry box using a keyboard. Or, Click Browse button and select a folder from
the [Browse for Folder] window.
The method for deleting personal data
This defines the method for deleting the test subject on the [Edit personal properties] window.
If ‘Send to the trash’ is checked, all the personal properties and measurement data of the deleted test
subject will be sorted in one folder with the ID number as the folder name and sent to the Recycle Box.
If you move the deleted folder to the [Folder] specified as above, the data are restored to the state before
deletion.
If ‘Delete permanently’ is checked, the data are deleted from the hard disk instead of being sent to the
Recycle Box.
Picture file
Specify the image to be displayed on the [OralChroma DataManager] window by clicking Browse button.
Clicking Reset button changes the image back to the default.
27
[Device ID] tab
This process enables registration of the Device ID numbers to identify which device was used in the
measurement when a user uses multiple OralChroma devices. Measurement is possible without registering
the Device ID, but it is recommended that the ID be registered if you use only one OralChroma device.
Registering Device ID
Enter the Device ID consisting of not more than 4 digits in the ‘New ID’ field using the keyboard, and click
Add button. The registered number is listed with its registered date.
Deleting Device ID
Select the number you want to delete and click Delete button.
Port
The number of currently used communication ports is displayed.
Click ‘Select port’ button to change the communication port number.
The [Select port] window is displayed. Select the new port number and click Apply button.
Printer setting
When you change a printer for a new model and print it by this software, there is the case that a printer error
extremely rarely happens.
In such a case, click ’Clear’ to reset the printer information of this software.
(This operation does not affect printer setting of Windows.)
28
[Judgment] tab
This defines the settings required for making judgments on the measurement value.
Up/down button
Cognitive threshold
Specify a threshold, a criterion for judgment, for each gas by clicking the up/down button.
Clicking ‘Restore defaults’ button specifies the values as below:
H2S = 112 ppb, CH3SH = 26 ppb,
(CH3)2S = 8 ppb
Specify range
Specify the maximum value to be displayed for the data with a
value above the cognitive threshold in the ‘The density of the
gases’ field on the [Judgment] window.
The default is 1000 ppb. By making this value smaller, you can
change the ratio to be displayed for the data with a value
above the threshold.
Click ‘Specify range’ button and enter the value in the Max field.
Click OK button, the change is saved.
Minimum value is zero.
29
Editing judgment sentences
Click ‘Edit the judgment sentences’ button. A window is displayed to edit the judgment sentences.
Default sentences are shown in page 17.
Select one sentence from the list. The registered sentence is displayed in the ‘Judgment sentence’ field
and the combination of gas concentrations is displayed in the Pattern field.
Every time you change the sentence, the sentence in the list is changed as well.
Click OK button when you complete changing sentences. Clicking Cancel button closes the dialog box
without saving the changes.
Note
No new judgment sentence is added. The patterns specified cannot be changed.
30
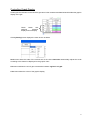
[Mark] tab
On the Mark tab, you can input your own clinic logo, information or message to display on the User
Information Column of [Judgment] Window.
Judgment Window
User Information Column
OralChromaTM logo is shown in the Input Box on the Mark tab screen as an initial setting.
Input box
To insert image, click Picture, then click Browse button, and then select the picture file you want.
The default image size is 323×95 pixels. For larger or smaller size images, DataManager automatically
resizes the picture to fit within the default image size.
To enter text, click Text, type the letter and character in the Input Box.
To change the font, style and size, click Font button, and then select the font, style and size you want. To
change the color of font, click Font Color button, select the color you want from the color pallet, and then
click OK. To change the color of background, check Enable Back Color box, and then click Back Color
button, and then select the color you want.
Sample of ‘Text’
31
Appendix
File Format
The formats are specified here for the CSV format files to be imported/exported.
Note
Some of the data files of OralChroma DataManager are text files. Do not open or edit the file using other
applications such as text editors. The file may not be opened normally or OralChroma DataManager may
not operate properly.
If you want to use the data in different applications, always output the file using the ‘Export’ function.
●List of personal properties of test subjects
Import
・Personal properties of one person per one line. Five items included. (If it has more than five items, the
items after the fifth will be ignored.)
・Items ⇒ ID, Name, Comment, Sex and Date of birth, followed by the line feed code
Note
The line feed code consists of two characters of ASCII code 0D(h) + 0A(h) [CR+LF]. With any other code,
the items cannot be correctly identified.
Export
・Personal properties of one person per one line. Eight items included.
・ID, Name, Comment, Sex, Date of birth, Date of first measurement, Date of last measurement, and
number of measurements, followed by the line feed code
32
●Measurement history of the test subject
Export
1st to 5th line: each item of personal property
6th line: blank
Lines after the 6th line: measurement date/time, device ID, gas concentration of H2S, gas concentration of
CH3SH, and gas concentration of (CH3)2S
●Measurement data (sensor voltage)
Export
1st to 5th line: Each item of personal property
6th line: blank
7th line: measurement date/time
8th line: device ID
9th line: blank
10th line: title ("time[s]","output[V]","difference with the first 'output' value[V]")
11th to 4811th: data
4812th to 4876th: calculated data
"DATA14" = H2S concentration [ppb]
"DATA15" = CH3SH concentration [ppb]
"DATA16" = (CH3)2S concentration [ppb]
33
Input the measurement result
You input the gas density of measurement result displayed by 'OralChroma' and can save it as a
measurement record. By the measurement result that was not stored by an error or the communication
error of the assembly operation, you have indication and printing of the judgment window.
Note
You cannot reproduce the chromatogram which failed in the reception.
Operation
(1) Save the measurement data on the OralChroma.
(2) Push the 'PAGE' key to display page 4 of the 'ppb' unit.
Note
Please refer to 'Instruction Manual' about operation of the
OralChroma.
(3) Click Input result on the measurement window.
An example of a measurement result
Note
When the measurement is finished normally, and a measurement result and chromatogram are displayed
by a measurement window, you cannot click "the input of the result".
34
(4) Choose the date and time.
(5) Input numerical value of gas density displayed by the OralChroma.
(6) Click Save to store the result that you input for a measurement record.
You can watch the measurement result that you stored with a history and the window of the judgment in this
way.
A record only for gas density
When you try detailed
indication, a message that
"This is a measurement
record
without
the
chromatogram" is shown.
35
Data conversion software
The format of the DataManager data file varies depending on its version and compliant operating system.
When you transfer the data to the other computer running under a different operating system from the
original or upgrade a version of operating system, use attached Data Conversion Tool to convert data
format.
The version of the OralChroma DataManager to convert the data
2.x(for Windows) => 3.x(for Windows)
2.x(for Windows) => 1.x(for Macintosh)
3.x(for Windows) => 1.x(for Macintosh)
1.x(for Macintosh) => 3.x(for Windows)
Installation and execution
This software is installed in the same folder at the time of installation of OralChroma DataManager.
Run the OCDMConv.exe by double-clicking on the file name in the Windows Explorer.
Operation
(7) Choose the version of source data.
(8) Enter the folder path of source data. Or choose on the dialog box by clicking ‘...’ button.
(9) Choose the version of destination data.
(10)Enter the folder path of destination data. Or choose on the dialog box by clicking ‘...’ button.
(11)Click Convert button.
Note:
If you select the same folder for Source and Destination data, The Data Conversion Tool automatically
creates “Backup” sub-folder and save the original data.
(1)
(2)
(3)
(4)
(5)
36
ABIMEDICAL CORPORATION
4-8-18, Imazukita, Thurumi-ku, Osaka-shi, Japan, 538-0041
Copyrightc 2008- ABIMEDICAL CORPORATION, All rights reserved.
Printed In Japan