1
6AKY2
Dayton Operating Instructions and Parts Manual
Dayton Wet/Dry Vacuum
®
Operation (Continued)
18
E
N
G
L
I
S
H
19
20
NOTE: When removing filter bag from tank,
remove inlet deflector from filter bag collar and
reinstall into deflector guide. Inlet deflector
should always be in place for any type of
cleaning.
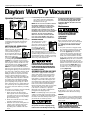
WET Pick up OPERATION
Remove ALL dirt and debris
found in the tank. The vacuum 21
requires only a minimum of
conversion when going from
dry to wet pick up. Remove all
dry use filters from the vacuum.
Wet pick up requires the
foam sleeve (not standard with all models)
or cartridge filter (not standard with all
models) to be in position over the lid cage.
Make sure inlet deflector is fully inserted into
deflector guide on inside of tank. If it is not,
install inlet deflector by sliding it downward
into slot on deflector guide (Figure 21).
NOTE: Hose must be removed before inlet
deflector can be inserted into or removed from
deflector guide. Opening on inlet deflector can
face either side of tank. Inlet deflector should
always be in place for any type of cleaning.
Misting in exhaust air may occur if the filter
becomes saturated during wet pick up. If
misting occurs, remove filter and allow to dry
or, replace with another dry filter to eliminate
the misting and possible dripping of liquid
around the lid. Turn the unit off immediately
upon completing a wet pick up job or when
tank is full and ready to be emptied. Raise the
hose to drain any excess liquid into the tank.
The interior of the tank should be periodically
cleaned.
The foam sleeve should be cleaned periodically
as described in the following steps:
1. Always disconnect the plug from the
wall receptacle before removing the tank
cover. Place tank cover in an upside down
position. Remove foam sleeve by sliding it
up and off the lid cage.
2. Shake excess dust off foam sleeve with a
rapid up and down movement.
3. Hold foam sleeve under running water for
a minute or two, rinsing from the inside.
A water wash is not always required,
depending on the condition of the foam
sleeve.
4. Gently wring out excess water, blot foam
sleeve with a clean towel, and allow to
dry. The foam sleeve is now ready to be
reinstalled on the lid cage.
Note: Wet pick up accessories should
be washed periodically with soap
and water, especially after picking
up wet, sticky liquids. Picking up
detergent or cleaners that create
foam or suds can defeat the vacuums
filtration. This could cause foreign
material to pass into the motor
impeller area and shorten motor
life. This is not normal use and is
not covered by product warrantY.
Blower feature
This vacuum can be used as
22
a powerful blower. To use
your unit as a blower, unscrew
blower port cover located on
the backside of the motor
housing (Figure 22). The
blower port cover is equipped
with a retaining strap to prevent loss of the
port cover while blower is in use. Insert hose
end with locking-nut into blower port on rear of
unit and tighten. Caution should be used when
using a blower due to the powerful force of air
when using certain attachments.
ALWAYS WEAR EYE PROTECTION TO
PREVENT ROCKS OR DEBRIS FROM
BEING BLOWN OR RICOCHETING INTO
THE EYES OR FACE WHICH CAN RESULT
IN SERIOUS INJURY.
AUTOMATIC SUCTION SHUT-OFF
This vacuum is equipped with an automatic
suction shut-off that operates when picking
up liquids. As the level of the liquid rises in
the tank, an internal float rises until it seats
itself against a seal at the intake of the motor,
shutting off suction. When this happens, the
motor will develop a higher than normal pitch
noise and the suction is drastically reduced.
If this occurs, turn the unit off immediately.
Failure to turn unit off after float rises and shuts
off suction will result in extensive damage
to the motor. To continue use, empty the
liquid waste from the tank as outlined in the
paragraph below (Emptying Tank).
NOTE: If accidentally tipped over, the vacuum
could lose suction. If this occurs, turn unit off
and place vac in upright position. This will allow
the float to return to its normal position, and
you will be able to continue operation.
Emptying Tank
Use special care when emptying heavily
loaded tanks. Your Wet/Dry Vacuum may
4
be emptied of liquid waste by removing
the tank cover. To empty, switch off the
vac and remove the plug from the wall
receptacle. Remove the tank cover and
empty the tank.
Maintenance
Be sure to disconnect power
supply before attempting
to service or remove any
components.
Storage
Before storing the vacuum cleaner, always
empty and clean the tank. Never allow liquids
to sit in the tank for any extended period of
time. Always store the vacuum cleaner
indoors.
1.The power cord can be wrapped around
the cord wraps provided on the top of the
tank cover located in front and behind
the handle (Figure 23). To remove the
cord from the cord wraps grasp the sides
of the rear cord wrap located behind the
handle, turn counter clockwise 180° until
the tip of the cord wrap is above the handle
(Figure 24). Grasp the entire cord behind
the handle and pull above the rear cord
wrap, pull cord towards the front of the vac
until the cord becomes disconnected from
the front cord wrap (Figure 25). Grasp
the sides of the rear cord wrap and turn
clockwise 180° to return it to its original
position (Figure 26).
23
24
25
26
Lubrication
No lubrication is necessary as the motor is
equipped with lifetime lubricated bearings.
Service
Do not attempt to service your Dayton wet/dry
vacuum cleaner beyond that described in this
manual. Refer all other servicing to a qualified
service center.
If any of the motor housing parts
should become detached or
broken, exposing the motor or