1
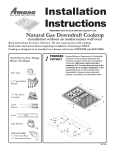
Installation Instructions Installer–Leave this manual and other literature with owner for future use. 5.1 Cubic Foot Gas Range Keep instructions for future reference. Be sure manual stays with range. Read entire instruction and Owners Manual before beginning installation. You'll Need a Few Tools Before You Begin /2" Open Ended Wrench 1 1 PREPARE TO INSTALL RANGE AND INSTALL ANTITIP BRACKET /8" Nut Driver or Sockets 3 Screw Drivers Level Tape Measure Drill and DrillBit 3 /32" for wood floor 3/ " for concrete floor 16 Pressure regulator location Anti-tip Bracket Installation To reduce risk of range tipping, secure range with a properly installed antitip bracket. Refer to anti-tip installation instruction. Measure cabinet area and prepare it according to illustrations in Minimum Clearances to Combustible Surfaces and Range and Cabinet Dimensions section in this instruction sheet. Gas supply must not interfere with electrical supply. Electrical supply must not be grounded to the gas supply line. Once a suitable location is found meeting the specified requirements, proceed to the next step of the installation. 2 CONNECT GAS SUPPLY Range is shipped to be connected to natural gas only. To convert to LP/Propane, refer to the conversion instructions supplied with range. ! WARNING To avoid risk of property damage or serious personal injury, never use a lighted match to test for gas leaks. Testing for Gas Leaks After final gas connection is made, turn on manual gas valve and test all connections in gas supply piping and range for gas leaks. Leak testing of the appliance shall be conducted according to the manufacturer’s instructions. 1. Place soap suds on connection. • Bubbles appear if leak is present. 2. If bubbles appear, shut off gas supply valve. 3. Tighten joint if leak is at factory fitting. • If leak is not at factory fitting, unscrew, apply more joint compound, and tighten to correct leak. 4. Retest connection for leak after tightening. • Retest any connections that were disturbed. Gas Connection Connect gas supply to regulator using hard pipe or flexible connector (check local codes). Pressure regulator supplied with this appliance has a 1/2 inch NPT female connection. If gas union is used, remove storage drawer, slide range into place, and connect union. • A manual shutoff, not supplied with range, must be installed in an accessible location outside of range. • Connector must be AGA/CGA design pressure regulator certified. • Verify oven shutoff valve is in the ON position. • Use joint compound that is resistant to the action of propane gas on all male threads. • Use supplied pressure regulator only. • Do not overtighten gas fitting when attaching to pressure regulator. Overtightening may crack regulator. • Support pressure regulator with wrench oven shutoff "ON" when installing gas fitting. valve ! WARNING To avoid risk of property damage or personal injury, only use a new flexible connector that is AGA/CGA design certified. • Do not use an old connector. • Do not reuse a connector after moving appliance. manual shut off valve hardpipe connection union pressure regulator flexible connector flexible connection adapter manual shut off valve pressure regulator 3 POSITION AND LEVEL RANGE To avoid risk of damaging oven door, do not lift or move range by oven door handle. Glass can break. Place range near final position and plug in. A 3-wire electrical cord approximately 4 feet in length is supplied on range. Then, slide range into final position and adjust all legs (4) until range is level side to side and front to back. • Place a level on top oven rack or on range top when leveling. • Leveling legs must extend ¼ inch to engage anti-tip bracket. Removal and Replacement of Range 1. 2. 3. 4. 5. Unplug range cord. Turn off gas valve and disconnect gas supply. Remove range and place aside. Remove anti-tip bracket. Install anti-tip bracket into new location using instructions provided with bracket. 6. To reinstall range, follow instructions in this manual. • Do not reuse a flexible connector after moving appliance. Remove Storage Drawer and Check Anti-tip Bracket After range is in position, remove storage drawer or lower panel and confirm anti-tip bracket is engaged with range leveling leg. To remove storage drawer 1. Slide drawer out until it stops. 2. Grasp drawer sides near back of drawer. 3. Lift up and out. Reverse to reinstall. 4 PLACE BURNER Before operating range, surface and oven burner CAPS AND ADJUST BURNER flames must be adjusted: • Refer to Owner’s Manual for FLAMES instructions on proper flame • adjustment. Failing to adjust flames properly can result in poor cooking or flaming. grate burner cap burner base IMPORTANT SAFETY INFORMATION ! WARNING To avoid risk of burns or fire by reaching over elements, cabinet storage space located above range should be avoided. If cabinet storage is provided, install a range hood that projects horizontally a minimum of 5 inches beyond the cabinet bottom to reduce the risk. ! WARNING To reduce risk of the appliance tipping, it must be secured by a properly installed anti-tip bracket. To make sure bracket has been installed properly, remove the storage drawer or panel and look under the range with a flashlight. Bracket must be engaged in the rear corner of the range. • ALL RANGES CAN TIP • INJURY TO PERSONS COULD RESULT ! WARNING • INSTALL ANTI-TIP BRACKET(S) PACKED WITH RANGE To avoid risk of electrical shock, personal injury, or death, make sure your range has been properly grounded and always disconnect it from main power supply before servicing. • SEE INSTALLATION INSTRUCTIONS Minimum Clearances to Combustible Surfaces This range can be installed flush against right and left base cabinets, and rear vertical wall. The dimensions provided are to be measured from the range itself, and not the installation cutout for the range. B A—Minimum of 30 inches between top of cooking surface and bottom of an unprotected wood or metal cabinet. OR C A—Minimum of 24 inches between cooking surface and protected wood or metal cabinet above range. Cabinet bottom must be protected by at least ¼ inch thick millboard with not less than No. 28 MSG sheet steel, .015 inch thick stainless steel, .024 inch thick aluminum, or .020 inch thick copper. B—Minimum of 30-inches of protected cabinets above the range. C—Minimum of 18” between top of countertop and bottom of an unprotected wood or metal cabinet. D—Maximum depth of 13” for overcounter cabinets. E—Minimum of 3 inches to a vertical right or left side wall extending above cooking surface. F—Maximum depth of 25 inches. G—Maximum of 36 inch cabinet height. Part No. 36-32018601-0 Printed in U.S.A. 08/00 E D A F G SAVE THESE INSTRUCTIONS 2000 Amana Appliances Amana, Iowa 52204 Consider Description Location This range can be installed flush against right and left base cabinets, and rear vertical wall. Range must have a minimum distance of 3 inches from a left or right vertical wall extending above 36 inch standard countertop height. Use dimensions shown in this manual to determine space needed for installation. Range must not be installed or stored in an area where it will be exposed to water and/or weather. Irregular Cabinet and Countertop Heights Countertops such as ceramic tile tops cause cabinet and countertop to be higher than 36”. Follow instructions below when countertop is higher than 36”. 1. Raise leveling legs to maximum height. 2. Measure from floor to rangetop. If the height of the range is less than height of countertop, floor must be shimmed. 3. Shim floor using a piece of plywood same size as range opening. Secure plywood to floor. Plywood must be as secure as original flooring. 4. Install anti-tip bracket and slide range into place. Electrical Requirements Electrical Supply Range needs a 120 volt, 60 hertz, 3 prong receptacle protected by a 15 amp circuit breaker or time delay fuse. A qualified electrician should confirm the outlet is properly polarized and grounded. Wiring system and grounding must conform with the latest edition of the National Electric Code, ANSI/NFPA 70, or the Canadian Electrical Code, CSA C22.1. Installation must conform to all local, municipal and state building codes, and local utility regulations. Connect range to power supply with MAXIMUM RATED VOLTAGE listed on the rating plate. Line voltage must not exceed rated voltage. If a 2 prong outlet is encountered, range owner must replace the outlet before using the range. Do not cut off the cord, use a plug adapter or extension cord, or remove grounding plug. Electrical supply should not converge on gas supply. Do not ground electrical supply to gas lines. Gas Requirements Gas Supply Installation must conform with the latest edition of the National Fuel Gas Code, ANSI Z223.1 or CAN1-B149.1 or B149.2 for gas burning appliances and equipment. Installation must conform to all local, municipal and state building codes, and local utility regulations. ! CAUTION To avoid property damage, maximum gas supply pressure must not exceed 14” WCP. In mobile housing, installation is to be in accordance with CSA standard Z241.1 gas equipped mobile housing. In manufactured (mobile) home installation must conform with the latest edition of Manufactured Home Construction and Safety Standard, Title 24 CFR, Part 3280. When that standard is not applicable, the Standard for Manufactured Home Installation, ANSI 225.1/NFPA 501-A, or local codes or the standard CAN/CSA-z240MH, “Mobile Homes” should be used. Gas Supply Pressure Appliance and individual shutoff valve must be disconnected from the gas supply piping system during any pressure testing of that system at test pressures in excess of ½ psig (3.5kPa) (14” WCP). Appliance must be isolated from gas supply piping system by closing manual shutoff valve during any pressure testing of the gas supply piping system at test pressures equal to or less than ½ psig (3.5 kPa) (14” WCP). Gas supply pressure for checking regulator setting must be at least 1” WCP above manifold pressure shown on rating label. 36" Range and Cabinet Dimensions 25" 30" 24" 46 1/ 2 " 36" 28 1 /4" 30 1/8 " 36" 25 1/ 2 " Gas Supply Location Electrical Receptacle Location Locate gas supply within gray shaded area. Gas and electrical supplies should not converge. Locate electrical receptacle in area with diagonal lines. Do not ground electrical supply to gas supply lines. 30 1/8" 30 1/8" 10 1/4" 1 3/4" 20 " 20 3/8" 14 " 8" 4" 2" 8" 21 " 8" 19 5/8" 8" 2 1/2 " 10 1/2" Questions? Refer to Owners Manual or call Amana Consumer Affairs Department 1-800-843-0304


![Service Manual FCB Pinnacle 2 and 4 Flavor [ 005271 ]](http://vs1.manualzilla.com/store/data/006038828_1-2ffb9d6cd82d544c3f733521619945ce-150x150.png)