1
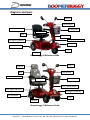
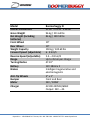
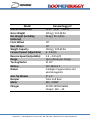
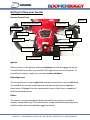
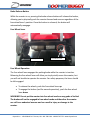
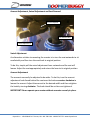
III & IV Series Mobility Scooter Owner’s Manual Daymak Inc. · 130 Oakdale Rd · Toronto, ON · M3N 1V9 416.749.2324 · 1.866.379.7779 · www.daymak.com Introduction Thank you for purchasing Daymak’s Boomerbuggy Mobility Scooter. We thank you for choosing a Daymak scooter, especially one that has been designed to provide you with years of trouble free, comfortable, quiet, and eco-friendly service. Your scooter has been equipped with the latest technologies that assist in providing you with the most efficient and comfortable ride you’ve ever felt. We at Daymak Inc. recognize the importance of your comfort when it comes to mobility, and our Boomerbuggy Mobility Scooters provide just that; with our direct drive transaxles and electromagnetic brakes, you will glide effortlessly where ever you choose to go. Another amazing feature of our Boomerbuggy mobility scooters is the fact that they are easily transportable and can be easily disassembled for storage. Please be sure to take time reading this manual thoroughly before operating your new scooter. As the operator, you are solely responsible for the manner in which you operate and maintain your scooter. Daymak Inc. is not responsible for any damage or personal injury incurred through improper or unsafe usage of the Boomerbuggy Mobility scooter. For more information about our products, warranty, or services, or if you are having any trouble understanding the instructions presented in this manual, please contact your nearest Daymak dealer, or call Daymak headquarters at 1866-379-7779, or visit our website at www.daymak.com. Daymak Inc. · 130 Oakdale Rd · Toronto, ON · 416-749-2324 · 1-866-379-7779 · www.daymak.com Diagrams and Specs Mirrors Control Panel Adjustable Armrests Carrier Basket Cup Holder Seat Reflectors Tiller / Steering Colum Rear Lights / Indicators Headlights Anti-Tip Wheels Tires Foot Rest Boomerbuggy III Reference Guide Mirrors Headrest Control Panel Seat Adjustable Armrests Cup Holder Carrier Basket Tiller / Steering Colum Rear Lights / Indicators Headlights / Indicators Anti-Tip Wheels Tires Foot Rest Boomerbuggy IV Reference Guide Daymak Inc. · 130 Oakdale Rd · Toronto, ON · 416-749-2324 · 1-866-379-7779 · www.daymak.com Model Overall Dimensions Gross Weight Net Weight (including batteries) Front Wheel Rear Wheel Weight Capacity Forward Speed (adjustable) Reverse Speed (adjustable) Range Turning Radius Battery Brakes Anti-Tip Wheels Bumper Motor Charger Boomerbuggy III 51.38” x 25.20” x 46.06” 96 kg / 211.64 lbs 86 kg / 189.59 lbs 10” 10” 150 kg / 330.69 lbs 6 - 8 km/h 2.4 – 4.8 km/h Up to 45 km per charge 47.24” 12V 38AH x 2 Intelligent regenerative and electromagnetic 3” x 1” Front and Rear 24V / 300W AC100-240V50/60HZ Output: 24V – 4A Daymak Inc. · 130 Oakdale Rd · Toronto, ON · 416-749-2324 · 1-866-379-7779 · www.daymak.com Model Overall Dimensions Gross Weight Net Weight (including batteries) Front Wheel Rear Wheel Weight Capacity Forward Speed (adjustable) Reverse Speed (adjustable) Range Turning Radius Battery Brakes Anti-Tip Wheels Bumper Motor Charger Boomerbuggy IV 55.51” 24.61” x 48.03” 105 kg / 231.48 lbs 96 kg / 211.64 lbs 10” 10” 150 kg / 330.69 lbs 6 - 9 km/h 2.4 – 4.8 km/h Up to 36 km per charge 51.18” 12V 38AH x 2 Intelligent regenerative and electromagnetic 3” x 1” Front and Rear 24V / 300W AC100-240V50/60HZ Output: 24V – 4A Daymak Inc. · 130 Oakdale Rd · Toronto, ON · 416-749-2324 · 1-866-379-7779 · www.daymak.com EMI Safety Information EMI Warning The increasing rate at which communication technology develops has flooded our environment with electromagnetic (EM) waves that are emitted by various sources (such as television transmitters, cellular phones, wireless technologies, and etc). Electromagnetic Interference (EMI) occurs more intensely as you approach the source of the transmission and are capable of causing your scooter to malfunction or function uncontrollably. EMI may cause possible interference with the motor and its braking system! WARNING! Be wary of EM sources around you, as unintended EMI may cause accident or injury! Some cellular phones and similar devises transmit signals while they are on, even when not in use! While not guaranteed, the following devices are not likely to cause emit enough EMI to interfere with the scooter: cordless phones, laptops, AM/FM radios, TV sets, CD players, cassette players, and small appliances. EMI Recommendations • Do not use hand-held personal communications (cellular phones, CB radio, ham radio, walkie-talkies, etc) while the scooter is in operation • Be aware of any nearby transmitters along your route to reduce unwanted interference • Turn off your scooter when not in operation to reduce chances of unintended movement • If unintended movement occurs, turn off your scooter as soon as it is safe Daymak Inc. · 130 Oakdale Rd · Toronto, ON · 416-749-2324 · 1-866-379-7779 · www.daymak.com Getting to Know your Scooter Scooter Control Panel Mirrors Forward/Reverse Indicator Charge Indicator Brake Release Ignition Charging Port Fuse Forward Lever Reverse Lever Speed Adjustment Knob Turning Signals Emergency Brakes Headlight Switch Horn Ignition Place your keys in the ignition and turn clockwise one click to engage the motor. You will know the scooter is on once the LEDs light up on your control panel. To turn off your scooter, simply turn your key counter-clockwise. Operating Levers The forward lever is on your right hand and the reverse lever is on your left hand. The speed of the scooter is dependent on the amount of pressure applied to these levers. Although there are two separate levers, either lever is capable of both forward and reverse. Brakes The scooter uses electromagnetic brakes assisted by the motor to provide a smooth, comfortable stop. To use the brakes, simply release the operating levers and the scooter will automatically engage the brakes. Daymak Inc. · 130 Oakdale Rd · Toronto, ON · 416-749-2324 · 1-866-379-7779 · www.daymak.com Speed Controls You can adjust the speed of your scooter by turning the speed adjustment knob. The lowest setting is set by turning the knob fully counter-clockwise and the highest setting is set by turning the knob fully clockwise. Charge Indicator The number of LED bars lit indicates the amount of charge left. The true charge level will show only when the bike is in operation. CAUTION! Do not allow the battery to completely deplete! For optimal battery maintenance, charge your batteries once they are at approximately 20%! Light Switch The switch turns on or off the headlights and taillights, if applicable. I is the on position and O is the off position. Horn The horn button is located on the tiller, facing the operator. Pressing the horn button operates it. Indicator Switch The indicator switch will engage the indicators respective to the position the switch is set. Pressing up (labeled ◄) will engage the left indicator and pressing down (labeled ►) will engage the right indicator. Charging Port Turn the cover and the charging port will be exposed. Align the charging plug’s pins with the charging port’s holes and insert the gently insert the charger. IMPORTANT! When charging your scooter, always make sure that you plug the charger into the scooter before plugging the charger into the wall! Failure to do so can potentially damage the scooter. Daymak Inc. · 130 Oakdale Rd · Toronto, ON · 416-749-2324 · 1-866-379-7779 · www.daymak.com Brake Release Button While the scooter is on, pressing the brake release button will release the brakes, allowing you to physically push the scooter forward and reverse regardless of the free wheel lever’s position. Once the button is released, the brakes will automatically reengage. Free Wheel Lever Anti-Tip Wheels Free Wheel Lever Free Wheel Operation The free wheel lever engages the parking brake while the scooter is inactive. Releasing the free wheel lever will allow you to physically move the scooter, but you will not be able to operate the scooter. For safety purposes, the lever should be left engaged. • To release the wheels, push the free wheel lever up • To engage the brakes (and for normal operation), push the free wheel lever down WARNING! Do not put the scooter into free wheel mode on any grade of incline! The brakes will not be engaged in free wheel mode and therefore the scooter can roll in an undesired manner and can result in injury or damage to the scooter. Daymak Inc. · 130 Oakdale Rd · Toronto, ON · 416-749-2324 · 1-866-379-7779 · www.daymak.com Anti-Tip Wheels The anti-tip wheels are a safety measure that helps to prevent the scooter from being tipped over. The anti-tip wheels are located at the rear of the scooter’s frame. WARNING! The scooter should never be used unless the anti-tip wheels are in place. Failure to do so can result in injury or damage. Safety Warnings WARNING! Failure to follow these instructions may result in damage to the scooter or personal injury! Safety Advice Please keep the following in mind to prevent any unwanted injury or damage. • DO NOT carry passengers • DO NOT drive across a slope • DO NOT drink and drive (or under the influence of medications that may impair your driving ability) • DO NOT tow a trailer • DO NOT use distracting devices such as cellular phones while operating • DO NOT exceed inclines over 8° • DO NOT turn on steep inclines • DO NOT turn suddenly at high speeds • DO NOT get on or off the scooter unless the brakes are on and the scooter is off • DO NOT switch the scooter off while in motion • DO NOT drive the scooter where you cannot safely walk; such as roads, streets, highways, and etc. • DO NOT attempt to drive over curbs greater than 2” in height • DO NOT exceed the suggested user weight limit • DO NOT use an escalator; please opt for the elevator Daymak Inc. · 130 Oakdale Rd · Toronto, ON · 416-749-2324 · 1-866-379-7779 · www.daymak.com • DO NOT drive on an incline with oil, water, or ice on it • DO NOT try to lift the scooter by the seat, tiller, rear chassis cover, or any removable parts • DO NOT use parts of accessories that are not authorized by Daymak Inc. • DO NOT connect any medical devises to the scooter battery On the Road Please adhere to the following recommendations to ensure your safety. • • • • • • • • • • • • • DO NOT drive in the rain DO NOT drive in or on snow DO NOT drive off-road or on any uneven surfaces DO NOT drive in traffic DO NOT reverse unless you are certain there are no obstacles behind you DO NOT make sudden stops, weave erratically, or make sharp turns DO NOT extend your arms or legs outside of the scooter while in operation DO NOT attempt to climb curbs greater than 2” DO NOT attempt to cross a gap greater than 3” DO NOT attempt to climb a hill greater than 10” DO NOT attempt to drive across a sloping surface greater than 8” DO NOT drive at full speed on a decline DO NOT get on or off the scooter when on a hill Daymak Inc. · 130 Oakdale Rd · Toronto, ON · 416-749-2324 · 1-866-379-7779 · www.daymak.com SAFETY WARNING! When getting on or off the scooter, please make sure that the key is in the off position to prevent engaging the scooter accidentally. When seated comfortably, set the speed control knob according to your driving ability. We recommend that you keep the speed at the lowest setting (fully counterclockwise) until you are comfortable with higher speeds. Getting Started Before the first use, you must charge your scooter completely. This should take approximately 8 to 12 hours. Please refer to the Getting to Know Your Scooter section for information on how to charge your scooter. Getting On/Off Before getting on or off your scooter, always make sure that the keys are not in the ignition and that the scooter is off. This is a safety measure to prevent any unwanted injury due to accidental engaging of the levers. For easier mounting or dismounting, lift one of the arm rests before getting on or off. Return the arm rest to its normal position before operation. Before operating your scooter, ensure that you are seated in a comfortable position. IMPORTANT! Do not use the handlebars or the tiller when mounting or dismounting the scooter. For support, please use the arm rests! Operating Instructions Before going on your first trip, spend some time to practice handling your scooter. Find an open area with plenty of room and no obstacles around. It is recommended that you have a friend or family member assist you until you are comfortable to operate the scooter on your own. Forward and Reverse First, make sure you are seated comfortably. Put the key into the ignition and turn the scooter on. You will know that the scooter is active when the LEDs light up on the control panel. Set your scooter to the lowest speed possible. You may adjust the speed once you are comfortable with operating the scooter. Daymak Inc. · 130 Oakdale Rd · Toronto, ON · 416-749-2324 · 1-866-379-7779 · www.daymak.com Start by gently squeezing the right lever. Gradually apply more pressure to the lever and the scooter will begin to pick up speed. If you have set your speed to the lowest, your top speed will be restricted. Once you are in motion, gently release the lever and the scooter will smoothly come to a stop. Repeat moving forward and braking a few times to get used to the motion. Next is to practice reversing. To reverse, gradually squeeze the left lever. Same as before, the more pressure applied to the lever, the faster the scooter will move. Practice reversing and stopping a few times to get used to the motion. WARNING! Make sure that there are no obstacles, curbs, or angled slopes behind you before reversing! Practice reversing to get used to judging your environment. Steering Steering the scooter is effortless and simple. Before you begin your practice, ensure that there are no obstacles in the way. To steer, simply rotate the tiller (handlebars) to the desired direction; the more you rotate, the more sharp the turn. Begin by slowly moving forward and steering the tiller at small angles; gradually increase the angle for your turn to familiarize yourself with the maximum turning radius. Practice by making gentle “S” patterns in both forward and reverse as much as necessary. When steering through limited spaces (such as a doorway or hallway), make sure to mind the width of your scooter. When approaching doorways, take your time and proceed slowly to prevent injury to yourself or others or damage to the scooter. When turning around corners, always keep a safe distance from the wall you are turning towards. Most importantly, you want to ensure that your rear tires will clear the corner without getting caught. Daymak Inc. · 130 Oakdale Rd · Toronto, ON · 416-749-2324 · 1-866-379-7779 · www.daymak.com WARNING! Never turn sharply while the scooter is at top speed! Always exercise caution when taking corners. Failure to do so can cause injury and damage. Extra Guidelines Ramps / Slopes The stability of your scooter is governed by several factors such as seating position, the angle of the slope, your height and your weight. Take caution when approaching an incline and always head directly (perpendicular) to the slope and not at an angle. While on the slope, avoid making any turns. When heading down a slope, keep your scooter’s speed setting to slow. Grass / Gravel Your scooter was not designed to travel off-road and therefore caution should be exercised when traveling on grass, sand, or loose gravel. If necessary, always travel at a slow pace to prevent slipping. IMPORTANT! You should never operate your scooter in wet weather or on wet surfaces. Daymak Inc. · 130 Oakdale Rd · Toronto, ON · 416-749-2324 · 1-866-379-7779 · www.daymak.com Adjustment Tiller Angle Adjustment The Tiller Adjustment lever is located on the side near the bottom of the tiller. To adjust the tiller angle, hold onto the handlebar with one hand to support its weight, pull the tiller adjustment lever outwards and adjust the angle of the tiller to the desired position. When you are comfortable, tighten the lever once more. Tiller Adjustment Lever Tiller Adjustment Lever IMPORTANT! Do not drive the scooter if the tiller is not secured. Seat Adjustment Lever Seat Adjustment You can adjust the seat to be either closer or further from the tiller. The seat adjustment lever is located on your seat to the left hand side where your left leg rests. To adjust your seating distance, simply lift the lever and adjust your seat accordingly. Once released, the seat will automatically lock into place. Seat Adjustment Lever Daymak Inc. · 130 Oakdale Rd · Toronto, ON · 416-749-2324 · 1-866-379-7779 · www.daymak.com Armrest Adjustment, Swivel Adjustment and Seat Removal Armrest Adjuster Seat Removal Nut Swivel Adjustment Swivel Adjustment An alternative solution to mounting the scooter is to turn the seat outwards to sit comfortably and then turn the seat back to original position. To do this, simple pull the swivel adjustment lever outwards and the seat will loosen. Adjust the seat appropriately and return the lever to its original position. Armrest Adjustment The armrests can easily be adjusted to be wider. To do this, turn the armrest adjustment knob found behind the seat near the bottom counter-clockwise to loosen the armrest. Adjust the armrest to the desired width and then retighten the knob by turning clockwise. The knob should be not be over tightened. IMPORTANT! Never operate your scooter without armrests securely in place. Daymak Inc. · 130 Oakdale Rd · Toronto, ON · 416-749-2324 · 1-866-379-7779 · www.daymak.com Seat Removal Nut The seat removal nut is located on the shaft holding the seat, next to the swivel adjustment lever. This is a grub screw that engages a groove on the shaft that the seat is mounted on. By loosening or removing this nut, you will be able to remove the seat. Upon reinstallation, pay extra attention to ensure that the nut is secured and in place. Seat Removal After you have removed the seat removal nut, the seat can be easily removed by lifting the chair off of the shaft it rests on. Disassembling the Scooter for Transport or Storage The Boomerbuggy series was designed to be easily dismantled for efficient transportation and storage. Disassembling the scooter requires very little time and effort. Simply follow these steps to disassemble your scooter. • First remove the seat. You can do so by loosening the swivel lever and removing the grub nut that holds the seat to the shaft. Please refer to the Seat Removal for more information. • With the seat removed, release the tiller lever and fold the tiller all the way down to where the seat used to be. IMPORTANT! While disassembled, the scooter is still considerably heavy due to the batteries and motor. When transporting the scooter, always have someone around to assist you! Daymak Inc. · 130 Oakdale Rd · Toronto, ON · 416-749-2324 · 1-866-379-7779 · www.daymak.com Batteries and Charger The Boomerbuggy series utilizes two maintenance free, seal lead acid batteries. Battery performance is affected by various factors including: temperature, terrain, the weight of the user, and overall usage for the batteries. The battery level indicator/gauge is only a guide for judging the amount of charge in the batteries. The true charge of the batteries will display once the scooter is in drive. To optimize the battery life, only charge the scooter once the batteries are at approximately 20%. When storing your unit, be sure to charge the scooter at least once every two weeks to optimize the battery’s life. Leaving the batteries completely discharged can cause irreversible damage to the batteries and may need to be replaced. Charger and Charging To charge your scooter, first make sure that the bike is off. Plug the charger into the charging port (refer to the Getting to Know Your Scooter section) and then plug the charger into the outlet. Once connected, a red light should appear on the charger; this indicates that the scooter is being charged. When the scooter is completely charged, the charger will automatically terminate the charge and the light will turn green. The charger requires a minimum feedback voltage signal from the batteries in order to begin the charging cycle. If your batteries are severely discharged for a long period of time, the charge may not receive the necessary feedback and therefore the batteries will not charge. If this occurs, contact your nearest Daymak dealer for assistance. IMPORTANT! Always insert the charger into your scooter before the outlet! Failure to do so has a possibility of short circuiting the scooter. IMPORTANT! Never let your batteries completely discharge. Doing so can result in irreversible damage to the batteries. Daymak Inc. · 130 Oakdale Rd · Toronto, ON · 416-749-2324 · 1-866-379-7779 · www.daymak.com Maintenance and Troubleshooting Lubrication In six-month intervals, you should lubricate the following parts with multipurpose grease or similar lubricant: seat pivot post and seat release lever. CAUTION! Do not lubricate the transaxle gears! Wheels and Tires The wheels have split rims, which allows easy puncture repair. To change the wheel, remove the center 13mm bolt and slide the wheel off its axle. When refitting the wheel, be sure to use a locking washer and use locktite or a similar adhesive. When changing a tire, the inner tube must be deflated. Remove the four bolts from the wheel and split the rim. General Maintenance Every six months, you may need to tighten certain nuts and bolts. The reason for this is due to the fact that operating the scooter will cause a lot of vibrations, which can gradually loosen the nuts and bolts on the scooter. The following are some areas that require attention: tiller base bolts, wheel axle bolts, armrest adjustment bolts, wheel-to-axle bolts, and etc. Troubleshooting Check List If you are having trouble operating your scooter, please check the following: • • • • • The unit is switched on All plugs and connectors are firmly fixed Battery is fully charged Free wheel lever is engaged Battery fuses are not blown If the problems persist, try resetting the circuit breaker. The circuit breaker can be found under the rear chassis cover and is accessible through a port hold under the seat. Daymak Inc. · 130 Oakdale Rd · Toronto, ON · 416-749-2324 · 1-866-379-7779 · www.daymak.com VCC GND LED9 Indicator Light ºì »Æ ºì LED10 LED12 LED13 LED10 »Æ DS1 DS2 5.1K R21 D3 1N4148 1 R19 5.1K R17 5.1K R15 5.1K DS4 LAMPS DS3 R16 5.1K R18 5.1K R20 5.1K R22 Q1 DS5 B2 B1 F2 F1 J3 S8050 K1 DS7 D5 KEYS S2 S3 J8 VCC VCC R5 5.1K VCC J4 VCC 1N4007 SRD-24VDC-SL-C DS6 1N4007 D4 1 2 3 4 5 5.1K J9 S4 R34 8 9 10 11 4 5 6 7 C1 Q2 TIP122 R36 R35 15K 1K pin16 VCC U1D LM339 14 13 ÉóºË Éóͼ ÖÆͼ Ö°Ôð Ç©Ãû Q3 2N5401 D7 4148 DW2 PE4 PE3 PE2 PE1 1N4742AG R4 5.1K R3 5.1K R2 5.1K R1 5.1K ÈÕÆÚ VCC ¿ØÖÆÏß·Ô-Àíͼ µç¶¯´ú²½³µ ͼºÅ ½ð»ªÆåÏéµç¶¯³µÖÆÔìÓÐÏÞ¹«Ë¾ BISWIFT U1C LM339 2 1 C4 0.1uF/63V U1A LM339 20V U1B LM339 1N4747AG DW1 47uF/50V 220uF/50V R37 4.7K C2 ***Sound abjustment*** LS1 SPEAKER J10 R39 100 R14 330 C3 0.1uF/63V D2 1N4007 12V VCC 12v R12 10K R13 10K R10 9.1K R11 10K R8 8.2K R9 10K R6 6.8K R7 10K 12V J16 Fuse1 1 2 S1 KEY J15 B+ 1 B2 For logic circuit or battery charger F2 »Æ J5 R33 4.3K R40 4.3K R41 4.3K R42 4.3K D6 1N4007 4.3K pin6 R43 VCC 7 U2B LM339 20V 2 13 14 1 2 HORN 1 2 J14 10K pin4 R31 6 U2A LM339 U2D LM339 U2C LM339 1 2 1 2 pin12 3 VCC R38 4.3K 12v R29 30K 5 4 11 10 9 8 1 2 3 DS8 Charging electrical outlet VCC 1 PE1 2 PE2 3 PE3 4 PE4 5 battery charge J13 J12 F1 1 F2 2 B1 3 B2 4 5 F/B Status J1 Status LED output pin9 pin9 Horn input pin16 1 pin16 Electromagnetic brake input (brake -) pin6 2 pin6 3 mode switch input pin8 pin8 4 push switch input pin7 pin7 5 Inhibit input pin12 pin12 Keyswitch input (KSI) pin5 6 VCC 7 Pot high output pin3 pin3 8 Pot wiper input; 5V throttle input pin4 pin4 9 Pot low input Pin13 pi13 10 From controller red yellow yellow blue blue yellow yellow R30 10K R27 24K R28 10K R25 51K R26 10K R23 68K horn switch 20V LED1 LED2 LED3 LED4 LED5 LED6 LED7 1 2 pin9 3 4 5 6 7 R24 10K 3 12 3 12 red J6 pin8 1 2 High/Low Change Key VCC pin8 J7 pin3 1 pin4 R32 2 pin13 3 F\B £¬pot J2 1 2 push switch Key VCC J11 1 pin12 2 ***Bredksuddenly*** 0-5K LED8 S5 speed limit pot wiper input R31 S6 S7 0-100K Daymak Inc. · 130 Oakdale Rd · Toronto, ON · 416-749-2324 · 1-866-379-7779 · www.daymak.com Daymak Inc. · 130 Oakdale Rd · Toronto, ON · 416-749-2324 · 1-866-379-7779 · www.daymak.com Warranty One Year Limited Warranty If assembled by a Daymak dealer, we will repair or replace parts within 90 days for parts and labour and 1 year for the motor and frame upon examination of the defect by an authorized representative. All parts that are defective in material or workmanship are covered by a manufacturer’s warranty. The warranty does not cover the shipping costs of replacement parts. Do not return faulty parts without prior consent. All transportation costs and shipping damaged incurred while submitting the parts for repair or replacement are at the discretion and are the responsibilities of the original purchaser. Warranty Exclusions The warranty will not cover the following: • Plastic fenders, tires (including flat tires), seats, and baskets • Damage caused by: o Battery fluid spillage or leakage o Abuse, misuse, accident or negligence o Improper operation, maintenance and storage o Commercial use or use other than normal wear and tear o Repairs and/or modifications made to any part without specific, written consent o Circumstances beyond the control of Daymak Inc., such as theft, natural disasters, or acts of war. Disclaimer We disclaim all liability and responsibility for incidental or consequential damages, including personal injury and property damage due to failure to follow the instructions written in this manual. The user is solely responsible for the care and maintenance of the scooter and its use. Daymak Inc. · 130 Oakdale Rd · Toronto, ON · 416-749-2324 · 1-866-379-7779 · www.daymak.com