1
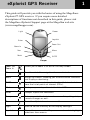
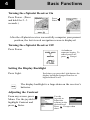
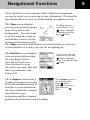
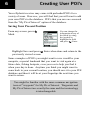
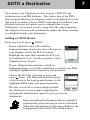
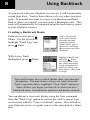
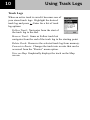
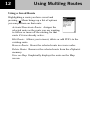
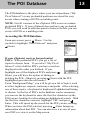
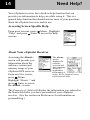
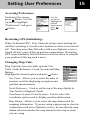
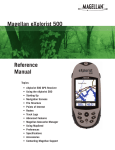
Magellan eXplorist GPS Receiver
Basic User Manual
This manual provides
basic operation
instructions for all
models of the
Magellan eXplorist
GPS Receiver.
WARNINGS
IN THE INTEREST OF SAFETY, DO NOT USE THIS NAVIGATION DEVICE
WHILE DRIVING A VEHICLE.
Please do not try and change any settings on the Magellan eXplorist while driving.
Come to a complete stop or have a passenger make any changes. Taking your eyes
off the road is dangerous and can result in an accident in which you or others could
be injured.
USE GOOD JUDGEMENT
This product is an excellent navigation aid, but does not replace the need for careful
orienteering and good judgement. Never rely solely on one device for navigating.
USE CARE
The Global Positioning System (GPS) is operated by the U.S. Government, which is
solely responsible for the accuracy and maintenance of the GPS network.The
accuracy of position fixes can be affected by the periodic adjustments to GPS
satellites made by the U.S. government and is subject to change in accordance with
the Department of Defense civil GPS user policy and the Federal Radionavigation
Plan. Accuracy can also be affected by poor satellite geometry and obstructions, like
buildings and large trees.
USE PROPER ACCESSORIES
Use only Magellan cables and antennas; the use of non-Magellan cables and
antennas may severely degrade performance or damage the receiver, and will void
the warranty.
LICENSE AGREEMENT
Thales Navigation grants you, the purchaser, the right to use the software supplied in
and with Thales Navigation GPS products (the “SOFTWARE”) in the normal
operation of the equipment.
The SOFTWARE is the property of Thales Navigation and/or its suppliers and is
protected by United States copyright laws and international treaty provisions;
therefore, you must treat this SOFTWARE like any other copyright material.
You may not use, copy, modify, reverse engineer or transfer this SOFTWARE except
as expressly provided in this license. All rights not expressly granted are reserved by
Thales Navigation and/or its suppliers.
* * *
No part of this guide may be reproduced or transmitted in any form or by any means,
electronic or mechanical, including photocopying and recording, for any purpose
other than the purchaser’s personal use without the prior written permission of
Thales Navigation.
© 2004 by Thales Navigation. All rights reserved. Magellan and eXplorist are
trademarks of Thales Navigation.
631148-18 A
eXplorist GPS Receiver
This guide will provide you with the basics of using the Magellan®
eXplorist™ GPS receiver. If you require more detailed
descriptions of functions not described in this guide, please visit
the Magellan eXplorist Support page at the Magellan web site
(www.magellangps.com).
Light
Power
Enter
Joystick
Zoom Out
Zoom In
Nav
Menu
Mark
GOTO
Escape
Zoom Out
Zoom In
Allows you to zoom in or out on the Map screen.
Nav
Used to select the navigational screen desired.
Menu
Brings up a menu, allowing you to access other functions
and display customizing.
GOTO
Used to create a route to a destination that is selected
from the list of points of interest (POIs).
Mark
Adds your present position to the list of POIs.
Enter
Accepts inputs and selections.
Escape
Returns you to the last viewed screen. If inputting data,
cancels changes as well.
Power
Turns the eXplorist receiver on or off.
Light
Used to set the intensity of the display backlight.
Joystick
Moves the cursor on the Map screen and used to highlight
selections from menus.
1
2
Basic Operation
The eXplorist GPS receiver is a handheld personal navigation
device that uses information from a constellation of GPS satellites
to compute your present position. It uses changes in your present
position to compute various navigation data, such as speed,
heading, etc. In its simplest form, you select a destination from
the list of POI’s (Points of Interest) and the eXplorist receiver will
provide you with the information to arrive at your destination.
1. Compute your position...
Turn the eXplorist on by pressing the
Power button.
Press
With a clear view of the sky, your eXplorist
receiver will begin tracking satellites and
computing your present position.
Your eXplorist begins
acquiring satellite
information and
computes your present
position.
When “Position Fix” is
displayed in the upper
left corner, you are
ready to select your
destination.
You can see the progress
of satellite data
collection by viewing
the Satellite Status
screen shown here.
Press
Nav until this
screen is displayed.
Pressing
Nav
button will allow you
to select the navigation
screen, (Map, Position
or Compass) that best
suits your needs.
Basic Operation
3
2. Select a destination...
Press the GOTO
button.
Press
If your eXplorist has a built-in background map,
you will be asked to choose the destination from
your saved points of interest or from points of
interests preloaded with your background map.
From the POI list, select
your destination
3. Go to your destination.
Use the joystick
to highlight your
desired
destination and
press
Enter.
As you travel you
will notice that your
eXplorist will
continually update
your position as
well as providing
you with the
necessary details to
arrive at your
destination.
4
Basic Functions
Turning the eXplorist Receiver On
Press Power. (Press
and hold for 2 - 3
seconds.)
Press
Enter.
After the eXplorist receiver successfully computes your present
position, the last viewed navigation screen is displayed.
Turning the eXplorist Receiver Off
Press Power.
A shutdown
sequence begins. To
cancel power off,
press
Escape.
Setting the Display Backlight
Press Light.
Each time you press the Light button, the
display backlight changes from low to
high and back to off.
The display backlight is a large drain on the receiver’s
batteries.
Adjusting the Contrast
From any screen, press
Menu. Use the joystick to
highlight Contrast and
press Enter.
Use the
joystick to
adjust the
contrast to the
desired level.
Press
Escape when
done.
Navigational Functions
Your eXplorist receiver employs three different navigational
screens to assist you in arriving at your destination. Pressing the
Nav button allows you to cycle through the navigation screen.
The Map screen displays
The Map screen is
your present position using a
customizable. Press
Menu, highlight
map of the area as the
Customize page and
background. You can zoom
press
Enter.
in or out using the zoom in/
out buttons to show just the
portion of the map you need.
The Map screen can also display your track history as well as a
visual indicator of a route you may be navigating on.
The Position screen displays
your present position using
the coordinate system
selected in Preferences.
Also displayed is your
elevation, accuracy, date and
time, trip odometer and
battery life.
The Compass screen uses a
graphical compass to provide
you with information used to
navigate to your destination.
An icon outside the compass
ring indicates your
destination and the compass
points in the direction you are heading.
You can reset the trip
odometer by pressing
Menu, highlight
Reset Trip and pressing
Enter.
The Compass screen is
also customizable.
Press
Menu,
highlight Customize
page and press
Enter.
5
6
Creating User POI’s
Your eXplorist receiver may come with preloaded POI’s for a
variety of areas. However, you will find that you will want to add
your own POI’s to the database. POI’s that you save are accessed
from the “My Pts of Interest” option of the database.
Saving Your Present Position
From any screen, press
Mark.
You can change the
information in any of
the fields by using
the joystick to
highlight the field
and press
Enter.
Highlight Save and press Enter when done and return to the
previously viewed screen.
Some examples of POI’s you might want to save would be your
campsite, a special landmark that you want to visit again at a
future date, fishing hotspots, even your car to help you find it
when your day is done. Anytime you think you might want to
come back to your current location, you should save it to your POI
database and then it will be at your fingertips the next time you
want to return.
You might be familiar with the more common navigation
term of “waypoint” for My Pts of Interest. Waypoints and
My Pts of Interest are exactly the same and the terminology
is interchangeable
GOTO a Destination
You can use your eXplorist receiver to go to (“GOTO”) any
destination in your POI database. This can be one of the POI’s
that was preloaded in your eXplorist receiver (if applicable) or one
that you have added. Once a GOTO route has been defined, your
eXplorist receiver will guide you in a straight line to your
destination. If you need to move away from the suggested path,
the eXplorist receiver will continuously update the route, keeping
you headed towards your destination.
Setting a GOTO Route
From any screen, press
GOTO
If your eXplorist came with a built-in
background map, you need to select the topic in
your database where the POI is located.
Highlight the topic that contains the POI you
are looking for is in. Use the joystick to select
Alphabetical or Nearest.
If your eXplorist does not have a built-in
background map, you will be asked how you want your POIs
displayed, alphabetical or nearest to your position.
Choose the POI that you want to go to and
press Enter. The information at the bottom
of the screen is the bearing and distance to the
highlighted POI from your present position.
The last viewed Nav screen is displayed and
the eXplorist receiver begins computing the
navigational information required to get you to your
destination.
Some navigational information that is computed
requires that you be moving for it to be calculated.
When that information is not being calculated, the
navigational fields will be filled with dashes.
7
8
Using Backtrack
As you travel with your eXplorist receiver on, it will continuously
record your track. Track is then a history of everywhere you have
gone. At anytime you want to reverse your direction and head
back to where you started, you can create a Backtrack route. This
route will automatically be computed using the track history stored
in your eXplorist receiver.
Creating a Backtrack Route
From any screen, press
Menu. Use the joystick to
highlight “Track Log” and
press
Enter.
Active Track is the
active track history
since the last time
track was cleared.
Other Track Logs in
the list are track logs
that you have saved for
future use.
With Active Track
highlighted, press
Highlight “BackTrack”
and press
Enter.
You will return to the
Nav screen and begin
seeing information to
guide you along your
track back to your point
of origin.
Menu.
Your track history may go back further then your intended
destination. You may want to clear your track (from the
Track Log menu above, highlight “Clear Track” and press
Enter) before you begin your travels so when you do a
backtrack route, it is limited to just the track history desired.
You can also save your track history using the Save command
from the “Track Log” option or convert the track to one of your
saved routes with the “Convert to Route” option. This will allow
your eXplorist receiver to guide you over the same path at a future
date.
Using Track Logs
9
As mentioned earlier, your eXplorist receiver records your track
and allows you to use this information to create a route, backtrack
or just to provide you with a visual indication of your journeys.
Accessing Track Logs
From any screen, press
Menu. Use the
joystick to highlight
“Track Log” and press
Enter.
The Track
Log is
divided into
two areas:
Active
Track and
Track Logs.
Active Track
Active Track is the track that is presently being
created by your eXplorist receiver. Highlighting
“Active Track” and pressing
Enter brings up a
menu offering a choice of activities to perform on
your active route.
Stop Logging: Turns the recording of your
track off.
Resume Logging: (Displayed if Track has been stopped).
Continues recording track from the point when it was stopped.
New Track: (Displayed if Track has been stopped). Erases old
track logging and begins recording a new track log.
Save: Allows the present track to be saved as a track log.
BackTrack: Creates a route that traces your track from your
present position back to where the track started.
Clear Track: Erases the active track from memory.
Convert to Route: Changes the track into a route that can be
accessed from the “Routes” menu option.
View on Map: Graphically displays the track on the Map
screen.
10
Using Track Logs
Track Logs
When an active track is saved it becomes one of
your stored track logs. Highlight the desired
track log and press
Enter for a list of track
log options.
Follow Track: Navigates from the start of
the track log to the end.
Reverse Track: Same as Follow track but
navigates from the end of the track log to the starting point.
Delete Track: Removes the selected track log from memory.
Convert to Route: Changes the track into a route that can be
accessed from the “Routes” menu option.
View on Map: Graphically displays the track on the Map
screen.
Using Multileg Routes
If you understand the concept of a GOTO route being a straight
route with a starting and ending point, then you can understand
multileg routes. A multileg route is many GOTO routes linked
together. So instead of having a route that only goes from A to B,
you can create routes that go from A to B to C to D and so on.
Accessing Routes
From any screen, press
Menu. Use the joystick to
highlight “Routes” and
press
Enter.
Any routes
saved will be
displayed
along with an
option to
create a new
route.
New Route
When “<New>” is selected, the Create Route screen is displayed.
Press
Enter with “<Add POI>” to go to the POI database to
select the next POI in the route list. If you highlight an existing
item in the route list and press Menu, you will be given the
choices of inserting a POI before the one highlighted, deleting the
highlighted POI from the route or just replacing it with a new POI.
When you have the route organized like you
want it, use the joystick to highlight Save Route
and press
Enter. Use the keypad to enter a
name for the route, highlight the “OK” button
and press
Enter.
11
12
Using Multileg Routes
Using a Saved Route
Highlighting a route you have saved and
pressing
Menu brings up a list of options
you can perform on that route.
Activate/Deactivate Route: Assigns the
selected route as the route you are wanting
to follow or turns off the routing for that
route if it was already active.
Edit Route: Allows you to insert, delete or add POI’s to the
existing route.
Reverse Route: Stores the selected route in reverse order.
Delete Route: Removes the selected route from the eXplorist
memory.
View on Map: Graphically displays the route on the Map
screen.
The POI Database
The POI database is the place where your saved positions (“My
Pts of Interest”) or any preloaded positions are stored for easy
access when creating a GOTO or multileg route.
NOTE: Not all versions of the eXplorist GPS receivers contain
preloaded POI’s. If your eXplorist does not have any preloaded
POI’s you will need to add user points of interest before you can
create a GOTO or a multileg route.
Accessing the POI Database
From any screen, press Menu. Use the
joystick to highlight “Pts of Interest” and press
Enter.
If your eXplorist receiver has preloaded
POI’s: With preloaded POI’s you get a list of
topics to choose from. If you select “My Pts of
Interest” a list of all the POI’s you have saved are
displayed in the order you defined. If you
highlight one of the displayed POI’s and press
Menu, you will have the option of editing or
deleting the POI. (Shortcut: pressing
Enter with the POI
highlighted goes into the edit mode.)
From “Background Map,” you will be given a list of topics, such
as cities, highways, airports, waterways and parks. After selecting
one of these topics, a keyboard is displayed if alphabetical listing
is chosen. As the list of POI’s in the database can be enormous,
you can use the keyboard to enter the first few characters in the
POI you are looking for when doing an alphabetical search. With
the first few characters entered, highlight “OK” and press
Enter. This will speed up the search for the POI you are seeking.
When you have the POI selected, pressing
Enter brings up
information about that POI. You can also save it as one of your
user POI’s or view it on the Map screen.
13
14
Need Help?
Your eXplorist receiver has a built-in help function that can
provide you information to help you while using it. This is a
general help function that should answer most of your questions
about the eXplorist receiver and its use.
Accessing Screen Specific Help
From most screens, press Menu. Highlight
“Help” and press Enter to access the help
screens.
About Your eXplorist Receiver
Accessing the About...
screen will provide you
information about the
software version and
memory usage of your
eXplorist GPS receiver.
From any Nav screen,
press
Menu.
Highlight “About...” and
press
Enter to access
the About... screen.
The About...
screen
displays the
software
revision and
date, mapping
detail (if
applicable),
and number of
routes, POI’s, length of active
track and track logs.
The Property of: field will display the information you entered in
the Name field after you have personalized your eXplorist
receiver. (See the section on Preferences for information on
personalizing.)
Setting User Preferences
Accessing Preferences
From any Nav screen,
press
Menu. Use the
joystick to highlight
“Preferences” and press
Enter.
Use the
joystick to
highlight the
desired
function and
press
Enter.
Restarting GPS (Initializing)
When To Restart GPS: Your eXplorist always starts looking for
satellites assuming it is in the same location as when it was turned
off. Traveling more than 500 miles with your eXplorist receiver
turned off may cause delays in position computation. Restarting
GPS is not mandatory but will decrease the time taken to compute
your position following such a move.
Changing Map Units
Map Units has four selectable options: Nav
Units, North Reference, Coord. System and Map
Datum.
Highlight the desired option and press
Enter.
Nav Units: Allows you to select the units of
measure used for displaying navigation and
position measurements.
North Reference: Used to set the top of the map display to
True North or Magnetic North.
Coordinate System (Coord System): Used to select the
coordinate system used to display position information.
Map Datum: Allows you to select the map datum used for
mapping information. If you are using a paper map or chart in
conjunction with your eXplorist receiver, be sure that the map
datum selected matches the map datum for the map or chart
you are using.
15
16
Setting User Preferences
Setting Power Management
Power Management options are used to help preserve battery life in
your eXplorist receiver. Under Power Management you have two
options, Power Off Timer and Light Timer.
Power Off Timer: Set the time that your eXplorist receiver will
turn off automatically if no keys have been pressed and you are
not moving.
Light Timer: Set the time that the backlight for the display will
turn off automatically if no keys have been pressed .
Personalizing Your eXplorist Receiver
You can add your name and address information to your eXplorist
receiver. Should you lose your eXplorist receiver, this information
could be used to aid in its recovery. The name you enter here will
also be displayed on the About... screen.
Changing Languages
You can set your eXplorist receiver to display text in any of 10
different languages. You can choose from English, French
(Français), German (Deutsch), Dutch (Nederlands), Finnish
(Suomi), Spanish (Español), Italian (Italiano), Portuguese
(Português), Swedish (Svenska) or Norwegean (Norsk).
Clearing Memory
You have five options for clearing memory. Be very careful when
clearing memory. This cannot be undone and all data selected will
be lost.
All Track Log: Clears all saved track logs.
POIs/Routes: Clears all user entered POIs and routes.
Routes: Clears all user created routes,.
Reset default: Resets the receiver to its default configuration.
Resets language, preferences and any screen customization done.
All: Clears all of the memory of your eXplorist receiver and sets
all of the defaults back to factory defaults. The eXplorist
receiver will shut off after all the memory has been cleared.
Contacting Magellan
The following information is provided so that if you need support for
your Magellan eXplorist, you can direct your questions/comments to
the proper person at Thales Navigation.
Technical Support
For Magellan product support in English, French, German, Spanish,
Portuguese, Dutch, Norwegian, Finnish and Danish please dial FREE
PHONE:
00800MAGELLAN* (00800 62435526)
from 9 AM to 6 PM GMT & GMT+1 or send an e-mail in English,
French, German, Spanish, Portuguese, Dutch, Norwegian, Finnish and
Danish to: [email protected]
*free of charge phone access available from Eire, UK, Portugal, Spain, France,
Belgium, The Netherlands, Germany, Austria, Switzerland, Norway, Sweden, Denmark
and Finland
For Magellan product phone support in English, French or German
from other Europe, Middle East or African locations please dial:
+33 2 28 09 38 00*
or send an e-mail to: [email protected]
* international communication charge according to opperator.
For Magellan product phone support in other European Middle East or
African Languages please contact our distributors listed in our dealer
locator or send an e-mail to:
[email protected]
Accessories
A complete list of accessories, along with ordering information can be
found on the Magellan web site, www.magellangps.com.
Thales Navigation
960 Overland Court, San Dimas, CA 91773
U.S.A.
Thales Navigation European Headquarters
Z.A.C de la Fleuriaye - B.P. 60433
44474 Carquefou Cedex - France
631148-18