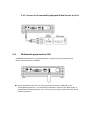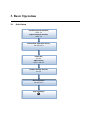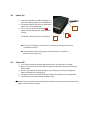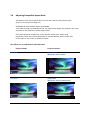
1
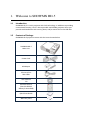
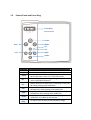
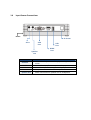
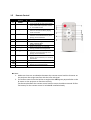
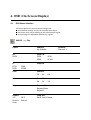
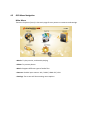
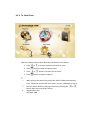
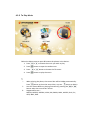
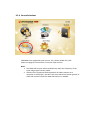
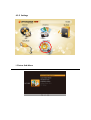
SHOWMX® Mini Projector
HD-5 User Manual
Copyright© 2013 APAC Opto Electronics Inc. All rights reserved.
Trademark, Registered Trademark Information
▪ SHOWMX is registered trademark of APAC Opto Electronics Inc.
▪ DLP™, Digital Micromirror Device, 3D-ready, and BrilliantColor™ are all trademarks of
Texas Instruments.
▪ HDMI, the HDMI logo and High-Definition Multimedia Interface are trademarks or
registered trademarks of HDMI Licensing LLC.
▪ Other brand or product names are trademarks or registered trademarks of their
respective holders.
SHOWMX®
APAC Opto Electronics Inc.
前鼎光電
3 Tzu Chiang Rd., Hsinchu Ind. Park,
Hukow, Hsin Chu County,
Taiwan
www.apacopto.com
Disclaimer
Information in this document is provided in connection with APAC Opto Electrics Inc. products. No
license, express or implied, by estoppel or otherwise, to any intellectual property rights is granted by
this document. Except as provided in APAC Opto Electrics Inc.’s terms and conditions of sale for such
products, APAC Opto Electrics Inc. assumes no liability whatsoever and APAC Opto Electrics Inc.
disclaims any express or implied warranties, relating to sale and/or use of APAC Opto Electrics Inc.
products including liability or warranties relating to fitness for a special purpose, merchantability, or
infringement of any patent, copyright or other intellectual property right.
You acknowledge that any purpose usage, test, or operation shall be at your own risk, APAC Opto
Electrics Inc. reserves the right, in its own discretion and without any obligation, to make correction
to, or modify any error in any portion of the service or the product materials.
APAC Opto Electrics Inc. may change specification, technical detail and product description at any
time, without notice. APAC Opto Electrics Inc. reserves these future definition and have no
responsibility whatsoever for conflicts or incompatibilities arising from future changes to them.
The products described in this document may contain design defects or errors known as errata which
may cause the product to deviate from published specifications. Future characterized errata are
available on request. Contact your local dealer or purchasing distributor to have latest information.
Safety Information
Safety Instructions
1. Instruction information
All the safety and operating instructions should be read before the product is operated.
2. Accessories usage
Do not use attachments and accessories not recommended by the manufacture as they may be
hazardous.
3. Avoid MEF (Magnetic or Electric fields)
Do not use the projector close to TV transmitters, portable Tele-communication devices or other
sources of appliances generating a strong magnetic field. They may cause picture interference, or
permanently damage the projector.
4. Projector placement
a) Do not place projector on an unstable cart, stand, tripod, bracket or table. The product may fall,
causing serious injury to a child or adult and serious damage to the product.
b) Place your projector on a level and stable surface. Do not place your projector on an unstable cart,
stand, or uneven surface, desk. Any mounting of this appliance should follow the manufacturer’s
instructions.
5. Power source
a) The compact power adapter should be operated only from the type of power source indicated on
the marking label.
b) Power cords should be routed so that they are not likely to be walked on or pinched by items
placed upon or against them.
c) Do not heat the power cord and do not place the power cord under the projector.
d) For added protection of this projector during a lightning storm, or when the projector is left
unattended and unused for long periods of time, disconnect it from the wall outlet.
6.
a)
b)
c)
Moisture and water
Do not use this product near water or in rainy and moist situations.
Do not use this projector near water or in contact of liquid.
Do not handle the power cord with wet hands.
7. Eye protection
DO not stare or face directly into the projector beam at all times.
8. Servicing
Do not attempt to service this projector yourself as opening or removing covers may expose you to
dangerous voltage or other hazards.
WARNING
TO REDUCE THE RISK OF FIRE, ELECTRIC SHOCK, OR ANNOYING INTERFERENCE
DO NOT EXPOSE THIS PRJECTOR TO RAIN OR MOISTURE. AND USE THE RECOMMENDED
ACCESSORIES ONLY.
1. Never push objects of any kind into this projector through openings as they may touch
dangerous voltage points or short out parts that could result in a fire or electric shock.
2. Be careful not to spill liquid of any kind onto the projector.
3. Do not touch the projector or its ventilation outlet while the projector is used for a long time as
it can become heated. Please do not block these openings.
4. Do not use this projector in direct sunlight.
5. Do not place the projector near any heat producing device. Leave a distance of 10cm or more
around the projector to ensure adequate ventilation.
6. Do not drop, throw or try to bend this projector.
7. Do not place heavy project right above this device.
8. If strange odor, noise, or smoke comes out of the unit, stop operating & unplug immediately.
9. Do not use this product during sports or under movement. It might lead to unexpected shortcut
to the circuit board, or damage to the lamp.
CAUTION
PLEASE FOLLOW ALL WARNINGS, CAUTIONS AND MAINTENANCE INSTRUCTIONS
Turn off the projector and unplug the power cord under the following conditions:
1. If the projector has been dropped, or the unit has been damaged.
2. If liquid has been spilled on to this projector.
3. If the power-supply cord or plug is damaged or broken.
4. Foreign object has fallen in the projector, or something is loose inside.
5. If the projector has been exposed to rain or water.
6. If the projector does not operate normally after you follow the operating instructions.
Please contact your local reseller for service. Do not attempt to service the unit yourself.
BASIC CLAENING
•
•
Turn off the device & unplug this projector from the wall outlet before cleaning it.
Use a dry soft cloth for cleaning. Do not use liquid aerosol cleaners.
Table of Contents
Chapter 1: Welcome to SHOWMX HD-5
1.1
1.2
1.3
1.4
1.5
Introduction
Contents of Package
Control Panel and Focus
Input Source Connections
Remote Control
Chapter 2: Projector Setup
2.1 Projection Method
2.1.1 Place projector in front of the screen
2.1.2 Place projector in the back of the screen
2.2 Adjust Projector Projection
2.2.1 Screen size & Projection distance
2.2.2 Manual Focus
2.3 Conventional Projection
2.3.1 Connect to Computer or Notebook by VGA
2.3.2 Connect to Compatible Sources by HDMI
2.3.3 Connect to AV compatible (equipped) Video Sources by AV-in
2.3.4 Multimedia projection by USB
Chapter 3: Basic operation
3.1
3.1
3.2
3.3
3.4
3.5
Quick Setup
Power On
Power Off
Power Indicator
Adjusting the Projector Focus
Adjusting Compatible Aspect Ratio
Chapter 4: OSD (On Screen Display)
4.1 OSD Menu Selection
4.2 OSD Menu Navigation
4.2.1
4.2.2
4.2.3
4.2.4
4.2.5
To Play Movie
To View Photo
To Play Music
Source Selections
Settings
Chapter 5: Appendixes
5.1 Troubleshooting
5.2 Specifications
5.3 Compliance Information
1. Welcome to SHOWMX HD-5
1.1
Introduction
SHOWMX HD-5 is a mini projector with DLP technology. In addition to providing
conventional function, HD-5 is also a portable multimedia projector when you
provide multimedia files with movie, photo, and/or music files in the USB disk.
1.2
Contents of Package
SHOWMX HD-5 projector comes with the items shown below.
SHOWMX HD-5
Main Unit
Power Cord
AC Adapter
3.5mm A/V to
RCA Cable
User Manual
CD
Remote Control
(One 3V CR2025
Battery Preinstalled)
Quick Start Guide
Warranty Card
1.3
Control Panel and Focus Ring
Focus Ring
Power
Back
Mode
Up
OK
Right
Left
Down
Button
Power
Back
Mode
OK
Up
Left
Right
Down
Focus
Ring
Function
Turn On/Off the projector
Back to previous page
Turns on the On-Screen Display (OSD) menu. Goes
back to previous screen, or, to exit OSD screen
Go to sub menu, or to change settings on the OSD
menu. Play/Pause functions
Adjust functions on OSD menu. It will show on the tool
bar when playing multi-media files
Adjust functions on OSD menu. It functions as fast
backward key when playing multi-media files.
Adjust functions on OSD menu. It functions as fast
forward key when playing multi-media files.
Adjust functions on OSD menu. When playing multimedia files, it’s hidden in the tool bar.
To adjust focus & clarity of the projection image.
1.4
Input Source Connections
Power
IR Sensor
AV In
VGA
Port
Speaker
Out
Connection
USB Port
HDMI Port
VGA Port
AV In
Speaker Out
USB
Port
HDMI
Port
Function
USB Disk as input source for play movie, photo, and
music.
HDMI video input from computer or laptop.
VGA video input from computer or laptop.
Component connections from vary video source.
Audio connection for speaker out or headphone.
1.5
Remote Control
1
2
Button
Power
Mode
3
Up
4
Left
5
6
Back
Source
7
8
Mute
Play/Pause
9
Right
10
Down
11
12
13
Menu
Volume Volume +
☛Note:
Function
Turn On/Off the projector
Turns on the On-Screen Display (OSD)
menu. Goes back to previous screen,
or, to exit OSD screen
Adjust functions on OSD menu. It will
show on the tool bar when playing
multi-media files
Adjust functions on OSD menu. It
functions as fast backward key when
playing multi-media files.
Back to previous screen
Switches current signal source to VGA,
HDMI, HDMI-3D & AV
On/Off mute mode
Enter to sub menu, or to change
setting on OSD menu. Play/Pause
Adjust functions on OSD menu. It
functions as fast forward key when
playing multi-media files.
Adjust functions on OSD menu. When
playing multi-media files, it’s hidden in
the tool bar.
Selects different menu options
Adjusts the sound level up
Adjusts the sound level down
1. Make sure there are no obstacles between the remote control and the IR sensor on
the projector that might interfere with the infra-red signal.
2. The remote control must be held at an angle within 30 degrees perpendicular to the
IR sensor on the projector to function correctly.
The distance between the remote control and the sensor should not exceed 25 feet.
The battery for the remote control is included & installed already.
2. Projector Setup
2.1
Projection method
2.1.1 Place projector in front of the screen
Position 1: Front View - this is more common!
Position 2: Invert Front View (mount projector on ceiling) *
* The image turns upside down, see .
☛
2.1.2 Place projector in the back of the screen
Position 3: Invert Rear View (mount projector on ceiling) **
Position 4: Rear (place projector on desk and behind the screen)
**The image appears reversed, see .
☛
☛Use the Mode button on the projector or the remote control; then
go to Picture > Position (Front/Rear/Invert Front/Invert Rear), and then
select the desired projection method.
In rare situation, when projector is mounted on ceiling and behind the screen, it’s better
to turn projector with IR sensor pointing to remote control before securely mount the
projector.
2.2
Adjust Projector Projection
2.2.1 Screen size & Projection distance
Screen size & Projection distance Table
(Unit: inch)
Diagonal screen size
d
d=1.179w
d=1.887h
Screen
Width
W
w=0.848d
w=1.6h
Screen
Height
h
h=0.53d
h= 0.625w
Projection
Distance
D
D=1.2343h
60
50.9
31.8
62.8
72
61.0
38.2
88.9
84
71.2
44.5
103.7
100
120
136
84.8
101.8
115.3
53.0
63.6
72.1
104.6
125.6
167.9
150
127.2
79.5
157.0
Position the projector horizontally to the screen for the best projection image.
2.2.2 Manual Focus
After moving projector back and forth to select preference screen size, then
manually adjust image clearness by turning the focus ring.
Trick
Projecting image, video, and presentation are not rocket science, you don’t have
to place projector by calculation or check related chart if playing in an easier way.
Here is a simple way to estimate the location of projector:
Use both hands to have rough arm spam width then add about 20% of its length
to quick estimating the distance between projector and screen.
(The average arm span of adult males in the US is likely to be around 69.2 inches
according to National Health and Nutrition Survey).
2.3
Conventional projection
2.3.1 Connect to Computer or Notebook by VGA
2.3.2 Connect to Compatible Sources by HDMI
2.3.3 Connect to AV compatible (equipped) Video Sources by AV-in
2.4.
Multimedia projection by USB
SHOWMX HD-5 becomes a multimedia player to project freely by storing movie,
photo, and music data in USB disk.
☛ Please be advised, do not try to have projection practices in USB disk in non-
multimedia applications; i.e. PowerPoint presentation, Word or PDF bible study, or
Spreadsheet marketing analysis…etc. since only music, photo, and music files can be
coded in projector.
Table of the supported display format by the projector
Signal
NTSC
PAL /
SECA
M
VESA
Apple
Mac
SDTV
EDTV
HDTV
Resolution
H-Sync(KHz)
V-Sync(Hz)
15.734
60
15.625
50
640 x 480
31.5
60
640 x 480
37.9
72
640 x 480
37.5
75
800 x 600
35.2
56
800 x 600
37.9
60
800 x 600
48.1
72
800 x 600
46.9
75
1024 x 768
48.4
60
1024 x 768
56.5
70
1024 x 768
60
75
-
-
1280 x 800
49.7
59.8
1280 x 800
62.8
74.9
1280 x 960
60
60
1280 x 1024
63.98
60
1280 x 1024
79.987
75
1400 x 1050
65.3
60
1440 x 900
70.6
75
1440 x 900
55.6
60
1600 x 1200
75
60
640 x 480
35
66.68
832 x 624
49.725
74.55
1024 x 768
60.24
75
1152 x 870
68.68
75.06
480i
15.734
60
576i
15.625
50
480p
31.469
60
576p
31.25
50
720p
37.5
50
720p
45
60
1080i
33.8
60
1080i
28.1
50
1080p
67.5
60
1080p
56.3
50
Composite
●
●
VGA
-
-
HDMI
○
○
○
○
○
○
○
○
○
○
○
○
○
○
○
○
○
○
○
○
○
○
○
○
○
○
○
○
○
○
○
○
○
●
●
●
●
●
●
●
●
●
●
●
●
●
●
●
●
●
●
●
●
●
●
●
○
○
○
○
○
○
○
○
○
○
○
○
○
○
○
○
○
○
○
○
○
○
○
○
○
○
○
○
○
○
○
○
○
●
●
●
●
●
●
●
●
●
●
○
○
3. Basic Operation
3.1
Quick Setup
Decide Projection Method,
see 2.1.1
Adjust Projector Position,
see 2.2.1
Connections with Input Source,
see 2.3 & 2.4
Power On,
see 3.2
Adjust Focus,
see 2.2.2 & 3.5
Prepare Remote Control,
see 1.5
Start Projection,
see 4.1 & 4.2
Play and Enjoy!
☺
3.2
Power On
1. Connect the power cord & AC adapter to
wall outlet and projector’s AC adapter jack.
2. The power button LED will turn RED when
power source is established.
3. Turn on the projector by pressing
button on top of projector or the remote
control.
1
2
The power LED will turn BLUE from RED.
3
☛ If you see “No Signal” on the screen, check all the wires and cords are
connected correctly.
☛ Use the Mode button on projector Source button on remote to
select the input signal (s).
3.3
Power Off
1. Turn off the projector by pressing power button on projector or remote.
2. Next, the screen will turn off, and the projector now has entered the shutting
down mode.
3. Once in the process of shutting down, the cooling fan continues to operate
about 8 seconds for cooling cycle.
4. The power LED will turn RED from BLUE when the cooling cycle is completed.
5. The projector has now entered standby mode.
☛ Make sure the projector has completed its shutdown process before disconnect the
power cord from the projector.
3.4
Power Indicator
LED Indicator
The LED Power button LED
on top of the projector
Stand by
Red light
Power On
Blue light
LED Error Message
Power LED Button
Message
Flashing RED and BLUE 3 times per second
Temperature is too high
Flashing RED and BLUE 5 times per second.
The projector system has problems
with its fans
Flashing RED and BLUE 1 times per second.
The temperature is too high and
projector system has problems with
its fans
☛ Please shut down and unplug the power cords, wait for about a minute and then
restart the projector if the above situation occurs.
3.5.
Adjusting the Projector Focus
1. When the projection image is not clear, you should first turn the focus ring
Until the image is clean and focus.
2. Ensure that the projector will focus at a distance from 18.8 to 150.4 inches
(0.5 to 4 meters).
3.6
Adjusting Compatible Aspect Ratio
The distance from the projector lens to the screen, and the video format each
factors in the projected image size.
SHOWMX HD-5 has default aspect ratio 16:10.
To be able to project a complete 16:9 or 4:3 aspect ratio image, the projector can resize,
and scale to the projector's native aspect width.
Since most projector screens are in 16:9 and 4:3 aspect ratio, when using
projection screen there will be black bars on top and bottom of16:9 screen and
on the sides of 4:3 screen as shown on below.
The difference of projection on wall and screen
Project to Wall
Project to Screen
Plan Wall
16:9 Screens
(Black bars on the sides)
Plan Wall
4:3 Screens
(Black bars on top and bottom)
4. OSD (On Screen Display)
4.1
OSD Menu Selection
The menu options are structured and categorized.
■ Some default settings vary by the selected input signal.
■ Sub-menu items vary according to the selected input signal.
■ Some settings are adjustable without any signals.
MOVIE
Play
Pause
Subtitle
No Subtitle
FB
FB2X
Slow FW
SF2X
SF8X
FF
FF2X
FF8X
Step FW
Channel
Channel 1
SF4X
SF16X
FF4X
FF16X
Prev
Zoom In
2X
4X
8X
Next
Zoom Out
4X
2X
1X
Stop
Repeat All
Repeat None
Repeat 1
Aspect
4:3
Zoom1
Auto
Loop A-B
Set A Set B None
16:9
Zoom2
PHOTO
Play
Pause
Rotate
Prev
Zoom In
1X
2X
Next
Stop
Repeat All
Repeat None
Repeat 1
Msc Off
Rotate
4X
Zoom Out
1X
1/2X 1/4X
8X
MUSIC
Play
Pause
Mute
FB
FB2X
FB4X FB8X FB16X
FF
FF2X
FF4X FF8X FF16X
Prev
Next
Stop
Repeat All
Repeat None
Repeat 1
SETTING
PICTURE
Picture Mode
Standard
Movie User
Bright Presentation
Medium
Warm User
Cool
Invert Front
Invert Rear
Color Mode
Keystone
-40 ~ 0 ~ +40
Auto
Manual
Front
Rear
Projection
Aspect Ratio
PC Setup
SOUND
Sound Mode
Standard
Music Movie Sports User
Surround
Off
Balance
-50 ~ 0 ~+50
Surround Sound
OPTION
OSD Language
Restore Factory Default
OSD Stay On Timer
5 Sec
SW ver.
10 Sec 15 sec Off
4.2
OSD Menu Navigation
Main Menu
There are 5 options (icons) in the main page for easy access to resources and settings.
• Movie: To play movies, multimedia playing
• Photo: To present photos
• Music: Supports different types of audio files
• Sources: Provide input sources: AV / HDMI / HDMI-3D / VGA
• Settings: The screen will show setting menu options
4.2.1 To Play Movie
Please follow the below steps to open the menu for movie listing:
1. Press or button to choose the image format from the multimedia
listings.
2. Press
button to open the file listings.
3. Press
or
button to choose from the movie listings.
4. Press
button to play movie.
i.
ii.
iii.
When playing the movie, the control bar interface will be hidden
automatically. Press button to show the control bar, or press button to
hide it.
You can choose different playing methods by pressing the or button
when the control bars shows.
Supported video format MPEG1, MPEG2, MPEG4, H264, RM, RMVB, MOV, MJPEG, DivX, FLV.
4.2.2 To View Photo
Follow the below steps to open & browse the photos in the device:
1. Press
or
to choose the photo you wish to view.
2. Press
button to open the photo menu.
3. Press
or
4. Press
button to open the photo.
button to choose the file menu.
i.
When playing the photo, the control bar will be hidden automatically.
Press
ii.
iii.
button to show the control bar, or press
button to hide it.
You can choose different playing functions by pressing the
button when the control bars shows.
Supported format JPG, BMP, PNG
or
4.2.3 To Play Music
Follow the below steps to open & browse the photos in the device:
1. Press
or
to choose the music you wish to play.
2. Press
button to open the audio menu.
3. Press
or
4. Press
button to play the music.
button to choose the file menu.
i.
When playing the photo, the control bar will be hidden automatically.
Press
ii.
iii.
button to show the control bar, or press
button to hide it.
You can choose different playing functions by pressing the
or
button when the control bars shows.
Supported format –
MPEG1, MPEG2, MPEG4, H.264, RM, RMVB, MOV, MJPEG, DivX, FLV,
JPEG, BMP, PNG.
4.2.4 Source Selections
SHOWMX HD-5 supported input sources: AV / HDMI / HDMI-3D / VGA
Please see page for Connections via various input sources.
Note:
1. The HDMI-3D function will be enabled only when the frequency of the
input image signal reaches 120Hz.
2. Please use the supported field-sequential 3D video contents on a
computer or DVD player, plus DLP Link active electronic shutter glasses to
watch 3D contents when the HDMI-3D function is enabled.
4.2.5 Settings
I. Picture Sub-Menu
■
Picture Mode
There are many factory presets optimized for various types of images.
button to enter Picture Mode menu, use or to select an item.
Press the
Standard: Standardized color setting.
Movie (Home Theater): This color setting is best used in a darker environment.
High Bright: Maximum brightness. For use when the environment is bright.
Presentation: For computer or notebook.
User: Memorize user defined settings.
Contrast
Control the differences between the lightest and darkest parts of the pictures.
This function can only be adjusted when the picture mode is in “user” settings.
Brightness
Adjust the brightness of the image.
This function can only be adjusted when the picture mode is in “user” settings.
Sharpness
Adjust the sharpness of the image.
This function can only be adjusted when the picture mode is in “user” settings, and, the
input source is HDMI or AV.
Color
Saturation: Adjust a video image from black and white to fully saturated color.
This function can only be adjusted when the picture mode is in “user” settings, and, the
input source is HDMI or AV.
Tint
Adjust the color balance of red or green .
This function can only be adjusted when the picture mode is in “user” settings, and, the
input source is AV.
■
Color Mode
Adjust the color temperature. At higher temperature, the screen looks colder; at lower
temperature, the screen looks warmer.
Press the
button to enter Color Temperature menu, use or to select a
desired color setting.
The intensity of each of 3 color (Red, Green, Blue) can be changed when the color
temperature settings is in “user” setting.
Keystone
Press the
Keystone.
button to use Keystone function, use
or
to choose from Manual/Auto
1) Auto Keystone: Automatically adjust image distortion vertically resulting from an
angled projection.
2) Manual: Press
or button to adjust image distortion vertically resulting
from an angled projection. (± 45 degree).
Projection
button to Projection menu, use
Press the
Front, Invert Front, Rear or Invert Rear.
or
to select a projection method:
Aspect Ratio
SHOWMX HD-5 has default aspect ratio 16:10.
To choose how the picture fits on the screen, press
button to Aspect Ratio,
use
or
button to choose desired aspect ratio:
Auto / 4:3 / 16:9 / Zoom 1 / Zoom 2 / Just Scan / Point to Point / Full.
1) Auto: Automatically selects the appropriate display format. This function is
available when the input source is HDMI or AV.
2) 4:3: The image is displayed in the center of the screen with 4:3 aspect ratios.
3) 16:9: Scales an image so that it is displayed in the center of the screen with 16:9
aspect ratios.
4) Panorama (Full): The image fills the full screen.
5) Zoom1, Zoom2: Functions available when the input source is HDMI or AV.
6) Just Scan: This function is available when the input source is HDMI.
7) Point to Point: The image is displayed in a point to point ratio. This function is
available when the input source is HDMI or VGA.
Computer Setup
Press
button to enter the display mode, use
or
button to choose different
setting.
1) Auto Adjust: Image positioning and synchronization are automatically adjusted.
2) Horizontal Position: Press
direction.
or
3) Vertical Position: Press
direction.
4) Image Size: Press
5) Phase: Press
or
or
or
button to adjust the pictures left and right
button to adjust the pictures down and up
to adjust the sizes of the image.
to adjust the position of the image.
Note:
`The Computer Setup is available when the projector is connected to the computer
via VGA cable.
II. Sound Sub-Menu
■
Sound Mode
Press
button to enter the sound submenu to choose different sound mode.
Use
or
button to choose from the following modes:
Standard / Music / Video / Sport / User.
Note: “Treble” and “Base” settings can only be adjusted when using “User” mode.
Balance
Press
button to use the Balance settings. Press the
volume of the right and left voice channel (-50 ~ 50).
or
button to adjust the
Surround Sound
Press
button to enter the surround sound settings. Use
on, or turn off the surround sound effect.
or
button to turn
III. Option Sub-Menu
OSD Language
Press
button to enter the OSD multilingual submenu, and press
choose your preferred language.
or
Restore Factory Default
Press
button to restore back to the original manufacture settings.
Press
or
button to ensure if it is back to the original setting.
OSD Stay On Timer
Press
button to show STAY ON Timer on projector.
Press
or
button to choose the duration timer of operating projector.
Selection: Off, 5 seconds, 10 seconds and 15 seconds.
SW Ver. (Software Version)
To show projector’s software version.
to
5.
Appendix
5.1 Troubleshooting
- Most common problems & possible solutions.
The following information offers solutions to some of the common problems you may
experience with your projector. Please contact your reseller for help if the problem
persists.
1. No image (display) on the screen.
1) Make sure all the cables and power cords are correctly & securely connected.
2) Ensure that the playing device is turned on & not in “mute” or “standby” mode.
3) Ensure all the pins of connectors are nor bent or broken.
4) Make sure the equipment is connected to the projector correctly and is turned
on.
5) Use remote control or button for signal input.
2. The image is displayed partially or incorrectly when connecting to computer.
1) Press
button on the remote control and select [VGA] mode and check the
computer display resolution.
2) Turn off and restart all devices including the projector then problem should be
gone.
3. The image is displayed partially or incorrectly when connecting to laptop.
1) Press
button on the remote control and select [VGA] mode.
2) If problem is not resolved, next, check the computer video setting by:
Open the "My Computer" icon, in the "Control Panel" folder, click on "Display"
icon. Select "Settings", and verifies that your display resolution setting is
adjusted correctly.
Please turn off and restart all devices including the projector if the image and
resolutions cannot be changed for the notebook.
4. The computer’s monitor or the screen of the notebook is not playing presentation image.
1) If you are using Microsoft® Windows® notebook. Some notebook computers
may deactivate their own screen when a second display device is in use. Please
refer to your computer’s manual for detailed information.
2) If you are using Apple® Mac® Operating system notebook.Go to “System
Preference”, open “Display”, select “Arrangement”, and choose “Mirror
Display”.
5. Image has vertical bars.
Make sure the display mode in your computer is in “default” setting and matches the
display data frequency of your projector.
6. The image is blurred.
1) Adjust the focus by turning the focus ring on top of the projector.
2) Make sure the projection is within the suggested range 20” - 160” (0.5m -4.0m).
Please refer to “Screen size & projection distance” section.
3) If the lens is covered with dust or stain, clean the lens lightly with optical cloth.
7. Projection image on the screen is stretched when displaying widescreen 16:9 DVD.
When you play DVD, the projector will show image in 16:9 format.
You may need to make adjustment:
a) If your DVD plays in 4:3 format, please change the projector’s format to 4:3 in
the OSD setting.
b) If the image appears stretched, you will also need to adjust the aspect ratio on
you DVD player by setting up the display format as 16:9 (wide) aspect ratio type
on your DVD player.
8. The image is too small or too big.
a) Move the projector forward or backward to the screen.
b) Press the
button on the remote control or on the projector, from main
menu, choose OPTION > Aspect ratio and change to the right setting.
9. Image has slanted sides.
1) Place the projector in a position that is horizontally centered on the screen.
2) Press
button on the remote control or on the projector, go to SETTINGS >
PICTURE > Keystone, change the setting to “Auto Keystone”.
10. Image is reversed
Press
button on the remote control or on the projector, go to SETTINGS > PICTURE
> projection from the OSD to adjust projection method.
11. The projector stops responding to all controls.
Turn off the projector, and then unplug the power cords. Please wait for at least 30
seconds, then reconnecting & turn on the power.
12. The projector has no response to the remote control.
1) Aim the remote control to the receiver of the projector, see if it is responding.
2) Make sure nothing is blocking in between of the remote control and the
projector.
3) Check the battery of the remote control.
4) Turn off any device that has infrared.
13. No sound.
a) Make sure all the cables and wiring are connected securely and correctly.
b) Press
button on the remote control or on the projector to increase the
sound volume.
c) Use other speaker to test the output of the audio sources.
14. Power issue (The power is not on).
1) Check if the power cable is loose.
2) Do not on and off the projector in a short time.
3) Check warning light indicator.
5.2 Specifications
Product Name/ Model
SHOWMX HD-5
Resolution
WXGA (1280x800)
Display Panel
TI DLP® 0.45”
Aspect Ratio
4:3 ,16:9 & full
Uniformity
85%
Color Gamut
> 130% NTSC
Contrast Ratio
2000:1
Projection Lens
Manual Optical Focus
Throw Ratio
Projection Screen
(Diagonal)
1.23:1 (Distance/Width)
Projection Distance
19”~90” (0.5 - 4.0m)
Projection OFF SET
100%
LED Life
20,000 hours
Projection method
Front-desk, Front-ceiling, Rear-desk, Rear-ceiling
18.8 – 150.4"
Keystone: auto vertical
Keystone correction
Color Number
1.07 Billion
Horizontal frequency
15, 30 to 90 KHz
Vertical frequency
43 to 85 Hz
Computer Compatibility
UXGA, WXGA, SXGA+, SXGA, XGA, SVGA, VGA
VESA Standards, PC and Mac Compatible
Video Compatibility
SDTV (480i), EDTV (480p), HDTV (720p,1080i/p),
NTSC/NTSC 4.43, PAL B/G/H/I/M/N 60, SECAM
Input
Audio
Weight
Dimension
(L x W x H)
Power Consumption
Operation Conditions
(Temperature)
Regulations
± 40°
Standard-HDMI, VGA, 3.5mm AV-In, 3.5mm Audio-Out,
USB
2W x 2 (stereo) Speaker
0.6 Kg (1.32 lbs)
150 mm x 38 mm x 135 mm (5.9" x 1.4" x 5.3")
Power adapter: AC 100-240V, 50/60Hz
Power consumption:<70W (operation)
Power consumption:<0.5W (standby)
0° to 35°C (32° to 95°F)
FCC, CE, CCC,KCC ,VCCI ,ICC, UL, TUV, PSE, RoHS
5.3 Compliance Information
FCC Notice
This device complies with Part 15 of the FCC Rules.
Operation is subject to the following two conditions:
(1) This device may not cause harmful interference, and
(2) This device must accept any interference received, including interference that may cause
undesired operation.
Warning
This device has been tested and found to comply with the limits for class B digital device,
pursuant to Part 15 of the FCC Rules. These limits are designed to provide reasonable
protection against harmful interference in a residential installation.
This device generates, uses and can radiate radio frequency energy and, if not installed and use
in accordance with the instructions, may cause harmful interference to radio communications.
However, there is no guarantee that interference will not occur in a particular installation. If
this device does cause harmful interference to radio or television reception, which can be
determined by turning the equipment off and on, the user is encouraged to try to correct the
interference by one or more of the following measures:
■ Relocate the position of device.
■ Increase the separation between the device and receiver.
■ Connect the device into an outlet on a circuit different from that to which the suspect
antenna is connected.
■ Consult the dealer or an experienced radio/television technician for help.
Note:
Use of shielded cable is required to comply with class B limits in Subpart B of Part 15 of FCC
rules.
Caution:
The Federal Communications Commission warns that changes or modifications not expressly
approved by the manufacturer could void the user’s authority to operate this device.
CE Conformity for European Countries
This device complies with the EMC Directive 2004/108/EC.
Doc Compliance Notice (For Canada)
This Class B digital apparatus complies with Canadian ICES-003.
Remarque à l’intention des utilisateurs canadiensCet appareil numerique de la classe B est conforme a
la norme NMB-003 du Canada.
Other Certifications: CCC,KCC ,VCCI ,ICC, UL, TUV, PSE, RoHS…