1
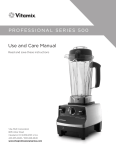
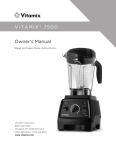
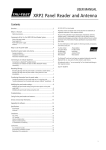
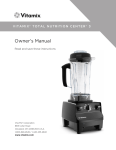
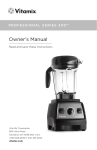
O w n e r ’s M a n u a l
PLEASE READ AND SAVE THESE INSTRUCTIONS
IMPORTANT SAFEGUARDS
When using your Professional Series or any other electrical appliance, the following basic safety
precautions should always be followed.
1. Read all instructions.
2. To protect against the risk of electrical shock, do not put the motor base in water or other liquid.
3. Close adult supervision is necessary when the appliance is used by, or near children.
4. Unplug the power cord from the wall outlet when the appliance is not in use, before disassembling,
putting on or taking off parts and before cleaning (other than simply washing the container).
5. Never touch moving parts.
6. Do not operate any appliance with a damaged cord or plug, if the Professional Series malfunctions,
or has been dropped or damaged in any manner. Call Vita-Mix Customer Service at 440-235-4840
or 800-848-2649 at once for examination, repair, replacement, electrical or mechanical adjustment.
If used outside the United States or Canada, contact your local Vita-Mix dealer.
7. Do not use attachments not recommended or sold by Vita-Mix Corporation.
8. Do not use outdoors.
9. Do not let the power cord touch hot surfaces or hang over the edge of a table or counter.
10. Do not place the machine on or near a hot gas or electrical burner, in a heated oven, or allow
machine to touch hot surfaces. External heat sources can damage your appliance.
11. Keep hands and utensils out of the container while the motor is running to prevent the possibility of
severe personal injury and/or damage to the machine. A rubber spatula may be used, but only when
the Professional Series is not running. The accelerator tool may be used while the motor is running
only when the main part of the lid is in place.
12. CAUTION: The blades are sharp. Handle carefully.
• Never try to remove the blades while the container is sitting on the motor base.
• Do not operate with loose or damaged blades.
• Never place the blade assembly on the motor base unless the Professional Series container is
properly attached.
13. The maximum normal load is 64 ounces (2.0 Ltr); substantially less with thick mixtures.
14. The container should not be more than 2/3 full when the accelerator tool is left in place while
blending. Do not exceed 30 seconds of continuous blending with the accelerator tool in place.
15. When making nut butters or oil based foods, do not process for more than one minute after the
mixture starts circulating. Overprocessing can cause dangerous overheating.
16. Always operate the Professional Series with the complete two-part lid in place. The lid plug should
only be removed when adding ingredients or when using the accelerator tool.
2
IMPORTANT SAFEGUARDS
17. WARNING: When processing hot liquids:
• The two-part lid must be securely locked in place. This allows steam to escape naturally and will
prevent the lid from coming off when the machine is turned on.
• Do not start processing hot liquids on HIGH speed. Always start processing hot liquids on
VARIABLE 1, then slowly increase to the speed indicated in your recipe.
• Use caution with hot liquids. Liquid may spray from under the lid plug or escaping steam may
cause scalding.
SAVE THESE SAFETY INSTRUCTIONS
Figure A
Figure B
THREE-PRONG
ADAPTERS ARE NOT TO
BE USED IN CANADA.
Enjoy the safety of this grounded appliance. The Vita-Mix® power cord
comes equipped with a three-prong (grounding) plug which mates with
a standard three-prong wall outlet. (Figure A)
If you do not have a three-prong outlet, you can use it with a regular
two-prong outlet with an adapter (available at hardware stores)
(Figure B). Do not cut or remove the third (ground) prong from the
plug on the power cord.
Consult your electrician if you are not sure if the wall outlet cover is
grounded through the house wiring. With a properly grounded two-prong
wall outlet, ground the Professional Series by attaching the tab on the
adapter to the wall outlet cover by means of the screw in the center of
the cover (Figure B).
Before returning this product for any reason, including repair, please first contact our
CUSTOMER SERVICE DEPARTMENT
440-235-4840 or 800-848-2649
to receive a “RETURN AUTHORIZATION NUMBER”
If purchased outside the United States or Canada, please contact your local Vita-Mix dealers.
This Vita-Mix® Professional Series is for household use only.
3
REGISTRATION & SERVICE
IMPORTANT: Register your Professional Series within 60 days to ensure a full warranty even if proof
of purchase is not available.
.
– IMPORTANT! PLEASE DO THIS NOW.
To properly register your purchase, and receive the full benefits of the warranty, complete the Owner
Registration Card and return it to the Vita-Mix Corporation. This information will establish the
warranty period and may eliminate the need for proof of purchase. Visit www.theprofessionalseries.com
to register online.
Product Registration
Service
If the automatic temperature protector keeps turning the motor off, please check the following before
you call for service:
• Is the motor overloaded because of the thickness or quantity of the mixture?
• Are you processing thick mixtures on the lower speeds for more than a few seconds?
(VARIABLE speed is for light duty; use HIGH speed for heavy applications.)
• Have you allowed the automatic temperature protector to reset by waiting up to 45 minutes
with the power off? (To reduce reset time, see page 10.)
Note
Instructions appearing in this publication are not meant to cover every possible condition
and situation that may occur. Common sense and caution must be practiced when operating
and maintaining any appliance.
4
OVERVIEW
Lid Plug See page 7
Rim
Press inward on side of lid
(directly above one of the
container tabs) to remove lid.
Two-Part Lid
See page 7
Container Tab
See page 7
64 oz / 2 Ltr Container
Accelerator
Tool
See page 10
Blades
See page 8
Retainer Nut
See page 8
Centering Pad
Drive Socket
Control Panel
See page 7
Motor Base
See page 10
5
CARE & CLEANING
To prepare your new machine for initial use, follow Step 1 of the container cleaning instructions
below. This will clean the unit and break-in the motor.
Motor Base/Control Panel
1. Unplug the power cord.
2. Gently wash the outside surface with a damp soft cotton cloth, moistened with a mild solution
of warm water and non-abrasive household dish detergent or non-abrasive liquid spray cleaner.
Never immerse the motor base in water or other liquid.
DO NOT USE ANY OF THE FOLLOWING CLEANING PRODUCTS:
• Automatic dishwasher detergent
• Abrasive pads, paper towels or cloths
• Oven cleaners • Abrasive cleaners
• Steel wool
3. Wipe switches carefully with a lightly dampened soft cloth, so that they function freely. If the grooves
around the switches retain residue, unplug the machine and use a wet cloth, moistened with water and
a mild detergent, to penetrate around the edges of the switch paddles until they function freely. Clean
carefully, using caution not to allow water or other liquids to infiltrate the switch.
4. Dry with a soft cotton cloth.
Lid
Separate the lid and lid plug. Wash in warm soapy water. Rinse clean under running water and dry.
Reassemble before use.
Container
Step 1: Add 5 cups (1.2 Ltr) warm water and a couple drops of liquid dishwashing detergent (Ivory
Liquid® or equivalent) to the container. Snap or push the complete two-part lid into locked
position. Run the machine on HIGH for 30 to 60 seconds. Turn the machine off, remove the
lid, rinse and drain the container.
Step 2: If any solid residue remains, remove the blade assembly (see page 8) and wash all container parts
in warm soapy water. Rinse and drain. Reassemble before use.
Step 3: To Sanitize:
• Follow steps 1 and 2 as needed.
• Fill the container 3/4 full with water. Add 1-1/2 teaspoons liquid Clorox® bleach. Secure lid
and run on HIGH for 30 seconds. Turn machine off and allow mixture to stand in the
container for an additional 1-1/2 minutes. Pour chlorine mixture out, return empty container
to motor base and run machine for 5 additional seconds. Allow container to air dry. Do not
rinse after sanitizing.
6
LID / CONTROL PANEL
Lid
To secure lid plug, rotate it
so one tab locks between the
stops on top of rubber lid.
Press in
above
container
tab to
remove
lid
Rim
Container
Tab
CUPS
Your new machine has our latest lid design. It is easy to put on
and take off and easy to clean. Always use the lid when the
machine is in operation.
New lids should not be forced into place. For ease in using a
new lid, lightly coat the rim and seal below the rim with food-safe
oil. Wipe away excess. Snap the lid onto the container and leave
in place a few minutes. Once a lid has been left in the container,
it will be much easier to lock or remove and will not require the
use of food-safe oil.
LID PLUG: Insert through the lid and secure between the
raised dots. Remove the lid plug to use the accelerator tool.
To lock the lid:
1. Align the lid rim under a CONTAINER TAB.
2. With the heel of your hand, push the opposite side of the
lid down until the rim snaps under the other container tab.
• The lid must be securely locked when processing more than
4 cups (960 ml), or when using hot materials.
To remove the lid: Press both thumbs directly above one of the
container tabs. Make sure you position your thumbs very close
to the edge of the container and push in and up.
Control Panel
ON/OFF Switch. Push up to turn ON. Push down to turn OFF.
HIGH/VARIABLE Switch. HIGH is the fastest speed available.
Switch to VARIABLE to activate the variable speed dial.
VARIABLE SPEED Dial allows the selection of many speed
settings. It is active only when the HIGH/VARIABLE switch
is set in the VARIABLE position.
7
BLADE ASSEMBLY
Blade Agitator Assembly. Use caution when handling the
blades. They are sharp. The blade assembly is removable
(see below). When inserting the blade assembly through the
container bottom, align the flat sides. Gravity holds it in place
while the retainer nut is tightened.
Drive Spline. Mates with the drive socket on the motor base
to turn the blades.
Retainer Nut. Must be snug. A wrench is necessary to fully
tighten (see below).
PLEASE NOTE: Your Professional Series includes a standard
polycarbonate container with blades. Designed specifically for
processing liquids including juice, frozen mixtures, sauces, soups,
purees, batters and for wet chopping. These blades can also
grind grain and knead dough. Additional containers may be
purchased separately.
CAUTION: Grinding dry materials, such as whole wheat, for more than two minutes
can cause the flour to pack and overheat the machine. Possible permanent damage to the
container and bearing seals may result. Some herbs and spices may result in cosmetic marring
of the container and cause the blades to become dull. If you grind herbs on a regular basis,
you may wish to purchase a separate container and replace blades as needed.
Blade Assembly Removal
Caution: Do not remove blades unless absolutely necessary!
At times, it may be necessary to give your blades additional cleaning. An
easy-to-use blade assembly removal wrench (Item #15596) may be purchased Retainer Nut Wrench
through Vita-Mix Customer Service at 800-848-2649. Never attempt to
take the blade assembly itself apart. This will void the warranty.
Turn container upside down and grip firmly. Insert retainer nut wrench in
groove of retainer nut and rotate counterclockwise to loosen. Then grip
blades with a cloth and remove retainer nut by hand.
Replacing Blade Assembly
With the container upside down, grip blades with cloth, insert into the
container bottom and align with flat sides of container opening. Place retainer
Retainer Nut Wrench
nut on and hand tighten. Last, carefully turn clockwise until secure, using
in use
wrench. Do not force.
8
CONGRATULATIONS!
Some exciting things are about to happen in your kitchen – if you’ll do three things:
First . . .
Follow the cleaning instructions on page 6 and clean your machine before initial use. Please read
thoroughly all instructional material found in this booklet.
Second . . .
Please use our recipes first. We have spent years developing them for delicious results. Your Professional
Series is an appliance. It will blend any fruit or vegetable, but not all combinations are palatable.
So please, give our recipes a try. We guarantee you will be delighted with the results.
Third . . .
Remember, everything you do successfully is a result of practice. . . so start practicing. Soon
you will have scores of delicious new recipes to add to your weekly menus.
Important Machine Information
Record the model number and product identification number of this appliance in the spaces provided
below. These numbers are provided on the back of the motor base.
Model Number____________________________________________________________
Product Identification Number________________________________________________
(Serial Number - located under the bar code.)
Date of Purchase __________________________________________________________
Purchased From __________________________________________________________
Retain this information for future reference.
9
ACCELERATOR TOOL / MOTOR BASE
How To Use The Accelerator Tool
The accelerator tool allows you to process very thick and/or frozen
mixtures that cannot be processed in a regular blender. While the
machine is running, use the accelerator tool to push ingredients into the
blades as you make frozen ice creams, thick smoothies and nut butters, or
puree fruits and vegetables.
• Use it only with the lid locked in place and lid plug removed.
• The splash disk (near the top of the accelerator tool) and lid prevent the
accelerator tool from hitting the blades.
• The container should not be more than 2/3 full when the accelerator
tool is used.
• Do not use the accelerator tool for more than 30 consecutive seconds
(to avoid overheating).
• If thick mixtures stop circulating, you may have trapped an air bubble.
Insert the accelerator tool through the lid and stir to release it.
• Holding the accelerator tool straight should allow extra thick ingredients
to circulate. If not, point the accelerator tool toward the side or corner of
the container.
Front
Back
Motor Base
Power Cord. Your machine is equipped with a six-foot long cord. Store
the unused portion neatly underneath. Plastic cord retainer clips hold the
cord securely. There is no need to unscrew the cord retainer clips to let
out more cord. They are flexible and will return to position after the cord
is lifted out.
Automatic Temperature Protection. Your Vita-Mix motor is designed to
protect itself from overheating. If the motor shuts off, turn the power
switch OFF for up to 45 minutes to reset. Reset time will be extended if
high room temperatures exist. To reduce the reset time, unplug the
machine, remove the container and blow air into the center section of the
bottom with a hair dryer on the cool setting.
10
GENERAL INSTRUCTIONS
How To Operate Your Machine
1. Set the Professional Series container on the motor base by aligning it over the centering pad.
(The motor must be completely stopped.)
2. Place liquids and soft foods in the container first, solid items and ice last. Although not necessary
for processing, you may want to cut or break food into smaller pieces for more precise measuring of
ingredients.
3. Always use the complete two-part lid when processing (unless the accelerator tool (see page 10) is inserted
through the lid). When processing hot ingredients, make sure the lid is securely latched (see page 7).
4. Select the desired speed. (Many foods are processed on HIGH speed. It is recommended that all
mixtures requiring HIGH speed start on VARIABLE 1 and are quickly increased to VARIABLE 10;
then to HIGH.) If the mixture stops circulating, you may have trapped an air bubble. If inserting
the accelerator tool through the lid while processing does not release it, reduce the speed and stir
with the accelerator tool until it “burps.” If none of these methods work, stop the motor, remove the
container from the motor base and use a rubber spatula to press the air bubble away from the blades.
Return the container to motor base, replace the lid and continue processing.
5. To prevent possible splashing, start on VARIABLE 1, quickly increase to VARIABLE 10 and then
switch to HIGH.
6. Due to the machine’s speed, processing times are much quicker than standard appliances.
Until you are accustomed to the machine, count your time carefully to avoid overprocessing.
7. After turning the machine off, wait until the blades completely stop before removing the lid
or container from the motor base.
Chef ’s Note: Automatic temperature protection shuts the motor off to protect the machine from
overheating. To restart, wait for it to cool down with the power off (up to 45 minutes). (To reduce the
reset time, see page 10.) When the motor shuts off, always review your processing technique and your
instructions. Your recipes may:
• Be too thick;
• Cause the container to be too full; or
• Be processed too long at too low a speed setting. (Use HIGH speed whenever possible.)
If the motor seems to be overheating, but the automatic temperature protector has not turned the
machine off, stop and remove the container. Select VARIABLE 10 speed. Run the machine for one
minute. This cools the motor quickly. Be careful never to touch any moving part of the Professional
Series while in use.
11
GENERAL INSTRUCTIONS
WARNING: When processing hot liquids always:
• Use caution; escaping steam or splashes may scald.
• Lock the lid. This allows steam to escape naturally and will prevent the lid from coming off
when the machine is turned on.
• Start on VARIABLE 1, slowly increase to VARIABLE 10 and then switch to HIGH. Never
start on HIGH with hot liquids.
Hints for Setting Speeds
Use HIGH speed as much as possible for whole food juices, soups, shakes, frozen mixtures, making
purees and grinding grains. Processing times will generally be less than one minute (most take less than
30 seconds). HIGH speed assures you of the smoothest consistency when crushing ice or processing
frozen fruit, whole fruits or vegetables and whole grains.
Use VARIABLE speed to start thick mixtures and hot mixtures, stirring, chopping, grinding meat
and preparing single servings. Use VARIABLE speeds cautiously. Blending too long at too low a speed
setting will overheat the machine and cause the automatic temperature protector to turn the machine
off. (For more information, see page 10.)
If you are unsure, watch the blending process. When using HIGH speed, if the mixture stops circulating,
you may have trapped an air bubble. If inserting the accelerator tool through the lid while processing
does not release it, reduce the speed and stir with the accelerator tool until it “burps.” If none of these
methods work, stop the motor, remove the container from the motor base and use a rubber spatula to
press the air bubble away from the blades. Return the container to motor base, replace the lid and
continue processing.
12
WARRANTY
USA AND CANADA 7-YEAR HOUSEHOLD USE WARRANTY
Your Professional Series represents over 60 years of research and development in manufacturing and
applications technology. Your machine is now fully warranted for a period of 7 years as described below.
1. SCOPE OF FULL WARRANTY
Vita-Mix Corporation warrants this appliance to be free from defects in materials and workmanship and to
perform satisfactorily in household use up to seven years from the date you purchased your machine when
used in accordance with the Vita-Mix Professional Series Owner’s Manual.
This warranty is void if this appliance has been subjected to abuse, negligence, accident, alteration or failure
to follow operating instructions or the product has been exposed to abnormal or extreme conditions.
Cosmetic changes that do not affect performance, such as discoloration of parts of the product in the hands
of the user or the effects of the use of abrasive cleaners will not be warranted or considered defects. The
cleaning or removal of food products along with any damage caused by allowing them to build up is not
covered by this warranty.
This warranty is in lieu of any other warranty expressed or implied. No representative or any other person
is authorized to make any other warranty or to assume any liability not strictly in accordance with the foregoing. This warranty gives you specific legal rights which may vary from state to state. Outside the U.S. and
Canada other warranties may apply. Within the U.S. and Canada, your warranty is honored directly through
the Vita-Mix Corporation.
Vita-Mix Corporation, 8615 Usher Road, Cleveland, Ohio 44138-2103
Vita-Mix Corporation, 200-1701 Shepherd St. East, Windsor, ON N8Y-4Y5
2. OBLIGATIONS OF RETAIL CUSTOMERS
In the event the appliance needs service or repair:
• Call or email Customer Service at Vita-Mix Corporation at 440-235-4840, 800-848-2649 or
[email protected] for replacement parts. Or if your machine needs to be returned for repair, our
Customer Service representatives will be happy to assist you with the return shipping. Please call the
above numbers for free shipping instructions. You may need to provide proof of purchase.
In case of shipping damage, notify the shipper or carrier immediately.
3. OBLIGATIONS OF VITA-MIX CORPORATION
If the terms and conditions of points above are satisfied:
• Vita-Mix Corporation will provide a pre-paid return ground shipping label from a USA or Canadian address.
• Vita-Mix Corporation will either repair or replace the product, at its discretion and expense, within a
30-day period of receipt of the product.
• In lieu of repair or replacement of products determined to be defective, Vita-Mix may elect to refund the
purchase price if no replacement product is available and if timely repair cannot be made.
• Vita-Mix Corporation will pay ground freight cost for return of product to a USA or Canadian address.
13
VITA-MIX® CORPORATION
Gourmet Retail Division
8615 Usher Road, Cleveland, Ohio 44138-2103 USA
www.theprofessionalseries.com
©2005 Vita-Mix Corporation. No part of this publication may be reproduced or transmitted in any form or
by any means, electronic or mechanical, including photocopy, recording or any information storage and retrieval system
without the written permission of the Vita-Mix Corporation.
Printed in USA
XPS000 01/05