1
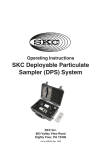
Operating Instructions
Leland Legacy
SKC Inc.
863 Valley View Road
Eighty Four, PA 15330
Form #40075 Rev 1001
Leland Legacy Quick Guide
Terms »
Star button Ò
• Scrolls through run time data and Setup options
Up and down arrow buttons ST
• Toggle between display choices and increase or decrease sampling parameters in Setup
Button sequence
T Ò = press buttons individually
[ST] = press simultaneously
ÒSTÒ = security code, always press in sequence
Security code ÒSTÒ
• Prevents unauthorized changes to the pump’s sampling program
Programming Sequences »
• To activate pump (e.g., to change pump from Sleep to Hold):
Press any button.
• To change pump from Hold to Run or Run to Hold:
Press [ST].
• To reset accumulated data:
Press [ST], then ÒSTÒ. Press Ò until CLr displays then press [ST]; press Ò until End
displays then press [ST].
• To set pump flow rate:
Press [ST], then ÒSTÒ. Flow rate and SET flash. Press S or T to change flow rate. Press Ò
until End appears then press [ST] to save setting and place pump in Hold.
• To calibrate flow rate with standard calibrator:
Press [ST], then ÒSTÒ. Flow rate and SET flash. Press S or T to change flow rate. Press Ò
once. ADJ displays. Press S or T until desired flow rate is indicated on calibrator. When finished,
press Ò until End displays then press [ST] to save new setting and place pump in Hold. For CalChek
Calibration, see operating instructions.
• To change temperature scale from F to C or C to F:
Press [ST], then ÒSTÒ. Press Ò until temperature displays. Press S or T to switch units;
press Ò until End displays then press [ST] to save new setting.
• To change atmospheric pressure scale (mm, mb, In):
Press [ST], then ÒSTÒ. Press Ò until pressure displays then press S or T to switch units;
press Ò until End displays then press [ST] to save new setting.
• To change time scale (12 Hr/24 Hr/Dela):
Press [ST], then ÒSTÒ. Press Ò until 12 Hr, 24 Hr, or Dela displays then press S or T to
switch units; press Ò until End displays then press [ST] to save new setting. To set delayed start
(Dela), see operating instructions.
• To change clock:
Press [ST], then ÒSTÒ. Press Ò until clock displays then press S or T to change flashing
hour; press Ò to move to minutes and S or T to change setting. Press Ò until End displays then
press [ST] to save new setting.
• To change the sampling time function:
Press [ST], then ÒSTÒ. Press Ò until ST L/min displays then press S to change flashing digit;
press Ò until End displays then press [ST] to save new setting. To delete, follow above steps and
press T until 0 appears. Exit Setup.
Note: When in Setup, choosing Esc instead of End will exit Setup without saving new settings.
SKC Inc., 863 Valley View Road, Eighty Four, PA 15330 • www.skcinc.com
Table of Contents
Description............................................................................................... 1
Performance Profile ................................................................................. 2
Battery Installation/Charging ................................................................... 4
Installing Battery Pack .................................................................................................. 4
Battery Status ............................................................................................................... 5
Low Battery Fault ......................................................................................................... 5
Charging the Battery .................................................................................................... 5
Reading the Charging Status LED on the Single Charger ........................................... 6
Pump Setup ............................................................................................. 7
Keypad Basics.............................................................................................................. 7
Turning the Pump On/Off ............................................................................................. 7
Entering and Navigating Setup..................................................................................... 7
Setup Options............................................................................................................... 7
Resetting Run Time Data ............................................................................................. 9
Setting a Sampling Time .............................................................................................. 9
Setting a DataTrac Program......................................................................................... 9
Setting a Delayed Start .............................................................................................. 10
Setting Pump Flow Rate............................................................................................. 11
Calibration ............................................................................................. 12
Verifying Flow Rate Using a Primary Standard Calibrator ......................................... 12
Verifying Flow Rate Using CalChek Automatic Calibration Feature........................... 13
Sampling................................................................................................ 18
Scrolling Through Data............................................................................................... 18
Resetting Run Time Data ........................................................................................... 18
Deleting a DataTrac Program or Delayed Start.......................................................... 19
Deleting a Sampling Time .......................................................................................... 19
Flow Fault ................................................................................................................... 19
Battery Replacement ............................................................................. 20
Removing and Replacing the Battery Pack ................................................................ 20
Programming the Pump Using a PC ..................................................... 21
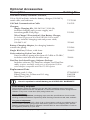
Optional Accessories ............................................................................. 22
Service Policy ........................................................................................ 23
Warranty ................................................................................................ 24
Indicates a reminder or note
Indicates a warning or caution
Notice: This operating instruction may not address all safety concerns (if any) associated with this product and its use. The user is responsible for determining and following the appropriate safety and health
practices and regulatory limitations (if any) before using the product. The information contained in this
document should not be construed as legal advice, opinion, or as a final authority on legal or regulatory
procedures.
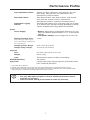
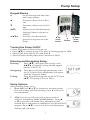
Description
®
The Leland Legacy dual diaphragm sample pump is designed specifically
to provide constant airflows from 5 to 15 L/min with minimum power
requirements and low noise. Diaphragm and valve design minimizes power
requirements and reduces noise. Incoming and outgoing airflow is pulsation
dampened. The lightweight Leland Legacy is housed in a thermoplastic
material for strength and features an overmolding of soft rubber that protects
against damage and reduces noise. Powered by a rechargeable Li-Ion battery
pack, the Leland Legacy provides 24-hour run times at 10 L/min and 12 inches
water back pressure. The pump’s patented internal flow sensor measures flow
directly and acts as a secondary standard, constantly maintaining the set flow
rate. Built-in sensors automatically correct flow for variations in temperature
and atmospheric pressure. Advanced programming features are available when
®
used with a PC and DataTrac for Leland Legacy Software. The performance of
the Leland Legacy pump with the Sioutas Impactor has been verified through
EPA-ETV.
Inlet Port
with protective filter
Flashing LED
Run Indicator
Battery
Status
Icon
Liquid
Crystal
Display
(LCD)
Li-Ion
Battery
Pack
for 24-hour
run times
(included)
Keypad
with large
operating
buttons
Not shown:
Beltclip (back)
Battery Charging
Jack (top)
Soft Rubber
Overmolding
protects against
damage
Computer Interface
Port (top)
Leland Legacy Sample Pump
1
Performance Profile
Flow
Flow Range:
5 to 15 L/min
Flow Control System:
Closed loop with patented* internal flow sensor
Compensation Range:
15 L/min at 5 inches water back pressure
10 L/min at 12 inches water back pressure
5 L/min at 20 inches water back pressure
Typical Back Pressure of Sampling Media (inches water)
Flow Rate (L/min)
Filter/Pore Size (μm)
37-mm MCE/0.8
37-mm PVC/5.0
5.0
8.0
10.0
12.0
15.0
11
4
18
7
22
9
28
11
36
15
Compare the information in this table to pump compensation range to determine appropriate applications.
Accuracy:
Flow Rate: ± 5% of set-point after calibration to desired flow
Timing: 1 min/month at 25 C
Atmospheric Pressure: ± 0.3 in Hg
Flow Fault:
Operation
Display:
If the pump is unable to compensate for > 15 seconds due
to excessive back pressure, a flow fault icon displays and
flashes, the pump enters Hold mode, and the pump retains
historical data. Auto-restart is attempted every 20 seconds
up to 10 times. Adjustable with DataTrac for Leland Legacy
Software. See pages 19 and 21.
LCD displays pump serial number, pump software revision
level, flow rate, volume, temperature, atmospheric
pressure, time of day, run time, and pump status, i.e., Hold
and run as well as Setup information.
Volume Display:
Continually updated, based on corrected flow rate
multiplied by sampling time
Time Display:
Time of day in hours and minutes (12 or 24-hour clock)
with AM and PM indicators
Timer Display Range:
1 to 99999 minutes (69 days). If the run time exceeds
69 days, the timer display rolls over.
Operating Temp. Range:
32 to 113 F (0 to 45 C)
Protect sample pump from weather when
in use outdoors.
Altitude:
Do not use pump beyond 7500 ft.
Operating Humidity:
0 to 95% non-condensing
Typical Run Time†:
• Sioutas Impactor (approx. 13 in water bp): 24 hrs at
9 L/min
• PEM with 37-mm, 2.0-μm PTFE filter 225-1709‡:
24 hrs at 10 L/min
• Low-volume PUF Tube: 24 hrs at 5 L/min
• DPS Sampler (PM2.5 or PM10): 24 hrs at 10 L/min
• For extended run times, the pump may be operated
while attached to the approved charger.
Noise Level:
62.5 dBA - pump without case
52 dBA - pump housed in noise-reducing case (optional
accessory Cat. No. 224-89, see page 22)
Measured 3-ft (1-m) distance from pump operating at
10 L/min and 12 inches water back pressure
2
Performance Profile
User-adjustable Values:
Sample run time, calibration, clock display, flow rate,
time of day, delayed start, and temperature and
atmospheric pressure display
Recorded Values:
Start date and time, stop date and time, total sample
time, flow rate, sample volume, temperature,
atmospheric pressure, and pump mode transitions
Adjustable Logging
Interval:
Records pump history from 3 seconds (15.4 min of data)
up to 8 hours (over 102 days of data) depending on setting.
Option available when using DataTrac Software.
Power
Power Supply:
Battery Recharge Time:
• Battery: Removable, rechargeable lithium-ion (Li-Ion)
(see Li-Ion Battery Shipment below), 7.4 V, 12-Ah capacity,
88.8 Wh
• Charger/AC adapter: input voltage 100 to 240 V AC
15 hrs
(with SKC-approved chargers;
varies with battery capacity and
level of discharge)
Charging Temp. Range:
32 to 113 F (0 to 45 C)
Storage Temp. Range:
-4 to 95 F (-20 to 35 C)
Physical
Size:
8 x 3.9 x 2.6 in (20 x 10 x 7 cm)
Weight:
36 oz (1 kg)
Case:
Thermoplastic with soft rubber overmolding
RFI/EMI Shielding
CE marked
Approvals:
Leland Legacy with Sioutas Impactor performance has
been verified by EPA-ETV.
* U.S. Patent No. 5,892,160
† Results when tested with a new pump and new fully charged battery. Pump performance may vary.
‡ Back pressure on PTFE (Teflon) filters can vary within the same lot. PTFE filter 225-1709 contains a PMP
support ring with a maximum operating temperature of 464 F (240 C).
Cautions:
• Use only SKC-approved parts to ensure reliable performance and to
maintain any warranty.
• Failure to follow warnings and cautions voids any warranty.
3
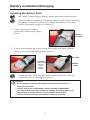
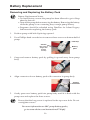
Battery Installation/Charging
Installing the Battery Pack
SKC ships Leland Legacy battery packs separate from the pump.
Once installed, completely charge the battery pack before operating
the pump. It may be necessary to charge the battery a few times
before maximum capacity is achieved.
1.
2.
Align connector of battery
pack with connector in pump
body.
Battery
connector
Gently press battery pack into pump body until it is flush with the
pump case. Insert and tighten three screws.
Belt clip
Screws
(top screw
is longer
than
bottom
screws)
Battery
pack
Ensure that the longest of the three screws is placed in the top
screw hole. Do not overtighten screws.
Cautions:
• Do not charge or operate the pump with or without the charger in
hazardous locations.
• Using a repaired or rebuilt battery pack VOIDS ANY WARRANTY.
• Use only an SKC-approved charger and battery pack designed for the
Leland Legacy Sample Pump to ensure reliable performance.
• Failure to follow warnings and cautions voids any warranty.
4
Battery Installation/Charging
Battery Status
Three bars indicate a full charge (normally appears after charging),
approximately 75 to 100%.
Two bars indicate that the battery is charged enough to operate the
pump, approximately 25 to 75%.
One bar indicates battery charge is low (charge battery),
approximately 1 to 25%.
Low Battery Fault
No bars and a flashing outline indicate a Low Battery Fault mode
(pump will go into Hold).
Charging the Battery
Shown with single charger (Cat. No. 223-241). A five-station charger is
available; see Optional Accessories on page 22. Follow charger instructions.
For a complete charge, ensure the pump is not running during charging.
• Use of a non-approved charger may damage the battery and pump and
VOIDS ANY WARRANTY.
• Do not charge or operate pump with or without the charger in hazardous
locations.
• Ensure proper orientation of charging cable before plugging it into the
charging jack. Improper orientation/contact will short circuit the battery
and VOID ANY WARRANTY.
• Short circuiting the battery pack will render it immediately inoperative.
• Failure to follow warnings and cautions voids any warranty.
1.
2.
3.
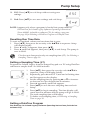
Insert the plug on the charging unit into the
battery charging jack on top of the pump
(underneath the protective cover).
Insert the plug on the power supply into the
jack on the charging unit.
Slide the appropriate wall plug into the
power supply and plug the power supply
into a wall outlet. The battery will recharge
in approximately 15 hours.
Battery charging jack
Power
supply
Jack
Charging
unit
Leland Legacy charging train with
single charger
After charging the battery pack, it is good practice to run the pump for
approximately 5 minutes before calibrating. This ensures the battery is
in more steady-state conditions and improves the agreement in pre and
post-sampling calibrations.
For more information on SKC pump battery packs,
go to www.skcinc.com instructions/1756.pdf.
The battery pack may be kept on the SKC-approved charger for an
indefinite time.
5
Battery Installation/Charging
Reading the Charging Status LED on the Single Charger
The Li-Ion Charging Unit (Cat. No. P22300) indicates battery charge status
via an LED on the unit that blinks in specific patterns. Observe the LED
steadily for > 5 seconds to read charge status.
LED Action
Charge Status
ON
Ò
steady
Charge in progress
ON
Ò
2 sec
OFF
{
.25 sec
ON
Ò
2 sec
(Repeats)
Approximately
80% charged
OFF
{
2 sec
ON
Ò
.25 sec
OFF
{
2 sec
(Repeats)
Charge completed
Power supply
jack
Charge status
LED
The battery pack may be kept on SKC-approved Li-Ion battery
chargers for an indefinite time.
Caution:
• Use only the SKC-approved charger for this pump. Use of an
unapproved charger may damage the battery and pump and
VOID ANY WARRANTY.
• Tampering with the battery pack VOIDS ANY WARRANTY.
• Do not charge in hazardous locations.
• Do not operate the pump with or without the charger in hazardous
locations.
• Do not open, disassemble, short circuit, crush, incinerate, or expose
the battery to fire or temperatures in excess of 212 F (100 C).
• Failure to follow warnings and cautions voids any warranty.
For more information on SKC pump battery packs,
go to www.skcinc.com/instructions/1756.pdf.
6
Pump Setup
Keypad Basics
Ò
Scrolls through run time data
and Setup options
S
Increases values such as flow
rate
T
Decreases values such as flow
rate
[ST]
When pressed simultaneously,
displayed item is selected or
entered.
ÒSTÒ
Security code that must be
pressed in sequence to enter
Setup
S Up
arrow
button
Ò
Button
Turning the Pump On/Off
•
•
•
•
Press any button to turn on the power.
Press [ST] to run the pump or to place a running pump in Hold.
Manual Off: from Hold, press and hold Ò.
Auto Off turns off the pump after 5 minutes in Hold.
Entering and Navigating Setup
Entering:
Navigating:
Exiting:
Press [ST], then press the security code
ÒSTÒ in sequence. Setup should appear
briefly on the LCD.
Press Ò to scroll through parameters. Once
the LCD shows End, parameters will repeat
until the user exits Setup.
Press Ò until End appears on the LCD. Press
[ST]. The pump is now in Hold.
Setup Options
After entering Setup, go to:
1. Flow Set: Press S or T to increase or decrease pump
flow rate. Pump will start running. Press Ò to move to
next parameter.
2.
ADJ: Used during calibration with primary standard
calibrator (not for use with CalChek feature). Press S
or T to increase or decrease flow adjustment until
desired flow is indicated on calibrator. Press Ò until End
appears. Press [ST] to save new flow and adjustment
settings and exit Setup.
7
T Down
arrow
button
Pump Setup
If changing other parameters, do not press [ST] but continue
pressing Ò after End appears and the remainder of the menu
items will appear. Once all changes are entered, press Ò until End
appears, then press [ST] to save new settings and exit Setup.
Pressing [ST] when Esc appears will exit Setup without saving
new settings.
3.
CALCh: Use for CalChek calibration feature only.
Pressing [ST] initiates single-point calibration.
Pressing S seven times initiates a full calibration.
See CalChek Calibration instructions on pages 13 to 17.
4.
12 Hr/24 Hr Clock and Delayed Start (factory
default is 12 Hr clock): Press S or T to move
between standard (12 hour), military (24 hour), and
Dela (delayed start). Press Ò to select. If Dela (delayed
start) is selected, follow instructions on page 10.
5.
Time of day: Press S or T to increase or decrease
flashing hour. Press Ò to move from hours to
minutes. Press S or T to increase or decrease
flashing minutes. Press Ò to move to next parameter.
6.
ST (Sampling Time): Allows the user to program
a specific run time. Press S or T to increase or
decrease the time in minutes (up to 99999 minutes).
Press Ò to move to next parameter. See pages 9 and 19
for Setting and Deleting a Sampling Time.
7.
Temperature (factory default is Celsius): Press S
or T to toggle between Fahrenheit (F) and Celsius
(C). Press Ò to move to next parameter.
8.
Atmospheric Pressure (factory default is mm):
Press S or T to toggle between inches of mercury
(In), millibars (mb), and millimeters of mercury
(mm). Press Ò to move to next parameter.
9.
CLr: Press [ST] to reset accumulated run time and
volume data to zero (see Resetting Run Time Data on page 9).
8
Pump Setup
10. ESC: Press [ST] to exit Setup without saving new
settings.
11. End: Press [ST] to save new settings and exit Setup.
PrOFF: Appears only when a program is loaded into pump memory.
See DataTrac for Leland Legacy Software Operating Instructions
(Form #40085, included on software CD) for setting a program.
See page 19 for Deleting a DataTrac Program or Delayed Start.
Resetting Run Time Data
To reset accumulated volume and run time data to zero:
1. Press [ST], then press the security code ÒSTÒ in sequence. Setup
will display briefly.
2. Press Ò until Clr appears, then press [ST].
3. Press Ò until End appears, then press [ST] to exit Setup. The pump is
now in Hold.
CLr does not clear previously set sampling time (ST). See Deleting a
Sampling Time on page 19.
Setting a Sampling Time (ST)
Program the Leland Legacy from the integral keypad or a PC using DataTrac
software to sample from 1 to 99999 minutes.
1.
2.
3.
4.
5.
6.
7.
Press [ST], then press the security code ÒSTÒ in
sequence. Setup will display briefly.
Repeatedly press Ò until ST L/min and a flashing time
and Set appear on the display.
Set the sampling time by pressing S or T to increase
or decrease it to the desired time in minutes.
Press Ò repeatedly until End appears.
Press [ST] to save the new sampling time and exit
Setup.
Press [ST] to begin sampling. The time display will
count down in minutes and the pump will go to Hold.
The total sampling time will display.
To delete a set sampling time, see Deleting a Sampling
Time on page 19.
Setting a DataTrac Program
See DataTrac for Leland Legacy Software Operating Instructions (included on
software CD).
9
Pump Setup
Setting a Delayed Start
A delayed start can be programmed using the pump
keypad or from a PC using DataTrac Software. The
following instructions are for keypad only. See DataTrac
for Leland Legacy Operating Instructions (included on software
CD) for programming from a PC.
Display for
delayed start
When setting the pump for sampling from 1 to 99999
minutes to begin within the next 12-hour period, follow this
procedure:
1.
2.
3.
Press [ST], then press the security code ÒSTÒ in
sequence. Setup will display briefly.
Press Ò until the display reaches the 12 Hr/24 Hr clock.
If delayed start is already programmed, the display will show Dela
(delayed start) in place of 12 Hr. If no delay is programmed, press S or
T until the display shows a flashing Dela (delayed start).
Press Ò until the time of day (flashing hours) displays. Select the hour
(time of day) that the pump is to begin sampling (within the next 12
hours) by pressing S or T until the desired hour displays. Press Ò and
the minutes will flash. Press S or T until the desired minutes display.
The time of day entered will be the next occurrence of this time
within the next 12-hour period after the delayed start is entered.
There is no a.m. or p.m. designation.
4.
5.
6.
7.
Press Ò until the ST displays. Press S or T to set the desired run time
in minutes. A delayed start cannot be run unless a sampling time (ST)
is programmed.
Press Ò until End appears.
Press [ST] to save settings and exit Setup.
Prog and a flashing Hold will appear in the upper
left corner of the display. The pump is now set for
delayed start.
Once a program is set in the pump, the pump cannot be run
manually. To return to manual pump operation, let the program
run its course or delete the program (see Deleting a DataTrac Program
or Delayed Start on page 19).
10
Pump Setup
Resetting Run Time Data
1.
2.
3.
Press [ST], then press the security code ÒSTÒ in
sequence. Setup will display briefly.
Press Ò until Clr appears, then press [ST].
Press Ò until End appears, then press [ST] to exit
Setup. The accumulated data is cleared and the pump
is now in Hold.
CLr does not clear previously set sampling time (ST). See Deleting a
Sampling Time (ST) on page 19.
Setting Pump Flow Rate
1.
2.
3.
4.
Press [ST], then press the security code ÒSTÒ in sequence.
The flow rate and Set will flash on the LCD. Press S to increase flow
rate. Press T to decrease flow rate. The pump will run while flow is set.
Once the desired flow rate is displayed, press Ò until End appears on
the display. The pump will stop running.
Press [ST] to save the new flow rate and exit Setup.
Flow Rate and Volume Display
h Flow Rate displayed on the pump LCD is the flow to which the pump has been
calibrated. To maintain flow as displayed, the pump automatically adjusts flow
during sampling for changes in temperature and atmospheric pressure that may
differ from the temperature and atmospheric pressure present at the time of
calibration. The flow rate display does not change from the calibrated flow rate.
The pump will fault if it is unable to maintain the calibrated flow rate.
h Volume displayed on the pump LCD is “corrected” in that it is the result of a
continual calculation of corrected flow rate multiplied by sample time.
11
Calibration
Verifying Flow Rate Using a Primary Standard Calibrator
Before use, allow pump to equilibrate after moving it from one
temperature extreme to another.
1.
2.
3.
7.
8.
Ensure the pump has run for 5 minutes before performing calibration.
Connect the pump inlet to a calibrator with representative media in line
(see photo below).
Press [ST], then press the security code ÒSTÒ in sequence. The flow
rate and Set will flash.
4. Set the flow on the pump display by pressing S or T
to increase or decrease flow to the desired rate.
5. Press Ò. Adj will appear.
6. If the calibrator reads a higher flow rate than the
pump is set for,
press T until they
are in agreement
(within 10 ml).
If the calibrator
reads a lower flow
rate, press S until
they agree (within
10 ml). When
pressing S or T ,
Calibration train with sample
the pump display
medium in line
will indicate the
adjustment (or correction) made in L/min.
Press Ò until End appears.
Press [ST] to save new flow rate and Adj and exit Setup. Reset run
time data (see page 11).
If the pump has been programmed with DataTrac Software and
switched to manual operation, a program may remain in pump
memory. Prog will display in the upper left corner of the pump
display. See page 19 for Deleting a DataTrac Program or Delayed Start.
12
Calibration
Verifying Flow Rate Using the CalChek Automatic
Calibration Feature
The CalChek automatic calibration
feature is available when calibrating
a Leland Legacy with a Defender
calibrator (Cat. No. 717-510H). A
CalChek Communication Cable
(Cat. No. 210-502) is required
for communication between the
pump and the calibrator. Optional
DataTrac for Leland Legacy
Software can be used to expand
the documentation capabilities of
Single-point calibration train with CalChek
this feature. The CalChek feature
provides single-point calibration to set and verify flow at a single point before
and after sampling and multiple-point (full) calibration to calibrate flow to a
primary standard at multiple flow rates within the pump flow range. Both
calibration options bring flow to within ± 5%.
For optimum accuracy, do not perform single-point or multiple-point
calibration until the pump has remained at ambient temperature for
several hours.
Single-point Calibration Using CalChek
The CalChek feature provides correction at a single flow setting and usually
takes less than one minute to complete. Use it to set the desired flow rate
before sampling and to verify flow after sampling.
Before use, allow pump to equilibrate after moving it from one
temperature extreme to another.
Calibrate with representative sampling media in line.
1.
2.
3.
Ensure the pump has run for 5 minutes before starting calibration. Leave
the pump on.
Use two pieces of 1/4-inch tubing, one to connect the Defender suction
port to the inlet of the representative sample medium and the other to
connect the medium outlet to the Leland Legacy pump inlet.
Select the Defender data port:
a. Press and hold the Defender power button to turn on the flowmeter.
b. Press the right arrow to highlight Setup; press Enter.
c. Press the right arrow to highlight Preferences; press Enter.
d. Press the down arrow to navigate to Data Port.
e. Press the left or right arrow to toggle to SKC.
f. Press the down arrow to highlight Confirm; press Enter.
13
Calibration
4.
5.
6.
7.
8.
9.
Enter Defender calibration mode:
a. Press the right arrow and then the down arrow to highlight Measure;
press Enter.
b. Press the right arrow to highlight Cont.; press Enter.
Attach the female end of the CalChek Communication Cable to the serial
port (RS-232) on the back of the Defender calibrator.
Insert the male end of the CalChek Communication Cable into the data
port on the pump.
Press the security code ÒSTÒ in sequence on the pump keypad to enter
Setup.
Set the pump to the desired flow rate.
Press Ò on the pump keypad until CALCh appears on
the pump display.
Note: If “no” is flashing on the pump LCD, the pump
has not equilibrated. Wait until the “no” display
disappears before proceeding with calibration.
10. Press [ST] to initiate single-point calibration.
11. The Defender calibrator will begin to automatically
calibrate the pump. Initial flow measurements are
taken without flow from the pump and the pump flow
rate is adjusted automatically. The pump will display
1Cal. During calibration, the pump will briefly display
the flow rates that it is reading from the calibrator.
12. When calibration is completed, the Leland Legacy will
continue to run. If the calibration was successful, the
pump LCD will revert to displaying pump run time as
0.0. If there was failure during the calibration process,
an error code of E4[x] will appear (see CalChek Error
Chart on page 17).
Note: To remove a CalChek error code from the LCD, press Ò.
13. Place the pump in Hold. Disconnect the pump from the representative
sampling medium and the calibrator.
14. Allow the pump to go to sleep.
15. Place a fresh sampling medium in line and sample when ready.
Successful single-point calibration will provide an entry in the
pump history that can be viewed using DataTrac for Leland Legacy
Software.
Allow pump to go to Sleep mode to write calibration data to pump
history.
14
Calibration
Multiple-point (Full) Calibration Using CalChek
This type of calibration using a Defender calibrator provides flow correction
across the complete operating range of the Leland Legacy (5 to 15 L/min)
in approximately 4 minutes. The operation calibrates each flow rate to a
primary standard. It can also provide a record of calibration for maintenance
and quality purposes if DataTrac for Leland Legacy Software is used. SKC
recommends that a full calibration be performed during pump maintenance
and after non-factory repairs.
Do NOT place sampling media in line for full calibration. Ensure the
battery pack is completely charged before starting a full calibration.
Before use, allow pump to equilibrate after moving it from one
temperature extreme to another.
Multiple-point calibration train
with CalChek; do not place
sample medium in train.
1.
2.
3.
4.
5.
Use 1/4-inch tubing to connect the Defender suction port to the Leland
Legacy pump inlet.
Follow Steps 1 and 3 through 9 of Single-point CalChek Calibration on
pages 13 and 14.
Verify that the battery icon on the pump display shows at least two bars.
If it does not, charge the battery before proceeding.
Press S on the pump keypad 7 times to place pump in full calibration
mode.
The Defender calibrator will begin to automatically
calibrate the pump. Initial flow measurements are
taken without flow from the pump and the pump
flow rate is adjusted automatically. The pump will
display FCAL, CS1, and a brief flow rate. The pump
will continue to display CS2, then a flow rate, CS3, then
a flow rate, etc. until calibration is completed at all flow
rates between 5 and 15 L/min.
Note: CalChek full calibration can be aborted by pressing [ST]. The pump
will go into Hold.
15
Calibration
6.
CCAL will display during Calibration Check mode and will count down
to 1. The pump will stop running.
7.
When calibration is completed, the Leland Legacy will
go to Hold. If the calibration was successful, the pump
LCD will revert to displaying pump run time as 0.0.
If there was failure during the calibration process, an
error code of E4[x] will appear (see CalChek Error Chart
on page 17).
Note: To remove a CalChek error code from the LCD, press Ò.
8.
Allow the pump to go to Sleep mode to write calibration data to pump
memory.
CalChek Full Calibration Data
Requires DataTrac for Leland Legacy Software
Full calibration completely clears pump history, run time parameters, and the
DataTrac Scheduler. Full calibration data can be viewed and printed by going to
the DataTrac Pump Manager window in DataTrac for Leland Legacy Software
and clicking on the View menu. Choose Calibration Info. This will display
calibration results, pump serial number, and date of the last full calibration. A
button allows this data to be printed. The printed report contains pump version,
date printed, and a validation code to perform data verification.
CalChek Full Calibration Data Verification
Requires DataTrac for Leland Legacy Software
To ensure that printed calibration data has not been tampered with, pull
down the Tools menu in the Calibration Info window and choose Confirm
Validation Code. Enter the data from the printed report, including the
validation code. DataTrac Software will indicate whether the information is
completely valid or if a parameter has been changed.
When entering data to confirm the validation number, enter the
date in the following format: mmm, dd, yyyy (e.g., Aug 18 2009).
16
CalChek Error Chart
Single-point Calibration Errors
Error
Problem
Troubleshooting
E41
Correction required too large. A
gross mismatch between the flow
setting on the pump and the reading
generated by the Defender calibrator
has occurred.
Perform a full calibration. If this fails,
call SKC Technical Support at 724-9419701 (800-752-8472 [U.S. only]).
E48
Could not get a successful single-point
calibration within five flow readings.
Try the calibration again. If problem
persists, perform a full calibration.
Multiple-point (Full) Calibration Errors
Error
Problem
Troubleshooting
E44
First flow reading greater than
5 L/min. The pump is flowing faster
than it should, even though the
calibration routine delivered only a
very small voltage to the pump.
Check pressure sensor tubing to ensure
that it is not pinched or blocked, or call
SKC Technical Support at 724-941-9701
(800-752-8472 [U.S. only]).
E45
Pump unable to achieve flow rate of
15 L/min possibly due to a blocked inlet
filter or flow tube or an air leak inside
the pump.
Check pump inlet filter for debris and
flow tube for blockage, or call SKC
Technical Support at 724-941-9701
(800-752-8472 [U.S. only]).
E46
or E49
Analysis error in the data (rare).
Try full calibration again. If problem
persists, call SKC Technical Support at
724-941-9701 (800-752-8472 [U.S.
only]).
E47
Less than two bars appear in the battery
icon on the pump display indicating that
the battery is too low. There must be at
least two bars to begin a full calibration.
Recharge the battery.
——
At conclusion of full calibration, pump
does not verify to within 5%.
Pump not at ambient conditions for at
least 2 hours. Retry calibration after
pump has been at ambient conditions
for 2 hours.
Pump not running for 5 minutes
prior to calibration. Run pump for
5 minutes and retry calibration.
Errors That Can Occur During Both Calibration Modes
Error
Problem
Troubleshooting
E42
Unstable average. There is too
much variation in the flow readings.
Try the calibration again. If problem
persists, contact SKC Technical Support
at 724-941-9701 (800-752-8472 [U.S.
only]).
E43
Serial time out. The calibrator is
not communicating with the pump.
Check adapter connection. If loose or
disconnected, connect properly.
E4A
Calibration has been initiated before
pump has equilibrated.
Press Ò. Allow pump to run until “no”
disappears from display.
17
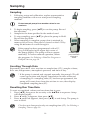
Sampling
Sampling
1.
Following setup and calibration, replace representative
sampling medium with a new unexposed sampling
medium.
Protect sample pump from weather when in use
outdoors.
2.
3.
4.
5.
To begin sampling, press [ST] to run the pump. Record
the start time.
Sample for the time specified in the method used.
To stop sampling, press [ST] to place the pump in Hold.
Record the stop time.
When sampling is complete, pump data is retained in
memory for recovery. Data can be viewed on the LCD by
using the Ò button to scroll through it.
If the pump has been programmed with a PC,
Prog will display in the upper left corner of
the pump display. The pump will not operate
manually. To restore manual operation, delete
the program. See Deleting a DataTrac Program or
Delayed Start on page 19.
Leland Legacy
pump with filter
cassette in
holder
Scrolling Through Data
Repeatedly press Ò to view run time or sample time (ST)*, sample volume,
flow rate, temperature, atmospheric pressure, and time of day.
* If the pump is started and stopped manually, the pump LCD will
count up run time and display cumulative run time at the end
of sampling. If a sampling time (ST) has been programmed, the
pump will count down from the set time to zero, then display
completed sampling time (ST).
Resetting Run Time Data
To reset accumulated volume and run time data to zero:
1. Press [ST], then press the security code ÒSTÒ in sequence. Setup
will display briefly.
2. Press Ò until Clr appears, then press [ST].
3. Press Ò until End appears, then press [ST] to exit Setup. The pump is
now in Hold.
CLr does not clear previously set sampling time (ST). See Deleting a
Sampling Time on page 19.
18
Sampling
Deleting a DataTrac Program or a Delayed Start
1.
2.
3.
4.
Press [ST], then press the security code ÒSTÒ in sequence. Setup
will display briefly.
Pressing Ò, scroll to the flashing PrOFF and press
[ST].
Press Ò until End displays.
Press [ST] to exit Setup. The Prog icon will
disappear.
Deleting a Sampling Time (ST)
To delete a sampling time (ST), enter Setup and use the Ò button to scroll to
ST L/min. Press T until 0 displays. Press Ò until End appears. Press [ST]
to exit Setup.
A time still appears on the display after deleting a sample time.
This value is cumulative run time since data was last cleared. To
clear this display, see Resetting Run Time Data on page 18.
Flow Fault
If the pump is unable to compensate for longer than 15
seconds due to excessive back pressure, a flow fault icon
displays and flashes, the pump enters Hold mode, and the
pump retains historical data. The pump will attempt to
restart in 20 seconds (default setting) and try to continue
sampling. If the flow remains restricted, the pump returns
to flow fault. Auto-restart is attempted every 20 seconds up
to 10 times (default setting). Flow fault time is not added to
the displayed run time or cumulative volume display.
To clear a flow fault icon from the pump display after flow is restored, press
[ST].
Use DataTrac for Leland Legacy Software to adjust the amount of time the
pump will remain in flow fault before going to Hold (5 to 30 seconds) and the
number of auto-restart attempts (0 to 25). See DataTrac for Leland Legacy Software
Operating Instructions (included on software CD).
19
Battery Replacement
Removing and Replacing the Battery Pack
Battery Replacement Notes:
• To retain history, ensure the pump has been allowed to go to Sleep
after the last run.
• Turn off the pump before removing the battery. Removing the battery
while the pump is on or running may corrupt pump history.
• Programs should be reloaded using DataTrac for Leland Legacy
Software after replacing the battery pack.
1.
Position pump with belt clip facing upward.
2.
Use a Phillips head screwdriver to remove three screws on bottom half of
pump.
Belt clip
Screws
(top screw is
longer than
bottom
screws)
Battery
pack
3.
Grasp and remove battery pack by pulling it up and away from pump
body.
4.
Align connector of new battery pack with connector in pump body.
Battery
connector
5.
Gently press new battery pack into pump body until it is flush with the
pump case and replace the three screws.
Ensure that the long screw is replaced in the top screw hole. Do not
overtighten screws.
For more information on SKC pump battery packs,
go to www.skcinc.com/instructions/1756.pdf.
20
Programming
Programming the Pump Using a PC
The Leland Legacy can be programmed manually, with its integral keypad,
or by using a personal computer and DataTrac for Leland Legacy Software
for full programmability.
Install DataTrac Software onto a PC and connect the PC to the Leland Legacy
pump data port with the provided cable adapter. With DataTrac, you can:
•
•
•
•
•
•
•
Create and save a Leland Legacy run schedule in pump memory for use
in the field at a later time.
Program a sampling strategy of up to 10 sampling sequences and flow
rates.
Program a delayed start, timed shutdown, or perform STEL and
replicate samples.
Create a sample and analysis sheet for all critical information.
Print or save to a PC file a complete history of run time data.
Create a worker exposure profile containing sample and analysis
information along with the pump’s history. Then, import this into a text
document.
Document CalChek pump calibration.
For complete information on programming the Leland Legacy Pump using
DataTrac for Leland Legacy Software, consult the DataTrac Operating
Instructions (included on software CD).
21
Optional Accessories
Description
Catalog No.
Defender Primary Standard Calibrator,
300 to 30,000 ml/min, includes battery, charger (100-240 V),
serial cable, and software
717-510H
CalChek Communication Cable
210-502
Chargers
Single Charging Kit, 100-240 VAC, 50/60 Hz,
includes charging unit, power supply, and
interchangeable wall plugs
223-241
Take Charge 5 Five-station Li-Ion Battery Charger,
for Leland Legacy and AirChek XR5000 Li-Ion model
pumps, includes charging unit and power cable,
100-240 V AC
223-441
Battery Charging Adapter, for charging batteries
outside the pump
223-248
Single Kit Case, Pelican, with foam
224-912
Noise-reducing Nylon Case, black
Lined to reduce pump noise from 62.5 dBA to 52 dBA†,
includes waist belt and shoulder strap
224-89
DataTrac for Leland Legacy Software Package
Includes software CD, DataTrac adapter, and DataTrac
cable, requires available serial port or appropriate USB to
serial adapter compatible with the PC and system
877-92
Replacement Parts
Battery pack, Li-Ion
Filter/O-ring Set, 5 filters and 1 O-ring
Inlet Filters, pk/50
P75692NUL*
P40021B
P40021A
Use of a repaired or rebuilt battery pack VOIDS ANY WARRANTY.
* Li-Ion Battery Shipment
Rechargeable, lithium-ion batteries for use with SKC sampling pumps have been
tested in accordance with the UN Manual of Tests and Criteria and are designated as
UN3481. They have a watt-hour (Wh) rating below 100.
For air shipments:
Per 2009 IATA regulations, packaging must meet the specifications of and contain
labeling and documentation required by IATA Packing Instructions 965, 966, and 967.
For ground shipments:
U.S. DOT regulations specify a limit of 24 or fewer battery cells in one shipping box. If
you exceed 2 Leland Legacy pumps with battery packs in one shipping box, specific
shipping requirements must be followed. Contact SKC for more information or refer to
the regulatory authority in your area.
† Measured 1 m from pump operating at 10 L/min and 12 inches water back pressure
22
Service Policy
To return products to SKC for servicing:
1. Call 800-752-8472 (724-941-9701 for international customers) to obtain a Return
Materials Authorization (RMA) number and Product Decontamination Form.
2. Carefully package the product. Mark the RMA number on any correspondence
relating to the return and on the outside of the package.
Package product carefully to prevent damage during transit. Include a contact
name, phone number, shipping address, RMA number, and a brief description
of the problem. For nonwarranty repairs, a purchase order number and billing
address are also required. The Service Department will contact nonwarranty
customers with an estimate before proceeding with repairs.
3. Ship to SKC, freight prepaid, to the following address:
SKC Inc.
National Service Center
863 Valley View Road
Eighty Four, PA 15330
SKC Inc. will accept for repair any SKC product that is not contaminated
with hazardous materials. Products determined to be contaminated will
be returned unserviced.
Cautions:
• Use only SKC-approved parts to ensure reliable performance and to
maintain any warranty.
• Failure to follow warnings and cautions voids any warranty.
23
SKC INC.
LIMITED ONE YEAR WARRANTY
1. SKC warrants that its instruments provided for industrial hygiene, environmental, gas
analysis, and safety and health applications are free from defects in workmanship and materials
under normal and proper use in accordance with operating instructions provided with said
instruments. The term of this warranty begins on the date the instrument is delivered to the buyer
and continues for a period of one (1) year.
This warranty does not cover claims due to abuse, misuse, neglect, alteration, accident,
or use in application for which the instrument was neither designed nor approved by SKC Inc.
This warranty does not cover the buyer’s failure to provide for normal maintenance, or improper
selection or misapplication. This warranty shall further be void if changes or adjustments to the
instrument are made by other than an employee of the seller, or if the operating instructions
furnished at the time of installation are not complied with.
2. SKC Inc. hereby disclaims all warranties either expressed or implied, including any
implied warranties of merchantability or fitness for a particular purpose, and neither assumes
nor authorizes any other person to assume for it any liability in connection with the sale of these
instruments. No description of the goods being sold has been made a part of the basis of the
bargain or has created or amounted to an express warranty that the goods will conform to any
such description. Buyer shall not be entitled to recover from SKC Inc. any consequential damages,
damages to property, damages for loss of use, loss of time, loss of profits, loss of income, or other
incidental damages. Nor shall buyer be entitled to recover from SKC Inc. any consequential
damages resulting from defect of the instrument including, but not limited to, any recovery under
section 402A of the Restatement, Second of Torts.
3. This warranty extends only to the original purchaser of the warranted instrument during
the term of the warranty. The buyer may be required to present proof of purchase in the form of
a paid receipt for the instrument.
4. This warranty covers the instrument purchased and each of its component parts.
5. In the event of a defect, malfunction, or other failure of the instrument not caused by
any misuse or damage to the instrument while in possession of the buyer, SKC Inc. will remedy the
failure or defect without charge to the buyer. The remedy will consist of service or replacement of
the instrument. SKC Inc. may elect refund of the purchase price if unable to provide replacement
and repair is not commercially practicable.
6. (a) To obtain performance of any obligation under this warranty, the buyer shall return
the instrument, freight prepaid, to SKC Inc., at the following address:
SKC Inc., National Service Center
863 Valley View Road
Eighty Four, PA 15330 USA
(b) To obtain return authorization information or for further information on the warranty
performance you may telephone 724-941-9701 at the above address. See Service Policy section
in operating manual (if applicable).
7. This warranty shall be construed under the laws of the Commonwealth of Pennsylvania
which shall be deemed to be the situs of the contract for purchase of SKC Inc. instruments.
8. No other warranty is given by SKC Inc. in conjunction with this sale.
Form #3755 Rev 0207
24