1
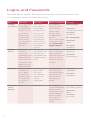
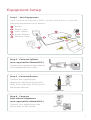
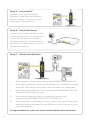
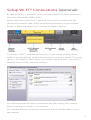
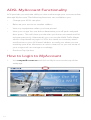
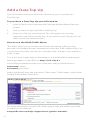
Quick Start Guide
Netgear® N300
Wireless ADSL 2+ Modem Router
Welcome to ACN
Congratulations on your selection
The Netgear® N300 Wireless ADSL 2+ Modem Router is ideal for both
professional and personal Internet use, providing Wireless-N speed for
simultaneous downloads, voice and music, and online gaming. Complete
with a built-in DSL modem, it is compatible with all major DSL Internet
service providers. Storage for downloads is easy with ReadySHARE™ for
shared access to a USB storage device.
This guide outlines the straightforward steps to install your Netgear®
N300 Wireless ADSL 2+ Modem Router and connect to the Internet so
you’ll be up and running in no time!
Once you are online check our website at acnpacific.com.au for further
information and technical support if required.
acnpacific.com.au/myaccount
At MyAccount you can check your monthly usage, change your rate plan,
purchase extra data, download your invoices and pay your ACN account.
With ACN Broadband you get free access to WebTools powered by
Google, a suite of applications including Calendar, Talk and up to five
Email accounts, each with their own myacn.net.au email address.
Customer Service
Our dedicated Customer Service team is available 6 days a week
Hours of Operation
9:00am - 6:00pm (AEST) Monday to Friday
10:00am - 6:00pm (AEST) Saturday
Contact Details
Email Enquiries: [email protected]
Online Chat: acnpacific.com.au/contact-us
Customer Service: 1300 881 778
For further information about pricing, other services available from ACN, the
ACN Opportunity or becoming an ACN Independent Business Owner (IBO),
please visit acnpacific.com.au.
2
What’s Inside?
Welcome to ACN
2
Customer Service
2
What’s Inside?
3
Netgear® N300 Setup Guide
4
Front Panel
4
Back Panel
4
Getting to Know your Device
5
Logins and Passwords
6
Equipment Setup
7
Setup Wi-Fi™ Connections
9
Change Default Modem Router Settings
10
Troubleshooting10
ACN Email Setup Guide
11
ADSL MyAccount Functionality
12
How to Login to MyAccount
12
Add a Data Top Up
14
Dead-On-Arrival (DOA) and Early Life Failure (ELF)
15
Warranty16
Conditions16
Warranty Claims
17
Standard Form of Agreement 18
Further Information 19
3
Netgear® N300
Setup Guide
The Netgear® N300 Modem Router from ACN has been setup to Plug-and-Play.
All that you need to do now is follow the instructions in this guide.
We recommend Microsoft® Windows 7, Vista, XP, 2000 and MAC OS as the
minimum Operating System requirements. Ideally, your computer should be
less than five years old and of a reasonable specification to get the most out
of the Internet. It is very important to ensure that your computer is up to date
with anti-virus and firewall / Internet protection software.
Front Panel
The front panel consists of 8 LED lights and 2 buttons.
Power Ethernet
USB DSL Internet
Supply LAN Ports 1-4 Light Light Light
WPS
Wireless Light
Back Panel
The back panel consists of port connections and also the Power (On/Off) button.
USB
4
Ethernet LAN
ADSL
On/Off Power
Getting to Know your Device
The table below describes the LED icons and buttons on the front panel of
the Netgear® N300 Modem Router.
Icon
LED Activity
Description
Power
Solid green
Power is supplied to the Modem Router.
Solid red
Failure or a device malfunction has occurred. Attempt to restart
your Modem Router.
Off
Power is not supplied to the Modem Router. Check that the
Power adaptor is plugged in and your electrical power point
is switched on.
Restore
factory
settings
The LED blinks momentarily when the Restore Factory Settings
button on the bottom of the unit is pressed for 6 seconds.
The Power LED then blinks red three times when the Restore
Factory Settings button is released and then turns green as the
gateway resets to the factory default settings.
Solid green
The LAN port has detected an Ethernet link with a device.
LAN
Blinking green Data is being transmitted or received.
USB
Off
No link is detected on this port.
Off
• No USB device connected
• ‘Safely Remove Hardware’ has been activated
• An error has occurred with the device
Solid green
USB device is ready to use.
Blinking green USB device is in use.
DSL
Solid green
You have a DSL connection. DSL port is synchronised with
your network.
Blinking green Indicates that the Modem Router is negotiating the best
possible speed on the DSL line.
Off
Internet Solid green
Solid red
The unit is off or there is no IP connection.
You have an Internet connection. If this connection is dropped
due to an idle time-out but the DSL connection is still present,
the light stays green.
Connection to the Internet has failed to connect.
Blinking green Data is being transferred or received over the wireless link.
Wireless Off
Solid green
No Internet connection is detected or the device is in bridge
mode.
There is wireless connectivity.
Blinking green Data is being transmitted or received over the wireless link.
WPS
Solid green
Indicates that wireless security has been enabled.
Blinking green WPS-capable device is connecting to the device.
Off
WPS is not enabled.
5
Logins and Passwords
The table below outlines the required username and password format for
your Internet connection and Online Tools.
Use
6
Username
Password
What is it used for? Example
Internet
This is your main
and Email email address
you requested
at sign-up. This
can also be
found on the
confirmation
email sent to
you when you
completed
sign-up.
This is the
password you
nominated
during online
sign-up. This
can also be
found on the
confirmation
email sent to
you when you
completed
sign-up.
Your Internet
username and
password is a
unique login
for your ADSL
or Naked ADSL
Service.
Modem
Wi-Fi™
Your Wi-Fi™
username
is your SSID
provided on the
Modem Router
label which can
be found on the
bottom of your
Modem Router.
Your Wi-Fi™
password is your
Network Key
provided on the
Modem Router
label.
Your Modem
Wi-Fi™ username
and password is
required when you
connect a device
wirelessly to your
modem.
Username:
Netgear99
MyAccount Your MyAccount
Username is
your 9 digit
Customer ID
Number which
can be found
on your first
invoice.
You would have
been asked
to create a
password for
MyAccount
during
registration.
Your MyAccount
username and
password enables
you to login to
MyAccount to
manage your
details.
Username:
1000000001
Netgear® admin
Smart
Wizard
password
The Netgear®
Smart Wizard login
details enables
you to gain access
to your Modem
Router settings
if you wish to
customise your
setup.
The username and
password is generic:
Internet login:
Username:
[email protected]
Password:
Abcdef123
For email login:
This is also used to
Username:
access your email
smith
from www.mail.
Password:
myacn.net.au
Abcdef123
Password:
Bumblebee92
Password:
MagicBeans
Username:
admin
Password:
password
Equipment Setup
Step 1 - Your Equipment
Once you have received your ADSL activation email from us, take the
following equipment out of the box
Router
Phone Cable
ADSL Splitter
Power Adaptor
Ethernet Cable
Step 2 - Connect Splitter
(not required for Naked DSL)
Connect the supplied splitter directly
to the telephone wall socket.
Step 3 - Connect Router
Connect the supplied grey
telephone cable from the splitter’s
ADSL port to the grey ADSL port on
the Modem Router.
Step 4 - Connect
Your Home Telephone
(not required for Naked DSL)
Connect your telephone to the
phone port on the splitter.
7
Step 5 - Connect PC
Connect the supplied yellow
Ethernet cable from the Modem
Router’s yellow LAN port to your
computer’s Ethernet port.
Step 6 - Connect Power
Connect the power adapter to the
router then plug it into an electrical
outlet. Ensure electrical outlet is
ON. Press the black power button
at the back of the router to turn on
the Modem Router.
Step 7 - Check Installation
1.
If the power is connected correctly, the POWER LED will light up.
2.
If the grey telephone cable and the splitter are connected correctly,
the ADSL LED will flash and after a few seconds turn solid green.
3.
Since the Modem Router is pre-configured the INTERNET LED will
turn green after a few seconds.
4.
If the yellow Ethernet cable is connected correctly, the
corresponding ETHERNET (LAN) LED will light up.
5.
Once you have confirmed the above, open your web browser (e.g.
Internet Explorer, Google Chrome, Firefox or Safari) and go to your
favourite website.
Congratulations, you are now connected to the Internet.
8
Setup Wi-Fi™ Connections (optional)
By default, Wi-Fi™ is turned on and is secured using Wi-Fi™ Protected Access
with a Pre-Shared Key (WPA2-PSK).
Please take note of your Wi-Fi™ Network Name (SSID) and Network Key
(Password) printed on the sticker attached to the bottom of your Modem
Router, as these are necessary to connect to wireless devices.
To connect a Wi-Fi™ enabled device (such as your laptop, mobile phone,
tablet or gaming device) to the Internet please ensure that the Wi-Fi™ on the
device is switched on. Then select your wireless network (this is your Wi-Fi™
Network Name [SSID]) and click ‘Connect’.
You will be required to enter your Network Key (Password) and ‘Connect’.
Please note the password is case sensitive.
Your Modem Router will now be connected and you will be able to access
the Internet.
9
Change Default Modem Router Settings
To change your Modem Router’s default settings (not recommended for
novice users):
1.
Open a browser and go to routerlogin.com
(or 192.168.0.1 alternatively).
2.
Enter the default username and password, which is admin and
password respectively.
ACN recommends keeping the Wi-Fi™ connection secured to block
unauthorised access to your network.
Troubleshooting
Quick Tips
If you are unable to get connected to the Internet try these quick tips:
•
Restart the Modem Router. Turn off the power, leave for 5 minutes and
then turn the power and the Modem Router back on. Once the lights
are on (refer to page 5), open your browser to connect to the Internet.
•
Alternatively, isolate the Modem Router. Remove all equipment
connected to the line (including your splitter, telephone and any other
equipment) except your Modem Router. Then restart the Modem
Router and connect it to your computer via an Ethernet Cable - once
the lights are on, try to connect to the Internet.
•
If you are still unable to connect to the Internet remove your Ethernet
cable and attempt to connect wirelessly through Wi-Fi™. (If you have a
successful Wi-Fi™ connection you may have a malfunctioning Ethernet
Cable. In this case contact ACN Technical Support for further assistance.)
If you have tried all of the above, rebooted your computer and still cannot
connect to the Internet, please contact ACN Technical Support on 1300 881 778.
10
ACN Email Setup Guide
Your primary email address will be the email address you requested
during sign-up, e.g. [email protected]. This can be found in the
confirmation email we sent you after sign-up.
To access your email:
1.
Open your browser and go to mail.myacn.net.au. It is helpful to
bookmark this website for future reference.
2.
At the login screen enter your username and password.
If your username is [email protected], you will only be required to
enter “smith”.
This will take you to your email account where you will be able to send and
receive emails from your ACN email address.
If you wish to setup your ACN email in Outlook please refer to our website:
acnpacific.com.au/help-support/user-guides-manuals
For all other email clients please refer to GoogleMail Documents
for assistance:
mail.google.com/support
11
ADSL MyAccount Functionality
ACN provides you with the ability to view and manage your account online
through ‘MyAccount’. The following functions are available to you:
•
Change your ADSL rate plan
•
Relocate your service to another address
•
View any equipment orders you have placed
•
View your usage. You are able to determine your off-peak and peak
data quota. This will show you the data you have consumed until 30
minutes previously. Alternatively you can use the N300 Traffic Meter
which is explained on page 14. ACN also sends out courtesy email
notifications to your ACN email address to notify you when you are
reaching your data allowance at various intervals so you are aware of
your usage and can manage accordingly.
•
Purchase Top Up data
How to Login to MyAccount
1.
12
Visit acnpacific.com.au and click on MyAccount at the top of the
webpage.
2.
Select Australia and you will be redirected to the following page:
3.
Enter your username and password. If this is your first time please
select ‘Not Registered’ and follow the prompts.
Your username is your Customer ID number and your password is your
selected password upon registration to MyAccount.
4.
Once you have logged in, the following page will be displayed:
5.
Click on 'Broadband' and select your required functionality.
13
Add a Data Top Up
If you have exhausted your peak data allowance, you can purchase a
Data Top Up.
To purchase a Data Top Up you will need to:
1.
Login to MyAccount and enter the 'Manage My Broadband Services
Screen.'
2.
Click on 'View Usage' and select 'Add Top Up.'
3.
Select your Top Up and purchase. This will appear on your next
statement and will last for 60 days. If you exhaust your Top Up you are
able to purchase additional data.
How to use the N300 Traffic Meter
The N300 allows you to monitor the volume of Internet traffic passing
through your Modem Router’s Internet port. With the Traffic Meter utility, you
can set limits for traffic volume, set a monthly limit, and get a live update of
traffic usage.
To use this tool, simply login to the Netgear® Smart Wizard by entering the
following address in the URL bar: http://192.168.0.1
You will be prompted to enter your username and password which is:
Username: admin
Password: password
Select 'Advanced' from the side menu. Then select 'Traffic Meter' and tick the
'Enable Traffic Meter' check box.
For more information on the Traffic Meter please refer the N300 User Guide
available on our website:
acnpacific.com.au/help-support/user-guides-manuals
14
Dead-On-Arrival (DOA) and Early Life
Failure (ELF)
We will arrange to replace your Netgear® N300 Wireless ADSL2+ Modem
Router (“Product”) if it fails within 14 days from the date of purchase. This
period is the Dead on Arrival/Early Life Failure (“DOA/ELF”) period. Please
refer to the Warranty Claims section to learn how to make a claim in these
circumstances. If the Product fails outside the DOA/ELF period, please also
refer to the Warranty section of this guide on pages 16-19.
15
Warranty
Subject to the conditions of this limited warranty (“Warranty”), ACN warrants
your Netgear® N300 Wireless ADSL2+ Modem Router (“Product”) to be free
from defects in design, materials and workmanship at the time of its original
purchase by you. The Warranty is valid for a period of 24 months (“Warranty
Period”) from the original date of purchase of the Product.
If during the Warranty Period, this Product fails to operate under normal use
and service, due to defects in design, materials or workmanship, ACN will
either repair or replace, at our option, the Product in accordance with the
conditions stipulated herein.
ACN reserves the right to charge a handling fee if a returned Product is found
to not be under Warranty according to the conditions below.
Conditions
This Warranty does not cover mechanical damage caused by misuse, abuse,
impact or accident or damage caused to the Product or damage caused
by liquids, lightning, power surges (ACN recommends you obtain surge
protection for your electricity supply), theft, or heat damage sustained from
the stacking of electrical equipment on or in close proximity to the Product.
This Warranty does not cover you changing your mind about purchasing
the Product. The Warranty is not transferable and does not cover any ACN
services nor does the Warranty Period recommence upon receipt of any
replacement unit sent to you by ACN. If you hack the firmware or software
installed with the Product or if you tamper with security seals or remove any
service covers on the equipment ACN will consider this Warranty voided. The
Warranty does not cover any computer viruses obtained from your use of the
Product or any ACN services. This Warranty does not cover Product failures
which have been caused by use of accessories or other peripheral devices
which are not ACN branded original accessories intended for use with this
Product.
Equipment models may change over the course of this Warranty. It may
be necessary for the replacement unit to be a refurbished unit, a different
model, and/or from a different manufacturer. Goods presented for repair
may be replaced by refurbished goods of the same type rather than being
repaired. Refurbished parts may be used to repair the goods. ACN confirms
that any replacement Product sent to you will be of merchantable quality
and functionally similar to the original Product supplied.
16
Warranty Claims
Should your Product fail within the DOA/ELF Period or the Warranty Period
you will need to contact ACN’s Customer Service Team on 1300 881 778 to
describe the defect. ACN will then issue you with a prepaid return courier
satchel for you to return the device for testing purposes. ACN will not be
liable for any expenses you incur in relation to any DOA/ELF or Warranty
claim.
The return satchel is pre-labelled with our return address which is:
ACN Product Returns
Locked Bag 2145
NORTH SYDNEY NSW 2059
Please note that some of your personal settings, content and other
information and stored data may be lost when the Product is repaired or
replaced. Due to applicable law, other regulation or technical restrictions,
ACN will not make a back-up copy of your information.
ACN does not take responsibility for any lost information of any kind and will
not reimburse you for such loss. You should always make back-up copies of
all the information stored on the Product before handing it in for repair or
replacement.
You will need to comply with any other return procedures stipulated by
ACN as published or explained at the time of the claim. If a defect exists and
a valid claim under the Warranty is received by ACN after the first 15 days
following the expiry of the Warranty Period, ACN is entitled to charge for any
reasonable shipping and handling costs made in connection with the repair
or replacement of the Product.
ACN respects your rights as a consumer. Our goods come with guarantees
that cannot be excluded under the Australian Consumer Law. You are entitled
to a replacement or refund for a major failure and for compensation for any
other reasonably foreseeable loss or damage. You are also entitled to have
the goods repaired or replaced if the goods fail to be of acceptable quality
and the failure does not amount to a major failure. Nothing contained in
this Warranty shall be read or applied so as to exclude, restrict or modify the
application of applicable provisions of Australian Consumer Law, including
Consumer entitlements described in the Competition and Consumer Act (as
amended), or any relevant State or Territory statute which by law cannot be
excluded, restricted or modified.
17
To the extent that any such statute permits ACN to limit our liabilities to
compensate or indemnify you or any other person for breach of an implied
guarantee, condition or warranty, our respective liabilities for such breach
shall be limited to, at our option: (a) the replacement of the Product or the
supply of an equivalent Product or payment of the cost of replacing the
Product or acquiring an equivalent Product; or (b) the repair of the Product or
payment of the cost of having the Product repaired.
Standard Form of Agreement
Important Customer Information: Your Rights and Obligations
For the complete terms and conditions which apply to the supply of the
Product and ACN services, and which set out your rights and obligations,
please refer to ACN’s Standard Form of Agreement (SFOA), available on our
website: acnpacific.com.au.
18
Further Information
For the latest rate plans, products and services visit acnpacific.com.au.
For further information about pricing, other services available from ACN, the
ACN Opportunity or becoming an ACN Independent Business Owner (IBO),
please visit acnpacific.com.au.
19
Contact Us
Email: [email protected]
acnpacific.com.au
Customer Service:1300 881 778
ACN Pacific Pty Ltd
20
ABN 85 108 535 708
600210
18.01.2012 . MKT-872