1
Quick Start Guide
acnpacific.com.au
GETTING STARTED
INSTALLING THE IRIS X
Before you begin, you will need the following:
• An active ADSL or Naked DSL line with a minimum speed of 384Kbps. Ensure your Internet is working
by browsing one of your favourite websites on your computer.
• A modem/router.
The following contents are included with your ACN Video Phone:
Handset Cradle
Camera
Home Button
Video Phone
Handset
Handset Cord
Ethernet Cable
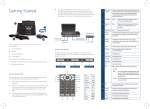
Front of IRIS X
(Diagram 1)
Back of IRIS X
(Diagram 2)
Camera Adjust Wheel
Stylus
Slots for Wall Mount and
Phone Stand
Handset Port
Network Ethernet Port
AC Power Adapter
Video Phone Stand
Wall Mount
Screen Cleaning Pad
Power Jack
Important:
• Please do not attempt to use the phone, touch the screen, or unplug your IRIS X until the setup
process is complete and the main screen appears. Interrupting the setup process may cause your
IRIS X to malfunction.
• Use only the power adapter included with the IRIS X. Using another power adapter may cause the
IRIS X to malfunction and void the warranty.
STEP
1
Choose Wall Mount or Phone Stand
Installing the IRIS X using the Video Phone Stand
• Attach the Video Phone Stand to the slots on the back of the Video Phone. (See Diagram 2).
Installing the IRIS X using the Wall Mount
• Attach the Wall Mount to the slots on the back of the Video Phone. (See Diagram 2).
• Attach the phone to the wall using the Wall Mount hole.
INSTALLATION TROUBLESHOOTING TIPS
INSTALLING THE IRIS X (Continued)
STEP
2
Connect the Handset to the
IRIS X using the phone cord
STEP
3
Connect the Ethernet Cable to
the Network Port on the back
of your IRIS X
Check your power source
• Check to ensure the Power Adapter is securely connected to the back of the IRIS X.
• If the Power Adapter is plugged into a surge protector or power strip, make sure the power to the surge
protector is switched on.
• Make sure the Home Button light is illuminated or flashing.
Verify your network
• Make sure your IRIS X is installed correctly as illustrated in this guide.
• Verify your Internet connection is working properly by browsing to your favorite website with
a computer.
Allow sufficient time for initial setup
• The initial setup may take up to fifteen minutes to complete. Please do not disconnect your IRIS X or
attempt to make calls during this time.
STEP
4
Connect the other end of the
Ethernet Cable to an open port
on your Modem/Router.
STEP
5
Plug the power adapter into the
IRIS X and a near by power point.
Ensure the power is switched on.
(Please ensure this device
is powered on and able
to successfully connect to
the Internet).
Ethernet Cable
shortened for clarity.
STEP
6
• Do not touch the screen or unplug your Video Phone until the main screen (shown in Step 7) appears
and remains unchanged for at least two minutes.
Now that your IRIS X is working, the following will help
familiarise yourself with the device.
Ethernet Cable
shortened for clarity.
Observe your IRIS X as it begins
the initial setup process
Your IRIS X will begin the initial setup process
during which you will see an animation
sequence. The IRIS X may turn itself off and on
as it registers with the ACN network. This may
take up to 15 minutes.
Important: please do not touch the screen
or unplug your Video Phone until the main
screen (shown in Step 7) appears and remains
unchanged for at least two minutes.
STEP
7
HOME SCREEN
4
2
1
Setup Complete
5
3
6
Your IRIS X is ready
to use once the
phone number is
displayed in solid
green in the top
right corner.
7
9
8
10
11
1.
Home Screen Indicator
2.
Application Indicator
3.
Telephone Number
4.
Status Bar
5.
Registration Indicator (green)
6.
IP Address
7.
Screen Switch
8.
Expands Widget Bar
9.
Quick Launch Bar
10. Phone Dialer Menu
11. Main Menu
NAVIGATION TIPS
USING YOUR IRIS X
• The IRIS X has an intuitive, but powerful touch screen navigation with four desktop screens. To change
from screen to screen, swipe the main screen to the left or right; or press to switch screens.
Making a Call
Ending a Call
There are several ways to make a call with your IRIS X:
• Menu
provides access to all available apps, widgets and functions.
By Phone
Simply hang up the handset or press End if using
the speaker phone
• Phone
displays the dial pad for voice and video calls as well as related options.
• Press
from the Home screen (or pick up
the handset)
• Widgets are applications that can be added, moved or deleted from the desktop.
• To modify the widget, touch the widget until Close/Setting options are visible.
• Additional widgets can be added to the desktop by touching and dragging from the bottom menu to
the desktop.
• To view additional widgets, press
to expand the Widget Bar.
• D
ial the number and press Audio Call or
Video Call
By Call History
• Press
• Select Call History
• The Status Bar provides a quick view of your phone’s status. If you press the status bar, a number of
options become available: Volume, Wi-Fi™ off/on, Network off/on (Ethernet), Do Not Disturb (DND) and
Camera off/on.
• Press
• Select from All, Received, Dialed and Missed
from the Home screen
Call Waiting
• While on a call, a tone and an on-screen display
will alert you of an incoming call. You can accept
or reject the call
• Select the contact you wish to dial
• Press
1
to call the selected number
CALL FUNCTION OPTIONS
2
4
5
3
Missed Call
• A missed call message will show up on the
Home screen. Users can press View to access the
details of the missed call
• Select Contacts
PHONE SCREEN
Incoming Call
to call the selected number
By Contacts
• Press
The screen will display the name and the number of
the person calling. There are several ways to answer
a call with your IRIS X:
• Select Accept Audio, Accept Video (if available)
or Reject
from the Home screen
• The Home button, located on the bottom center of the phone (below the screen), allows you to easily
jump to the Home screen from any screen.
Answering a Call
6
1. Call/Line – The ACN IRIS X can support up to three concurrent calls
2. Audio Output – Speaker, Handset or Headphone Selection
3. Volume Controls
4. Message – Not Functional
5. Voice Mail – Used to access your Voice Mail messages
6. Once numbers have been dialed, press Audio Call or Video Call
While a call is in progress, several options are available. Press
to access all the call functions.
Note: While on a video call, the
menu may disappear. Press anywhere on the screen to reveal
the menu.
Three menu choices will display:
Option Menu
Function
Description
Dial Pad
Select to enter touch tone responses or to dial another number
Hold
Mute/Unmute
Video off/on
Press to hold the call. To take the call off hold, press Unhold
Press to mute or unmute the call
Press to switch between Video off and Video on
Once you have placed another call using another line, press
Conference to establish a 3-way audio conference call
Conference
Speaker/Headset/
Headphone
Volume
PIP
Snapshot
Press one of the three options to change audio output
Press to increase or decrease volume
Press to switch videos between the callers and display full screen
Press to take a snapshot of the current video
The snapshot will be automatically saved to the folder
“screenshot” in Tools>File Manager
VOICE MAIL
Voice Mail allows callers to leave a message when you are busy or not available to take a call. An
envelope will appear on your Home screen to indicate you have a Voice Mail message and the number
of saved, new and urgent messages waiting.
Set-up/Retrieving Messages
Upon initial access to your Voice Mail, you will be asked for your PIN. This is the 4 digit PIN that you
selected at sign-up.
After login, follow the prompts to retrieve Voice Mail message(s).
1. Press
from the Home screen.
2. Press the Voice Mail envelope for Voice Mail.
3. Follow the prompts to listen to your Voice Mails.
DEAD-ON-ARRIVAL (DoA) and EARLY LIFE FAILURE (ELF)
We will arrange to replace your IRIS X (“Product”) if it fails within 30 days from the date of purchase. This
period is called Dead on Arrival/Early Life Failure (“DOA/ELF”). Please refer to the Warranty Claims section
to learn how to make a claim in these circumstances. If the device fails outside the DOA/ELF period, this is
also covered in the Warranty section of this guide.
IRIS X WARRANTY
Subject to the conditions of this limited warranty (“Warranty”), ACN warrants your IRIS X (“Product”) to be
free from defects in design, materials and workmanship at the time of its original purchase by you. The
Warranty is valid for a period of 24 months (“Warranty Period”) from the original date of purchase of
the Product.
If during the Warranty Period, this Product fails to operate under normal use and service, due to defects
in design, materials or workmanship, ACN will either repair or replace, at our option, the Product in
accordance with the conditions stipulated herein.
ACN reserves the right to charge a handling fee if a returned Product is found to not be under Warranty
according to the conditions below.
CONDITIONS
This Warranty does not cover mechanical damage caused by misuse, abuse, impact or accident or damage
caused to the Product or damage caused by liquids, lightning, power surges (ACN recommends you
obtain surge protection for your electricity supply), theft, or heat damage sustained from the stacking of
electrical equipment on or in close proximity to the Product.
This Warranty does not cover you changing your mind about purchasing the Product. The Warranty is
not transferable and does not cover any ACN services nor does the Warranty Period recommence upon
receipt of any replacement unit sent to you by ACN. If you hack the firmware or software installed with
the Product or if you tamper with security seals or remove any service covers on the equipment ACN will
consider this Warranty voided. The Warranty does not cover any computer viruses obtained from your use
of the Product or any ACN services. This Warranty does not cover Product failures which have been caused
by use of accessories or other peripheral devices which are not ACN branded original accessories intended
for use with this Product.
Equipment models may change over the course of this Warranty. It may be necessary for the replacement
unit to be a refurbished unit, a different model, and/or from a different manufacturer. Goods presented
for repair may be replaced by refurbished goods of the same type rather than being repaired. Refurbished
parts may be used to repair the goods. ACN confirms that any replacement Product sent to you will be of
merchantable quality and functionally similar to the original Product supplied.
WARRANTY CLAIMS
CUSTOMER SERVICE
Should your Product fail within the DOA/ELF Period or the Warranty Period you will need to contact ACN’s
Customer Service Team on 1300 881 778 to describe the defect. ACN will then issue you with a prepaid
return courier satchel for you to return the device for testing purposes. ACN will not be liable for any
expenses you incur in relation to any DOA/ELF or Warranty Claim.
Our dedicated Customer Service team is available 6 days a week for all of your service needs.
The return satchel is pre-labelled with our return address which is:
Customer Service
1300 881 778
From Overseas +61 2 8214 4285
ACN Product Returns
Locked Bag 2145
NORTH SYDNEY NSW 2059
Please note that some of your personal settings, content and other information and stored data may
be lost when the Product is repaired or replaced. Due to applicable law, other regulation or technical
restrictions, ACN will not make a back-up copy of your information.
ACN does not take responsibility for any lost information of any kind and will not reimburse you for such
loss. You should always make back-up copies of all the information stored on the Product before handing
it in for repair or replacement.
You will need to comply with any other return procedures stipulated by ACN as published or explained
at the time of the claim. If a defect exists and a valid claim under the Warranty is received by ACN after
the first 14 days following the expiry of the Warranty Period, ACN is entitled to charge for any reasonable
shipping and handling costs made in connection with the repair or replacement of the Product.
ACN respects your rights as a consumer. Our goods come with guarantees that cannot be excluded
under the Australian Consumer Law. You are entitled to a replacement or refund for a major failure and
for compensation for any other reasonably foreseeable loss or damage. You are also entitled to have the
goods repaired or replaced if the goods fail to be of acceptable quality and the failure does not amount
to a major failure. Nothing contained in this Warranty shall be read or applied so as to exclude, restrict
or modify the application of applicable provisions of Australian Consumer Law, including Consumer
entitlements described in the Competition and Consumer Act (as amended), or any relevant State or
Territory statute which by law cannot be excluded, restricted or modified.
To the extent that any such statute permits ACN to limit our liabilities to compensate or indemnify you
or any other person for breach of an implied guarantee, condition or warranty, our respective liabilities
for such breach shall be limited to, at our option: (a) the replacement of the Product or the supply of an
equivalent Product or payment of the cost of replacing the Product or acquiring an equivalent Product; or
(b) the repair of the Product or payment of the cost of having the Product repaired.
STANDARD FORM OF AGREEMENT
Important Customer Information: Your Rights and Obligations.
For the complete terms and conditions which apply to the supply of the Product and ACN services, and
which set out your rights and obligations, please refer to ACN’s Standard Form of Agreement (SFOA),
available on our website acnpacific.com.au.
Email Enquiries [email protected]
Chatacnpacific.com.au/contact-us
Hours of Operation
Monday to Friday: 9:00am - 6:00pm (AEST)
Saturday: 10:00am - 6:00pm (AEST)
Sundays and Public Holidays: Closed
For further information about pricing and other services available from ACN, please visit acnpacific.com.au.
acnpacific.com.au
ACN Pacific Pty Ltd
ABN 85 108 535 708
600810
MKT-1165
01.08.2012