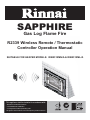
1
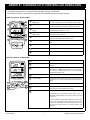
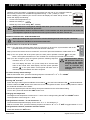
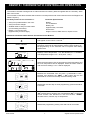
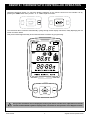
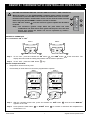
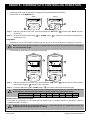
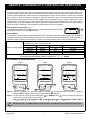
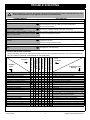
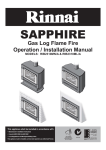
SAPPHIRE
/"0(0
!123!(
&'(
4$
5&%604!76&6!4869!%1!%1
This appliance shall be installed in accordance with:
!"
#$%#"#
&'$$(
)
#*+##$#),
'#-.
All Rinnai gas products
are A.G.A. certified.
Distributed and serviced in Australia under a Quality
System certified as complying with ISO 9001 by
SAI Global
Congratulations on the purchase of your Rinnai Sapphire gas log flamefire.
We trust you will have many years of comfort and enjoyment from your appliance.
BEFORE PROCEEDING WITH THE OPERATION OR INSTALATION OF YOUR NEW REMOTE
CONTROLLER PLEASE READ THIS MANUAL THOROUGHLY AND GAIN A FULL UNDERSTANDING
OF THE REQUIREMENTS, FEATURES AND OPERATION OF YOUR NEW CONTROLLER.
Rinnai Australia
i
Sapphire Controller Operation Manual
TABLE OF CONTENTS
SAFETY & CARE .................................................................................................................................................. 1
CONTROLLER SAFE HANDLING & CARE........................................................................................................ 1
BATTERY SAFETY & DISPOSAL INSTRUCTIONS........................................................................................... 1
REMOTE / THERMOSTATIC CONTROLLED OPERATION................................................................................ 2
REMOTE CONTROLLER - BATTERY INSTALLATION ..................................................................................... 3
REMOTE CONTROLLER - SYNCHRONISATION. ............................................................................................ 3
REMOTE CONTROLLER - MANUAL OPERATION ........................................................................................... 3
REMOTE CONTROLLER - AUTOMATIC OPERATION ..................................................................................... 4
WIRELESS CONTROLLER / THERMOSTAT..................................................................................................... 5
TO TURN YOUR HEATER ON WITH REMOTE / THERMOSTATIC CONTROL............................................... 7
MODES OF OPERATION ................................................................................................................................... 7
PROGRAMMING OF PROGRAM MODES......................................................................................................... 9
GENERAL OPERATION CHARACTERISTICS ............................................................................................... 11
TROUBLE SHOOTING CHECKLIST ................................................................................................................ 11
WARRANTY & PURCHASE RECORD............................................................................................................... 12
WARRANTY ...................................................................................................................................................... 12
PURCHASE RECORD ...................................................................................................................................... 12
CONTACT INFORMATION ................................................................................................................................. 13
CARTON CONTENTS
Ensure that the components listed below are present before proceeding.
1
2
3
4
1 Wireless remote/thermostatic control
3 AA batteries (x2)
2 Wall mount
4 These Operating Instructions
Rinnai Australia
ii
Sapphire Controller Operation Manual
SAFETY & CARE
CONTROLLER SAFE HANDLING & CARE
• Clean your controller with a lightly dampened cloth; DO NOT use harsh abrasives or solvents to clean any part
of the controller, doing so may result in damage to the finish of the controller.
•
DO NOT place your controller in a position where it may be easily damaged, i.e. on the floor or on a seat or
under a heavy object.
•
DO NOT leave your controller in direct sunlight.
•
DO NOT expose your controller to excessive humidity or submerse it in fluid.
•
DO NOT carry your controller around in pants pockets or purse, risk of damage to the screen may occur.
•
DO NOT leave your controller on top of a free standing unit where it may be affected by the heat of an operating
appliance.
•
DO NOT dismantle, or otherwise modify the controller, attempting to do so may damage or affect the operation
and will void your warranty.
BATTERY SAFETY & DISPOSAL INSTRUCTIONS
Please follow the instructions below for safe handling and proper disposal of each type of your controller batteries.
•
DO read the instructions on packaging of batteries. Make sure to insert new batteries correctly, following the
symbols for positioning the positive (+) and negative (-) ends of each battery.
•
DO replace batteries with the size and type specified in your Rinnai product's Operation / Installation manual.
•
Exchange both spent batteries from the controller at the same time, do not mix old and new batteries.
•
DO store batteries in a cool, dry place at normal room temperature. Remove batteries from devices that will be
stored unused for extended periods.
•
DO dispose of batteries according to the local laws and regulations of your region. Some batteries may be
recycled, and may be accepted for disposal at your local recycling centre. If you are not able to identify the
applicable rules in your area, please check the instructions of the battery manufacturer.
•
Batteries may present a risk of fire, explosion, or chemical burn if mistreated.
•
DO NOT disassemble, puncture, modify, drop, throw, or cause other unnecessary shocks to batteries.
•
DO NOT dispose of batteries in a fire or incinerator, or leave batteries in hot places such as a car left in direct
sunlight.
•
DO NOT store batteries near an oven, stove, or other heat source.
•
DO NOT connect batteries directly to an electrical source, such as a domestic power outlet or car power-point.
•
DO NOT place batteries into a microwave oven, or into any other high-pressure container.
•
DO NOT immerse batteries in water or otherwise get them wet.
•
DO NOT short circuit batteries; for example, do not carry loose batteries in a pocket or purse with other metal
objects, which may inadvertently cause a battery to short circuit.
•
DO NOT use batteries, or charge rechargeable batteries, that appear to be leaking, discoloured, rusty,
deformed; emit an odour; or are otherwise abnormal.
Warranty does not cover damage caused to the controller by incorrect, damaged, or leaking
batteries.
•
DO NOT touch leaking batteries directly; wear protective material to remove the batteries and dispose of them
properly immediately.
•
DO NOT reverse the polarity (positive and negative terminals) of batteries.
•
DO NOT mix used and new batteries, or install used batteries in other equipment.
•
DO NOT charge non-rechargeable batteries, or use unspecified charging instructions or equipment for
rechargeable batteries.
•
DO NOT continue to charge batteries beyond the specified time.
•
DO NOT give batteries to young children, or store batteries where children may access them.
•
DO NOT put batteries in mouth. If swallowed, contact physician or local poison control centre immediately.
Rinnai Australia
1
Sapphire Controller Operation Manual
REMOTE / THERMOSTATIC CONTROLLED OPERATION
For further enhanced comfort and convenience the Sapphire heater can be both remotely and thermostatically
controlled through the use of a wireless wall mountable controller / thermostat.
The wireless controller / thermostat is an optional extra available through your Rinnai stockist.
DISPLAY LAYOUT & FEATURES
5
3
6
1
Time of day with ‘AM’ or
‘PM’ display
Displays time of the day in hours and minutes, ‘AM’ or ‘PM’.
The time is displayed when the thermostat is ‘ON’ or ‘OFF’.
2
Day of the week
Displays the current day of the week.
The day is displayed when the thermostat is ‘ON’ or ‘OFF’.
3
Current Room temperature
display
Displays the current temperature.
The temperature range is 7°C - 32°C.
4
Setting Temperature
‘SET’ display
When the thermostat is ‘ON’, the programmed (set)
temperature will be displayed.
5
Transmit indicator
Indicates that the thermostat is transmitting to the receiver,
the symbol will appear on the LCD for 1 sec.
6
Battery Low indicator
Indicates when the battery power is below an acceptable
level.
7
Automatic mode indicator
Indicates if the thermostat is in automatic mode.
8
Program mode indicator
Indicates that the thermostat is in programming mode.
9
Manual mode indicator
Indicates if the thermostat is in manual mode.
10
Setting ‘UP’ Button
Increase hours, minutes, day or temperature.
11
‘OK’ Button
Accepts the current function and advances to the next
function.
12
‘PWR’ (Power) Button
Switches the thermostat ‘ON’ and ‘OFF’. To turn ‘ON’ press
and release the ‘PWR’ and ‘OK’ Buttons at the same time
this will turn the thermostat ‘ON’ to the most recently
programmed working mode.
13
‘A/M’ Button
Toggles between automatic, manual and flame mode.
14
‘T’ (Time) Button
Initiates time and day of the week programming (must press
and hold for 2 or more seconds when the thermostat is
‘OFF’).
15
Setting ‘DOWN’ Button
Decrease hours, minutes, day or temperature.
16
‘P’ (Program) Button
Initiates the programming mode (must press and hold for 2 or
more seconds when the thermostat is ‘OFF’).
17
Flame Indicator
Indicates the flame setting.
17
4
1
2
7
with
9
8
UP
A/M
T
OK
P
PWR
DOWN
BUTTON LAYOUT & FEATURES
10
11
UP
A/M
13
14
15
T
OK
DOWN
P
PWR
12
16
The Flame symbol graphically indicates which of the 7
graduated settings between Low and High flame when the
burner is on.
In AUTO or MANUAL temperature mode, if the burner is OFF
due to room temperature being reached the symbol will
modulate UP and DOWN. This is to indicate that the unit is
still ON even though there are no flames visible in the
appliance.
Rinnai Australia
2
Sapphire Controller Operation Manual
REMOTE / THERMOSTATIC CONTROLLED OPERATION
REMOTE CONTROLLER - BATTERY INSTALLATION
Carefully remove the battery compartment cover panel from the rear of your controller hand-set
and correctly insert the two AA batteries supplied ensuring '+' and '-' polarity is correct.
When installing your batteries your remote control will display the 'Initial Set-up Screen'. The
screen will display the following:
•
Current room temperature in °C
•
Default time setting of
•
Default day of the week setting ‘MO’ - Monday.
When batteries are changed all settings other than synchronisation are lost and the controller will
revert back to the 'Initial set -up screen'.
NOTE
Synchronisation must be carried out when a new controller has been purchased. The heater will
not respond or operate to any function until synchronisation has been carried out.
REMOTE CONTROLLER - SYNCHRONISATION.
Before proceeding with synchronisation ensure that the gas and electricity are connected.
NOTE
Two controllers CAN NOT be used at the same time!
Synchronisation of Controller & The Heater
Step 1).Turn the power off at the power point for a minimum of 30 seconds, synchronisation will not be
possible unless the minimum 30 seconds has been observed.
a
b
Step 2).Ensure the remote control is turned OFF, to turn OFF press and release the ‘PWR’ button once.
Step 3).Turn the power ON at the power point, the blue power operation indicator b on the push
button control panel will flash once. The controller can now be synchronised with the heater.
Step 4).On the controller in quick succession press the following sequence
of buttons: ‘P’ > ‘T’ > ‘T’ > ‘UP’.
NOTE
The LCD display will show ‘L/C’ (Learn Code) for 2 seconds then
return to the normal ‘OFF’ state display. The blue power operation
indicator b on the push button control panel will flash once to
indicate that synchronisation has been accepted.
Synchronisation MUST
BE performed within 30
seconds of the power
being turned ON, if more
than 30 seconds has
elapsed repeat steps 1
through 3.
To restore factory default settings
With the thermostat ‘OFF’, press the following sequence of buttons ‘P’ > ‘T’ > ‘T’ > ‘DOWN’.
REMOTE CONTROLLER - MANUAL OPERATION
Turning ‘ON’ and ‘OFF’
Press ‘ON’/‘OFF’ button of the Push Button Control Panel a once the Power Indicator LED b , will illuminate blue.
Press the ‘OK’ and ‘PWR’ button at the same time to turn ‘ON’/ ignite the heater. This is a safety feature to reduce
the accidental activation of the heater.
The unit first lights the pilot and then after a short period switches to the ‘HIGH’ flame setting.
To turn ‘OFF’ press and release the ‘PWR’ button once.
Changing the temperature
The Sapphire has temperature increments of 1° which can be changed using the ‘UP’ and ‘DOWN’ buttons.
The temperature control range is 7 - 32°C
Change between Celsius - °C and Fahrenheit - °F
The thermostat temperature display can be set to °C or °F. The default is °C.
With the controller ‘OFF’, press the following sequence of buttons: ‘P’ > ‘T’ > ‘T’ ‘A/M’ to toggle between °C or °F.
Change between manual, automatic and flame modes
Press and release the ‘A/M’ button.
Rinnai Australia
3
Sapphire Controller Operation Manual
REMOTE / THERMOSTATIC CONTROLLED OPERATION
REMOTE CONTROLLER - AUTOMATIC OPERATION
Setting the Current Time and Day of the Week
STEP 1
STEP 2
STEP 3
10
UP
A/M
T
OK
UP
P
PWR
A/M
DOWN
UP
OK
T
P
PWR
A/M
T
DOWN
OK
P
PWR
DOWN
11
14
15
Step 1. With the controller ‘OFF’, press and hold the ‘T’ button
‘HOUR’ and ‘AM or PM’ will flash.
NOTE
14
for approximately 2 seconds. ‘TIME’,
If no buttons are pressed within 10 seconds the display will revert back to 'Initial Set-Up Screen'
retaining the last entered setting.
Step 2. To select the hour push the ‘UP’ button 10 or ‘DOWN’ button 15 until the desired hour is chosen, note
that AM or PM is chosen by cycling through the 12 hour range.
Step 3. Press the ‘OK’ button
will flash.
11
to enter the selected hour and AM or PM. ‘TIME’ + ‘MINUTES’ + ‘AM or PM’
STEP 5
STEP 4
STEP 6
STEP 7
10
10
UP
UP
A/M
T
OK
P
PWR
A/M
T
OK
UP
P
PWR
A/M
DOWN
DOWN
T
OK
UP
P
PWR
A/M
T
DOWN
11
OK
P
PWR
DOWN
11
15
15
Step 4. To select the minutes push the ‘UP’ button
chosen.
Step 5. Press the ‘OK’ button
will flash.
11
11
or ‘DOWN’ button
15
until the desired minutes are
to enter selected minutes, One of the days SU, MO, TU, WE, TH, FR or SA
Step 6. To select the hour push the ‘UP’ button
Step 7. Press the ‘OK’ button
10
10
or ‘DOWN’ button
15
until the desired day is chosen.
to enter the selected day and to complete time and day setup.
To adjust time for Daylight Saving time
To adjust time or to adjust for daylight savings follow Steps 1 and 2 then press ‘OK’ button
keep the minutes and the current day.
NOTE
11
, three times to
When changing batteries all settings will be lost and the controller will revert back to the 'Initial
setup screen'. Re-setting of time, date and programming will be necessary.
Rinnai Australia
4
Sapphire Controller Operation Manual
REMOTE / THERMOSTATIC CONTROLLED OPERATION
WIRELESS CONTROLLER / THERMOSTAT
The wireless controller is designed to be wall mounted on a bracket, (bracket supplied with the controller), within
20m of the heater.
The controller houses the thermostat which senses room temperature and communicates back to the Sapphire via
Radio Frequency.
The ideal position for the controller is:
Controller Specifications
• Away from direct sunlight.
Battery:
2 x AA batteries.
• Suitable distance away from the heater
(not exceeding 20 metres).
Battery Life:
Approximately 12 months.
• Ideally 1.5 m from the floor
(approximately at chest height).
Dimensions:
Height: 140 mm, Width: 80 mm, Depth: 20 mm.
• Away from possible drafts in the room.
Additional information about Remote Thermostat Control Buttons
Transmit Indicator
Battery Indicator
Indicates the thermostat is transmitting to the receiver, the symbol
with appear on the LCD for 1 second.
This symbol will flash when batteries need replacing. The thermostat
will remain functional for approximately 5 days before shutting ‘off’.
Re-programming of the controller will be required after battery
replacement.
Temperature Display
Displays current temperature. °C is the default but °F is available.
The temperature range is 7°C - 32°C (45°F - 90°F).
Room Indicator or Set Indicator
When the thermostat is ‘ON’ the programmed (set) temperature and
the room temperature will be displayed. When the Flame mode is
‘ON’ the Flame setting F7 to F1 will be displayed.
PWR + OK
UP
A/M
T
OK
P
PWR
DOWN
Switches the thermostat ‘ON’ and ‘OFF’. If thermostat is ‘OFF’,
pressing and releasing the ‘PWR’ + ‘OK’ button will turn the
thermostat on to the most recently selected working mode.
T (Time)
UP
A/M
T
OK
P
PWR
PWR
Initiates the time and day of week programming, press and hold for
2 seconds.
DOWN
UP, DOWN & OK
UP
A/M
T
OK
P
PWR
PWR
DOWN
‘UP’ increase hours, minutes, day or temperature ‘OK’, accepts the
current function and advances to the next function, ‘DOWN’,
decrease hours, minutes, day or temperature.
P (Program)
UP
A/M
T
OK
P
PWR
PWR
Initiates the programming mode, press and hold for 2 seconds.
DOWN
Rinnai Australia
5
Sapphire Controller Operation Manual
REMOTE / THERMOSTATIC CONTROLLED OPERATION
Additional information about Remote Thermostat Control Opertation
Character Diagnostic Check. To check the display characters on the remote control turn the controller 'off' by
pressing the 'PWR' button then press P - T - T - OK in rapid succession.
UP
UP
A/M
T
OK
P
PWR
A/M
T
OK
P
PWR
DOWN
DOWN
The remote will then commence automatically cycling through all the display characters, finally displaying the full
screen as shown below.
This process takes approximately 20 seconds and does not affect any programming.
1
2
3
UP
A/M
T
OK
P
PWR
DOWN
If any of the characters are not displayed contact your Rinnai stockist for a replacement controller.
NOTE
The Fan and Snowflake symbols displayed are not utilized in the operation of the Sapphire heater.
Rinnai Australia
6
Sapphire Controller Operation Manual
REMOTE / THERMOSTATIC CONTROLLED OPERATION
TO TURN YOUR HEATER ON WITH REMOTE / THERMOSTATIC CONTROL
BEFORE PROCEEDING ENSURE THE GAS AND ELECTRICITY ARE TURNED ON.
NOTE
When the heater is in the OFF/STANDBY condition (power supply connected
and switched on) the blue LED Power Indicator will double flash. This is normal.
However before remote / thermostatic control can be used the heater must be
taken out of the OFF/STANDBY condition, do this as follows:
Press ‘ON’/‘OFF’ button a once the electronic ignition sparker will be able to
be heard.
Step 1. The electronic ignition stops when the pilot flame has been
established. The main burner then ignites off the pilot. Once the main
burner has ignited the heater can the be operated by remote /
thermostatic control.
b
d
a
c
MODES OF OPERATION
To Turn Remote ‘ON’ or ‘OFF’
STEP 1
STEP 2
UP
A/M
T
OK
UP
P
PWR
A/M
T
DOWN
OK
P
PWR
DOWN
11
12
12
Step 1. To turn ‘ON’ - press and release the ‘OK’ button 11 and ‘PWR’ button
display will now include the setting temperature and the mode of operation.
Step 2. To turn ‘OFF’ - press the ‘PWR’ button
12
12
at the same time. The
only.
Manual Temperature Mode
•
Temperature can be set at any level.
•
Time and day of week does not need to be programmed to operate.
STEP 1
STEP 2
10
UP
A/M
UP
OK
T
P
PWR
A/M
DOWN
T
OK
P
PWR
DOWN
13
15
Step 1. With the controller turned ‘ON’, press and release the ‘A/M’ button
appears on the LCD.
Step 2. Press press the ‘UP’ button
increments of 1°C.
Rinnai Australia
10
or ‘DOWN’ button
7
15
13
until the word ‘MANUAL’
to increase or decrease the temperature in
Sapphire Controller Operation Manual
REMOTE / THERMOSTATIC CONTROLLED OPERATION
Automatic Timer Mode
•
In automatic timer mode temperature is regulated to the programmed level and time.
•
Time and day of week MUST BE set.
STEP 1
STEP 2
10
UP
A/M
T
UP
OK
P
PWR
A/M
T
DOWN
OK
P
PWR
DOWN
13
15
Step 1. With the controller turned ‘ON’, press and release the ‘A/M’ button
on the LCD.
Step 2. At any time press the ‘UP’ button
increments of 1°C.
10
or ‘DOWN’ button
13
until the word ‘AUTO’ appears
to increase or decrease the temperature in
15
Flame Mode
•
Temperature control is over ridden and the flame size can be set to any setting from F7 highest to F1 lowest.
NOTE
•
When the fire first ignites it remains on highest flame for the first 60 seconds before changing to
the selected flame height.
Time and day of week does not need to be programmed.
STEP 1
STEP 2
17
17
10
UP
A/M
T
OK
UP
P
PWR
A/M
DOWN
T
OK
P
DOWN
13
15
Step 1. With the controller turned ‘ON’, press and release the ‘A/M’ button
and the flame symbol
Step 2. Press the ‘UP’ button
PWR
17
10
13
until the letter ‘F’ with a number
appear on the LCD panel.
or ‘DOWN’ button
15
to increase or decrease the flame height.
The fan speed automatically adjusts to the corresponding flame height. It is not able to be selected
by the operator. See the flame table below for flame height to fan speed relationship.
NOTE
Flame Height
1
2
3
4
5
6
7
Fan Speed
HIGH
LOW
LOW
LOW
HIGH
HIGH
HIGH
Manually Overriding The Set Program
At any time, the temperature or fan speed may be adjusted ‘UP’ or ‘DOWN’ similarly to operating in “Manual
Temperature Mode” on page 7.
NOTE
However, whenever the thermostat changes to a new time period, the temperature will be set
automatically according to that period’s setting.
Rinnai Australia
8
Sapphire Controller Operation Manual
REMOTE / THERMOSTATIC CONTROLLED OPERATION
Flame Height And Fan Speed
The flame height and fan speed are not individually adjustable. Flame height and fan speeds are selected by the
microprocessor according to the difference between the set temperature and the ambient temperature of the room.
The fan speed automatically adjusts to the corresponding flame height. The fan speed is not able to be selected
by the operator. When the heater is operated in ‘Manual Temperature Mode’ the flame height is automatically
selected by the microprocessor to achieve and maintain the ‘set’ temperature. As an example, if the room is much
colder than the ‘set’ temperature, the flame height and corresponding fan speed will be high. As the room heats up
and gets close to the ‘set’ temperature the flame height and corresponding fan speed will revert to lower settings.
When the heater is operated in ‘Flame Mode’ the flame height is set by the operator.
Flashing Small Flame Symbol ‘on’
The small flashing flame symbol 17 on the RF controller display indicates the room
temperature is within 0.5°C of set temperature.
17
Program Modes
The appliance can be programmed to operate during four separate periods in one day, resulting in a possible 28
operating periods per week. A weekday program can be set so the program is used Monday to Friday. Similarly, a
weekend program can be set for Saturday to Sunday. The entire week can also have the same program.
If you do nothing to change the programming the following default settings would be
available if you set it to automatic mode.
Time Period
Start Time
Temperature °C
Suggested Time Period Settings
Period 1
6:00 am
20°C
- Morning
Period 2
8:30 am
15°C
- Day time
Period 3
5:00 pm
21°C
- Evening
Period 4
10.30 pm
15°C
- Night time
To revert back to the default settings once you have reset the periods, in rapid
succession press the following sequence of buttons ‘P’ - ‘T’ - ‘T’ - ‘DOWN’.
Factory default settings
PROGRAMMING OF PROGRAM MODES
STEP 1
STEP 2
STEP 3
10
UP
A/M
T
OK
DOWN
UP
P
PWR
A/M
16
T
OK
DOWN
15
UP
P
PWR
A/M
T
OK
DOWN
P
PWR
11
Step 1. With the controller ‘OFF’, press and hold the ‘P’ button 16 for approximately 2 seconds. The LCD will
display ‘PROG’. ‘Pd’ and the current time and the day ‘MO’ will flash.
Step 2. To select the day range press the ‘UP’ button 10 or ‘DOWN’ button 15 until the desired day range has
been chosen the day ranges are as follows:
MO TU WE TH FR MO TU WE TH FR SA SU SU - SA SU MO TU WE TH FR SA
Holding the ‘UP’ or ‘DOWN’ buttons for more than 2 seconds will scroll through the day ranges.
NOTE
Rinnai Australia
9
Sapphire Controller Operation Manual
REMOTE / THERMOSTATIC CONTROLLED OPERATION
STEP 4
STEP 6
STEP 5
10
10
UP
A/M
T
OK
UP
P
PWR
A/M
T
DOWN
OK
UP
P
PWR
DOWN
A/M
15
OK
T
P
PWR
DOWN
16
15
Step 3. Press the ‘OK’ button 11 to enter the selected day range. The LCD will display ‘PROG’. ‘P1’ and the
‘TIME’ + ‘HOUR’ + ‘AM’ will flash.
Step 4. To select the ‘ON’ hour for ‘P1’ push the ‘UP’ button 10 or ‘DOWN’ button 15 until the desired hour is
chosen, note that AM or PM is chosen by cycling through the 12 hour range.
Step 5. Press the ‘OK’ button
will flash.
11
to enter the selected hour and AM or PM. ‘TIME’ + ‘MINUTES’ + ‘AM or PM’
Step 6. To select the ‘ON’ minutes for ‘P1’ push the ‘UP’ button
minute is chosen.
STEP 7
10
or ‘DOWN’ button
STEP 8
until the desired
15
STEP 9
10
UP
A/M
T
OK
UP
P
PWR
DOWN
A/M
16
T
OK
UP
P
PWR
A/M
DOWN
T
OK
P
DOWN
15
Step 7. Press the ‘OK’ button
11
PWR
16
to enter the ‘ON’ minutes. ‘SET’ + ‘TEMPERATUTRE DIGITS’ will flash.
Step 8. To select the ‘ON’ temperature for ‘P1’ push the ‘UP’ button
temperature is chosen.
10
or ‘DOWN’ button
15
until the desired
Step 9. Press the ‘OK’ button 11 to enter the selected temperature. The LCD will display ‘PROG’. ‘P2’ and the
‘TIME’ + ‘HOUR’ + ‘AM’ will flash, this completes the programming for the ‘P1 - ON’ period. Repeat
steps 3 through 9 for ‘PROG’. ‘P2 - OFF’, ‘P3 - ON’ and ‘P4’ ‘OFF’ periods.
Rinnai Australia
10
Sapphire Controller Operation Manual
TROUBLE SHOOTING
GENERAL OPERATION CHARACTERISTICS
NOTE
Before asking for a service call please check the following table as these characteristics are part
of the normal operation of the appliance and do not indicate a fault.
CHARACTERISTIC
EXPLANATION
At ignition:
Warm air does not start when the burner lights.
The fan is started automatically after a short delay. This is to allow the
heat exchanger to warm up, helping to avoid cold draughts.
This is normal operation.
Smoke or strange smells are produced on the
first start up after installation.
This is caused by grease, oil or dust on the heat exchanger.
This is to be expected and will cease after a short time.
Sharp clicking noises at ignition, or when the
unit thermostat modulates to a lower or higher
setting, or shuts down.
This is simply expansion and contraction noise from the heat exchanger.
This is a normal operation sound.
During combustion:
Dull clunking noise when the thermostat
operates.
This is the sound of the solenoid gas valves opening and closing to
regulate the gas flow.
These are normal operation noises.
When the appliance is turned off:
Convection fan continues to run after turning
‘OFF’.
This is to remove residual heat from the heat exchanger and stops once
the appliance cools sufficiently.
TROUBLE SHOOTING CHECKLIST
Not plugged in or turned off
Mains power failure
(Initial Install) Air in gas pipe
Air in hose
Ignition failure
Flat battery for remote control
Gas supply turned off
Gas escape
Inadequate flue system
Insufficient gas pressure
Log Misalignment
Normal operation
*Remote not working
Fault
Condition
Simplest Possible
Remedy
Plug in power cord and turn power ‘ON’.
Re-ignition, when power restored.
Installer to purge air from gas supply.
Repeat Ignition procedure.
Repeat Ignition procedure.
Replace remote control battery.
Turn gas supply on at the meter or cylinder.
Isolate gas supply, call Rinnai.
Call Rinnai.
Call Rinnai.
Call Rinnai.
No action is required.
Fan not working - fan automatically comes on after
4 minutes not heat switch activated.
Allow heater to warm up.
Allow heater to run on high for 4 minutes.
Call Rinnai.
Replace batteries.
Refer to page 9 for solution.
Refer to page 11 for solution.
*
Normal operation
Normal operation
Heat switch not activated
Possible fan fault
Controller display blank
Control Panel Operation
Controller Not Synchronised
**
* Only applicable when optional remote controller is used.
Rinnai Australia
Glass, Streaky lines
Glass, Condensating
Severe sooting
Minor soot deposits
Fan Not Working
Probable
Cause
Smell of gas
Fault
Condition
Burners fail to ignite
Use the following chart to help determine whether a service call is required, however if you are unsure about the
way your heater is operating, contact Rinnai or your local agent.
** Only applicable if the remote controller is programmed.
11
Sapphire Controller Operation Manual
WARRANTY & PURCHASE RECORD
WARRANTY
Warranty does not cover damage caused to the controller by; incorrect, damaged, or leaking batteries.
For full warranty terms and conditions for you remote controller / thermostat refer to the warranty booklet supplied
with your Rinnai Sapphire heater.
THE ORIGINAL RECEIPT MUST BE RETAINED AS PROOF OF PURCHASE.
NOTE
PURCHASE RECORD
Purchased From
Company Name:
____________________________________________________________________
Company Address: ____________________________________________________________________
____________________________________________________________________
____________________________________________________________________
Telephone:
____________________________________________________________________
Mobile Phone:
____________________________________________________________________
Purchase Date:
____________________________________________________________________
Rinnai Australia
12
Sapphire Controller Operation Manual
CONTACT INFORMATION
Australia Pty. Ltd.
Internet: www.rinnai.com.au E-mail: [email protected]
ABN 74 005 138 769
Head Office
National Help Lines
10-11 Walker Street,
Braeside, Victoria 3195
P.O. Box 460
Tel: (03) 9271 6625
Fax: (03) 9271 6622
Sales & Service
Tel: 1300 555 545*
Fax: 1300 555 655*
*Cost of a local call Higher from mobile or public phones.
Rinnai has a Service and Spare Parts network with personnel who are fully trained
and equipped to give the best service on your Rinnai appliance. If your appliance
requires service, please call our Help Line. Rinnai recommends that this appliance
be serviced every 2 years.
RNZ 11979 Issue D
13
RA 2010_013RIB2310CONTROL, Issue 4 - 5/9/11