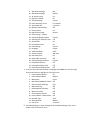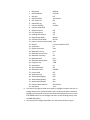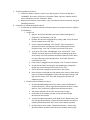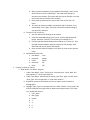
1
Ricoh G700SE Software Configuration
1. Formatting Memory Care for First Use
a. Before you take any images or connect to a computer for the first time, you must format
the SD Card.
b. After properly installing the SC card and closing the flap on the bottom of the camera,
turn the camera ON.
c. Press the MENU/OK button. Hit the left directional button to highlight the left tabs. Hit
down once to highlight the Setup menu (tools symbol on menu). Tab over with the right
directional button to highlight “Format [Card]”. Hit the right directional button to open
up the “Format [Card]” sub-menu. Select “Yes” and press the Trash button on the
camera to format the memory card.
d. Once the formatting process is complete, new folders will be created on your memory
card including a “Templates” folder which is necessary for holding Camera Memos.
2. Installing Camera Software
a. Insert Camera CD-ROM into computer
b. Open the file “AutoRu.exe”
c. Click “Install the software”
d. Complete all installation steps. The Ricoh software will now be installed on your
computer.
3. Note on Camera Software:
a. The two programs that will be used are:
i. ST-10
1. This is the primary program for any kind of wireless information
transfer.
ii. List Editor
1. This program allows the user to create and edit memos to be used on
the camera.
4. Camera Settings
a. The Camera should be set the following for shooting images with memos:
i. From the main screen, hit the MENU/OK button. When the menu opens press
the left directional button and then press the down directional button once to
highlight the Tools tab (tools symbol).
1. Format [Card]
N/A
2. Format [Internal Memory]
N/A
3. New folder options
Standard
4. LCD Brightness
N/A
5. Reg. My Settings
N/A
6. Stepped Zoom
Off
7. ADJ Button Setting 1
Exposure Comp.
8. ADJ Button Setting 2
White Balance
9. ADJ Button Setting 3
ISO
10. ADJ Button Setting 4
Quality
11. AF Auxiliary Light
On
12. Operation Sounds
All
13. Volume Settings
Custom
14. LCD Confirmation Time
0.5 seconds
15. Auto Power Off
5 minutes
16. Monitor Auto off Delay
Off
17. LCD Auto Dim
On
18. Digital Zoom Image
Normal
19. Level Settings Display
20. Grid Guide Display options
Custom
21. Shooting Info. Display Frame Off
22. Auto Rotate
On
23. Card Sequence No.
On
24. Date Settings
Custom
25. Language
English
26. Video Out Mode
NTSC
27. CALS Pic Quality
1M 4:3N
28. Start Date/Time
On
29. Show folder at startup
Off
30. Choose/Change Password
Custom
31. Password Protection
Off
32. Password Validity Period
Off
33. Power Button Hold Options
Off
ii. Press the down directional button to highlight the MEMO tab. Press the right
directional button to highlight the first menu item.
1. Camera Memo Options:
On
2. Camera Memo Mode:
Mode1
3. Memo Skip:
Item1
4. Mark Memo Added to Photos: Off
5. Remove Memo Marking:
N/A
6. Memo Warning:
Off
7. Display Memo at Startup:
Off
8. Memo Increment:
Off
9. Camera Memo Imprint:
Off
10. Camera Memo 1 Auto Delete: Off
11. Barcode Type:
Auto
12. Barcode Mode:
Mode1
13. Scan Time:
3 seconds
iii. Expanded Settings: to make changes to the expanded settings menu, scroll
down to the Ex tab of the menu
1. GPS Datum
WGS-84
2. GPS Dips Mode
LAT/LON
3. GPS Lock
Off
4. GPS Data Select
GPS Options
5. GPS Track Time
Off
6. Delete GPS Log
N/A
7. Compass Heading
Cardinal
8. Compass Calibration
9. GPS Data Imprint
Off
10. UTC Data Imprint
Off
11. Heading Data Imprint
Off
12. Range Finder Mode
Mode3
13. Communication Mode
W-LAN
14. Import Communication Setting N/A
15. Send To
Custom to Wireless /FTP
16. Send Status
On
17. Simple Connection
Scan
18. Bluetooth Pass Key
N/A
19. Bluetooth Search Count
5
20. Bluetooth Auto Conn
Off
21. Bluetooth Serial
N/A
22. Bluetooth Master/Slave
Slave
23. Image File Size
1280
24. Auto Delete
On
25. Quick Send Mode
Off
26. Bluetooth Profile
OPP/BIP
27. Custom Help
Off
28. Admin Pass Key
N/A
29. Admin Mode [Regist]
N/A
30. Admin Mode [Delete]
N/A
31. Admin Mode [Delete]
N/A
32. Compass Data Selection
GPS Options
33. Declination
True
iv. To make any changes to these menu options, highlight the option you wish to
change and press the right directional arrow to open up the option submenu.
Highlight the new option and press the left directional button to return to the
main MEMO menu. To save changes and return to the shooting screen, press
the MENU/OK button.
v. To ensure that all changes take effect, turn the camera off and on again.
5. Transferring Memo to Camera
a. Locate the “Pipeline Vehicle” memo. From “My Computer” click on the disk drive
“RICOHDCX”. Once open, click on the “Templates” folder. Copy the “Pipeline Vehicle”
memo and paste it into the “Templates” folder.
b. When you are ready to use the memo, “eject” the Camera from the computer, using the
USB Safety Removal.
6. Connection to a Wireless Network and FTP
a. A connection to a wireless network can be done either on the camera itself or using the
ST-10 software.
i. Using ST-10
1. Open ST-10 from the Windows start menu, select [All Programs] >
[Programs] > [DC Software] > [ST-10].
2. Create a new wireless configuration by clicking “Add”. Enter the name
of your network setup. Click “OK”.
3. Under “Connection Method”, click “Details”. Fill in the pertinent
wireless information including setup name, ESS-ID, password and
encryption type. Click “OK” to return to the main ST-10 menu.
4. To set up an FTP, under “Send Method” click “Send via FTP”. Click
“Details” and enter pertinent FTP information including setup name,
server name, user name, password and folder. Make sure both “Does
not send a file whose name already exists” and “PASV” boxes are
unchecked. Click “OK”
5. If the camera is plugged into the computer, click “Transfer to Camera”.
6. An alert box will open informing you that updating the settings will
change any current settings on the camera. Click “Yes”.
7. You’re connection settings are now stored on the camera.
8. Once you have transferred any information to the camera, under the Ex
menu, scroll down and highlight “Import Communication Settings" and
right tab over. Select “Yes”. Your new settings will overwrite the
old/existing ones.
ii. Connect to Wi-Fi network on Camera
1. On the Expanded Settings menu (“Ex” tab on menu), scroll down to
“Simple Connection”. Hit the right directional button to select it. Scroll
down to “Scan” and click the right directional button to select.
2. The camera will now scan for Wi-Fi access points in range.
3. Scroll down to the network you wish to use and click the right
directional arrow to select.
4. To enter the network password, scroll down to the “Network Key” and
click the right directional key. Use the directional buttons to enter the
network password and click “ADJ” to set as the network password.
5. On the previous menu, under “Crypt/Authentication”, use the right
directional button and then select the correct network security type.
6. After you have entered the correct network information, return to the
Access Point List and hit “MENU/OK”. The camera will attempt to
connect to the network. The camera will alert you to whether or not the
camera was able to connect to the network.
7. Once properly connected, the camera will return to the main “Ex”
menu.
8. TIP: Once you have successfully connected to a Wi-Fi network, try to
avoid hutting “Scan” again. The camera losses the network settings if
you rescan for networks.
iii. Connect to FTP on Camera
1. You may edit the FTP settings on the camera.
2. Under the Expanded Settings (“Ex”) menu, click the right directional
button. Select the “Send to” FTP method you created in ST-10.
3. Click the right directional button and scroll down to “FTP Server”. Click
the right directional button again to bring up the FTP settings. Scroll
down and edit any FTP Server information.
4. Once you have made all changes, click “DISP” to return to the previous
menu.
iv. Default Ricoh Folder Info
1. User Name:
ricoh
2. Password:
photos
3. Folder:
/Ricoh
4. Overwrite:
Off
5. PASV:
Off
7. Creating a “Check-In” Memo
a. Open up the “List Editor” program.
i. Under “Item Name”, enter “Stock_Num” and press Enter. “Stock_Num” will
now populate “1” on the Item Name list.
ii. Under “Item Name” (should now be empty), type “Shot_Type” and click enter.
“Shot_Type” will now populate “2” under Item name list.
iii. Repeat for any other information you wish to capture such as location or
photographer.
iv. Highlight “Shot_Type” on the Item Name list. Under “Details” in the “Input” box,
enter the different shot types with an underscore and press enter. The “Input
List” should look like this:
1. Front_Main
2. Rear_Right
3. Interior
4. 3
5. 4
6. 5
7. 6
8. 7
9. 8
10. 9
v. Photo numbers 3-9 will be used to label Miscellaneous photos
vi. Note: The details section for the “Stock_Num” must be left blank for it to be
populated by a stock number during field use. Do not add any information for
“Stock_Num” under “Input”.
vii. Now highlight any other additional information under “Item Name”, such as
“Taken_By” for the photographer and add and important information under the
details section.
viii. Once you have entered all important information, under “File” click “Save As”
and name your memo accordingly.
ix. Make sure the camera is correctly connected to the computer and click the
Camera icon. This will transfer the memo to the camera.
x. Note: The camera’s SD card must be formatted for the memo to transfer to the
right folder and be properly read by the camera.
xi. Your memo will now appear on your camera and is ready for use.
8. Using the “Check-In” Memo
a. Using the Modes dial, make sure the camera is in “CALS” mode.
b. Turn the camera on and press the “ADJ/MEMO” button. A menu will pop up and you
should see the “Check-In” [or whatever it’s called] memo with the “Barcode” field
highlighted.
a. Scan the vehicle’s window sticker. The “Barcode” field will populate with the window
sticker number.
b. [This step could change if “Memo Increment” is turned on.] Press the right directional
button to forward to the next Memo item.
c. “FrontMain” should now appear as the memo field. Take a front main picture by
pressing the yellow capture button on the top of the camera. The memo will save the
image type as “FrontMain”.
d. If you are unsatisfied with this image, simply remain on “FrontMain” in the memo and
retake the picture.
e. Once satisfied with the image, press the right directional button to forward the memo
to the “BackMain” field. Take a picture of the back of the vehicle. If satisfied with your
shot, press the right directional button to forward to the interior field.
f. Repeat the steps for “Interior” and any other miscellaneous shots of the vehicle.
g. Once you have captured the bar code and all desired vehicle images you must send
them to the ASI400 server where they will be uploaded to the Pipeline.
1.
Sending photos from camera via “File Send” function
a. Press the yellow Playback button (symbol)
b. Scroll through your images and select the one you wish to send via FTP.
c. Click “MENU/OK” and scroll down using the down direction button to “File Send”. Tab over
using the right directional button and click “OK” on the wireless network you wish to send the
image over. Highlight “Send All” to send all images to the server and press the “MENU/OK”
button. A progress bar will show on your screen while the images are transferring. Once the
transfer is complete, press the “MENU/OK” button to return to Playback mode. Press the
Playback button again to return to the Shooting Mode screen.
d. If your wireless network and FTP have been correctly setup, the images will appear in your
desired FTP folder as jpg ??? images.
9. Manually Download Images
a. With the camera powered OFF, connect the camera USB cable to an available USB port
on the computer.
b. Turn the camera upside down and locate the smaller of the hatches on the bottom of
the camera. This hatch will open by sliding the yellow latch to the left with your thumb.
Once the hatch is open, connect the USB cable to the USB terminal on the camera.
c. The computer should recognize the camera and you may be prompted to choose to
open the files on the camera. Click “Open Folder to view files”. A window will open with
the content files of the camera.
d. If you are not prompted by the computer, go to “My Computer” and click on the disk
drive called “RICOHDCX”, this is the camera.
e. Once inside the camera files, click on DCIM and then click 100RICOH. From this folder
you should see your camera images.
10. Auto Delete
a. Use Auto Delete to automatically delete a camera image once it has been transferred to
the FTP folder.
b. Expanded Settings Menu
1. Under “Ex” scroll up to “Auto Delete” and change the setting from “Off”
to “On”
2. Press the left directional menu to return to the main menu.
3. Press the “MENU/OK” button to return to shooting mode.
4. The files will now automatically delete upon transfer