1
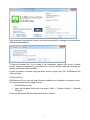
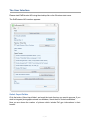
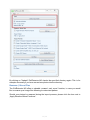
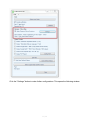
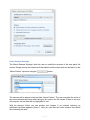
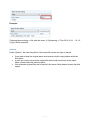
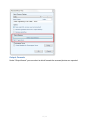
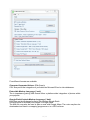
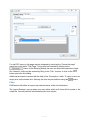
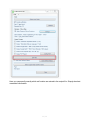
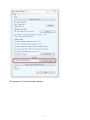
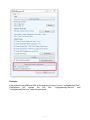
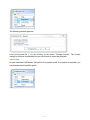
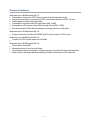
ExifExtractor NG User
Manual
1 / 29
Table of contents
Welcome to ExifExtractor NG ..................................................................................................... 3
What is ExifExtractor NG? .......................................................................................................... 5
What's new? ................................................................................................................................. 6
Installation and Licensing ............................................................................................................ 7
System Requirements ............................................................................................................ 7
Installation ................................................................................................................................ 7
Licensing .................................................................................................................................. 7
Deinstallation ........................................................................................................................... 8
The User Interface ........................................................................................................................ 9
Select Input Folder .................................................................................................................. 9
Rename / Move Files ........................................................................................................... 10
Batch Rename Settings .................................................................................................. 12
Options .............................................................................................................................. 13
Output Directory ............................................................................................................... 14
Output Formats ..................................................................................................................... 15
PDF Export ....................................................................................................................... 17
Grouping ...................................................................................................................... 18
Layout ........................................................................................................................... 20
Title Page .................................................................................................................... 20
Filter ....................................................................................................................................... 21
User Defined Values ............................................................................................................ 23
Output Folder and File Names ............................................................................................ 25
Service Menu ............................................................................................................................. 27
Saving and Resetting ........................................................................................................... 27
Info Menu ................................................................................................................................ 27
Registration ...................................................................................................................... 27
AutoUpdate ...................................................................................................................... 28
Previous Versions ..................................................................................................................... 29
2 / 29
Welcome to ExifExtractor NG
ExifExtractor NG
User Manual
Version: 3.7
Last Update: May 23th, 2013
alta4 Geoinformatik AG
Frauenstraße 8-9
54290 Trier
Germany
Fon: +49.651.96626.0
Fax: +49.651.96626-26
http://www.alta4.com
[email protected]
Copyright © 2013 alta4 Geoinformatik AG
All rights reserved.
We have compiled the following texts and illustrations with the greatest care. Nevertheless, mistakes can
3 / 29
never be completely ruled out. alta4 can assume neither juristic responsibility nor any kind of liability for
faulty information and its consequences.
We are grateful for suggestions for improvement and indications of mistakes.
ESRI, ArcGIS, ArcView, ArcMap and ArcReader are registered trademarks of ESRI Inc. RICOH, Caplio
500SE, G700SE are registered trademarks of RICOH Company Ltd. All other hardware and software
designations as well as company names used in this manual are also registered trademarks of the
respective owners and should be considered as such. In the product descriptions we generally use the
producers' spelling.
4 / 29
What is ExifExtractor NG?
The standalone software ExifExtractor NG allows the automatic processing of GPS photos
and generates a multitude of output formats.
These facilitate the integration of GPS photos in various geographic information systems
and mapping applications.
The most widely-used formats are the shapefile format and KML. The latter permits the
publication of your images in Google Earth.
ExifExtractor NG enables the user to sustainable manage and sort photos with spatial
information.
With the batch function, the photos may be collectively renamed following individual rules or
may be moved. With subsequently inserted data fields and respective information during
the batch processing, additional attributes may be recorded in the output file, like the
weather conditions at the time the picture was taken. These informations are then for
example collated in the attribute table of a shapefile.
5 / 29
What's new?
New in ExifExtractor NG 3.7:
·
·
·
·
Presentation of photos in PDF Export in portrait and landscape format
Improved compression of photos into PDF reports and reduction of PDF file size
Added button to reread the input folder
Presentation of photos within Google Earth (KML / KMZ)
·
·
Presentation of 20 memo values within Google Earth (KML / KMZ)
Direction arrows in KML files indicating the viewing direction of the photo
6 / 29
Installation and Licensing
In the following chapters you will find information that are necessary for installation and licensing.
System Requirements
Disk space
Operating
System
Image
Acquisition
Technique
System rights
22 MB
Windows 2000, NT, XP, Vista or 7
Digital camera RICOH G700SE with GPS device or comparable
system for digital image acquisition and storage of GPS information
within the photograph's exif header
administrator rights are required for installation and uninstall
Installation
Please make sure that you have the relevant administration rights required for installation.
1. Start the MSI-file by double-clicking. The installation window will automatically
appear.
2. Read the license agreement and accept it by checking the box “I Agree” and click
“Next >”.
3. Then you are requested to select the installation folder. When done, continue by
clicking “Next >”. By another confirmation the installation process is being started.
The installation is then complete. If you encounter problems, please refer to our technical
support at alta4 ([email protected]).
The installation process has added a link for starting ExifExtractor to the Windows start
menu and your desktop.
When you start the program you have the possibility to load your license file.
Licensing
Should you not yet own a license file, the ExifExtractor NG demo version will be loaded.
7 / 29
After acquiring a commercial license, you have the possibility to change to full functionality
without a new installation.
To load your license file (*.lic) to swap to full functionality, please click on the „Change
license“ button and navigate to your license file. A pop-up window appears informing you
that the registration was successful.
In case you want to continue using the demo version, simply click „Ok“. ExifExtractor NG
will be opened.
Deinstallation
ExifExtractor NG can, like any other Windows software, be uninstalled via system control.
You will need administrator rights to do so.
1. Exit ExifExtractor NG
2. Open the Windows Start menu and select „Start“ > „System Control“ > „Uninstall
Program“.
Choose ExifExtractor NG from the list and click on „Delete“.
8 / 29
The User Interface
Please start ExifExtractor NG using the desktop link or the Windows start menu.
The ExifExtractor NG interface appears:
Select Input Folder
Click the button „Select input folder“ and mark the input directory you want to process. If you
wish to integrate photographs stored in subfolders, check the box “Include subfolders”.
Now you are shown the number of pictures which include Exif gps informations in their
header.
9 / 29
By clicking on "Update" ExifExtractor NG checks the specified directory again. This is for
example necessary if you have moved new photos into the directory.
Rename / Move Files
The ExifExtractor NG offers a valuable „rename“ and „move“ function, in case you would
like to rename your image files following a customized pattern.
Should your photos be renamed during the import process, please click the box next to
„Apply Rename-/Move-Functions“.
10 / 29
Click the "Settings" button to make further configurations. This opens the following window:
11 / 29
Batch Rename Settings
The „Batch Rename Settings“ allow the user to modify the structure of the new photo file
names. Simply choose the desired exif information from the drop-down list and add it to the
“Name Pattern” input box using the
button.
The element will be placed in the text field „Name Pattern“. The user may alter the order of
the name elements and insert other strings to be used in the file names. If there is an error
in the syntax, the test field will be highlighted in red.
With the element "index" you can number your images. If you choose indexing, an
additional input field appears (“Index:”). Here you can enter the index number from which
the numbering will start.
12 / 29
Example:
Following these settings, a file with the name „0 Sightseeing in Trier 2013-01-01 - 10-1523.jpg” will be imported.
Options
Under „Options“, the user may define if the output file names are kept or altered:
·
·
·
If you want to keep the original name and rename only the copy, please select the
first option.
In case you want to rename the original file names and move them to the output
folder, please select the second option.
If the renamed original files are to remain in the same folder please choose the third
option.
13 / 29
Output Directory
Please define the output directory by clicking on the button “Select output directory” and
select or create the respective folder.
If you choose to rename the original files and not move them, no output directory is
required.
14 / 29
Output Formats
Under "Output format" you can select to which formats the scanned photos are exported.
15 / 29
Five different formats are available:
Character-Separated-Values - File (*.csv):
CSV-files permit the integration of your data into Microsoft Excel or into databases.
Extensible Markup Language (*.xml):
The in importance gaining XML-format offers a platform-wide integration of photos within
your projects.
Google Earth Keyhole-Markup-Language (*.kml):
KML-files are the exchange format of the software Google Earth.
Use this format to illustrate your images in Google Earth.
The KML-file may also be used to plan a route with Google Maps. The route may then be
downloaded and used in a mapping programme or in a GPS receiver.
16 / 29
Google Earth KMZ (*.kmz):
The KMZ-format is a compressed KML-file in ZIP format. In the KMZ-file, additionally, the
photographs are stored so that this format is especially appropriate for sharing your
projects.
ESRI Shapefile (*.shp + *.shx + *.dbf + *.prj):
Beside the SHP-file the SHX-, DBF- and PRJ-files are generated.
The format offers the possibility to integrate the image location as a point layer in
shapefile-compatible geographic information systems. The name and paths of the
associated photos are stored in the attribute table.
Portable Document Format (*.pdf) :
The PDF format can be illustrated and printed with Acrobat Reader and other illustration
programs. Beside text and vector graphics, it may contain images. For more information
on PDF export, please refer to section PDF Export.
PDF Export
The PDF-export allows to generate several PDF files containing not only the exif
information but also the respective photographs.The selected photos are grouped with the
help of exif fields, e.g. all images of a specific bar code, and then written to a PDF.
To configure the PDF-export, check the “Create PDF Report” box, select an output folder
and finally click on "config PDF".
17 / 29
The configuration menu appears, where you can set the exif information used for grouping,
design the layout and title page.
Grouping
In this slider the scheme used to group the photos to PDFs may be defined. The PDFs will
be named following the defined naming scheme using exif information. The selected output
directory and file name will be used as a prefix. If only grouping parameters are used for
naming, the file name should be given as “_” (without quotation marks).
In case grouping is not required, leave the input field „Parameters for grouping” empty.
Then all images will be saved in one PDF.
The settings of grouping items are carried out analogously to the renaming of file names
(see section Batch Rename Settings). In case you are confident with file renaming, you
may skip the following description.
18 / 29
Select the required exif information from the drop-down list and click on the
button.
The element will then be place in the text field „Parameters for grouping:“. Here, you can
modify the order. In case of syntax errors, the text field will be highlighted in red.
Example:
19 / 29
Consequently, a PDF is generated for all photographs with the same values in the first
memo name and value field. The PDFs will be named following these values, e.g.
“barcode123.pdf”, “barcode124.pdf.”
Layout
The layout slider helps you to configure the page layout. Templates can be selecetd which
define how many photogaphs are illustrated on a page. The number of templates provided
depends on the number of exif items selected for output. If a large number of exif items are
to be exported, it may not be possible to place more than two images per page.
Furthermore, an image title may be used. You can choose between the following options:
· “None”: no image title will be used
· “Filename”: the file name will be used as image title
· “ Full filepath”: the complete directory path and file name will be used as image title.
Title Page
20 / 29
For the PDF report, a title page may be designed by checking the “Create title page”
check-box in the slider “Title Page”. A logo may be included by clicking on the
button. In the following dialog, the user can select the respective image
file. Likewise, a title may be inserted by filling in the “Title:” text box. A click on the
button opens the font dialog.
Additional text can be inserted with the help oft he „Description:“ table. To insert a new row
simply click on the bottom line. Similarly, the font may be modified using the
button.
Filter
ExifExtractor NG offers to import only selected items of the exif information.
The „Import Settings“ pop up where you may define which exif items will be saved to the
output file. You may uncheck all information you don't require.
21 / 29
Here you can specify exactly which exif entries are stored in the output file. Simply deselect
unneeded information.
22 / 29
Please note, that the filter will not be applied for the generation of KML- and KMZ-files.
User Defined Values
The user may attach additional customized information to each photo, e.g. to save the
photographer or the weather for each shot. Simply click on the field “Add User Defined
Values”.
23 / 29
The input menu „Customize Data“ appears:
24 / 29
Enter the desired name in the "Name" field. Please note that the rules below have to be
followed:
· The field can contain up to 10 characters
· The following characters are supported: "az, AZ, 0-9, _"
· Caution! Spaces and points are not supported!
In the field “Type” you may define the relevant data type. For text use “String”, for whole
numbers “Integer” and for decimal numbers the data type “Double”.
Finally, you may introduce default values used for each photograph. These are typed into
the “Value” field.
Please note that your customized fields will not be saved to KML- or KMZ-file formats.
Output Folder and File Names
Under "Select output folder and file names", you can specify the path where the processed
files which are defined under "Output Formats" shall be stored.
If you check one of the options under "Output formats" for the first time a selection window
will pop up.
25 / 29
Example:
If the output formats KMZ and KML select and the file name is set to "mySightseeingTour",
ExifExtractor
NG
creates
the
two
files
"mySightseeingTour.kml"
and
"mySightseeingTour.kmz" under the given path.
26 / 29
Service Menu
In the service menu, additional features are available.
Saving and Resetting
Once you exit the ExifExtractor NG your settings will be saved. After a new start, the
program recalls your configuration. If you like to reset the settings to the default values,
choose "File" > "Reset settings".
Info Menu
The ExifExtractor NG service functions may be reached by the service menu.
Registration
Choose "Registration" in the service menu to change the license type.
27 / 29
The following window appears:
Load your license file (*. Lic) by clicking on the button "Change license". The license
change is effective immediately and you don't have to restart the program.
AutoUpdate
At each new start ExifExtractor NG verifies if an update exists. If an update is available, you
can download and install the patch.
28 / 29
Previous Versions
What was new in ExifExtractor NG 3.7:
· Presentation of photos in PDF Export in portrait and landscape format
· Improved compression of photos into PDF reports and reduction of PDF file size
· Added button to reread the input folder
· Presentation of photos within Google Earth (KML / KMZ)
· Presentation of 20 memo values within Google Earth (KML / KMZ)
· Direction arrows in KML files indicating the viewing direction of the photo
What was new in ExifExtractor NG 3.6:
· Support of photos from Ricoh G700SE with 20 memo values in PDF report
What was new in ExifExtractor NG 3.5:
· Creation of PDF reports based on Exif fields
What was new in ExifExtractor NG 3.0:
· New output format KMZ
· Manual selection of read-out exif fields
· Comfortable batch processing for renaming and moving data following individual rules
· Batch function allowing subsequent adding of fields and contents to the output file
29 / 29