1
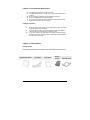
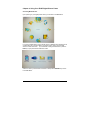
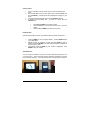
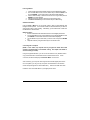
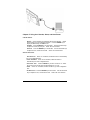
Hi-Res 10” Digital Picture Frame with MP3 player
User Manual
Table of Contents
Introduction…………………………………………………………………………3
Chapter 1: Features and Specs……………………………………………………..3
Chapter 2: Precautions & Maintenance…………………………………………...4
Cleaning the LCD Screen…………………………………………………………4
Chapter 3: Getting Started…………………………………………………………..4
Package Contents…………………………………………………………………4
Digital Picture Frame Layout…………………………………………………..…5
Remote Control Layout………………………………………………………..6
Chapter 4: Using Your EDGE Digital Picture Frame……………………………..7
Accessing Media Devices……………………………………………………….7
Vie win g Photos…………………………………………………………8
Rotating Photos…………………………………………………………………….8
Auto-Rotate View………………………………………………………………….8
Listening to Music…………………………………………………………………9
Slideshow with Music……………………………………………………………9
1
Watching a Video………………………………………………………………9
Connecting with a Computer……………………………………………………9
Chapter 5: Using the Calendar, Alarm, and Auto Power…………………………10
Calendar & Clock…………………………………………………………...10
Alarm & Auto Power…………………………………………………...10
Chapter 6: Setup Menu…………………………………………………………………11
Chapter 7:
File Edit……………………………………………………………………12
C o p yi n g Fi l es……… …………… ………… ………… ……… …… …1 2
Deleting Files……………………………………………………………12
Chapter 8: Troubleshooting……………………………………………………………13
2
Introduction
Thank you for purchasing the EDGE™ Hi-Res 10” Digital Picture Frame with MP3
player! This manual is designed to make your experience with our product both
easy and enjoyable.
Your digital picture frame has the ability to display digital photos, videos and play
music from media cards or flash drives. Using pictures from one of the supported
device formats, you can create an image slideshow with multiple transition effects.
No computer, digital camera, or Internet connection is required.
For questions or assistance with this product, visit www.edgetechcorp.com/support
or call us, toll-free at 1-800-259-6565
Chapter 1: Features and Specs
10.2" active matrix LCD screen and integrated stereo speakers.
Picture slideshow with background music
Calendar with clock and alarm functions
Auto Power feature enables users to program the frame to power on and off at
designated times
Auto-Rotate View functionality allows photos to be viewed in portrait or
landscape mode depending on how the frame is positioned
Supported Device Formats: CF, MMC, Memory Stick, Memory Stick Pro,
Memory Stick Pro Duo, SD, SDHC, USB flash drive devices, and xD
Supported Image Format: BMP, JPEG
Supported Video Formats: AVI, Divx/Xvid, MPEG 1, MPEG 2, MPEG 4
Supported Audio Formats: MP3, WAV, WMA
Resolution: 800 x 480 (16:9 aspect ratio)
Weight: 2 lbs
Power: 5V, 2A
Dimensions: 10.7” x 1.15” x 7.5”
One-year warranty
.
3
Chapter 2: Precautions & Maintenance
The digital picture frame is for indoor use only.
To reduce the risk of fire or electric shock, do not expose this to rain or
moisture.
Do not block the ventilation holes on the back of the frame.
Keep your digital frame out of direct sunlight.
Do not open the case of the frame as there is a risk for electric shock.
Opening the case will void your warranty.
Cleaning the LCD Screen
Be gentle with the LCD screen of your digital picture frame. The screen
is delicate and prone to scratches.
If the LCD screen is dirty, we recommend using a soft, non-abrasive
cloth such as a camera lens cloth to clean the screen.
If you using a liquid LCD cleaning kit, do not apply the cleaning liquid
directly to the screen. Instead, moisten a clean cloth with the liquid and
then clean the LCD screen.
Chapter 3: Getting Started
Package Contents
Before proceeding, please make sure the following items were included with your picture frame:
Digital Picture Frame
AC Adapter
User Guide
4
Remote
Control
Mini USB Cable
Digital Picture Frame Layout
Digital Picture Frame Front View
Digital Picture Frame Rear View
0
Remote
Control Sensor
6
LEFT
12
1
EXIT
7
Setup
13
Headphone Jack
14
Mini USB
connection)
15
USB Flash Drive Port
16
Power Adapter Input
2
UP
3
DOWN
9
4
ENTER
10
CF Card Slot
5
RIGHT
11
Memory Card
Slot Cover
8
Volume
Adjustment
Memory card
Slot (4-in-1)
5
Power Button
Port
(PC
Remote Control Layout
Key
Function
Key
File Select
Used for editing files in Edit
Mode
Function
INFO
Displays information of the
selected file
ESC
Exits the current info display, or
go back to previous screen
LEFT
Moves the cursor left
RIGHT
Moves the cursor right
UP
Move the cursor up
DOWN
Move the cursor down
Play/Pause
Stop
Previous File
Next File
Rewind
Fast Forward
Calendar
Display calendar and time
Zoom
SETUP
Jumps to the Setup screen
Power
Photo + Music
Starts a slideshow of
photos with background
music (only if music files
are saved to you device)
Volume Up
ENTER
Volume Down
Rotate
Mute
MENU
Jumps to the Main Menu
6
Chapter 4: Using Your EDGE Digital Picture Frame
Accessing Media Devices
Upon powering on your digital picture frame, you are taken to the Main Menu:
If you have a media device, such as an SD card or a USB flash drive inserted into its
corresponding slot, you will be able to access the photos, video, and music files
stored on it from this screen. If you would like to change media devices, press the
ESC key to jump to the Device Selection screen:
Select the device you would like to view files on and press the ENTER key to return
to the Main Menu.
7
Viewing Photos
1.
2.
3.
4.
Insert a media device with photo files stored on it into the digital picture
frame.
From the Main Menu screen, use the direction keys to select the Photo icon
and press ENTER - a thumbnail view will be displayed of all images on your
device.
Use the directional keys to select a photo and press ENTER to display it.
A slideshow will automatically start. To pause on a photo, press the
Play/Pause key.
•
•
•
Press LEFT and RIGHT keys to rotate an image.
Press the Zoom key on the remote control to zoom in and out of
images.
Press the UP and DOWN keys to skip to the next photo
Rotating Photos
While at the Thumbnail View screen, it is possible to rotate your photos and save them.
1.
2.
3.
Press the DOWN key until you highlight “Rotate.” Pressing ENTER will take
you to Rotate Mode.
Highlight a photo you would like to rotate and press ENTER to rotate it.
Continue to press the ENTER key to rotate another 90 degrees. Repeat for all
photos you wish to rotate.
Once finished, press the DOWN key until “Confirm” is highlighted. Press
ENTER to save your changes.
Auto-Rotate View
You can change the orientation of a photo to portrait or landscape depending on how
you turn the frame. This is particularly helpful for displaying pictures taken in portrait
mode (vertically displayed). This change is automatic - the following are examples:
8
Listening to Music
1.
2.
3.
4.
5.
Insert a media device with music files stored on it into the digital picture frame.
From the Main Menu screen, use the direction keys to select the Music icon
and press ENTER – a list of music saved on the device will be displayed.
Use the directional keys to select the music file in the song list and press the
ENTER key to begin playback.
Adjust the volume by using the volume keys on the remote control.
Press Next or Previous keys on the remote to skip to a different song.
Slideshow with Music
Press the Photo + Music key on the remote control to begin a photo slideshow with
background music (NOTE: You must have at least one music file saved to your device in
order for this function to work properly). Alternatively, you can select Photo + Music from
the Main Menu to start this mode.
Watching a Video
1. Insert a media device with video files stored on it into the digital picture frame.
2. From the Main Menu screen, use the direction keys to select the Video icon and
press ENTER – a list of videos saved on the device will be displayed.
3. Use the direction keys to select video you want to view and press the ENTER
key.
4. Adjust the volume by using the volume keys on the remote control.
Connecting with a Computer
(NOTE: In this section, the computer will only recognize the media card format
selected in the digital frame’s “Card Reader” setting. See Chapter 4 for details on
where this setting is located).
Using the supplied USB cable, you can connect the frame to a PC (Windows 2000+
only) and transfer files to media cards that are inserted into the frame. When
connected, the frame will display ”Card Reader Mode” on the screen.
After connecting, your computer will recognize and install the digital picture frame.
Once completed, you can go to “My Computer” and transfer files to the inserted
media card (it will appear as a “Removable Disk”).
Remove the USB cable when
finished to return to the Main Menu of your digital picture frame.
9
Chapter 5: Using the Calendar, Alarm, and Auto Power
Calendar & Clock
Display: Choose between three different date and time displays: Digital
Clock, Analog Clock, and Standard Calendar. Press the ENTER key to
display the desired style, and ESC to exit
Set Date: Press the ENTER key to set the date. Use the directional keys
to adjust the month, day and year. Select “OK” when finished.
Set Time: Press the ENTER key to set the date. Use the directional keys
to adjust the hour, minute and seconds. Select “OK” when finished.
Alarm & Auto Power
Auto Power On: When “On” is selected, enables the frame to automatically
turn on at a designated time.
Power Off Enable: When “On” is selected, enables the frame to
automatically turn off at a designated time.
Auto Power Time: Press the ENTER key on either “Power On” or “Power
Off” to set the time for the frame to automatically turn on or off.
Alarm: When “On” is selected, enables an alarm to go off at a designated
time.
Set Alarm Time:Press the ENTER key to set the date. Use the directional
keys to adjust the hour, minute and seconds. Select “OK” when finished.
10
Chapter 6: Setup Menu
Photo Setup
Transition Time: Choose the length of time between each photo transition
during a slideshow.
Transition Effect: Sets the effect while changing from one photo to the
next during a slideshow.
Photo Display: How a photo is displayed – choose to either have a photo
fit the screen how it was taken, or stretch to fit the entire screen.
Slideshow Mode: Choose from various modes of slideshows.
Photo Preview: How photos are displayed in the preview window of Photo
Mode.
Auto-Play
When a mode is turned to “On”, that mode will start automatically when the digital
frame is first powered on (as long as at least one applicable file exists on the inserted
device).
Photo:
: When on, Photo Mode will automatically begin when the frame
powers on.
Music:
: When on, Music Mode will automatically begin when the frame
powers on.
Movie:
: When on, Movie Mode will automatically begin when the frame
powers on.
Auto-Play:
:When on, Photo + Music Mode will automatically begin when the
frame powers on.
Display Setup
Brightness: Adjusts the brightness level of the display.
Contrast: Adjusts the contrast level of the display.
Saturation: Adjusts the saturation level of the display.
Miscellaneous
Repeat Mode: Determines how files will be repeated when played. “File”
will repeat a single file, “Folder” will repeat an entire folder of files, and “All”
will repeat all files on the device for the mode that is being played.
11
Card Reader:Select which media card a computer will recognize when in
Card
Reader Mode: See Chapter 4 on how to connect your digital frame to a
computer.
Chapter 7: File Edit
This mode allows you to manage files stored on media devices. You can delete
files or copy files from one media device to another.
Copying Files
NOTE: Two media devices must be inserted in order to copy files.
1.
2.
3.
4.
5.
6.
7.
8.
From the Main Menu, select “File Edit.”
Select the type of files you wish to copy (“All” is recommended).
Use the directional keys to select the device you wish to copy files from and
press ENTER.
Press the ENTER key on all files to be copied (maximum of 20 files).
Press the RIGHT key to select “File Edit” and then hit ENTER to display the
editing options.
Select “Copy” and press ENTER.
Use the directional keys to select the device you wish to copy the files to. Once
selected, press the ENTER key on “File Edit” to bring up the “Paste” option.
Press ENTER on “Paste” to begin the transfer process.
Deleting Files
1.
2.
3.
4.
5.
6.
7.
From the Main Menu, select “File Edit.”
Select the type of files you wish to copy (“All” is recommended).
Use the directional keys to select the device you wish to delete files from and
press ENTER.
Press the ENTER key on all files to be deleted (maximum of 20 files).
Press the RIGHT key to select “File Edit” and then hit ENTER to display the
editing options.
Select “Delete” and press ENTER.
Select “Yes” and press ENTER to complete deleting the file(s).
12
Chapter 8: Troubleshooting
Problem
The digital picture
frame will not
power on
Cause and/or Solution
Press the power button located on the back of the frame in
the upper-right hand corner.
My photos display
with black bars on
the sides
I set an On and/or
Off time for Auto
Power, but nothing
happens
I can’t view photos,
play videos, or
listen to music
The digital picture
frame will not
power on
No sound
Small or distorted
images or videos
Video playback is
choppy and/or
skips
Ensure that the AC adapter is connected securely to the
frame and is plugged into a power source.
Your digital picture frame uses a 16:9 (widescreen) aspect
ratio. If you see black bars, it is because the screen is
compensating for a photo that was taken using a 4:3
(square) aspect ratio. If you would like for photos to fit the
entire screen, adjust the Photo Display setting to “Full
Screen” under the Photo Setup option.
Make sure that you have turned the “Auto Power On” or
“Auto Power Off” settings to “On”
Ensure you have set the time in “Calendar & Clock Setup.”
Refer to the supported file formats in Chapter 1 and ensure
you are using the correct media file types and devices.
Check that at least one image, video, or music file exists on
the media device.
Ensure that the AC adapter is connected securely to the
frame and is plugged into a power source.
The volume is muted.
The volume is set to the lowest level.
Ensure the file you are playing with sound is one of the
supported media types in Chapter 1.
Low video or image resolution. Try playing a file with a
better quality resolution.
Media card speed may be too slow; try a higher speed card.
13
Federal Communication Commission Interference Statement
This equipment has been tested and found to comply with the limits for a Class B
digital device, pursuant to Part 15 of the FCC Rules. These limits are designed to
provide reasonable protection against harmful interference in a residential installation.
This equipment generates, uses and can radiate radio frequency energy and, if not
installed and used in accordance with the instructions, may cause harmful
interference to radio communications. However, there is no guarantee that
interference will not occur in a particular installation. If this equipment does cause
harmful interference to radio or
television reception, which can be determined by turning the equipment off and on,
the user is encouraged to try to correct the interference by one of the following
measures:
- Reorient or relocate the receiving antenna.
- Increase the separation between the equipment and receiver.
- Connect the equipment into an outlet on a circuit different from that to which the
receiver is connected.
- Consult the dealer or an experienced radio/TV technician for help.
FCC Caution: Any changes or modifications not expressly approved by the party
responsible for compliance could void the user's authority to operate this equipment.
This device complies with Part 15 of the FCC Rules. Operation is subject to the
following two conditions: (1) This device may not cause harmful interference, and (2)
this device must accept any interference received, including interference that may
cause undesired operation.
The antenna(s) used for this transmitter must not be co-located or operating in
conjunction with any other antenna or transmitter.
This device is intended only for OEM integrators under the following
conditions:
1) The antenna must be installed such that 20 cm is maintained between the antenna
and users, and
2) The transmitter module may not be co-located with any other transmitter or
antenna. As long as 2 conditions above are met, further transmitter test will not be
required. However, the OEM integrator is still responsible for testing their
end-product for any additional compliance requirements required with this module
installed (for example, digital device emissions, PC peripheral requirements, etc.).
IMPORTANT NOTE:
In the event that these conditions can not be met (for example certain laptop
configurations or co-location with another transmitter), then the FCC authorization is
14
no longer considered valid and the FCC ID can not be used on the final product. In
these circumstances, the OEM integrator will be responsible for re-evaluating the end
product (including the transmitter) and obtaining a separate FCC authorization.
15