1
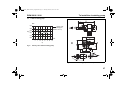
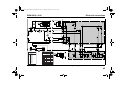
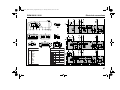
1303560C_DBW 2010 EA_degbfr.book Page 1 Tuesday, March 5, 2013 9:05 AM Wasserheizgeräte Water Heaters Appareils de chauffage à eau Einbauanweisung Installation instructions Notice de montage DBW 2010 / 2016 mit Steuergerät 1553 with Control Unit 1553 avec organe de commande 1553 1303560C_DBW 2010 EA_degbfr.book Page 1 Tuesday, March 5, 2013 9:05 AM DBW 2010 / 2016 Inhaltsverzeichnis Sommaire 1 2 3 4 5 6 7 8 9 10 11 12 13 1 2 3 4 5 6 7 8 9 10 11 12 13 Gesetzliche Bestimmungen für den Einbau . . . . . . . . . . . . 1 Verwendung / Ausführung . . . . . . . . . . . . . . . . . . . . . . . . . . 3 Einbau . . . . . . . . . . . . . . . . . . . . . . . . . . . . . . . . . . . . . . . . . . . 4 Einbaubeispiel für DBW 2010 / 2016. . . . . . . . . . . . . . . . . . . 7 Einbau Umwälzpumpe . . . . . . . . . . . . . . . . . . . . . . . . . . . . . . 8 Anschluss an das Kühlsystem des Fahrzeuges . . . . . . . . 10 Brennstoffversorgung . . . . . . . . . . . . . . . . . . . . . . . . . . . . . 11 Brennluftversorgung . . . . . . . . . . . . . . . . . . . . . . . . . . . . . . 13 Abgasleitung. . . . . . . . . . . . . . . . . . . . . . . . . . . . . . . . . . . . . 14 Elektrische Anschlüsse . . . . . . . . . . . . . . . . . . . . . . . . . . . . 15 Erstinbetriebnahme . . . . . . . . . . . . . . . . . . . . . . . . . . . . . . . 23 Störungen . . . . . . . . . . . . . . . . . . . . . . . . . . . . . . . . . . . . . . . 24 Technische Daten. . . . . . . . . . . . . . . . . . . . . . . . . . . . . . . . . 25 Table of contents 1 2 3 4 5 6 7 8 9 10 11 12 13 Statutory regulations governing installation. . . . . . . . . . . Use / version . . . . . . . . . . . . . . . . . . . . . . . . . . . . . . . . . . . . . Installation . . . . . . . . . . . . . . . . . . . . . . . . . . . . . . . . . . . . . . Installation example for DBW 2010 / 2016 . . . . . . . . . . . . . To install the circulating pump . . . . . . . . . . . . . . . . . . . . . . Connection to the vehicle cooling system . . . . . . . . . . . . Fuel supply . . . . . . . . . . . . . . . . . . . . . . . . . . . . . . . . . . . . . . Combustion air supply . . . . . . . . . . . . . . . . . . . . . . . . . . . . Exhaust pipe . . . . . . . . . . . . . . . . . . . . . . . . . . . . . . . . . . . . . Electrical connections . . . . . . . . . . . . . . . . . . . . . . . . . . . . . Initial start-up . . . . . . . . . . . . . . . . . . . . . . . . . . . . . . . . . . . . Troubleshooting . . . . . . . . . . . . . . . . . . . . . . . . . . . . . . . . . . Technical data . . . . . . . . . . . . . . . . . . . . . . . . . . . . . . . . . . . 29 31 32 35 36 38 39 41 42 43 51 52 53 Dispositions légales concernant le montage . . . . . . . . . . . 57 Utilisation / version . . . . . . . . . . . . . . . . . . . . . . . . . . . . . . . . 59 Installation . . . . . . . . . . . . . . . . . . . . . . . . . . . . . . . . . . . . . . . 60 Exemple d'installation pour le DBW 2010 / 2016 . . . . . . . . 63 Installation de la pompe de circulation. . . . . . . . . . . . . . . . 64 Raccordement au circuit de refroidissement du véhicule 66 Alimentation en carburant . . . . . . . . . . . . . . . . . . . . . . . . . . 67 Alimentation en air de combustion . . . . . . . . . . . . . . . . . . . 69 Conduite d'échappement . . . . . . . . . . . . . . . . . . . . . . . . . . . 70 Branchements électriques . . . . . . . . . . . . . . . . . . . . . . . . . . 71 Première mise en service . . . . . . . . . . . . . . . . . . . . . . . . . . . 79 Pannes . . . . . . . . . . . . . . . . . . . . . . . . . . . . . . . . . . . . . . . . . . 80 Caractéristiques techniques . . . . . . . . . . . . . . . . . . . . . . . . 81 1303560C_DBW 2010 EA_degbfr.book Page 29 Tuesday, March 5, 2013 9:05 AM DBW 2010 / 2016 1 Statutory regulations governing installation Statutory regulations governing installation 1.1. Statutory regulations governing installation DBW 2010 / 2016 heaters have been type-tested and approved in accordance with EC Directives ECE-R 122 (heaters) and ECE-R 10 (EMC) with the following permit numbers: DBW 2010 EMV: E1 10R 03 1087 DBW 2016 EMV: E1 10R 03 1087 1.2. Extract from directive ECE-R 122 Part I and Annex 7 Start of extract. Part I 5.3 Vehicle Installation Requirements for Combustion Heaters and for Electric Heaters DBW 2010 heater: E1 122R 00 0006 5.3.1 Scope DBW 2016 heater: E1 122R 00 0001 5.3.1.1 Subject to paragraph 5.3.1.2, heaters shall be installed according to the requirements of paragraph 5.3. Primarily the regulations of Annex VII of the Directive 2001/56/EC and Part I and Annex 7 of the directive ECE-R 122 must be observed for the installation. NOTE: The provisions of these Directives are binding within the territory governed by EU Directive 70/156/EEC and/or EC/2007/46 (binding for new vehicle types as of 29/04/2009) and should also be observed in countries in which there are no special regulations! IMPORTANT: Failure to follow the installation instructions and the notes contained therein will lead to all liability being refused by Webasto. The same applies if repairs are carried out incorrectly or with the use of parts other than genuine spare parts. This will result in the invalidation of the type approval for the heater and therefore of its homologation / ECE type licence. 5.3.1.2 Vehicles of category O having liquid fuel heaters are deemed to comply with the requirements of paragraph 5.3. 5.3.2 Positioning of heater 5.3.2.1 Body sections and any other components in the vicinity of the heater must be protected from excessive heat and the possibility of fuel or oil contamination. 5.3.2.2 The heater shall not constitute a risk of fire, even in the case of overheating. This requirement shall be deemed to be met if the installation ensures an adequate distance to all parts and suitable ventilation, by the use of fire resistant materials or by the use of heat shields. 5.3.2.3 In the case of M2 and M3 vehicles, the combustion heater must not be positioned in the passenger compartment. However, an installation in an effectively sealed envelope which also complies with the conditions in paragraph 5.3.2.2 may be used. 5.3.2.4 The label referred to in Annex 7, paragraph 4, or a duplicate, must be positioned so that it can be easily read when the combustion heater is installed in the vehicle. 29 1303560C_DBW 2010 EA_degbfr.book Page 30 Tuesday, March 5, 2013 9:05 AM Statutory regulations governing installation 5.3.2.5 Every reasonable precaution should be taken in positioning the heater to minimize the risk of injury and damage to personal property. 5.3.3 Fuel supply 5.3.3.1 The fuel filler must not be situated in the passenger compartment and must be provided with an effective cap to prevent fuel spillage. 5.3.3.2 In the case of liquid fuel heaters, where a supply separate from that of the vehicle is provided, the type of fuel and its filler point must be clearly labelled. DBW 2010 / 2016 5.3.7 Heating air outlet 5.3.7.1 Any ducting used to route the hot air through the vehicle must be so positioned or protected that no injury or damage could be caused if it were to be touched. 5.3.7.2 The air outlet must be so positioned or guarded that blocking by rubbish or luggage is unlikely. 5.3.8 Automatic control of the heating system 5.3.3.3 A notice, indicating that the heater must be shut down before refuelling, must be affixed to the fuelling point. In addition a suitable instruction must be included in the manufacturer’s operating manual. 5.3.8.1 The heating system must be switched off automatically and the supply of fuel must be stopped within five seconds when the vehicle’s engine stops running. If a manual device is already activated, the heating system can stay in operation. 5.3.4 Exhaust system ANNEX 7 5.3.4.1 The exhaust outlet must be located so as to prevent emissions from entering the vehicle through ventilators, heated air inlets or opening windows. ADDITIONAL REQUIREMENTS FOR COMBUSTION HEATERS 5.3.5 Combustion air inlet 5.3.5.1 The air for the combustion chamber of the heater must not be drawn from the passenger compartment of the vehicle. 5.3.5.2 The air inlet must be so positioned or guarded that blocking by rubbish or luggage is unlikely. 5.3.6 Heating air inlet 5.3.6.1 The heating air supply may be fresh or re-circulated air and must be drawn from a clean area not likely to be contaminated by exhaust fumes emitted either by the propulsion engine, the combustion heater or any other vehicle source. 5.3.6.2 The inlet duct must be protected by mesh or other suitable means. 30 7 Warning light 7.1 A clearly visible tell-tale in the operator’s field of view shall inform when the combustion heater is switched on or off. End of extract. 1303560C_DBW 2010 EA_degbfr.book Page 31 Tuesday, March 5, 2013 9:05 AM DBW 2010 / 2016 2 Use / version Use / version 2.1. Use of the water heaters Webasto DBW 2010 / 2016 water heaters are used in connection with the vehicle’s own heating system 2.2. – to heat the passenger cabin, – to defrost the vehicle windows and – to preheat water-cooled engines. The heat output is: The water heater operates independently of the engine and is connected to the cooling system, the fuel system and the electrical system of the vehicle. The heater is approved for heating the passenger cabin or the driver’s cab, but not to heat a cargo space used to transport hazardous substances. Version The water heaters are approved for use with “diesel” fuel. – DBW 2010 heater – DBW 2016 heater 11.6 kW (10,000 kcal/h) 16.0 kW (13,800 kcal/h) The heaters DBW 2010 are designed for 12 or 24 V. The heaters DBW 2016 only for 24 V. Depending on requirements and equipment, a nozzle block preheating system may be fitted. 31 1303560C_DBW 2010 EA_degbfr.book Page 32 Tuesday, March 5, 2013 9:05 AM Installation 3 Installation IMPORTANT: – The statutory regulations governing installation on pages 29 and 30 must be adhered to. – If the water heater is to be operated in a separately installed heating system, prior to installation an installation planning report must always be submitted to Webasto for approval. If this approval is not obtained, all warranty and liability claims will be void. The water heater has been designed, tested and approved for specific bus requirements. NOTE: Check the installation situation of the relevant vehicle type. 3.1. Installation position The heater and circulating pump are to be integrated into the cooling system (or in a separate heating system). The heater must be installed in as low a position as possible to allow the heater and circulating pump to be bled automatically. This is particularly important as the circulating pump is not self-priming. The heater must not be installed in the vehicle interior. If it is not possible to install the heater in the vehicle’s engine bay it may be installed in a box. The installation box must have sufficient external ventilation to ensure that a maximum temperature of 85 °C is not exceeded in the box. Bear in mind the space required for servicing accessibility (for example for removing the combustion chamber) (see Figure 1) when installing the heater. 32 DBW 2010 / 2016 1303560C_DBW 2010 EA_degbfr.book Page 33 Tuesday, March 5, 2013 9:05 AM DBW 2010 / 2016 Installation 8 1 5 2 3,4 6 8 6 Fig. 1: 1 2 3 4 5 6 7 8 Combustion air intake Exhaust outlet Fuel intake Fuel discharge Space required to remove the burner chamber Coolant intake Max. swivelled burner Coolant outlet Dimensions of DBW 2010 / 2016 heaters 33 1303560C_DBW 2010 EA_degbfr.book Page 34 Tuesday, March 5, 2013 9:05 AM Installation 3.2. To install DBW 2010 / 2016 heaters The heater may be secured either with four M8 screws or with four bolts and nuts (see Figure 3). Fig. 2: DBW 2010 / 2016 3.3. Model plate The model plate must be protected from damage and must be clearly legible when the heater is installed (otherwise a duplicate model plate must be used). Position Fig. 4: Fig. 3: 34 Hole pattern DBW 2010 model plate (DBW 2016 similar) 1303560C_DBW 2010 EA_degbfr.book Page 35 Tuesday, March 5, 2013 9:05 AM DBW 2010 / 2016 4 Installation example for DBW 2010 / 2016 Installation example for DBW 2010 / 2016 Water heating circuit – wall heater and roof duct heating system 1 2 3 4 5 6 7 8 Wall heater with fan Heat exchanger at entry point Heater Circulating pump Roof heat exchanger Vehicle engine Driver’s position heating system Control element Forwards Backwards Fig. 5: Installation example for DBW 2010 / 2016 heaters 35 1303560C_DBW 2010 EA_degbfr.book Page 36 Tuesday, March 5, 2013 9:05 AM To install the circulating pump 5 DBW 2010 / 2016 To install the circulating pump The circulating pump is installed as shown in Figure 7 (U 4810) and 9 (U 4840). Note the installation position. NOTE: The pump ports and connection lines from the water intake and water outlet must be flush (no stress). 5.1. U 4810 circulating pump Delivery rate (with water at 20 °C) Flow resistance (with the pump stopped) Fig. 6: Delivery rate and flow resistance U 4810 circulating pump Fig. 7: 36 U 4810 circulating pump installation position 1303560C_DBW 2010 EA_degbfr.book Page 37 Tuesday, March 5, 2013 9:05 AM DBW 2010 / 2016 5.2. To install the circulating pump U 4840 circulating pump bar 0,50 Delivery rate (with water/glycol 50/50 at +23 °C) 0,40 Δp 0,30 12/24V 0,20 0,10 2800 2450 2100 1750 1400 1050 700 350 0 0,00 l/h Q Fig. 8: Delivery rate U 4840 circulating pump Fig. 9: U 4840 circulating pump installation position 37 1303560C_DBW 2010 EA_degbfr.book Page 38 Tuesday, March 5, 2013 9:05 AM Connection to the vehicle cooling system 6 Connection to the vehicle cooling system The heater is connected to the vehicle cooling system as shown in Figures 1 and 5. The system must contain at least 10 litres of coolant. The water hoses supplied by Webasto must always be used. If you do not use these hoses, the hoses that you do use must comply with DIN 73411. The hoses must be installed without kinks and (to ensure perfect bleeding of the heater) rising if possible. Hose connections must be supported by hose clips to prevent them slipping. NOTE: The hose clips must be tightened with a torque of 1.5 Nm. Only pressure valves with an opening pressure of min. 0.4 bar and max. 2.0 bar may be used in the vehicle’s cooling system or in a separate heating system. The cooling system must be bled carefully before using the heater for the first time or after replacing the coolant. The heater and lines should be installed in such a way as to ensure static bleeding. Perfect ventilation can be identified by the circulating pump operating almost silently. Poor bleeding may cause the resetting temperature limiter to trip whilst the heater is operating. 38 DBW 2010 / 2016 1303560C_DBW 2010 EA_degbfr.book Page 39 Tuesday, March 5, 2013 9:05 AM DBW 2010 / 2016 7 Fuel supply Fuel supply The fuel is taken from the vehicle fuel tank or from a separate fuel tank. 7.1. Fuel lines Fuel lines are to be installed with a gradient wherever possible to prevent air inclusions. Connections within the line are to be secured with hose clips if no mechanical screw connectors are used. If fuel hoses are used, the hoses supplied by or available from Webasto must generally be used. If you do not use these hoses, the fuel hoses that you do use must comply with DIN 73379. Fuel hoses must not be kinked or twisted and must be secured with clips approx. every 25 cm. Only the normal steel, copper and plastic lines of plasticised, light and temperature-stabilized PA 11 or PA 12 (e.g. Mecanyl RWTL) pursuant to DIN 73378 used in the manufacture of motor vehicles may be used for the fuel lines, together with the appropriate connectors. Fig. 10: Information sticker The following must be observed for the installation of fuel lines: Do not install an additional fuel pump. – The lines must be protected from the effects of high temperatures. See pages 29 and 30 for the statutory regulations. IMPORTANT! The external casing on the heater may reach the ignition temperature of diesel if it is operated without coolant. – The lines must be protected from stone damage. – Dripping or evaporating fuel must not be allowed either to accumulate or to ignition hot parts or electrical equipment If a shut-off device is installed in the return line, an information sticker as shown in Figure 10 is to be affixed where it is clearly visible. IMPORTANT: Operation with a closed return line will damage the fuel pump. Fuel may escape. Danger of fire! Unsupported fuel lines must be secured to prevent them sagging. 39 1303560C_DBW 2010 EA_degbfr.book Page 40 Tuesday, March 5, 2013 9:05 AM Fuel supply 7.1.1. Maximum dimensions of the fuel lines: – Internal diameter for intake and return line: 6 mm (other diameters to order). – Maximum line length for each intake and return line: 10 m – Maximum intake height: 2 m (we recommend the installation of a foot valve if the max. intake height is used) – Maximum supply pressure: 0.3 bar. 7.2. Fuel filter A fuel filter supplied or approved by Webasto must be used (check the flow direction). To avoid malfunctions the filter or filter insert is to be replaced before the start of the cold weather. 40 DBW 2010 / 2016 1303560C_DBW 2010 EA_degbfr.book Page 41 Tuesday, March 5, 2013 9:05 AM DBW 2010 / 2016 8 Combustion air supply Combustion air supply Under no circumstances may the combustion air be taken from areas occupied by people. The combustion air intake opening must not point in the direction of travel. It must be located so that it cannot become clogged with dirt or snow and cannot suck in splashing water. Maximum dimensions of the fuel intake line: – Internal diameter: 55 mm – Maximum line length: 5 m without the exhaust extension – Maximum bends: 270 ° The combustion air intake must not be routed above the exhaust outlet. NOTE: If the combustion air intake line cannot be installed so that it slopes downwards, a water drain hole with a diameter of 4 mm is to be made at its lowest point. If the heater is installed in a general installation space near the vehicle’s fuel tank, the combustion air must be taken in from the outside and the exhaust fumes discharged into the atmosphere. The openings must be splash-proof. A ventilation opening measuring at least 20 cm2 is required if the heater is installed in an enclosed box. The size of the ventilation opening must be increased subject to consultation with Webasto if the temperature in the box exceeds the permitted ambient temperature of the heater (see Technical data). 41 1303560C_DBW 2010 EA_degbfr.book Page 42 Tuesday, March 5, 2013 9:05 AM Exhaust pipe 9 Exhaust pipe The opening of the exhaust pipe must not point towards the front of the vehicle. The exhaust pipe opening must be located so that it cannot become clogged with snow and mud. Rigid pipes of unalloyed or alloyed steel with a minimum wall thickness of 1.0 mm or flexible piping of alloyed steel only must be used as the exhaust line. The exhaust pipe is secured to the heater using a clamping collar, for example. See the statutory regulations for other requirements. Maximum dimensions of the exhaust pipe: – Internal diameter: 38 mm – Maximum line length: 5 m without the combustion air intake extension – Maximum bend: 270 ° NOTE: If the exhaust line is installed near heat-sensitive parts, it must be insulated. 42 DBW 2010 / 2016 1303560C_DBW 2010 EA_degbfr.book Page 43 Tuesday, March 5, 2013 9:05 AM DBW 2010 / 2016 10 Electrical connections Electrical connections 10.1. Heater connection IMPORTANT HIGH VOLTAGE: Danger of death. Disconnect the plug connection to the vehicle before you open the heater. The electrical connection of the heaters is made as shown in Figure 11 (DBW 2010) or Figure 12 (DBW 2016): System circuit for DBW 2010 / 2016 with SG 1553 control unit and switch. Connections of the heaters differing from those of the standard variant (Figures 11 / 12) are shown in Figure 13 (heater variants and plug assignments), Figures 14 / 15 (nozzle block preheating system) and Figure 16 (timer). Use the specified cable cross-sections. Connect the negative and positive terminals of the heater controller directly to the battery. 10.2. Connecting the controls The heater can be switched on and off using the following Webasto controls: – Switch, see automatic circuit diagram Figures 11 to 15 – Timer, see circuit diagram Figure 16 43 1303560C_DBW 2010 EA_degbfr.book Page 44 Tuesday, March 5, 2013 9:05 AM Electrical connections Item A1 A2 4 5 Designation Heater Control unit Ignition spark generator Thermostat 7 8 Thermostat Thermostat 10 Ignition electrodes 61.3 Interference suppression set (2x) A Plug connection B Plug connection B5 Thermostat C Plug connection F1 Temperature fuse F2 Fuse 8 A F3 Fuse 8 A F4 Fuse F5 Fuse F6 Fuse H1 Light, green H2 Light, circulating pump K1 Relay K2 K3 Relay Relay K4 Relay 44 Comment SG 1553 Control thermostat (internal) Fan thermostat Temperature limiter thermostat DBW 2010 / 2016 A B C D Radio interference suppression Control unit, 2-pin Control unit, 6-pin Nozzle block preheating Control unit, 8-pin Any polarity Blade-type fuse DIN 72581 Blade-type fuse DIN 72581 Blade-type fuse DIN 72581 Blade-type fuse DIN 72581 Blade-type fuse DIN 72581 Indicator if controlled via S4 Circulating pump; negative for heater Heater motor Light, control thermostat operation Ignition spark generator Item Designation K5 Relay K6 K7 M1 M2 M3 R R1 R2 S1 S3 Relay Relay Motor Motor Motor Flame monitor Motor resistor Resistor, heating cartridge Switch Switch on water tap S4 Switch S6 X1 X2 X3 X5 Y1 Switch Plug connector, 2-pin Plug connector, 1-pin Plug connector, 2-pin Plug connector, 4-pin Solenoid valve A B C D Comment Solenoid valve, flame monitor Nozzle block preheating Vehicle heating fan Circulating pump Combustion air fan Vehicle fan Photoresistor, any polarity Power resistor Nozzle block preheating A B C D Heater on/off Contact open when water tap closed for on/off, circulating pump separate Vehicle fan Any polarity Fitted in heater Parts supplied loose Only if required In vehicle Set assignment Possible depending on scope of supply or version 1303560C_DBW 2010 EA_degbfr.book Page 45 Tuesday, March 5, 2013 9:05 AM DBW 2010 / 2016 Cable colours bl br ge gn gr or rt sw vi ws blue brown yellow green grey orange red black violet white Electrical connections Cable cross-sections < 7.5 m 7.5 m–15 m 0.75 mm² 1.0 mm² 0.75 mm² 1.0 mm² 1.0 mm² 1.5 mm² 1.5 mm² 2.5 mm² 2.5 mm² 4.0 mm² 4.0 mm² 6.0 mm² Vehicle’s own cable Fig. 11: System circuit for DBW 2010 with control unit 1553 and switch, see legend on page 44 45 1303560C_DBW 2010 EA_degbfr.book Page 46 Tuesday, March 5, 2013 9:05 AM Electrical connections Cable colours bl br ge gn gr or rt sw vi ws blue brown yellow green grey orange red black violet white DBW 2010 / 2016 Cable cross-sections < 7.5 m 7.5 m–15 m 0.75 mm² 1.0 mm² 0.75 mm² 1.0 mm² 1.0 mm² 1.5 mm² 1.5 mm² 2.5 mm² 2.5 mm² 4.0 mm² 4.0 mm² 6.0 mm² Vehicle’s own cable Fig. 12: System circuit for DBW 2016 with control unit 1553 and switch, see legend on page 44 46 1303560C_DBW 2010 EA_degbfr.book Page 47 Tuesday, March 5, 2013 9:05 AM DBW 2010 / 2016 Cable colours bl br ge gn gr or rt sw vi ws blue brown yellow green grey orange red black violet white Electrical connections Cable cross-sections < 7.5 m 7.5 m–15 m 0.75 mm² 1.0 mm² 0.75 mm² 1.0 mm² 1.0 mm² 1.5 mm² 1.5 mm² 2.5 mm² 2.5 mm² 4.0 mm² 4.0 mm² 6.0 mm² Vehicle’s own cable Fig. 13: Unit variants and plug assignments, see legend on page 44 47 1303560C_DBW 2010 EA_degbfr.book Page 48 Tuesday, March 5, 2013 9:05 AM Electrical connections Cable colours bl br ge gn gr or rt sw vi ws blue brown yellow green grey orange red black violet white DBW 2010 / 2016 Cable cross-sections < 7.5 m 7.5 m–15 m 0.75 mm² 1.0 mm² 0.75 mm² 1.0 mm² 1.0 mm² 1.5 mm² 1.5 mm² 2.5 mm² 2.5 mm² 4.0 mm² 4.0 mm² 6.0 mm² Vehicle’s own cable Fig. 14: System circuit for DBW 2010 with control unit 1553, switch and nozzle block preheating system, see legend on page 44 48 1303560C_DBW 2010 EA_degbfr.book Page 49 Tuesday, March 5, 2013 9:05 AM DBW 2010 / 2016 Electrical connections X5 2 1 4 85 3 Cable colours bl br ge gn gr or rt sw vi ws blue brown yellow green grey orange red black violet white 30 K6 86 87 Cable cross-sections < 7.5 m 7.5 m–15 m 0.75 mm² 1.0 mm² 0.75 mm² 1.0 mm² 1.0 mm² 1.5 mm² 1.5 mm² 2.5 mm² 2.5 mm² 4.0 mm² 4.0 mm² 6.0 mm² B5 R2 ws Vehicle’s own cable Fig. 15: System circuit for DBW 2016 with control unit 1553, switch and nozzle block preheating system, see legend on page 44 49 1303560C_DBW 2010 EA_degbfr.book Page 50 Tuesday, March 5, 2013 9:05 AM Electrical connections DBW 2010 / 2016 Item 9 F2 F3 H1 H2 Cable colours bl br ge gn gr or rt sw vi ws NOTE Sample application in conjunction with circuit diagram Figures 11 – 13 blue brown yellow green grey orange red black violet white Cable cross-sections < 7.5 m 7.5 m–15 m 0.75 mm² 1.0 mm² 0.75 mm² 1.0 mm² 1.0 mm² 1.5 mm² 1.5 mm² 2.5 mm² 2.5 mm² 4.0 mm² 4.0 mm² 6.0 mm² Vehicle’s own cable H3 K9 K10 P S2 S3 S4 X4 Designation Plug connection Fuse 8 A Fuse 8 A Light-emitting diode, green Light-emitting diode, yellow Lights Relay Relay Timer (digital) Switch Switch on water tap Switch Plug connector, 8-pin Key: A B C D A B C D Ready indicator (in item P) Symbol light (in item P) Only necessary if battery switch in negative For programmed operation Battery switch Contact open when water tap closed for on/off, circulating pump separate for item P Fitted in heater Parts supplied loose Only if required In vehicle Set assignment Possible depending on scope of supply or version 1 Timer P with positive at connection 9 = Continuous operation with immediate heating without positive at connection 9 = Heating duration 1 hour 2 to vehicle terminal 75, if present – otherwise terminal 15 3 Motor vehicle lighting (terminal 58) Fig. 16: System circuit for DBW 2010 / 2016 with control unit 1553 and timer 50 Comment 1-pin Blade-type fuse DIN 72581 Blade-type fuse DIN 72581 Indicator (in item P) 1303560C_DBW 2010 EA_degbfr.book Page 51 Tuesday, March 5, 2013 9:05 AM DBW 2010 / 2016 11 Initial start-up Initial start-up NOTE: Refer to the safety instructions in the operating and maintenance instructions. The operating and maintenance instructions must be read through without fail before starting the heater. After you have installed the heater, bleed the water system and the fuel supply system carefully. Follow the instructions supplied by the vehicle manufacturer for this purpose. Conduct a trial of the heater to check all the water and fuel connections for leaks and to ensure that they are secure. If the heater suffers a fault during operation, the fault must be located and remedied. 51 1303560C_DBW 2010 EA_degbfr.book Page 52 Tuesday, March 5, 2013 9:05 AM Troubleshooting 12 Troubleshooting 12.1. Fault lock-out If it recognises one of the following fault features, the heater will conduct a fault lock-out. – If there is undervoltage, approx. 10 – 25 seconds after the voltage drops below the switching threshold. – If no combustion starts within approx. 30 seconds after the heater is switched on – If the fuel supply is interrupted for more than 10 seconds during heating operation – If the heater is switched off by the temperature fuse or the temperature limiter due to overheating. In such a case, the temperature fuse must be replaced with another of the same type (note the colour code) or the button on the temperature limiter must be reset (after cooling to below 60 °C). 52 DBW 2010 / 2016 1303560C_DBW 2010 EA_degbfr.book Page 53 Tuesday, March 5, 2013 9:05 AM DBW 2010 / 2016 13 Technical data Technical data Except where limit values are specified, these technical data refer to the usual heater tolerances of 10 % at an ambient temperature of +20 °C and at the rated voltage. 13.1. Fuel The diesel fuel specified by the manufacturer must be used (DIN EN 590). We know of no negative influences due to additives. If fuel is extracted from the vehicle’s tank, follow the additive instructions issued by the vehicle manufacturer. If fuel is extracted from a separate fuel tank, a winter diesel fuel must be used in temperatures below 0 °C. Media to improve the flow properties of the fuel may also be used. If you change to low-temperature fuel, the heater must be operated for approx. 15 minutes so that the fuel line, filter and fuel pump are filled with the new fuel. 53 1303560C_DBW 2010 EA_degbfr.book Page 54 Tuesday, March 5, 2013 9:05 AM Technical data Heater ECE type permit number EMC: Heating system: Model Heating current Fuel Fuel consumption Rated voltage Operating voltage range Rated power consumption (without circulating pump) Max. ambient temperature during operation (Heater, control unit, circulating pump) Max. storage temperature (Heater, control unit, circulating pump) Max. operating pressure Capacity of the heat exchanger Minimum capacity of the system CO2 in exhaust gas at rated voltage Heater dimensions (Tolerance 3 mm) Weight 54 DBW 2010 / 2016 DBW 2010 DBW 2016 E1 10R 03 1087 E1 122R 00 0006 High pressure atomiser 11.6 (10,000) Diesel (DIN EN 590) 1.3 12 or 24 10...14 or 20...28 E1 10R 03 1087 E1 122R 00 0001 High pressure atomiser 16.0 (13,800) Diesel (DIN EN 590) 1.9 24 22...28 W 60 90 °C -40... +60 -40... +60 -40 ... +85 0.4...2.0 1.1 10.00 I 10.5 0.5 Length 584 Width 205 Height 228 14.5 -40 ... +85 0.4...2.0 1.1 10.00 I 10.5 0.5 Length 584 Width 205 Height 228 14.5 kW (kcal/h) kg/h VV- °C bar I I % v/v mm mm mm kg 1303560C_DBW 2010 EA_degbfr.book Page 55 Tuesday, March 5, 2013 9:05 AM DBW 2010 / 2016 Circulating pump Delivery rate Rated voltage Operating voltage range Rated power consumption Dimensions (Tolerance 3 mm) Weight Technical data I/h VVW mm mm mm kg U 4810 1600 (against 0.15 bar) 12 or 24 10...14 or 20...28 25 Length 173 Width 94 Height 77 0.8 U 4840 1600 (against 0,1 bar) 12 or 24 9...15 or 16...30 30 Length 135 Width 95 Height 48 0,4 55 Im Fall einer mehrsprachigen Version ist Deutsch verbindlich. Die Telefonnummer des jeweiligen Landes entnehmen Sie bitte dem Webasto Servicestellenfaltblatt oder der Webseite Ihrer jeweiligen Webasto-Landesvertretung. In multilingual versions the German language is binding. The telephone number of each country can be found in the Webasto service center leaflet or the website of the respective Webasto representative of your country. Dans le cas d'une version rédigée en plusieurs langues, l'allemand est alors la langue qui fait foi. Pour trouver le numéro de téléphone du pays concerné, veuillez consulter le dépliant des points-service Webasto ou la page web de la représentation Webasto de votre pays. Webasto Thermo & Comfort SE Postfach 1410 82199 Gilching Germany Visitors’ address: Friedrichshafener Str. 9 82205 Gilching Germany Internet: www.webasto.com Technical Extranet: http://dealers.webasto.com Nur innerhalb von Deutschland Tel.: 01805 93 22 78 (€ 0,14/Min. aus dem deutschen Festnetz) E-mail: [email protected] Ident-Nr. 1303560C • 03/13 • Errors and omissions excepted • Printed in Germany • © Webasto Thermo & Comfort SE, 2013 1303560C_DBW 2010 EA_degbfr.book Page 2 Tuesday, March 5, 2013 9:05 AM