1
C H A P T E R
1
P R O D U C T
O V E R V I E W
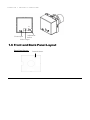
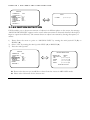
Back Panel Layout:
(3)
Up
Video
(1)
(5)
R
L
Down
(2) (6) (4)
(7)
(1) Power Input Terminal & Video Output Connector
Connect to the appropriate power to each model. Video Output connector is for connecting the
video output of the camera to a color monitor or other video devices through a 75 Ohm type coaxial
cable with BNC female connector at backside of the camera.
(2) Second Video Output Connector
When installing the camera, you can use second video connector to connect a portable monitor, this
will allow you to easily adjust camera’ angle.
(3) Up: Adjust the switch to move the cursor upwards. This is used to select the item need to be set.
(4) Down: Adjust the switch to move the cursor downwards. This is used to select the item need to be
set.
(5) Right: Adjust the switch to right direction. This is used to select or adjust the parameters of the
selected item.
(6) Left: Adjust the switch to left direction. This is used to select or adjust the parameters of the
selected item.
(7) Set button: This button is used to enter setup menu. If the item has its own setting menu (sign
), press this button again to display the setup menu.
14