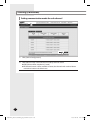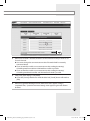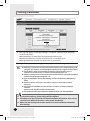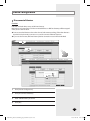
1
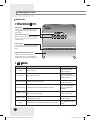
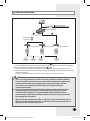
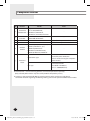
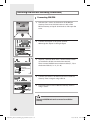
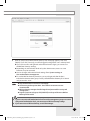
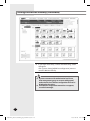
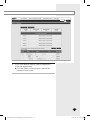
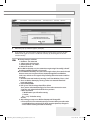
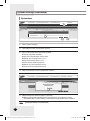
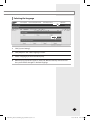
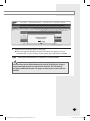
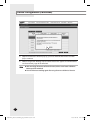
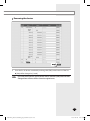
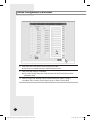
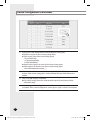
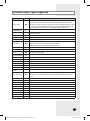
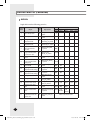
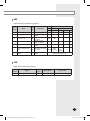
BACnet Gateway MIM-B17 Air Conditioner installation manual imagine the possibilities Thank you for purchasing this Samsung product. E DB98-32390A(3) MIM-B17_BACnet Gateway_IM_E 32390-3.indd 65 2011-04-04 오후 3:44:31 Safety Precautions This installation manual describes how to install the BACnet Gateway. For installation of other optional accessories, refer to the appropriate installation manual. WARNING CAUTION R ead carefully this installation manual before installation and check if the BACnet Gateway is installed correctly after installation. Do not attempt to install or repair this BACnet Gateway by yourself. T his BACnet Gateway contains no user-serviceable parts. Always consult authorized service personnel for repairs. When moving, consult authorized service personnel for disconnection and installation of the BACnet Gateway. E nsure that the wall is strong enough to support the weight of the BACnet Gateway. M ust install the BACnet Gateway with rated power supply. T he BACnet Gateway must be installed according to the national electrical rules by an installation specialist. If you wish to uninstall the BACnet Gateway, consult an authorized installation center. Do not use inflammable gases near the BACnet Gateway. D o not install the BACnet Gateway in a location where it will come into contact with combustible gases, machine oil, sulphide gas, etc. A void locations where acid/alkali solution or special spray is used. C hoose a location that is dry and sunny, but not exposed to direct sunlight. Suitable temperature is between 0°C(32°F) and 39°C(102.2°F). Do not spill water into the BACnet Gateway. D o not apply tensile strength to the cable to avoid cable damage. D o not press the buttons with a sharp object. D o not connect the power cable to the control terminal. If the BACnet Gateway is installed in a hospital or other special places, it should not affect other electronic devices. B ACnet is a registered trademark of American Society of Heating, Refrigerating and Air-Conditioning Engineers (ASHRAE). E-2 MIM-B17_BACnet Gateway_IM_E 32390-3.indd 2 2011-04-04 오후 3:44:20 Contents Safety Precautions ........................................................... 2 Before Installing the BACnet Gateway .............................. 4 Accessories ...................................................................... 5 Viewing the Parts ............................................................. 6 Product Dimensions ......................................................... 8 System Architecture ......................................................... 9 Compatible Devices ........................................................ Installing the BACnet Gateway ...................................... Setting the BACnet Gateway .......................................... Reading EHP Watt-hour Meter . .................................... System Setting Initialization ........................................... System Settings ............................................................. Tracking . ...................................................................... Device Configuration ..................................................... BACnet Protocol Implementation Conformance Statement .... Standard Object Types Supported .................................. Detail Description of Object ........................................... BACnet Point List ......................................................... Other Information ........................................................ 10 12 17 22 27 28 37 43 51 55 56 57 61 E-3 MIM-B17_BACnet Gateway_IM_E 32390-3.indd 3 2011-04-04 오후 3:44:21 Before Installing the BACnet Gateway Checks before installation 1 BACnet Gateway IP A public IP is needed to access the BACnet Gateway over the internet. (One public IP is needed for each BACnet Gateway) A private IP may be used if the BACnet Gateway need not be accessed over the internet. 2 Network related equipments 3 Installation connection wire The LAN cable and the communication cables from centralized controllers/interface modules must be installed in such a way that the wires can be connected to the BACnet Gateway with ease. Note T he BACnet Gateway is a server and supports static IP. To access the BACnet Gateway through the internet or with BMS System, the BACnet Gateway address, which is the IP address, must be known. A static IP service from an internet service provider must be used if xDSL (ADSL, VDSL) is being used for internet connection. (Static IP costs more than dynamic IP.) BACnet Gateway should be situated in the same sub- net as BMS system. E-4 MIM-B17_BACnet Gateway_IM_E 32390-3.indd 4 2011-04-04 오후 3:44:21 Accessories Make sure you have each item. Supplied items may vary depending on your country or service provider. Item BACnet Gateway Adapter Power cable M4 x16 Screw Quantity 1 1 1 6 User’s manual Installation manual Cable tie 1 1 1 Shape The BACnet Gateway must be installed by a trained installer. Ensure the main power is turned off before installing the BACnet Gateway. Be sure to use adapter and power cable we provide. The power cable and the communication cable must be installed according to the national electrical wiring regulations. E-5 MIM-B17_BACnet Gateway_IM_E 32390-3.indd 5 2011-04-04 오후 3:44:21 Viewing the Parts Main Parts BACnet Gateway Exterior LCD Display Shows current time and IP address. Various messages will be displayed depending on button input. LCD operation button There are 4 buttons(Menu, (Down), (Up), Set) and you can access to menu and move, check the menu. LED Indicator Check 15 LED status such as Power, CPU-Alive, Ethernet-Linked/Active, COM1~5-TX/RX and Check BACnet Gateway Bottom cover Unfasten 2 screws on the bottom and separate the bottom cover from BACnet Gateway. Then check cable connection part. LED Indicator Item Power CPU Alive Name Status Power indicator Turns blue when the power is supplied. CPU operation indicator Blinks in orange with 1 second intervals during normal operation. Ethernet–Linked Internet connection indicator Turns green during normal connection. Ethernet–Active Internet data transmission/reception indicator Blinks in orange during normal transmission/ reception. COM1~5 – TX Channel 1~5 Centralized controller/Interface module Data transmission Indicator Blinks in green during normal transmission. COM1~5 – RX Channel 1~5 Centralized controller/Interface module Data reception Indicator Blinks in green during normal reception, Check Indoor/Outdoor unit/Communication check Indicator Turns green when notice occurs. E-6 MIM-B17_BACnet Gateway_IM_E 32390-3.indd 6 2011-04-04 오후 3:44:21 BACnet Gateway Cable Connection Part DI Terminal1 Power Terminal Reset Button RS485 Communication Terminal DO Terminal4 DO Terminal3 DI Terminal2 Serial Terminal SD Card Socket Name Cable tie groove Ethernet Terminal Description DI Terminal1 Digital Input connection terminal, Channel1~Channel5 DI Terminal2 Digital Input connection terminal, Channel6~Channel10 DO Terminal3 Digital Output connection terminal, Channel1~Channel5 DO Terminal4 Digital Output connection terminal, Channel6~Channel8 Reset Button Reset BACnet Gateway Power Terminal Connect BACnet Gateway adapter Serial Terminal Service agent checks BACnet Gateway error status using this terminal SD card socket Sub memory (for program update and set information saving) socket RS485 Communication Terminal Connect for RS485 communication with devices such as centralized controller/Interface module -COM1 ~ COM5 Ethernet Terminal Connect LAN cable Cable tie groove Groove for arranging cables E-7 MIM-B17_BACnet Gateway_IM_E 32390-3.indd 7 2011-04-04 오후 3:44:21 Viewing the Parts (Continued) Main Parts BACnet Gateway Interior Display Board 20-pin Cable Main Board 40-pin Cable Sub Board Note If you need external circuit configuration, consult with the manufacturer. Product Dimensions 64.80 (Unit : mm) 255 240 E-8 MIM-B17_BACnet Gateway_IM_E 32390-3.indd 8 2011-04-04 오후 3:44:23 System Architecture BMS system Internet BMS Engineering SAMSUNG Engineering BACnet Gateway Centralized controller Interface module Interface module Interface module Connecting centralized controller and BACnet Gateway ( type) - You can control up to 16 centralized controllers and 256 indoor units using BACnet Gateway. Connecting interface module and BACnet Gateway( type) - You can control up to 80 interface modules and 256 indoor units using BACnet Gateway. *MAX.16 interface module can be connected to each of the RS485 communication channels of the BACnet Gateway. - The more interface modules are connected, the longer time takes for tracking. W hen connecting centralized controller and interface module to the BACnet Gateway of same communication channel, only one of them will communicate according to the communication channel mode setting of [System Settings]-[Tracking]. Therefore, do not connect the centralized controller and interface module to the same communication channel. If you set the communication channel mode as interface module, virtual centralized controller address will be assigned. Therefore please aware of that if you set the centralized controller address as virtual centralized controller address when you connect interface module and centralized controller at the same, it may cause trouble for bringing device information. Channel 0: Virtual centralized controller 11, Channel 1: Virtual centralized controller 12, Channel 2: Virtual centralized controller 13, Channel 4: Virtual centralized controller 14, Channel 5: Virtual centralized controller 15 E-9 MIM-B17_BACnet Gateway_IM_E 32390-3.indd 9 2011-04-04 오후 3:44:23 Compatible Devices No 1 2 3 4 5 6* Devices Model All System indoor/outdoor units Indoor Unit such as: DVM, DVM PLUS, Outdoor Unit DVM PLUS II, DVM PLUS III, DVM PLUS IV, mini DVM, CAC Series Centralized Controller SIM PIM Interface module MCM-A202, MCM-A202A, MCM-A202B, MCM-A202D MIM-B12 MIM-B16 MIM-B04A (DVM, DVM PLUS, etc.) MIM-B13 (DVM PLUS II, etc.) MIM-B13A (DVM PLUS II/ DVM PLUS III, DVM PLUS IVetc.) MIM-B13B, MIM-B13D, MIM-B13E Note - Needed for EHP power distribution Needed for EHP power distribution - RS485 comm. type Connected with SIM Needed for power distribution ( Please consult Samsung for compatible power meters) Pulse type Connected with PIM Pulse Width : 20~400(ms) Pulse : 1~10000(Wh/Pulse) Watt-hour Meter Products with ‘* ’ are not Samsung products and must be purchased separately. (Only selected power meters may be used for protocol compatibility issues.) Samsung is not responsible for BMS engineering which creates each device and objects. For further directions regarding on BMS engineering, consult with specialized BMS related vendor. E-10 MIM-B17_BACnet Gateway_IM_E 32390-3.indd 10 2011-04-04 오후 3:44:23 Maximum Devices Attachable Devices Max. Note Indoor Unit 256 Tracking error occurs if exceeded Centralized Controller 16 Must not exceed 16 units Interface module 80 16 units per 1 channel, total 80 units are connectable when connecting interface module to BACnet Gateway directly (256 units are connectable when using centralized controller) SIM/PIM 8 Up to 8 units are connectable Watt-hour Meter 64 8 units are connectable per 1 SIM/PIM E-11 MIM-B17_BACnet Gateway_IM_E 32390-3.indd 11 2011-04-04 오후 3:44:23 Installing the BACnet Gateway 1 Separate the installation plate on the rear side of BACnet Gateway. 2 Fix the installation plate on the wall using 4 screws. 3 Hang the BACnet Gateway on the groove which is on the top of the installation plate. Installation plate E-12 MIM-B17_BACnet Gateway_IM_E 32390-3.indd 12 2011-04-04 오후 3:44:24 4 Fix the installation plate and BACnet Gateway using 2 screws. Depending on the installation environment, fix BACnet Gateway using assistant holes. (Screws for assistant hole are not provided by our company.) 5 Assistant hole If you install BACnet Gateway inside of the wall or wiring from the rear side is needed, use wiring groove on the bottom of BACnet Gateway. wiring groove To prevent breakdown and damage of BACnet Gateway, and for safe usage, it is recommended to install BACnet Gateway on the wall. E-13 MIM-B17_BACnet Gateway_IM_E 32390-3.indd 13 2011-04-04 오후 3:44:24 Installing the BACnet Gateway (Continued) Connecting Centralized Controller 1 Unfasten the 2 screws on the bottom of the BACnet Gateway front cover. Hold the bottom 2 sides of the BACnet Gateway and push downwards to slide open the cover. 2 Connect the adapter to the power terminal. Arrange the adapter as the right figure. Adapter 3 Separate 1 terminal block from 5 terminal blocks which are attached to RS485 communication terminal. Then, connect interface communication cable (C1, C2) to the terminal block.(C1A, C2B) 4 Connect LAN cable to the Ethernet terminal of BACnet Gateway. Then arrange it using cable tie. 5 Fasten the bottom cover of BACnet Gateway and fix it using 2 screws. Connect communication cable Cable tie LAN cable Maximum 16 centralized controllers can be connected to one BACnet Gateway. E-14 MIM-B17_BACnet Gateway_IM_E 32390-3.indd 14 2011-04-04 오후 3:44:25 Connecting Interface Module 1 Unfasten the 2 screws on the bottom of the BACnet Gateway front cover. Hold the bottom 2 sides of the BACnet Gateway and push downwards to slide open the cover. 2 Connect the adapter to the power terminal. Arrange the adapter as the right figure. Adapter 3 Separate 1 terminal block from 5 terminal blocks which are attached to RS485 communication terminal. Then, connect interface module communication cable(R1, R2) to the terminal block.(R1A, R2B) 4 Connect LAN cable to the Ethernet terminal of BACnet Gateway. Then arrange it using cable tie. 5 Fasten the bottom cover of BACnet Gateway and fix it using 2 screws. Connect communication cable Cable tie LAN cable Maximum 80 interface modules can be connected to one BACnet Gateway. E-15 MIM-B17_BACnet Gateway_IM_E 32390-3.indd 15 2011-04-04 오후 3:44:25 Installing the BACnet Gateway (Continued) Connecting SIM/PIM 1 Unfasten the 2 screws on the bottom of the BACnet Gateway front cover. Hold the bottom 2 sides of the BACnet Gateway and push downwards to slide open the cover. 2 Connect the adapter to the power terminal. Arrange the adapter as the right figure. Adapter 3 Separate 1 terminal block from 5 terminal blocks which are attached to RS485 communication terminal. Then, connect SIM/PIM communication cable (C1, C2) to the terminal block. (C1A, C2B) 4 Connect LAN cable to the Ethernet terminal of BACnet Gateway. Then arrange it using cable tie. 5 Fasten the bottom cover of BACnet Gateway and fix it using 2 screws. Connect communication cable Cable tie LAN cable aximum 8 SIM/PIM units can be connected to one BACnet M Gateway. E-16 MIM-B17_BACnet Gateway_IM_E 32390-3.indd 16 2011-04-04 오후 3:44:26 Setting the BACnet Gateway BACnet Gateway Connection and Login Address bar 1 Click internet explorer icon( 2 When internet explorer window appears, enter IP address (http://192.168.0.100) on the address bar then press [ENTER]. 3 If it is the first time to access BACnet Gateway, “ Install Microsoft Silverlight” message will appear. If Microsoft Silverlight have already installed, the screen will not appear. ) twice on your computer. E-17 MIM-B17_BACnet Gateway_IM_E 32390-3.indd 17 2011-04-04 오후 3:44:26 Setting the BACnet Gateway (Continued) 4 4 Click [Run] button and continue installation. After installation, access to BACnet Gateway again. Silverlight operates normally with Windows XP SP2 or later version. It may not operate normally with previous version of Windows. E-18 MIM-B17_BACnet Gateway_IM_E 32390-3.indd 18 2011-04-04 오후 3:44:26 5 5 Enter ID and password when BACnet Gateway main web page appears, Then click [LOGIN]. If you click [Connect], you will be logged in with general user’s authority level. If you use accounts with general authorization level to login, you cannot use the BACnet Gateway settings. Depending on authorization level set by the administrator, access to some functions may be restricted. You can change authorization level settings from System settings User authorization management. To use the BACnet Gateway functions, you must login with the ID that is included in administration group. Factory default BACnet Gateway ID is ‘admin’ and password is ‘1234’. Note O nly authorized users can access to web page. C onnection speed may slow down. Fewer than 5 concurrent users are recommended. B ACnet Gateway manager should change ID and password for security and management. L ogout: If you want to logout, click [LOGOUT] on the top of the menu. BACnet Gateway will be ended. If you use accounts with authorization level lower than management group or accounts with general authorization level, you cannot access BACnet Gateway settings. If you cannot access BACnet Gateway, consult the manager. E-19 MIM-B17_BACnet Gateway_IM_E 32390-3.indd 19 2011-04-04 오후 3:44:27 Setting the BACnet Gateway (Continued) 6 6 If you login successfully, 'Control and Monitoring' screen will appear. Click [System Setting]➔[BACnet configuration] menu to switch to BACnet Gateway. If you use accounts with authorization level lower than management group or accounts with general authorization level, BACnet configuration will not be displayed on the menu. If the BACnet configuration menu does not appear, consult the manager. E-20 MIM-B17_BACnet Gateway_IM_E 32390-3.indd 20 2011-04-04 오후 3:44:27 7 7 If you access BACnet Gateway, 'Device Configuration' screen will appear initially. If you click [DMS2 Connect] button, screen will be switched to initial screen. E-21 MIM-B17_BACnet Gateway_IM_E 32390-3.indd 21 2011-04-04 오후 3:44:27 Reading EHP Watt-hour Meter Setting and checking watt-hour meter 1 3 2 4 1 Click [System and Checking Watt-hour meter]. You can change settings on watt-hour meter only when SIM/PIM interface module is connected. 2 Click [Edit] from the 'Setting and checking Watt-hour meter' screen. CT proportion is set to ‘1’ as factory default value. 3 Set the [Name] and [CT proportion] for the watt-hour meter. You can use maximum 16 letters for name and only available special characters are “.”, ”,”, ”_”, ”-“, and “space”. Value for CT proportion should be integer between range of 1 ~ 5000. 4 Click [Save]. CT proportion value will be saved to the BACnet Gateway. If you do not click [Save] changed setting will not be saved. 5 Watt-hour meter value will display the actual value of electricity on the corresponding watt-hour meter. Value will be updated automatically. When using CT watt-hour meter, be careful that there can be difference with actual power consumption as much as CT ratio error. E-22 MIM-B17_BACnet Gateway_IM_E 32390-3.indd 22 2011-04-04 오후 3:44:27 Monthly baseline setting 1 2 1 Click [System and Checking Watt-hour meter]. 2 Click [Edit] from the ‘Monthly baseline setting’ screen. You can make changes when list box enables. 3 Set the Monthly baseline setting. You can select from 1~31. If you select the last day of the month, it will automatically set the last day of corresponding month as baseline. Ex) Last day of February: 28th or 29th 4 Click [Save]. Changed settings will be saved to the BACnet Gateway. If you do not click [Save] changed setting will not be saved. 4 E-23 MIM-B17_BACnet Gateway_IM_E 32390-3.indd 23 2011-04-04 오후 3:44:27 Reading EHP Watt-hour Meter (Continued) Period setting 1 3 2 4 1 Click [System and Checking Watt-hour meter]. 2 Click [Edit] from the ‘Period setting’ screen. You can select checkbox to set period in daily or monthly unit. If you select daily period setting, text box will be enabled and you can enter the period in daily unit. If you select monthly period setting, you can select the period in monthly unit. 3 Set the period If you set period in daily unit, you can set up to maximum 90 days. If you set period in monthly unit, you can set up to maximum 1 months. 4 Click [Save]. Changed setting will be saved to BACnet Gateway. If you do not click [Save], changed setting will not be saved. E-24 MIM-B17_BACnet Gateway_IM_E 32390-3.indd 24 2011-04-04 오후 3:44:27 Channel setting by indoor unit 1 3 2 7 1 Click [Channel setting by indoor unit]. 2 Click [Edit] from the ‘Channel setting by indoor unit’ screen. 3 Check the address and the channel information of the SIM/PIM interface module which is connected to the watt-hour meter. If the SIM interface modules with addresses 0 ~ 7 executes tracking, it will be displayed as 16~23 in BACnet Gateway. 4 Check the information of indoor/outdoor unit which is connected to watt-hour meter. E-25 MIM-B17_BACnet Gateway_IM_E 32390-3.indd 25 2011-04-04 오후 3:44:27 Reading EHP Watt-hour Meter (Continued) 5 Check the SIM/PIM interface module channel (Watt-hour meter) information of indoor/outdoor unit. You can set the channel when SIM/PIM interface module is installed in BACnet Gateway. When the indoor unit’s power is supplied from outdoor unit, set the ‘Outdoor unit SIM/PIM channel’ information only. (‘Outdoor unit SIM/PIM channel’ is referring to watt-hour meter which is connected to outdoor unit.) When the indoor unit’s power is supplied from source other than outdoor unit, set the ‘Outdoor unit SIM/PIM channel’ and ‘Indoor unit SIM/PIM channel’ information. (‘Indoor unit SIM/PIM channel’ is referring to watt-hour meter which is connected to indoor unit.) Power distribution will be executed automatically. User does not need to check the value of watt-hour meter. 6 Set indoor unit to execute power distribution. If you do not set the watt-hour meter information, the power distribution result of the indoor unit will be displayed as ‘0’. 7 Click [Save]. Changed setting will be saved to BACnet Gateway. If you do not click [Save] changed setting will not be saved. Information of watt-hour meter connected to indoor/outdoor unit should be accurate. If the watt-hour meter information is not accurate upon setting the channel information of indoor unit, error may occur in the power distribution result. You must set SIM/PIM channel information in the indoor unit if you want to execute power distribution. If not, it means that you do not execute power distribution and the power distribution result of the indoor unit will be ‘0’. If the information of watt-hour meter connected to indoor/outdoor unit is changed, consult with installation enginner. BACnet Gateway executes power distribution based on set information. E-26 MIM-B17_BACnet Gateway_IM_E 32390-3.indd 26 2011-04-04 오후 3:44:27 System Setting Initialization 1 Press [Menu], [], [] or [Set] from the screen where IP and current time is displayed. Main menu screen appears. Initialization is not possible in the screen where time information is displayed. 192.168.0.100 06:12:13(AM) 2 Press [Menu] [] [] [] [Menu] buttons in order from the main menu screen. Caution will be displayed on LCD Display. MAIN MENU 1.IP Config 3 Initialize BACnet Gateway by clicking [Set] when caution phrase appears. If you press [Menu] button, system will return to main menu without initialization. Are you sure? YES:Set, NO:Menu When initializing system setting, all saved data in BACnet Gateway will be deleted. After initialization, you must aware that the saved data and IP address will be reset to default factory setting. E-27 MIM-B17_BACnet Gateway_IM_E 32390-3.indd 27 2011-04-04 오후 3:44:27 System Settings You can set and check information about BACnet Gateway installation and operation. BACnet Gateway network information 1 2 1 Click [System Settings]. 2 Click [Edit] from the ‘BACnet network information’ section. 3 4 3 When text boxes of IP, Subnet mask, Default gateway, Device Instance No. and DNS server are enabled. Enter values for each item. 15 letters can be entered for each item. Each item should match with the network address form. You can enter from 1 to 16 for Device Instance No. 4 Click [Save] button on the ‘BACnet network information’ section. E-28 MIM-B17_BACnet Gateway_IM_E 32390-3.indd 28 2011-04-04 오후 3:44:28 5 5 When the pop-up window appears, click [OK]. 6 If you click [OK], current internet explorer will be closed. Then you may run the web browser again and access to BACnet Gateway by entering the IP set and saved manually. Note Factory setting is as follows. 1. IP address: 192.168.0.100 2. Subnet mask: 255.255.255.0 3. Default gateway: 192.168.0.1 4. DNS server: 0.0.0.0 Since BACnet Gateway sets 192.168.0.254 as engineering IP internally, it should be always available regardless of current IP. If several BACnet Gateways are connected to single website, there can be IP crash because same service engineer IP(192.168.0.254)is applied to each BACnet. In this case, edit the service engineer IP by following below instructions and then use the IP. 1. Run DOS command window by entering “cmd” from Windows “Start ➞ Run”. 2. Access to BACnet Gateway by running “telnet 192.168.0.254”from DOS command window. 3. Enter ID/PASSWORD. 4. Edit “sysenv” file (IP setting related file) as below. - Run “sudo vi /mnt/nand0/config/sysenv” from telnet connection screen. - Find“IP2=192.168.0.254”and edit the IP as you want. ❈ Basic commands ‘i’- Modification is possible after entering ‘x’- Delete Esc + “:wq” – End after saving. - Restart 5. After editing you may access BACnet Gateway with changed IP. ❈ There can be IP (192.168.0.254) crash if you execute above procedure when several DMS units are connected. To check accurate operation, change the service IP after installing each BACnet Gateway. E-29 MIM-B17_BACnet Gateway_IM_E 32390-3.indd 29 2011-04-04 오후 3:44:28 System Settings (Continued) System time 1 3 2 1 Click [System Settings]. 2 Click [Edit] from the 'System time' section. 3 Enter system time when text boxes enables. You can only enter numbers. Year: You can enter from 1980 to 2035. Month: You can enter from 1 to 12. Day: You can enter from 1 to 31. Hour: You can enter from 0 to 23. Minute: You can enter from 0 to 59. Second: You can enter from 0 to 59. 4 Click [Save] button on the 'System time' section. 4 5 5 When the pop-up window appears, click [OK]. When message with “Reading data from DMS. Please wait” appears saving is completed. Then, 'System Settings' screen appears again with all items disabled. Note System time reflects set current value. E-30 MIM-B17_BACnet Gateway_IM_E 32390-3.indd 30 2011-04-04 오후 3:44:28 Selecting the language 1 2 1 Click [System Settings]. 2 Click [Edit] from the 'Select language' section. 3 Select a language you want and click [Save]. 4 When the pop-up window appears, click [OK]. BACnet Gateway will restart and the system will be changed to selected language. E-31 MIM-B17_BACnet Gateway_IM_E 32390-3.indd 31 2011-04-04 오후 3:44:28 System Settings (Continued) Selecting the contact point control pattern 1 3 2 4 1 Click [System Settings]. 2 Click [Edit] from the 'Select the contact point control pattern' section. 3 Select the pattern you want to check when checkboxes enables. Pattern 1: No operation will be made when inputting contact control signal. Pattern 2[Level (Emergency stop)]: Commands to stop all operation of indoor unit (except DDC) and disable remote control when inputting contact control signal. In level emergency stop status, it will not be controllable even if the command is from upper controller. Pattern 3[Level (Operation/Stop)]: Level signal input timing. It changes operation/ stop status of all indoor units. Pattern 4[Pulse (Operation/Stop, Disable/Enable)]: Pulse signal. It changes operation/stop status of all indoor units. 4 When pattern is selected, click [Save]. E-32 MIM-B17_BACnet Gateway_IM_E 32390-3.indd 32 2011-04-04 오후 3:44:28 5 5 When the pop-up window appears, click [OK]. When message with “Reading data from DMS. Please wait” appears saving is completed. Then, 'System Settings' screen appears again with all items disabled. Note Contact point control pattern is set to pattern 1 as factory default. For extension purpose, BACnet Gateway has total of 10 DI/DO ports. Contact control and output function is assigned to Ch1 and Ch2. Ch3~Ch10 will be assigned to additional functions. For proper contact control, connect with Ch1 and Ch2. E-33 MIM-B17_BACnet Gateway_IM_E 32390-3.indd 33 2011-04-04 오후 3:44:28 System Settings (Continued) Contact point control pattern Pattern Pattern1 Control ▶No external input (Factory default setting) When you input contact control signal in port 1, there will be no response. ▶L evel input (Emergency stop) 1. If the contact control signal is changed to ON, emergency stop status and all the indoor units are given ‘Stop’ command, and controlling using remote controller is impossible. 2. During the emergency stop, the BACnet Gateway will ignore any request from the upper controllers. 3. During the emergency stop, the BACnet Gateway will ignore previously set Pattern2 schedules. 4. When the contact control signal changes from ON to OFF, DVM goes into normal operation status and returns to the remote control status before emergency stop. 5. Even if the contact control signal of port 1 changes from ON to OFF, there will be no change to the indoor unit. 6. When you input contact control signal in port 2, there will be no response. ▶L evel input (Operation/Stop, Remote control Enable/Disable) 1. If the contact signal of port 1 changes from OFF to ON, all indoor units will be given ‘Operation‘ command. 2. If the contact signal of port 1 changes from ON to OFF, all indoor units will be given ‘Stop‘ command. 3. If the contact signal of port 2 is OFF, you cannot control all indoor units using remote controller. Pattern3 4. If the contact signal of port 2 changes from OFF to ON, you can control all indoor units using remote controller. 5. If the contact signal of port 2 changes from ON to OFF, you cannot control all indoor units using remote controller. 6. Control command from the upper controller will be operated regardless of the contact point status. 7. DVM system control using Schedule control will be operated regardless of the contact point status. ▶P ulse input (Operation/Stop) 1. Valid pulse duration for input signal is 0.5~1.0 second. BACnet Gateway ignores the signal which has shorter than 0.5 second duration, longer than 1.0 second Pulse width. 2. When Pulse input signal is ON in Port 1. all indoor units will be given ‘Operation‘ command. Pattern4 3. When Pulse input signal is ON in Port 2. all indoor units will be given ‘Stop‘ command. 4. DVM control command from the upper controller will be operated regardless of Pulse input signal. 5. DVM system control using Schedule control will be operated regardless of Pulse input signal. E-34 MIM-B17_BACnet Gateway_IM_E 32390-3.indd 34 2011-04-04 오후 3:44:28 DI(Digital Input) Circuitry according to Control Switch Pattern P attern 2 (May be used for connection with a fire sensor) BACnet Gateway Emergency Stop/Resume Operation CH1 CH2 No Connection P attern 3 (External contact signal control) BACnet Gateway Operation/Stop A/C CH1 Enable/Disable remote control CH2 P attern 4 (Pulse signal control) BACnet Gateway CH1 CH2 A/C Operation A/C Stop E-35 MIM-B17_BACnet Gateway_IM_E 32390-3.indd 35 2011-04-04 오후 3:44:29 System Settings (Continued) BACnet gateway information 1 1 Click [System Settings]. 2 You can check the basic BACnet gateway information from 'BACnet gateway information' section. E-36 MIM-B17_BACnet Gateway_IM_E 32390-3.indd 36 2011-04-04 오후 3:44:29 Tracking W hat is tracking? Tracking is an operation that finds devices connected to BACnet Gateway. Through tracking operation, devices will be recognize if they are connected to BACnet Gateway. To supervise and control system air conditioner using BACnet Gateway, tracking should be done first. T hings you can do through tracking Checking the number of devices installed, setting communication mode for each channel, DVM tracking, Renaming and setting ports is possible through tracking. E xecute tracking (1) Connect DVM device to COM1~COM5. (2) Set communication mode for each channel. - Set proper communication mode which fits to the devices connected in step (1). - Be aware that if communication mode is not properly set, the device may not be found through tracking. (3) Execute tracking - Execute DVM tracking. - DVM tracking is an operation that finds system air conditioner devices such as indoor/outdoor unit and watt-hour meter. (4) Setting name for each device. - You can set name for connected device. Set the names to help you recognize the location of the device easily. C ommunication mode setting for each channel Roles - It records what devices are connected to COM1~ COM5 of BACnet Gateway. - Through tracking, BACnet Gateway searches proper devices that fits to user’s setting. - Select proper communication mode which fits to connected device. What is communication mode? - Interface module, centralized controller, SIM interface modules and Watt-hour meter interface modules can be connected to BACnet Gateway. - BACnet Gateway can use only the device assigned for each COM port. - Communicational devices by communication mode is as follows. ▶ Interface module : Interface module, SIM interface modules, Watt-hour interface modules. ▶ Centralized controller mode : C entralized controller, SIM interface modules, Watt-hour interface modules. BACnet gateway will automatically assign the instance number of a device or object according to the tracking result. When the indoor unit address is changed by tracking, check the device information again in the man machine interface (MMI) since the instance number can also be changed. E-37 MIM-B17_BACnet Gateway_IM_E 32390-3.indd 37 2011-04-04 오후 3:44:29 Tracking (Continued) Setting communication mode for each channel 1 2 1 Click [Device Configuration]. 2 Click [Edit] from the 'Communication mode by channel' screen. [Edit] button will be switched to [Cancel]. All selection buttons will be enabled. However, the channels with searched device maintain its button in disabled status. E-38 MIM-B17_BACnet Gateway_IM_E 32390-3.indd 38 2011-04-04 오후 3:44:29 3 4 3 When each channel is enabled, check the communication mode you want to set for each channel. You cannot change the communication mode of channel which has currently connected device. If you set interface module as communication mode, tracking/monitoring/ controlling interface module and SIM interface module is possible. If you set interface module as communication mode, tracking/monitoring/ controlling centralized controller and SIM interface module is possible. 4 Click [Save] after setting is completed. If you click [Cancel], check boxes will be disabled and [Cancel] button will switch to [Edit]. 5 When message with “Reading data from DMS. Please wait” appears saving is completed. Then, 'System Environment Setting' screen appears again with all items disabled. E-39 MIM-B17_BACnet Gateway_IM_E 32390-3.indd 39 2011-04-04 오후 3:44:29 Tracking (Continued) DVM Tracking 1 2 1 Click [Device Configuration]. 2 Click [DVM Tracking]. E-40 MIM-B17_BACnet Gateway_IM_E 32390-3.indd 40 2011-04-04 오후 3:44:29 3 4 5 3 Enter administrator’s password. 4 Click [OK]. 5 When tracking information window pops up, check it and click [OK] to continue. Tracking will be executed regarding on the communication mode set from 'Communication mode by channel' section. Channels with communication mode set to Interface module, tracking will be executed on the interface modules within range of D0~DF and SIM interface modules. Channels with communication mode set to Centralized controller, tracking will be executed on centralized controller and SIM interface module. 6 Pop-up window with message “Tracking is in progress. Please wait.” will appear. Tracking takes from few seconds to 3 minutes. However, it may vary depending on the number of installed controllers. E-41 MIM-B17_BACnet Gateway_IM_E 32390-3.indd 41 2011-04-04 오후 3:44:29 Tracking (Continued) 7 7 Message will appear to alert that tracking is completed. Select the zone initializing mode and click [OK]. No initialization: No zone information initialization will be made. Individual initialization: Initialize zone information as individual mode. Group initialization: Initialize zone information as group mode. 8 Page will be refreshed by clicking [OK]. Then you can check the tracking result. Note If tracking is executed successfully with interface module set for communication mode setting for each channel, virtual centralized controller will be assigned to each channel. For the address of the virtual centralized controller, Channel 0 will be set to 11, Channel 1 to 12, Channel 2 to 13, channel 3 to 14 and channel 4 to 15. If there is existing communication channel for interface module, tracking for centralized controller will be limited to range of 0 ~ 10. If you cannot find any devices after tracking, it will be considered as a DVM tracking failure If there are devices which have same address, only first searched device will be registered. T he number of centralized controller contains the number of virtual centralized controller which is used in interface module communication. The number of indoor unit contains the number of indoor unit, ERV and AHU kit. If you execute tracking, system setting will be initialized. If tracking result does not match with actual installation information, there can be critical error in additional functions such as power distribution. Make sure that tracking information matches to actual installation information after tracking. E-42 MIM-B17_BACnet Gateway_IM_E 32390-3.indd 42 2011-04-04 오후 3:44:29 Device Configuration Disconnect all devices Function Initialize searched device status in BACnet Gateway. Monitoring and controlling of all the connected devices to BACnet Gateway will be stopped when you use this function. ◆ Connect searched device to the other channel and execute tracking. If the other device is searched in the channel you want to use, use ‘Disconnect all devices’function. ◆ If you use this function, BACnet Gateway device connection status will be initialized. 1 2 3 4 1 Click [Device Configuration]. 2 Click [Disconnect all devices]. 3 Enter administrator’s password. 4 Click [OK]. E-43 MIM-B17_BACnet Gateway_IM_E 32390-3.indd 43 2011-04-04 오후 3:44:30 Device Configuration (Continued) 5 5 When the information window pops up, you must check the information and click [OK] to continue. 6 When message with “Reading data from DMS. Please wait” appears and all the devices are disconnected, page will be refreshed. Note After executing 'Disconnect all device function', device search status of BACnet Gateway will be initialized. You should execute tracking again after using disconnect all devices function. E-44 MIM-B17_BACnet Gateway_IM_E 32390-3.indd 44 2011-04-04 오후 3:44:30 Renaming the devices 1 1 From the list of devices searched by tracking, click [Edit] in the bottom of the list. [Edit] will be changed to [Cancel]. Note If you click [Cancel] button, [Cancel] button will be switched to [Edit] button and the changed name of devices will be restored to original name. E-45 MIM-B17_BACnet Gateway_IM_E 32390-3.indd 45 2011-04-04 오후 3:44:30 Device Configuration (Continued) 2 3 2 Enter the name of the devices when the text box enables. You cannot use special characters within the device name. 3 Click [Save] after setting is completed. If you click [Cancel], text boxes will be disabled and the [Cancel] button will be switched to [Edit]. 4 When message with “Reading data from DMS. Please wait” appears saving is completed. Then, 'Tracking' screen appears again as all items are disabled. E-46 MIM-B17_BACnet Gateway_IM_E 32390-3.indd 46 2011-04-04 오후 3:44:30 Checking device information 1 1 Click one of the Object ID from 'Object ID' column. Detail information of the selected device will be displayed in device information. E-47 MIM-B17_BACnet Gateway_IM_E 32390-3.indd 47 2011-04-04 오후 4:44:51 Device Configuration (Continued) 3 2 Analog data of the selected device will be displayed in Analog data. Object ID: Displays ID of the corresponding object. Type: Displays type of the corresponding object. - I: Input (Read Only) - O: Output (Read/Write) - V: Value (Read/Write) Object Name: Displays the name of the corresponding object. Value: Displays the current value of the corresponding object. - Unit will be displayed between [ ]. 3 You can enter numbers to modify the Output type objects. Click [Edit] button on the bottom of the 'Device configuration' screen and enter the value when the text box enables. 4 Click [Save] after setting is completed. If you click [Cancel], text boxes will be disabled and the [Cancel] button will be switched to [Edit]. 5 When message with “Reading data from DMS. Please wait” appears saving is completed. Then, 'Device configuration' screen appears again as all items are disabled. E-48 MIM-B17_BACnet Gateway_IM_E 32390-3.indd 48 2011-04-04 오후 3:44:30 7 6 Binary data of the selected device will be displayed in Binary data. Object ID: Displays ID of the corresponding object. Type: Displays type of the corresponding object. - I: Input (Read Only) - O: Output (Read/Write) - V: Value (Read/Write) Object Name: Displays the name of the corresponding object. Value: Displays the current value of the corresponding object. - It will be displayed either On or Off 7 You can select the values to modify the Output type objects. Click [Edit] button on the bottom of the 'Device configuration' screen and select the value from On or Off when the button enables. 8 Click [Save] after setting is completed. If you click [Cancel], buttons will be disabled and the [Cancel] button will be switched to [Edit]. 9 When message with “Reading data from DMS. Please wait” appears saving is completed. Then, 'Device configuration' screen appears again as all items are disabled. E-49 MIM-B17_BACnet Gateway_IM_E 32390-3.indd 49 2011-04-04 오후 3:44:30 Device Configuration (Continued) 11 12 10 Multi-state Data of the selected device will be displayed in Multi-state data. Object ID: Displays ID of the corresponding object. Type: Displays type of the corresponding object. - I: Input (Read Only) - O: Output (Read/Write) - V: Value (Read/Write) Object Name: Displays the name of the corresponding object. Value: Displays the current value of the corresponding object. 11 You can select the values to modify the Output type objects. Click [Edit] button on the bottom of the 'Device configuration' screen and select the value when the list box enables. 12 Click [Save] after setting is completed. If you click [Cancel], buttons will be disabled and the [Cancel] button will be switched to [Edit]. 13 When message with “Reading data from DMS. Please wait” appears saving is completed. Then, 'Device configuration' screen appears again as all items are disabled. NotePlease refer to BACnet Point List to check the device configuration data for each device (Refer to page 54~59). E-50 MIM-B17_BACnet Gateway_IM_E 32390-3.indd 50 2011-04-04 오후 3:44:30 BACnet Protocol Implementation Conformance Statement Date: May 24. 2010 Vendor Name: SAMSUNG Electronics CO., Ltd. Product Name: DMS BACnet Gateway Product Model Number: MIM-B17 Application Software Version: 1.0 Firmware Revision: 1.0 BACnet Protocol Revision: 2.0 Product Description: This product supports BACnet/IP and provide functions to monitor and control status of air conditionerss. BACnet Standardized Device Profile (Annex L): BACnet Operator Workstation (B-OWS) BACnet Advanced Operator Workstation (B-AWS) BACnet Operator Display (B-OD) BACnet Building Controller (B-BC) BACnet Advanced Application Controller (B-AAC) BACnet Application Specific Controller (B-ASC) BACnet Smart Sensor (B-SS) BACnet Smart Actuator (B-SA) List all BACnet Interoperability Building Blocks Supported (Annex K): SUPPORTED BIBBS DS-RP-A DS-RP-B DS-RPM-A DS-RPM-B DS-RPC-A DS-RPC-B DS-WP-A Data DS-WP-B Sharing DS-WPM-A DS-WPM-B DS-COV-A DS-COV-B DS-COVP-A DS-COVP-B DS-COVU-A DS-COVU-B BIBB NAME Data Sharing-ReadProperty-A Data Sharing-ReadProperty-B Data Sharing-ReadPropertyMultiple-A Data Sharing-ReadPropertyMultiple-B Data Sharing-ReadPropertyConditional-A Data Sharing-ReadPropertyConditional-B Data Sharing-WriteProperty-A Data Sharing-WriteProperty-B Data Sharing-WritePropertyMultiple-A Data Sharing-WritePropertyMultiple-B DataSharing-COV-A DataSharing-COV-B DataSharing-COVP-A DataSharing-COVP-B DataSharing-COV-Unsolicited-A DataSharing-COV-Unsolicited-B SUPPORTED REMARKS E-51 MIM-B17_BACnet Gateway_IM_E 32390-3.indd 51 2011-04-04 오후 3:44:30 BACnet Protocol Implementation Conformance Statement (Continued) Alarm and Event Management Scheduling Trending Device and Network Management SUPPORTED BIBBS AE-N-A AE-N-I-B AE-N-E-B AE-ACK-A AE-ACK-B AE-ASUM-A AE-ASUM-A AE-ESUM-A AE-ESUM-B AE-INFO-A AE-INFO-B AE-LS-A AE-LS-B SCHED-A SCHED-I-B SCHED-E-B T-VMT-A T-VMT-I-B T-VMT-E-B T-ATR-A T-ATR-B T-VMMV-A T-VMMV-I-B T-VMMV-E-B T-AMVR-A T-AMVR-B DM-DDB-A DM-DDB-B DM-DOB-A DM-DOB-B DM-DCC-A DM-DCC-B DM-TM-A DM-TM-B DM-TS-A DM-TS-B DM-UTC-A DM-UTC-B DM-RD-A DM-RD-B DM-BR-A DM-BR-B BIBB NAME Alarm&Event-Notification-A Alarm&Event-Notification Internal-B Alarm&Event-Notification External-B Alarm&Event-ACK-A Alarm&Event-ACK-B Alarm&Event-Summary-A Alarm&Event-Summary-B Alarm&Event-Enrollment Summary-A Alarm&Event-Enrollment Summary-B Alarm&Event-Information-A Alarm&Event-Information-B Alarm&Event-LifeSafety-A Alarm&Event-LifeSafety-B Scheduling-A Scheduling-Internal-B Scheduling-External-B Viewing and Modifying Trends-A Viewing and Modifying Trends Internal-B Viewing and Modifying Trends External-B Automated Trend Retrieval-A Automated Trend Retrieval-B Viewing and Modifying Multiple Values-A View and Modifying Multiple Values Internal-B View and Modifying Multiple Values External-B Automated Multiple Value Retrieval-A Automated Multiple Value Retrieval-B Dynamic Device Binding-A Dynamic Device Binding-B Dynamic Object Binding-A Dynamic Object Binding-B DeviceCommunicationControl-A DeviceCommunicationControl-B Text Message-A Text Message-B Time Synchronization-A Time Synchronization-B UTCTime Synchronization-A UTCTime Synchronization-B ReinitializeDevice-A ReinitializeDevice-B Backup&Restore-A Backup&Restore-B SUPPORTED REMARKS E-52 MIM-B17_BACnet Gateway_IM_E 32390-3.indd 52 2011-04-04 오후 3:44:30 SUPPORTED BIBBS DM-R-A DM-R-B DM-LM-A DM-LM-B DM-OCD-A Device and DM-OCD-B Network Management DM-VT-A DM-VT-B NM-CE-A NM-CE-B NM-RC-A NM-RC-B BIBB NAME SUPPORTED REMARKS Restart-A Restart-B List Manipulation-A List Manipulation-B Object Creation & Deletion-A Object Creation & Deletion-B Virtual Terminal-A Virtual Terminal-B Connection Establishment-A Connection Establishment-B Router Configuration-A Router Configuration-B Segmentation Capability: Segmented requests supported Window Size Segmented responses supported Window Size Standard Object Types Supported: Object-Type Analog Input Analog Output Analog Value Binary Input Binary Output Binary Value Calendar Command Device Event Enrollment File Group Loop Multi-state Input Multi-state Output Multi-state Value Notification Class Program Schedule Supported Yes Dynamically Creatable n/a Dynamically Deletable n/a Writeable Properties Present value Present value Present value Present value Present value Present value n/a Present value Present value Present value E-53 MIM-B17_BACnet Gateway_IM_E 32390-3.indd 53 2011-04-04 오후 3:44:30 BACnet Protocol Implementation Conformance Statement (Continued) Data Link Layer Options: BACnet IP, (Annex J) BACnet IP, (Annex J), Foreign Device ISO 8802-3, Ethernet (Clause 7) ANSI/ATA 878.1, 2.5 Mb. ARCNET (Clause 8) ANSI/ATA 878.1, RS-485 ARCNET (Clause 8), baud rate(s) MS/TP master (Clause 9), baud rate(s): MS/TP slave (Clause 9), baud rate(s): Point-To-Point, EIA 232 (Clause 10), baud rate(s): Point-To-Point, modem, (Clause 10), baud rate(s): LonTalk, (Clause 11), medium: BACnet/ZigBee (ANNEX O) Other: Device Address Binding: Is static device binding supported? (This is currently necessary for two-way communication with MS/TP slaves and certain other devices.) Yes No Networking Options: Router, Clause 6 - List all routing configurations, e.g., ARCNET-Ethernet, Ethernet-MS/TP, etc. Annex H, BACnet Tunneling Router over IP BACnet/IP Broadcast Management Device (BBMD) Does the BBMD support registrations by Foreign Devices? Yes No Does the BBMD support network address translation? Yes No Character Sets Supported: Indicating support for multiple character sets does not imply that they can all be supported simultaneously. ANSI X3.4 IBM™/Microsoft™ DBCS ISO 8859-1 ISO 10646 (UCS-2) ISO 10646 (UCS-4) JIS 0208 If this product is a communication gateway, describe the types of non-BACnet equipment/ networks(s) that the gateway supports: This gateway switches SAMSUNG air conditioner protocol to BACnet protocol to make RS-485 communication possible with the air conditioners connected to gateway. E-54 MIM-B17_BACnet Gateway_IM_E 32390-3.indd 54 2011-04-04 오후 3:44:31 Standard Object Types Supported Object Type Support Description Analog Input [Indoor temperature], [The power value after the basic date], [The number of hours usage of an indoor unit after the basic date], [Power value within period], [The number of hours usage of an indoor unit within period], [Indoor unit error code], [Centralized controller error code], [Interface module error code], [SIM interface module error code], [DMS status], [DMS error] Analog Output Analog Value Averaging Binary Input Binary Output Binary Value Calendar Command Device Event Enrollment File Group Life Safety Point Life Safety Zone Loop Multi-state Input Multi-state Output Multi-state Value Notification Class Program Pulse Converter Schedule Trend Log Access Door Event Log Load Control Structured View Trend Log Multiple [Set temperature], [Setting lower temperature limit], [Setting upper temperature limit] [DI], [Filter sign status] [DO], [Filter sign reset] [Power On/Off control] [Setting the fucntion of limiting lower temperature] [Setting the function of limiting upper temperatue ] [DMS], [A/C Indoor Unit], [ERV], [AHU], [SIM], [Centralized controller], [Interface module], [DDC] [Operation mode control], [Fan speed control], [Air flow direction control], [Setting Cool only/ Heat only/ No Limit ], [Control Enable RC/ Disable RC / Level1] E-55 MIM-B17_BACnet Gateway_IM_E 32390-3.indd 55 2011-04-04 오후 3:44:31 Detail Description of Object Device Following table shows regulation of device ID and they are created automatically. DNET – Range [Digit 2] CPP – Range [Digit 3] INDOOR – Range [Digit 2] Centralized Controller 0~15 000~015 64 SIM 0~15 100~115 64 DMS DI/DO 0~15 300~315 64 Interface Module 0~15 400~655 (16 x 16) 64 Indoor Unit ERV AHU kit 0~15 400~655 0~63 Gateway 0~15 900 64 Item Ex)Indoor Unit DNET (Gateway number): 9 Indoor Unit Address: 01.01.32 Device ID: 941732 DNET (Gateway number) 9 Indoor Unit Individual address 417 32 400 + 1x16 + 1 = 417 Centralized Controller address Interface Module address O bject of device Refer to BACnet point List E-56 MIM-B17_BACnet Gateway_IM_E 32390-3.indd 56 2011-04-04 오후 3:44:31 BACnet Point List Indoor Unit Single indoor unit has following point list. Instance Number Object Object Type Object Name AC_RoomTemp_xx_ xxxxxx AC_Temp_Set_xx_ xxxxxx AC_Cool_LimitTemp_ xx_xxxxxx AC_Heat_LimitTemp_ xx_xxxxxx AC_Baseline_kWh_xx_ xxxxxx AC_Baseline_Minute_ xx_xxxxxx AC_Period_kWh_xx_ xxxxxx AC_Period_Minute_xx_ xxxxxx AC_Power_xx_xxxxxx AC_Cool_Limit_set_xx_ xxxxxx AC_Heat_Limit_set_xx_ xxxxxx AC_FilterSign_xx_ xxxxxx AC_FilterSign_Reset_ xx_xxxxxx AC_Operation_Mode_ xx_xxxxxx AC_FanSpeed_xx_ xxxxxx 1 Indoor Temperature AI 2 Set temperature AV 3 Setting lower temperature limit AV 4 Setting upper temperature limit AV 6 The power value of an indoor unit after the basic date The number of hours usage of an indoor unit after the basic date 7 Power value within period AI 8 The number of hours usage of an indoor unit within period Power On/Off Applying lower temperature limit setting Applying upper temperature limit setting AI 5 9 10 11 AI AI BV BV BV Unit Inactive Active Text-1 Text-2 Status value Text-3 Text-4 Text-5 °C °C °C °C kWh Minute kWh Minute Off On Off On Off On Off On Off On Auto Cool Heat Fan Auto Low Mid High 12 Filter sign status BI 13 Filter sign reset BO 14 Operation mode status MV 15 Fan speed status MV 16 Air flow direction status 17 Operation mode limit status 18 Remote controller limit status MV AC_FanFlow_xx_xxxxxx Stop UpDown LeftRight UpDown/ LeftRight AC_Mode_Limit_xx_ No Cool Heat MV xxxxxx Limt Only Only Power AC_Remocon_Limit_ Fully MV xx_xxxxxx Work Limited On Limited 19 Integrated error code of both indoor unit and outdoor unit AI AC_Error_Code_xx_ xxxxxx Temperature setting range can be different depending on the model and the common range is as follows: Auto: 18˚C~30˚C Cool: 18˚C~30˚C Heat: 16˚C~30˚C Fan: Temperature cannot be adjusted Dry: 18˚C~30˚C MIM-B17_BACnet Gateway_IM_E 32390-3.indd 57 Dry Refer to list of error code E-57 2011-04-04 오후 3:44:31 BACnet Point List (Continued) AHU Kit Single AHU unit has following point list. Instance Number Object 1 Indoor Temperature 2 Set temperature 3 4 5 6 7 8 9 10 11 12 13 14 15 Setting lower temperature limit Setting upper temperature limit The power value of an indoor unit after the basic date The number of hours usage of an indoor unit after the basic date Power value within period The number of hours usage of an indoor unit within period Object Type Object Name AHU_RoomTemp_xx_ xxxxxx AV AHU_Temp_Set_xx_ xxxxxx AV AHU_Cool_ LimitTemp_xx_xxxxxx AV AHU_Heat_ LimitTemp_xx_xxxxxx AI Unit Inactive Active Text-1 Text-2 Text-3 Text-4 Text-5 °C °C °C °C AI AHU_Baseline_kWh_ xx_xxxxxx AI AHU_Baseline_ Minute_xx_xxxxxx AI AHU_Period_kWh_xx_ kWh xxxxxx AI AHU_Period_Minute_ Minute xx_xxxxxx kWh Minute BV AHU_Power_xx_ Off xxxxxx Applying lower AHU_Cool_Limit_set_ BV xx_xxxxxx Off temperature limit setting Applying upper BV AHU_Heat_Limit_set_ Off xx_xxxxxx temperature limit setting Filter sign status BI AHU_FilterSign_xx_ Off xxxxxx AHU_FilterSign_ Filter sign reset BO Reset_xx_xxxxxx Off Operation mode status MV AHU_Operation_ Auto Mode_xx_xxxxxx Operation mode limit No MV AHU_Mode_Limit_xx_ xxxxxx Limt status Power On/Off 16 Remote controller limit status MV AHU_Remocon_Limit_ Work xx_xxxxxx 17 Integrated error code of both indoor unit and outdoor unit AI AHU_Error_Code_xx_ xxxxxx Status value On On On On On Cool Heat Fan Dry Cool Only Heat Only Power Fully On Limited Limited Refer to list of error code E-58 MIM-B17_BACnet Gateway_IM_E 32390-3.indd 58 2011-04-04 오후 4:15:02 ERV Single ERV unit has following point list. Unit Inactive Text-1 ERV_Power_xx_xxxxxx Off ERV_FilterSign_xx_ Off xxxxxx ERV_FilterSign_Reset_ Off xx_xxxxxx ERV_Operation_ Auto Mode_xx_xxxxxx ERV_FanSpeed_xx_ Low xxxxxx Instance Number Object Object Type 1 Power On/Off operation BV 2 Filter sign status BI 3 Filter sign reset BO 4 Operation mode status MV 5 Fan speed status MV 6 Remote controller limit status MV ERV_Remocon_Limit_ xx_xxxxxx 7 Integrated error code of ERV unit AI Object Name Work ERV_Error_Code_xx_ xxxxxx Status value Active Text-2 ON Text-3 Text-4 Text-5 HeatEx Bypass Sleep High Turbo Fully Limited Power On Limited ON ON Refer to list of error code SIM Single SIM has following point list. Instance Number 1 Object SIM error code Object Type Object Name Status value AI SIM_Error_Code Refer to list of error code E-59 MIM-B17_BACnet Gateway_IM_E 32390-3.indd 59 2011-04-04 오후 3:48:54 BACnet Point List (Continued) Centralized controller Single Centralized controller has following point list. Instance Number Object Object Type 1 Centralized controller error code AI Object Name Central_Error_ Code Status value Refer to the list of the integrated error code Interface module Single Interface module has following point list. Instance Number Object Object Type Object Name Status value 1 Interface module error code AI Repeater_Error_ Code Refer to the list of the integrated error code Object Name Status Value BACnet Gateway BACnet Gateway has following point list. Instance 1 Control and Monitoring All device OFF Object Type BO ALL_OFF Inactive : All devices Off 2 DMS2 Status AI DMS2_Status 0: Normal, 8: Emergency stop, 105 : Tracking in progress, 108 : Tracking failed 3 BACnet error code AI BACnetApp_ Error_Code BACnet error code You may use ALL_OFF command to turn on all the indoor units but it is not recommended. If communication error occurs on devices such as SIM/Centralized Controller/ Interface Module etc, other functions such as power distribution may also create a problem. You must have BMS system to check the errors and you must take action immediately. E-60 MIM-B17_BACnet Gateway_IM_E 32390-3.indd 60 2011-04-04 오후 4:15:02 Other Information Object setting when there is communication error If any communication error occurs between the air conditioner devices, the property will be set as below. 1. Reliability property will be set as COMMUNICATION_FAILURE. 2. Fault / Alarm flag of Status_Flags property will be set as TRUE. 3. Present_Value property is readable but the value is not guaranteed. Object setting when there is general error If any air conditioner related error occurs, the property will be set as below. 1. The Reliability property value of each object will be set as UNRELIABLE_OTHER. 2. FAULT / Alarm flag of Status Flags property will be set as TRUE. Main service Time setting Time synchronization Service is a service that allows the time of BACnet Gateway to be synchronized with the time of PC. COV (Change Of Value) COV service is supported and you can set confirmed or unconfirmed COV. You can set lifetime value. COV registration information will disapper when a BACnet gateway is switched off. The reserved value caused by the power supply problem is not guaranteed according to the BACnet regulation. E-61 MIM-B17_BACnet Gateway_IM_E 32390-3.indd 61 2011-04-04 오후 3:44:31 Memo E-62 MIM-B17_BACnet Gateway_IM_E 32390-3.indd 62 2011-04-04 오후 3:44:31 E-63 MIM-B17_BACnet Gateway_IM_E 32390-3.indd 63 2011-04-04 오후 3:44:31 MIM-B17_BACnet Gateway_IM_E 32390-3.indd 64 2011-04-04 오후 3:44:31