1
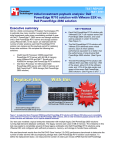
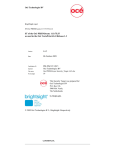
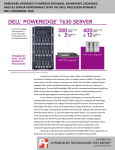
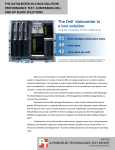
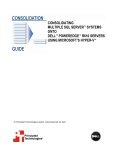
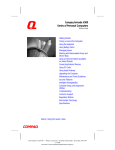
TEST REPORT
MARCH 2009
Virtualized Exchange workload performance comparison of end-to-end
solutions: Dell PowerEdge M610 with Dell EqualLogic storage vs. HP ProLiant
BL465c with HP StorageWorks EVA 4400
Executive summary
KEY FINDINGS
Dell Inc. (Dell) commissioned Principled Technologies
(PT) to compare the virtualized Microsoft Exchange 2007
workload performance of two blade server-and-storage
solutions:
•
•
Dell PowerEdge M610 server and Dell EqualLogic
storage
HP ProLiant BL465c G5 server and HP
StorageWorks EVA 4400 storage
z
The Dell PowerEdge M610 server and Dell
EqualLogic storage supported 25 percent
more Microsoft Exchange 2007 virtual
machines than did the HP ProLiant BL465c
server andTEST
HP StorageWorks
EVA 4400
REPORT
storage. (See Figure 1.)
z
The Dell PowerEdge M610 server and Dell
EqualLogic storage had a 36.7 percent
performance-per-watt advantage over the
HP ProLiant BL465c server and HP
StorageWorks EVA 4400 storage. (See
Figure 2.)
FEBRUARY 2006
The Dell PowerEdge M610 solution had two 2.4GHz Intel
Xeon E5530 processors and 72 GB of RAM while the HP
ProLiant BL465c solution had two 2.7GHz AMD Opteron
8384 processors and 64 GB of RAM. (The Dell
PowerEdge M610 currently supports up to the 2.93GHz Xeon X5570 processor.) The difference in the quantity
and speed of RAM in the systems was due to the system architectures and was not a factor in performance
because each virtual machine (VM) was limited to 4 GB of RAM. We connected the Dell PowerEdge M610 to the
EqualLogic storage via iSCSI and connected the HP ProLiant BL465c to the EVA 4400 storage via Fibre Channel.
We installed build 148592 of a version of ESX still under development as the hypervisor for each server.
For this comparison, we used Microsoft Exchange LoadGen 2007, a Microsoft-provided tool for benchmarking an
Exchange Mail Server. We defined the peak number of VMs per server as the maximum number of concurrent
VMs under load where each VM had acceptable performance.
Virtualized Exchange 2007 workload results
Higher results are better
Peak number of virtual machines
12
10
HP BL465c server and HP
StorageWorks EVA 4400
storage
8
6
Dell PowerEdge M610
server and Dell EqualLogic
storage
4
2
0
Server and storage solution
Figure 1: Microsoft Exchange 2007 workload performance results for the two solutions. Higher
numbers are better.
Figure 1 compares the peak
number of virtual machines
running a Microsoft Exchange
2007 workload that each
solution ran with acceptable
performance. The Dell
PowerEdge M610 ran 10 such
simultaneous VMs, while the
HP ProLiant BL465c ran 8
such simultaneous VMs. Each
VM contained 4000 users for
a total of 40,000 users on the
Dell PowerEdge M610 and
32,000 users on the HP
ProLiant BL465c. Thus, the
Dell PowerEdge M610
solution had a 25 percent
performance advantage over
the HP ProLiant BL465c
solution.
Virtualized Exchange 2007 performance/watt results
Higher scores are better
Normalized comparison
1.60
1.40
1.20
HP ProLiant BL465c
server
1.00
Dell PowerEdge M610
server
0.80
0.60
0.40
0.20
0.00
Server
Figure 2 illustrates the
performance/watt for each of
the two solutions. In this chart,
we normalized the results for
each workload to those of the
solution with lower
performance/watt. We
compute performance/watt by
dividing the benchmark’s
score by the average power
consumption, in watts, of the
solution during the period the
benchmark was delivering
peak performance. As Figure
2 shows, the Dell M610
solution delivered 36.7
percent more performance/
watt than did the HP BL465c
solution. We normalized the
results for each workload to
those of the server with lower
performance/watt.
We installed and ran the
LoadGen client from VMs on
a separate ESX 3.5 host with
four Intel X7460 2.66Ghz processors and 64 GB of RAM. We ran a single instance of the client per VM, and each
client VM targeted only one server VM.
Figure 2: Performance/watt results for the solutions normalized to that of the HP ProLiant
BL465c solution. Higher numbers are better.
Workload
Our goal was to see how many virtual machines running this workload on Microsoft Server 2008 with Exchange
2007 the server could handle with acceptable performance.1 To reach that goal, we created a new custom
workload that reflected existing standards.
To build the workload, we used Microsoft Exchange LoadGen 2007, an industry-standard tool for benchmarking
an Exchange Mail Server. We used as the basis of that workload the LoadGen settings from an industry-standard
virtualized mail benchmark that uses the Microsoft Exchange Server 2003 MAPI Messaging Benchmark 3
(MMB3). MMB3 is the previous generation Exchange benchmark, which Microsoft has replaced with LoadGen
2007. We modified the MMB3 workload so it would work on the latest version of LoadGen 2007 by using the
Custom feature of that tool. We tuned the workload to in such a way as to stress CPU and memory. Our workload
consisted of 4000 users per VM. During the tests, LoadGen performs tasks to simulate a standard user
generating mail activity. When the workload finishes, LoadGen reports the response time, which is the number of
seconds necessary to complete the task. We ran this workload on all virtual machines simultaneously for 30
minutes.
We modified the Loadgen profile we used for this testing, based on MMB3, to stress the memory and processor
resources of the servers. Those modifications result in the tested workload no longer resembling an Exchange
workload deployed in “real world,” practical scenarios. The testing results, therefore, should not be used as a
guide or recommendation for sizing Exchange server and storage architectures. However, the testing results do
show an accurate picture and comparison of the servers’ overall performance and power capabilities and
limitations.
1
This report does not reflect suggested Microsoft Exchange architecture; the focus of the study was performance.
Principled Technologies, Inc.: Virtualized Exchange workload performance comparison of end-to-end
solutions: Dell PowerEdge M610 with Dell EqualLogic storage vs. HP ProLiant BL465c with HP
StorageWorks EVA 4400
2
Test results
Figure 3 shows the total number of virtual machines each solution could handle during testing. For a solution to
earn an acceptable score, all VMs needed a latency of less than 1.3 seconds. Our goal for the latency threshold
was to have the majority of the latencies for the specific run under 1 second. The Dell PowerEdge M610 complied
with this level of acceptability. We broadened the acceptable latency threshold to 1.3 seconds in order to
accommodate the HP ProLiant BL465c.
To determine the maximum number of simultaneous virtual machines each solution could handle, we added
virtual machines until one or more had a latency greater than 1.3 seconds. We then subtracted one VM to identify
the total number of VMs the solution could handle. We performed three runs at the total number to verify the
response time met these standards.
Server
Total number of virtual machines
Dell PowerEdge M610 and Dell EqualLogic storage
HP ProLiant BL465c and HP StorageWorks EVA 4400 storage
10
8
Figure 3: The total number of virtual machines for the two server-and-storage solutions. Higher numbers are better.
Figure 4 shows the latency from the median run for each virtual machine.
HP ProLiant BL465c and HP
Dell PowerEdge M610 and
Server
Storage Works EVA 4400
Dell EqualLogic storage
storage
Virtual machine 1
716.5
1143.05
Virtual machine 2
994.6
986.25
Virtual machine 3
742.6
948.63
Virtual machine 4
746.7
1009.62
Virtual machine 5
960.0
1111.80
Virtual machine 6
975.3
910.00
Virtual machine 7
916.5
978.67
Virtual machine 8
763.7
1012.30
Virtual machine 9
1035.0
Virtual machine 10
961.3
Figure 4: Latency from median run for each virtual machine for the two server-and-storage solutions. Lower
numbers are better.
Figure 5 details the power consumption, in watts, of the server while idle and during the median run of the
virtualized Exchange 2007 workload.
Server
Dell PowerEdge M610
HP ProLiant BL465c
Idle power (watts)
Average power (watts)
505
557
593
648
Figure 5: Average power usage (in watts) of the two servers while idle and during the median run of the Microsoft Exchange 2007
workload. Lower numbers are better.
Test methodology
Setting up and configuring the storage
Dell EqualLogic storage configuration
Each of the four Dell EqualLogic arrays has 16 drives, for a total of 64 drives. Each of the five HP StorageWorks
EVA 4400 storage trays has 12 drives, for a total of 60 drives. To match the drive count of the two storage
Principled Technologies, Inc.: Virtualized Exchange workload performance comparison of end-to-end
solutions: Dell PowerEdge M610 with Dell EqualLogic storage vs. HP ProLiant BL465c with HP
StorageWorks EVA 4400
3
configurations, we configured two Dell EqualLogic arrays in RAID 10 no-spares mode (16 active drives each) and
two Dell EqualLogic arrays in regular RAID 10 mode (14 active drives each), for a total of 60 active drives.
We connected the Dell Server to the Dell EqualLogic storage via three 1Gb/s Ethernet cables. We configured the
Dell EqualLogic storage into two storage pools. Figure 7 shows the storage layout. The VM operating system and
log storage pool (Storage Pool 1) contained one Dell EqualLogic PS6000 Array. The MailStore database storage
pool (Storage Pool 2) contained three Dell EqualLogic PS5000XV Arrays. We created one 1.28TB volume in the
VM operating system and log storage pool. We connected this storage pool to ESX Server as a single datastore
via the ESX iSCSI initiator using one physical NIC. We created 10 60GB volumes in the MailStore database
storage pool. We used the Microsoft iSCSI Initiator with the EqualLogic Host Integration Toolkit (HIT) within each
VM to connect one 60GB volume to every VM through two virtual NIC’s shared between every VM.
PS5000XV-1
PS5000XV-2
PS5000XV-3
Storage Pool 1
PS6000
Storage Pool 2
Db 1 Volume
Db 2 Volume
Db 3 Volume (...)
OS-Log Volume
MS iSCSI Initiator 1
MS iSCSI Initiator 2
MS iSCSI Initiator 3
(…)
ESX iSCSI Initiator
VMWare Datastore
Db 1 HDD
Db 2 HDD
Db 3 HDD (…)
MailServer 1 HDD
MailServer 2 HDD
MailServer 3 HDD
Figure 7: The layout of the Dell EqualLogic storage.
Setting up the storage
1. Using the command line, setup a storage group with the following RAID policies:
a. PS5000XV-1: RAID-10 (no-spares)
b. PS5000XV-2: RAID-10
c. PS5000XV-3: RAID-10 (no-spares)
d. PS6000: RAID-10
2. Create a storage pool named database with the following members:
a. PS5000XV-1
b. PS5000XV-2
c. PS5000XV-3
3. Create a storage pool named OS-Log with the following member:
a. PS6000
4. Enable all network connections on each PS5000XV and PS6000 using the following IP address scheme:
a. IP Address: 192.168.1.## (## being any number between 10 and 60)
Principled Technologies, Inc.: Virtualized Exchange workload performance comparison of end-to-end
solutions: Dell PowerEdge M610 with Dell EqualLogic storage vs. HP ProLiant BL465c with HP
StorageWorks EVA 4400
4
b. Subnet Mask: 255.255.248.0
5. Create 10 60GB volumes in the database storage pool with no snapshot reserve, and name them loadgen# (# being 1-10)
6. Create one 1.28TB volume in the OS-Log storage pool with no snapshot reserve, and name it OS-Log
7. Enable shared access to the iSCSI target from multiple initiators on every volume.
8. Create an access control record for every volume without specifying any limitations.
9. Create a read-only SNMP community name to use for group monitoring.
HP StorageWorks storage configuration
We connected the HP Server to the HP StorageWorks storage via two 4 Gb/s Fibre Channel cables. We
configured the HP StorageWorks storage into two disk groups using RAID 10. Figure 8 shows the storage layout.
Our database disk group (Disk Group 1) contained 48 disks. Our VM operating system and log disk group (Disk
Group 2) contained 12 disks. We created one 819GB volume in the operating system and log disk group, which
we connected to ESX Server as a single datastore and assigned to one fibre channel port. We created two
1,569GB volumes in the database disk group, which we connected to ESX Server as two datastores and
assigned to one fibre channel port.
Figure 8: The layout of the HP StorageWorks storage.
Setting up the storage
1. Create a disk group with the following parameters:
Principled Technologies, Inc.: Virtualized Exchange workload performance comparison of end-to-end
solutions: Dell PowerEdge M610 with Dell EqualLogic storage vs. HP ProLiant BL465c with HP
StorageWorks EVA 4400
5
2.
3.
4.
5.
6.
a. Name: Database
b. Disks: 1-48
c. Disk drive failure protection: None
d. Alarm Level: 100%
Create a disk group with the following parameters:
a. Name: OS-Log
b. Disks: 49-60
c. Disk drive failure protection: None
d. Alarm Level: 100%
Create a new vDisk with the following parameters:
a. Name: Database1
b. Size: 1,569 GB
c. Disk Group: Database
d. Redundancy: Vraid 1
Create a new vDisk with the following parameters:
a. Name: Database2
b. Size: 1,569 GB
c. Disk Group: Database
d. Redundancy: Vraid 1
Create a new vDisk with the following parameters
a. Name: OS-Log
b. Size: 819 GB
c. Disk Group: OS-Log
d. Redundancy: Vraid 1
Create a Host, and add the World Wide Name for both Fibre Channel adapters on each server under test.
Adjusting BIOS settings
To maximize performance for each server, we adjusted the BIOS settings as follows:
•
•
Dell PowerEdge M610 system: We enabled virtualization.
HP ProLiant BL465c system: We enabled virtualization and enabled No-Execute Page-Protection.
Setting up the host server
We installed build 148592 of a version of ESX still under development on the host server. ESX build 148592
supports the new virtualization technologies such as EPT. We also installed the vSphere client tool on a
management workstation, which was an Intel Pentium 4, 630 3.00GHz running Windows Vista Ultimate SP1
(6001) with 2GB RAM.
Installing ESX Build 148592
1. Insert ESX Build 148592 DVD, and restart the computer.
2. While booting, press F11 to enter Boot Menu.
3. Press the down arrow to navigate to the appropriate boot device, and press Enter.
4. To start ESX in graphical mode, press Enter.
5. On the Welcome screen, click Next.
6. Click the checkbox to accept the terms of the license agreement, and click Next.
7. Accept the default keyboard layout, and click Next.
8. On the Custom Drivers screen, choose No to install custom drivers, and click Next.
9. You will receive a warning if you chose No. Click Yes to proceed. Drivers will load at this point.
10. Click Next.
11. Enter your serial number now, or choose to enter one later. Click Next.
12. On the Network Configuration screen, choose the NIC that you will use for system tasks. Click Next.
13. On the next Network Configuration screen, set your IP addressing information, subnet mask, DNS, and
hostname. Click Next.
14. On the Setup Type screen, choose Standard setup.
15. Select the virtual disk you wish to install ESX on, and click Next.
Principled Technologies, Inc.: Virtualized Exchange workload performance comparison of end-to-end
solutions: Dell PowerEdge M610 with Dell EqualLogic storage vs. HP ProLiant BL465c with HP
StorageWorks EVA 4400
6
16.
17.
18.
19.
20.
21.
22.
On the Data Loss warning screen, click OK.
On the Time Zone Settings screen, choose your appropriate time zone, and click Next.
On the Date and Time screen, modify the date and time as you wish, and click Next.
Assign a root password for ESX. Optionally, add additional users if you wish, and click Next.
On the Summary screen, click Next to install.
When the installation is complete, click Next.
Click Finish to reboot the system.
Enabling secure shell (ssh) access for the root user
1. Using Putty, Cygwin, or another terminal, ssh to the ESX server.
2. Type the following command to switch to the root user:
# su 3. Enter the root user password.
4. Type the following command to change to the appropriate directory:
# cd /etc/ssh
5. Edit the sshd_config file using vi. Use the following command:
# vi sshd_config
6. Press the down arrow key to move the cursor to the PermitRootLogin line, and then move the cursor to
the word no. Press the i key to insert text.
7. Type the word yes and delete the word no.
8. Press the Escape key to return to command mode.
9. Type the following command to save and exit the file:
:wq
10. Type the following command to reboot the server:
# init 6
Installing vSphere on a management workstation
1. Navigate to the IP address of your ESX Server.
2. Accept certificate warnings, and continue.
3. Click vSphere to download the vSphere client.
4. Choose Run to install.
5. Choose your language, and click OK.
6. On the Welcome screen, click Next.
7. Accept the license terms, and click Next.
8. Enter user and organization details, and click Next.
9. Optionally, click the checkbox to install the update utility. Click Next.
10. On the Destination Folder screen, click Next.
11. Click Install.
12. Click OK.
Connecting the storage to the host
On the Dell EqualLogic storage, we connected the OS-Log volume to the ESX Server VMkernel using one
physical 1Gb NIC. We presented each virtual machine with two 1Gb virtual NICs connected to two physical NICs
that we used to connect the Microsoft iSCSI Initiator within the virtual machine to its individual iSCSI MailStore
database volume.
On the HP StorageWorks storage, we connected the OS-Log volume to ESX Server using the first Fibre Channel
adapter. We connected the two MailStore database volumes to ESX Server using the second Fibre Channel
Adapter.
We connected an additional virtual NIC to a physical 1Gb NIC for LoadGen client to server communications.
Adding the iSCSI storage adapter in ESX (Dell only)
1. Click Start, All Programs, VMware, VMware vSphere client.
2. Click the Configuration tab.
Principled Technologies, Inc.: Virtualized Exchange workload performance comparison of end-to-end
solutions: Dell PowerEdge M610 with Dell EqualLogic storage vs. HP ProLiant BL465c with HP
StorageWorks EVA 4400
7
3.
4.
5.
6.
7.
8.
9.
10.
11.
12.
13.
14.
15.
16.
17.
18.
19.
20.
21.
Click Networking.
Click Add Networking…
Select the VMkernel radio button, and click Next.
Deselect any selected NICs that vSphere shows as “down.” Select the first of the available four NICs that
vSphere does not show as “down” in the Speed column. Click Next.
Assign a label to the network. Click Next.
Enter a valid IP address and subnet. Click Next.
Click Finish.
Click No when the application prompts you to enter a default gateway.
Click the Configuration tab.
Click Storage Adapters under Hardware pane.
Click iSCSI Software Adapter. Then, click Properties.
Click Configure.
Click Enabled.
Click OK.
After the application disables the device, click the Dynamic Discovery tab.
Click Add.
Enter the IP address of the storage group.
Click Close.
When the application prompts you to rescan for changes, click Yes.
Adding the storage volumes to ESX storage
1. In vSphere, click the Configuration tab.
2. Click Storage in the Hardware pane.
3. Click Add Storage…
4. Choose Disk/LUN. Click Next.
5. Select the appropriate LUN. Click Next.
6. Click Next.
7. Enter a name for the datastore. Click Next.
8. Click Next to accept the defaults for block size.
9. Click Finish to complete the addition of the LUN.
10. Repeat steps 1 through 9 two more times (HP only).
Setting up the iSCSI NICs with vSphere (Dell only)
1. Click the Configuration tab.
2. Click Networking.
3. Click Add Networking.
4. Click Virtual Machine.
5. Choose to create a virtual switch. Assign the relevant NIC in the system. Click Next.
6. Assign a network name.
7. Click Finish.
8. Repeat steps 1 through 7 once more.
Installing and configuring the mail server
To set up this server, you must install several software components. The following subsections detail the
necessary installation processes. Before following these instructions, make sure to statically assign an IP address
for the server under test, and then plug that port into another system or router. This allows the server to correctly
add the domain server function. We recommend making the IP address 192.168.x.250, where x is the VM
number. For example, the first mail server would have an IP address 192.168.1.250.
Creating the virtual machine with vSphere
Create the VM according to the following specifications:
a.
Name: MailServer
b.
Virtual processors: 1
c.
Virtual memory: 4,096 MB
Principled Technologies, Inc.: Virtualized Exchange workload performance comparison of end-to-end
solutions: Dell PowerEdge M610 with Dell EqualLogic storage vs. HP ProLiant BL465c with HP
StorageWorks EVA 4400
8
1.
2.
3.
4.
5.
6.
7.
8.
9.
10.
11.
12.
13.
14.
15.
16.
17.
18.
19.
20.
21.
22.
23.
24.
d.
Virtual Disk Size: 24 GB
e.
Virtual Network: Mail Network (keep the default Windows Network DHCP settings)
Click Start, All Programs, VMware, VMware vSphere client.
Enter the IP address or hostname, user name, and password. Click Login.
Click the Virtual Machines tab.
Right-click, and choose New Virtual Machine.
Choose Custom, and click Next.
Assign a name to the virtual machine. Click Next.
Select a datastore for the virtual machine files. We chose the OS-Log Datastore. Click Next.
Choose Virtual Machine Version 7 to utilize build 148592 of ESX. Click Next.
Choose Microsoft Windows, then Microsoft Windows Server 2008 (64-bit). Click Next.
Choose one virtual processor. Click Next.
Choose 4GB RAM. Click Next.
Click None for the number of NICs. Click Next.
Choose LSI Logic SAS as the SCSI controller. Click Next.
Choose to create a new virtual disk. Click Next.
Make the OS virtual disk size 24 GB, and click Next.
Keep the default virtual device node, and click Next.
Click Finish.
Right-click the VM, and choose Edit Settings.
On the Hardware tab, click Add…
Choose Ethernet Adapter, and click Next.
Choose VMXNet 3, and click Next.
Click Finish.
Click OK.
Repeat steps 18 through 23 two times for the Dell system.
Installing the guest operating system
1. Insert the installation DVD for Windows Server 2008 x64 into the DVD drive.
2. In vSphere, right-click the virtual machine, and choose CD/DVD drive.
3. Click the Host Device radio button, and choose the appropriate drive.
4. Click OK.
5. Right-click the machine, and choose Power, Power On.
6. Right-click the machine, and choose Open console.
7. Choose the language, time and currency, and keyboard input. Click Next.
8. Click Install Now.
9. Choose Windows Server Enterprise (Full Installation). Click Next.
10. Accept the license terms, and click Next.
11. Click Custom.
12. Click the Disk, and click Drive options (advanced).
13. Click New, Apply, Format, and click Next.
14. Let the installation process continue. The VM will reboot several times.
15. After the installation completes, click OK to set the Administrator password.
16. Enter the administrator password twice, and click OK.
17. When the operating systems finishes booting, choose VM, Guest, Install/Upgrade VMware Tools.
18. On the Install VMware Tools screen, click OK.
19. On the AutoPlay menu, click Run setup.exe.
20. On the Welcome screen, click Next.
21. On the Setup Type screen, choose Typical, and click Next.
22. Click Install.
23. On the various Windows Security screens, click Install each time.
24. Click Finish to complete the installation.
25. Click Yes to reboot the VM.
26. Log into the VM after reboot.
27. Click Start, Control Panel, and double-click System.
Principled Technologies, Inc.: Virtualized Exchange workload performance comparison of end-to-end
solutions: Dell PowerEdge M610 with Dell EqualLogic storage vs. HP ProLiant BL465c with HP
StorageWorks EVA 4400
9
28.
29.
30.
31.
32.
33.
34.
35.
36.
37.
38.
39.
40.
41.
42.
43.
Click Change Settings.
Click Change.
Enter the new computer name, and click OK.
Click OK to restart, click Close, and click Restart Now.
Right-click the VM in the vSphere window, and select Install VMware tools.
Reboot the VM.
Right-click the desktop, and select Personalize.
Click the Screen Saver link.
Click the Screen saver drop-down menu, and select (None).
Click Apply.
Click Change power settings.
Click Change plan settings under Balanced.
Change the Turn off monitor drop-down menu to Never.
Click Save changes, and close the Power Options, Screen Saver Settings, and Personalization windows.
Open the Start menu, type regedit in the search field, and press Enter.
To allow the VM to automatically log into the OS after a system reboot, change the following Registry key
to have the values shown here:
[HKEY_LOCAL_MACHINE\SOFTWARE\Microsoft\Windows NT\CurrentVersion\Winlogon]
DefaultPassword=Password1
AutoAdminLogon=1
DefaultUsername=administrator
44. Restart the VM.
Configuring networking in the VM
1. Power on the VM, and open the console.
2. Click Start, Control Panel, Network Connections, and click Manage Network Connections.
3. Right-click the NIC, and choose properties.
4. Select TCP/IP (v4), and choose properties.
5. Set the IP address, subnet, gateway, and DNS server for this NIC, which will handle outgoing server
traffic (i.e., the public IP). Click OK, and click Close.
6. On the Dell server, repeat steps 2 through 5 twice, but these NICs should be on the same network
segment as the Dell EqualLogic storage.
Installing the Host Integration Toolkit on the VM (Dell only)
1. Download the Host Integration Toolkit (Setup64.exe).
2. Double-click Setup64.exe.
3. Accept the security warnings, and choose to run the exe.
4. Click Next.
5. Click Accept, then Next.
6. Click Typical, then Next.
7. You will see a Windows Firewall warning; leave it open for a minute.
8. Click the Start button, then choose Administrative ToolsÆWindows Firewall with Advanced Security.
9. In the left panel, click Inbound Rules.
10. In the center Inbound Rules panel, right-click iSCSI Service (TCP-In), and choose Enable Rule.
11. In the center Outbound Rules panel, right-click iSCSI Service (TCP-In), and choose Enable Rule.
12. Close the Windows Firewall dialog.
13. Clear the message box.
14. Click Install.
15. Click Yes to install multipath software automatically.
16. Choose to restart the computer when the application prompts you to do so.
Installing Windows updates
1. Power on the VM, and open the console.
Principled Technologies, Inc.: Virtualized Exchange workload performance comparison of end-to-end
solutions: Dell PowerEdge M610 with Dell EqualLogic storage vs. HP ProLiant BL465c with HP
StorageWorks EVA 4400
10
2.
3.
4.
5.
6.
7.
8.
9.
Log into the VM.
Click Start, Windows Update.
Click View Advanced Options.
Click Never Check for Updates.
Click OK.
Click Check for Updates.
Click Install Now when the application prompts you to install an update for Windows Update.
Click View available updates to ensure you install the necessary updates.
Note: We installed the following updates:
• Hotfix for Windows(KB942288)
• Security Update for Windows Server 2008 x64 Edition (KB958687)
• Update for Windows Server 2008 x64 Edition (KB957388)
• Security Update for Windows Server 2008 x64-based Systems (KB938464)
• Security Updates for Windows Server 2008 x64 Edition (KB955069)
• Cumulative Security Update for Internet Explorer 7 for Windows Server 2008 x64 Edition
(KB961260)
• Security Updates for Windows Server 2008 x64 Edition (KB954459)
• Security Updates for Windows Server 2008 x64 Edition (KB957097)
• Security Updates for Windows Server 2008 x64 Edition (KB958623)
• Security Updates for Windows Server 2008 x64 Edition (KB953733)
• Security Updates for Windows Server 2008 x64 Edition (KB950762)
• Update for Windows Server 2008 x64 Edition (KB955839)
• Security Updates for Windows Server 2008 x64 Edition (KB958624)
• Security Updates for Windows Server 2008 x64 Edition (KB950974)
• Update for Windows Server 2008 x64 Edition (KB951978)
• Microsoft .NET Framework 3.5 Service Pack1 and .NET Framework 3.5 Family Update
(KB951847) x64
• Security Updates for Windows Server 2008 x64 Edition (KB954211)
• Security Update for Windows Mail for Windows Server 2008 x64 Edition (KB951066)
• Update Rollup for ActiveX Killbits for Windows Server 2008 x64 Edition (KB960715)
• Security Updates for Windows Server 2008 x64 Edition (KB956841)
• Security Updates for Windows Server 2008 x64 Edition (KB956802)
• Update for Windows Server 2008 x64 Edition (KB957321)
• Update for Windows Server 2008 x64 Edition (KB952287)
• Windows Malicious Software Removal Tool x64 – Febuary 2009 (KB890830)
• Security Updates for Windows Server 2008 x64 Edition (KB958644)
• Security Updates for Windows Server 2008 x64 Edition (KB958644)
• Update for Windows Server 2008 x64 Edition (KB950050)
• Cumulative Security Update for ActiveX Killbits for Windows Server2008 x64 Edition (KB950760)
• Update for Windows Server 2008 x64 Edition (KB955302)
• Windows Update software 7.2.6001.788
10.
11.
12.
13.
14.
15.
Click Install.
Agree to the license terms, and click Finish.
Reboot the VM when the application requests you do so.
After reboot, check Windows Update again for further updates. Click Start, Windows Update.
Click Check for updates.
If Windows lists no important updates, then close the updates window.
Installing the domain controller
1. Set a static IP address using the following steps:
a. Right-click the network icon in the quick-launch bar, and choose Network and Sharing Center.
b. Click Manage network connections.
Principled Technologies, Inc.: Virtualized Exchange workload performance comparison of end-to-end
solutions: Dell PowerEdge M610 with Dell EqualLogic storage vs. HP ProLiant BL465c with HP
StorageWorks EVA 4400
11
c. Right-click the local area connection, and choose Properties.
d. Select Internet Protocol Version (TCP/IPv4), and click Properties.
e. Select the Use the following IP address radio button, and type 192.168.0.250 in the IP
address field.
f. Press Tab to auto-fill 255.255.255.0 in the Subnet mask field.
g. In the Preferred DNS server field, type 127.0.0.1 and click OK to close the IPv4 properties
window.
h. Click Close.
2. Give the computer a name using the following steps:
a. Click Start, right-click Computer, and select Properties.
b. Click Change Settings.
c. Click Change.
d. Type mailserver in the Computer name field, and click OK.
e. In the Computer Name/Domain Changes pop-up window, click OK.
f. Click OK.
g. In the Microsoft pop-up window, click Restart Now.
3. Promote the mailserver to domain controller by following these steps:
a. Select StartÆCommand Prompt.
b. Type dcpromo
c. At the Welcome pop-up window, click Next.
d. At the Operating System Compatibility screen, click Next.
e. At the Choose a Deployment Configuration screen, select the Create a new domain in a new
forest radio button, and click Next.
f. At the Name the Forest Root Domain screen, type a domain name (i.e., mailserver.com), and
click Next.
g. At the Set Forest Functional Level screen, choose Windows Server 2008 from the drop-down
menu, and click Next.
h. At the Additional Domain Controller Options screen, accept the defaults, and click Next.
i. When the Static IP assignment window pops up, click Yes, the computer will use a dynamically
assigned IP address.
j. When the Active Directory domain Services Installation Wizard window pops up, click Yes.
k. At the Location for Database, Log Files, and SYSVOL screen, click Browse next to the Database
folder field, and choose the C:\ drive. Click Next.
l. At the Directory Services Restore Mode Administrator Password screen, enter a password, and
click Next.
m. At the Summary screen, review the selections, and click Next.
n. When the installation software prompts you to do so, insert the OS CD, and click OK.
o. At the Completing the Active Directory Installation Wizard screen, click Finish.
p. When the system prompts you to reboot the server, click Restart Now.
q. After the server reboots, log into the system.
Installing Internet Information Services 6.0
1. Select StartÆAdministrative ToolsÆServer Manager.
2. Click Add Roles.
3. At the Select Server Roles screen, click Web Server (IIS).
4. At the Add features required for Web Server (IIS) pop-up window, click Add Required Features.
5. Click Next.
6. At the Web Server (IIS) screen, click Next.
7. At the Select Role Services screen, select the IIS 6 Metabase Compatibility, IIS 6 Management Console,
Basic Authentication, Windows Authentication, Digest Authentication, and Dynamic content Compression
checkboxes, and click Next.
8. At the Confirm Installation Selections screen, click Install.
9. At the Installation Results screen, click Close.
Principled Technologies, Inc.: Virtualized Exchange workload performance comparison of end-to-end
solutions: Dell PowerEdge M610 with Dell EqualLogic storage vs. HP ProLiant BL465c with HP
StorageWorks EVA 4400
12
Installing Exchange Server 2007
1. Insert the Microsoft Exchange Server 2007 CD.
2. In the pop-up AutoPlay window, click Run Setup.EXE.
3. The installer should consider Steps 1 and 2 complete, and gray them out.
4. Click Step 3: Install Microsoft Windows PowerShell.
5. Select StartÆCommand Prompt.
6. In the Command Prompt window, type ServerManagerCmd –I PowerShell and press Enter.
7. When the installation completes, close the Command Prompt window.
8. Click the link to Step 4: Install Microsoft Exchange Server 2007 SP1.
9. Click Next to go past the introduction screen.
10. Accept the license agreement, and click Next.
11. Select No for error reporting, and click Next.
12. Select Typical Exchange Server Installation, and click Next.
13. Leave the organization name at default (First Organization), and click Next.
14. At the question about client computers running Outlook 2003 and earlier, select No, and click Next.
15. If a warning about a lack of SMTP appears after the check finishes, ignore it.
16. Click Install to start the installation process.
17. Once installation is complete, click Finish. Exchange should automatically open the Exchange
Management Console.
Configuring Exchange Server 2007
1. If Exchange does not automatically open the Exchange Management Console, select StartÆAll
ProgramsÆMicrosoft Exchange Server 2007ÆExchange Management Console.
2. In the left pane, expand Organization Configuration, and select Hub Transport.
3. In the action pane on the far right, select New Send Connector.
4. Name the send connector SMTP, select the intended use as Internet, and click Next.
5. In the Address space window, click Add.
6. In the SMTP Address Space window, type * as the address, ensure that the installer has checked Include
all subdomains, and click OK.
7. Click Next.
8. Accept defaults for the next two pages by clicking Next.
9. At the New Connector page, click New to create the connector.
10. Click Finish to close the New SMTP Send Connector wizard.
11. In the left pane of the Exchange Management Console window, expand Server Configuration, and select
Mailbox.
12. In the Database Management tab, right-click First Storage Group, and select New Public Folder
Database.
13. Name the new public folder database Public Folder Database and click New.
14. In the Completion page, click Finish to close the New Public Folder Database window.
15. Close the Exchange Management Console, and reboot the server.
16. Once the server successfully reboots, log in, and select StartÆAll ProgramsÆAdministrative
ToolsÆActive Directory Users and Computers.
17. In the Active Directory Users and Computers window, select test.com in the left pane, and open Users in
the right pane.
18. Right-click a blank area in the Users folder, and select NewÆUser.
19. In the New Object - User window, complete the name fields as you wish (we used first name: test, last
name: tester, logon name: tester), and select Next.
20. Enter a secure password (we used Password1), and check Password never expires.
21. In the pop-up information window, click Accept.
22. Select Next to close the New Object – User window.
23. Double-click the new user to bring up the Properties window.
24. Under the Member Of tab, click Add.
25. In the Enter the object names to select dialog box, type Domain Admins; Exchange Organization
Administrators select Check Names to verify, and then click OK.
26. Click OK to close the User Properties window and close Active Directory Users and Computers window.
Principled Technologies, Inc.: Virtualized Exchange workload performance comparison of end-to-end
solutions: Dell PowerEdge M610 with Dell EqualLogic storage vs. HP ProLiant BL465c with HP
StorageWorks EVA 4400
13
27. Select StartÆAll ProgramsÆMicrosoft Exchange Server 2007ÆExchange Management Console.
28. In the left pane of the Exchange Management Console window, select Recipient Configuration; and in the
right pane, select New Mailbox.
29. In the New Mailbox window, select User Mailbox, and click Next.
30. In the User Type page, select Existing users, and click Add.
31. Select the new account you created earlier, and click OK to add it to selection box.
32. Click Next.
33. In the Mailbox Settings page, leave the Alias textbox with default settings, and select Browse in the
Mailbox database selection spot.
34. In the Select Mailbox database window, select Mailbox Database, and click OK.
35. Click through the next screens to create the new mailbox, and close when you have done so.
36. Close the Exchange Management Console.
37. Select StartÆAll ProgramsÆMicrosoft ExchangeÆSystem Manager.
38. In the left window pane, expand Server Configuration and Mailbox so the First Storage Group is visible.
39. Right-click First Storage Group, and select Properties.
40. Click Browse, and change the Transaction log and System path location to E:\.
41. Check the Enable circular logging box.
42. Click Apply.
43. When the pop-up message appears asking if you want to perform this task, click Yes.
44. When the message appears saying that all mounted stores are back online, click OK.
45. Right-click First Storage Group, and select New Mailbox Database.
46. Under Mailbox database name, type Mailbox Database 2
47. Click the Browse button, and select E:\Mailstore. If there is not a directory with the name of Mailstore,
create it.
48. Click the New button to create the database.
49. Right-click Mailbox Store under First Storage Group, and select Properties.
50. Select the Database tab.
51. Click Browse, and move the Exchange database and Exchange streaming database to E:\.
52. Check the box beside This database can be overwritten by a restore.
53. Click Customize next to Maintenance interval.
54. Remove all blue from the boxes so the system will not perform maintenance, and click OK.
55. At the Mailbox Store Properties window, click Apply.
56. When a warning message appears, click Yes.
57. When the message that the database files have been moved appears, click OK.
58. Click OK to close the Mailbox Store Properties window.
59. Right-click Mailbox Store 2 under First Storage Group, and select Properties.
60. Select the Database tab.
61. Click Browse, and move the Exchange database and Exchange streaming database to E:\.
62. Check the box beside This database can be overwritten by a restore.
63. Click Customize next to Maintenance interval.
64. Remove all blue from the boxes so the system will not perform maintenance, and click OK.
65. At the Mailbox Store 2 Properties window, click Apply.
66. When a warning message appears, click Yes.
67. When the message that the database files have been moved appears, click OK.
68. Click OK to close the Mailbox Store 2 Properties window. (Repeat step 45 through 68 for Mailbox store 3
and 4)
69. Right-click Public Store under First Storage Group, and select Properties.
70. Select the Database tab.
71. Click Browse, and move the Exchange database and Exchange streaming database to E:\.
72. Check the box beside This database can be overwritten by a restore.
73. Click Customize next to Maintenance interval.
74. Remove all blue from the boxes so the system will not perform maintenance, and click OK.
75. At the Public Store Properties window, click Apply.
76. When a warning message appears, click Yes.
77. When the message that the database files have been moved appears, click OK.
Principled Technologies, Inc.: Virtualized Exchange workload performance comparison of end-to-end
solutions: Dell PowerEdge M610 with Dell EqualLogic storage vs. HP ProLiant BL465c with HP
StorageWorks EVA 4400
14
78. Click OK to close the Public Store Properties window.
79. In the left pane of the Virtual Infrastructure Client, right-click the MailServer1 VM, and select Install
VMware Tools.
80. At the Install Tools pop-up window, click OK.
81. Click Next through the Installation Wizard to install the VMware Tools. This process accepts all defaults.
82. When the installation completes, click Finish.
83. Click Yes to reboot the virtual machine.
84. In the left pane of the Virtual Infrastructure Client, right-click the MailServer1 VM, and select Edit Settings.
85. Click Upgrade Hardware.
86. Click Next through the Installation Wizard to install the virtual hardware upgrade. This process accepts all
defaults.
87. When the installation completes, click Finish.
88. Click Yes to reboot the virtual machine.
Adding an additional drive to the VM via the iSCSI initiator (Dell only)
1. Power on the VM, and open the console.
2. Click Start, Control Panel, and double-click iSCSI Initiator.
3. Click the Discovery tab.
4. Click Add Portal…
5. Add the IP address of the Dell EqualLogic storage group.
6. Click OK.
7. Click the Targets tab.
8. Find the relevant MailStore volume for this VM, and select it. Click Log On…
9. Check the checkbox to allow automatic logon on reboot, and to also enable multipath.
10. Click OK.
Adding an additional virtual drive to the VM via vSphere (HP only)
1. Power off the VM, right-click and choose Edit Settings.
2. Click Add
3. Choose Hard Disk, and click Next.
4. Choose Create a new virtual disk, and click Next.
5. Choose 60GB for the size, and select Specify a datastore. Click Browse.
6. Select the appropriate datastore. We alternated MailStore database storage between the two datastores
available on the HP Storage. Click OK.
7. Click Next.
8. Click Next.
9. Click Finish.
10. Click OK.
Configuring additional drives in Disk Management
1. Power on the VM, and open the console.
2. Click Start, Administrative Tools, Computer Management.
3. Click Disk Management.
4. Right-click the uninitialized disks (if any), and choose Initialize Disk.
5. Choose MBR.
6. Right-click the volume, and choose New Simple Volume. Click Next.
7. Set the volume size to 30,718.
8. Keep the default drive letter assignment, and click Next.
9. Choose NTFS, default allocation unit size, and check the Perform a quick format checkbox. Click Next.
10. Click Finish.
11. Right-click the unallocated space and choose New Simple Volume. Click Next.
12. Set the volume size to 30,718.
13. Keep the default drive letter assignment, and click Next.
14. Choose NTFS, default allocation unit size, and check the Perform a quick format checkbox. Click Next.
15. Click Finish.
Principled Technologies, Inc.: Virtualized Exchange workload performance comparison of end-to-end
solutions: Dell PowerEdge M610 with Dell EqualLogic storage vs. HP ProLiant BL465c with HP
StorageWorks EVA 4400
15
16. Create folders necessary for the datastore restore. We used E:\Mailstore.
Creating the additional VMs on the host server
After installing and configuring the initial VM, we created the additional VMs through automated cloning scripts.
Cloning the VMs
We used a shell script on the ESX server to copy the Virtual Disks, and to clone the VMs. This shell script copied
the VM definition and virtual disks, and registered the new VM in ESX, using the vmware-cmd utility. Using these
automated cloning scripts saved time and let us confirm that we configured all VMs similarly.
Configuring the additional VMs after cloning
1. In vSphere, expand the host, and click the VM.
2. Click the Console tab.
3. Start the VM by right-clicking the VM, and choosing PowerÆPower On.
4. Click StartÆControl PanelÆNetwork and InternetÆNetwork Connections, and double-click the Local
Area Connection.
5. Select Internet Protocol Version 4 (TCP/IPv4), and click Properties.
6. In the Internet Protocol Version 4 (TCP/IPv4) Properties screen, select the Use the following IP address
radio button.
7. Enter a valid static IP address for this new VM, subnet mask, and default gateway.
8. Select the Use the following DNS server addresses radio button, and enter at least one valid DNS server,
if the application requires you to do so.
9. Click OK, and click Close to exit.
10. Click StartÆControl PanelÆSystem.
11. Click Change Settings to change the computer name.
12. Click the Change button.
13. Enter the new computer name.
14. Click OK, and click OK again.
15. When the installer prompts you to do so, reboot the VM.
Installing and configuring the mail client
We used a separate ESX Server running virtual clients for all mail clients. To ensure that the accuracy of virtual
clients is comparable to physical clients we performed a similar test on physical clients as well. To create the mail
client, you must install several software components. Before following these instructions, make sure to statically
assign an IP address for the client, and to then plug that port into the system under test. This allows the client to
join the Active Directory domain. We followed this process for each installation:
1. Follow the steps in the earlier Creating a virtual machine section using the following VM specifications:
a. Name: MailClient
b. Virtual processors: 2
c. Virtual memory: 512 MB
d. Virtual Disk Size: 8 GB
e. Virtual network: External Network (keep the default Windows Network DHCP settings)
2. Install Microsoft Windows Server 2003 R2 Enterprise x64 Edition Service Pack 2 on the VM.
3. Assign a computer name of Clientx for the mail client, where x is the client number.
4. For the licensing mode, use the default setting of five concurrent connections.
5. Enter a password for the administrator log on.
6. Select Eastern Time Zone.
7. Use typical settings for the Network installation.
8. Type Testbed for the workgroup.
To set up this server, we had to install several additional software components. The following subsections detail
the necessary installation processes.
Principled Technologies, Inc.: Virtualized Exchange workload performance comparison of end-to-end
solutions: Dell PowerEdge M610 with Dell EqualLogic storage vs. HP ProLiant BL465c with HP
StorageWorks EVA 4400
16
Joining the domain
1. Select StartÆControl PanelÆNetwork ConnectionsÆLocal Area Connection.
2. Click Properties.
3. Highlight Internet Protocol (TCP/IP), and click Properties.
4. Select the Use the following DNS server addresses radio button, and enter the IP of the DNS server in
the Preferred DNS server field. Click OK.
5. Right-click My Computer, and select Properties.
6. Under the Computer Name tab, click Change.
7. In the Computer Name Changes window, under the Member of section, select the Domain radial box, and
type mailserver.com
8. Select OK to start joining the domain.
9. When the window appears asking for a person qualified on the domain, type Tester as the username
and Password1 as the password.
10. At the welcome pop-up window and the window warning that you must reset the computer for the
changes to take effect, click OK.
11. At the System Properties window, click OK.
12. When a pop-up appears asking if you want to restart now, click Yes to restart your computer.
Installing Internet Information Services 6.0
1. Select StartÆControl PanelÆAdd or Remove Programs.
2. Click Add/Remove Windows Components.
3. Select Application Servers, and click Details.
4. Click ASP.NET, and make sure a check appears in the check box.
5. Select Internet Information Services (IIS), and click Details.
6. Click OK to close the Application Server window.
7. At the Windows Components Wizard, click Next to begin the installation.
8. When the system prompts you to do so, insert the OS CD, and click OK.
9. At the Completing the Windows Components Wizard window, click Finish.
10. Close the Add or Remove Programs window.
Installing Microsoft Exchange Server 2007 and Load Generator
1. Insert the Microsoft Exchange Server 2007 CD. The CD should automatically launch the installation
software.
2. Click the link to Step 1: Install .NET Framework 2.0.
3. When you arrive at the download link, download the x64 version of the .NET Framework, and install.
4. Click the link to Step 3: Install Microsoft Windows PowerShell; this takes you to the download link.
5. When you arrive at the download link, download Microsoft Windows PowerShell, and install with defaults.
6. Search for and download SP1 for .NET Framework 2.0.
7. Install SP1 with all defaults.
8. Click the link to Step 4: Install Microsoft Exchange Server 2007 SP1.
9. Click Next to go past the introduction screen.
10. Accept the license agreement, and click Next.
11. Select No for error reporting, and click Next.
12. Select Custom Exchange Server Installation, and click Next.
13. Check Management Tools, and click Next.
14. After the check finishes, click Install to start the installation process.
15. Once installation is complete, click Finish.
16. Download and install Load Generator using all defaults.
Preparing Load Generator
1. Log into the MailClient using the tester account.
2. Select StartÆAll ProgramsÆMicrosoft ExchangeÆExchange Load Generator.
3. When the Load Generator window appears, select Start a new test.
4. Select Create a new test configuration, and click Continue.
5. Type tester as the account name.
Principled Technologies, Inc.: Virtualized Exchange workload performance comparison of end-to-end
solutions: Dell PowerEdge M610 with Dell EqualLogic storage vs. HP ProLiant BL465c with HP
StorageWorks EVA 4400
17
6. In the Specify test settings window, type Password1 as the Directory Access Password and Mailbox
Account Master Password, and click Continue with recipient management.
7. Make 1,000 users in each Mailbox Database, and click Continue.
8. To accept defaults for Advanced recipient settings, click Continue.
9. In the Specify test user groups window, select the plus sign to add a user group.
10. Change the Client Type to Outlook 2007 Online and the Action Profile to Custom.
11. Uncheck the PreTestLogon check box, and click Continue.
12. Leave defaults in Remote configurations, and click Continue.
13. Click Save the configuration file as, and name it Loadgencfg
14. Click Start the initialization phase (recommended before running the test) to start initialization. The
initialization process might take a few hours.
Power measurement procedure
To record each server’s power consumption during each test, we used an Extech Instruments (www.extech.com)
380803 Power Analyzer/Datalogger. We connected the power cord from the server under test to the Power
Analyzer’s output load power outlet. We then plugged the power cord from the Power Analyzer’s input voltage
connection into a power outlet. For the storage arrays, which have multiple power cords, we plugged all of the
cords for each array into a power strip and then plugged the power strip into the Power Analyzer’s output load
power outlet.
We used the Power Analyzer’s Data Acquisition Software (version 2.11) to capture all recordings. We installed the
software on a separate Intel processor-based PC, which we connected to the Power Analyzer via an RS-232
cable. We captured power consumption at one-second intervals.
To gauge the idle power usage, we recorded the power usage for 2 minutes while each system was running ESX
Server 3i but otherwise idle, meaning we did not power on any VMs.
We then recorded the power usage (in watts) for each system during the testing at 1-second intervals. To
compute the average power usage, we averaged the power usage during the time the system was producing its
peak performance results. Since we measured the power of the server and storage separately, we added the
average power of both together to get the total power. We call this time the power measurement interval. See
Figure 5 (idle and average peak power) for the results of these measurements.
Testing procedure
To perform the test, we used a series of batch files. First, we powered on all virtual machines. We started the
scripts, which copied the LoadGen parameter files to the clients VMs. Then we started our monitoring programs.
To start the test, we executed the start batch file on our controller, which copied a file to all virtual machines to
start LoadGen. After LoadGen finished, we used another batch file to copy the results from all virtual machines.
The batch files simply used the copy command and referred to all virtual machines by their IP addresses. Once a
run finished, we used a restore batch file, which restored the MailStore to the original state. This allowed us to
start from the same point in testing.
Principled Technologies, Inc.: Virtualized Exchange workload performance comparison of end-to-end
solutions: Dell PowerEdge M610 with Dell EqualLogic storage vs. HP ProLiant BL465c with HP
StorageWorks EVA 4400
18
Appendix A – Server configuration information
This appendix provides detailed configuration information about the servers, which we present in alphabetical
order. Figure 9 provides detailed system configuration information. Please note that both systems are blade
servers.
VMware Build 148592 caveat: All information in this disclosure regarding future directions and intent are subject
to change or withdrawal without notice and should not be relied on in making a purchasing decision of VMware's
products. The information in this disclosure is not a legal obligation for VMware to deliver any material, code, or
functionality. The release and timing of VMware's products remains at VMware's sole discretion.
Servers
Dell PowerEdge M610
HP ProLiant BL465c G5
Enclosure
General dimension information
Height (inches)
Width (inches)
Depth (inches)
U size in server rack (U)
Power supplies
Total number
Wattage of each (W)
Cooling fans
Total number
Dimensions (h x w) of each
Voltage (V)
Amps (A)
General processor setup
Number of processor packages
Number of cores per processor
package
Number of hardware threads per
core
System power management policy
CPU
Vendor
Name
Stepping
Socket type
Core frequency (GHz)
L1 cache
L2 cache
L3 cache
Platform
Vendor and model number
Motherboard model number
Dell PowerEdge M1000e
HP BladeSystem c7000
17.3
17.6
29.7
10
17.5
17.5
32.0
10
6
2,360
6
2,250
9
3.1” x 3.5”
12
7.0
10
2.75” x 2.25”
12
16.5
2
2
4
4
2
1
OS control
HP Dynamic Power Savings Mode
Intel
Xeon E5530
4
LGA1366
2.4
32 KB + 32 KB (per core)
1 MB (4 x 256 KB)
1 x 8 MB
AMD
Opteron 2384
2
Socket F
2.7
64KB + 64KB (per core)
2 MB (4 x 512 MB)
1 x 6 MB
Dell PowerEdge M610
PWB5N793
HP ProLiant BL465c G5
447463-001
Principled Technologies, Inc.: Virtualized Exchange workload performance comparison of end-to-end
solutions: Dell PowerEdge M610 with Dell EqualLogic storage vs. HP ProLiant BL465c with HP
StorageWorks EVA 4400
19
Servers
Motherboard revision number
BIOS name and version
Dell PowerEdge M610
X02
Dell 0.2.15
BIOS settings
Virtualization enabled
Memory modules
Total RAM in system (GB)
Number of types of memory
modules
First type of memory modules
Vendor and model number
Type
Speed (MHz)
Speed in the system currently
running @ (MHz)
Timing/latency (tCL-tRCD-iRPtRASmin)
Size (GB)
Number of RAM modules
Chip organization
Second type of memory modules
Vendor and model number
Type
Speed (MHz)
Speed in the system currently
running @ (MHz)
Timing/Latency (tCL-tRCD-iRPtRASmin)
Size (GB)
Number of RAM modules
Chip organization
Hard disk
Vendor and model number
Number of disks in system
Size (GB)
Buffer size (MB)
RPM
Type
Operating system
Name
Build number
File system
Language
HP ProLiant BL465c G5
A02
HP BIOS A13
AMD Virtualization enabled
No-Execute Page-Protection
enabled
72
64
2
1
Crucial CT51272BB1339
PC3-10600 DDR3
1,333
Samsung M393T1K66AZA
PC2-5300 DDR2
667
1,066
667
9-9-9-24
5-5-5-15
24
6 x 4 GB
Double-sided
64
8 x 8 GB
Double-sided
Samsung M393B1K70BH1
PC3-8500 DDR3
1,066
N/A
N/A
N/A
1,066
N/A
8-8-8-24
N/A
48
6 x 8 GB
Double-sided
N/A
N/A
N/A
Seagate ST973451SS
2
73
16
15,000
SAS
HP DH072BAAKN
2
72
16
15,000
SAS
VMware ESX
148592
ext3 (server)
vmfs3 (virtual machines)
English
VMware ESX
148592
ext3 (server)
vmfs3 (virtual machines)
English
Principled Technologies, Inc.: Virtualized Exchange workload performance comparison of end-to-end
solutions: Dell PowerEdge M610 with Dell EqualLogic storage vs. HP ProLiant BL465c with HP
StorageWorks EVA 4400
20
Servers
Dell PowerEdge M610
HP ProLiant BL465c G5
Broadcom NetXtreme II 5709 DualPort Ethernet
Integrated
Two Cisco WS-CBS3130X-S
Catalyst Blade Switch Modules
Two Gigabit Ethernet Pass-Through
Modules
Broadcom NetXtreme II 5706
Ethernet
Integrated
Two HP 1:10 Ethernet Blade Switch
Modules
Two HP 4Gb Fibre Channel PassThrough Modules
Network card/
subsystem
Vendor and model number
Type
Blade switch modules
Blade pass-through modules
USB ports
Number
Type
2 on the blade, 4 on the chassis (2
on the iKVM)
USB 2.0
2 with attachment
USB 2.0
Figure 9: Detailed system configuration information for the two test servers.
Principled Technologies, Inc.: Virtualized Exchange workload performance comparison of end-to-end
solutions: Dell PowerEdge M610 with Dell EqualLogic storage vs. HP ProLiant BL465c with HP
StorageWorks EVA 4400
21
Appendix B – Storage array configuration information
This appendix provides detailed configuration information about the array systems, which we present in
alphabetical order. Figure 10 presents detailed configuration information for the storage arrays.
Arrays
Disks
Active storage cache
Number of active storage
controllers
Number of passive storage
controllers
Number of active storage
ports
Firmware revision
Switch type/ model/firmware
revision
Dell EqualLogic
iSCSI SAN
Three Dell EqualLogic PS5000XV
arrays and one Dell EqualLogic
PS6000 Array
60 active 15,000RPM SAS disks total
for the four shelves
5 GB (1 GB per PS5000XV and 2 GB
per PS6000)
HP StorageWorks
Fibre Channel SAN
HP StorageWorks EVA 4400 Enterprise
Virtual Array with five full disk shelves
60 active 15,000RPM FC disks total for
the five shelves
4GB
4 (1 per array)
2
4 (1 per array)
0
Disk size
10 (3 per PS5000XV array; 4 per
PS6000)
v4.1.1
Two Dell PowerConnect 6248
v2.2.0.3
32x Seagate ST3146855SS
16x Seagate ST3450856SS
16x Maxtor ATLAS15K2_147SAS
146 GB and 450 GB
Disk buffer size (MB)
16
16
Disk RPM
15,000
15,000
Disk type
RAID type
SAS
RAID 10
Fibre Channel
RAID 10
Disk vendor and model
number
4
XCS v9.00.10
Two Brocade 200E
Fabric OS v6.0.0b
36x HP BDF146DA47A
24x HP BF146DA47A
146 GB
Figure 10: Detailed configuration information for the storage arrays.
Principled Technologies, Inc.: Virtualized Exchange workload performance comparison of end-to-end
solutions: Dell PowerEdge M610 with Dell EqualLogic storage vs. HP ProLiant BL465c with HP
StorageWorks EVA 4400
22
About Principled Technologies
We provide industry-leading technology assessment and fact-based marketing services. We bring to every
assignment extensive experience with and expertise in all aspects of technology testing and analysis, from
researching new technologies, to developing new methodologies, to testing with existing and new tools.
When the assessment is complete, we know how to present the results to a broad range of target audiences. We
provide our clients with the materials they need, from market-focused data to use in their own collateral to custom
sales aids, such as test reports, performance assessments, and white papers. Every document reflects the results
of our trusted independent analysis.
We provide customized services that focus on our clients’ individual requirements. Whether the technology
involves hardware, software, Web sites, or services, we offer the experience, expertise, and tools to help you
assess how it will fare against its competition, its performance, whether it’s ready to go to market, and its quality
and reliability.
Our founders, Mark L. Van Name and Bill Catchings, have worked together in technology assessment for over 20
years. As journalists, they published over a thousand articles on a wide array of technology subjects. They
created and led the Ziff-Davis Benchmark Operation, which developed such industry-standard benchmarks as Ziff
Davis Media’s Winstone and WebBench. They founded and led eTesting Labs, and after the acquisition of that
company by Lionbridge Technologies were the head and CTO of VeriTest.
Principled Technologies, Inc.
1007 Slater Rd., Suite 250
Durham, NC 27703
www.principledtechnologies.com
[email protected]
Principled Technologies is a registered trademark of Principled Technologies, Inc.
All other product names are the trademarks of their respective owners
Disclaimer of Warranties; Limitation of Liability:
PRINCIPLED TECHNOLOGIES, INC. HAS MADE REASONABLE EFFORTS TO ENSURE THE ACCURACY AND VALIDITY OF ITS
TESTING, HOWEVER, PRINCIPLED TECHNOLOGIES, INC. SPECIFICALLY DISCLAIMS ANY WARRANTY, EXPRESSED OR
IMPLIED, RELATING TO THE TEST RESULTS AND ANALYSIS, THEIR ACCURACY, COMPLETENESS OR QUALITY, INCLUDING
ANY IMPLIED WARRANTY OF FITNESS FOR ANY PARTICULAR PURPOSE. ALL PERSONS OR ENTITIES RELYING ON THE
RESULTS OF ANY TESTING DO SO AT THEIR OWN RISK, AND AGREE THAT PRINCIPLED TECHNOLOGIES, INC., ITS
EMPLOYEES AND ITS SUBCONTRACTORS SHALL HAVE NO LIABILITY WHATSOEVER FROM ANY CLAIM OF LOSS OR DAMAGE
ON ACCOUNT OF ANY ALLEGED ERROR OR DEFECT IN ANY TESTING PROCEDURE OR RESULT.
IN NO EVENT SHALL PRINCIPLED TECHNOLOGIES, INC. BE LIABLE FOR INDIRECT, SPECIAL, INCIDENTAL, OR
CONSEQUENTIAL DAMAGES IN CONNECTION WITH ITS TESTING, EVEN IF ADVISED OF THE POSSIBILITY OF SUCH DAMAGES.
IN NO EVENT SHALL PRINCIPLED TECHNOLOGIES, INC.’S LIABILITY, INCLUDING FOR DIRECT DAMAGES, EXCEED THE
AMOUNTS PAID IN CONNECTION WITH PRINCIPLED TECHNOLOGIES, INC.’S TESTING. CUSTOMER’S SOLE AND EXCLUSIVE
REMEDIES ARE AS SET FORTH HEREIN.
Principled Technologies, Inc.: Virtualized Exchange workload performance comparison of end-to-end
solutions: Dell PowerEdge M610 with Dell EqualLogic storage vs. HP ProLiant BL465c with HP
StorageWorks EVA 4400
23