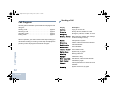
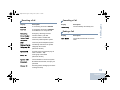
1
PROFESSIONAL DIGITAL TWO-WAY RADIO SYSTEM
MOTOTRBO™
DP 3600/DP 3601
MPT1327 FOR PORTABLE RADIOS
USER GUIDE
Authorized Communication Solution Provider
H.E.R.T.Z Elektronik GmbH
Strausberger Straße 8h (Pappelhain)
15378 Rüdersdorf bei Berlin (OT Herzfelde)
Telefon: 033434 766-0
Fax: 033434 766-76
E-Mail: [email protected]
Internet: www.hertz-elektronik.de
APAC_DispPort.book Page i Friday, June 10, 2011 1:52 PM
Contents
Important Safety Information . . . . . . . . . . . . . . . . . iii
Product Safety and RF Exposure Compliance . . .iii
Software Version . . . . . . . . . . . . . . . . . . . . . . . . . . . iii
Option Board Part Number . . . . . . . . . . . . . . . . . . . iii
Computer Software Copyrights . . . . . . . . . . . . . . . iv
Getting Started . . . . . . . . . . . . . . . . . . . . . . . . . . . . . . 1
How to Use This User Guide . . . . . . . . . . . . . . . . . . 1
What Your Dealer/System Administrator
Can Tell You . . . . . . . . . . . . . . . . . . . . . . . . . . . . . . 1
Additional Performance Enhancement . . . . . . . . . . 2
Preparing Your Radio for Use . . . . . . . . . . . . . . . . . . 2
Charging the Battery . . . . . . . . . . . . . . . . . . . . . . . . . 2
Attaching the Battery . . . . . . . . . . . . . . . . . . . . . . . . . 3
Attaching the Antenna . . . . . . . . . . . . . . . . . . . . . . . . 4
Attaching the Belt Clip . . . . . . . . . . . . . . . . . . . . . . . . 4
Attaching the Universal Connector Cover (Dust Cover)
5
Powering Up the Radio . . . . . . . . . . . . . . . . . . . . . . . 5
Identifying Radio Controls . . . . . . . . . . . . . . . . . . . . 6
Radio Controls . . . . . . . . . . . . . . . . . . . . . . . . . . . . . 7
Programmable Buttons . . . . . . . . . . . . . . . . . . . . . . . 8
Assignable Radio Functions . . . . . . . . . . . . . . . . . 8
Accessing the Programmed Functions . . . . . . . . . . . 9
Notes . . . . . . . . . . . . . . . . . . . . . . . . . . . . . . . . . . . . . 9
Using the Keypad . . . . . . . . . . . . . . . . . . . . . . . . . . 10
Contents
This User Guide covers only the functional operation of
the MPT1327 Generic Option Board (GOB) installed in
MOTOTRBO DP Series Portables.
Adjusting the Volume . . . . . . . . . . . . . . . . . . . . . . . . 6
Identifying Status Indicators . . . . . . . . . . . . . . . . . . 12
Display Icons . . . . . . . . . . . . . . . . . . . . . . . . . . . . . . 12
LED Indicators . . . . . . . . . . . . . . . . . . . . . . . . . . . . 14
Audio Tones . . . . . . . . . . . . . . . . . . . . . . . . . . . . . . 14
Indicator Tones . . . . . . . . . . . . . . . . . . . . . . . . . . . . 14
MPT Personalities and Radio Zones . . . . . . . . . . . 15
MPT . . . . . . . . . . . . . . . . . . . . . . . . . . . . . . . . . . . . 15
Talkgroup . . . . . . . . . . . . . . . . . . . . . . . . . . . . . . . . 15
Fixed and Dynamic Groups . . . . . . . . . . . . . . . . . 16
Personality Selection . . . . . . . . . . . . . . . . . . . . . . . 16
Selecting a Personality in Non-MPT Mode . . . . . 17
Zone Selection . . . . . . . . . . . . . . . . . . . . . . . . . . . . 17
Radio Calls . . . . . . . . . . . . . . . . . . . . . . . . . . . . . . . . 18
Making a Call . . . . . . . . . . . . . . . . . . . . . . . . . . . . . 18
User Absent . . . . . . . . . . . . . . . . . . . . . . . . . . . . . 18
i
English
Contents
APAC_DispPort.book Page ii Friday, June 10, 2011 1:52 PM
Dedicated Calls . . . . . . . . . . . . . . . . . . . . . . . . . .
Manual Dialing . . . . . . . . . . . . . . . . . . . . . . . . . .
Last Number Redial . . . . . . . . . . . . . . . . . . . . . .
Keypad Edit . . . . . . . . . . . . . . . . . . . . . . . . . . . . .
Contact List . . . . . . . . . . . . . . . . . . . . . . . . . . . . .
Modifying the Contact List . . . . . . . . . . . . . . . . . . .
To Add an Entry . . . . . . . . . . . . . . . . . . . . . . . . .
To Delete an Entry . . . . . . . . . . . . . . . . . . . . . . .
To Edit an Entry . . . . . . . . . . . . . . . . . . . . . . . . .
To Search for an Entry . . . . . . . . . . . . . . . . . . . .
Ending a Call . . . . . . . . . . . . . . . . . . . . . . . . . . . . .
Cancelling a Call . . . . . . . . . . . . . . . . . . . . . . . . . .
Receiving a Call . . . . . . . . . . . . . . . . . . . . . . . . . . .
Receiving a Call on an OACSU System . . . . . . .
Receiving a Call on a FOACSU System . . . . . . .
Missed Calls . . . . . . . . . . . . . . . . . . . . . . . . . . . . . .
Examples of Missed Calls List . . . . . . . . . . . . . .
Call Diversion . . . . . . . . . . . . . . . . . . . . . . . . . . . . .
19
19
19
20
20
21
21
21
21
22
22
22
22
23
23
23
24
25
Special Calls . . . . . . . . . . . . . . . . . . . . . . . . . . . . . .
Short Data Messages (SDM) . . . . . . . . . . . . . . . . .
Receiving Short Data Messages . . . . . . . . . . . . .
Displaying Incoming Data . . . . . . . . . . . . . . . . . .
Storing SDMs . . . . . . . . . . . . . . . . . . . . . . . . . . .
Interrogating the SDM Calls List . . . . . . . . . . . . .
26
26
26
26
26
26
ii
English
Deleting Messages from the Data Calls List . . . .
Making an SDM Call . . . . . . . . . . . . . . . . . . . . . .
Status Calls . . . . . . . . . . . . . . . . . . . . . . . . . . . . . .
Making a Status Call . . . . . . . . . . . . . . . . . . . . . .
Receiving a Status Call . . . . . . . . . . . . . . . . . . . .
Emergency Calls . . . . . . . . . . . . . . . . . . . . . . . . . .
Priority Calls . . . . . . . . . . . . . . . . . . . . . . . . . . . . . .
Broadcast Calls . . . . . . . . . . . . . . . . . . . . . . . . . . .
27
28
29
29
30
30
31
31
Call Progress . . . . . . . . . . . . . . . . . . . . . . . . . . . . . .
Sending a Call . . . . . . . . . . . . . . . . . . . . . . . . . . . .
Receiving a Call . . . . . . . . . . . . . . . . . . . . . . . . . . .
Cancelling a Call . . . . . . . . . . . . . . . . . . . . . . . . . .
Ending a Call . . . . . . . . . . . . . . . . . . . . . . . . . . . . .
32
32
33
33
33
APAC_DispPort.book Page iii Friday, June 10, 2011 1:52 PM
Software Version
Product Safety and RF Exposure Compliance
All the features described in the following sections are
supported by the radio's software version R01.08.20 or
later.
!
Caution
Before using this product, read the operating
instructions for safe usage contained in the
Product Safety and RF Exposure booklet
enclosed with your radio.
Check with your dealer or system administrator
for more details of all the features supported.
Option Board Part Number
ATTENTION!
This radio is restricted to occupational use only to
satisfy FCC/ICNIRP RF energy exposure
requirements. Before using this product, read the RF
energy awareness information and operating instructions
in the Product Safety and RF Exposure booklet enclosed
with your radio (Motorola Publication part number
6864117B25) to ensure compliance with RF energy
exposure limits.
All the features described in the following sections are
supported by the radio’s MPT1327 Generic Option Board
kit number PMLN5743_S.
Important Safety Information
Important Safety Information
For a list of Motorola-approved antennas, batteries, and
other accessories, visit the following website:
http://www.motorola.com/governmentandenterprise
iii
English
APAC_DispPort.book Page iv Friday, June 10, 2011 1:52 PM
Computer Software Copyrights
Computer Software Copyrights
The Motorola products described in this manual may
include copyrighted Motorola computer programs stored
in semiconductor memories or other media. Laws in the
United States and other countries preserve for Motorola
certain exclusive rights for copyrighted computer
programs including, but not limited to, the exclusive right
to copy or reproduce in any form the copyrighted
computer program. Accordingly, any copyrighted
Motorola computer programs contained in the Motorola
products described in this manual may not be copied,
reproduced, modified, reverse-engineered, or distributed
in any manner without the express written permission of
Motorola. Furthermore, the purchase of Motorola
products shall not be deemed to grant either directly or by
implication, estoppel, or otherwise, any license under the
copyrights, patents or patent applications of Motorola,
except for the normal non-exclusive license to use that
arises by operation of law in the sale of a product.
iv
English
The AMBE+2TM voice coding Technology embodied in
this product is protected by intellectual property rights
including patent rights, copyrights and trade secrets of
Digital Voice Systems, Inc.
This voice coding Technology is licensed solely for use
within this Communications Equipment. The user of this
Technology is explicitly prohibited from attempting to
decompile, reverse engineer, or disassemble the Object
Code, or in any other way convert the Object Code into a
human-readable form.
U.S. Pat. Nos. #5,870,405, #5,826,222, #5,754,974,
#5,701,390, #5,715,365, #5,649,050, #5,630,011,
#5,581,656, #5,517,511, #5,491,772, #5,247,579,
#5,226,084 and #5,195,166.
APAC_DispPort.book Page 1 Friday, June 10, 2011 1:52 PM
Getting Started
How to Use This User Guide
This User Guide covers only the functional operation of the
MPT1327 Generic Option Board (GOB) installed in
MOTOTRBO Portables.
For the complete operation of the MOTOTRBO Portables, refer
to the specific User Guides for each radio.
You can consult your dealer or system administrator about the
following:
• Is your radio programmed with any preset conventional
channels?
• Which buttons have been programmed to access other
features?
• What optional accessories may suit your needs?
Getting Started
Take a moment to review the following:
How to Use This User Guide . . . . . . . . . . . . . . . . . . . . . page 1
What Your Dealer/System Administrator Can Tell You . page 1
Additional Performance Enhancement . . . . . . . . . . . . . page 2
What Your Dealer/System Administrator
Can Tell You
NOTE: Specifications may vary for different radio models.
Check with your dealer or system administrator for
more information.
1
English
APAC_DispPort.book Page 2 Friday, June 10, 2011 1:52 PM
Additional Performance Enhancement
The following are some of the latest creations designed to
enhnace the security, quality and efficiency of your radio.
Preparing Your Radio for Use
Tone Private Line (TPL)
TPL prevents any channel or radio out of MPT system to disturb
the transmission in MPT system. TPL code are embedded in
the traffic channels to prevent noise when the radio is receiving
TPL voice or data signals. To run this feature fully, your MPT
base station and radios need to be enabled to receive and
transmit TPL signals. Only the radios with TPL feature enabled
are able to encode or decode the TPL signal.
2
English
Preparing Your Radio for Use
Assemble your radio by following these steps:
Charging the Battery . . . . . . . . . . . . . . . . . . . . . . . . . . . page 2
Attaching the Battery . . . . . . . . . . . . . . . . . . . . . . . . . . . page 3
Attaching the Antenna . . . . . . . . . . . . . . . . . . . . . . . . . . page 4
Attaching the Belt Clip . . . . . . . . . . . . . . . . . . . . . . . . . . page 4
Attaching the Universal Connector
Cover (Dust Cover) . . . . . . . . . . . . . . . . . . . . . . . . . . page 5
Powering Up the Radio . . . . . . . . . . . . . . . . . . . . . . . . . page 5
Adjusting the Volume . . . . . . . . . . . . . . . . . . . . . . . . . . . page 6
Charging the Battery
Your radio is powered by a Nickel Metal-Hydride (NiMH) or
Lithium-Ion (Li-lon) battery. To avoid damage and comply with
warranty terms, charge the battery using a Motorola charger
exactly as described in the charger user guide.
Charge a new battery for 14 to 16 hours before initial use for
best performance.
APAC_DispPort.book Page 3 Friday, June 10, 2011 1:52 PM
To remove the
battery, turn the
radio off. Move the
battery latch into
unlock position
and hold, and slide
the battery down
and off the rails.
Attaching the Battery
Battery Latch
Align the battery with the rails on the back of the radio. Press
the battery firmly, and slide upward until the latch snaps into
place. Slide battery latch into lock position.
Preparing Your Radio for Use
IMPORTANT: ALWAYS charge your IMPRES battery with an
IMPRES charger for optimized battery life and
valuable battery data. IMPRES batteries
charged exclusively with IMPRES chargers
receive a 6-month capacity warranty extension
over the standard Motorola Premium battery
warranty duration.
3
English
APAC_DispPort.book Page 4 Friday, June 10, 2011 1:52 PM
Attaching the Antenna
Preparing Your Radio for Use
With the radio turned off, set the antenna in its receptacle and
turn clockwise.
Attaching the Belt Clip
Align the grooves on the clip
with those on the battery and
press downward until you hear
a click.
To remove the clip, press the
belt clip tab away from the
battery using a key. Then slide
the clip upward and away from
the radio.
To remove the antenna, turn the antenna counterclockwise.
Make sure you turn off the radio and remove the universal
connector cover (dust cover) first.
!
Caution
4
English
If antenna needs to be replaced, ensure that only
MOTOTRBO antennas are used. Neglecting this
damages your radio.
APAC_DispPort.book Page 5 Friday, June 10, 2011 1:52 PM
Attaching the Universal Connector Cover
(Dust Cover)
Cover
(Dust Cover)
Insert the hooked end of the
cover into the slots above
the universal connector.
Press downward on the
cover to seat the lower tab
properly into the RF
connector.
Turn the thumbscrew clockwise to secure the connector cover
to the radio.
Replace the dust cover when the universal connector is not in
use.
Powering Up the Radio
Rotate the On/Off/Volume
Control Knob clockwise
until you hear a click. You
see Motorola and
MOTOTRBO (TM) on the
radio’s display momentarily,
followed by Motorola once
more.
LED
Indicator
The LED blinks green and
the Home screen lights up if
the backlight setting is set
to turn on automatically.
Preparing Your Radio for Use
The universal connector is located on the antenna side of the
radio. It is used to connect MOTOTRBO accessories to the
radio.
Place the universal
connector cover loop over
the attached antenna. Slide
it all the way down to the
Universal
base of the antenna.
Connector
To remove the universal connector cover, press down on the
cover and turn the thumbscrew counterclockwise. Lift the cover
up, slide the connector cover loop upwards, and remove it from
the attached antenna.
A brief tone sounds, indicating that the power up test is
successful.
If your radio does not power up, check your battery. Make sure
that it is charged and properly attached. If your radio still does
not power up, contact your dealer.
English
5
APAC_DispPort.book Page 6 Friday, June 10, 2011 1:52 PM
To turn off the radio, rotate this knob counterclockwise until you
hear a click. You see a brief Powering Down on the radio’s
display.
Adjusting the Volume
Identifying Radio Controls
To increase the volume,
turn the On/Off/Volume
Control Knob clockwise.
To decrease the volume,
turn this knob
counterclockwise.
NOTE: Your radio can be
programmed to
have a minimum
volume offset
where the volume
level cannot be
turned down fully.
Check with your
dealer or system
administrator for
more information.
6
English
Identifying Radio Controls
Take a moment to review the following:
Radio Controls . . . . . . . . . . . . . . . . . . . . . . . . . . . . . . . . page 7
Programmable Buttons . . . . . . . . . . . . . . . . . . . . . . . . . page 8
Accessing the Programmed Functions . . . . . . . . . . . . . page 9
Using the Keypad . . . . . . . . . . . . . . . . . . . . . . . . . . . . page 10
APAC_DispPort.book Page 7 Friday, June 10, 2011 1:52 PM
Radio Controls
5 Push-to-Talk (PTT) Button
17
6 Side Button 2*
2
16
15
3
4
14
5
13
6
12
7
11
1 Channel Selector Knob
2 On/Off/Volume Control Knob
8 Front Button P1*
9 Microphone
10 Speaker
11 Front Button P2*
12 Keypad
13 Menu Navigation Keys
8
9
7 Side Button 3*
10
14 Universal Connector for Accessories
Identifying Radio Controls
1
4 Side Button 1*
15 Display
16 Emergency Button*
17 Antenna
* These buttons are programmable.
3 LED Indicator
7
English
APAC_DispPort.book Page 8 Friday, June 10, 2011 1:52 PM
Programmable Buttons
The Customer Programming Software (CPS) can program the
programmable buttons as shortcuts to radio functions or
preset channels/groups depending on the duration of a button
press:
• Short press – Pressing and releasing rapidly (between 0.05
and 0.75 second).
Identifying Radio Controls
• Long press – Pressing and holding for the programmed
duration (between 1.00 second and 3.75 seconds).
• Hold down – Keeping the button pressed.
Assignable Radio Functions
Clear – Allows cancelling an incoming or outgoing call (Only
available on Side Button 1)
Dedicated Call/Emergency/Help – To make a call to a predetermined number, effectively activating an Emergency,
Priority, Speech, Status, Data, or a normal call.
Personality – Shortcut to the personality menu option to select
one of four MPT personalities (provided by MPT1327) or
Conventional Zones (provided by TRBO radio).
User Absent – Shortcut to the User Absent menu.
8
English
Missed Calls – Shortcut to the Missed Call menu. This is a list
of calls received and stored by the radio when you are unable to
take the call.
Status – Shortcut to the Status menu that allows access to the
status functionality.
Data – Shortcut to the Data menu that allows access to the data
functionality.
Short Data Display Disable – Controls the short data display
switch.
Redial Key – Press to show the last called numbers.
Phone Key – Press to make a call, this is the same function as
PTT.
Help Call – Call the Help number as pre-defined via the CPS.
SFD/Talkgroup Toggling – Press to toggle between SFD and
Talkgroup mode.
APAC_DispPort.book Page 9 Friday, June 10, 2011 1:52 PM
Accessing the Programmed Functions
• A short or long press of the
relevant programmable buttons.
OR
• Use the Menu Navigation Buttons as follows:
1 To access the menu, press S. Press the appropriate
Menu Scroll button (Por Q) to access
the menu functions.
2 To select a function or enter a sub-menu, press N.
3 To go back one menu level, or to return to the previous
screen, press R. Long press R to return to the Home
Identifying Radio Controls
You can access various radio functions through one of the
following ways:
Notes
screen.
NOTE: Your radio automatically exits the menu after a period
of inactivity and returns to your Home screen.
9
English
APAC_DispPort.book Page 10 Friday, June 10, 2011 1:52 PM
Using the Keypad
You can use the 3 x 4 alphanumeric keypad to access your radio’s features. You can use the keypad to enter subscriber aliases or IDs,
and text messages. Many characters require that you press a key multiple times. The table below shows the number of times a key
needs to be pressed to generate the required character.
This table is only applicable for a radio that does not support Simplified Chinese.
Identifying Radio Controls
Number of Times Key is Pressed
10
English
Key
1
2
3
4
5
6
7
8
9
10
11
12
13
14
15
1
2
3
4
5
6
7
8
9
0
*
#
.
1
?
!
,
@
-
&
:
“
(
)
‘
%
$
A
B
C
2
Ä
Å
Á
À
Æ
ß
ç
D
E
F
3
É
È
Ê
Ë
G
H
I
4
Ì
Í
J
K
L
5
M
N
O
6
Ö
Ó
P
Q
R
S
7
T
U
V
8
Ü
W
X
Y
Z
9
+
-
0
X
*
<
#
* or del
# or space
Ò
Ù
/
=
NOTE: Press during edit mode to enter a “*”.
NOTE: Press during edit mode to confirm input.
>
APAC_DispPort.book Page 11 Friday, June 10, 2011 1:52 PM
Number of Times Key is Pressed
Key
1
2
3
4
5
6
7
8
9
10
11
12
13
14
15
1
2
3
4
5
6
7
8
9
0
*
#
.
1
?
!
,
@
-
&
:
“
(
)
‘
%
$
A
B
C
2
D
E
F
3
G
H
I
4
J
K
L
5
M
N
O
6
P
Q
R
S
T
U
V
8
W
X
Y
Z
9
+
-
0
X
*
/
=
>
<
#
* or del
# or space
7
Identifying Radio Controls
This table is only applicable for a radio that supports Simplified Chinese.
NOTE: Press during edit mode to enter a “*”.
NOTE: Press during edit mode to confirm input.
11
English
APAC_DispPort.book Page 12 Friday, June 10, 2011 1:52 PM
Identifying Status Indicators
Identifying Status Indicators
Your radio indicates its operational status through the following:
Display Icons. . . . . . . . . . . . . . . . . . . . . . . . . . . . . . . . page 12
LED Indicators. . . . . . . . . . . . . . . . . . . . . . . . . . . . . . . page 14
Audio Tones . . . . . . . . . . . . . . . . . . . . . . . . . . . . . . . . page 14
Indicator Tones . . . . . . . . . . . . . . . . . . . . . . . . . . . . . . page 14
Display Icons
The full dot matrix, black and white, liquid crystal display (LCD)
of your radio shows radio status, text entries, and menu entries.
12
English
The following are icons that appear on the radio’s display.
Received Signal Strength (RSSI)
The number of bars displayed represents the radio
signal strength. Four bars indicate the strongest
signal. This icon is only displayed while receiving.
Loudspeaker
Indicates that the loudspeaker is active.
APAC_DispPort.book Page 13 Friday, June 10, 2011 1:52 PM
Power Level
Radio is set at Low power.
Radio is set at High power.
Registered
Indicates that Control Channel is acquired.
Repeater/Talkaround
Indicates that background hunt is running.
Scan
Indicates that scanning for a control channel is in
progress.
Battery Level
Indicates the remaining charge in the battery. Blinks
when the battery is low.
Option Board
The Option Board is enabled.
Option Board Non-Function
The Option Board is disabled.
Identifying Status Indicators
or
Data Message
Indicates messages in the Data Calls list. Blinks
when there are new messages.
13
English
APAC_DispPort.book Page 14 Friday, June 10, 2011 1:52 PM
LED Indicators
The LED indicator shows the operational status of your radio.
LED Indicator
Audio Tones
Alert tones provide you with audible indications of the radio’s
status or the radio’s response to data received.
Continuous Tone A monotone sound. Sounds
continuously until termination.
Identifying Status Indicators
Repetitive Tone
A single tone that repeats itself until it is
terminated by the user.
Momentary Tone Sounds only once for a short period of
time defined by the radio.
Indicator Tones
Solid red – Radio is transmitting.
Blinking red – Channels are currently busy.
High pitched tone
Low pitched tone
Blinking green – No service.
14
English
Positive Indicator Tone
Negative Indicator Tone
APAC_DispPort.book Page 15 Friday, June 10, 2011 1:52 PM
MPT Personalities and Radio Zones
The personalities described below are programmed into your
radio by your dealer and are accessible either via the
personality button or via the menu.
An MPT personality contains data such as frequencies, display
text, alert tones, permitted calls etc. which determines the mode
of operation of your radio. Your radio may be programmed with
up to 4 different MPT personalities.
This personality permits the radio to operate in a trunked mode.
Incoming and outgoing calls are set up using a defined set of
rules or protocol between your radio and a controller in a similar
manner to your home telephone.
Talkgroup
Talkgroup is an MPT personality following the same rules or
protocol, but is primarily for talkgroup calls. In talkgroup
personality, talkgroups are contained in a Talkgroup list, similar
to the Contact list, which is scrolled and selected using the
Channel Selector Knob. On selection of a talkgroup, you may
send and receive calls as described below.
MPT Personalities and Radio Zones
Use this guide to understand the personalities programmed into
your radio:
MPT . . . . . . . . . . . . . . . . . . . . . . . . . . . . . . . . . . . . . . . page 15
Talkgroup . . . . . . . . . . . . . . . . . . . . . . . . . . . . . . . . . . . page 15
Personality Selection . . . . . . . . . . . . . . . . . . . . . . . . . . page 16
Zone Selection . . . . . . . . . . . . . . . . . . . . . . . . . . . . . . page 17
MPT
15
English
APAC_DispPort.book Page 16 Friday, June 10, 2011 1:52 PM
Personality Selection
Fixed and Dynamic Groups
MPT Personalities and Radio Zones
These groups form part of the Talkgroup Personality, such
that when this personality is selected your talkgroup list shows
only these groups.
A fixed group is a group of users, the address (number) of
which is preprogrammed into your radio by your dealer.
The Personality menu provides access to all MPT personalities
and radio defined zones. To scroll through the menu, use the
navigation buttons (Por Q) as described from step 6
below. Alternatively, you may use the Channel Selector Knob
instead.
A dynamic group is a group of users, the address (number) of
which is sent to your radio ‘over air’ at any time via the system
controller.
To select a personality via the menu, press the programmed
Personality button and proceed to Step 2.
Therefore at any time you may become a member of a dynamic
group, able to receive calls and (depending on how your radio is
programmed) send calls to that group.
Follow the procedure below.
Incoming calls to fixed and dynamic group numbers are detailed
in Receiving a Call and displayed under Receiving a Call.
To make an outgoing call to a selected talkgroup, press the PTT
and speak after the Talk Permit Tone.
OR
1 Ensure radio is in IDLE STATE.
2 Press S to enter Menu Mode.
3 Press P or Q until Personality.
4 Press N to select Personality.
Calls are cleared in the normal manner.
5 Display shows current personality e.g. MPT
If the system is busy, an engaged tone will be heard, release the
PTT and wait for the Talk Permit Tone. You may then proceed
with the call by pressing the PTT.
6 Press Por Q until desired personality e.g. MPT 2.
When in Talkgroup personality, you can still make an individual
or status call using the keypad or entering the Contact List via
the menu. See “Contact List” on page 20.
16
English
7 Press N to select. The display shows MPT 2. The display
holds for 2 seconds while the radio re-tunes to the new
personality.
The radio returns to IDLE STATE with display showing
Freetext.
APAC_DispPort.book Page 17 Friday, June 10, 2011 1:52 PM
Zone Selection
Selecting a Personality in Non-MPT Mode
1 Press S to enter Menu Mode.
2 Press Por Q until Zone.
3 Press N to select Zone.
A zone is a group of channels. Your radio supports up to 250
zones, with a maximum of 16 channels and Capacity Plus
personalities per zone.
Use the following procedure to switch from an MPT personality
to a zone in non-MPT mode.
4 Display shows current zone e.g. Zone 1.
Press the programmed Personality button and proceed to Step
2.
5 Press Por Q until desired zone with option board
OR
enabled e.g. Zone 2. Check with your dealer which zone
has option board enabled.
6 Press N to select. The display shows the previously
selected personality for 2 seconds while the radio re-tunes
to the new personality. The radio returns to IDLE STATE
with display showing Freetext.
Follow the procedure below.
1 Press S to enter Menu Mode.
2 Press Por Q until Personality.
3 Press N to select Personality.
4 Display shows the current MPT personality e.g. MPT.
5 Press Por Q until the required zone.
6 Press N to select.
7 The display shows <Zone> Selected momentarily and
MPT Personalities and Radio Zones
To switch from your current zone to MPT mode, use the
following procedure to select a personality.
returns to the selected zone screen.
17
English
APAC_DispPort.book Page 18 Friday, June 10, 2011 1:52 PM
Radio Calls
Once you understand how your MOTOTRBO Portable is
configured, you are ready to use your radio.
Radio Calls
Use this navigation guide to familiarize yourself with the basic
Call features:
Making a Call . . . . . . . . . . . . . . . . . . . . . . . . . . . . . . . page 18
Ending a Call. . . . . . . . . . . . . . . . . . . . . . . . . . . . . . . . page 22
Cancelling a Call . . . . . . . . . . . . . . . . . . . . . . . . . . . . . page 22
Receiving a Call . . . . . . . . . . . . . . . . . . . . . . . . . . . . . page 22
Missed Calls . . . . . . . . . . . . . . . . . . . . . . . . . . . . . . . . page 23
Call Diversion . . . . . . . . . . . . . . . . . . . . . . . . . . . . . . . page 25
18
English
Making a Call
The radio is capable of making a variety of calls, including calls
to individual radios, groups of radios and calls to private and
public telephone systems.
Before you can make a call the radio must be in IDLE STATE,
i.e. a personality has been selected and no call is in progress.
The radio can make calls by using the Dedicated Calls,
Manual Dialing or Contact List.
User Absent
User Absent is a network feature which may be enabled in your
radio. With this feature enabled, entry into the user absent
mode is automatic and any calls received when you are away
from your radio goes into the Missed Calls list automatically and
the message “Will call back” sent to the caller.
When you return to your radio, check whether a momentary
tone sounds every 10 seconds which indicates that your radio is
in user absent mode. Press any button to exit user absent mode
and return the radio to IDLE STATE for normal operation.
APAC_DispPort.book Page 19 Friday, June 10, 2011 1:52 PM
Last Number Redial
Dedicated calls can be made from either a preprogrammed
button or using the speed-dial feature from the keypad.
The last number dialed by the radio is stored in the memory of
the radio.
Press the Dedicated Call button to make a call to the most
commonly used preprogrammed number. The display shows
Calling.
Procedure:
To use the speed-dial feature, hold down one of the keypad
keys (0 to 9) for a preset period to make a call to one of ten (1 of
10) preprogrammed numbers which are the first ten entries (1 to
9, 0= 10) in the contact list. The selected number and alias is
displayed and the conversation can go ahead.
1 Press the preprogrammed button (for redial) to redial. The
Manual Dialing
To make a call from the keypad:
1 Enter Telephone Number (PSTN calls always start with 0,
PABX calls start with 6, 7, or 8)
OR
Radio ID
OR
Group ID
Partially entered numbers are also stored. With the radio in
IDLE STATE:
display shows last called Radio ID or Group ID e.g.
1234567.
Radio Calls
Dedicated Calls
2 Press P to delete. The display shows 123456.
3 Enter new numbers. The display shows 12345699.
4 Press the PTT button or [ to make the call. The display
shows Calling.
Last number redial does not function when Talkgroup
personality is selected. See “Personality Selection” on page 16.
2 Press the PTT button or [ to make radio call. The
display shows Calling.
19
English
APAC_DispPort.book Page 20 Friday, June 10, 2011 1:52 PM
If the radio is displaying a Contact List number, a Keypad Dialed
number, Status number or Missed Call number, the last digit
may be deleted by:
The contact list can be entered directly by one click of the
Channel Selector Knob when the radio is in IDLE STATE. Use
the Channel Selector Knob or the menu navigation buttons to
scroll through the list. Then select the required name or number
as indicated in step 5 below.
Procedure:
Procedure:
1 Press S once. The display shows 1234567.
To access the contact list via the menu:
2 Long press S to enter edit mode.
1 Press S to enter Menu Mode.
3 Press P to delete. The display shows 123456.
2 Press Por Q until Contact List.
4 Enter new numbers. The display shows 12345699.
3 Press N to select Contact List.
5 Press the PTT button or [ to make radio call. The
4 Press Por Q to scroll the Contact List.
Keypad Edit
display shows Calling.
Radio Calls
NOTE: The edited number is not saved at the end of the call in
the contact list, but is saved in the last number redial.
20
Contact List
When the radio is in IDLE STATE, the contact list may be used
which allows access to up to 100 preprogrammed numbers
accessed via the menu.
Depending on the way your radio is programmed, the radio
displays either the alpha alias (name) or the number to be
dialed. One of four tones may be tagged to the preprogrammed
numbers, which sounds when the radio receives a call from that
number.
English
5 Press N or PTT button or [ to make call.
The display shows Calling.
If a contact list number is selected but no call request is sent,
the display is held until a momentary tone sounds and then
reverts to the IDLE STATE.
When the number is displayed it may be edited. See “Keypad
Edit” on page 20.
APAC_DispPort.book Page 21 Friday, June 10, 2011 1:52 PM
Modifying the Contact List
• Add an entry
• Delete an entry
• Edit an existing entry
2 Press Por Q until Delete Contact.
3 Press N to select Delete Contact. The display shows
Alias 1.
4 Press Por Q until you see the entry you want to
delete. The display shows Alias 2.
To Add an Entry
1 Press S to enter Menu Mode.
5 Press N to select the entry. The display shows Delete?.
2 Press Por Q until Add Contact.
6 Press N to delete selected entry. The display returns to
3 Press N to select Add Contact. The display shows
Name?.
4 Enter the contact name. A maximum of 14 characters are
allowed, depending on programming.
5 Press N to store the name. The display shows Number?.
6 Enter the number. A maximum of 20 digits are allowed,
depending on programming.
7 Press N to store the number. The display shows Add
Contact.
8 If you make an error, use the P to delete the last
character/digit and Q to create a space.
Radio Calls
You can modify the Contact List in three ways:
To Delete an Entry
1 Press S to enter Menu Mode.
Delete Contact.
To Edit an Entry
1 Press S to enter Menu Mode.
2 Press Por Q until Contact List.
3 Press N to select Contact List.
4 Press Por Q until you see the entry you want to edit.
The display shows Alias 3.
5 Press P for 2 seconds to enter Edit Alias Mode when
display icon flashes. The display shows Alias 3.
6 Edit the alias or delete and enter a new alias. Use P to
delete the last character and R to delete entire entry.
21
English
APAC_DispPort.book Page 22 Friday, June 10, 2011 1:52 PM
7 Press N to store edited/new alias. The display shows
Ending a Call
0123456789.
8 Edit the number or delete and enter a new number. Use
P to delete the last digit and R to delete entire entry.
9 Press N to store edited entry. The display returns to
Alias 3.
To Search for an Entry
When in Contact List or Delete Contact menu, search for an
alias (name) by entering characters from the keypad.
Procedure:
1 Enter up to 3 characters. The display shows Pol.
2 Press N to start searching the list. The display shows
1 Press R
OR
press Z[. The negative indicator tone sounds and
the display shows Call Ended.
See “Ending a Call” on page 33.
Cancelling a Call
1 Press R
OR
press Z[. The display shows Cancelling.
See “Cancelling a Call” on page 33.
search results Police.
Radio Calls
3 Press Z to repeat search using the same search criteria.
4 Press R to cancel search at any time
OR
If search is unsuccessful, the display returns to the Contact
List menu prior to search.
NOTE: The search process is not case sensitive.
22
English
Receiving a Call
There are two types of systems on which the radio may be
used, Off Air Call Set Up (OACSU) and Full Off Air Call Set Up
(FOACSU).
If you are in doubt about which system you are operating on,
please consult your dealer.
APAC_DispPort.book Page 23 Friday, June 10, 2011 1:52 PM
Receiving a Call on an OACSU System
1 A repetitive tone sounds. The display shows Alerted.
2 A momentary tone sounds. The display shows Call Type.
Receiving a Call on a FOACSU System
When the radio is called:
1 The ring tone sounds. The display shows Alerted.
2 Press the PTT button to accept call (unless in talkgroup
personality, when radio unmutes automatically for fixed and
dynamic group calls).
3 A repetitive tone sounds. The display shows Alerted.
4 When conversation is permitted, a momentary tone sounds.
The display shows Call Type.
See “Receiving a Call” on page 33 for display Call Type.
NOTE: The system may have a limited call time, indicated on
the display, and the call may be terminated
automatically if this call time is exceeded; e.g. display
shows 01:22.
If a call remains unanswered, the call is stored by the radio,
provided that missed calls have been programmed into your
radio.
Up to five calls can be stored. If the same radio calls more than
once the call is only stored once. When five calls have been
stored by the radio, the sixth call received may overwrite the
first.
Radio Calls
When the radio is called:
Missed Calls
When a call has been stored by the radio, a momentary tone
sounds every ten seconds and the display shows Missed
Calls.
At this time, pressing any of the menu buttons provides a quick
access into the Missed Calls List.
The Missed Call List can also be entered directly by pressing
the Missed Call button (if programmed) when the radio is in the
IDLE STATE or via the menu.
If using the Missed Call button, follow the procedures from step
4 below.
To view the calls in the list via the menu:
1 Press S to enter Menu Mode.
2 Press Por Q until Missed Calls.
3 Press N to select. The display shows Missed Calls.
23
English
APAC_DispPort.book Page 24 Friday, June 10, 2011 1:52 PM
4 First call in list, the display shows Alpha Alias or the radio
number.
5 Press Por Q to scroll list.
NOTE: In the Missed Calls list some alpha alias/numbers may
contain a suffix S that indicates a status message
associated with the call.
Examples of Missed Calls List
The display shows Reception S,
where S is a status message associated with the call.
1 Press S, the display shows message e.g. On Break.
2 Press Sagain, the display shows the status number e.g.
Status 04.
3 Press Sagain, the display shows Reception S.
Radio Calls
You can call back to any number in the Missed Call list by:
1 Scroll Por Q until Alias.
2 Press the PTT button or [ to make the call. The display
shows Calling.
3 After the call is set-up, press PTT button and talk with your
mouth 2.5-5 cm from the microphone. Release PTT to
listen.
24
English
4 Press R
OR
press Z[. The negative indicator tone sounds and
the display shows Call Ended.
5 The display then shows Idle Freetext.
NOTE: Whilst displaying alias, press S to display and edit
the number.
On a successful call set- up, the entry is automatically deleted
with an associated voice message.
Unanswered calls may be deleted from the Missed Call list at
any time by pressing R. On deletion of the last message in
the Missed Calls list, the radio exits the menu and return to the
IDLE STATE.
To exit the Missed Call List:
1 Press R, display shows Idle Freetext.
NOTE: The calls are not deleted when the radio is turned off. It
is not possible to call back status calls.
APAC_DispPort.book Page 25 Friday, June 10, 2011 1:52 PM
Call Diversion
1 Press ZGD from your radio.
2 Press ZGG from another radio.
To initiate call diversion when the radio is in IDLE STATE:
1 Press ZGDZ to divert all calls
OR
Press
ZGGZ
2 Press ZGDDZ to divert speech calls only
OR
Press
ZGGDZ
3 Press ZGDEZ to divert status calls only
OR
ZGGEZ
4 Enter ID of radio to which you are diverting to.
5 Press [ to complete call diversion.
2 To redirects all calls from the radio with ID “234” to the radio
with ID “432”,
pressZGGZEFGZGF
E[.
Radio Calls
To divert incoming speech calls or status calls:
Examples of Call Diversion
1 To divert all calls from your radio to the radio with ID “234”,
press ZGDZEFG[.
If a call is made to a radio whose calls are currently being
diverted:
A repetitive tone sounds and the display shows Diverting.
A call is automatically set up to the radio which is receiving the
diverted calls.
To cancel Call Diversion:
1 To cancel call diversion from your radio, press
[GD followed by D or E if necessary and
[.
2 To cancel call diversion from another radio, press
[GG followed by D or E if necessary and
Z“ID (234 in example).”
3 To cancel calls redirected to your radio, press
[GH followed by D or E if necessary and
[.
25
English
APAC_DispPort.book Page 26 Friday, June 10, 2011 1:52 PM
Special Calls
Use this guide to familiarize yourself with the special call
features:
Short Data Messages (SDM) . . . . . . . . . . . . . . . . . . . page 26
Status Calls . . . . . . . . . . . . . . . . . . . . . . . . . . . . . . . . . page 29
Emergency Calls . . . . . . . . . . . . . . . . . . . . . . . . . . . . . page 30
Priority Calls . . . . . . . . . . . . . . . . . . . . . . . . . . . . . . . . page 31
Broadcast Calls . . . . . . . . . . . . . . . . . . . . . . . . . . . . . . page 31
Short Data Messages (SDM)
Special Calls
Short data messages may be set up, sent and received using
the keypad microphone and controls.
Outgoing data messages from the keypad are limited to
alphanumeric data in any combination of up to 20 characters
(which include address information and data selection
characters).
The data message icon
is lit whenever SDMs are present in
the Data Calls list, unless the message display has been turned
off. The data message icon flashes when data messages in the
Data Calls list are unread. The icon is lit permanently when a
message is read and retained in the Data Calls list.
Displaying Incoming Data
The short data message display can be switched ON and OFF
using the preprogrammed Data Display button, or via the menu.
The SDM display defaults to ON, however the option setting is
retained when the radio is switched off.
Storing SDMs
Incoming SDMs are stored on receipt in the Data Calls list. Up
to ten SDMs can be stored by the radio. The data message icon
is lit whenever SDMs are in the Data Calls list.
SDMs are not stored when the radio is switched OFF, except for
one SDM only which can be saved.
Receiving Short Data Messages
Interrogating the SDM Calls List
On receiving a Short Data Message:
When an SDM call has been stored by the radio, the display
shows: Data Received
1 A momentary tone sounds. The display shows Data
Received.
26
English
With the display showing "Data Received", pressing any of the
menu buttons provides a quick access into the Data Calls list.
APAC_DispPort.book Page 27 Friday, June 10, 2011 1:52 PM
Procedure:
To view the calls in the list via the menu:
2 Press Por Q until Data Calls.
3 Press N to select Data Calls.
4 First call in list shows Alpha Alias or Number.
5 Press Por Q to scroll list. The display shows Alpha
Alias or Number.
6 Press N or Q to read selected message. The display
shows Call 8116.
7 Press Q or R to return to the Data Calls list at the end
of the message.
8 Press R to retain message in the list and exit from Data
Calls list.
NOTE: You must exit the Data Calls list interrogate mode to
put the radio in the IDLE STATE in order to make other
calls.
Deleting Messages from the Data Calls List
1 Press R to delete data messages from the Data Calls list
or while viewing data messages. The display shows
Delete?.
2 Press N(or Z[ or R) to delete data message
from the Data Calls list.
3 Press R to retain the data message in the Data Calls list.
4 Press Z[ to delete the currently selected data
message with no display prompt.
5 The radio returns to the Data Calls list interrogate mode
9 Press R again to exit from Menu Mode.
after each deletion until the last message is deleted when
the display returns to the IDLE STATE and the data
To save an SDM to be retained after the radio is switched off.
message icon
1 Read the data message in the Data Calls list.
2 Press N. The display shows Save?.
3 Press N to save selected message.
4 Press R to return to the Data Calls list.
Special Calls
1 Press S to enter Menu Mode.
When the radio is switched off and on again the saved SDM will
appear in the Data Calls list.
stops flashing.
You can move directly from the Data Calls list to the Missed
Calls List by pressing the Missed Calls button. See “Missed
Calls” on page 23.
27
English
APAC_DispPort.book Page 28 Friday, June 10, 2011 1:52 PM
Making an SDM Call
SDM Calls may be initiated in two different ways:
• via the keypad using a Call modifier
• via the Contact List
NOTE: The maximum data message size is limited to 20
characters which includes address information and
data selection characters. Data entered via the data
button or call modifier methods may be alphanumeric
characters entered from the keypad.
In the contact list method data may consists of
alphanumeric characters which are preprogrammed in
your radio by your dealer.
To initiate a data call via the keypad:
Special Calls
1 ZEZ
28
Part of modifier
2 Enter message from keypad in alphanumeric characters.
3 Z Final part of modifier
4 Enter called radio address.
5 The display shows *2*Call Bryan. Press Por Q to
scroll message. Display shows ASAP*NNN where NNN is
called radio address.
6 Press PTT button or [ to make a call to the dialed
numbers. A repetitive tone sounds. Display shows Sending
Data.
English
7 Press R or Z[ at any time to delete dialed
numbers and return radio to IDLE STATE when a
momentary tone sounds.
To initiate a data call via the contact list:
In this method data may consist of alphanumeric characters
which are pre-programmed into your radio by your dealer.
1 Press S to enter Menu Mode.
2 Press Por Q until Contact List.
3 Press N to select Contact List.
4 Press Por Q until Alpha Alias.
Press Q to display Number.
Press Q to display Ring Tone.
Press Q to return to Alpha Alias.
5 Press N or PTT button to make radio call. Display shows
Sending Data.
6 When finished with call, press R or Z[. A
momentary tone sounds. Display shows Call Ended.
NOTE: The maximum data message size is limited to 20
characters which includes address information and
data selection characters.
APAC_DispPort.book Page 29 Friday, June 10, 2011 1:52 PM
Status Calls
3 Press N to select Status.
4 Press Por Q until display shows Status Message e.g.
On Break.
Making a Status Call
Status Calls may be initiated in two different ways:
5 Press S until display shows Status Number e.g. Status
04.
• via the keypad using a Call modifier
6 Press N to select. The display shows Status 04.
• via the Menu
7 The display shows for 10 seconds Select Contact.
To initiate a status call via the keypad:
8 Press S or turn Channel Selector Knob to display current
1 ZC Part of modifier
2 CH Example of status digits in range 1-31
3 Z Final part of modifier
4 Enter called radio address.
5 Display shows *005*NNNNN
where NNNNN is called radio address.
Make the call by:
1 Press the PTT button or [ to make the call. The display
Special Calls
A status is a code for transmitting prearranged messages, e.g.
status “05” may indicate “Return to Base”.
2 Press Por Q until Status.
entry in contact list.
9 Press Por Q until display shows Alpha Alias
(required name or number).
10 Alternatively, a valid number can be dialed from the keypad,
for e.g. *004*207
11 Press N or PTT button or [ to make the call. The
display shows Sending Status.
NOTE: The N key only functions when you are in the contact
list menu option.
shows Sending Status.
To initiate a status call via the menu:
1 Press S to enter Menu Mode.
29
English
APAC_DispPort.book Page 30 Friday, June 10, 2011 1:52 PM
Receiving a Status Call
You radio receives a Status Call when:
1 A momentary tone sounds.
2 The display alternates every 2 seconds between:
Status 04
OR
On Break
AND
Alias/Number
where Status Messages “04”/”On Break” are examples.
Special Calls
NOTE: Status number (04) is only displayed if associated
message is not programmed into your radio. Alias/
Number is the name or number of the calling radio.
30
English
Emergency Calls
An emergency call allows you the highest form of priority calling
and normally takes precedence over all other calls.
Your radio can be programmed to give you a one-button quick
access to call a particular radio or centre (predefined by your
dealer) in emergency situations.
Alternatively, you can dial the number prefixing it with
ZLZ.
Procedure:
To initiate an emergency call:
1 Press the Emergency button
OR
Press ZLZ followed by the radio number and
PTT or [.
A repetitive tone sounds and the display shows Emergency.
Emergency can be stopped by one of the following:
• Switching the radio Off and On again.
• The emergency time duration is reached.
APAC_DispPort.book Page 31 Friday, June 10, 2011 1:52 PM
A repetitive tone OR ring tone sounds and the display shows
Emergency.
Priority Calls
A priority call allows you to gain priority over other users of the
system when requesting a call.
Procedure:
To initiate a priority call:
Broadcast Calls
A broadcast call allows you to make calls to groups of radios.
Note that on a broadcast call only the calling radio can talk and
there is no indication that any radios in the group have received
the call.
Procedure:
To initiate a broadcast call:
1 Press ZDDZ followed by the radio number
and PTT or [.
Special Calls
NOTE: The emergency time duration is programmed into your
radio by your dealer.Your radio may receive an
emergency call when:
A repetitive tone sounds and the display shows *11*90.
1 Press ZKZ followed by the radio number and
PTT or [.
A repetitive tone sounds and the display shows Priority.
See “Sending a Call” on page 32.
31
English
APAC_DispPort.book Page 32 Friday, June 10, 2011 1:52 PM
Call Progress
Use this guide to familiarize yourself with the call progress and
call types:
Sending a Call. . . . . . . . . . . . . . . . . . . . . . . . . . . . . . . page 32
Receiving a Call . . . . . . . . . . . . . . . . . . . . . . . . . . . . . page 33
Cancelling a Call . . . . . . . . . . . . . . . . . . . . . . . . . . . . . page 33
Ending a Call. . . . . . . . . . . . . . . . . . . . . . . . . . . . . . . . page 33
Call Progress
When in operation, your radio monitors each step in setting up a
call whether sending or receiving. These steps are displayed to
provide you with call progress and indicate call types.
32
English
Sending a Call
Display
Description
Calling
Trying to connect call
Priority
Priority call sent, modifier *8* used
Emergency
Emergency call sent, modifier *9* used
Sending Status
Status call sent, modifier *0xx* used (xx
is status message number)
Queued
Call queued on system
Diverting
Calls to called unit have been diverted
Unobtainable
Call unobtainable
Unavailable
Unit unavailable
Invalid Number
Unit number invalid
System Busy
System busy, try again
Alerting
Alerting called unit
Engaged
Called unit is busy
Will Call Back
User absent, called unit will call back
Call Failed
Call failed, try again
Timeout
Call request timed out. Check service is
available
Scanning
System access lost, try again
APAC_DispPort.book Page 33 Friday, June 10, 2011 1:52 PM
Receiving a Call
Cancelling a Call
Description
Display
Description
Alerted
A call is being received on OACSU
Cancelling
Call successfully canceled by user
Alerted
A call is being received on FOACSU.
Press PTT or ‘#’ to accept the call
Emergency
Emergency call being received
Alias/Number
Call from radio in your fleet
Display
Description
Inter–fleet
Call from radio in another fleet
Call Ended
Telephone
Calls from public telephone system
Call ended, another call can now be
made
PABX
Calls from private telephone system
Unknown Party
Call identity unknown to the system
Talkgroup NN
Talkgroup call received
(NN is list number)
Dynamic NN
Dynamic group call received (may be
alias or number – NN)
Group NN
Fixed group call received
(NN is list number)
System Wide
Call to all radios in use on the system
Broadcast
Broadcast call received, user reply not
permitted
Status XX
Receiving status message (xx is status
message number)
Ending a Call
Call Progress
Display
33
English
MOTOROLA, MOTO, MOTOROLA SOLUTIONS and
the Stylized M logo are trademarks or registered trademarks
of Motorola Trademark Holdings, LLC and are used under license.
All other trademarks are the property of their respective owners.
© 2011 Motorola Solutions, Inc. All rights reserved.
June 2011.
www.motorola.com/mototrbo
*68012003013*
68012003013-B