1
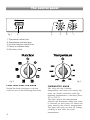
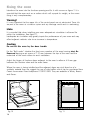
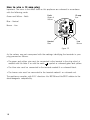
ESM 460 electric multifunction oven Users Operating Instructions Before operating this oven, please read these instructions carefully Dear Customer Thank you for choosing one of our appliances which has been carefully designed and built by our specialist staff and thoroughly tested to satisfy your cooking requirement. We suggest that you read this Instruction Booklet so that you will understand fully how to operate the appliances. Please keep the booklet handy. You may wish to refer to it at a later date. De Longhi Contents Model ESM 460 Page Number Installation . . . . . . . . . . . . . . . . . . . . . . . . . . . . . . . . . . . . . . . . . . . . . . . . . . . . . . . 3 Before use . . . . . . . . . . . . . . . . . . . . . . . . . . . . . . . . . . . . . . . . . . . . . . . . . . . . . . . 3 Operating principles . . . . . . . . . . . . . . . . . . . . . . . . . . . . . . . . . . . . . . . . . . . . . . 3 The control panel . . . . . . . . . . . . . . . . . . . . . . . . . . . . . . . . . . . . . . . . . . . . . . . . . 4 Function selector & Thermostat controls . . . . . . . . . . . . . . . . . . . . . . . . . . . . . . . 4 How to use the electronic clok . . . . . . . . . . . . . . . . . . . . . . . . . . . . . . . . . . . . . . 9 Cleaning and maintenance: . . . . . . . . . . . . . . . . . . . . . . . . . . . . . . . . . . . . . . . . 10 Important notes . . . . . . . . . . . . . . . . . . . . . . . . . . . . . . . . . . . . . . . . . . . . . . . . . 12 Before calling for assistance . . . . . . . . . . . . . . . . . . . . . . . . . . . . . . . . . . . . . . . . 12 Optional safety guard . . . . . . . . . . . . . . . . . . . . . . . . . . . . . . . . . . . . . . . . . . . . . 12 Do’s and do not’s . . . . . . . . . . . . . . . . . . . . . . . . . . . . . . . . . . . . . . . . . . . . . . . . 13 For the installer Building in the oven . . . . . . . . . . . . . . . . . . . . . . . . . . . . . . . . . . . . . . . . . . . . . . Oven installation . . . . . . . . . . . . . . . . . . . . . . . . . . . . . . . . . . . . . . . . . . . . . . . . . Fixing the oven . . . . . . . . . . . . . . . . . . . . . . . . . . . . . . . . . . . . . . . . . . . . . . . . . . Electrical connection . . . . . . . . . . . . . . . . . . . . . . . . . . . . . . . . . . . . . . . . . . . . . Technical Data . . . . . . . . . . . . . . . . . . . . . . . . . . . . . . . . . . . . . . . . . . . . . . . . . . 2 14 14 16 17 19 Installation The oven must be installed in accordance with the installation instructions contained in this booklet. Connection to the electricity supply must be made by a competent electrician to a suitable 13 amp. switched socket. Warning this appliance must be earthed. Before use Please ensure that all packing has been removed from the appliance before switching on. Before installing the oven, remove the protective film. Operating principles Heating and cooking in the MULTI-FUNCTION oven are obtained in the following ways: a. by normal convection The heat is produced by the upper and lower heating elements. b. by forced convection A fan sucks in the air contained in the oven muffle, which sends it through the circular heating element and then sends it back through the muffle. Before the hot air is sucked back again by the fan to repeat the described cycle, it envelops the food in the oven, provoking a complete and rapid cooking. It is possible to cook several dishes simultaneously. c. by semi-forced convection The heat produced by the upper and lower heating elements is distributed throughout the oven by the fan. d. by radiation The heat is irradiated by the infra red grill element. e. by radiation and ventilation The irradiated heat from the infra red grill element is distributed throughout the oven by the fan. 3 The control panel A U T O Fig. 1 5 4 3 2 1 1. Thermostat control knob 2. Temperature indicator lamp 3. Function selector control knob 4. Power on indicator lamp 5. Electronic clock Fig. 2 Fig. 3 FUNCTION SELECTOR KNOB THERMOSTAT KNOB Rotate the knob clockwise to set the oven for one of the following functions. This only sets the cooking temperature and does not switch the oven on. Rotate clockwise until the required temperature is reached (from 50 to 250°C). The light above the temperature selector will illuminate when the oven is swiched on and turns off when the oven reaches the correct temperature. The light will cycle on and off during cooking in line with the oven temperature. 4 OVEN LIGHT By setting the knob to this position, only the oven light comes on (15 W). It remains on in all the cooking modes. TRADITIONAL CONVECTION COOKING The upper and lower heating elements come on. The heat is dispersed by natural convection and the temperature must be set to between 50° and 250°C via the thermostat knob. The oven must be preheated before cooking. Recommended for: Food that requires the same degree of cooking both inside and out, for example roasts, spare pork ribs, meringues etc. GRILLING The infrared electrical resistance comes on. The heat is dispersed by radiation. Set the thermostat knob to between 50° and 200 °C. Always grill with the oven door closed. For cooking hints, see the chapter “USE OF THE GRILL”. Recommended for: Intense grilling, browning, cooking au gratin and toasting etc. It is recommended that you do not grill for longer than 30 minutes at any one time. Caution: the oven door becomes very hot during operation. Keep children well out of reach. DEFROSTING FROZEN FOODS Only the oven fan comes on. Use with the thermostat knob set to “0” - other positions have no effect. The food is thawed by ventilation without heating. Recommended for: Quick thawing of frozen foods; one kg requires approximately 1 hour. Thawing times vary according to the quantity and type of food to be thawed. 5 HOT AIR COOKING The circular resistance and fan come on. The heat is dispersed by forced convection and the temperature can be regulated to between 50° and 250°C via the thermostat knob. The oven does not require preheating. Recommended for: Food which has to be well-cooked outside and soft or rosy inside, for example lasagne, lamb, roast beef, whole fish etc. VENTILATED GRILL COOKING The infrared grill and the fan come on. The heat is dispersed mainly by radiation and the fan then distributes it all over the oven. Use with the door closed. The temperature can be regulated via the thermostat knob to between 50° and 175° max. The oven must be preheated for approximately 5 minutes. For cooking hints, see the chapter “GRILLING AND COOKING AU GRATIN. Recommended for: Grilling where quick browning on the outside is required to keep the juices in. For example: veal steaks, chops, hamburgers etc. It is recommended that you do not grill for longer than 30 minutes at any one time. Caution: the oven door becomes very hot during operation. Keep children well out of reach. MAINTAINING TEMPERATURE AFTER COOKING OR SLOWLY HEATING FOODS The upper resistance, the circular resistance and the fan come on. The heat is dispersed by forced convection with greater intensity in the upper part. The temperature can be set to between 50° and 150°C via the thermostat knob. Recommended for: Food that has to be well-cooked. Keeping food warm after any type of cooking. Slow heating of cooked food. 6 CONVECTION COOKING WITH VENTILATION The upper and lower heating elements come on and the fan. The heat coming from above and below is dispersed by convection with ventilation. The temperature can be set to between 50° and 250°C via the thermostat knob. Recommended for: Voluminous dishes and large quantities which require the same degree of cooking both inside and out, for example rolled roasts, turkey, roast legs, cakes etc. COOKING ADVICE STERILIZATION Sterilization of foods to be conserved, in full and hermetically sealed jars, is done in the following way: a. Set the switch to position . b. Set the thermostat knob to position 185 °C and preheat the oven. c. Fill the dripping pan with hot water. d. Set the jars onto the dripping pan making sure they do not touch each other and the door and set the thermostat knob to position 135 °C. When sterilization has begun, that is, when the contents of the jars start to bubble, turn off the oven and let cool. REGENERATION Set the switch to position and the thermostat knob to position 150° C. Bread becomes fragrant again if wet with a few drops of water and put into the oven for about 10 minutes at the highest temperature. SIMULTANEOUS COOKING OF DIFFERENT FOODS The MULTI-FUNCTION oven set on position consents a simultaneous heterogeneous cooking of different foods. Different foods such as fish, cake and meat can be cooked together without mixing the smells and flavors together. This is possible since the fats and vapors are oxidized while passing through the electrical element and therefore are not deposited onto the foods. The only precaution to follow are: – The cooking temperatures of the different foods must be as close to as possible, with a maximum difference of 20° - 25 °C. – The introduction of the different dishes in the oven must be done at different times in relation to the cooking times of each one. The time and energy saved with this type of cooking is obvious. 7 ROASTING To obtain classical roasting, it is necessary to remember: – that it is advisable to maintain a temperature between 180° and 200 °C. – that the cooking time depends on the quantity and the type of foods. GRILLING AND COOKING “AU GRATIN” Grilling may be done without the roasting jack on position of the switch, because the hot air completely envelops the food that is to be cooked. Set the thermostat to position 175 °C and after having preheated the oven, simply place the food on the rack. The dripping pan should be placed under the rack to catch the cooking juices and fats. Close the door and let the oven operate with the thermostat on position 175 °C, until grilling is done. Adding a few dabs of butter before the end of the cooking time gives the golden “au gratin” effect. It is recommended that you do not grill for longer than 30 minutes at any one time. Remember to keep children away from the appliance when you use the grill or oven, since these parts become very hot. USE OF THE GRILL Preheat the oven for about 5 minutes with the door closed. Introduce the food to be cooked, positioning the rack as close to the grill as possible. The dripping pan should be placed under the rack to catch the cooking juices and fats. It is recommended that you do not grill for longer than 30 minutes at any one time. To avoid possible smoking during grilling, it is advisable to add a little water to the grill pan. The water can be topped up during grilling as evaporation takes place. DO NOT grill food containing fat without using the grid. DO NOT cover the grill pan grid with aluminium foil, as this can stop fats draining away and could possibly cause the fat to catch fire. The oven door becomes very hot during operation. Keep children away. 8 How to use the electronic clock The electronic programmer is a device with the following functions: – 24 hours clock with illuminated display – Timing of oven cooking with automatic switch-off (max. 99 minutes). Electronic clock Upon immediate connection of the oven or after a mains failure, three zeros will flash on the programmer panel. To set the clock it is necessary to push the button and then, within 7 seconds, the or button until you have set the correct time. The clock will show zero after a mains failure. Attention: When the programmer display shows three flashing zeros the oven cannot be switched on. The oven can be switched on when the symbol is shown in the display. Setting the frequency of the alarm sound The selection from 3 possibilities of sound can be made by pressing the button. A U T O Fig. 4 Cooking with automatic switch-off The aim of this function is to automatically stop the cooking after a pre programmed time, for a maximum period of 99 minutes. To set the cooking time, push the or button until you obtain the desired time in the display. The symbol AUTO will be shown in the display. Then you adjust the oven thermostat knob according to the required temperature. The oven will immediately start to operate and will work for the pre programmed time. The display shows the count down. Clock time can be displayed by pressing the button. Once the time has elasped, the oven will switch off automatically, the symbol AUTO will go off and an intermittent buzzer, lasting 7 minutes, will start; this can be stopped by pressing the button. Important: Before the buzzer is stopped switch off the oven manually. To cancel the cooking program at any time press the and buttons together and release the button first. Electronic alarm The programmer can be used as an alarm only for a maximum period of 99 minutes. To set the alarm, push the or button until you obtain the desired time in the display. Once the time has elasped, an intermittent buzzer, lasting 7 minutes, will start; this can be stopped by pressing the button. Attention: If the bottom oven is switched on when the buzzer starts, it will be automatically switched off. For it to operate furtherly you have to stop the buzzer by pressing the button. 9 Cleaning and Maintenance Using the oven for the first time You are advised to carry out the following operations: • Clean the inside of the oven with a cloth soaked in water and neutral detergent and dry thoroughly. • Hang the wire racks, together with the self cleaning liners, on the oven sides (Figure 5). • Slide in, on the guides, the shelf and the tray etc. (Figure 6). • To eliminate traces of grease from the heating elements, switch the oven on to the maximum temperature for 90 minutes. Fig. 5 Fig. 6 Fig. 7 Removal the inner glass door panel The inner glass door panel can easily be removed for cleaning by unscrewing the two screws. Figure 7. During re-assembly, ensure that the inner glass is correctly aligned and do not over tighten the screws. 10 Cleaning General After use allow the oven to cool and whilst the oven is still “warm” it should be wiped with a damp cloth using warm soapy water. With regular cleaning the oven will remain in good condition. It is advisable to disconnect the electrical supply to the oven before cleaning is undertaken. Enamel Parts In order to maintain the condition of the enamel parts, clean and wipe frequently with hot soapy water. Any obstinate marks can be removed using a paste or cream cleaner or a well moistened soap impregnated steel wool pad. Rub gently so as not to damage the surface. Never use abrasive powders. Never permit vinegar, coffee, milk, salt water or tomato juice to remain in contact with the enamel parts as they may stain or discolour the surface. If any cleaners such as a spray or a stick are used on enamel they must have the VEDC (Vitreous Enamel Development Council) seal of approval and the manufacturers instructions must be followed. Stainless steel surfaces Clean with a suitable product. Always dry accurately. Dry preferably with a chamois leather. Self cleaning catalytic liners The self cleaning catalytic liners (fig. 5) work by absorbing oil splashes and food particles, then vaporizing them when the temperature rises above 200°C. Instructions for use: If after cooking very fatty meals, the oven is still dirty, re-heat it empty to the maximum temperature for about 20-30 minutes. The liners are double sided and can be turned over to extend the use. They should not be washed or cleaned with water or detergents. durst them regularly with a damp cloth. 11 Important notes Installation, and any demonstration, information or adjustments are not included in the warranty. We recommend that the installation is carried out by qualified personnel. To replace the interior oven lamp, unscrew the glass guard and make sure that the new lamp has identical specifications, i.e. 15 Watts, 300°Centigrade. Be sure to switch off the electrical supply. Before calling for assistance If your oven will not work, make sure that: • Electricity is being supplied (check your fuse box; circuit breaker, etc.) and plug fuse. • The appliance is properly plugged in. • Please contact a Comet Service Centre in case of assistance. Attention The appliance gets very hot, mainly around the cooking areas. It is very important that children are not left alone in the kitchen when you are cooking. Optional Safety Guard WARNING: Oven become very hot with use, and retain its heat for a long time after use. Children should be supervised at all times and be prevented from touching the hot surfaces, until such time as the appliance has cooled. A safety guard for the oven door is available at an addition cost if required. To order telephone accessories direct 0113 2310523. 12 Do’s and do not’s Do’s and do not’s • Do always grill with the oven door closed. • Do always remove the detachable handle when using the grill pan. • Do read the user instructions carefully before using the cooker for first time. • Do allow the oven to heat for one and a half hours, before using for the first time, in order to expel any smell from the new oven insulation, without the introduction of food. • Do clean your oven regularly. • Do remove spills as soon as they occur. • Do always use oven gloves when removing food shelves and trays from the oven. • Do not allow children near the oven when in use. • Do not allow fat or oils to build up in the oven trays, grill pan or oven base. • Do not place cooking utensils or plates directly onto the oven base. • Do not grill food containing fat without using the grid. • Do not cover the grilling grid with aluminium-foil. • Do not use the oven tray for roasting. • Do not clean the oven without first turning off the electricity supply and allow to cool. • Do not place hot enamel parts in water. Leave them to cool first. • Do not allow vinegar, coffee, milk, saltwater, lemon or tomato juice to remain in contact with enamel parts. • Do not use abrasive cleaners or powders that will scratch the surface of the enamel. • Do not attempt to repair the internal workings of your oven. • Do not grill with the oven door open as damage to the front panel and control knobs will result. For your safety The product should only be used for its intended purpose which is for the cooking of domestic foodstuffs. Under no circumstances should any external covers be removed for servicing or maintenance except by suitably qualified personnel. 13 For the installer Building in the oven All our ovens are designed for being easily built in - whether masonry or a cabinet made of wood laminated plastic or metal, provided it is heat resistant. To fit the oven properly, any such enclosure, should be as shown in figures 8 and 9. The oven should then be secured by 4 screws fitted into the holes provided at the sides of the oven. Oven installation The oven can be installed either into a tall housing unit or built under the working surface into a kitchen base unit. The unit should have an aperture according to the measurements as detailed in figures 8 and 9. Warning! The installer should note that the appliance is of type “X” and that the temperature rise of the walls surrounding the oven shall not exceed 75 K. We would point out that the adhesive which unites the plastic laminate to the furniture must withstand temperature not less than 150°C to avoid delamination. 14 50 585 560 Fig. 9 560 594 591 555 . in m 50 5 0 54 594 Fig. 8 20 15 Fixing the oven Introduce the oven into the furniture opening and fix it with screws as figure 7. It is essential that the oven rests on a surface which will support its weight, as the screw fixing is only complementary. Warning! It is very important that the upper slits of the control panel are not obstructed. These slits are part of the ovens air circulation system and any blockage could result in overheating. Note It is essential that when installing your oven adequate air circulation is allowed for within the installation. See figure 11. Inadequate air circulation may greatly impair the performance of your oven and may effect adjacent cabinets due to an increase in temperature. Caution Do not lift this oven by the door handle For the “Built under” situation the front cross member of the oven housing Must Be Removed leaving an air space of 7-10 mm between the top of the oven and the underside of the work surface to assist ventilation. Adjust the hinges of furniture doors adjacent to the oven to allow a 4-5 mm gap between the furniture door and the oven frame Where the oven is being installed and the adjacent doors are vinyl faced or of a synthetic material then we suggest the use of side baffles which can be purchased from Comet Accessories Direct telephone 0113231 0523. They are available in White, Brown and Green. ;;;; ;; ;; ÀÀ @@ ;; ÀÀ @@ ;; ÀÀ @@ ;; ÀÀ @@ ;; ÀÀ @@ @@@@@ ÀÀÀÀÀ ;;;;; @@@@@ ÀÀÀÀÀ ;;;;; ; ;; ;; ;; ;;; ;;;;;;;; ;;;;;;;; Fig. 10 16 Fig. 11 Electrical connection All electrical wiring must be in compliance with the appropriate I.E.E. and local Electricity Board regulations and carried out by a qualified electrician, e.g. your local Electricity Board or a contractor who is on the roll of the National Inspection Council For Electrical Contracting (N.I.C.E.I.C.). Each oven is equipped with a data plate which can be found on the right hand side of the inner frame when the oven door is open, indicating the rated input and voltage at which the oven should operate. Important: this appliance must be earthed. This oven must be fitted with a 13 amp plug to BS 1363 incorporating a 13 amp (BS 1362) fuse and supplied via a suitable 13 amp switched socket, placed in an accessible position adjacent to the oven. For your safety please read the following information: • The electrical connections of the appliance must be carried out in compliance with the provisions and standards in force. • Warning: This appliance must be earthed. • This appliance operates from a 3 pin 13 amp plug. The voltage rating is 230 volt and should be protected by a 13 Amp fuse either in the plug or distribution board. • The appliance is supplied with a moulded 13 amp 3 pin mains plug fitted with 13 amp fuse. Should the fuse require replacement it must be replaced with a fuse rated at 13 Amps and approved to BS1362. • The plug contains a removable fuse cover that must be refitted when the fuse is replaced. In the event of the fuse cover being lost or damaged, the plug must not be used until a replacement cover has been obtained. • If the moulded mains plug is unsuitable for the socket outlet in your home or is removed for any other reason, then the fuse should be removed and the cut off plug disposed of safely to prevent the hazard of electric shock. • There is a danger of electric shock if the cut off plug is inserted into any 13 amp socket outlet. 17 How to wire a 13 amp plug Important. The wires in the mains lead on this appliance are coloured in accordance with the following code: Green and Yellow - Earth Blue - Neutral Earth Green & Yellow 13 amp fuse Brown - Live Neutral Blue Live Brown figure 12 As the colours may not correspond with the markings identifying the terminals in your plug proceed as follows: • The green and yellow wire must be connected to the terminal in the plug which is marked with the letter E or with the earth symbol or coloured green and yellow. • The blue wire must be connected to the terminal marked N or coloured black. • The brown wire must be connected to the terminal marked L or coloured red. The appliance complies with E.E.C directives No. 89/336 and No.92/31 relative to the electromagnetic compatibility. 18 Technical Data Overall dlmensions Width 594 mm Height 594 mm Depth 560 mm Aperture sizes for kitchen base unit Width 560 mm Height 591 mm Depth 550 mm Aperture sizes for tall housing unit Width 560 mm Height 585 mm Depth 550 mm Rated voltage and frequenoy 230V - 50 Hz Maximum input 2560 W Top element 1.00kW Bottom element 1.40kW Fan element 2.50kW Grill element 2.50kW Oven lamp 15 W Fan motor 25 W Cooling fan 20 W De Longhi continually strive to improve their products. For this reason we reserve the right to change specifications without prior notice. 19 ESM 460 electric multifunction oven 1101503 ß3