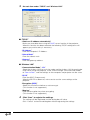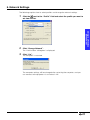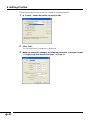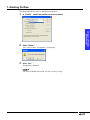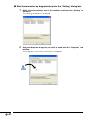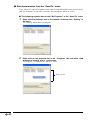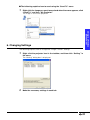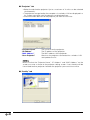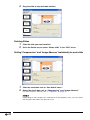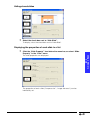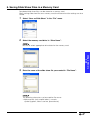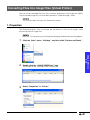
1
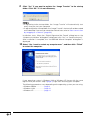
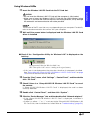
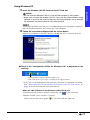
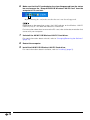
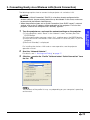
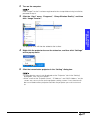
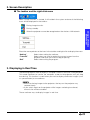
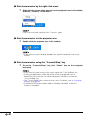
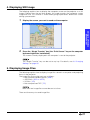
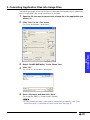
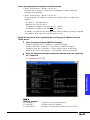
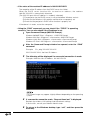
Installation
Using in a Wireless
Environment
Using a Memory
Card
Troubleshooting
Software for the PG-M25X projector
Wireless Reality
OPERATION MANUAL
Make sure to read this manual thoroughly
in order to correctly use this product.
Before using make sure to read the software license agreement.
For
Windows
Introduction
“Wireless Reality” software for the Sharp projector allows for a more effective presentation by transferring images
from a computer to the projector via a wireless connection and saving slide show files to memory cards, thus
creating presentations using only the projector and a memory card.
The following software is included with this package.
■ Image Transfer
Allows for computer screens or image files to be sent and displayed by the projector via a wireless connection.
■ Network Selector
Allows you to change all the settings when using a computer in a wireless environment.
■ Sharp Wireless LAN PC Card Driver
Wireless LAN PC Card (AN-WC11B) driver.
■ Slide Manager
Allows for creating slide show files and stores them on a memory card. Just insert the memory card with the slide
show files into the projector, and the slide show will automatically start.
Can be used to make presentations without a computer.
■ Virtual Printer
Allows for data files from different types of application such as PowerPoint to be converted into still image files.
• This software supports only the PG-M25X model.
• Operation has been checked with the Sharp Wireless LAN PC Card AN-WC11B (or supplied RUNTKA025WJZZ)
only.
This manual assumes that you are familiar with Windows and mouse operations. If not, refer to the appropriate
documentation that comes with the Windows operating system.
• This OPERATION MANUAL is based on the Windows XP Classic View.
When using Windows XP, change to the Classic View. To change to the Classic View, make the settings in
“Control Panel” on the “Start” menu. For more information about the settings, please refer to the documentation
that comes with Windows XP.
For details about the Sharp Wireless LAN PC Card AN-WC11B, refer to “Wireless LAN PC Card AN-WC11B
OPERATION MANUAL”.
The specifications of this software is subject to change without prior notice.
Please visit our website for the latest drivers and support information:
http://www.sharp-world.com/projector/
• Microsoft, Windows are either registered trademarks or trademarks of Microsoft Corporation in the United
States and/or other countries.
• Acrobat, Acrobat Reader are either registered trademarks or trademarks of Adobe Systems Incorporated.
• Other product and company names mentioned herein may be the registered trademarks or the trademarks
of their respective owners.
• The explanations in this manual may vary depending on the type of computer you are using. Also, operations
may be slower, depending on the operating environment and processing capability of your computer.
-2
Contents
Installation
System Requirements ................................................................................................4
Installing ......................................................................................................................5
Changing/Removing the Software ............................................................................15
Installation
Introduction .................................................................................................................2
Contents .....................................................................................................................3
Using in a Wireless Enviroment
1. Starting and Exiting ..................................................................................................... 17
2. Screen Description ...................................................................................................... 18
3. Connecting Easily via a Wireless LAN (Quick Connection) ......................................... 19
4. Registering New Network Settings .............................................................................. 21
5. Network Settings .......................................................................................................... 23
6. Editing Profiles ............................................................................................................. 24
7. Deleting Profiles ........................................................................................................... 25
Transferring Images to the Projector (Image Transfer) ..............................................26
Using a Memory Card
Creating a Slide Show (Slide Manager) ....................................................................39
1. Starting and Exiting ..................................................................................................... 39
2. Properties .................................................................................................................... 40
3. Creating Slide Show Files ............................................................................................ 42
4. Saving a File while Creating it ...................................................................................... 46
5. Saving Slide Show Files in a Memory Card ................................................................. 47
Using a Memory
Card
1. Starting and Exiting ..................................................................................................... 26
2. Screen Description ...................................................................................................... 29
3. Displaying in Real Time ............................................................................................... 29
4. Displaying Still Image .................................................................................................. 31
5. Displaying Image Files ................................................................................................ 31
6. Changing Settings ....................................................................................................... 35
Using in a Wireless
Environment
Wireless Settings (Network Selector) .......................................................................17
Converting Files into Image Files (Virtual Printer) ....................................................49
Troubleshooting
Troubleshooting ........................................................................................................54
For SHARP Assistance .............................................................................................58
Glossary ...................................................................................................................59
Index .........................................................................................................................61
-3
Troubleshooting
1. Properties .................................................................................................................... 49
2. Converting Application Files into Image Files ............................................................. 53
System Requirements
This software requires the following minimum system configuration:
PC running under Microsoft Windows 98, 98SE, Me, 2000 Professional, XP Home Edition,
XP Professional Edition. (Japanese and English versions)
CPU:
Memory:
Hard Disk:
Display:
Interface:
CD-ROM Drive
Browser:
500 MHz Pentium III processor or higher recommended
64 MB of RAM or more (Windows 98, 98SE, Me)
96 MB of RAM or more (Windows 2000 Professional)
160 MB of RAM or more (Windows XP Home Edition, Professional Edition)
50 MB or more of free hard disk space
A 1,240 × 768 dot display capable of displaying 65,536 colors or more
recommended
PC card slot interface (PCMCIA TYPE II)
Internet Explorer 4.01 or later
Wireless LAN Card: The card included with the PG-M25X or the AN-WC11B (sold separately)
CAUTION
This software may not work on user-built computers or computers that have had their motherboards
modified.
-4
Installing
CAUTION
• Make sure to consult your Network Administrator when installing this software on a
computer connected to a network.
• Before touching the Wireless LAN PC Card, make sure to touch any metallic object
such as a faucet or doorknob to discharge any static electricity in your body.
Before installing
• If there are any other 11 Mbps (IEEE 802.11b std) wireless LAN card drivers
already installed on your computer, make sure to uninstall them before
performing the procedure below.
• Do not insert the wireless LAN PC card into the PC card slot on the computer
until indicated by the instructions on the screen.
1
Make sure that the computer you are using supports this software.
For details, see “System Requirements” on page 4.
2
Turn on the computer.
If your operating system is Windows 2000 or Windows XP, log on using an account
that has Administrators permission.
3
Make sure to close all other applications before installing.
4
Insert the included CD-ROM into the computer’s CD-ROM drive.
-5
Installation
Install this software using the setup program included in the CD-ROM.
5
Select “English”, and click “OK” when the “Choose Setup Language”
dialog box is displayed.
If the “Choose Setup Language” dialog box is not displayed:
1 Click the “Start” button, and then “Run”.
2 Enter “R:\software\setup.exe” and click “OK”.
(Enter the CD-ROM drive letter if it is different from “R”.)
6
Select the install destination on the “Choose Destination Location” dialog
box, and then click “Next>”.
Normally, it is not necessary to change the settings providing there are no problems.
-6
7
Select the software you want to install on the “Select Components”, and
then click “Next>”.
Installation
• Normally, it is not necessary to change the settings providing there are no problems.
• A short explanation will be displayed in the “Description” box when clicking the
software name on the tree list.
8
Select the program folder on the “Select Program Folder” dialog box, and
then click “Next>”.
Nomally, it is not necessary to change the settings providing there are no problems.
-7
9
Click “Yes” if you want to register the “Image Transfer” to the startup
folder. Click “No” if it is not necessary.
• If registering to the startup folder, the “Image Transfer” will automatically start
every time you start your computer.
• If registering to the startup folder, the “Image Transfer” shortcut will not be created
on the desktop. If you want to create the shortcut later, refer to “Start transmission
by dragging to a shortcut” (page 33).
Installation starts. When the “Digital Signature Not Found” dialog box or the
“Hardware Installation” dialog box is displayed, click “Yes” or “Continue Anyway”.
After installation is complete, the “InstallShield Wizard Complete” dialog box is
displayed.
10
Select “Yes, I want to restart my computer now.”, and then click “Finish”
to restart the computer.
If your operating system is Windows 2000 or Windows XP, log on with the same
log-on name you used in step 2 (page 5) right after restarting your computer.
The following procedures vary depending on the operating system you are using.
• Windows 98/Me ................. page 9
• Windows 2000 ................... page 10
• Windows XP ....................... page 11
-8
Using Windows 98/Me
11
Insert the Wireless LAN PC Card into the PC Card slot.
The location of the PC card slot may vary depending on your computer. For details,
refer to the documentation that comes with your computer.
12
Wait until the screen below is displayed and the Wireless LAN PC Card
driver is installed
■ Check if the “Configuration Utility for Wireless LAN” is displayed on the
task tray
Configuration Utility for Wireless LAN icon
(The color of the icon varies according to the signal status.)
• If this icon is not displayed on the status bar, the driver is not properly installed.
See “Reinstalling the ‘Sharp AN-WC11B Wireless LAN PC Card’ driver” on page
13 to uninstall and then reinstall the driver.
13
From the “Start” menu, click “Settings”, “Control Panel”, and then double
click “PC Card”.
14
Check if there is a “Sharp AN-WC11B Wireless LAN PC Card” in one of
the sockets.
If “Sharp AN-WC11B Wireless LAN PC Card” is displayed, the card has been
correctly detected.
15
Double click “Control Panel”, and then click “System”.
16
Click the “Device Manager” tab, and then double click “Network adapters”.
• If the “Sharp AN-WC11B Wireless LAN PC Card” is displayed, installation is
completed.
• If there is a yellow “ ? ” or “ ! ” mark next to the “Sharp AN-WC11B Wireless LAN
PC Card” icon, then installation has failed. Refer to “Troubleshooting” (page 54).
-9
Installation
CAUTION
• Do not insert the Wireless LAN PC Card until the computer is fully loaded.
• Make sure to insert the Wireless LAN PC Card with the LINK indicator facing
upwards. If you force the card into the slot in the wrong direction, it may damage
the connector and communication will not be possible.
Using Windows 2000
11
Insert the Wireless LAN PC Card into the PC Card slot.
CAUTION
• Do not insert the Wireless LAN PC Card until the computer is fully loaded.
• Make sure to insert the wireless LAN PC Card with the LINK indicator facing
upwards. If you force the card into the slot in the wrong direction, it may damage
the connector and communication will not be possible.
The location of the PC card slot may vary depending on your computer. For details,
refer to the documentation that comes with your computer.
12
Follow the instructions displayed on the screen below.
When the “Digital Signature Not Found” dialog box is displayed, click “Yes”.
■ Check if the “Configuration Utility for Wireless LAN” is displayed on the
task tray
Configuration Utility for Wireless LAN icon
(The color of the icon varies according to the signal status.)
• If this icon is not displayed on the status bar, the driver is not properly installed.
See “Reinstalling the ‘Sharp AN-WC11B Wireless LAN PC Card’ driver” on
page 13 to uninstall and then reinstall the driver.
-10
13
From the “Start” menu, click “Settings”, and then “Control Panel”.
14
Double click the “System” icon.
15
Click the “Hardware” tab, and then “Device Manager”.
16
Double click “Network adapters”.
• If the “Sharp AN-WC11B Wireless LAN PC Card” is displayed, installation is
completed.
• If there is a yellow “ ? ” or “ ! ” mark next to the “Sharp AN-WC11B Wireless LAN
PC Card” icon, then installation has failed. Refer to “Troubleshooting” (page 54).
Using Windows XP
11
Insert the Wireless LAN PC Card into the PC Card slot.
The location of the PC card slot may vary depending on your computer. For details,
refer to the documentation that comes with your computer.
12
Follow the instructions displayed on the screen below.
When the “Hardware Installation” dialog is displayed, click “Continue Anyway”.
■ Check if the “Configuration Utility for Wireless LAN” is displayed on the
task tray
Configuration Utility for Wireless LAN icon
(The color of the icon varies according to the signal status.)
• If this icon is not displayed on the status bar, the driver is not properly installed.
See “Reinstalling the ‘Sharp AN-WC11B Wireless LAN PC Card’ driver” on
page 13 to uninstall and then reinstall the driver.
When the LINK indicator on the Wireless LAN PC Card is lit:
1Double click the wireless network connection icon (
) in the status bar.
2Select “SHARP_PRJ” and click “Connect”.
Make sure that the icon is green (
). The LINK indicator lights up.
-11
Installation
CAUTION
• Do not insert the Wireless LAN PC Card until the computer is fully loaded.
• Make sure to insert the wireless LAN PC Card with the LINK indicator facing
upwards. If you force the card into the slot in the wrong direction, it may damage
the connector and communication will not be possible.
13
14
15
16
From the “Start” button, click “Control Panel”.
On the upper left hand cover, click “Switch to Classic View”, and then
click “System” on the right.
Click the “Hardware” tab, and then click “Device Manager”.
Double click “Network adapters”.
• If the “Sharp AN-WC11B Wireless LAN PC Card” is displayed, installation is
completed.
• If there is a yellow “ ? ” or “ ! ” mark next to the “Sharp AN-WC11B Wireless LAN
PC Card” icon, then installation has failed. Refer to “Troubleshooting” (page 54).
If the unit does not function properly:
“!”, “?” or “X” is displayed on the “Sharp AN-WC11B Wireless LAN PC Card” icon
indicates that the Wireless LAN PC Card driver is not functioning.
An error occurred
The following can be probable causes for the error:
• The “Sharp AN-WC11B Wireless LAN PC Card” is not properly installed.
• Another wireless LAN PC card is already installed.
• Driver or hardware conflict.
If any of these errors occur, uninstall the “Sharp AN-WC11B Wireless LAN PC
Card” and then reinstall it again (page 13).
If there is another wireless LAN PC card already installed, uninstall it first before
installing the Sharp AN-WC11B Wireless LAN PC Card.
To uninstall other wireless LAN PC cards from your computer, refer to the
documentation of the respective wireless LAN PC card.
-12
■ Reinstalling the “Sharp AN-WC11B Wireless LAN PC Card” driver
1
Click the “Start” menu, “Settings”, and then “Control Panel”.
2
Double click “System”, and then select the “Hardware” tab.
3
4
Click “Device Manager” , and then [+] in “Network adapters”.
5
Select the “Sharp AN-WC11B Wireless LAN PC Card”, and then click
“Uninstall”.
Click “OK”.
-13
Installation
The “Sharp AN-WC11B Wireless LAN PC Card” driver should be uninstalled before
reinstalling.
6
Make sure that the PC card adapter icon has disappeared from the status
bar, and remove the “Sharp AN-WC11B Wireless LAN PC Card” from the
computer’s PC card slot.
Before removing the card, make sure that the two icons have disappeared.
Depending on the operating system, the LINK indicator on the Wireless LAN PC
Card may stay lit. This does not indicate a malfunction.
For information about how to remove the PC card, refer to the documentation that
comes with your computer.
7
Uninstall the AN-WC11B Wireless LAN PC Card driver.
For more information about uninstall, refer to “Changing/Removing the Software”
(page 15).
8
Restart the computer.
9
Install the AN-WC11B Wireless LAN PC Card driver.
For more information about installation, refer to “Installing” (page 5).
-14
Changing / Removing the Software
Installation
Uninstalling or adding the software.
1
Close all applications that are currently running.
To close the “Image Transfer”, right click the projector icon on the status bar, and
then click “Exit” on the pop up menu (page 28).
2
Remove the Wireless LAN PC Card from the computer.
3
Click the “Start” menu, “Settings”, and then “Control Panel”.
If your operating system is Windows XP, click the “Start“ button, and then “Control
Panel”.
4
Click the “Add or Remove Programs” icon.
5
Select “Sharp Wireless Reality”, and then click “Change/Remove”.
-15
6
Select “English”, and then click “OK” on the “Choose Setup Language”
dialog box.
7
Select “Modify”, “Repair” or “Remove”, and then click “Next>” on the
“Welcome” dialog box.
■ “Modify”
For adding software that was not installed or uninstalling components from the
software. The “Select Components” dialog box is displayed and there you can
select which programs you want to add or remove.
•
•
→
→
Add
Remove
■ “Repair”
For reinstalling software already in the computer.
■ “Remove”
For uninstalling (removing) software already installed.
8
-16
Follow the instructions on the screen.
Wireless Settings (Network Selector)
Network settings are necessary for the projector and the computer to communicate via
a wireless LAN. If a wireless network connection has already been configured, you can
easily and quickly change the settings of a wireless LAN PC card installed in the
computer using “Network Selector”. This function enables you to use the projector in a
wireless environment easily even if you have no experience with network settings.
“Network Selector” is not necessary if the wireless network has not yet been configured.
1. Starting and Exiting
The following explains how to start and exit the “Network Selector” program.
Starting
1
Click the “Start” menu, “Programs”, “Sharp Wireless Reality”, and then
click “Network Selector”.
The startup screen that shows the current network settings is displayed.
Exiting
1
Click “Close” on the startup screen.
This exits the program.
-17
Using in a Wireless
Environment
• If a wireless network has already been configured, you may use this software after
consultation with your Network Administrator.
• The only wireless cards that can be set with this software are the one included with
the projector, or the “Sharp AN-WC11B Wireless LAN PC Card” (sold separately).
Other cards cannot be set using this software.
2. Screen Description
■ Startup screen
“Profile”
“Setting Information”
“New”
“Edit”
“Delete”
“Change Network”
“Close”
“Comment”
the name of the stored settings.
displays the contents stored in the selected profile.
for registering a new profile.
for editing a registered profile.
for deleting a registered profile.
for changing the network settings to the selected profile
setting.
for exiting the program.
displays comments about the operation.
■ “Change Profile” dialog box
“Profile”
the name of the registered setting.
“TCP/IP”
settings related to TCP/IP
“Wireless LAN”
settings related to the Wireless LAN.
“Save”
saves the settings and closes the dialog box.
“Cancel”
closes the dialog box without saving the settings.
*The “Encryption (WEP)” function cannot be used.
-18
3. Connecting Easily via a Wireless LAN (Quick Connection)
The following explains how to connect to the projector via a wireless LAN.
CAUTION
• When using “Quick Connection” (DHCP) in a location already configured with a
wireless network, the pre-existing network may be affected. In this case, make sure
to consult with the Network Administrator.
• When the profile has been set to “Quick Connection (from DHCP server)”, network
settings such as the IP address will be received from the projector. First start the
projector, and then the computer after “Standby” appears.
Turn the projector on, and reset the network settings on the projector.
1 On the projector, select “Reset” in the “Network” menu, and then press the
ENTER button.
2 On the confirmation message, select “Yes”, and then press the ENTER button.
3 Install the AN-WC11B Wireless LAN Card to the PC card slot (INPUT 4) on the
projector.
4 Wait until “Standby” is displayed.
For installing the wireless LAN card or menu operation, see the projector
operation manual.
2
Start the “Network Selector”.
For details, see “1. Starting and Exiting” on page 17.
3
Click the
the list.
next to the “Profile” field and select “Quick Connection” from
The contents of the profile list may vary depending on your computer’s operating
environment.
-19
Using in a Wireless
Environment
1
4
Click “Change Network”.
The “Confirmation” dialog box is displayed.
If “Change Network” appears gray, “Quick Connection” has already been set.
Click “Close”, and exit “Network Selector”.
5
Click “Yes”.
The computer restarts.
The computer settings will be changed after restarting the computer, and you can
connect to the projector via a wireless LAN.
The network settings for “Quick Connection” are as follows:
■ On the projector:
IP Address
Subnet Mask
Gateway
Channel
SS ID
DHCP Server function
Assign start address
Number of maximum addresses
that can be assigned
192.168.150.150
255.255.255.0
192.168.150.1
11ch
SHARP_PRJ
On
192.168.150.151
10 addresses
■ On the computer:
IP Address
Subnet Mask
Gateway
Channel
SS ID
Transmission mode
Encryption
-20
From DHCP Server
From DHCP Server
From DHCP Server
11ch
SHARP_PRJ
802.11 AdHoc mode
None
4. Registering New Network Settings
• The following explains how to manually set and register the wireless LAN network
setting.
• Use the network settings of the “Quick Connection” when problems occur in the preexisting network settings.
1
Click “New”.
The “Change Profile” dialog box is displayed.
Using in a Wireless
Environment
2
Enter a name in “Profile”.
It is recommended that you set a name that can be used to recognize the content
of the settings.
-21
3
Set each item under “TCP/IP” and “Wireless LAN”.
■ “TCP/IP”
“Obtain an IP address automatically”
Make sure to enable when using the DHCP server function in the projector.
When this function has been selected, the following TCP/IP setting items will
appear gray and no entry is necessary.
“IP Address”
Enter the computer’s IP Address.
“Subnet Mask”
Enter the subnet mask.
“Gateway”
Enter the gateway address.
■ “Wireless LAN”
“Communication Mode”, “Ch”
Select the wireless LAN transmission mode and the wireless LAN channel to be
used. When using the projector, make sure to change “Communication Mode”
to “Peer-to-Peer”, and the settings on the computer and projector are the same.
“SS ID”
Enter the SS ID (Group name).
When the SS ID has been set, make sure to use the same settings on the
projector.
“Encryption (WEP)”
Select this function to whether or not to encrypt.
(This function is not supported.)
“Wep key”
Enter the encryption key when encrypting.
(This function is not supported.)
4
Click “Save” to register the settings.
The settings will be registered and the dialog box will close.
Click “Cancel” to close the dialog box without registering the settings.
-22
5. Network Settings
The following explains how to select profiles and change the network settings.
Click the
next to the “Profile” field and select the profile you want to
set from the list.
2
Click “Change Network”.
Using in a Wireless
Environment
1
The “Confirmation“ dialog box is displayed.
3
Click “Yes”.
The computer is restarted.
The computer settings will be changed after restarting the computer, and you
can connect to the projector via a wireless LAN.
-23
6. Editing Profiles
The following explains how to edit the content of registered profiles.
1
In “Profile”, select the profile you want to edit.
2
Click “Edit”.
The “Change Profile” dialog box is displayed.
3
-24
Make the necessary changes by following procedure 2 through 4 under
“4. Registering New Network Settings” on page 21.
7. Deleting Profiles
The following explains how to delete stored profiles.
In “Profile”, select the profile you want to delete.
2
Click “Delete”.
Using in a Wireless
Environment
1
The “Confirmation” dialog box is displayed.
3
Click “Yes”.
The profile is deleted.
You cannot delete the profile you are currently using.
-25
Transferring Images to the Projector (Image Transfer)
The following explains how to transfer images from a computer to the projector
and projecting them via the projector.
The same image can be displayed simultaneously on up to 4 projectors.
1. Starting and Exiting
The following explains how to start and exit the “Image Transfer” program.
Make sure to turn on the projector first when sending images to the projector
using a wireless LAN PC card. When “Standby” is displayed on the screen, turn
on the computer.
Starting
1
Turn on the projector and make sure that it is ready for transmission.
• Make sure to install the wireless LAN PC cards supplied with the projector or the
wireless LAN PC card “AN-WC11B” (sold separately) into the PC card slot (INPUT
4) on the projector and into the PC card slot in the computer.
• For installation procedures, see the projector operation manual as well as the
computer operation manual.
-26
2
Turn on the computer.
If the “Image Transfer” has been registered to the startup folder during installation,
proceed to step 4.
3
Click the “Start” menu, “Programs”, “Sharp Wireless Reality”, and then
click “Image Transfer”.
Using in a Wireless
Environment
The projector icon will then be added to the taskbar.
4
Right click the projector icon on the status bar, and then click “Settings”
on the pop up menu.
5
Click the transmission projector in the “Setting” dialog box.
• If the projector name is not displayed on the “Projector” tab in the “Setting”
dialog box, click “Scan Projector”.
• Make sure that the “Projector Name”, “IP Address” and “MAC Address” on the
screen are same as those on the projector setting screen. If not, the data will
be transmitted to other projectors besides the projector you want to transmit
to.
-27
■ “Setting” dialog box
“Projector” tab
“Quality” tab
“Option” tab
For selecting the destination projector
For selecting the quality of the image being transferred
For setting options when transferring the image
Exiting
1
Place the mouse pointer on the projector icon in the taskbar, and right
click the mouse.
A menu is displayed.
2
Click “Exit”.
This exits the program. The projector icon in the taskbar disappears.
-28
2. Screen Description
■ The taskbar and the right-click menu
When “Image Transfer” is started, it will reside in the system and one of the following
icons will be displayed in the taskbar:
During image transfer.
During standby.
Using in a Wireless
Environment
When the projector cannot be recognized on the wireless LAN network.
Place the mouse pointer on the icons in the taskbar and right-click to display the menu.
“Setting”
“Transmit”
“Exit”
Select when setting the software.
Select when you want to project the current screen from the
projector and when you want to stop projecting.
Select when exiting the program.
3. Displaying in Real Time
The following explains how to display a computer screen in real time via the projector.
This mode continues to transfer the computer screen to the projector until you stop
transferring. This function is useful when you want to display continuous images (such
as a presentation) to an audience.
• When transfering images to the projector, the keys on the projector may
respond slowly.
• If you switch inputs on the projector while images are being transferred,
transmission will be canceled.
Threre are three ways to display images in real time.
-29
■ Start transmission by the right click menu
1
Right click the mouse while placing it on the projector icon in the taskbar,
and click “Transmit” in the menu.
If you want to cancel sending, click “Transmit” again.
■ Start transmission via the projector icon
1
Double click the projector icon in the taskbar.
• If you want to cancel sending, double click again the projector icon in the
taskbar.
■ Start transmission using the “Transmit/Stop” key
1
Press the “Transmit/Stop” key (the “Pause” key on the computer
keyboard).
• If you want to cancel transmission, press again the “Transmit/Stop” key.
• If software applications where the entire screen is displayed such as
PowerPoint, the status bar will not be displayed. Therefore, use the the
“Transmit/Stop” key.
• The “Transmit/Stop” key can be set to any key. For details, see “6. Changing
Settings” on page 35.
• If the MS-DOS Prompt windows open in Windows 98, 98SE, or Me, this
function is disabled.
-30
4. Displaying Still Image
The following explains how to display the computer screen on the projector as a still
image. Different from the real time display, this mode transfers the computer screen
image one time. This function is useful when giving explanations about each screen
during a presentation.
Display the screen you want to send on the computer.
2
Press the “Single Transfer” key (the “Print Screen” key on the computer
keyboard right after installation).
Using in a Wireless
Environment
1
The screen currently displayed in the computer is sent to the projector.
The “Single Transfer” key can be set to any key. For details, see “6. Changing
Settings” on page 35.
5. Displaying Image Files
The following explains how to display image files stored in a computer and projecting
them via the projector.
The image files that can be sent are as follows:
• Non-compressed Bitmap files (.BMP)
• JPEG files (.JPG or .JPEG)
• VQ files (.VQ)
• Non-compressed TIFF (.TIF)
More than two image files cannot be sent at a time.
There are three ways to send image files.
-31
■ Start transmission by drag-and-drop into the “Setting” dialog box
1
Right click the projector icon in the taskbar, and then click “Setting” in
the menu.
The “Setting” dialog box is displayed.
2
Drag and drop the image file you want to send onto the “Projector” tab
window.
The image file is sent at the same time it is dropped.
-32
■ Start transmission by dragging to a shortcut
Create a shortcut for “Image Transfer” on the desktop, and then drag the file into the
shortcut. The following explains how to create a shortcut.
Use the following procedure to create a shortcut.
1
Right click the projector icon in the taskbar, and then click “Setting” in
the menu.
Using in a Wireless
Environment
The “Setting” dialog box is displayed.
2
Right click on the projector list under in the “Projector” tab, and then
click “Create shortcut on Desktop” in the menu.
Projector List
The “Image Transfer” shortcut appears on the desktop.
-33
■ Start transmission from the “Send To” menu
In the “Send To” menu that appears after right clicking the image file you want to send,
add “My Projector” to the menu, and then send using the “Send To” menu.
■ The following explains how to add “My Projector” to the “Send To” menu
1
Right click the projector icon in the taskbar, and then click “Setting” in
the menu.
The “Setting” dialog box is displayed.
2
Right click on the projector list in the “Projector” tab, and click “Add
shortcut to ‘send to’ menu” in the menu.
“My Projector” is added to the “Send To” menu.
Projector List
-34
■ The following explains how to send using the “Send To” menu
1
Right click the image you want to send and when the menu appears, click
“Send To”, and then “My Projector”.
The image is sent to the projector.
Using in a Wireless
Environment
6. Changing Settings
The following explains how to change the “Image Transfer” settings.
1
Right click the projector icon in the taskbar, and then click “Setting” in
the menu.
The “Setting” dialog box is displayed.
2
Make the necessary settings in each tab.
-35
■ “Projector” tab
• Select the destination projector. Up to a maximum of 4 units can be selected
simultaneously.
• The projectors recognized by the computer via a wireless LAN are displayed in a
list. Images cannot be sent to projectors not displayed here.
• Check the check box next to the projector you want to transmit to.
“Projector Name”
“IP Address”
“MAC Address”
“Scan Projector”
The name set on the projector.
The IP address of the projector.
The MAC address of the projector.
Searches for projectors connected via a wireless LAN
and updates the list.
Make sure that the “Projector Name”, “IP Address” and “MAC Address” on the
screen are same as those on the projector setting screen. If not, the data will be
transmitted to other projectors besides the projector you want to transmit to.
■ “Quality” tab
-36
You can select one from the following 6 types of image quality to be sent.
When projecting high quality images such as
images with various pictures or computer graphics.
“Picture (Standard)”
When projecting images with various pictures or
computer graphics.
“Picture (High Speed)”
When projecting animated images such as
computer animations or movies.
“Text (High Quality)”
When projecting high quality images that have both
text and images.
“Text (Standard)”
When projecting images that have both text and
images.
“Text (High Speed)”
When projecting animated images such as scrolling
images that have both text and images.
■ “Option” tab
These are detailed settings when sending images.
“Mouse Cursor”
You can select whether or not to display the mouse pointer when projecting
the computer screen from the projector. Clear the check box if you do not
want to display the mouse pointer.
Depending on your computer enviroment, the mouse pointer may blink or may
not operate smoothly after transferring images to the projector. In this case,
adjust the monitor settings of your computer to 16 bit color or 24 bit color, and
set the mouse pointer to Windows default.
“Transmit/Stop Key”
Specifies the key for starting or stopping the image transfer to the projector.
The “Pause” key is set right after installation. For changing the key settings,
see “Changing the key settings” on page 38.
-37
Using in a Wireless
Environment
“Picture (High Quality)”
“Single Transfer Key”
Specifies the key for sending images to the projector. The “Print Screen” key
is set right after installation. For changing the key settings, see “Changing the
key settings”.
“Auto Scan”
Select this function to automatically search for a projector in a wireless LAN
network when starting “Image Transfer”. When “Auto Scan” has been enabled,
it may take some time to start the software. Make sure to transfer the image
after checking the destination projector.
• When a projector name is not displayed on the “Projector” tab, click “Scan
Projector”.
• Make sure that the “Projector Name”, “IP Address” and “MAC Address” on
the screen are same as those on the projector setting screen. If not, the
data will be transmitted to other projectors besides the projector you want to
transmit to.
“Display Type”
Select the display type for displaying in real time.
“All at Once”
This mode is for displaying at once the screen after image
data has been sent from the computer to the projector.
Therefore, switching of the image may take time.
Select when displaying images that change occasionally,
such as those in a slide show with explanations given for
each image.
“Wipe Down”
This mode is for arranging image data sent from the
computer to the projector in order from top to bottom.
Select when displaying images with parts that change
frequently, such as a computer screen or an animated
image.
■ Changing the key settings
The following explains how to change the “Transmit/Stop” key or the “Single Transfer”
key settings.
1
Click “Setting” for the key you want to change on the “Option” tab.
2
Select the new key you want to set by pressing it on the computer
keyboard.
3
Click “OK”.
To cancel the settings, click “Cancel”.
• As the Enter key on the keyboard can also be set, make sure to use the
mouse on step 3 to select “OK” or “Cancel”.
• Some key settings cannot be changed. If the key names on the screen is not
changed when you press the keys you want to set in step 2, you cannot
change those keys.
-38
Creating a Slide Show (Slide Manager)
Using the “Slide Manager”, you can create Auto Run script files (Slide show defined
files) and store them on the memory card. You can then create files that can be
reproduced automatically on the projector.
• See as well “Using Autorun” under “Memory Card Settings” in the projector’s
operation manual.
• The file types that can be used to create script files are as follows:
BMP files*2,
JPEG files*3,
PPT files*1,
*4
TIFF files ,
VQ files
*1 : Microsoft PowerPoint required (except PowerPoint viewer).
*2 : Only non-compressed BMP supported.
*3 : Does not support Progressive JPEG.
*4 : Only non-compressed RGB supported.
1.Starting and Exiting
The following explains how to start and exit the “Slide Manager” program.
Starting
Click the “Start” menu, “Programs”, “Sharp Wireless Reality”, and then
click “Slide Manager”.
The window of the selected mode opens.
Exiting
1
In the “File” menu, select “Exit” or click the
hand corner of the window.
button on the upper right
-39
Using a Memory
Card
1
2. Properties
Setting the properties allows you to store settings you frequently use.
1
In the “File” menu, select “Properties”.
Slide show properties
“Model/Resolution”
Select the projector model you are using.
It is not necessary to change the settings in the PG-M25X.
“Compression Setting”
Select “Non-compressed” or “Compressed”.
If you select “Compressed”, set “Compression”.
• If you select “Non-compressed”, the slide will be saved as a BMP file.
• If you select “Compressed”, the slide will be saved as a VQ file.
• If you select “Non-compressed”, it will take time for the image to be
displayed.
• Depending on the compression rate, you can select “High Quality”,
“Standard” or “High Speed” as the “Compression”. Be sure to usually select
“Standard”. “Text” is suitable for storing images with many letters, and
“Picture” is suitable for storing images that include pictures.
• The items are selected from the pull-down menu.
-40
“Image Advance”
Select “Manually (Press Enter Key)” or “Automatically (Selected Interval)”.
If you select “Automatically (Selected Interval)”, select the time in “Interval”.
• The “Interval” can be selected from “15 sec”, “30 sec”, “45 sec”, “1 minute”,
“1.5 minutes”, “2 minutes”, or “5 minutes” on the pull-down menu.
• Images of large sizes such as BMP files (.bmp) will take more than 15
seconds to be displayed.
“Play Mode”
If you want to display again from the first page after the last page of the slide
show has been displayed, select the check box next to “Repeat”.
2
Click “OK”.
Using a Memory
Card
-41
3. Creating Slide Show Files
The following explains how to create slide show files.
1
Start “Slide Manager”.
For details, see “1. Starting and Exiting” on page 39.
Thumbnail display area
The images converted into
slides are compressed and
displayed here.
Preview area
The images selected
on the thumbnail display
area are enlarged.
Property area
The properties of images
converted into slides are
displayed.
2
Convert the files to slides.
You can convert the files to slides by one of the following procedures:
1 When creating new script files
Select “Open” in the “File” menu to open the file.
2 When adding files to the other slides
Importing the file by selecting “Import” in the “File” menu.
The images converted into slides are displayed in the thumbnail area.
• When creating or adding script files, select “Files of type” in the “Open” dialog
box, and then select the file type you want to convert to.
• See page 39 for the file types that can be converted.
• You can also convert by dropping the file onto the thumbnail display area.
-42
• If color PowerPoint data is converted to monochrome slide files, see “Color
PowerPoint data is converted to monochrome data” on page 57.
Replacing the order of the slides
Example: Replacing Page 3 and Page 2.
1
Place the mouse pointer on the slide you want to replace and click
the mouse.
Using a Memory
Card
-43
2
Drag the slide to any desirable location.
Deleting Slides
1
2
Click the slide you want to delete.
Press the Delete key or select “Delete slide” in the “Edit” menu.
Setting “Compression” and “Image Advance” individually for each slide
1
2
Clear the check box next to “Use default value”.
Select the check box next to “Compression” and “Image Advance”.
For information on settings, see “2. Properties” on page 40.
Depending on the compression method set in the property area, you can check
the compressed slide in the preview area.
-44
Hiding stored slides
1
Select the check box next to “Hide Slide”.
To display, clear the check box next to “Hide Slide”.
Displaying the properties of each slide in a list
1
Using a Memory
Card
Click the “Slide Property” icon below the menu bar, or select “Slide
Property” in the “View” menu.
The slide properties are displayed.
The properties of each slide (“Compression”, “Image Advance”) can be
individually set.
-45
4. Saving a File while Creating it
Slide show files can be stored in a computer while being created.
This is useful when assembling a slide show in multiple sessions.
-46
1
In the “File” menu, select “Save as”.
2
Enter a file name and click “Save”.
5. Saving Slide Show Files in a Memory Card
Completed slide show files can be stored on a memory card.
When storing slide show files on a memory card, the Autorun function settings are also
stored.
1
Select “Save as Slide Show” in the “File” menu.
2
Select the memory card drive in “Drive Name”.
Be sure to select appropriate drive letter for the memory card.
Using a Memory
Card
3
Enter the name of the slide show file you created in “File Name”.
The following characters can be used for file names.
• Alphanumeric (only capital letters), numeric,
symbol (hyphen, lower case bar, parentheses)
-47
4
Click “Save”.
The Auto Run setting dialog is displayed.
5
Click “Yes” if you want to make the Auto Run setting, or “No” if it is not
necessary.
Only one file can have Auto Run setting per memory card.
-48
Converting Files into Image Files (Virtual Printer)
You can convert printable files from most software applications into image files (BMP).
The converted image files can then be imported as “Slide Manager“ slides.
This function does not work with PowerPoint viewer.
1. Properties
The following explains how to change the resolution or the size of images when
converting them to image files.
Normally, it is not necessary to change the settings providing there are no problems.
Click the “Start” menu, “Settings”, and then click “Printers and Faxes”.
2
Double click the “SHARP BMPWriter” icon.
Using a Memory
Card
1
The window of the selected printer is displayed.
3
Select “Properties” in “Printer”.
-49
4
Click the “Printing Preferences” on the “General” tab.
The “Layout” sheet is displayed.
5
Select the paper orientation in the “Orientation” box.
6
Click “Advanced”.
The “Advanced Options” sheet is displayed.
-50
7
Select the desired paper size from the “Paper Size” pull down list.
8
Select the desired resolution from the “Resolution” pull down list.
Using a Memory
Card
• If you want to make converted image files smaller, lower the resolution.
• If you want to neatly display converted image files, increase the resolution.
9
Click “OK”.
This returns to the “Layout” sheet.
10
Click “OK”.
-51
11
To make the output Bitmap (BMP) image size lower than XGA, select “True”
on the “Device Settings” tab.
12
Click “OK”.
The “SHARP BMPWriter Properties” window closes.
-52
2. Converting Application Files into Image Files
The following example shows how to convert a printable file created using an application
into an image (BMP) file, using PowerPoint as example.
1
Open the file you want to convert into a image file in the application you
create it in.
2
Click “Print” in the “File” menu.
The “Print” dialog box is displayed.
Select “SHARP BMPWriter” in the “Name” box.
4
Click “OK”.
Using a Memory
Card
3
The “Save As” dialog box is displayed.
5
Enter a file name, and then click “Save”.
The image file (BMP) is saved on the computer.
• If color PowerPoint data is converted to monochrome slide files, see “Color
PowerPoint data is converted to monochrome data” on page 57.
-53
Troubleshooting
When images cannot be transferred or a transmission error occurs
•
•
•
•
Make sure that other wireless LAN devices are not in use.
Is the transmission distance too far? Bring the wireless LAN PC cards closer.
Remove any obstacles from between the wireless LAN PC cards.
Are the network settings correctly set? Make sure to consult with your Network
Administrator regarding the network settings.
The image transfer speed is too slow
• Close all other running applications.
• Set the resolution on your computer to lower than XGA.
The image quality is poor
• Check the image quality settings.
Image Transfer (page 35)
Slide Manager (page 40)
Destination projector cannot be found (Image Transfer)
First, turn on the projector. When “Standby” is displayed on the projector screen, turn
on the computer.
When the wireless LAN card does not work
• Is the LINK indicator on the Wireless LAN PC Card on?
• On: operating properly.
• Blinking: wireless LAN PC driver not operating properly. Reinstall the driver.
• Off: wireless LAN PC card is not operating. Check if the card is correctly
inserted.
• Has the wireless LAN card been correctly recognized ?
• See “If the unit does not function properly” on page 12.
• Is the SS ID name, Channel, and wireless transmission settings the same in
both the projector and computer?
• If not, transmission is not possible.
• When transmitting to the projector, set the wireless transmission mode to
“Peer-to-Peer”.
-54
• Check the projector and computer network settings
• When “DHCP Server” setting is set to “OFF”.
Recheck the IP address, subnet mask and gateway values of both the
projector and computer.
• When “DHCP Server” setting is set to “ON”.
Check projector’s IP address, subnet mask and the DHCP assigned start
address.
IP Address : 192.168.150.120
Subnet mask: 255.255.255.0
Assigned start address 192.168.150.100 Correct
Assigned start address 192.168.050.100 Wrong
IP address assignation will not be possible if the IP address or DHCP assigned
start address does not match with the subnet mask.
• Check the set values when automatically receiving an IP address from the
DHCP server.
1
Open Command Prompt (MS-DOS Prompt).
Windows 98/98SE: Start →Programs →MS-DOS Prompt
Windows Me: Start→Programs → Accessories→MS-DOS Prompt
Windows 2000: Start→Programs →Accessories→Command Prompt
Windows XP: Start→All Programs →Accessories→Command Prompt
2
After the Command Prompt window has opened, enter the “ipconfig/
all” command.
C:\> ipconfig /all [ENTER]
Troubleshooting
“ipconfig” example
C:\> ipconfig /?
C:\> ipconfig
C:\> ipconfig /all
Displays how to use ipconfig.exe
Displays the set IP address.
Displays all information related to the set TCP/IP
-55
• If the value of the received IP address is 169.254.XXX.XXX
The reception of the IP address from the DHCP server has failed.
When the DHCP server function fails to receive an address, the address
169.254.XXX.XXX is automatically allocated.
(The XXX.XXX part of the IP address is randomly selected).
1 The projector (on the DHCP server) is not active before Windows restarts.
2 Check that the Wireless LAN settings and the driver are properly set.
3 Check that the projector’s DHCP server function is properly set.
If the above is in order, restart the computer.
• Using the “PING” command, you can check if the “TCP/IP” is operating
correctly. You can also check if the IP address is set.
1
Open Command Prompt (MS-DOS Prompt).
Windows 98/98SE: Start →Programs → MS-DOS Prompt
Windows Me: Start→Programs →Accessories→MS-DOS Prompt
Windows 2000: Start→Programs →Accessories→Command Prompt
Windows XP: Start→All Programs →Accessories→Command Prompt
2
After the Command Prompt window has opened, enter the “PING”
command.
Example:
C:\> ping XXX.XXX.XXX.XXX
XXX.XXX.XXX.XXX is the Host IP Address.
3
The following will be displayed if a successful connection is made.
Example: When the Host IP Address 192.168.150.150
The screen image may appear slightly different depending on the operating
system.
4
If a connection cannot be made, “Request timed out” is displayed.
Recheck the wireless LAN settings and the network settings.
If all else fails, consult your Network Administrator.
5
-56
To return to the Windows desktop, type “exit”, and then press the
Enter key.
Color PowerPoint data is converted to monochrome data
Open the PowerPoint file you want to convert in PowerPoint, select “Options” from the
“Tools” menu, and check the following in the “Print” tab.
1
If “Use the most recently used print settings” is set, change to “Use the
following default print settings”.
2
Clear the check box next to “Grayscale” and “Pure black and white”.
3
Click “OK”, close the “Options” dialog box and save the file.
After carrying out the above procedure, try again to convert the PowerPoint file.
Troubleshooting
-57
For SHARP Assistance
If you encounter any problems during operation of this software, first refer to the “Troubleshooting” section on page 54. If this operation manual does not answer your question, please
contact the SHARP Service departments listed below.
U.S.A.
Sharp Electronics Corporation
1-888-GO-SHARP (1-888-467-4277)
[email protected]
http://www.sharplcd.com
Canada
Sharp Electronics of Canada Ltd.
(905) 568-7140
http://www.sharp.ca
Mexico
Latin America
Sharp Electronics Corporation
Mexico Branch
(525) 716-9000
http://www.sharp.com.mx
Sharp Electronics Corp. Latin
American Group
(305) 264-2277
[email protected]
http://www.siempresharp.com
Germany
Sharp Electronics (Europe) GMBH
01805-234675
http://www.sharp.de
U.K.
Sharp Electronics (U.K.) Ltd.
0161-205-2333
[email protected]
http://www.sharp.co.uk
Italy
Sharp Electronics (Italy) S.P.A.
(39) 02-89595-1
http://www.sharp.it
France
Sharp Electronics France
01 49 90 35 40
[email protected]
http://www.sharp.fr
Spain
Sharp Electronica Espana, S.A.
93 5819700
[email protected]
http://www.sharp.es
Switzerland
Sharp Electronics (Schweiz) AG
0041 1 846 63 11
[email protected]
http://www.sharp.ch
Sweden
Sharp Electronics ( Nordic ) AB
(46) 8 6343600
[email protected]
http://www.sharp.se
-58
Austria
Sharp Electronics Austria
(Ges.m.b.H.)
0043 1 727 19 123
[email protected]
http://www.sharp.at
Australia
Sharp Corporation of Australia Pty.
Ltd.
1300-135-022
http://www.sharp.net.au
New Zealand
Sharp Corporation of New Zealand
(09) 634-2059, (09) 636-6972
http://www.sharpnz.co.nz
Singapore
Sharp-Roxy Sales (S) Pte. Ltd.
65-226-6556
[email protected]
http://www.sharp.com.sg
Hong Kong
Sharp-Roxy (HK) Ltd.
(852) 2410-2623
[email protected]
http://www.sharp.com.hk
Malaysia
Sharp-Roxy Sales & Service Co.
(60) 3-5125678
U.A.E.
Sharp Middle East Fze
971-4-81-5311
[email protected]
Thailand
Sharp Thebnakorn Co. Ltd.
02-236-0170
[email protected]
http://www.sharp-th.com
Korea
Sharp Electronics Incorporated of
Korea
(82) 2-3660-2002
[email protected]
http://www.sharp-korea.co.kr
India
Sharp Business Systems (India)
Limited
(91) 11- 6431313
[email protected]
Glossary
Access point
Device used for relaying transmissions when using
the Infrastructure mode.
Can be used for relaying transmissions between
wireless LAN devices and wired LAN devices as
well as relaying transmissions between wireless
LAN devices.
AdHoc (peer to peer) mode
A type of wireless transmission.
Mode used for exchanging data between devices
that have Wireless LAN PC Cards installed without
going via an access point.
BMP
Short for Bitmap. One type of image file format
used normally in a Windows environment. This
software supports only non-compressed file types
only.
Channel
Wireless LAN devices that comply with
IEEE802.11b transmit using a specified wireless
channel from wireless channels 1 to 14.
(This device has 11 channels (1 to 11) that can be
used. The channels that can be used vary with
the country or region.)
It may be possible to use the same channel on a
different network, however, the transmission speed
may be reduced.
It is recommended to use a different channel.
DHCP (Dynamic Host Configuration
Protocol)
DHCP client function
This protocol allows for automatically receiving IP
addresses from DHCP servers connected to the
same network.
This function is found in most computers. If the
computer is connected to the DHCP server on the
network, it is also possible to automatically get an
IP address for the computer.
Device which relays transmissions between
different networks.
IEEE802.11b
One of the international standards for wireless
LANs. Allows for wireless transmissions using a
wireless frequency of 2.4Ghz and a maximum
speed of 11Mbps.
Infrastructure (access point) mode
A type of wireless transmission.
Mode used for exchanging data between devices
connected to wired LANs and devices connected
to wireless LANs.
IP Address
When configuring a network using TCP/IP protocol,
every device must have a number assigned to it.
This number is called an IP address.
An IP address is necessary to avoid duplicates or
overlapping on the network.
JPEG
Short for Joint Photographic Experts Group. One
type of widely used image file format.
LAN (Local Area Network)
A network built in a small self-contained network.
MAC Address (Media Access Control
Address)
A fixed number assigned to individual network
devices.
It is assigned by the manufacturer at the time of
shipping and does not overlap with other devices.
Maximum Assign Number
The maximum number of IP addresses that the
DHCP server can automatically assign.
Subnet Mask
A parameter used on a TCP/IP network, that is used
when an IP address is separated into network
address and host address.
DHCP server
This server allows automatically to assign IP
addresses, subnet masks, and gateway
addresses to devices connected on the network.
In using this function, a computer connected to
the DHCP server via a wireless connection can
also automatically receive IP addresses.
-59
Troubleshooting
When setting up a network using TCP/IP, an IP
address must be assigned to each device that will
be connected to the network. This protocol will
perform the above procedure automatically.
Gateway
SS ID (Service Set Identification)
An ID (extension) for grouping multiple wireless
LAN devices. An SS ID equal to other devices must
be set to communicate with them.
A maximum of 32 single-byte Alphanumeric
characters can be used.
Letters are categorized as capital and lower case.
TCP/IP (Transmission Control Protocol /
Internet Protocol)
Standard protocol for using the Internet or LANs.
TIFF
Short for Tagged Image File Format. One type of
image file format used in digital cameras. This
software supports only non-compressed RGB file
types only.
VQ
Short for Vector Quantization. One type of image
file format. When compared to JPEG image
compression, this format allows for compression
while maintaining high image quality. When
“Compressed” has been selected in
“Compresssion” in the “Slide Manager”, the slide
will be saved as a VQ file.
WEP (Wired Equivalent Privacy)
A method of encrypting data when sending over
wireless transmissions.
A shared key of 64 bits or 128 bits can be used.
-60
Index
All at Once .................................................. 38
Auto Scan ................................................... 38
BMP................................................. 31, 39, 59
Channel (Ch) ............................................... 22
Communication Mode ................................ 22
Compression Setting .................................. 40
Creating slide show files............................. 39
Destination projector ............................. 28,36
DHCP Server ............................................... 22
Display Type ............................................... 38
Encryption(WEP) ......................................... 22
Gateway ...................................................... 22
Hiding slides ............................................... 45
Image Transfer ......................................... 2,26
Installing ........................................................ 5
IP address .............................................. 22,36
JPEG ............................................... 31, 39, 59
MAC address .............................................. 36
Model/Resolution ........................................ 40
Network Selector ..................................... 2,17
New ............................................................. 21
Number of maximum addresses
that can be assigned ............................. 20
Option ................................................... 28, 37
Play Mode ................................................... 41
Preview area ............................................... 42
Profile .......................................................... 18
Projector Name ........................................... 36
Property area .............................................. 42
Quality .................................................... 28,36
Quick Connection ....................................... 19
Registering New Network Settings ............. 21
Repeat ........................................................ 41
Scan Projector ............................................ 36
Single Transfer Key ............................... 31,38
Slide Manager .......................................... 2,39
Slide Show file ............................................ 42
SS ID ........................................................... 22
Subnet Mask ............................................... 22
TCP/IP ................................................... 18, 22
Thumbnail display area .............................. 42
TIFF ................................................. 31, 39, 60
Transmit/Stop Key ................................. 30,37
Image Advance .......................................... 41
Uninstalling ................................................. 15
Virtual Printer .......................................... 2, 49
VQ ................................................... 31, 39, 60
WEP ............................................................. 22
Wep key ...................................................... 22
Wipe Down .................................................. 38
Wireless LAN .............................................. 22
Troubleshooting
-61
SHARP CORPORATION