1
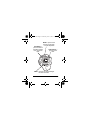
63-5017.fm Page 1 Wednesday, June 13, 2001 7:18 AM Please read before using this equipment. Owner’s Manual Multifunction LCD Stopwatch 63-5017.fm Page 2 Wednesday, June 13, 2001 7:18 AM Features Your RadioShack Multifunction Stopwatch is much more than an ordinary timer. It is an exceptionally versatile instrument that performs many different functions. Caution: The stopwatch is water resistant to a depth of about 164 feet (50 meters), but it is not waterproof. The supplied nylon cord lets you wear the stopwatch around your neck. Press the button on the clasp and slide it up or down to adjust the cord to the desired length. Press the tabs on the cord’s connector to remove the cord from the watch. © 2001 RadioShack Corporation. All Rights Reserved. RadioShack and RadioShack.com are trademarks used by RadioShack Corporation. 2 Features 63-5017.fm Page 3 Wednesday, June 13, 2001 7:18 AM MODE — press to view the time, set an alarm, or run the stopwatch. LAP/RESET — press to confirm a selection, reset the timer, or split the timer. START/STOP — press to run the timer. LIGHT — press to turn on the backlight for about 3 seconds. Features 3 63-5017.fm Page 4 Wednesday, June 13, 2001 7:18 AM Operation SETTING THE TIME/DATE Note: If you do not press a button for 30 seconds, the stopwatch exits setup and stores the new settings. 1. Repeatedly press MODE until J?C;, then the time display appears. 2. Hold down LAP/RESET until I;J appears. The second digits flash. 3. Press START/STOP to reset the second digits to &&. 4. Press MODE. The minute digits flash. 4 Operation 63-5017.fm Page 5 Wednesday, June 13, 2001 7:18 AM 5. Repeatedly press or hold down START/STOP to select the desired minutes. 6. Press MODE. The hour digits flash. 7. Repeatedly press or hold down START/STOP to select the desired hour. Note: Be sure to select an AM or PM hour if the stopwatch is set to the 12hour time display format. appears at the top left of the display when PM is selected. 8. Repeat Steps 6–7 to set the desired date, month, day of the week, 12- or 24-hour format, and date display format. Operation 5 63-5017.fm Page 6 Wednesday, June 13, 2001 7:18 AM Notes: • When setting the date, you can select the date to appear in either the M–D (month–date) or D–M (date–month) format. • There are always 29 days displayed for the month of February. If there are only 28 days in February for the current year, you must manually change the date from ( (/ (February 29) to )' (March 1). • If you need to set a date later than the last day of the displayed month (for example, if you want to set the date to August 31 and the month is set to , for June), you must set the current month first, then the day. 6 Operation 63-5017.fm Page 7 Wednesday, June 13, 2001 7:18 AM 9. Press LAP/RESET at any time to confirm the settings and return to the time display. The stopwatch automatically displays the time. When you are using the daily alarm, the time reappears if no button is pressed for about 2 minutes. To view the calendar, with the time displayed, press START/STOP. :7J;, then the month and date appear for about 5 seconds. Then the time reappears. SETTING THE DAILY ALARM TIME 1. Repeatedly press MODE until 7BC, then the last set alarm time appears. 2. Hold down LAP/RESET until I;J appears. The minute digits flash. Operation 7 63-5017.fm Page 8 Wednesday, June 13, 2001 7:18 AM 3. Repeatedly press or hold down START/STOP to set the desired minute, then press MODE. The hour digits flash. 4. Repeatedly press or hold down START/STOP to set the desired hour. Note: Be sure to select an AM or PM hour if the stopwatch is set to the 12hour time display format. appears at the top left of the display when PM is selected. 5. Press LAP/RESET to store the setting. 6. To return to the time display, repeatedly press MODE, or wait about 2 minutes. 8 Operation 63-5017.fm Page 9 Wednesday, June 13, 2001 7:18 AM To check the set alarm time, repeatedly press MODE until 7BC then the set alarm time appears. TURNING THE DAILY/ HOURLY ALARM ON/OFF 1. Press MODE until 7BC, then the set alarm time appears. 2. Repeatedly press START/STOP to turn the alarms on or off. • appears when the alarm is turned on. • appears when the hourly chime is turned on. At the set alarm time, the stopwatch beeps for 20 seconds. Press any button except LIGHT to silence the alarm sooner. Operation 9 63-5017.fm Page 10 Wednesday, June 13, 2001 7:18 AM When the hourly chime is turned on, the stopwatch sounds two beeps at the beginning of each hour. USING THE STOPWATCH 1. From the time display, press MODE twice to view the stopwatch display. IJM then the last reading of the stopwatch appear. 2. Press LAP/RESET to reset the counter to &&0&&. The stopwatch beeps. If you do not reset the counter, the stopwatch continues timing from the last reading. 3. Press START/STOP to start timing. The stopwatch beeps and IJM appears at the top left of the display 10 Operation 63-5017.fm Page 11 Wednesday, June 13, 2001 7:18 AM (even if the time or alarm time is displayed). When the stopwatch reaches 59 minutes, 59.99 seconds, it restarts from zero. 4. To stop timing, press START/STOP. IJM disappears. Lap Timer The stopwatch is equipped with a split function for you to keep track of individual accumulated time. 1. While the stopwatch is running, press LAP/RESET to check the accumulated time at that instant. The stopwatch beeps and IFB?J appears below IJM, at the top left of the display. The timer continues running. Operation 11 63-5017.fm Page 12 Wednesday, June 13, 2001 7:18 AM 2. Press LAP/RESET again to return to the actively running view. The stopwatch beeps and IFB?J disappears. Note: If you press START/STOP while IFB?J appears, the timer stops and the total accumulated time appears. Care Use and store the stopwatch only in normal temperature environments. Handle the stopwatch carefully; do not drop it. Keep the stopwatch away from dust and dirt, and wipe it with a damp cloth occasionally to keep it looking new. Modifying or tampering with the stopwatch’s internal components can cause a malfunction and might invalidate its war12 Care 63-5017.fm Page 13 Wednesday, June 13, 2001 7:18 AM ranty. If your stopwatch is not performing as it should, take it to your local RadioShack store for assistance. INSTALLING THE BATTERY Your stopwatch requires one CR2032 3volt lithium button-cell battery (supplied) for power. For the best performance and longest life, we recommend a RadioShack battery. Warning: Dispose of old batteries promptly and properly. Do not burn or bury them. Caution: Use only a fresh battery of the required size and recommended type. Note: Removing the battery automatically clears all settings. Care 13 63-5017.fm Page 14 Wednesday, June 13, 2001 7:18 AM 1. With a Phillips screwdriver, remove the screws from the back of the stopwatch, then lift off the back. 2. Remove the screws on each side of the metal plate and lift it off. 3. Replace the old battery with a new battery, positive (+) side up. 4. Replace the metal plate and secure it with the screws. 5. Press the RESET pad to reset the stopwatch. All the display characters appear on the display for about 2 seconds. J?C;, then '(0&& appears. Note: After replacing the battery, you must reset the stopwatch to resume operation. 14 Care 63-5017.fm Page 15 Wednesday, June 13, 2001 7:18 AM 6. Replace the back of the stopwatch and secure it with the screws. 7. Re-enter the correct time, date, month, and day of week. When the stopwatch stops operating properly or the display dims, replace the battery. Warning: Keep button-cell batteries away from children. Swallowing a buttoncell battery can be fatal. Care 15 63-5017.fm Page 16 Wednesday, June 13, 2001 7:18 AM Limited One-Year Warranty This product is warranted by RadioShack against manufacturing defects in material and workmanship under normal use for one (1) year from the date of purchase from RadioShack company-owned stores and authorized RadioShack franchisees and dealers. EXCEPT AS PROVIDED HEREIN, RadioShack MAKES NO EXPRESS WARRANTIES AND ANY IMPLIED WARRANTIES, INCLUDING THOSE OF MERCHANTABILITY AND FITNESS FOR A PARTICULAR PURPOSE, ARE LIMITED IN DURATION TO THE DURATION OF THE WRITTEN LIMITED WARRANTIES CONTAINED HEREIN. EXCEPT AS PROVIDED HEREIN, RadioShack SHALL HAVE NO LIABILITY OR RESPONSIBILITY TO CUSTOMER OR ANY OTHER PERSON OR ENTITY WITH RESPECT TO ANY LIABILITY, LOSS OR DAMAGE CAUSED DIRECTLY OR INDIRECTLY BY USE OR PERFORMANCE OF THE PRODUCT OR ARISING OUT OF ANY BREACH OF THIS WARRANTY, INCLUDING, BUT NOT LIMITED TO, ANY DAMAGES RESULTING FROM INCONVENIENCE, LOSS OF TIME, DATA, PROPERTY, REVENUE, OR PROFIT OR ANY INDIRECT, SPECIAL, INCIDENTAL, OR CONSEQUENTIAL DAMAGES, EVEN IF RadioShack HAS BEEN ADVISED OF THE POSSIBILITY OF SUCH DAMAGES. Some states do not allow limitations on how long an implied warranty lasts or the exclusion or limitation of incidental or consequential damages, so the above limitations or exclusions may not apply to you. In the event of a product defect during the warranty period, take the product and the RadioShack sales receipt as proof of purchase date to any RadioShack store. RadioShack will, at its option, unless otherwise provided by law: (a) correct the defect by product repair without charge for parts and labor; (b) replace the product with one of the same or similar design; or (c) refund the purchase price. All replaced parts and products, and products on which a refund is made, become the property of RadioShack. New or reconditioned parts and products may be used in the performance of warranty service. Repaired or replaced parts and products are warranted for the remainder of the original warranty period. You will be charged for repair or replacement of the product made after the expiration of the warranty period. This warranty does not cover: (a) damage or failure caused by or attributable to acts of God, abuse, accident, misuse, improper or abnormal usage, failure to follow instructions, improper installation or maintenance, alteration, lightning or other incidence of excess voltage or current; (b) any repairs other than those provided by a RadioShack Authorized Service Facility; (c) consumables such as fuses or batteries; (d) cosmetic damage; (e) transportation, shipping or insurance costs; or (f) costs of product removal, installation, set-up service adjustment or reinstallation. This warranty gives you specific legal rights, and you may also have other rights which vary from state to state. RadioShack Customer Relations, 200 Taylor Street, 6th Floor, Fort Worth, TX 76102 We Service What We Sell RadioShack Corporation Fort Worth, Texas 76102 12/99 63-5017 06A01 Printed in China