1
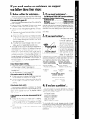
Install
properly..
Install defrost drain cover...
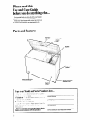
I. Remove cover from literature package
2. Check drawing on front cover for placement
Clean it . ..
Clean your freezer before
using It See cleaning
rnstructrons on page 6
1 Check the strength of the floor It should hold the
weight of a fully loaded freezer
2 Pick a safe place,
indoors,
away from inflammables
such as gasoline.
3 Allow at least 3 Inches (7.5 cm) arr space on all
sides of freezer and 2 inches (5 cm) at back. Leave
room at top for lid to open all the way.
4. It should not be necessary to remove the Ird during
installation If, for any reason, the hinges need adjustment, see your authorized WHIRLPOOL dealer.
5. Do not cover lhe treezer with items such as
blankets,
sheets, tablecloths,
etc.
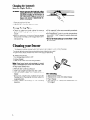
Plug it in...
3-prong grounding
type wall receptacle
Retaining
Clip
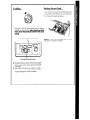
Level chest freezer.. .
from end to end and front to back so that the lid will
seal properly
Check
with level
Freezer /
Power Plug
grounding
Recommended
Remove sales labels...
Remove the Consumer Buy Guide label and any
inside labels before usrng the freezer
To remove any remaining
glue:
1 Rub briskly wrth thumb to make a ball. then
remove
OR
2 Soak area with drshwashrng detergent solution (1
teaspoon detergent
In 1 quart warm water] before removing glue as described
In step 1
DO NOT USE rubbing
alcohol
or flammable
or
toxic solvents, such as acetone,
gasoline,
carbon tetrachloride,
etc. These can damage
the
material.
NOTE: DO NOT REMOVE ihe Care 81 Service label
on Inside Ild or Tech Sheet on back of cabinet.
Grounding
plug
Method
A 115 Volt, 60 Hz, AC only 15 or 20 ampere fused
and properly
grounded
electrIcal
supply is requrred. It IS recommended
that a separate circuit
servtng only this dpplrance
be provided
Do not use an extension
cord. Use a receptacle which cannot be turned off with a switch
or pull chain. See rndivrdual electrrcal
requirements and grounding
instruction sheet In your Irterature package