1
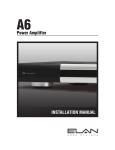
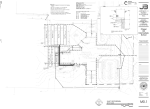
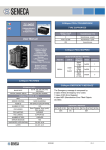
V85 Component Video Controller INSTALLATION MANUAL ELAN HOME V85 INSTALLATION MANUAL SYSTEMS Preface Purpose of This Manual This manual provides step-by-step installation instructions and connection examples, along with basic user information for installation and ongoing use of the V85 Component Video Controller. This manual is written for the installer of this equipment. Organization The following information is contained in this manual: Safety Information Provides a comprehensive list of safety practices and procedures allowing for the safe installation and operation of ELAN Home Systems’ V85 Component Video Controller. V85 Introduction Provides an introduction to the V85 Component Video Controller, along with system features to include Front and Rear panel controls, indicators and connections, along with a short description of each. V85 System Design Overview Provides a system design application overview of the V85 Component Video Controller for use in video applications. V85 Connections Provides a description of V85 Component Video Controller connections including connections made with ELAN Multi-Room Systems and direct connections to the V85 Componenet Video Controller from other components. Troubleshooting Provides troubleshooting tables to help fix common discrepancies that may be associated with the V85 Component Video Controller. CVRM Connections Appendix A provides specifications for connecting the CVRM Component Video Receive Module to the V85's Cat-5 Video Outputs. Rack Mounting Appendix B provides specifications for Rack Mounting of the V85 Component Video Controller using the included rack mount brackets. Specifications Appendix C provides equipment specifications for the V85 Component Video Controller. © ELAN Home Systems 2009 • All rights reserved. Page I V85 INSTALLATION MANUAL ELAN HOME SYSTEMS WARNING RISK OF ELECTRIC SHOCK DO NOT OPEN! CAUTION: TO REDUCE THE RISK OF ELECTRIC SHOCK, DO NOT REMOVE COVER (OR BACK). NO USER SERVICEABLE PARTS INSIDE. REFER SERVICING TO QUALIFIED SERVICE PERSONNEL. CAUTION: RISK OF EXPLOSION IF BATTERY IS REPLACED BY AN INCORRECT TYPE. DISPOSE OF USED BATTERIES ACCORDING TO THE INSTRUCTIONS. The lightning flash with arrowhead symbol within an equilateral triangle is intended to alert the user to the presence of uninsulated "dangerous voltage" within the product's enclosure that may be of sufficient magnitude to constitute a risk of electric shock to persons. The exclamation point within an equilateral triangle is intended to alert the user to the presence of important operating and maintenance (servicing) instruction in the literature accompanying the appliance. WARNING: TO REDUCE THE RISK OF FIRE OR SHOCK, DO NOT EXPOSE THIS APPLIANCE TO RAIN OR MOISTURE. CAUTION IMPORTANT SAFETY INFORMATION Read Information—All the safety and operating information should be read before the appliance is operated. Follow Information—All operating and use information should be followed. Retain Information—The safety and operating information should be retained for future reference. Heed Warnings—All warnings on the appliance and in the operating instructions should be heeded. Wall Mounting—Mounting of this appliance should be done only by an authorized installer. Ventilation—The appliances should be situated so that their location or position does not interfere with their proper ventilation. These appliances should never be placed near or over a radiator or heat register. These appliances should not be placed in a built-in installation such as a bookcase or cabinet that may impede the flow of air through the ventilation openings. Non-Use Periods—Appliances that are left unattended and unused for long periods of time should be de-energized. Power Sources—The appliances should be connected to a power supply only of the type described in the operating instructions or as marked on each appliance. If you are not sure of the type of power supply to your home, consult your authorized ELAN dealer or local power company. Grounding or Polarization—Do not defeat the safety purpose of the polarized or grounding-type plug. A polarized plug has two blades with one blade wider than the other blade. A grounding type plug has two blades and a third grounding prong. The polarized wide blade and the third prong are provided for your safety. If the provided plug does not fit your outlet, consult an electrician for replacement of the obsolete outlet. Water and Moisture—To reduce the risk of electric shock or fire, these appliances should not be used near water––for example, near a bathtub, washbowl, kitchen sink, laundry tub, in a wet basement, or near a swimming pool. Power Cord Protection—Protect the power cord from being walked on or pinched particularly at plugs, convenience receptacles and the point where they exit from the apparatus. Telephones—Avoid using a telephone (other than a cordless type) during an electrical storm. There may be a remote risk of electrical shock from lightning. Do not use a telephone to report a gas leak if the leak is in the vicinity of the ELAN electronic equipment because of risk of fire or explosion. Page II © ELAN Home Systems 2009 • All rights reserved. ELAN HOME V85 INSTALLATION MANUAL SYSTEMS Cleaning—Unplug the apparatus from the power outlet before cleaning. Use only a dry cloth to clean the apparatus. Power Lines—An outdoor antenna should be located away from power lines. When installing an outside antenna system, extreme care should be taken to avoid touching power lines or circuits, as contact with them may be fatal. Outdoor Antenna Grounding—If an outside antenna or cable system Grounding Diagram is connected to these audio products, be sure the antenna or cable system is grounded so as to provide some protection against voltage surges and built-up static charges. Section 810 of the U.S. National Electrical Code, and Section 54 of the Canadian Electrical Code, provide information with respect to proper grounding of the mast and supporting structure, grounding of the lead-in wire to an antenna discharge unit, size of grounding conductors, location of antenna-discharge unit, connection to grounding electrodes, and requirements for the grounding electrode. See the grounding diagram (right). ANTENNA LEAD-IN WIRE GROUND CLAMPS ANTENNA LEAD-IN WIRE (CEC SECTION 54-200) (NEC SECTION 810-20) ELECTRIC SERVICE EQUIPMENT Overloading—Do not overload wall outlets and extension cords, as this could GROUNDING CONDUCTORS (CEC SECTION 54-200) (NEC SECTION 810-21) GROUND CLAMPS result in fire or electric shock. NEC - NATIONAL ELECTRICAL CODE CEC - CANADIAN ELECTRICAL CODE Object and Liquid Entry—Never insert objects of any kind through the POWER SERVICE GROUNDING ELECTRODE SYSTEM (CEC SECTION 10-700) (NEC ARTICLE 250, PART H) openings of these appliances, as they may touch dangerous voltage points or short-out parts that could result in a fire or electric shock. Care should be taken so that objects do not fall and liquids are not spilled into the appliance through openings in the enclosure. Servicing—Do not attempt to service these appliances yourself, as opening or removing covers may expose you to dangerous voltage or other hazards. Refer all servicing to qualified service personnel. Damage Requiring Service—These appliances should be serviced by qualified service personnel when: • • • • • A power supply connection or a plug has been damaged or If liquid has been spilled into the appliance or objects have fallen into the appliance or The appliance has been exposed to water or moisture or The appliance does not appear to operate normally or exhibits a marked change in performance or The appliance has been dropped or the enclosure damaged. Replacement Parts—When replacement parts are required, be sure the service technician has used replacement parts specified by the manufacturer or that have the same characteristics as the original part. Unauthorized substitutions may result in fire, electric shock, or other hazards. The Master Control Unit battery should be replaced only after turning the power off and only by an authorized installer. Safety Check—Upon completion of any service or repairs to this audio product, ask the service technician to perform safety checks to determine that the audio product is in proper operating condition. Lightning Storms—Unplug this apparatus during lightning storms or when unused for long periods of time. Attachments and Accessories—Use only attachments/accessories specified by the manufacturer. Cart, Stand, Tripod, Bracket or Table—Use only with a cart, stand, tripod, bracket or table specified by the manufacturer, or sold with the apparatus. When a cart is used, use caution when moving the cart/apparatus combination to avoid injury from tip over. Disconnect Device—Where the mains plug or an appliance coupler is used as the disconnect device, the disconnect device shall remain operable. C US ® © ELAN Home Systems 2009 • All rights reserved. Page III V85 INSTALLATION MANUAL Page IV ELAN HOME SYSTEMS © ELAN Home Systems 2009 • All rights reserved. ELAN HOME SYSTEMS V85 INSTALLATION MANUAL Table of Contents Purpose of This Manual ....................................................................................................................................... I Organization ............................................................................................................................................................ I Safety Information ................................................................................................................................................ II Chapter 1: Introduction Introduction ............................................................................................................................................................ 1 V85 Features ........................................................................................................................................................... 1 V85 Functions & Indicators .................................................................................................................................. 2 Front Panel .......................................................................................................................................................... 2 Rear Panel .......................................................................................................................................................... 3 Chapter 2: V85 System Design Overview System Design ...................................................................................................................................................... 4 Pre-Wire .............................................................................................................................................................. 5 Applications ........................................................................................................................................................... 5 Stand-Alone Applications ..................................................................................................................................... 5 Basic Stand-Alone System .................................................................................................................................... 5 Multi-Chassis Stand-Alone System .......................................................................................................................... 6 ELAN Multi-Room Controller-Based Applications .................................................................................................. 7 S66A Application ................................................................................................................................................. 7 S86A or S86P Application ...................................................................................................................................... 8 S128P Application ............................................................................................................................................... 9 Chapter 3: V85 Connections Component Video Outputs ................................................................................................................................. 10 Cat-5 Video Outputs to CVRM Module ................................................................................................................10 Control Connections - IR .................................................................................................................................... 10 IR IN Port .........................................................................................................................................................11 IR OUT Port ..................................................................................................................................................... 12 Control Connections - RS-232 ............................................................................................................................ 13 RS-232 ............................................................................................................................................................ 13 Multi-Chassis RS-232 ......................................................................................................................................... 13 AC Power Connector ..........................................................................................................................................14 Chapter 4: Operations and Settings DIP Switch Settings ............................................................................................................................................... 15 Unit ID Settings ................................................................................................................................................. 15 Front Panel ID Designations ................................................................................................................................. 15 BAUD Rate Settings .......................................................................................................................................... 16 IR Power ......................................................................................................................................................... 16 Chapter 5: Programming Control Methods ................................................................................................................................................... 17 RS232 Command List ............................................................................................................................................ 19 Chapter 6: Troubleshooting ........................................................................................................................................ 21 Appendix A: CVRM Component Video Receive Module .................................................................................... 24 Appendix B: Rack Mounting ................................................................................................................................... 26 Appendix C: Specifications ...................................................................................................................................... 27 Warranty ....................................................................................................................................................... Back Page © ELAN Home Systems 2009 • All rights reserved. Page V V85 INSTALLATION MANUAL ELAN HOME SYSTEMS Items in package: • V85 Component Video Switcher • Power Cord • Installation Manual • Rack Mount Hardware V85 Accessories: • CVRM - Component Video Receive Module • AVRM - Audio Video Receive Module • PV12 - Video Precision Panel Page VI © ELAN Home Systems 2009 • All rights reserved. ELAN HOME V85 INSTALLATION MANUAL SYSTEMS Chapter 1: Introduction The ELAN V85 Component Video Controller is designed to provide a reliable, affordable solution for multi-room systems requiring up to eight component video sources to any of eight locations and can be expanded to 32 locations with additional V85 units. The ELAN Story Located in Lexington, KY, USA, ELAN Home Systems has designed innovative multi-room audio/video systems since 1989. ELAN was the first to integrate music, intercom and TV distribution features that used the homeowner's stereos, telephones, and televisions to create the whole-house entertainment experience. These systems allow people to move freely from room to room, controlling centrally located equipment with ease. With a current catalog of over 600 items and having been honored with many prestigous industry awards, ELAN is considered by many to be the leader in whole-house distributed audio/video systems. V85 Features • 8 X 8 Component Video Controller with RCA and Cat-5 (RJ-45) video outputs • Cat-5 video outputs allow for extended wire runs (Up to 500 ft) when using ELAN's Component Video Receive Modules (CVRM), sold separately • Component and Cat-5 video outputs can be used simultaneously for 16 total outputs per chassis* • Expandable to 8 X 32 with additional V85 units (Or 8 x 64 when using Cat-5 Outputs*) • RS-232 Controllable • IR Controllable Available in 240 Volt Version cTUVus Certified, CE®, and C-tick Safety Concerns Use only grounded outlets when powering this product. Making any modification to the power cord could cause unsafe operation and will void the manufacturer’s warranty. * The video of each Cat-5 output mirrors its corresponding component RCA video output. For example, Cat-5 video output 1 will output the same video signal as component video output 1, and so on. VIA!NET EXT IR TO SENSE INPUTS 1 2 ELAN Precision Panels save time and make sense out of complex wiring jobs! SS/SC4 3 USE STEREO 3.5mm PLUGS ONLY 4 5 6 1 2 3 4 5 6 7 8 ZONE ZONE 1 5 TRIGGERS ZONE 2 ZONE POWER ZONE 3 ZONE 4 + -- 16VDC / 10A 6 ZONE 7 ZONE 8 16VDC / 4A 16VDC/1.5A ® © ELAN Home Systems 2009 • All rights reserved. Page 1 V85 INSTALLATION MANUAL ELAN HOME SYSTEMS V85 Functions and Indicators 1 2 3 4 Figure 1-1: V85 Front Panel Table 1-1:Front Panel Item Function 1 OUTPUT CHANNEL INDICATOR 2 INPUT CHANNEL INDICATOR 3 IR ACTIVITY LED 4 POWER LED Page 2 © ELAN Home Systems 2009 • All rights reserved. ELAN HOME V85 INSTALLATION MANUAL SYSTEMS V85 Rear 1 2 3 10 4 5 6 9 7 8 Figure 1-2: V85 Rear Panel Table 1-2: Rear Panel Item Function 1 POWER SWITCH 2 IR IN/OUT 3 RS232 IN/OUT 4 VIA-NET IN/OUT 5 DIP SWITCHES (UNIT ID, BAUD RATE, IR POWER) 6 CAT-5 VIDEO OUTPUTS 7 COMPONENT VIDEO INPUTS 8 COMPONENT VIDEO LOOP OUTPUTS 9 COMPONENT VIDEO ZONE OUTPUTS 10 POWER CORD CONNECTOR/FUSE (REPLACE WITH SPECIFIED TYPE) © ELAN Home Systems 2009 • All rights reserved. Page 3 V85 INSTALLATION MANUAL ELAN HOME SYSTEMS Chapter 2. System Design & Applications System Design The first step to a good design is to map the system. It is advisable to mark up a copy of the house floor plan with speaker, keypad, touch panel, volume control, and equipment locations etc. Make sure that all locations are decided upon before pre-wiring so that all necessary wiring and installation hardware is in place. This unit will be interfacing with other components such as multi-room controllers, source components, communications controllers, serial controllers, and user interfaces, so it is essential that ALL system components are accounted for prior to the pre-wire stage. Secondly, make a detailed list of all components. Include source equipment, keypads, touch panels, volume controls, amplifiers, and communications gear. Be sure to include necessary electrical boxes, structured wiring enclosures, telephone lines, rough-in brackets, patch cords, power supplies, etc. ELAN Touch Panels V85 S86A Figure 2-1: System Design VIA!NET EXT IR TO SENSE INPUTS 1 2 ELAN Precision Panels save time and make sense out of complex wiring jobs! SS/SC4 3 USE STEREO 3.5mm PLUGS ONLY 4 5 6 1 2 3 4 5 6 7 8 ZONE ZONE 1 5 TRIGGERS ZONE 2 ZONE POWER ZONE 3 ZONE 4 + -- 16VDC / 10A 6 ZONE 7 ZONE 8 16VDC / 4A 16VDC/1.5A ® Page 4 © ELAN Home Systems 2009 • All rights reserved. ELAN HOME V85 INSTALLATION MANUAL SYSTEMS Pre-Wire V85 WIRING CONSIDERATIONS • Component Video Outputs Component/RCA Video Patch Cables • Cat-5 Video Outputs CAT5 RJ45 to RJ45 • RS232 DB9 Cables • IR 2 Conductor Wire w/ 3.5mm mono connector This section describes typical applications using the V85 in video distribution installations. These are all basic in nature and should be used for guideline purposes only. Each application can be augmented as needed for individual circumstances. This section is for overall design purposes. Please see Chapter 3: Connections for specific wiring configurations. Stand-Alone Applications Basic Stand-Alone System The diagram below shows a basic stand-alone system that utilizes the V85 to switch component video sources to televisions located throughout the home. A stand-alone system is one in which an ELAN multi-room preamp controller is not used. Note: When using the V85's Cat-5 video outputs, the total number of outputs can be expanded to 16 using one chassis. Be aware, however, that the video of each Cat-5 output mirrors its corresponding component RCA video output. For example Cat-5 video output 1 will output the same video signal as component video output 1, and so on. Component Video Source Local A/V Receiver Y PB DIG AUD DIGITAL AUDIO DIGITAL AUDIO INPUT 1 INPUT 2 PR Component Video Cables V85 TV x8 Digital Audio Cable Component Video Cables Cat-5 Cable Component Video TV x8 Component Video CVRM Y PB PR Y PB PR Figure 2-2: Stand-Alone Component Switching © ELAN Home Systems 2009 • All rights reserved. Page 5 V85 INSTALLATION MANUAL ELAN HOME SYSTEMS Multi-Chassis Stand-Alone System This application shows four V85s linked together to form an 8 x 32 component video matrix. Verify that the UNIT ID DIP switches are correctly set for each unit to ensure proper switching. Note: When using the V85's Cat-5 video outputs, the total number of outputs can be expanded to 16 using one chassis and 64 outputs using 4 chassis. Be aware, however, that the video of each Cat-5 output mirrors its corresponding component RCA video output. For example Cat-5 video output 1 will output the same video signal as component video output 1, and so on. Component Video Source DIG AUD To A/V Receiver Y P B PR Component Video Cables TV Y PB PR Component Video Cables x8 Component Video Cables Cat-5 Cable TV V85 #1 V85 #2 Y PB PR x8 Component Video Cables CVRM TV Y PB PR x8 Component Video Cables Component Video Cables Cat-5 Cable TV V85 #3 V85 #4 Y PB PR x8 CVRM UNIT ID UNIT 2 UNIT ID UNIT 1 1 2 3 1 2 3 UNIT ID UNIT 4 UNIT ID UNIT 3 1 2 3 1 2 3 (Factory Default) Figure 2-3: Multiple Chassis Configuration Page 6 © ELAN Home Systems 2009 • All rights reserved. ELAN HOME V85 INSTALLATION MANUAL SYSTEMS ELAN Multi-Room Controller-Based Applications There are many possible applications when using the V85 in ELAN Multi-Room Controller-based systems. This section shows basic concepts that can be combined or arranged according to the needs of the exact system being installed. V85/S66A When utilizing a S66A Integrated Multi-Room Controller, the V85 can be an economical and versatile video switching solution. In this application, the S66A routes analog audio and performs IR distribution and amplification functions. The V85 routes component video sources to TVs with component video inputs. The system below shares sources between the S66A and a local Home Theater. A local A/V receiver in the Home Theater is used to play digital audio from the shared BluRay and HD Satellite Receiver. S66A 1 2 3 4 5 Local A/V Receiver 6 L DIGITAL AUDIO DIGITAL AUDIO INPUT 1 INPUT 2 HD Sat Receiver R SOURCE INPUTS Y PB PR COMPOSITE VIDEO Y ANALOG AUDIO L DIGITAL AUDIO R PB PR ANALOG AUDIO L DIGITAL AUDIO R BluRay Player V85 Y PB PR TV #1 TV #2 Component Video CVRM ELAN Touch Panels Y PB PR Component Video Figure 2-4: V85 and S66A © ELAN Home Systems 2009 • All rights reserved. Page 7 V85 INSTALLATION MANUAL ELAN HOME SYSTEMS V85/S86A or S86P When utilizing a S86A Integrated Multi-Room Controller, the V85 can be a powerful component video switching addon. In this application, the S86A routes analog audio and composite video and performs IR distribution and amplification functions. The V85 routes component video sources to TVs with component video inputs and the S86A routes composite video to TVs and ELAN Touch Panels with composite video inputs. Composite Video TV#1 ELAN Touch Panels Composite Video S86A ZONE OUTPUTS SOURCE INPUT 1 V V V V V L L L L L R R R 2 1 R 4 3 V R 5 L R SOURCE INPUT 2 V SOURCE INPUT 5 L R SOURCE INPUT 6 SOURCE INPUT 3 V L R SOURCE INPUT 7 SOURCE INPUT 4 V L R SOURCE INPUT 8 6 CCTV Camera VCR OUT VIDEO OUT V I D E O I N P U T S DC INPUT VGA OUT Y PB MENU/ENTER COMPOSITE VIDEO PR UP/FREEZE NTSC/PAL PIP/- QUAD/ ZOOM/+ VIDEO 4 VIDEO 3 VIDEO 2 HD Sat Receiver BluRay Player VIA!Quad VIDEO 1 Y ANALOG AUDIO L DIGITAL AUDIO R PB PR ANALOG AUDIO L DIGITAL AUDIO R DOWN/SEQUENCE V85 TV #2 Component Video Y Y PB PB PR PR TV #3 Component Video CVRM Figure 2-5: V85 and S86A Page 8 © ELAN Home Systems 2009 • All rights reserved. ELAN HOME V85 INSTALLATION MANUAL SYSTEMS V85/S128P This application shows an S128P Multi-Room A/V Controller performing audio distribution functions as well as composite video switching. The V85 is used to distribute component video. Although the S128P has component video capabilities, the use of the V85 frees up S128P video inputs and allows them to be used as composite video inputs that can be routed to ELAN touch panels and TV's that do not have component video inputs. TV #1 Component Video Y TV #2 Y PB Component Video PR PB PR CVRM HD Sat Receiver Y PB PR BluRay Player Y ANALOG AUDIO L PB DIGITAL AUDIO ANALOG AUDIO COMPOSITE VIDEO L PR R DIGITAL AUDIO R V85 S128P Composite Video CCTV Camera VIA!Quad TV#3 Composite Video ELAN Touch Panels VCR OUT VIDEO OUT V I D E O I N P U T S DC INPUT VGA OUT Composite Video UP/FREEZE MENU/ENTER NTSC/PAL PIP/- QUAD/ ZOOM/+ VIDEO 4 VIDEO 3 VIDEO 2 VIDEO 1 DOWN/SEQUENCE Figure 2-6: V85 and S128P © ELAN Home Systems 2009 • All rights reserved. Page 9 V85 INSTALLATION MANUAL ELAN HOME SYSTEMS Chapter 3: Connections Component Video Outputs Use high-quality component video cables to make connections between sources and the V85’s inputs. Sources will typically be located near the V85 at the head-end of the system. Component video outputs will typically be sent via RG-6 coaxial cables from the head-end to televisions, monitors and video projectors with component video inputs located throughout the house. Use F-to-RCA adaptors to connect high quality component video cables to each TV, monitor or video projector as shown below. Maximum coaxial wire run is 300 feet. Component Video Cables F-to-RCA Adaptor RG-6 Coaxial Cable (300 Ft. Max) Rear Y F-to-RCA Adaptor Rear Component Video Cables PB PR To V85 Component Video Outputs Coaxial Wall Plates Front To TV/Monitor/Projector Component Video Inputs Front Figure 3-1: Component Video Connectivity Cat-5 Video Outputs to CVRM Receive Module ELAN’s CVRM Component Video Receive Module makes an ideal companion accessory to the V85 when long video wiring runs are necessary. The CVRM receives component video signals from the V85's Cat-5 outputs, up to 500 feet away with no image quality degradation. Run Cat-5 cable between the head-end location (where the V85 is located) and the destination location (a TV, monitor or projector). The drawing below shows an example of using CVRM Receive Modules with the Cat-5 outputs of the V85. See Appendix A: CVRM Component Video Receive Module for detailed specifications and dip-switch settings. Control Connections - IR There are two ways to send IR to the V85 using the 3.5mm IR IN port. The IR OUT port passes any IR signal that is V85 Cat-5 Video Out TV/Monitor Component Video Input 568A Terminated Cat-5 Cable (Up to 500 ft) TV V85 CAT-5 VIDEO PINOUT (568A) FRONT PIN # COLOR CODE 1 2 3 4 5 6 7 8 TAB WHITE/GREEN GREEN WHITE/ORANGE BLUE WHITE/BLUE ORANGE WHITE/BROWN BROWN FUNCTION Pr+ PrY+ PbPb+ YGROUND 16V CVRM Back CVRM Front CABLE Figure 3-2: CVRM/Cat-5 Connectivity Page 10 © ELAN Home Systems 2009 • All rights reserved. ELAN HOME V85 INSTALLATION MANUAL SYSTEMS sent to the V85's IR IN port. IR IN Port Most ELAN multi-room applications will utilize the rear IR IN port for IR control. Use a 3.5mm mono interconnect cable to connect between an IR OUT port (typically an ‘ALL’ port) of an ELAN multi-room controller and the IR IN port of the V85. In this configuration, any IR signal sent from any zone of the multi-room system will be sent to the V85. ELAN Multi-Room Controller V85 Figure 3-3: IR IN An IR Receiver such as the ELAN IRS5 may be plugged directly into the V85 to allow for individual room control or system-wide control using V85 discrete IR codes. See Figure 4-4: IR Power DIP Settings to enable IR Receiver Power. V85 Figure 3-4: IR IN using ELAN IRS5 Connecting the CVRM Receive Module © ELAN Home Systems 2009 • All rights reserved. Page 11 V85 INSTALLATION MANUAL ELAN HOME SYSTEMS IR OUT Port Any IR signal that is sent into the V85 through the IR IN port is passed out of the IR OUT port. Use the IR OUT port to link multiple V85s or as a convenient way to send signals to additional IR controlled devices, or to IR distribution products such as ELAN’s IRD4 Amplified IR Connection Block, as shown below. V85 #2 V85 #1 IR IN IR IN 3.5mm Mono Interconnect Cable IR OUT IR OUT V85 IRD4 Amplified Connecting Block IR IN +12V J5 IRD4 Amplified Connection Block J6 HP ON HP ON NET ON J8 LP/HP IR OUT 12V DC REGULATED J7 LP ON LP ON NET OFF Satellite IR OUT STATUS IN 5~24V D C IR OUT GND IR RCVR J4 ST OUT IR IN IRD4 Interconnect Cable (included w/IRD4) Digital Music Server DVD V85 IR IN Additional IR Controlled Device 3.5mm Mono Interconnect Cable IR IN IR OUT Figure 3-5: IR Out Connections Page 12 © ELAN Home Systems 2009 • All rights reserved. ELAN HOME V85 INSTALLATION MANUAL SYSTEMS Control Connections - RS-232 Use the SERIAL PORTS when a computer, third party, or ELAN RS-232 controller will be used with the V85. DB-9 Serial Cable RS-232 Controller IN SERIAL PORTS RS-232 OUT V85 Figure 3-6: Single Chassis RS232 Connection Multi-Chassis Connections - RS-232 Connect a DB-9 serial cable between two (or more) V85 chassis as shown below when controlling multiple units using RS-232 serial communications. From RS-232 Controller DB-9 Serial Cables V85 #2 V85 #1 IN SERIAL PORTS RS-232 OUT IN SERIAL PORTS RS-232 OUT To V85 #3 Figure 3-7: Multiple Chassis RS232 Connections © ELAN Home Systems 2009 • All rights reserved. Page 13 V85 INSTALLATION MANUAL ELAN HOME SYSTEMS AC Power Connector A removable IEC compatible AC Power cord is included for connecting the V85 AC Power Connector to 120VAC or 240VAC power. The fuse is located below the receptacle. Fuse Holder Figure 3-9: AC Power Connector Page 14 © ELAN Home Systems 2009 • All rights reserved. ELAN HOME V85 INSTALLATION MANUAL SYSTEMS Chapter 4: Operations & Settings DIP Switch Settings - UNIT ID Consult the chart below to determine the correct UNIT ID DIP Switch settings. These settings determine to which output commands a particular unit will respond. V85s set to UNIT ID 1 will respond to commands specifying Outputs 1-8, UNIT ID 2 responds to commands specifying Outputs 9-16, etc. Unit ID Zones Switch #1 Switch #2 1 2 3 4 1-8 9-16 17-24 25-32 OFF/UP OFF/UP ON/DOWN ON/DOWN OFF/UP ON/DOWN OFF/UP ON/DOWN Table 4-1: Unit ID Settings UNIT ID UNIT 1 1 2 3 UNIT ID UNIT 2 1 2 3 UNIT ID UNIT 3 1 2 3 UNIT ID UNIT 4 1 2 3 (Factory Default) Figure 4-1: Unit ID DIP Settings Front Panel Unit ID Designations The Output/Input LED indicators on the front display the V85s UNIT ID designation. A decimal point located in the display window indicates the Unit ID for each chassis as shown below. Unit ID #1 Unit ID #2 Unit ID #3 Unit ID #4 Figure 4-2: Front Panel Unit ID Designations © ELAN Home Systems 2009 • All rights reserved. Page 15 V85 INSTALLATION MANUAL ELAN HOME SYSTEMS DIP Switch Settings - Baud Rate UNIT ID UNIT 1 UNIT 1 UNIT 2 UNIT 3 UNIT 4 9.6K BAUD RATE UNIT ID UNIT 2 UNIT 3 UNIT 4 19.2K BAUD RATE Set the Baud Rate DIP switch to the 9600 position (Up) when utilizing RS-232 controllers that require this baud rate. Use the 19.2k (Down) position for ELAN RS-232 applications and third party controllers that operate at 19.2k. 1 2 3 1 2 3 9.6K BAUD 19.2K BAUD (Factory Default) Figure 4-3: Baud Rate DIP Settings DIP Switch Settings - IR Power When powering external IR Receivers such as the ELAN IRS5, enable (Down) the IR PWR DIP Switch. 1 2 3 4 OFF 1 2 3 4 ON Figure 4-4: IR Power DIP Settings Page 16 © ELAN Home Systems 2009 • All rights reserved. ELAN HOME V85 INSTALLATION MANUAL SYSTEMS 5. Programming Use ELAN's configuration software to assign commands to keypads, Ole' Touchpads and Touch Panels. When programming ELAN user interfaces, the configuration software will automatically assign the video switching commands. Please consult ELAN's configuration software and the Help file for specific programming steps and full IR, and RS-232 code sets. Control Methods There are two methods of controlling the V85. • IR • RS-232 Overall system configuration and design goals will determine which programming method should be used. IR Use IR commands when controlling the V85 with ELAN keypads, Ole' Touchpads or hand-held remote controls. RS-232 Use RS-232 commands when controlling the V85 with the ELAN SS1 or other third-party RS-232 controllers or when using a computer to test/verify RS-232 functionality. V85 RS-232 Protocol The V85 uses the following communications settings: • • • • • Baud-9.6k or 19.2k (Default) 8 Data Bits 1 Stop Bit No Parity Flow Control-None Command Structure • Prefix: Must be present for every command string (Required) • Command: See list below for all commands (Required) • Parameter: Decimal value of zone/source command • Carriage Return: 0x0d or Decimal 13 (Required) &V85, cmd, par <cr> Command KEY • &V85,KEY,xxx<CR> where xxx represents the decimal value of the IR command. • Unit responds with acknowledgement &V85,ACK,xxx<CR> • Unit will ignore all characters preceding the ‘&’. It will process and ACK the command as soon as the carriage return has been received. • EXAMPLES: &V85,KEY,041 <CR> &V85,KEY,120 <CR> Connects output 6 to input 2 Connects output 16 (chassis #2) to input 1 © ELAN Home Systems 2009 • All rights reserved. Page 17 V85 INSTALLATION MANUAL ELAN HOME SYSTEMS Command QRY • &V85,QRY,u?<CR> QRY: Queries a unit to get the current output to input assignments. u: Unit to be queried • &V85,QRY,u?<CR> where u is the UNIT I.D. (1-4). The reply to a QRY is: • &V85,QRY,u,abcdefgh<CR> a-h represents outputs 1-8 respectively. The value will be 0-8 (0 = OFF). • EXAMPLE: (QUERY) &V85,QRY,1? <CR> Queries V85 Unit 1 for its current output to input assignments This reply is interpreted as follows: (REPLY) &V85,QRY,1,28311140 <CR> Unit 1 Output 1, Input 2 Output 2, Input 8 Output 3, Input 3 Output 4, Input 1 Output 5, Input 1 Output 6, Input 1 Output 7, Input 4 Output 8, Input 0 (OFF) Note: The V85 requires at least 50ms between each serial command transmitted to it. However, if the &V85,ACK,xxx<CR> is received prior to 50ms, another command can be transmitted immediately. Page 18 © ELAN Home Systems 2009 • All rights reserved. ELAN HOME V85 INSTALLATION MANUAL SYSTEMS RS-232 Command List DESCRIPTION DEC DESCRIPTION DEC OUTPUT1 INPUT1 OUTPUT1 INPUT2 OUTPUT1 INPUT3 OUTPUT1 INPUT4 OUTPUT1 INPUT5 OUTPUT1 INPUT6 OUTPUT1 INPUT7 OUTPUT1 INPUT8 OUTPUT2 INPUT1 OUTPUT2 INPUT2 OUTPUT2 INPUT3 OUTPUT2 INPUT4 OUTPUT2 INPUT5 OUTPUT2 INPUT6 OUTPUT2 INPUT7 OUTPUT2 INPUT8 OUTPUT3 INPUT1 OUTPUT3 INPUT2 OUTPUT3 INPUT3 OUTPUT3 INPUT4 OUTPUT3 INPUT5 OUTPUT3 INPUT6 OUTPUT3 INPUT7 OUTPUT3 INPUT8 OUTPUT4 INPUT1 OUTPUT4 INPUT2 OUTPUT4 INPUT3 OUTPUT4 INPUT4 OUTPUT4 INPUT5 OUTPUT4 INPUT6 OUTPUT4 INPUT7 OUTPUT4 INPUT8 OUTPUT5 INPUT1 OUTPUT5 INPUT2 OUTPUT5 INPUT3 OUTPUT5 INPUT4 OUTPUT5 INPUT5 OUTPUT5 INPUT6 OUTPUT5 INPUT7 OUTPUT5 INPUT8 OUTPUT6 INPUT1 OUTPUT6 INPUT2 OUTPUT6 INPUT3 OUTPUT6 INPUT4 OUTPUT6 INPUT5 OUTPUT6 INPUT6 OUTPUT6 INPUT7 OUTPUT6 INPUT8 OUTPUT7 INPUT1 OUTPUT7 INPUT2 OUTPUT7 INPUT3 OUTPUT7 INPUT4 OUTPUT7 INPUT5 OUTPUT7 INPUT6 OUTPUT7 INPUT7 OUTPUT7 INPUT8 OUTPUT8 INPUT1 OUTPUT8 INPUT2 OUTPUT8 INPUT3 OUTPUT8 INPUT4 OUTPUT8 INPUT5 OUTPUT8 INPUT6 OUTPUT8 INPUT7 OUTPUT8 INPUT8 000 001 002 003 004 005 006 007 008 009 010 011 012 013 014 015 016 017 018 019 020 021 022 023 024 025 026 027 028 029 030 031 032 033 034 035 036 037 038 039 040 041 042 043 044 045 046 047 048 049 050 051 052 053 054 055 056 057 058 059 060 061 062 063 OUTPUT9 INPUT1 OUTPUT9 INPUT2 OUTPUT9 INPUT3 OUTPUT9 INPUT4 OUTPUT9 INPUT5 OUTPUT9 INPUT6 OUTPUT9 INPUT7 OUTPUT9 INPUT8 OUTPUT10 INPUT1 OUTPUT10 INPUT2 OUTPUT10 INPUT3 OUTPUT10 INPUT4 OUTPUT10 INPUT5 OUTPUT10 INPUT6 OUTPUT10 INPUT7 OUTPUT10 INPUT8 OUTPUT11 INPUT1 OUTPUT11 INPUT2 OUTPUT11 INPUT3 OUTPUT11 INPUT4 OUTPUT11 INPUT5 OUTPUT11 INPUT6 OUTPUT11 INPUT7 OUTPUT11 INPUT8 OUTPUT12 INPUT1 OUTPUT12 INPUT2 OUTPUT12 INPUT3 OUTPUT12 INPUT4 OUTPUT12 INPUT5 OUTPUT12 INPUT6 OUTPUT12 INPUT7 OUTPUT12 INPUT8 OUTPUT13 INPUT1 OUTPUT13 INPUT2 OUTPUT13 INPUT3 OUTPUT13 INPUT4 OUTPUT13 INPUT5 OUTPUT13 INPUT6 OUTPUT13 INPUT7 OUTPUT13 INPUT8 OUTPUT14 INPUT1 OUTPUT14 INPUT2 OUTPUT14 INPUT3 OUTPUT14 INPUT4 OUTPUT14 INPUT5 OUTPUT14 INPUT6 OUTPUT14 INPUT7 OUTPUT14 INPUT8 OUTPUT15 INPUT1 OUTPUT15 INPUT2 OUTPUT15 INPUT3 OUTPUT15 INPUT4 OUTPUT15 INPUT5 OUTPUT15 INPUT6 OUTPUT15 INPUT7 OUTPUT15 INPUT8 OUTPUT16 INPUT1 OUTPUT16 INPUT2 OUTPUT16 INPUT3 OUTPUT16 INPUT4 OUTPUT16 INPUT5 OUTPUT16 INPUT6 OUTPUT16 INPUT7 OUTPUT16 INPUT8 064 065 066 067 068 069 070 071 072 073 074 075 076 077 078 079 080 081 082 083 084 085 086 087 088 089 090 091 092 093 094 095 096 097 098 099 100 101 102 103 104 105 106 107 108 109 110 111 112 113 114 115 116 117 118 119 120 121 122 123 124 125 126 127 © ELAN Home Systems 2009 • All rights reserved. Page 19 V85 INSTALLATION MANUAL Page 20 ELAN HOME SYSTEMS DESCRIPTION DEC DESCRIPTION DEC DESCRIPTION DEC OUTPUT17 INPUT1 OUTPUT17 INPUT2 OUTPUT17 INPUT3 OUTPUT17 INPUT4 OUTPUT17 INPUT5 OUTPUT17 INPUT6 OUTPUT17 INPUT7 OUTPUT17 INPUT8 OUTPUT18 INPUT1 OUTPUT18 INPUT2 OUTPUT18 INPUT3 OUTPUT18 INPUT4 OUTPUT18 INPUT5 OUTPUT18 INPUT6 OUTPUT18 INPUT7 OUTPUT18 INPUT8 OUTPUT19 INPUT1 OUTPUT19 INPUT2 OUTPUT19 INPUT3 OUTPUT19 INPUT4 OUTPUT19 INPUT5 OUTPUT19 INPUT6 OUTPUT19 INPUT7 OUTPUT19 INPUT8 OUTPUT20 INPUT1 OUTPUT20 INPUT2 OUTPUT20 INPUT3 OUTPUT20 INPUT4 OUTPUT20 INPUT5 OUTPUT20 INPUT6 OUTPUT20 INPUT7 OUTPUT20 INPUT8 OUTPUT21 INPUT1 OUTPUT21 INPUT2 OUTPUT21 INPUT3 OUTPUT21 INPUT4 OUTPUT21 INPUT5 OUTPUT21 INPUT6 OUTPUT21 INPUT7 OUTPUT21 INPUT8 OUTPUT22 INPUT1 OUTPUT22 INPUT2 OUTPUT22 INPUT3 OUTPUT22 INPUT4 OUTPUT22 INPUT5 OUTPUT22 INPUT6 OUTPUT22 INPUT7 OUTPUT22 INPUT8 OUTPUT23 INPUT1 OUTPUT23 INPUT2 OUTPUT23 INPUT3 OUTPUT23 INPUT4 OUTPUT23 INPUT5 OUTPUT23 INPUT6 OUTPUT23 INPUT7 OUTPUT23 INPUT8 OUTPUT24 INPUT1 OUTPUT24 INPUT2 OUTPUT24 INPUT3 OUTPUT24 INPUT4 OUTPUT24 INPUT5 OUTPUT24 INPUT6 OUTPUT24 INPUT7 OUTPUT24 INPUT8 128 129 130 131 132 133 134 135 136 137 138 139 140 141 142 143 144 145 146 147 148 149 150 151 152 153 154 155 156 157 158 159 160 161 162 163 164 165 166 167 168 169 170 171 172 173 174 175 176 177 178 179 180 181 182 183 184 185 186 187 188 189 190 191 OUTPUT25 INPUT1 OUTPUT25 INPUT2 OUTPUT25 INPUT3 OUTPUT25 INPUT4 OUTPUT25 INPUT5 OUTPUT25 INPUT6 OUTPUT25 INPUT7 OUTPUT25 INPUT8 OUTPUT26 INPUT1 OUTPUT26 INPUT2 OUTPUT26 INPUT3 OUTPUT26 INPUT4 OUTPUT26 INPUT5 OUTPUT26 INPUT6 OUTPUT26 INPUT7 OUTPUT26 INPUT8 OUTPUT27 INPUT1 OUTPUT27 INPUT2 OUTPUT27 INPUT3 OUTPUT27 INPUT4 OUTPUT27 INPUT5 OUTPUT27 INPUT6 OUTPUT27 INPUT7 OUTPUT27 INPUT8 OUTPUT28 INPUT1 OUTPUT28 INPUT2 OUTPUT28 INPUT3 OUTPUT28 INPUT4 OUTPUT28 INPUT5 OUTPUT28 INPUT6 OUTPUT28 INPUT7 OUTPUT28 INPUT8 OUTPUT29 INPUT1 OUTPUT29 INPUT2 OUTPUT29 INPUT3 OUTPUT29 INPUT4 OUTPUT29 INPUT5 OUTPUT29 INPUT6 OUTPUT29 INPUT7 OUTPUT29 INPUT8 OUTPUT30 INPUT1 OUTPUT30 INPUT2 OUTPUT30 INPUT3 OUTPUT30 INPUT4 OUTPUT30 INPUT5 OUTPUT30 INPUT6 OUTPUT30 INPUT7 OUTPUT30 INPUT8 OUTPUT31 INPUT1 OUTPUT31 INPUT2 OUTPUT31 INPUT3 OUTPUT31 INPUT4 OUTPUT31 INPUT5 OUTPUT31 INPUT6 OUTPUT31 INPUT7 OUTPUT31 INPUT8 OUTPUT32 INPUT1 OUTPUT32 INPUT2 OUTPUT32 INPUT3 OUTPUT32 INPUT4 OUTPUT32 INPUT5 OUTPUT32 INPUT6 OUTPUT32 INPUT7 OUTPUT32 INPUT8 192 193 194 195 196 197 198 199 200 201 202 203 204 205 206 207 208 209 210 211 212 213 214 215 216 217 218 219 220 221 222 223 224 225 226 227 228 229 230 231 232 233 234 235 236 237 238 239 240 241 242 243 244 245 246 247 248 249 250 251 252 253 254 255 OUTPUT1 OFF OUTPUT2 OFF OUTPUT3 OFF OUTPUT4 OFF OUTPUT5 OFF OUTPUT6 OFF OUTPUT7 OFF OUTPUT8 OFF OUTPUT9 OFF OUTPUT10 OFF OUTPUT11 OFF OUTPUT12 OFF OUTPUT13 OFF OUTPUT14 OFF OUTPUT15 OFF OUTPUT16 OFF OUTPUT17 OFF OUTPUT18 OFF OUTPUT19 OFF OUTPUT20 OFF OUTPUT21 OFF OUTPUT22 OFF OUTPUT23 OFF OUTPUT24 OFF OUTPUT25 OFF OUTPUT26 OFF OUTPUT27 OFF OUTPUT28 OFF OUTPUT29 OFF OUTPUT30 OFF OUTPUT31 OFF OUTPUT32 OFF ALL OUTPUTS OFF ALL UNIT 1 OFF ALL UNIT 2 OFF ALL UNIT 3 OFF ALL UNIT 4 OFF 256 257 258 259 260 261 262 263 264 265 266 267 268 269 270 271 272 273 274 275 276 277 278 279 280 281 282 283 284 285 286 287 288 289 290 291 292 © ELAN Home Systems 2009 • All rights reserved. ELAN HOME V85 INSTALLATION MANUAL SYSTEMS 6. Troubleshooting General SYMPTOM CAUSE SOLUTION No power up. 1. No AC power. Connect Power Cord to AC outlet. Check AC circuit breaker. 2. Blown fuse. Replace fuse with specified type. SYMPTOM CAUSE SOLUTION No source or zone selected from IR controller (keypad, hand-held remote, etc.). IR LED does NOT flash when button pressed. 1. IR controller not programmed. Program IR controller. 2. IR signal path wiring bad. Verify IR signal path wiring. Check keypads, IR sensors, IR distribution blocks, V85 IR Input jack, IR emitters, etc. 1. Incorrect IR commands programmed (not V85 commands). Verify/correct IR programming. 2. UNIT ID DIP switches incorrect. Verify/correct DIP switches. Intermittant or no source or zone control from IR controller (keypad, hand-held remote, etc.). IR LED flickers or is lit constantly. IR flooding. Check IR receivers for ambient light or plasma TV flooding. Incorrect source and/or zone selected. Incorrect V85 IR commands programmed. Verify/correct IR programming. IR Control No source or zone selected from IR controller (keypad, hand-held remote, etc.). IR LED DOES flash when button pressed. © ELAN Home Systems 2009 • All rights reserved. Page 21 V85 INSTALLATION MANUAL ELAN HOME SYSTEMS RS-232 Control SYMPTOM CAUSE SOLUTION No source or zone selected from RS-232 controller. 1. RS-232 controller incorrectly programmed. Verify/correct programming. 2. RS-232 signal path wiring bad. Verify RS-232 wiring. Check wire integrity and pin-out configuration. 3. UNIT ID DIP switches incorrect. Verify/correct DIP switches. 4. BAUD RATE switches incorrect. Verify/correct DIP switches. Incorrect source and/or zone selected. The V85 RS-232 commands were incorrectly programmed. Verify/correct programming. Acknowledgement &V85,ACK,xxx<CR> is not received within 200ms 1. The command was formatted incorrectly. Verify/correct programming. 2. An error has occurred in the V85. Turn unit OFF, then back ON. 3. Serial cable not connected or defective. Connect or replace serial cable. 4. V85 does not have power. Connect power, check breakers. SYMPTOM CAUSE SOLUTION Video does not appear on desired TV/monitor. Front of V85 displays correct source/zone. 1. V85 output cables incorrectly routed. TV/monitor connected to incorrect output. Verify/correct video output wiring. 2. TV/monitor has incorrect input selected. Select correct video input on TV/monitor. 3. Video wiring bad/damaged. Verify/correct video wiring. Video Switching 4. Video source not sending video Verify/correct video source (not connected, playing, or problem. turned on). Incorrect source displays on TV/monitor. Front of V5 displays correct source/zone. V85 input cables incorrectly routed. Source connected to incorrect V85 input. Verify/correct video input wiring. Incorrect source displays on TV/monitor. Front of V85 displays incorrect source/zone. Incorrect programming. Verify/correct IR programming. Component video sources display correctly, composite source does not display at all. Ensure same type (Y, PB, PR) input 1. Composite video source not connected to same type (Y, PB, PR) & output used for all composite video sources and TVs/monitors. input as TV/monitor. 2. TV/monitor has incorrect input selected. Page 22 Select correct composite video input on TV/monitor. © ELAN Home Systems 2009 • All rights reserved. ELAN HOME V85 INSTALLATION MANUAL SYSTEMS Video Quality SOLUTION SYMPTOM CAUSE Video image is not optimal (i.e., fuzzy, blurry, smeared, ghosted, or dull). Do not run video wiring near AC 1. In-house video wiring picking up noise from high-voltage lines lines. If necessary, cross AC lines or other source of interference. at 90 degrees. Video image colors incorrect, scrambled, jagged lines, etc. 2. In-house coax runs have sharp bends or using poor quality cable. Make gradual bends in coax when running wire. Use high-quality RG-6 coaxial cable. 3. Video wiring bad/damaged. Verify/correct video wiring. 1. Component video cables conVerify/correct component video nected to wrong type (Y, PB, PR) input/output wiring. of inputs/outputs at V85 or TV/monitor. 2. One or more component video connections (Y, PB, PR) not made. Verify/correct component video input/output wiring. Technical Support If, after carefully following the steps in the Troubleshooting section, you are unable to resolve issues with the installation or operation of the V85, please call ELAN Technical Support at 1-800-622-ELAN (3526). © ELAN Home Systems 2009 • All rights reserved. Page 23 V85 INSTALLATION MANUAL ELAN HOME SYSTEMS Appendix A: Component Video Receive Module (CVRM) The Component Video Receive Module (CVRM) extends Hi-Definition component video wire runs up to 500 feet over standard Cat-5 cable. The CVRM is ideal for video distribution when using an ELAN Component Video Controller such as the V85 to zones equipped with Hi-Definition video displays. Cat-5 video outputs from an ELAN V85 are connected to the RJ-45 input on the back of the CVRM (See V85 Cat-5 Video Pinout Below). Component video connections on the front of the CVRM are then connected to the component video inputs of a TV or other video display. V85 Cat-5 Video Out TV/Monitor Component Video Input 568A Terminated Cat-5 Cable (Up to 500 ft) TV V85 CAT-5 VIDEO PINOUT (568A) FRONT PIN # COLOR CODE 1 2 3 4 5 6 7 8 TAB WHITE/GREEN GREEN WHITE/ORANGE BLUE WHITE/BLUE ORANGE WHITE/BROWN BROWN FUNCTION Pr+ PrY+ PbPb+ YGROUND 16V CVRM Back CVRM Front CABLE The CVRM module includes a decora faceplate and pre-installed bracket for mounting in a J-box*. Alternatively, the bracket may be removed and the unit may be mounted to the back of a TV using the included velcro fastener or mounted to the wall using the CVRM's screw keyholes as shown below. 1. Connect a 568A terminated Cat-5 cable to the RJ-45 jack located on the back of the CVRM module. Note: ELAN recommends looping the Cat-5 cable prior to routing it out of the back of the single-ganged J-box punch outs, see illustration below. 2. Secure the CVRM's bracket to the singlegang box or low-voltage trim ring and install the faceplate 3. At the head end, connect the other end of the Cat-5 cable (568A terminated) to the V85 Cat-5 Video Output 4. Back in the local zone, connect the video outputs from the CVRM module to the component video input jacks on the TV or other video display *Carlon Model B122A J-box or trim ring is recommended for use with the CVRM Page 24 © ELAN Home Systems 2009 • All rights reserved. ELAN HOME V85 INSTALLATION MANUAL SYSTEMS CVRM DIP Switch Settings DIP Switches on the back of the CVRM module provide proper Contrast settings for variable lengths of Cat-5 cable, up to 500 feet. See the DIP Switch Setting Table below for proper settings versus length. Contrast DIP Switch Settings Cat-5 Cable Length (Ft) DIP Switch Setting Cat-5 Cable Length (Ft) Factory Default (50 ft.) 250 Ft 10 Ft 290 Ft 25 Ft 330 Ft 50 Ft 370 Ft 90 Ft 410 Ft 130 Ft 450 Ft 170 Ft 490 Ft 210 Ft 530 Ft DIP Switch Setting Specifications RJ45 Input Impedence: 50 Ohm (4.0V max) Coaxial Output Impedance: 75 Ohm, 1V pk-pk (3.5V max) Bandwidth: 150MHz (125MHz @ 500 ft.) THD: -50dBc © ELAN Home Systems 2009 • All rights reserved. Gain: 1.0 Power: Supplied from V85 Pin-out: 568A Page 25 V85 INSTALLATION MANUAL ELAN HOME SYSTEMS Appendix B: Rack Mounting Rack-Mount Brackets When mounting the V85 Component Video Controller in an equipment rack, use the included rack mount brackets for secure mounting and proper ventilation. The V85 requires two rack spaces. To install the V85 into a standard 19” equipment rack: 1. Mount the brackets onto the V85 chassis from the front. Ensure that the brackets are flush with the front of the V85. Install each of the eight screws (included) through the side mounting flanges into the holes in the sides of the unit as shown below. Hand tighten screws! Over-tightening could cause damage to the V85. 2. Once the brackets are securely mounted, install the entire assembly into a standard 19” equipment rack from the front using four rack screws (not included). 19" Equipment Rack Rack Screws Page 26 © ELAN Home Systems 2009 • All rights reserved. ELAN HOME V85 INSTALLATION MANUAL SYSTEMS Appendix C: Specifications Video Inputs Connectors (8 Sets) Component Video Inputs Gold-Plated Component Video Inputs (Y, Pb, Pr) 1V Peak-to-Peak Nominal Input Impedance 75 Ohm Video Outputs Zone Output Connectors (8 Sets) Gold-Plated RCA Component Video Inputs, Y, Pb, Pr Buffered Loop Output Connectors (8 Sets) Gold-Plated RCA Component Video Inputs, Y, Pb, Pr Cat-5 Zone Output Connectors (8) RJ-45 jacks Component Video Outputs 1V Peak-to-Peak Nominal Output Impedance 75 Ohm Video Gain Unity Gain Flatness 50 MHz Bandwidth (-3dB) DC to 125MHz Minimum S/N Ratio >65dB Differential Phase 0.02 Deg Typical Differential Gain 0.02% Typical Crosstalk >85 dB @ 5MHz; > 83 dB @ 10MHz Control Ports IR Input ports 3.5mm stereo jack (Tip-IR, Ring-Ground, Sleeve-+12V) IR Output port 3.5mm mono jack (Tip-IR, Sleeve-Ground) RS-232 In/Thru ports (2) DB9 connectors VIANET In/Thru ports (2) RJ45 jacks Power AC Power Requirements 120 VAC, 90 Watts (V85) 240 VAC, 105 Watts (V85-240) FUSE: 1.25A FUSE: 750mA Dimensions/Weight Dimensions w/ Feet (2U w/o Feet) 17 W X 4-1/8 H X 14 D (in.) / 432 W X 105 H X 356 D (mm) Weight 12.5 lbs / 5.7 kgs © ELAN Home Systems 2009 • All rights reserved. Page 27 Limited Warranty ELAN HOME SYSTEMS L.L.C. (“ELAN”) warrants the ELAN V85 Component Video Controller to be free from defects in materials and workmanship for the period of two years (2 years) from date of purchase. If within the applicable warranty period above purchaser discovers that such item was not as warranted above and promptly notifies ELAN in writing, ELAN shall repair or replace the item at the company’s option. This warranty shall not apply (a) to equipment not manufactured by ELAN, (b) to equipment which shall have been installed by other than an ELAN authorized installer, (c) to installed equipment which is not installed to ELAN’s specifications, (d) to equipment which shall have been repaired or altered by others than ELAN, (e) to equipment which shall have been subjected to negligence, accident, or damage by circumstances beyond ELAN’s control, including, but not limited to, lightning, flood, electrical surge, tornado, earthquake, or other catastrophic events beyond ELAN’s control, or to improper operation, maintenance or storage, or to other than normal use of service. With respect to equipment sold by, but not manufactured by ELAN, the warranty obligations of ELAN shall in all respects conform to the warranty actually extended to ELAN by its supplier. The foregoing warranties do not cover reimbursement for labor, transportation, removal, installation or other expenses which may be incurred in connection with repair or replacement. Except as may be expressly provided and authorized in writing by ELAN, ELAN shall not be subject to any other obligations or liabilities whatsoever with respect to equipment manufactured by ELAN or services rendered by ELAN. THE FOREGOING WARRANTIES ARE EXCLUSIVE AND IN LIEU OF ALL OTHER EXPRESSED AND IMPLIED WARRANTIES EXCEPT WARRANTIES OF TITLE, INCLUDING BUT NOT LIMITED TO IMPLIED WARRANTIES OF MERCHANTABILITY AND FITNESS FOR A PARTICULAR PURPOSE. ATTENTION: TO OUR VALUED CONSUMERS To ensure that consumers obtain quality pre-sale and after-sale support and service, ELAN Home Systems products are sold exclusively through authorized dealers. ELAN products are not sold online. The warranties on ELAN products are NOT VALID if the products have been purchased from an unauthorized dealer or an online E-tailer. To determine if your ELAN reseller is authorized, please contact ELAN Home Systems at (859) 269-7760. www.elanhomesystems.com www.elanhomesystems.com Lexington, KY P/N 9901006 REV: B