1
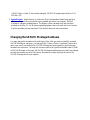
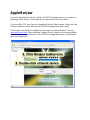
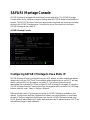
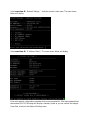
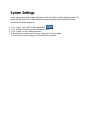
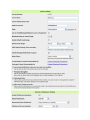
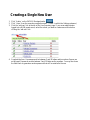
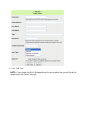
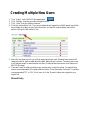
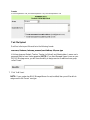
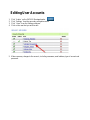
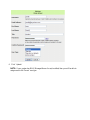
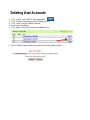
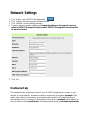
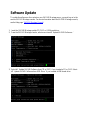
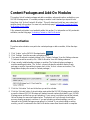
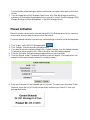
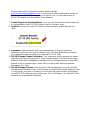
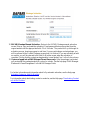
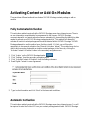
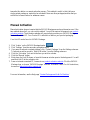
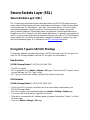
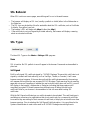
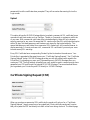
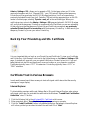
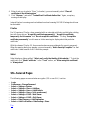
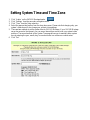
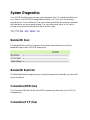
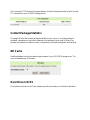
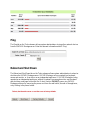
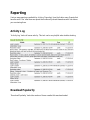
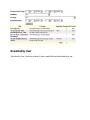
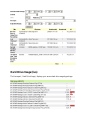
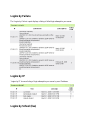
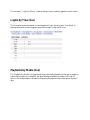
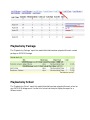
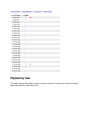
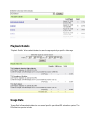
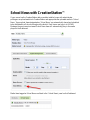
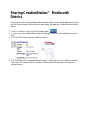
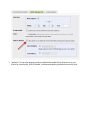
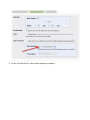
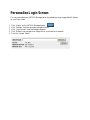
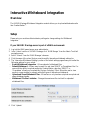
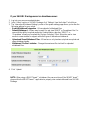
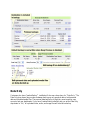
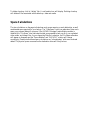
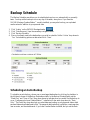
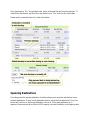
SAFARI Montage Administrator Guide
SAFARI Montage
© 2005-2009 Library Video Company. All Rights Reserved.
Accessing Your SAFARI Montage Server
The instructions below describe how to access your SAFARI Montage server for the first time.
These instructions assume that you have connected your SAFARI Montage server to your
network and it is powered on.
Finding SAFARI Montage on Your Network
SAFARI Montage is factory-configured to use the Dynamic Host Configuration Protocol
(DHCP). On power-up, SAFARI Montage will attempt to retrieve network configuration
parameters from a DHCP host (if available) on your network. These configuration parameters
include IP address, gateway address, subnet/netmask address, and DNS addresses. The
instructions below assume that you have left SAFARI Montage in its default factory
configuration and you have not modified any network settings or disabled DHCP. If your
network is not configured to use DHCP, please see ‘Configuring SAFARI Montage to Use a
Static IP’ in the ‘SAFARI Montage Console’ documentation.
Any of three methods can be used to find and access SAFARI Montage on your network.
1. Default Hostname- Enter the SAFARI Montage default hostname into a web browser.
SAFARI Montage is factory-configured to use a default hostname of:
SVN<SerialNo>.local
Replace <SerialNo> with the six-digit serial number of your SAFARI Montage server. Your
serial number can be found on the back cover of your printed Setup Guide, on the back of the
SAFARI Montage rack unit, or inside the case door of the SAFARI Montage tower. For
example, if your serial number were 000123, you would enter the following address into your
web browser:
http://SVN000123.local
2. IP Address - Enter SAFARI Montage’s IP address into a web browser. To find out what IP
address is assigned to SAFARI Montage, you may ping the default hostname. To ping the
default hostname, enter the following command into a command prompt:
ping svn000123.local
Replace the six-digit serial number with the one from your SAFARI Montage unit. The ping
command will display the IP address of SAFARI Montage. You may enter the IP directly into
the address bar of your web browser, for example:
http://192.168.1.78
If DHCP fails or a static IP has not been assigned, SAFARI Montage assigns itself an IP of
192.168.1.251.
3. Apple Bonjour - Apple Bonjour is a Zeroconf (Zero Configuration Networking) tool that
allows you to easily discover other Bonjour-enabled devices on your network. SAFARI
Montage is a Bonjour-enabled device. The Bonjour client is already built into the Safari
browser on the Mac OS. For Windows operating systems, there is a small add-in for Internet
Explorer available via free download. Click the link above for more information.
Changing the SAFARI Montage Hostname
You may change the hostname to be anything you like. After you have successfully accessed
SAFARI Montage in a browser, you may go to the “Admin > Setup > Hostname” section and
enter a new one. From that point on, SAFARI Montage will be accessible by typing the new
hostname into a browser. You may also choose to point a fully qualified domain name (FQDN)
to SAFARI Montage. In this case, the SAFARI Montage hostname does not need to be changed
to match the domain you point to the server. Hostname is merely the physical name of the
SAFARI Montage box on your network.
Apple Bonjour
If you are having trouble finding or “seeing” the SAFARI Montage server on your network, a
technology called “Bonjour” from Apple can be used to easily discover the server.
If you are a Mac OS X user, Bonjour is already built into the Safari browser. Simply select the
Bonjour bookmark in Safari, then select the SAFARI Montage server that is listed.
For Windows users, Bonjour is available as a free plug-in for Internet Explorer. You may
download Bonjour here. Upon installation a Bonjour icon will appear in your browser toolbar.
Click the Bonjour icon and double-click the SAFARI Montage server shown in the left-hand
panel (see image below).
SAFARI Montage Console
SAFARI Montage is equipped with a text-based console application. The SAFARI Montage
Console allows you to configure core server settings when SAFARI Montage is unavailable in a
browser. The SAFARI Montage Console will appear when a keyboard and mouse are connected
directly to the SAFARI Montage server. One particular use for the console is to configure
SAFARI Montage to use a static IP.
SAFARI Montage Console
Configuring SAFARI Montage to Use a Static IP
SAFARI Montage is factory-configured to acquire an IP address, and other network parameters,
dynamically from your DHCP host. Some network administrators may not use DHCP, and may
want to configure SAFARI Montage to use a static IP. The following instructions will
demonstrate how to disable DHCP and configure SAFARI Montage to use a static IP using the
SAFARI Montage Console. These functions may also be performed from the SAFARI Montage
browser interface, under ‘Admin > Settings > Network.’
Make sure that the static IP you are about to assign to SAFARI Montage is available on your
network. Configuring a duplicate IP address on a network can lead to problems. In most cases,
the static IP that you assign must be different from any that SAFARI Montage acquired using
DHCP. Network administrators will usually dedicate a particular IP address range for DHCP use
and a different range for static addresses.
Select menu item #1, ‘Network Settings...’, from the console’s main menu. The menu shown
below will display.
Select menu item #2, ‘IP Address (Static).’ The screen shown below will display.
Enter each network configuration parameter that you are prompted for. After each parameter has
been entered, SAFARI Montage will display a summary screen so you can confirm the changes.
Press Enter to return to the Network Settings menu.
Configuring SAFARI Montage to Use a Dynamic IP (DHCP)
From the Network Configuration menu, choose menu item #3, ‘IP Address (DHCP).’ Press
Enter to continue. SAFARI Montage will acquire the necessary network configuration
parameters from the DHCP host on your network.
Other Console Settings
The remainder of the console settings should be self-explanatory for a Systems Administrator.
System Settings
System settings provide the system administrator with the ability to change settings globally. The
system settings control which state standards are searched, grade limits, the preferred video
player and whiteboard integration.
1.
2.
3.
4.
Click ‘Admin’ on the SAFARI Montage header.
Click ‘Settings’ from the secondary navigation menu.
Click ‘System’ from the Settings submenu.
Enter relevant information and save your changes by clicking ‘Update.’
Full descriptions of each setting are found below the screenshot.
System Setting Descriptions
•
•
•
•
•
•
•
•
•
•
•
•
•
•
•
•
•
•
Version Number - The version number of your SAFARI Montage software.
Server Name - The server name (hostname) of your SAFARI Montage system.
System Notifications Email - The email address that will receive system-level email
notifications from SAFARI Montage. For example, this email account is notified when a user
changes their password or other user account data.
Admin Password - The password of the master administrator. To log in as the master
administrator, use a username of “admin” or “administrator” along with this password. This
user has access the all SAFARI Montage functions including all administrative functions. This
user’s administrative privileges can never be revoked. Use description when distributing this
password to anyone.
State - Your home state. This causes the Curriculum Standards search to search within this state
by default. Users may override this setting on the Standards search page or in their individual
preferences. Also, any new users will initially have this state set on their personal preferences.
After you select your default state, if you see the red X icon next to your state, then you will
have to load the standards for that particular state. To load the standards, click the ‘load’ link.
Link to SAFARIMontageHDNetwork.com on Dashboard - when enabled, a link to
SAFARIMontageHDNetwork.com will display on the Dashboard.
Maximum Items per Search Page - The default number of search results per page. Users may
override this setting in their individual preferences.
Enable Default Grade Range - Activate or deactivate the Default Grade Range feature.
Default Grade Range - The default grade range that new users will see in searches. Users may
override this setting in their individual preferences.
Stills Display Running Time (seconds) - The running time for stills and the default running
time for stills in playlists.
SAFARI Montage Media Player Support - This box must be checked in order to allow users
to use the SAFARI Montage Media Player.
Media Player - Select the specific player to be used by all users of the SAFARI Montage
server or allow the user to decide by selecting ‘User’s Choice.’
CreationStation Content Downloadable By - Determines which users can download and save
CreationStation content marked as downloadable to their local computer.
Packaged Content Downloadable By - Determines which users can download and save
downloadable content to their local computer.
Send emails when accounts are modified - With this feature active, users are notified of any
changes to their account, including usernames and passwords. Disable this feature if you are
sensitive to passwords travelling via email or if you need to modify user accounts without the
users being made aware.
Permanent Links - Activate the Permanent Links feature on the playback page. This feature
allows users to generate and save permanent links to media
Password Encryption - Activating this feature enables non-SSL-based encryption for
passwords in transit between browser and server.
Allow user-created accounts - This feature allows anyone to create new user accounts.
Activating this feature causes an “I am a new user” link to appear on the Login page. This
feature allows the user to create accounts in the Student group only. If they desire a higher
access level, they must contact their SAFARI Montage administrator. This feature is only
available to standalone servers.
Interactive Whiteboard Settings Descriptions
•
•
•
•
Enable Whiteboard Integration - Allows for the playback and uploading of Flipcharts and
Notebooks into CreationStation.
Default Whiteboard - Select your default Whiteboard type. SMART allows for the uploading
and playback of Notebook files. Promethean allows for the uploading and playback of Flipchart
files.
Upload and Share Whiteboard - allows the administrator to extend uploading capabilities to
teachers. By selecting ‘All teachers, including teachers (w/upload)’, the administrator can grant
all users with the user type of teacher, to upload and share whiteboard files. As a default, only
users with the user type of teacher (w/upload) will be able to upload and share whiteboard files.
This option will only be viewable if you have the CreationStation module installed.
Whiteboard file size limitation - Set the maximum file size limit for uploaded whiteboard
files. This option will only be viewable if you have the CreationStation module installed.
Note: Administrators logged into a WAN parent server will see a system settings page
containing fewer settings than outlined above. This is because many of the system settings are
shifted to the schools page in a WAN environment. For info about schools and the management
of schools, see the Help page, ‘School Management’ in the WAN Manager Guide.
LDAP Settings
SAFARI Montage Users vs. LDAP Users
SAFARI Montage may be configured to use either of two user-bases for login accounts—local
SAFARI Montage users, or users from a directory server such as Microsoft Active Directory,
Apple Open Directory, Novell eDirectory, or OpenLDAP. When configuring SAFARI Montage
to use local users, each user must be created and managed manually in the SAFARI Montage
system. This may become time-consuming if your organization is large. A better option is to
connect SAFARI Montage to your organization’s directory server using LDAP (Lightweight
Directory Access Protocol). Once SAFARI Montage is connected to an LDAP-compliant server,
security groups from your organization’s directory server may be mapped directly to SAFARI
Montage groups. This allows you to grant access to a large number of your network users in a
single operation, and spares you the labor of having to manage two sets of user accounts: domain
accounts and SAFARI Montage accounts.
Enabling LDAP
Under the ‘Settings’ sub-navigation item, click the ‘LDAP’ button. To enable LDAP on your
SAFARI Montage system, click the ‘Enable LDAP’ link at the top of the page.
Disabling LDAP
When LDAP is active, the ‘Enable LDAP’ link will become ‘Disable LDAP.’ Click this link to
disable the LDAP connection and return to using SAFARI Montage accounts.
LDAP Settings
Once LDAP is active, the form shown below will display. Enter the appropriate information for
your directory server and click the ‘Save’ button. Beneath the example below, you will find more
detailed information about each field on this form.
Description
Descriptive name for your LDAP server.
Host
The Host may be either the resolvable name of your LDAP server or its IP address. If you
use the host name rather than IP, the SAFARI Montage system must be able to resolve
the name. SAFARI Montage will look up the name in the DNS server(s) that you
configured upon install. In most cases, you will need to fully qualify the hostname by
appending its complete domain name, for example, ldap.myschool.edu rather than ldap.
You may use SAFARI Montage’s ‘Ping’ feature, found under the ‘Tools’ sub-menu, to
see if SAFARI Montage is able to resolve the hostname.
SSL
Activate the SSL checkbox if your LDAP server requires Secure Sockets Layer
connections.
Base DN
Enter your LDAP server’s Base Distinguished Name (DN) in this field. Examples of
valid Base DN’s are shown below. Note that most Novell eDirectory setups only require
an organization (as shown).
Base DN Examples
•
•
•
Microsoft Active Directory - dc=domain, dc=com
Apple Open Directory - dc=domain, dc=com
Novell eDirectory - o=myorganization
•
OpenLDAP - dc=domain, dc=com
Fetch
The Fetch button will attempt to retrieve the Base DN from your LDAP server. This
method may not always retrieve the correct Base DN, depending upon your LDAP
implementation.
LDAP Connection Style
Choose the LDAP technology that exists on your network.
Login
Enter the username and password for the user that has read access to the LDAP tree specified.
Clicking ‘Save’ will attempt to connect to your LDAP server and, if successful, will save your
LDAP settings.
After SAFARI Montage connects successfully to your LDAP server, click ‘LDAP Groups’ in the
left navigation menu to map your LDAP groups to the SAFARI Montage user types.
LDAP Groups
The LDAP Groups page allows you to map groups from your LDAP server to the user types
within SAFARI Montage.
To Map an LDAP Group to a SAFARI Montage User Type
1. Select an LDAP Server from the ‘LDAP Server’ dropdown box.
2. Select the SAFARI Montage user type from the ‘Show LDAP Assignments for the ... User
Type’ selection box that you would like to map LDAP groups to.
3. Select an LDAP group, or groups, from the listbox and hit ‘Add.’ to map the LDAP group to
the SAFARI Montage user type. Your selections will display in the ‘Assigned LDAP Groups’
listbox.
To Remove the Mapping of an LDAP Group to a SAFARI
Montage User Type
1. Select an LDAP Server from the ‘LDAP Server’ dropdown box.
2. Select the SAFARI Montage user type you want to modify from the ‘Show LDAP Assignments
for the ... User Type’ selection box.
3. Select the LDAP group from the ‘Assigned LDAP Groups’ listbox that you want to unmap
from the SAFARI Montage user type.
4. Click on the ‘Remove’ button.
SAFARI Montage User Types
Detailed descriptions of each SAFARI Montage user type are below. The user types below are
listed in order of permission level.
Administrator
Users within the Administrator user type have access to all SAFARI Montage functions,
including full access to the private ‘Admin’ area. Administrators are also able to view
and manipulate all of the content in the system, including expired content.
Teacher (w/Upload)
This user type has the same permissions as the Teacher user type below, with the addition
of upload capabilities if the CreationStation™ module is installed.
Teacher
Teachers have access to all features in the system, with the exception of the private
‘Admin’ area. Teachers have more permissions than Students in that they can create
quizzes and view teacher’s guides, blackline masters and other attachments in SAFARI
Montage. If the CreationStation module is installed, Teachers cannot create or modify
any uploaded content. If whiteboard integration is enabled for your system and you have
the CreationStation module installed, then whiteboard file uploading capabilities can be
extended to Teachers. Please see the ‘System Settings’ Help page for more information.
Student
Students cannot view or search for teacher’s guides, quizzes, blackline masters, or other
attachments. If the CreationStation module is installed, Students cannot create or modify
any uploaded content. Students do not have access to the ‘Admin’ area.
Creating a Single New User
1. Click ‘Admin’ on the SAFARI Montage header.
2. Click ‘Users’ from the secondary navigation menu. (‘Users’ is within the Settings submenu.)
3. Click the ‘add user’ link at the top of the User Summary page. If you are an administrator
logged into a WAN parent server, select the school you want to create users within before
clicking the ‘add user’ link.
4. Complete the form. Usernames must be between 3 and 30 letters and/or numbers. Spaces are
not allowed. Passwords must be between 5 and 10 letters and/or numbers. You may also leave
the field blank to generate a random password that will be emailed to the user
5. Click ‘Add User’.
NOTE: If your system has MHA (Managed Home Access) installed, then you will be able to
assign users to the ‘Parent’ user type.
Creating Multiple New Users
1.
2.
3.
4.
Click ‘Admin’ on the SAFARI Montage header.
Click ‘Settings’ from the secondary navigation menu.
Click ‘Users’ from the Settings submenu.
Click the ‘add multiple’ link. If you are an administrator logged into a WAN parent server that
has multiple direct play schools, select the school you want to create multiple users within
before clicking the ‘add multiple’ link.
5. Select the user type to which you will be assigning the new users. Students have access to all
features except for teacher materials and system administrator functions. Teachers have access
to all features except for administrator functions. Administrators have access to all features of
SAFARI Montage.
6. There are 2 ways of adding multiple users, manual entry or text file upload. For manual entry,
enter a comma-separated list of email address into the ‘Email Addresses’ text-area. To upload a
comma-separated TXT or CSV file of users, click the ‘Browse’ button and navigate to your
import file.
Manual Entry
Text File Upload
Each line in the import file must be in the following format:
username, firstname, lastname, password, emailaddress, title, user type
Valid user types are Student, Teacher, Teacher (w/Upload), and Administrator. Leave a user’s
password blank to have it auto-generated. NOTE: If you have Managed Home Access on your
SAFARI Montage server, you will have the abilty to assign users to an additional user group
called ‘Parent.’
7. Click ‘Add Users’.
NOTE: If your system has MHA (Managed Home Access) installed, then you will be able to
assign users to the ‘Parent’ user type.
Editing User Accounts
1.
2.
3.
4.
Click ‘Admin’ on the SAFARI Montage header.
Click ‘Settings’ from the secondary navigation menu.
Click ‘Users’ from the Settings submenu.
Click on the user that you wish to edit.
5. Make necessary changes to the account, including username, email address, type of account and
password.
6. Click ‘Update.’
NOTE: If your system has MHA (Managed Home Access) installed, then you will be able to
assign users to the ‘Parent’ user type.
Deleting User Accounts
1.
2.
3.
4.
5.
Click ‘Admin’ on the SAFARI Montage header.
Click ‘Settings’ from the secondary navigation menu.
Click ‘Users’ from the Settings submenu.
Select user to be deleted.
Click ‘delete’ at the end of the user management line.
6. Select ‘Delete’ to permanently remove the user and all related playlists.
Network Settings
1.
2.
3.
4.
Click ‘Admin’ on the SAFARI Montage header.
Click ‘Settings’ from the secondary navigation menu.
Click ‘Network’ from the Settings submenu.
Change or set various network settings. Changing the settings on this page will require a
restart of SAFARI Montage. During the restart, SAFARI Montage will not be accessible
for up to 10 minutes.
5. Click ‘Set.’
Hostname Help
The Hostname is the unique name by which your SAFARI Montage server is known on your
network. On most networks, hostname is usually a single word, for example, montage1. With
certain other network configurations your hostname may need to be fully qualified using its
entire domain name. For example, if the hostname of this server is montage1 and the domain on
which it resides is called myschool.edu, the hostname above would be montage1.myschool.edu.
Software Update
To update the software or the content on your SAFARI Montage server, you must log on to the
server's SAFARI Montage console. For more information about the SAFARI Montage console,
see the Help page ‘SAFARI Montage Console.’
1. Insert the SAFARI Montage update CD, DVD or USB thumb drive.
2. From the SAFARI Montage console, select menu item #5 ‘Update SAFARI Software...’
3. Select #1 ‘Update SAFARI Software from CD or DVD’ if you inserted a CD or DVD. Select
#2 ‘Update SAFARI Software from USB Drive’ if you inserted a USB thumb drive.
The update will take several minutes to complete. If you are updating the software on your
SAFARI Montage server, then your server will reboot once the update is finished. If you are only
running a content update, the server will not reboot when the update is complete.
Note: The software update will update all point releases as well as patch releases. If your server
is in a WAN parent/child environment or you have expansion servers, it is suggested that you
update your WAN parent or WAN controller server first. After updating the WAN controller
server, the expansion servers will be automatically updated. If your WAN environment has child
servers, you can opt to have your child servers automatically update once the WAN parent is
updated - see Help page ‘Remote School Servers’ in the WAN Manager Guide. If you do not
enable this feature, then you must manually update each child server once the update has been
installed on the WAN parent.
Release Notes
Release notes for versions of SAFARI Montage can found here or by clicking the ‘Release
Notes’ link on the ‘Software Update’ page.
Adding New Content and Add-On Modules
(Quick Start)
The ‘Activate Content & Modules’ function will attempt to automatically activate all inactive
content packages that are on the hard drives on the server. The SAFARI Montage server needs to
be connected to the Internet for this to take place. The server will transmit a few small pieces of
data that identify your content packages and your server. An average-sized content package takes
approximately 10 to 15 minutes to activate while the database is populated. This time may vary
depending on your SAFARI Montage hardware and configuration.
1.
2.
3.
4.
Click ‘Admin’ on the SAFARI Montage header.
Click ‘Settings’ from the secondary navigation menu.
Click ‘Activate Content and Modules’ from the Settings submenu.
Read Digital Content License Agreement.
5. Type in site information and click ‘Next’ to the terms and conditions.
If you experience any problem with this multi-package activation method, you may activate
individual packages by browsing the ‘Content Packages’ section of ‘Admin’ area. If your
SAFARI Montage server does not have Internet connectivity, there is also a manual activation
method in the ‘Content Packages and Add-On Modules’ Help section.
Content Packages and Add-On Modules
This section lists all content packages and add-on modules, active and inactive, available on your
SAFARI Montage server. If a content package or module is not listed and you expect it to be
listed, then click ‘Active Content & Modules.’ This will detect and install any new content and
modules found in the system. For more info, see the help page ‘Adding New Content and AddOn Modules (Quick Start).’
Fully-automatic activation is not available within this section. For information on fully-automatic
activation, see the Help page ‘Activating Content or Add-On Modules.’
Auto-Activation
To perform auto-activation on a particular content package or add-on module, follow the steps
below.
1. Click ‘Admin’ on the SAFARI Montage header.
2. Click ‘Settings’ from the secondary navigation menu.
3. If you want to activate a content package, click ‘Content Packages’ from the Settings submenu.
To activate an add-on module, click ‘Add-On Modules’ from the Settings submenu.
4. View currently installed media packages or modules. The list also displays packages or
modules awaiting activation. The ‘Active’ column indicates the activation status of each
package or module. Items without a green check in the ‘Active’ column are inactive. (The
image below displays the screen for content packages.)
5. Click the ‘Activation’ link next to the item you wish to activate.
6. Click the ‘Activate’ button. Auto-activation requires that the SAFARI Montage server is able to
access the Internet. SAFARI Montage will transmit several numbers that identify your SAFARI
Montage server and the item you are activating. If your server is not able to access the Internet,
follow the steps for manual activation below. The product will cycle through its activation
process, showing progress in real time. If you are activating a content package, you will be
returned to the Content Packages screen when it is finished. If you are activating an add-on
module, you will be returned to the Add-On Modules screen when the activation is complete.
Confirm that the content package or add-on module now has a green check mark in the Active
column.
7. If you are logged into a WAN Manager Parent Server only: After the package or module is
activated, you must assign the package/module to a school or schools. See the help page ‘WAN
Manager Media and License Management’ in the WAN Manager Guide.
Manual Activation
Manual Activation can be used in the event that the SAFARI Montage server fails to connect to
our activation servers or does not have access to the Internet.
To perform manual activation on a particular content package or module, follow the steps below.
1. Click ‘Admin’ on the SAFARI Montage header.
2. Click ‘Settings’ from the secondary navigation menu.
3. If you want to activate a content package, click ‘Content Packages’ from the Settings submenu.
To activate an add-on module, click ‘Add-On Modules’ from the Settings submenu.
4. Click the ‘Activation’ link next to the package/module you wish to activate.
5. Click the ‘Manual’ button. The manual activation screen will display. (The image below is an
example of the manual activation screen for a content package.)
6. Enter your Activation ID and Password and hit ‘Activate.’ To acquire your Activation ID and
Password, record the Unit ID from the screen shown, and have your Product ID from your
package label handy.
Browse to the Product Support and Activation website indicated:
http://software.safarivideonetworks.com/. You may want to launch a new browser window for
this site and leave SAFARI Montage open in the previous one. You will need to return to
SAFARI Montage to enter the activation ID and password.
7. Product Support and Activation Website - Once you have arrived at the Product Support and
Activation website, select ‘SAFARI Montage’ from the ‘Activation’ menu.
8. Product ID - Enter your Product ID from your content package or module label and click
‘Next.’
9. Agreements - Read and agree to both license agreements by clicking the checkboxes
underneath each license. You must also digitally ‘sign’ the license agreement by confirming
your organization name and entering your name and title. Click ‘Next.’
10. SAFARI Montage Customer Information - This screen gives you the opportunity to create a
login and modify your personal profile. You will need the login for future visits to the support
website to access the Knowledgebase, Downloads and Service Request sections. Please make a
personal record of the password you choose. When you are finished entering all pertinent
information, click ‘Save.’
11. SAFARI Montage Activation - Enter the Unit ID that was displayed to you on the SAFARI
Montage manual activation screen. Version Number and Serial Number should already be filled
in, but you may correct them if necessary. Be sure to enter the numbers exactly as they appear
on the SAFARI Montage manual activation screen. Click ‘Get Password.’ An activation ID and
password will be generated and displayed.
12. SAFARI Montage Manual Activation - Return to the SAFARI Montage manual activation
screen. Enter or copy and paste the activation ID and password that were provided from the
support website into the appropriate fields. Click ‘Activate.’ The product will cycle through its
activation process, showing progress in real time. If you are activating a content package, you
will be returned to the Content Packages screen when it is finished. If you are activating an addon module, you will be returned to the Add-On Modules screen when the activation is
complete. Confirm that the content package/module is now labeled ‘true’ in the Active column.
13. If you are logged into a WAN Manager Parent Server only: After the package is activated,
you must assign the package/module to a school or schools. See the help page ‘WAN Manager
Media and License Management’ in the WAN Manager Guide.
For further information and information about fully-automatic activation, see the Help page
‘Activating Content or Add-On Modules.’
For information about deactivating content or modules, see the Help page ‘Deactivating Content
or Add-On Modules.’
Activating Content or Add-On Modules
There are three different methods to activate a SAFARI Montage content package or add-on
module.
Fully Automated Activation
This activation method requires that the SAFARI Montage server have Internet access. There is
no user intervention required aside from agreement to the licenses. SAFARI Montage
communicates with our remote activation servers automatically, transmitting the identifying data
needed to activate your SAFARI Montage package/module(s). This method will attempt to
activate all inactive content packages and modules detected within SAFARI Montage. SAFARI
Montage attempts to use this method upon first-time install. If it fails, you will have the
opportunity to use manual activation (see ‘Manual Activation’ below). This method may also be
used to discover and activate add-on module content packages in the future by clicking the
‘Activate Content & Modules’ button in the secondary navigation menu.
1.
2.
3.
4.
Click ‘Admin’ on the SAFARI Montage header.
Click ‘Settings’ from the secondary navigation menu.
Click ‘Activate Content & Modules’ from the Settings submenu.
Read Digital Content License Agreement.
5. Type in site information and click ‘Next’ to the terms and conditions.
Automatic Activation
This activation method requires that the SAFARI Montage server have Internet access. You will
be required to enter the Product ID from your content package/module label. SAFARI Montage
transmits this data to our remote activation servers. This method is useful in that it allows a
single content package or module to be activated if there are other packages/modules that you
would like to leave inactive for whatever reason.
Manual Activation
Manual activation does not require that the SAFARI Montage server have Internet access. If the
two methods above fail, you can use this method. You will be required to browse to our product
activation website. The activation website will require that you enter your SAFARI Montage
Product ID and Unit ID. Your Product ID is affixed to a label on your product packaging.
Your Unit ID can be found in SAFARI Montage:
1. Click ‘Admin’ on the SAFARI Montage header.
2. Click ‘Settings’ from the secondary navigation menu.
3. If you want to activate a content package, click ‘Content Packages’ from the Settings submenu.
To activate an add-on module, ‘Add-On Modules’ from the Settings submenu.
4. Click the ‘Activation’ link next to the item you wish to activate.
5. Click the ‘Manual’ button.
6. Write down the Unit ID shown or leave this browser window open in the background. You will
need that Unit ID at the activation site.
7. From an Internet-connected PC, browse to our product activation website. Click the SAFARI
Montage logo, or choose ‘SAFARI Montage’ from the ‘Activation’ menu. For full instructions,
browse our manual activation support site.
For more information, see the Help page ‘Content Packages and Add-On Modules.’
Deactivating Content or Add-On Modules
1. Click ‘Admin’ on the SAFARI Montage header.
2. Click ‘Settings’ from the secondary navigation menu.
3. If you want to deactivate a content package, click ‘Content Packages’ from the Settings
submenu. If you’d like to deactivate a module, click ‘Add-On Modules’ from the Settings
submenu.
4. Click the ‘Activation’ link next to the content package or module that you want to deactivate.
5. Click the ‘Deactivate’ button.
6. A message box will pop up asking you to verify that you want to deactivate this package. All
media included in the package will be removed from your SAFARI Montage server.
7. When the deactivation is finished, there will no longer be a green check mark next to the
package in the ‘Active’ column.
Secure Sockets Layer (SSL)
Secure Sockets Layer (SSL)
SSL is a technology that allows browser-based applications like SAFARI Montage to encrypt
private data as it travels between the user’s web browser and the server. If data is not encrypted
in this manner, then it is transmitted in “plain text,” which means there is a risk that it can be
viewed by eavesdroppers using the right tools. This becomes a much greater concern with
publicly exposed Internet or Extranet applications, as opposed to ones that reside behind your
firewall on your LAN (Intranet). Even with Intranet applications, it is generally a wise practice to
use SSL to secure certain pages where private data is entered by the user. In SAFARI Montage’s
case, activating SSL will secure all pages where a password is entered for example, the Login
and User-Management pages. (For complete list, see SSL-Secured Pages below.)
Encryption Types in SAFARI Montage
There are two methods of password-encryption in SAFARI Montage, a non-SSL encryption for
older SAFARI Montage hardware, and true SSL encryption for new hardware.
New Hardware
SAFARI Montage Models: T-420, RM-640, WAN-1240
•
•
•
True SSL encryption
SSL is managed from the Admin > Settings > SSL page. There are three SSL Types to choose
from on that page. See “SSL Types” below.
SSL Type is a "server-wide" setting. It applies to all schools on that server.
Old Hardware
SAFARI Montage Models: T-400, RM-800, WAN-1000
•
•
•
•
•
Only the non-SSL encryption is available, which can be activated or deactivated by the
SAFARI Montage Admin.
Non-SSL encryption is activated/deactivated on the Admin > Settings > System page.
This is also a server-wide setting. It applies to all schools.
When active, extra asterisks will suddenly appear in password boxes when “Submit” is clicked
on secure pages.
There is no Admin > Settings > SSL page.
SSL Behavior
When SSL is active on secure pages, several things will occur in the web browser:
•
•
•
•
The browser will display an SSL icon (usually a padlock or shield) either in the Address bar or
the Status bar.
The SSL icon may be double clicked to see details about the SSL certificate, such as Certificate
Authority, Encryption Level, etc.
The browser’s URL will begin with https:// rather than http://.
If the certificate in use is not signed by a trusted authority, the browser will display a warning
about an untrusted certificate.
SSL Types
The three SSL Types on the Admin > Settings > SSL page are:
None
SSL is inactive. No SSL padlock icons will appear in the browser. Passwords are transmitted in
plain text.
Self-Signed
Built-In self-signed SSL certificate signed by “SAFARI Montage.” Because this certificate is not
signed by a trusted certificate authority (such as VeriSign, Thawte, or Comodo), it will cause
browser warnings to appear. If the user does not trust this certificate permanently, the warnings
will reappear the next time the user accesses SAFARI Montage. These warnings do not mean the
pages are not secure. Regardless of whether the user trusts the certificate or not, an SSL icon will
still display in the browser’s Address bar or Status bar indicating that these pages are still
completely encrypted. Different browsers have different ways of letting the user trust a
certificate. Refer to your browser’s documentation to find out more about trusting SSL
certificates.
With the Self-Signed certificate type, no certificate needs to be uploaded. This certificate type is
available as a convenience to organizations that do not want to pay for a commercial certificate
to use while they are waiting for their commercial certificate, or simply do not mind the one-time
browser warnings. Prior to selecting this Self-Signed Certificate option, it is a good idea for the
Systems Administrator to send out an email to all SAFARI Montage users asking them to
permanently trust the certificate when prompted. They will encounter the warning first on the
Login screen.
Upload
This option allows the SAFARI Montage Admin to upload a commercial SSL certificate from a
commercial certificate vendor such as VeriSign, Thawte, or Commodo, or perhaps a certificate
of your own. With commercial certificates from a trusted authority, there will be no browser
security warnings for any users. Be aware that SSL vendors offer free SSL certificates that expire
within 90 days, but these temporary certificates are not signed by the trusted authority. This
means that temporary certificates from commercial SSL vendors will still cause the browser to
display warnings. You must purchase a full, commercial SSL certificate if you want your users
to never see any SSL warnings.
Every SSL Certificate has a corresponding Private Key that is stored on the web server. Your
Private Key is generated at the same time as your “Certificate Signing Request.” See “Certificate
Signing Request” below. SAFARI Montage provides you with two options with regard to the
Private Key (1) uploading your own, and (2) generating one in SAFARI Montage when you
create your CSR. The first method, uploading your own, would be used in cases where you have
generated your CSR and Private Key outside of SAFARI Montage. The second method allows
you to generate your Private Key and CSR directly in SAFARI Montage.
Certificate Signing Request (CSR)
When you purchase a commercial SSL certificate, the vendor will ask you for a “Certificate
Signing Request” (simply some lines of encrypted text). Most certificate vendors will require
that you to paste the CSR text directly into their online form during checkout. The Admin page,
Admin > Settings > SSL, allows you to generate a CSR. On that page, when you fill in the
required information and click “Generate CSR,” your CSR text will display and a temporary
Private Key will be saved onto the SAFARI Montage hard drive. It will not overwrite any
previously uploaded Private Keys (yet). Paste the CSR text into the appropriate box on the SSL
vendor's checkout page, selecting “Apache - mod_ssl” as the certificate type. When your
certificate arrives, return to the Admin > Settings > SSL page and upload it. SAFARI Montage
will verify that the temporary Private Key corresponds to the Certificate you are now uploading.
At that point, provided the temporary Private Key and Certificate correspond, any previously
uploaded Private Key will be overwritten with the temporary Private Key. In other words, you
temporary Private Key is now your active Private Key.
Back Up Your Private Key and SSL Certificate
It is very important that you back up your Private Key and Certificate. To view your Certificate
and Private Key, click the small icons next to the Upload boxes on the Admin > Settings > SSL
page. A window will open with your encrypted Certificate or Private Key text in it. Copy and
paste that text into text file and save them in a secure location on your computer or network.
Certificates typically have a “CRT” file extension. Private Keys typically have a “KEY” or
“PEM” extension.
Certificate Trust in Various Browsers
In each web browser brand, there are ways to trust self-signed certificates so that the security
warnings no longer display.
Internet Explorer
To eliminate the warnings and the red Address Bar in Microsoft Internet Explorer when using a
self-signed certificate, you must add the certificate to the Windows “Trusted Root Certification
Authorities” store. To do this:
1. Click the following link to the self-signed SSL Certificate on this server.
2. When prompted, select “Open” button and agree to any warnings or prompts.
3. Click the “Install Certificate” button in the tabbed dialog box that appears. Internet Explorer
will inform you that you are about to install the certificate. Click “Next.”
4. When it asks you to select a “Store” (a location), you must manually select “Place all
certificates in the following store.”
5. Click “Browse...” and select “Trusted Root Certificate Authorities.” Again, accept any
warnings that display.
Internet Explorer’s warnings and red address bar when browsing SAFARI Montage should now
be eliminated.
Firefox
Pre-3.0 versions of Firefox, when presented with an untrusted certificate, would display a dialog
box with three choices: “Accept this certificate permanently”, “Accept this certificate
temporarily for this session” and “Do not accept this certificate...” Clicking “Accept this
certificate permanently” would cause no further warnings to display about that particular
certificate.
With the release of Firefox 3.0, the process has become more elaborate (for security purposes).
When the warning dialog box appears, you must manually “Add a Security Exception” for that
certificate. It takes several clicks. Follow the prompts.
Safari
Safari displays a dialog entitled, “Safari can't verify the identity of this website...” To trust the
certificate, click “Show Certificate.” In the “Trust” section, set “When using this certificate”
to “Always trust.”
SSL-Secured Pages
The following pages are secured when encryption (SSL or non-SLL) is active:
•
•
•
•
•
•
•
•
•
•
Login
Preferences > Change Password
Admin > Settings > System
Admin > Settings > Users > Add User
Admin > Settings > Users > Add Multiple
Admin > Settings > Users > [click a username]
Admin > Settings > LDAP > Add Server
Admin > Settings > LDAP > Edit Server
Admin > Data Recovery > Add Destination
Admin > Add-On Modules > DataCasting > Share
Top
Setting System Time and Time Zone
1.
2.
3.
4.
Click ‘Admin’ on the SAFARI Montage header.
Click ‘Settings’ from the secondary navigation menu.
Click ‘Time’ from the Setup submenu.
Select the appropriate location from the drop down menu. Please note that changing only your
system’s time zone will also change your system’s time settings.
5. There are two methods to set the system time for SAFARI Montage. If your SAFARI Montage
server has access to the internet, you can use an internet time server to set your system's date
and time. The second method on the System Time page allows you to manually enter system
time by entering the year, month, day, hour and minutes in a continuous number series.
6. Click ‘Set.’
System Diagnostics
Your SAFARI Montage server has many system diagnostic tools. To locate these helpful tools,
click ‘Admin’ on the SAFARI Montage header and then click ‘Tools’ from the secondary
navigation menu. Tools with the text ‘live’ next to them are tools that are continually refreshed
with new data as you are browsing the page. You can set the refresh rate of a ‘live’ tool by
clicking on the refresh rate settings at the top of the tool’s page.
Bandwidth (live)
The Bandwidth tab on the Tools submenu allows system administrators to monitor the
bandwidth usage of their SAFARI Montage server.
Bandwidth Restrictor
The Bandwidth Restrictor page allows you to specify the amount of bandwidth your server will
use on the network.
Connections SMB (live)
The Connections SMB tab lists the active SMB connections per hard drive of your SAFARI
Montage server.
Connections TCP (live)
The Connections TCP tab lists the remote address, connection type and number of ports for each
TCP connection to your SAFARI Montage server.
Content Packages Statistics
This page lists all of the content packages available on your server. If a content package is
activated, a breakdown of providers contained in the package, a total count of titles in the
package, and amount of hard drive space consumed by the content package will be displayed.
DB Cache
Enabling database caching increases the performance of your SAFARI Montage server. The
cache is updated every 20 minutes.
Hard Drive Info OS
The hard drive info tab on the Tools submenu provides information on hard drive utilization.
Ping
The Ping tab on the Tools submenu allows system administrators to ping other network devices
from the SAFARI Montage server. Enter the relevant information and hit ‘Ping.’
Reboot and Shut Down
The Reboot and Shut Down tab on the Tools submenu allows system administrators to reboot or
shut down the SAFARI Montage server. SAFARI Montage can be connected to a keyboard,
mouse and monitor, or it can be run as an independent appliance. If SAFARI Montage is being
operated as an independent appliance, without a keyboard, mouse and monitor, use the reboot
and shut down web page from within the ‘Admin’ section. DO NOT power your SAFARI
Montage unit down by removing the power cord from the wall outlet, the rear of the appliance,
or by holding in the power button.
Server Load (live)
The Server Load page reports the CPU uptime and the processes currently running on your
SAFARI Montage server.
Server Load Averages (live)
The Server Load Averages page lists the 5 minute load average per hour for a particular date. It
averages the hourly values and displays an average for the day. You can view the data for this
report for today or any day in the past.
Software Update History
This page displays what SAFARI Montage software version is installed on your server. It also
displays a link the release notes and a history of installed software updates.
Space Available
The Space Available page displays the size and storage space available on your SAFARI
Montage server.
Sync Cache Status (live)
This page lists the status of the WAN cache for syncing with remote servers and expansion
servers.
System Volumes
The System Volumes tab lists the volumes located on your SAFARI Montage server and the
content packages contained on each volume.
Traceroute
The Traceroute tab on the Tools submenu allows system administrators to trace network paths
from the SAFARI Montage server. Enter the relevant information and hit ‘Trace.’
Reporting
Various usage reports are available by clicking ‘Reporting’ from the Admin menu. Reports that
have the word ‘live’ after them are reports that continually refresh themselves with live data as
you are viewing them.
Activity Log
‘Activity Log’ tracks all server activity. This tool can be very helpful when trouble shooting.
Download Popularity
‘Download Popularity’ tracks the number of times a media title was downloaded.
Download by User
‘Download by User’ tracks the number of times a media title was downloaded by a user.
Hard Drive Usage (live)
The live report, ‘Hard Drive Usage,’ displays your servers hard drive usage by package.
Logins by Failure
The ‘Logins by Failure’ report displays a listing of failed login attempts to your server.
Logins by IP
‘Logins by IP’ shows a listing of login attempts to your server by user IP address.
Logins by School (live)
The live report, ‘Logins by School,’ shows a listing of users currently logged on in each school.
Logins by Time (live)
This live report tracks the number of users logged on to your server by time. As a default, it
displays the number of users logged in on an hourly basis for the last 24 hours.
Playbacks by Media (live)
The ‘Playbacks by Media’ live report breaks down the media playbacks by the type of media for
a specified time period. As a default, the report displays playbacks by media for the last 24
hours. In the example below, the report is displaying the playbacks by media type for the last 7
days.
Playbacks by Package
The ‘Playbacks by Package’ report lists media titles that have been played within each content
package on SAFARI Montage.
Playbacks by School
The ‘Playbacks by School’ report lists media titles that have been played within each school on
your SAFARI Montage server. Use the list of schools at the top to display the report for a
different school.
Playback by Time (live)
The ‘Playback by Time’ live report lists the number of plays each hour.
Playback by User
This report displays the number of plays for users in a school. Use the list of schools at the top to
display the report for a different school.
Playback Details
‘Playback Details’ allows administrators to search usage reports by a specific date range.
Usage Data
‘Usage Data’ allows administrators to run several specific specialized DB extraction queries. The
DB extraction queries include:
•
•
•
•
•
•
•
•
•
•
•
•
•
•
•
Total Plays (Month)
Total Plays (Month, Content Package)
Total Plays (Month, Content Package, School)
Total Plays (Month, School)
Total Plays (Month, School, User)
Total Plays (Month, School, User, Title)
Total Plays Last Month
Total Plays Last Month (Content Package)
Total Plays Last Month (Content Package, School)
Total Plays Last Month (School)
Total Plays Last Month (School, User)
Total Plays Last Month (School, User, Title)
Full Export (up to 5 years)
Full Export Last Year
Full Export Last Month
If you have the SAFARI Montage Managed Home Access feature installed, then you will also
see the following:
•
•
•
•
•
•
•
•
•
•
•
•
•
Total Home Access Plays
Total Home Access Plays (Month)
Total Home Access Plays (Month, Content Package)
Total Home Access Plays (Month, Content Package, School)
Total Home Access Plays (Month, School)
Total Home Access Plays (Month, School, User)
Total Home Access Plays (Month, School, User, Title)
Total Home Access Plays Last Month
Total Home Access Plays Last Month (Content Package)
Total Home Access Plays Last Month (Content Package, School)
Total Home Access Plays Last Month (School)
Total Home Access Plays Last Month (School, User)
Total Home Access Plays Last Month (School, User, Title)
Web Server Statistics
‘Web Server Statistics’ provides system administrators with a large number of basic reports.
These reports can provide necessary daily, weekly, as well as quarterly usage reports.
Restricting Access to Packaged Content Titles
System Administrators can restrict access to a particular title included in distributed content
packages by completing the following steps.
1. Click ‘Search’ on the SAFARI Montage header.
2. Locate the media that needs to be restricted by using the standard search feature.
3. Click the permissions icon on the title’s detail page.
4. From the ‘Grant Permissions To’ drop down box, select ‘All’ to grant permissions to all users
or select ‘User Types’ to grant permission to specific users.
5. If you selected to grant permissions to user types, put a check mark in the boxes next to all of
the user types you want to grant permissions to. By selecting only ‘Administrator,’ this title will
only be viewable by logins within the Administrator group. If you choose ‘Teacher (w/Upload)’
and ‘Teacher,’ this title will be viewable by logins within the Teacher (w/Upload) group or the
Teacher group.
6. Hit the ‘Save’ button. The media title will now only be viewable by logins belonging to the
groups specified.
NOTE: Administrators have full access by default.
SNMP
Montage is an SNMP-enabled device. An SNMP agent is running on Montage that provides
some standard SNMP system monitoring data to an SNMP management application.
There are thousands of SNMP management applications, each having very different ways of
aggregating and displaying SNMP data, and many are very elaborate. Outlining the specific
configuration processes of individual SNMP applications is beyond the scope of this article. The
intent of this article is to provide some of the system monitoring information that can be gathered
from Montage by an SNMP application. This article assumes you are familiar with network
monitoring via SNMP and familiar with terms such as ‘Community String,’ ‘Management
Information Base’ (MIB), and ‘Object Identifier’ (OID).
SAFARI Montage provides read-only access via the SNMP V1 and V2c protocols. The
Community String you will enter into your SNMP management application is ‘public.’
We do not publish or maintain a MIB specific to SAFARI Montage. It is left as an exercise for
the Systems Administrator to choose which data they are interested in.
The four general MIBs that encompass the OIDs accessible on a SAFARI Montage server:
•
•
•
•
HOST-RESOURCES-MIB
RFC1213-MIB
SNMPv2-MIB
SNMPv2-SMI
Open each of these MIBs and you will see over 1,300 OIDs available. Some examples of
monitoring data provided:
•
•
•
•
•
•
•
•
System Information (Contact, Location, Name, etc.)
Uptime
Network Interfaces
Partitions (Drive Capacities and Usage)
Memory
Processes
Sockets
Network Connections
There are two objects specific to the SAFARI Montage software (rather than the hardware or
OS):
•
syscontact - Email address if the Montage Admin user
•
syslocation - The ‘Server Name’ field on the ‘System Settings’ page in the Montage Admin.
This is simply a short name that the Admin can give to the server.
Most SNMP applications will have a search feature if you need to find the above OIDs.
APC UPS Monitor
Supported Models
SAFARI Montage supports the following APC UPS USB Models:
APC Model
UPS
Type
UPS Cable
Status
SmartUPS, SmartUPS VS (It has not been
smart (note: using
confirmed that the cable shipped with the VS is a
apcsmart Smart-Custom),
940-0095.), PowerStack 450, Matrix UPS,
940-0024C
ShareUPS Advanced Port
Supported
BackUPS CS USB, Pro USB, ES USB, RS/XS
1000, RS/XS 1500, and probably other USB
models
Supported in
version
>=3.9.8
usb
usb (note: using
APC cables 9400127A/B/C)
Before you begin:
•
•
Ensure that the Customer is running SAFARI Montage 2.3.10 or higher.
Ensure that the Customer’s UPS is an APC UPS USB device and is listed in the ‘Supported
Models’ table above.
• Ensure that the Customer has properly connected the USB cable from the APC UPS to the
SAFARI Montage server.
• Determine whether or not the Customer’s server requires a rebuild of the kernel:
o Kernel Rebuild Required: If a customer has an older, 30GB OS partition hard drive, they
will receive this message when they click on Admin>Tools>APC UPS Monitor. Proceed to
Step I: Rebuilding the Kernel.
o
Kernel Rebuild Not Required: If a customer has a newer, 80GB OS partition hard drive,
they will receive this message when they click on Admin>Tools>APC UPS Monitor. Proceed
to Step II: Installing APC UPS Monitor.
Step I: Rebuilding the Kernel
If the Customer has one of the 2007 80GB OS partition drives, go to the next step, otherwise,
you must rebuild the kernel.
1. cd /usr/src/sys/i386/conf
2. Perform a ls on the directory.
3. Edit or vi one of the following files: MONTAGE or MONTAGESMP. Under the ‘USB
support’ section, search for the line that looks like this:
device uhid #Human Interface Devices
If there is a # in front of device, leave it alone. If there is not a # in front of device, place one
there and save the file.
4. cd /usr/src
5. If you modified the MONTAGE file, enter:
make buildkernel KERNCONF=MONTAGE
If you modified the MONTAGESMP file, enter:
make buildkernel KERNCONF=MONTAGESMP
6. If you modified the MONTAGE file, enter:
make installkernel KERNCONF=MONTAGE
If you modified the MONTAGESMP file, enter:
make installkernel KERNCONF=MONTAGESMP
7. Reboot the server to initialize the new kernel.
8. After reboot, verify that the UPS is attached to ugen by entering:
dmesg | grep –i ups
If the result indicates the UPS is attached to both ugen0 and uhid0, shut the machine down and
then power it on, and repeat this step.
Step II: Installing APC UPS Monitor
Have the customer perform the following steps:
1. Choose Primary Monitor Configuration (the SAFARI Montage server must be directly
connected to the APC UPS via USB).
2. Select the battery threshold at which the Monitor engages and powers down the server.
3. Click ‘Install APC UPS Monitor.’
The server is now configured to be the Primary Monitor, and will be powered down safely once
the battery level of the APC UPS reaches the Battery Threshold level.
School News with CreationStation™
If your server has the CreationStation add-on module installed, users with administrator
privileges can upload media into CreationStation and appropriate the uploaded media to ‘School
News.’ Upon upload, items designated as ‘School News’ are automatically shared and scheduled
to be distributed to all schools throughout the district. Each time a user logs in to SAFARI
Montage, the most recent unviewed School News item will automatically play in the media
player on the Dashboard.
Media items tagged as School News are listed in the ‘School News’ panel on the Dashboard.
For more information about uploading media into CreationStation see the ‘Uploading Media into
CreationStation™’ Help page.
Sharing CreationStation™ Media with
District
If your server has the CreationStation add-on module installed, users having administrator rights
in a WAN environment have the ability to share media uploaded into CreationStation with their
district.
1. Click on ‘Modules’ on the SAFARI Montage header.
2. You are now on the CreationStation Search Homepage. Search for the media title you want to
edit.
3. Click the ‘Edit’ button under the Add/Play buttons.
4. The ‘Edit Media Info’ screen automatically opens. To allow others in your district to view this
item, check the ‘Share to District’ checkbox. Media shared with the district will bypass the
approval queue.
5. (optional) You can also assign a priority to distribute the media title to other servers in your
district by checking the ‘Auto-Distribute’ checkbox and selecting a distribution priority level.
6. Hit the ‘Save Media Info’ button when changes are complete.
Personalize Login Screen
You can personalize your SAFARI Montage server by uploading a logo image that will display
on your login screen.
1.
2.
3.
4.
5.
Click ‘Admin’ on the SAFARI Montage header.
Click ‘Settings’ from the secondary navigation menu.
Click ‘Login Screen’ from the Settings submenu.
Click ‘Browse’ and navigate to an image file on your machine or network.
Click the ‘Upload’ button.
Interactive Whiteboard Integration
Overview
The SAFARI Montage Whiteboard Integration module allows you to upload whiteboard media
into CreationStation™.
Setup
Please note, you must have Administrator privileges to change settings for Whiteboard
Integration.
If your SAFARI Montage server is part of a WAN environment:
1. Log into the WAN parent server as an administrator.
2. In the ‘Admin’ section of SAFARI Montage, click ‘WAN Manger’ from the Admin Tools left
navigation menu.
3. Select ‘Schools’ from the ‘WAN Manager’ submenu.
4. Click the name of the school that you want to modify interactive whiteboard settings for.
5. The ‘Interactive Whiteboard Settings’ portion of the school settings page allows you to alter the
following settings for your school.
o Enable Whiteboard Integration - Allows upload of whiteboard files.
o Default Whiteboard - Allows users to search for and view SMART or Promethean files. For
users with the ability to upload media into CreationStation, selecting ‘SMART’ or
‘Promethean’ allows you to upload this file type. Selecting ‘Other’ allows the user to view
media in a new window for support with other types of interactive whiteboards.
o Upload and Share Whiteboard Files - All teachers or only teachers w/upload can upload and
share whiteboard media.
o Whiteboard File Size Limitation - Changes the maximum file size limit for uploaded
whiteboard files.
6. Click ‘Update.’
If your SAFARI Montage server is a standalone server:
1. Log into your server as an administrator.
2. In the ‘Admin’ section of SAFARI Montage, click ‘Settings’ from the Admin Tools left nav.
3. The ‘Interactive Whiteboard Settings’ portion of the system settings page allows you to alter the
following settings for your school.
o Enable Whiteboard Integration - Allows upload of whiteboard files.
o Default Whiteboard - Allows users to search for and view SMART or Promethean files. For
users with the ability to upload media into CreationStation, selecting ‘SMART’ or
‘Promethean’ allows you to upload this file type. Selecting ‘Other’ allows the user to view
media in a new window for support with other types of interactive whiteboards.
o Upload and Share Whiteboard Files - All teachers or only teachers w/upload can upload and
share whiteboard media.
o Whiteboard File Size Limitation - Changes the maximum file size limit for uploaded
whiteboard files.
4. Click ‘Update.’
NOTE: When using a SMART board™ whiteboard, the user must turn off the SMART board™
player within the SMART board™ application to properly view content delivered from SAFARI
Montage.
Add/Edit Destination
Adding a Destination
The first step in backing up your SAFARI Montage data is adding a backup destination. To add a
destination, click the “Add Destination” button under the Data Recovery menu in the left
navigation menu. The form shown below will display. Fill in the form fields to point to a
SAMBA or Windows file share on your network. Click the “Add Destination” button to add the
destination to your backup destinations list. As soon as you click “Add Destination”, the backup
system will attempt to connect to the destination to verify its validity.
•
•
•
•
•
Destination Name: Your personal name for this backup destination. Destination Name can be
anything you prefer. It does not affect the connection to the remote share.
Remote Machine Name: The name of the destination machine on your network. This name
should not be prefixed with double backslashes (\\) or foreslashes (//).
Remote IP or Hostname: The IP address on the destination machine. The IP is used if the
name resolution for Remote Machine Name fails. A fully qualified hostname can also be used
here, for example, backup.yourschool.edu.
Remote Share Name: The name of the share on the remote (destination) machine. Make sure
the remote share has granted read, write, and delete permissions to the specified user.
Domain: If the permissions on the remote share use a domain user account, you must specify
that domain here. To use a local user account on the backup destination, you may leave this
field blank.
•
•
User Name: The user account used to connect to the remote share.
Password: The password of the user account used to connect to the remote share.
Backup
Backing Up
The Backup page allows you to manually back up your data or media files at any time.
To begin a manual backup, choose one or more target destinations by clicking its checkbox in
the left-hand column of the Backup Destinations table. Set the “Data Only” and “Keep Previous”
drop-downs accordingly and click the “Back Up” button.
What is Backed Up
Data
Uploaded Media Files
(CreationStation™ module only)
Playlists
Recent Searches
User Accounts
User Dashboards
Audio
Images
Video
Flipcharts
Data Only
Customers who have CreationStation™ installed will also see a drop-down for “Data Only.” The
Data Only drop-down lets you select between backing up only personal data or both personal
data and uploaded media files. The personal data backed up is playlists, recent searches, user
accounts, and user dashboards. If you have CreationStation installed, and you set the Data Only
drop-down to “No,” all uploaded video, audio, and image files will also be backed up.
Keep Previous
The “Keep Previous” drop-down allows you to select whether to retain prior backups or
overwrite the most recent backup. If Keep Previous is set to “Yes,” a new backup will be created
on the selected destination. If Keep Previous is set to “No,” the backup labeled, “Default
backup,” will be overwritten. If your default backup is not on your target destination and you set
Keep Previous to “No,” the system will still remove the default backup from the former
destination. In other words, the system obeys the “Keep Previous” setting regardless of where the
default backup is located.
Spanning Destinations
Activating more than a single destination checkbox allows you to span the backup across
multiple destinations. During a multi-destination backup, when the first destination fills up, the
backup will continue on the second destination, and so on, filling each destination up in
sequence. Because a hard drive filled to 100% capacity can cause instability on the target system,
the backup system does not fill the target drive(s) completely. The system will leave 2 GB of free
space on each target destination.
Editing Destinations
To edit a destination, click the “edit” link at the right-hand side of its row. The Edit Destination
page with appear allowing you to edit the title, server name, IP address, backup share name, and
login credentials.
Deleting Destinations
To delete a destination, click the “delete” link at the right-hand side of its row. A dialog box will
display to confirm deletion. Important: Deleting a destination does not delete the backup files
that reside there. You may reassociate backups in the future by creating a destination and
pointing it to that same location.
Deleting Backups
To delete a backup, click its “delete” link. A confirmation box will display. Deleting a backup
will delete all files associated with that backup—data and media.
Space Calculations
The size calculations on the page indicate how much space remains on each destination, as well
as estimated space required for your backup. The “Data Space” total is an estimate of how much
space your personal data will consume. If the SAFARI Montage CreationStation module is
installed, the “File Space” total indicates the total space needed to back up all of your uploaded
video, audio, and image files. As you change the Data Only selection, the File Space estimation
will appear or disappear and the “Space Needed” and “Will it Fit?” metrics will change
accordingly. Please note that these space calculations are “safe estimates” with some overhead
added. The physical space consumed on the destination drive will likely be less.
Backup Schedule
The Backup Schedule area allows you to schedule backups to occur automatically on a weekly
basis. You may set the backup to occur any day of the week, at any time. If you have the
SAFARI Montage CreationStation™ module installed, you may also back up your uploaded
media content in addition to your personal data.
1.
2.
3.
4.
Click ‘Admin’ on the SAFARI Montage header.
Click ‘Data Recovery’ from the secondary navigation menu.
Click ‘Backup Schedule.’
Place a checkmark next to the destinations you wish to schedule. Set the ‘Active’ drop-down to
‘Yes.’ Set scheduling options as desired and click ‘Save.’
Scheduling an Auto-Backup
To schedule an auto-backup, choose one or more target destinations by clicking its checkbox in
the left-hand column of the Backup Destinations table. In the Backup Schedule table, set the
“Week Day” and “Hour of Day” drop-down boxes to indicate when you would like the backup to
occur. Customers who have CreationStation™ installed will also see a drop-down for “Data
Only.” The Data Only drop-down lets you select between backing up only personal data or both
personal data and uploaded media files. The personal data backed up is playlists, recent searches,
user accounts, and user dashboards. If you have CreationStation installed, and you set the Data
Only drop-down to “No,” all uploaded video, audio, and image files will also be backed up. To
schedule the auto-backup, set the Active drop-down box to “Yes” and click the Save button.
Please see the screenshot below for further information.
Spanning Destinations
Activating more than a single destination checkbox allows you to span the auto-backup across
multiple destinations. During a multi-destination backup, when the first destination fills up, the
backup will continue on the second destination, and so on, filling each destination up in
sequence. Because a hard drive filled to 100% capacity can cause instability on the target system,
the backup system does not fill the target drive(s) completely. The system will leave 2 GB of free
space on each target destination.
Restore
Restoring Backups
To restore a backup, select its radio button and click the “Restore” button. A dialog box will
appear confirming your decision to restore that backup. Restoring a backup will overwrite all
existing personal data and personal content in your SAFARI Montage system. Your existing
licensed content packages will not be overwritten.
You may also delete destinations and backups from this page. See the ‘Backup’ Help page for
more information on deleting destinations and backups.
What is Restored
Backup restoration will overwrite all existing personal data in your SAFARI Montage system.
This includes dashboards, playlists, recent searches, user accounts, and for CreationStation™
users that selected a full backup (rather than “Data Only”), all uploaded video, audio, and image
files. For CreationStation users, if the backup being restored was “Data Only,” any media files
that still exist since that backup took place will remain available in SAFARI Montage. Any
media that was deleted since that backup will appear in search results but will not play. For these
records, you must upload a media file again, or delete the entire item and add it again.
Restoring to a New System
Always follow this sequence to restore backups into a new system.
1. Install and activate all content packages.
2. Restore your backups.
Do note restore your backups prior to reinstalling and activating content. Unpredictable results
can occur.