1
owner’s manual
Backcountry Access, Inc.
•
Boulder, Colorado, 80301 USA
•
www.backcountryaccess.com
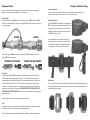
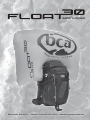
Basic Components
Basic Components
airbag
lined goggle storage pocket
airbag compartment
diagonal ski mount loop
helmet carry system loops
compression straps
shovel blade storage pocket
helmet carry system loops
trigger handle
12
insulated hydration sleeve
diagonal ski mount loop
waist strap pockets
leg strap
9
11
leg strap loop
shovel handle/probe storage pocket
10
Theory of Operation / Disclaimer / Warranty
Equipment Check
Why do I need an avalanche airbag?
Preventing or minimizing burial depth is the key to reducing avalanche fatalities. That’s because the
majority of time in an avalanche rescue is spent on excavating the victim. An airbag is designed to
keep you at or near the surface, minimizing excavation time.
How does a pack reduce burial depth?
Inverse segregation, more commonly referred to as the “Brazil nut effect,” is the science behind why
airbags work. The turbulent movement sorts different shaped objects by size (similar to the way large
Brazil nuts will rise to the top when a bowl of mixed nuts is shaken). Smaller objects are more likely
to fall into the voids created by the turbulence, while larger objects move to the top. In addition to
increasing your overall buoyancy, the Float 30 avalanche airbag is designed to make a backcountry
user “bigger” than the surrounding pieces of debris in an avalanche. The Float 30 uses compressed
air in the cylinder to fill the bag and make the user’s volume larger, reducing—or eliminating—burial
depth and increasing your chances of survival.
release valve cover
13
Disclaimer
The Float 30 avalanche airbag system is designed to improve your chances of surviving an
avalanche by reducing your likelihood of getting buried. The Float 30 must be used correctly,
following the guidelines in this manual. Do not modify any aspects of this product or perform any
operations not described in this manual.
The Float 30 cannot prevent the release of an avalanche or guarantee survival under any conditions.
While the Float 30 will provide some protection from impact, no airbag system can completely
prevent injury from trauma. The Float 30 must be used in conjunction with a beacon, shovel, probe,
and helmet to provide the best chance of survival. As with other avalanche rescue tools, the Float 30
should not promote taking more risks.
ejector assembly
You have invested in lifesaving technology. Be sure you have also invested your time in acquiring
the necessary skills to avoid avalanche situations before heading into the backcountry. Take an
avalanche awareness course, practice good snow safety skills, and keep your eyes and ears open in
the mountains. Prevention is always the best protection!
Warranty
The manufacturer, Backcountry Access, Inc. (BCA), expressly warrants the workmanship and
components of the Float 30 for three years after the date of retail purchase. All parts will be either
repaired or replaced free of charge, including labor, by the manufacturer. This warranty does not
cover damage to the product caused by improper use or excessive wear and tear. Direct all warranty
claims to BCA or your retailer. All claims must include proof of purchase and a return authorization
number. To ensure warranty protection and periodic technical updates please register online at
www.backcountryaccess.com/warranty.
4
14
2
coupler gauge
quick connect fitting
air hose
air cylinder
4
1
3
8
pressure gauge
trigger cable
5
trigger cover
5
Equipment Check
Using the Avalanche Airbag
Be sure to complete the following steps before each use of the Float 30 avalanche airbag pack.
Refer to the numbered images and diagrams for visual reference.
System Fittings
Check the quick connect fitting u between the compressed air cylinder v and the air hose w to
make sure it is attached securely. The plastic coupler gauge x must fit in place to ensure the system
is properly connected.
SECURE 4
WRONG
1
1
Pack Adjustments
Your pack should be properly fitted before you head into avalanche terrain. The forces of an
avalanche can rip the pack from your back if it is not secured to your body.
Attaching Leg Straps
The leg straps } are stored behind the waist strap pockets
~. Pull one leg strap out and loosen the adjustment on the
strap so you have plenty of length to work with. With the
loop 11 in your hand, bring the strap around the outside of
your leg then through your legs.
9
10
Insert the waist strap (the same side as the leg strap)
through the leg strap loop. Repeat process for the other
leg, then fasten the waist buckle. Tighten the adjustment
on the leg straps until they are snug but comfortable.
Unscrew the trigger cover y and make sure the trigger cable nut z is attached securely to the
trigger pin {. Replace trigger cover.
TRIGGER PIN ATTACHED
5
6
TRIGGER PIN UNATTACHED
7
5
6
Air Cylinder
Check the pressure gauge | on the compressed air cylinder and make sure it is between 2500
and 2700 psi at room temperature (approximately 70°F or 21°C). Pressure must be checked at
room temperature for the reading to be accurate. Check pressure before every use. Pressure must
be between 2500 and 2700 psi at 70°F (21°C) for system to operate properly. Once the system
is exposed to cold, the pressure will drop. If the pressure is ever observed below 2000 psi, at any
temperature, the airbag may not fill completely. PRESSURE MUST BE IN THIS RANGE OR THE
SYSTEM MAY NOT FUNCTION PROPERLY. See “Installing Compressed Air Cylinder” on page 9 for
replacement details.
11
11
11
9
Waist Buckle
There are two parts to the buckle: male and female. Insert the male part into the widest opening of the
female part. Tighten the waist strap until snug. When attached correctly, the webbing and the buckle
should lay flat against your body.
Inspect the cylinder. Do not use a cylinder that is dented or damaged.
Pack
Check that the fabric inner liner that houses the compressed air assembly is zipped completely. Be
sure nothing is inside the inner liner other than the airbag components.
Check to make sure that nothing is obstructing the airbag compartment on the outside of the pack.
6
7
Using the Avalanche Airbag
Using the Avalanche Airbag / Maintenance
Shovel and Probe Storage
The shovel shaft and probe should be stored in the long side pockets and secured with the strap
and fastener. The shovel blade can be stored in the front pocket for easy access. Shovels with long
blades or ferrules can be placed upside down, with the ferrule extending through the hole at the
bottom of the shovel pocket. If you prefer to carry your shovel and shaft fully assembled, make sure
you secure the shaft with the Velcro attachment at the top of the shovel pocket.
using the release valve. After most of the air has been released, disconnect the air hose before
stuffing the airbag. Stuff the sides of the airbag first, then the top. The system deploys best when the
airbag seam faces toward the Velcro flaps of the airbag compartment. Close the Velcro flap securely
along its length. If there are tight spots where the Velcro won’t close completely, redistribute the
airbag as needed. If the airbag is wet, always dry it completely before repacking.
Maintenance and Storage
Ski Attachment
Skis can be mounted to the pack using the diagonal ski straps concealed in the lower left and upper
right corners of the pack.
Hydration
The Float 30 is designed to accommodate hydration but does not include a hydration system. To add
a hydration system, feed the hydration tube (bite valve may need to be temporarily removed) through
the back of the left shoulder strap, through the hole in the back panel. The reservoir can be secured
by using the bladder hanger cord inside the pack.
Periodic Deployment
BCA recommends deploying the Float 30 at least once per year, both to make sure the system is
operating correctly and to be sure the user knows how to operate the equipment efficiently. Put it on,
pull the trigger and replace the cylinder with a refill before the season starts.
Discharging Compressed Air Cylinder
If the compressed air cylinder v is pressurized but the pressure is below 2500 psi at 70°F (21°C), it
should not be used in the backcountry but it may be used for a practice deployment. Simply deploy
the airbag by pulling on the trigger handle.
Deployment
When traveling in avalanche terrain, unzip the pocket where the trigger handle
12 is stored (see image on right for reference). In case of an avalanche, pull
the trigger handle quickly in a downward motion. Try to avoid pulling the trigger
across your chest
No scheduled maintenance is required as long as the system is stored in a cool, dry place. Do not
expose a charged Float 30 cylinder to temperatures exceeding 130°F (55°C) or below -22°F (-30°C).
12
What to Expect
The airbag should exit the backpack and fill completely in approximately three
seconds. The airbag will continue to build pressure for a few seconds longer until
the system pressure equalizes. The airbag should hold air for several minutes
until the threat of an avalanche has passed.
If the compressed air cylinder must be discharged without deploying the airbag, disconnect the quick
connect fitting u between the compressed air cylinder and the air hose (coupler gauge x will need
to be removed), zip the fabric inner liner, close the pack and pull the trigger handle. The compressed
air will empty directly into the pack.
DO NOT POINT CYLINDER OUTLET PORT AT ANYONE OR ANYTHING, AS IT COULD CAUSE
DAMAGE OR INJURY. DISCHARGING A COMPRESSED AIR CYLINDER IS LOUD – PERSONAL
EAR PROTECTION IS RECOMMENDED.
After Deployment
Installing Compressed Air Cylinder
Release the air from the airbag by pressing the release valve with your finger. The valve is located
underneath the orange release valve cover 13 . Do not use hard or sharp objects to hold the release
valve open, as they could damage the valve-sealing surface. Re-pack the airbag into the airbag
compartment. See “Packing the Airbag” below for details. Replace the compressed air cylinder before
using again. See “Installing Compressed Air Cylinder” on page 9 for details. If you have deployed your
Float 30 in an avalanche, please contact BCA for a free product inspection.
1. Remove packaging caps from pressurized air cylinder. Unzip the fabric inner liner in the pack.
Screw the trigger cable nut z onto the trigger pin {. To grasp trigger cable nut before threading it on
the trigger pin, it may be necessary to push the trigger handle 12 back in, to expose more cable on the
other end.
2. Screw the trigger cover y over the trigger cable nut.
Packing the Airbag
Airbag must be stuffed, not folded or rolled, into the airbag compartment. DO NOT ROLL THE
AIRBAG OR THE SYSTEM MAY NOT DEPLOY PROPERLY. Empty any residual air from the airbag
8
5
6
5
6
7
9
Maintenance / Shipping and Travel
Avalanche Rescue
4
1
1
This is a basic introduction to avalanche rescue techniques. On our website, you will also find a list of
avalanche instructors. We strongly suggest taking an avalanche course in your area before venturing
into the backcountry. Each person needs a working beacon, probe and shovel—and must know how
to use them. Before leaving, call your local avalanche forecast center and determine the danger level
in the area you intend to visit:
US: www.avalanche.org
Canada: www.avalanche.ca
Europe: www.lawinen.org
Searching for victims
Shipping a Compressed Air Cylinder
If a member of your group is buried, you must perform a beacon
search. The objective is to find the strongest signal (lowest
distance reading) and immediately begin probing the area. In the
event of a burial, switch all avalanche beacons to search mode.
The guidelines below assume the use of a digital beacon.
20m
40m
40m
path
Signal search: If there is a “last seen point,” start your signal
search there. Otherwise, start your signal search at the top,
bottom or side of the slide path. See diagram on right to establish
a search pattern.
20m
avalanche
3. Connect the quick connect fitting u by pulling the large ring toward the air cylinder. It should click
back into place when air hose nipple is properly connected. Coupler gauge x is not essential, but
should fit in place to ensure air hose is connected properly.
4. Position air cylinder v next to the ejector assembly 14 as shown on page 5. Secure air cylinder
into place with the elastic and Velcro straps.
5. If you’re replacing a discharged cylinder, return empty cylinder to retailer or refill center to refill
or exchange it for a recharged one. See “Shipping a Compressed Air Cylinder” below for shipping
instructions, if shipping is required.
6. To disconnect an empty cylinder, follow these steps in reverse.
DISCHARGE CYLINDER BEFORE SHIPPING.
Compressed air cylinders may not be shipped pressurized without proper (Hazmat) certification.
Compressed air cylinders must be shipped in original packaging to prevent damage. Please return
protective covers. When shipping unpressurized cylinders in their original packaging, please make
sure you remove any Hazmat labels or markings that were used when they were shipped pressurized.
Coarse search: Once a signal is engaged, align your beacon so
that any of the center three lights are flashing and move quickly in
the direction it is pointing. Make sure the number in the distance
display is decreasing. If it is increasing, turn 180 degrees. Inside
ten meters, move slowly and try to keep the center search light engaged.
Transportation Guidelines
Fine search: Within three meters, use your beacon close to the snow surface and look for the
smallest distance reading. Confirm by “bracketing” in the perpendicular direction.
While the Federal Aviation Administration (FAA) has specifically approved avalanche airbags with
pressurized cylinders for airline travel, many individual airlines have not. Airport security personnel
have no way of knowing what your pressurized cylinder contains or its purpose.
The best way to travel by airline with an airbag is to discharge the compressed air cylinder before you
are anywhere near the airport (discharging the cylinder will create a loud noise, not unlike a gunshot),
unscrew the cylinder head and carry the pack through security so you can explain what it is. When
you get to your destination, locate a retailer or refill center and exchange or refill your empty cylinder.
The cylinder head can be screwed back on the cylinder by hand.
Do not attempt to bring a pressurized system through security or check one in your luggage.
Transportation Security Administration (TSA) personnel will ask you to remove the cylinder head so
they can see that the cylinder is empty. If you discharge the cylinder at the airport, you are not likely to
reach your destination.
10
single searcher
search path
multiple searchers
search paths
Probing/Pinpointing: At the point where the distance has reached a
minimum, probe the area in concentric circles, with each probe hole about
10 inches (25cm) apart. Your probe should enter the snow perpendicular to
the slope. Once you have confirmed the victim’s location, leave the probe
in the snow.
Shoveling: While shoveling might seem elementary, it usually
consumes the majority of time during an avalanche beacon rescue.
For best results, start shoveling just downhill of the probe. Make your
hole one “wingspan” wide. In burials deeper than one meter, excavate
downhill about 1.5 times the burial depth. For more advanced
shoveling techniques, see our website:
www.backcountryaccess.com/education.
90˚
10˝ 10˝
25CM 25CM
1.5 x
burial depth
11
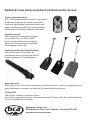
Additional snow safety essentials from Backcountry Access:
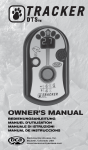
Tracker avalanche beacons
BCA’s Tracker beacons are the easiest to use because
of their rapid processors and simple user interface.
A real-time, digital display shows both direction and
distance with bright red LEDs (light emitting diodes).
North America’s best-selling avalanche transceiver.
Avalanche shovels
BCA shovels are the strongest and lightest
on the market. Our oval shaft and 6061
aluminum blade maximize the strength-toweight ratio. Arsenal shovels are available
with integrated probe or saw.
Avalanche probes with Quickie hardware
Every second counts. BCA probes are
manufactured with our lightning-fast Quickie
tensioning hardware for fast deployment.
Snow study tools
BCA offers a full line of snow study equipment including slope meter, crystal card, magnifying loupe,
digital thermometer, snow saw, and field book. Kit available with carrying case.
Training DVD
Take Charge: Leading a Companion Rescue.
Learn how to organize and execute a fast avalanche rescue. Produced with Teton Gravity Research
(18 min). Available from our website.
Backcountry Access, Inc.
2820 Wilderness Place, Unit H, Boulder, Colorado, 80301 USA
www.backcountryaccess.com