1
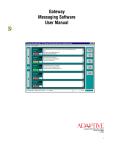
PROGRAMMING
MANUAL
Form No. 9703-6001D
11/13/98
i
NOTE:
Due to continuing product innovation, specifications in
this document are subject to change without notice.
Copyright © 1998 Adaptive Micro Systems, Inc. All rights reserved.
The distinctive appearance of this product is a Trade Dress of Adaptive Micro Systems, Inc.
BETA-BRITE, BIG DOT, and SMART ALEC are trademarks of Adaptive Micro Systems, Inc.
registered in the United States Patent and Trademark Office.
Alec, ALPHA, AlphaLert, AlphaNET, AlphaNET plus, AlphaNET plus II, ALPHAVISION,
Automode, Director, EZ KEY II, EZ95, PagerNET, PrintPak, PPD, Solar, and TimeNet are
trademarks of Adaptive Micro Systems, Inc.
Visit our Internet World Wide Web site:
http://www.ams-i.com or e-mail us at [email protected]
ii
Contents
General information ...................................................................... 1
Using a Remote Control to operate your sign..................................................1
Using a computer to operate your sign ...........................................................2
Attaching your sign to a surface......................................................................3
Technical specifications...................................................................................5
EMI information ..............................................................................................5
Basic sign operation ..................................................................... 6
Turning a sign on and off.................................................................................6
Setting a sign’s time and date..........................................................................7
Clearing a sign’s memory ................................................................................8
Setting a sign’s password................................................................................9
What to do when you forget a sign’s password......................................10
How to delete a sign’s password ............................................................10
Sound control................................................................................................10
Beginning text messaging..............................................................11
Example 1 — Using upper and lowercase in messages ................................11
Example 2 — Displaying messages in file name order (A, B, C, etc.)............13
Example 3 — Displaying messages in time order .........................................15
Example 4 — Changing the text of an existing message ...............................17
Example 5 — Deleting messages ..................................................................20
Advanced text messaging ..............................................................21
Example 6 — Displaying the time and date ...................................................21
Example 7 — Using fonts and colors ............................................................24
Example 8 — Speeding up and slowing down messages .............................27
Example 9 — Special effects with modes (Trailing modes)...........................29
Example 10 — International characters ........................................................30
Graphics ...................................................................................32
Example 11 — Creating a movie marquee ....................................................32
Example 12 — Mixing text with graphics ......................................................37
Example 13 — Deleting a graphic .................................................................39
Appendixes ...............................................................................40
Appendix A — Modes, fonts, colors, and graphics available.........................40
Appendix B — Sign diagnostic test ...............................................................45
iii
WARNING FOR EUROPEAN USERS
This is a class A product. In a domestic environment,
this product may cause radio interference, in which case
the user may be required to take adequate measures.
iv
BETA BRITE Programming Manual
General information
You can operate a BETA BRITE sign in two ways:
• by using a hand-held Remote Control
• by using personal computer
Using a Remote Control to operate your sign
A Remote Control is a hand-held keyboard used to operate a BETA
BRITE sign. Most of this manual shows you how to program messages on
your sign using a Remote Control.
A Remote Control needs two AA batteries to operate.
Press PROGRAM to put the
sign into one of these modes:
(Use BACK to move from mode
to mode and ADV to select a
mode.)
• PROG TEXT A – for entering
text messages. (“A” is a file
name, from A to Z.)
• PROG DOTS A – for creating
graphics. (“A” is a file name,
from A to Z.)
• SET TIME – changes the
sign’s time.
• SET DATE – changes the
sign’s date.
• SET PASSWORD – used to
prevent someone from
changing your messages.
• CLEAR MEMORY – deletes
all text and graphic files.
Point this end of the Remote Control
at the front of your BETA BRITE.
ON/OFF
CAPS LOCK
SOUND
PROGRAM
MODE
FONT
FCN
RUN
1
2
3
4
5
6
7
8
9
0
A
B
C
D
E
F
G
H
I
J
K
L
M
N
O
P
Q
R
S
T
U
V
W
X
Y
Z
SPACE
RETURN
COLOR
SYMBOL
APPEND TIME/DATE
SPEED
DOTS
!
BACK
ADV
SELECT
DELETE
Use SPACE to insert a blank
space between characters. (To
insert just a half space, press
SELECT.)
Hold down FCN and then
press PROGRAM to turn
the sign off and on.
INSERT
Press RUN twice to exit
programming mode.
These keys with red
triangles are used in PROG
DOTS to draw graphics.
(Press SELECT to turn
drawing on and off.)
HOW TO ENTER A MESSAGE:
1. POINT THIS REMOTE CONTROL KEYBOARD AT THE DISPLAY.
2. PRESS THE PROGRAM KEY. THE WORDS
"PROG TEXT" WILL APPEAR ON THE DISPLAY.
3. ENTER THE MESSAGE YOU WANT TO BE DISPLAYED.
(USE THE ! AND SELECT KEYS FOR PUNCTUATION).
4. PRESS THE RUN KEY TWICE.
SEE YOUR PROGRAMMING MANUAL FOR
ADDITIONAL INSTRUCTIONS AND DISPLAY FEATURES.
General information: Using a Remote Control to operate your sign
To type a special character
(like ? or !) or a graphic
symbol, press SYMBOL or
!.
Then press SELECT to
choose a special character
or graphic.
1
BETA BRITE Programming Manual
Using a computer to operate your sign
Though messages can be programmed into the sign using the handheld Remote Control, messages can also be sent to the sign using a
computer. To do this, you’ll need special connectors and computer
software:
A
B
To the sign’s
RS232 jack
(on the side)
To power source
C
To one of the
PC’s COM
(RS232) ports
PC running
AlphaNET
software
D
NOTE: Do NOT connect a telephone to the sign’s RS232 jack.
NOTE: Do NOT use ordinary telephone wire to connect the sign to a computer.
NOTE: Use only the power supply (Item D) that came with the sign.
NOTE: All of the parts listed below (including the AlphaNET software) are
available from Adaptive Micro Systems.
Item
A
B
C
D
Part #
—
1088-8625
1088-8627
4370-0001C
1088-9108
—
Description
Ferrite (ferrite end towards sign)
25-foot 6-conductor RS232 data cable
50-foot 6-conductor RS232 data cable
25 pin sub-D/to 6 pos. RJ11 adapter
9 pin sub-D/to 6 pos. RJ11 adapter
Power supply
NOTE: This manual shows you how to send messages to your sign
with the Remote Control.
The manual that comes with the AlphaNET software shows
you how to send messages to your sign with a computer.
2
General information: Using a computer to operate your sign
BETA BRITE Programming Manual
Attaching your sign to a surface
Your sign can be mounted on a wall, ceiling, or counter.
NOTE: This sign is intended for indoor use only.
NOTE: • Do not mount or attach the power supply to anything.
• Do not let the power supply hang loose.
• Place the power supply on a flat surface where no
chemicals or liquid, such as water, will contact it.
• Plug the power supply into an easily-accessible electrical
outlet no further than 15 feet away from the sign.
Wall mount
1.
2.
3.
Screw
Attach the mounting brackets to the wall or surface, 24 5/8 inches
(62.7 cm) on center.
Attach the sign to mounting brackets using hardware as shown.
Plug the power cord into the sign and into an outlet.
Lock
washer Bracket
Bracket
Washer
Washer
Lock
washer Screw
Power cord
Top view
Front view
General information: Attaching your sign to a surface
3
BETA BRITE Programming Manual
Ceiling mount
1.
2.
3.
Attach the ceiling brackets to the sign using the screws supplied.
Hang the sign from the ceiling using mounting chains and ceiling
hooks (not supplied). The chains and hooks must be able to support at
least four times the weight of the sign.
Plug the power cord into the sign and into a nearby outlet.
Top view
Ceiling bracket
X
Side view
X
Ceiling
This mounting chain and ceiling hook (not supplied) must
be able to support at least four times the weight of the sign.
Counter mount
1.
2.
3.
4.
Screw
Front
view
Attach the mounting brackets to the counter, 24 5/8 inches (62.7 cm)
on center.
Plug the power cord into the sign.
Attach the sign to mounting brackets using hardware as shown.
NOTE: On the end with the power cord, use the spacer proviced,
not a washer.
Plug the power cord into an outlet.
Lock
washer Bracket
Bracket
Spacer
Washer
Lock
washer Screw
Power cord
Top view
Front view
4
General information: Attaching your sign to a surface
BETA BRITE Programming Manual
Technical specifications
Weight
2.55 pounds (1.16 kg)
(without power supply or keyboard):
Height: 3 13/16 inches (9.7 cm)
Length: 25 7/8 inches (65.7 cm)
Depth: 1 15/16 (3.4 cm)
Power: 7.5 VDC at 3.25A
The display should be operated in an environment
Environmental requirements: where the temperature is between 0° C and 45° C, and
the humidity (non-condensing) does not exceed 95%.
EMI information
Electromagnetic interference (EMI) information follows:
United States
This device complies with Part 15 of the FCC rules. Operation is
subject to the following two conditions: (1) This device may not cause
harmful interference. (2) This device must accept any interference
received, including interference that may cause undesired operation.
Canada
This Class A digital apparatus meets all requirements of the
Canadian Interference-Causing Equipment Regulations.
Cet appareil numerique de la class A respecte toutes les exigences du
Regement sur le material broullieur du Canada.
General information: Technical specifications
5
BETA BRITE Programming Manual
Basic sign operation
Turning a sign on and off
When you plug in the sign’s power supply, the sign starts up
automatically, and unplugging the power supply turns the sign off.
However, instead of unplugging a sign, there is another way to turn
the sign off:
Holding down FCN and then press PROGRAM turns a sign off and on.
NOTE: Messages that you have programmed into the sign will not be
lost when you turn a sign off. Messages will be retained for
up to 30 days if the sign is not powered.
When a signs starts up, the following will be displayed:
1036-0001A
The software (or “firmware”) version inside the sign.
THEN
32K RAM
The amount of memory inside the sign.
THEN
WED 1:26 PM
6
The time and date of the sign.
Basic sign operation: Turning a sign on and off
BETA BRITE Programming Manual
Setting a sign’s time and date
Once set, a sign will remember the time and date unless the sign is
unplugged or interrupted by a power loss.
NOTE: Because the time and date are not updated when the sign is
off, the time and date must be re-programmed each time the
sign is turned off and on.
Step
When you do this...
1
Press PROGRAM.
2
Press BACK until SET TIME appears.
You see this...
PROG TEXT A
SET TIME
SET W/D ,H&M
3
Press ADV.
THEN
MON 2:29 AM
4
Press D to set the day of the week.
Press H to set the hour.
Press M to set the minute.
TUE 11:21 AM
NOTE:Press SELECT, to change from 12-hour
(AM/PM) to 24-hour mode (0 - 23).
5
Press BACK until SET DATE appears.
6
Press ADV.
SET DATE
SET WITH D,M,&Y
THEN
JAN. 1 ,1998
Press D to set the day.
Press M to set the month.
Press Y to set the year.
7
NOTE:Press SELECT to display the date in
different formats—for example, JAN 26,
1998 or 1/26/98, or 26/1/98, etc.
OCT. 14 ,1998
After setting the date and time, press RUN twice to return to normal operation.
8
NOTE:Date and Time will not appear on the screen after you have returned to normal operation.
Basic sign operation: Setting a sign’s time and date
7
BETA BRITE Programming Manual
Clearing a sign’s memory
Clearing a sign’s memory erases all messages and graphics that have
been programmed into the sign — also, the sign’s password (if any) will
be deleted.
Step
When you do this...
1
Press PROGRAM.
2
Press BACK until CLEAR MEMORY appears.
3
Press ADV.
You see this...
PROG TEXT A
CLEAR MEMORY
WARNING!
THEN
CLEAR ALL? Y/N
4
8
Press Y to clear the sign’s memory. The sign will return to normal operation and display a series of demo
messages.
Basic sign operation: Clearing a sign’s memory
BETA BRITE Programming Manual
Setting a sign’s password
You can set a personal password to protect your messages and
graphics from tampering by others.
If you forget the password, see “What to do when you forget a sign’s
password” on page 10.
Step
When you do this...
You see this...
PROG TEXT A
1
Press PROGRAM.
2
Press BACK until SET PASSWORD appears.
SET PASSWORD
3
Press ADV.
SET PASSWORD? Y/N
4
Press Y to set a password.
Type a 6-character password. (Only asterisks will
appear on the sign as you type.)
ENTER 6 CHAR’S
******
RE-ENTER THE 6
Re-type the password when prompted.
THEN
******
5
THEN
CORRECT will appear if you entered the same
password.
CORRECT
THEN
If you failed to type the same password, ERROR will
appear, and you’ll have to start over from Step 1.
6
PROG TEXT A
Press RUN twice.
PASSWORD RUN? Y/N
Press Y to password protect the sign.
SECURE
The sign will return to normal operation.
7
NOTE:If you select N, then a password will not be
needed when you press PROGRAM.
Basic sign operation: Setting a sign’s password
Now, whenever you press PROGRAM, you’ll have
to type the password you just entered.
9
BETA BRITE Programming Manual
What to do when you forget a sign’s password
Step
1
When you do this...
Press PROGRAM.
You see this...
ENTER PASSWORD
******
2
Press L six times.
CORRECT
THEN
PROG TEXT A
3
Enter a new password. (See “Setting a sign’s password” on page 9.)
How to delete a sign’s password
If you no longer want to be prompted to password protect a sign, you
must clear the sign’s memory in order to delete the password. To do this,
see “Clearing a sign’s memory” on page 8.
Sound control
Normally, when you press a Remote Control key while programming
a sign, the sign will beep.
If you want to turn the beeping off, hold down FCN and then press
FONT. (To turn the beeping on again, repeat this.)
10
Basic sign operation: Sound control
BETA BRITE Programming Manual
Beginning text messaging
This section shows you how to start creating messages on your sign.
Example 1 — Using upper and lowercase in messages
In this first example, you’ll display the text THIS IS YOUR FIRST
MESSAGE like this:
THIS IS YOUR
Your first message
will look like this.
THEN
FIRST MESSAGE
. . . and then the text This is your second message:
This is your
THEN
second
This message must be shown
on three displays because the
words “second message”
won’t fit on a single line.
THEN
message
Step When you do this...
1
Press PROGRAM.
2
Press ADV.
Your second message will use
lowercase text.
You see this...
PROG TEXT A
A]
“A” is the file name of your message
A]
[AUT]T
Type THIS IS YOUR FIRST
MESSAGE
3
Note: If you make a
mistake while
typing, press
DELETE to erase a
letter.
[AUT], which stands for Automode, will
appear as you type your first character.
Automode automatically displays your
message in different formats.
Your message should
look like this when
you’re done typing.
A] IRST MESSAGE
Beginning text messaging: Example 1 — Using upper and lowercase in messages
11
BETA BRITE Programming Manual
THIS IS YOUR
THEN
4
Press RUN twice.
FIRST MESSAGE
Because Automode [AUT] was used in your message (see Step 3), the
text of your message will be displayed in a variety of formats. For
example, one of the formats (or modes) called Scroll moves your
message from the bottom to the top of the sign.
Now that the first message is done, we’ll enter a second message which contains upper and lowercase characters.
5
Press PROGRAM again.
6
Press SELECT.
PROG TEXT A
PROG TEXT ?
The A changes to a question mark (?) after pressing SELECT.
B]
7
Press B.
“B” is now the file name of your second message. If you pressed
A instead of B, you would have written over the first message.
Type T
8
Hold down FCN and then
press MODE to switch to
lowercase letters.
B]cond message
Your message should look like this when you’re done typing.
Type his is your second
message
This is your
THEN
second
9
Press RUN twice.
THEN
message
You should notice that . . .
• The first message doesn’t appear at all. (We’ll fix this in the
following example.)
12
Beginning text messaging: Example 1 — Using upper and lowercase in messages
BETA BRITE Programming Manual
Example 2 — Displaying messages in file name order (A, B, C, etc.)
Once you’ve programmed messages into the sign, you may want to
set the order or sequence in which messages appear.
In this example, we’ll display messages by their file name (A, B, C,
etc.) or in alphabetical order.
Step When you do this...
You see this...
This example continues where Example 1 left off.
This example assumes that there are two messages (files A and B) in the sign:
File A = THIS IS YOUR FIRST MESSAGE
File B = This is your second message
1
Press PROGRAM.
2
Press RUN.
PROG TEXT B
RUN
TIME or DEMO may also appear here.
If RUN appears on the sign,
go to the next step.
RUN
3
Otherwise, press SELECT
until RUN appears.
4
Press B.
B
RUN
This is your
THEN
5
second
Press RUN.
THEN
message
You have just programmed the sign to run only message file B.
Next, we’ll program the sign to display message B and then message A.
6
Press PROGRAM.
7
Press RUN.
PROG TEXT A
RUN
Beginning text messaging: Example 2 — Displaying messages in file name order (A, B, C, etc.)
13
BETA BRITE Programming Manual
If RUN appears on the sign,
go to the next step.
8
RUN
Press SELECT until RUN
appears.
BA
RUN
9
Press B, then A.
The order of these letters determines the order in which
messages will appear on a sign.
(In this case, message B will appear first, then message A.)
This is your
File B
THEN
second
THEN
message
10
THEN
Press RUN.
File A
THIS IS YOUR
THEN
FIRST MESSAGE
These two messages will keep being
displayed in this order until a new file
name order or a new message is entered.
Using this method, you can program the order
of some or all of the messages you’ve entered on a sign.
14
Beginning text messaging: Example 2 — Displaying messages in file name order (A, B, C, etc.)
BETA BRITE Programming Manual
Example 3 — Displaying messages in time order
In Example 2, you set the order of messages by file name. However,
that method could not specify an exact time when a message would
appear.
In this example, we’ll show you how to make a message appear and
disappear at times you specify.
NOTE: Displaying messages in time order will work only as long as
the sign has power. When your sign loses power, its internal
clock becomes inaccurate and must be reset (see “Setting a
sign’s time and date” on page 7).
Step When you do this...
You see this...
For this example, make sure that your sign’s internal clock has been accurately set.
(See “Setting a sign’s time and date” on page 7.)
This example continues where Example 1 left off.
This example assumes that there are two messages (files A and B) in the sign:
File A = THIS IS YOUR FIRST MESSAGE
File B = This is your second message
In this example, we’ll program the sign to display File A from Monday through Friday from 1:10 PM to 2:30 PM.
We’ll program the sign to always display File B.
1
Press PROGRAM.
PROG TEXT A
2
Press SELECT until B
appears.
PROG TEXT B
3
Press TIME/DATE.
4
Press PROGRAM.
PROG TEXT B
5
Press SELECT until A
appears.
PROG TEXT A
B ON ALWAYS
Since file B is already set up,
we’ll go on to file A.
ON ALWAYS is the default
setting for a message. A
message set to ON ALWAYS
will run continuously.
A ON ALWAYS
6
Press TIME/DATE.
First, we’ll select the ON time or when the message starts.
Beginning text messaging: Example 3 — Displaying messages in time order
15
BETA BRITE Programming Manual
7
8
A ON M-F 0:00
Press D (for day) until
M-F (Monday through
Friday) appears.
Press D to set the day, H for hour, and M for minute
(in 10-minute increments).
A ON M-F 13:00
Press H (for hour) until
13:00 appears.
Hours must be represented in 24-hour or military style.
So 1:00 PM = 13:00, 2:00 PM = 14:00, etc.
9
A ON M-F 13:10
Press M (for minute) until
13:10 appears.
Minutes are set in increments of 10.
10
A OFF M-F 0:00
Press SELECT.
After setting the ON time, select the OFF time or when the message stops.
11
Repeat Steps 7, 8, and 9 to set the OFF time (2:30 or 14:30 in this example.)
12
Press RUN once.
(If TIME does not appear,
press SELECT until it
does.)
13
TIME
RUN or DEMO may also appear here.
Press AB.
TIME
AB
This is your
THEN
File B
This message
should appear
continuously.
second
THEN
14
message
Press RUN once.
THEN
16
THIS IS YOUR
File A
This message
should only
appear between
the ON and OFF
times you set.
THEN
FIRST MESSAGE
Beginning text messaging: Example 3 — Displaying messages in time order
BETA BRITE Programming Manual
Example 4 — Changing the text of an existing message
After typing in a message, you may want to add or remove text from
it. The following is an example of this common situation:
Step When you do this...
You see this...
This example continues where Example 2 left off.
This example assumes that there are two messages (files A and B) in the sign:
File A = THIS IS YOUR FIRST MESSAGE
File B = This is your second message
and
that File A, then File B is displayed.
In this example, we’ll change File A and File B to the following:
File A = THIS IS YOUR FIRST MESSAGE, BUT NOW IT’S LONGER
File B = This is the second message ( your changed to the )
1
Press PROGRAM.
PROG TEXT A
2
Press SELECT until B
appears.
PROG TEXT B
3
Press ADV until the space
after your appears.
B] This is your
We’re going to delete your and replace it with the.
4
Press DELETE until your
(and the space after it) are
erased.
B]
[AUT]This
INSERT
5
T]This
is
is
Press INSERT.
Text you type now will be inserted
here—after the space following is.
6
Type the
(and then SPACE).
INSERT
7
Press INSERT to turn text
insertion off.
B]
8
Press ADV until the first
few letters of second
appear.
is is the
T]This
is the
B] is is the sec
the has replaced your
Beginning text messaging: Example 4 — Changing the text of an existing message
17
BETA BRITE Programming Manual
Press APPEND to go to
the end of the message.
9
B] cond message
DON’T OMIT THIS STEP.
If you do, the last part of the
message will be
automatically deleted.
This is the
Press RUN twice.
File B
THEN
10
second
THEN
message
Next, we’ll add text to the end of File A.
11
Press PROGRAM.
PROG TEXT B
12
Press SELECT until A
appears on the sign.
PROG TEXT A
13
Press APPEND.
14
To type a comma, press !
and then SELECT until a
comma appears.
15
Press SPACE and then
type BUT NOW IT.
A] E, BUT NOW IT
16
Press ! and then SELECT
until an apostrophe
appears.
A] , BUT NOW IT’
17
Type S LONGER.
A] W IT’S LONGER
A] IRST MESSAGE
APPEND takes you to the end of a message.
18
A]IRST MESSAGE,
Beginning text messaging: Example 4 — Changing the text of an existing message
BETA BRITE Programming Manual
THIS IS YOUR
THEN
18
Press RUN twice.
File A
FIRST MESSAGE
THEN
BUT NOW IT’S
THEN
LONGER
Beginning text messaging: Example 4 — Changing the text of an existing message
19
BETA BRITE Programming Manual
Example 5 — Deleting messages
To delete all the messages in a sign, see “Clearing a sign’s memory”
on page 8.
However, if you only want to delete selected messages, then use the
method shown in this example.
Step When you do this...
You see this...
This example continues where Example 4 left off.
This example assumes that there are two messages (files A and B) in the sign:
File A = THIS IS YOUR FIRST MESSAGE, BUT NOW IT’S LONGER
File B = This is the second message
In this example, we’ll delete File B.
1
Press PROGRAM.
PROG TEXT A
2
Press SELECT until B
appears on the sign.
PROG TEXT B
3
Press DELETE.
4
Press Y to delete the file.
DEL TEXT B? Y/N
PROG TEXT A
THIS IS YOUR
THEN
5
Press RUN twice.
File A
FIRST MESSAGE
THEN
BUT NOW IT’S
THEN
LONGER
20
Beginning text messaging: Example 5 — Deleting messages
BETA BRITE Programming Manual
Advanced text messaging
Before attempting the following, make sure you’re familiar with the
previous examples in the “Beginning text messaging” section of this
manual.
Example 6 — Displaying the time and date
NOTE: Because the time and date are not updated when the sign is
off, the time and date must be re-programmed each time the
sign is turned off and on.
Step When you do this...
You see this...
In this example, we’ll create a message that continuously displays the current time and date:
Rosco
THEN
Advertising
THEN
The time will be displayed
in wide letters.
3:26 PM
THEN
Oct. 14 ,1997
1
Delete all the messages currently stored in the sign.
(See “Clearing a sign’s memory” on page 8 or “Example 5 — Deleting messages” on page 20.)
2
Press PROGRAM.
PROG TEXT A
3
Press SELECT.
PROG TEXT ?
4
Press A.
A]
5
Press MODE to select a
“mode”. (Modes are used
to change the way a
message appears. See
Appendix A for a list of the
modes available.)
A]
6
Press SELECT until the
Roll Down — [RL ↓] —
mode appears.
[HLD]
This stands for Hold mode.
A]
[RL↓]
This stands for Roll Down mode.
Advanced text messaging: Example 6 — Displaying the time and date
21
BETA BRITE Programming Manual
7
8
A]
Type R
Hold down FCN and then
press MODE to switch
between uppercase and
lowercase letters, type the
following:
[RL↓]R
A]o Advertising
osco Advertising
We’ll Roll the time in from the bottom to the top of the sign.
9
Press MODE and then
SELECT until the Roll Up
mode appears: [RL ↑]
10
Press FONT and then
SELECT until [WD7]
appears.
11
Press TIME/DATE to
include the time in the
message.
A]
[RL↑]
A]
[RL↑][WD7]
[WD7] means that the time will be displayed in wide letters.
A] 3:48 PM
This inserts the current time (in wide characters).
Next, we’ll Roll the date in from the left to the right of the sign.
NOTE: Make sure that the date is set correctly before using the date in a message.
(See “Setting a sign’s time and date” on page 7.)
12
13
Press MODE and then
SELECT until the Roll Left
mode appears: [RL ←]
Press FONT and then
SELECT until [SS7]
appears.
([SS7] is the default or
normal font.)
14
22
Press TIME/DATE and
then SELECT to display
the date.
A]
[RL←]
We’ll make the date will roll to the left.
A]
[RL←][SS7]
[SS7] means the following characters won’t be wide.
A] CT. 14 ,1997
Advanced text messaging: Example 6 — Displaying the time and date
BETA BRITE Programming Manual
Rosco
THEN
15
Press RUN twice to see the
message.
Advertising
THEN
3:26 PM
THEN
Oct. 14 ,1997
Advanced text messaging: Example 6 — Displaying the time and date
23
BETA BRITE Programming Manual
Example 7 — Using fonts and colors
Fonts
Fonts are the way characters are displayed on a sign. In the world of
printing and publishing, fonts are given names like Times or Helvetica
and qualities like serif or sans serif, font size (like 12 point or 14 point),
bold or italic, etc.:
This is Times — a serif font.
This is Helvetica — a sans serif font.
The fonts available for your sign are in “Appendix A — Modes, fonts,
colors, and graphics available” on page 40.
Colors
Your sign can display up to eight colors — [GRN] for green, [RED]
for red, etc. — plus four special color combinations.
To determine what colors are available on your sign, see “Appendix
A — Modes, fonts, colors, and graphics available” on page 40.
The following examples demonstrate how to use fonts and colors on
your sign:
Step When you do this...
You see this...
1
Delete all the messages currently stored in the sign.
(See “Clearing a sign’s memory” on page 8 or “Example 5 — Deleting messages” on page 20.)
2
Press PROGRAM.
3
Press ADV.
4
Press MODE until [HLD]
appears.
PROG TEXT A
A]
A]
[HLD]
Hold mode turns off Automode.
5
24
Press COLOR and then
SELECT until [GRN]
(green) appears.
A]
[HLD][GRN]
We’ll make the first part of the message appear in green.
Advanced text messaging: Example 7 — Using fonts and colors
BETA BRITE Programming Manual
6
Press FONT and then
SELECT to select [SRF]
(a serif font).
7
Using FCN and
PROGRAM when needed,
type This is SRF
8
Press RETURN to start a
new line of text.
A]
[HLD][GRN][SRF]
A] his is SRF
As you type, the font you selected will appear
as it will actually be displayed on the sign.
A] is is SRF ↵
This symbol indicates RETURN.
9
10
Press COLOR and then
SELECT until [AMB]
appears.
Press FONT and then
SELECT until [WDF] (wide
text) appears.
A] s SRF↵
[AMB]
All the text after [AMB] will be amber colored.
A] RF↵
[AMB][WDF]
[WDF] = wide serif font
11
Using FCN and MODE
when needed, type WDF
Wide
A] Wide
12
Press RETURN to start a
new line of text.
A]Wide ↵
13
Press COLOR and
SELECT until [RB1]
(Rainbow 1) appears.
A]de ↵
14
Press FONT and then
SELECT to select the
[SS5] font.
A] e ↵
[RB1]
[RB1][SS5]
[SS5] = the smallest font
Type THIS IS SS5
15
NOTE:Only uppercase
character can be
used with this font.
A] [SS5]THIS
Advanced text messaging: Example 7 — Using fonts and colors
IS SS5
25
BETA BRITE Programming Manual
This is SRF
This text should
appear in green.
THEN
WDF
16
Press RUN twice to see
what you’ve typed.
THEN
This text should
appear in amber.
Wide
THEN
THIS IS SS5
26
This text should
appear in rainbow 1.
Advanced text messaging: Example 7 — Using fonts and colors
BETA BRITE Programming Manual
Example 8 — Speeding up and slowing down messages
Messages can be speeded up or slowed down using the SPEED mode.
Once you pick a mode, like ROTATE, a speed can be selected by selecting
SPEED on the Remote Control. Then press SELECT to change the speed:
[SP1]
[SP2]
[SP3]
[SP4]
[SP5]
[NHL]
Slowest
speed
Fastest
speed
Here’s an example of how to vary the speed of the SCROLL mode of a
message:
Step When you do this...
You see this...
1
Delete all the messages currently stored in the sign.
(See “Clearing a sign’s memory” on page 8 or “Example 5 — Deleting messages” on page 20.)
2
Press PROGRAM.
3
Press ADV.
4
Select the SCROLL mode.
(Press MODE and then
press SELECT until [SCR]
appears.)
5
Press SPEED.
PROG TEXT A
A]
A]
[SCR]
[SCR] = Scroll mode, which we’ll use to demonstrate message speed.
A]
[SCR][SP4]
[SP4] is the default speed setting.
6
Press SELECT until [SP1]
(very slow) appears.
A]
[SCR][SP1]
[SP1] = very slow
Type Scroll speed=1
7
(Press SYMBOL and then
SELECT to get the “=”
sign.)
A]croll speed=1
8
Select SCROLL again.
A]
[SCR]
Advanced text messaging: Example 8 — Speeding up and slowing down messages
27
BETA BRITE Programming Manual
9
10
Select SPEED again.
Press SELECT until [NHL]
appears.
A]
[SCR][SP1]
A]
[SCR][NHL]
(No Hold = very fast)
11
Type Scroll speed=N
Press RUN twice to see
your message.
12
The message Scroll
speed=1 should scroll up
very slowly.
A]croll speed=N
Scroll speed=1
Using [SP1], slow
speed, the message
scrolls up into the
sign, pauses, then
scrolls off the sign.
Scroll speed=1
However, the message
Scroll speed=N should
scroll up without pausing
at all.
Using [NHL],
fastest speed, the
message scrolls
into and off the sign
without pausing.
Scroll speed=N
28
Advanced text messaging: Example 8 — Speeding up and slowing down messages
BETA BRITE Programming Manual
Example 9 — Special effects with modes (Trailing modes)
Modes, like ROTATE and ROLL, are used to create special effects with
messages. Typically modes are used once at the beginning of a message.
However, a mode can also be placed at the end of a message (called a
“trailing mode”) to create a special effect.
NOTE: The following can not be used as a trailing mode: CONDENSED
ROTATE, SCROLL, SLIDE, SNOW, and SPRAY.
Step When you do this...
You see this...
1
Delete all the messages currently stored in the sign.
(See “Clearing a sign’s memory” on page 8 or “Example 5 — Deleting messages” on page 20.)
2
Press PROGRAM.
3
Press ADV.
A]
[FLS]
ˆ
Press MODE and ´then
SELECT until [RF ↑] (Roll
Up) appears.
ˆ
6
(Press ! and then SELECT
to get “!”)
A]
LS]ATTENTION!
A]
[RL↑]
ˆ
5
ˆ
A]
ˆ
Press MODE and then
SELECT until [FLS]
(Flash) appears.
Type ATTENTION!´
ˆ
4
PROG TEXT A
This is the trailing mode. The Roll mode “trails” the first mode, Flash.
7
Type Trailing mode
8
Press RUN twice to see trailing mode in action. ATTENTION! should flash and then roll off the display
followed by Trailing mode.
A]Trailing mode
Advanced text messaging: Example 9 — Special effects with modes (Trailing modes)
29
BETA BRITE Programming Manual
Example 10 — International characters
International characters — like ü and é — can be included in
messages. Also, the ! and SYMBOL keys can produce special characters (see
“Using a Remote Control to operate your sign” on page 1).
NOTE: International characters can not be used with the small fonts
(like [SS5]).
The following international characters can be used:
Type a Base Character, like A.
Then press SELECT to choose
an international character.
A
A
B
C
D
E
I
N
O
S
U
Y
Z
A
B
C
D
E
I
N
O
S
U
y
Z
Ä
ß
ÿ
Z
Ç
D
É
Í
Ñ
Ö
S
Ü
Å
C
d
Ê
i
n
Õ
ß
u
z
Æ
C
d
e
î
ñ
o
s
ü
z
Á
c
é
ï
ô
s
û
À
ç
ê
ì
ö
ß
Ã
c
ë
í
ò
a
c
è
!
ù
ú
ó
æ
õ
â
o
SYMBOL
(Hold down FCN and then press MODE on the Remote Control
to switch between uppercase and lowercase letters.)
ä
á
à
å
a
ã
Both the ! and SYMBOL keys can produce a variety of specialized symbols.
International
Characters
Base
Characters
A]
The following example shows how to use international characters in
a message:
Step When you do this...
1
30
You see this...
Delete all the messages currently stored in the sign.
(See “Clearing a sign’s memory” on page 8 or “Example 5 — Deleting messages” on page 20.)
Advanced text messaging: Example 10 — International characters
BETA BRITE Programming Manual
PROG TEXT A
2
Press PROGRAM.
3
Press ADV.
A]
4
Using FCN and MODE
when needed, type Submit
your re
A]ubmit your re
5
Press SELECT until é
appears.
A]ubmit your ré
6
Type sume
A] your résume
7
Press SELECT until é
appears.
A] your résumé
8
Press RUN twice to see your message.
Advanced text messaging: Example 10 — International characters
31
BETA BRITE Programming Manual
Graphics
In addition to pre-programmed or “canned” graphics (see “Graphics
available:” on page 44), you can create your own custom graphics using
DOTS files.
You can display a DOTS graphic that you create either by itself or
with text.
NOTE: After you create a DOTS graphic, to display it on your sign, the
DOTS graphic must be placed in a text file—even if you just
want to display the graphic all by itself.
Example 11 — Creating a movie marquee
Step When you do this...
You see this...
In this example, we’ll create three graphics (or DOTS files)
and combine them with text to make a flashing marquee:
First you’ll create
these three
graphics files
(called DOTS files
A, B, C).
Then this text will
be added after the
three graphic files.
1
Delete all the messages currently stored in the sign.
(See “Clearing a sign’s memory” on page 8 or “Example 5 — Deleting messages” on page 20.)
2
Press PROGRAM.
PROG TEXT A
PROG DOTS A
3
Press BACK.
The name of your first DOTS graphics is A.
(The second one will be named B and the third one C.)
32
Graphics: Example 11 — Creating a movie marquee
BETA BRITE Programming Manual
The blinking DOTS cursor keeps
track of where you’re drawing.
4
Press ADV.
ON/OFF
CAPS LOCK
SOUND
5
Press I until the DOTS
cursor is on the bottom.
PROGRAM
MODE
FONT
FCN
RUN
1
2
3
4
5
6
7
8
9
0
A
B
C
D
E
F
G
H
I
J
K
L
M
N
O
P
Q
R
S
T
U
V
W
X
Y
Z
SPACE
RETURN
COLOR
SYMBOL
APPEND TIME/DATE
SPEED
DOTS
!
BACK
ADV
SELECT
DELETE
INSERT
Keep pressing I
until the DOTS
cursor moves here.
These keys move the DOTS
cursor.
HOW TO ENTER A MESSAGE:
1. POINT THIS REMOTE CONTROL KEYBOARD AT THE DISPLAY.
2. PRESS THE PROGRAM KEY. THE WORDS
"PROG TEXT" WILL APPEAR ON THE DISPLAY.
3. ENTER THE MESSAGE YOU WANT TO BE DISPLAYED.
(USE THE ! AND SELECT KEYS FOR PUNCTUATION).
4. PRESS THE RUN KEY TWICE.
Also, you can draw dots when
you press SELECT.
SEE YOUR PROGRAMMING MANUAL FOR
ADDITIONAL INSTRUCTIONS AND DISPLAY FEATURES.
6
Press E to draw a line
across the entire bottom of
the display.
(Press SELECT again to turn
drawing off.)
E
C
7
Complete DOTS graphic A
by using 9, C, and I keys.
I
9
E
Graphics: Example 11 — Creating a movie marquee
33
BETA BRITE Programming Manual
8
Press RUN.
9
Then press Y to save
graphic A.
PROG DOTS A
10
Press SELECT until a
question mark appears.
PROG DOTS ?
11
Type B as the name of the
next graphics file.
PROG DOTS B
Repeat the previous steps
to draw graphics B and C.
(Both are just smaller
versions of graphic A.)
DOTS graphic B
Use the COLOR key to
make all the dots in graphic
B green, and all the dots in
graphic C amber.
DOTS graphic C
12
NOTE:
In order to display a DOTS graphic, it must be placed in a text message.
In the following steps, we’ll create a text message and add the three DOTS graphics just created.
13
Press BACK until PROG
TEXT A appears.
PROG TEXT A
14
Press SELECT until a
question mark appears.
PROG TEXT ?
15
Press A.
A]
16
Press MODE and then
SELECT until [FLS]
(Flash) appears.
A]
[FLS]
Press SPEED and then
SELECT until [SP5]
appears.
A]
[FLS][SP5]
17
18
Insert the first DOTS
graphic you created (file A)
by pressing DOTS.
[SP5] is a fast message speed.
A]
FLS][SP5][DOT]A
The letter A is the name of the graphic file.
34
Graphics: Example 11 — Creating a movie marquee
BETA BRITE Programming Manual
19
Insert the second DOTS
graphic by pressing DOTS
again.
Then press SELECT until
the letter B appears.
20
Insert the third and final
DOTS by pressing DOTS
again.
Then press SELECT until
the letter C appears.
A]
[DOT]A
Press SELECT.
A]
4][DOT]A [DOT]B
A]
[DOT]A
Press SELECT.
A]]A
[DOT]B [DOT]C
Now we’ll add the message Movie News after the three graphics:
21
Press FONT and then
SELECT until [SRF]
appears.
A]T] B[DOT] C[SRF]
22
Type the letter M
A]B[DOT]C[SRF] M
23
Press FONT again. Then
press SELECT until [SS5]
appears.
A]]C
[SRF]M [SS5]
[SS5] is the smallest character font.
24
Type ovie and then press
SPACE.
A]RF]M
25
Press FONT and then
SELECT until [SRF]
appears again.
A][SS5]OVIE
26
Type the letter N
A]S5]OVIE
27
Press FONT and then
SELECT until [SS5]
appears again.
A]IE
28
Type ews
A][SRF]N
Graphics: Example 11 — Creating a movie marquee
[SS5]OVIE
[SRF]
[SRF] N
[SRF]N [SS5]
[SS5]EWS
35
BETA BRITE Programming Manual
29
36
Press RUN twice to watch
the marquee you created.
Graphics: Example 11 — Creating a movie marquee
BETA BRITE Programming Manual
Example 12 — Mixing text with graphics
In this example, we’ll create a graphic and combine it with text:
Step When you do this...
You see this...
These triangle graphics (which is just a single DOTS file) will be combined with the text Graphics!
1
Delete all the messages currently stored in the sign.
(See “Clearing a sign’s memory” on page 8 or “Example 5 — Deleting messages” on page 20.)
2
Press PROGRAM.
3
Press BACK.
PROG TEXT A
PROG DOTS A
The name of your DOTS graphics file will be A.
The blinking DOTS cursor keeps
track of where you’re drawing.
4
Press ADV.
Press X to move a vertical
line across the sign. This
reduces the size of the
drawing area.
5
Keep pressing X until there
are 5 dots between the
vertical line and the end of
the sign.
W moves this line left
(increases drawing area)
X moves this line right
(reduces drawing area)
The line should end up 5 dots from the end. So our
drawing area will be 5 dots wide by 7 dots high.
NOTE:If you don’t reduce
the graphic area, the
graphic would take
up the entire area of
the sign.
Graphics: Example 12 — Mixing text with graphics
37
H
BETA BRITE Programming Manual
Remember:
I
6
Draw the following graphic
using the keys indicated.
7
Press RUN twice.
PROG DOTS ?
8
Press BACK until PROG
TEXT A appears.
PROG TEXT A
9
Press ADV.
A]
10
Press MODE and press
SELECT until [ROT]
(Rotate) appears.
A]
11
Press DOTS to insert your
DOTS graphic.
Use SELECT to turn
drawing on or off.
J
A]
[ROT]
[ROT][DOT]A
The A is the file name of your DOTS graphic.
12
Using FCN and MODE
when necessary, type
Graphics!
(Place a space before
Graphics!)
38
13
Press DOTS to insert your
DOTS graphic again.
14
Press RUN twice to see
your graphic and text
message move across the
sign.
A]T]A Graphics!
Place a space before the word Graphics!
(Otherwise, the first triangle will appear too close.)
A]
[DOT]A
NOTE: If you had not placed a space after the first triangle graphic,
the message would look like the following:
Graphics: Example 12 — Mixing text with graphics
BETA BRITE Programming Manual
Example 13 — Deleting a graphic
If you want to delete an entire DOTS graphic file, use this example as
a guide:
Step When you do this...
You see this...
This is a continuation of the previous example.
This example assumes that the following graphic is in DOTS file A:
1
Press PROGRAM.
PROG TEXT A
2
Press BACK.
PROG DOTS A
3
Press SELECT.
PROG DOTS ?
4
Type the letter of the
graphic you want to delete.
(In this case, type A.)
5
Press Z.
6
Press Y to delete the
graphic. (Or N if you don’t
want to delete it.)
7
Press RUN four times to return to normal operation.
Graphics: Example 13 — Deleting a graphic
39
BETA BRITE Programming Manual
Appendixes
Appendix A — Modes, fonts, colors, and graphics available
Modes determine the way text and graphics move on a sign. For
example, the ROTATE mode moves a message across a sign from right to
left. Fonts are the size and shape of text characters.
The letters in brackets — like [AUT] and [RED] — are what will
appear on the sign:
Modes available
Use the MODE key to select one of the following:
• Automode — [AUT]
• Cycle colors — [SPC]5
• Flash — [FLS]
• Hold — [HLD]
• Interlock — [SPC]3
• Roll — [RL↑] — Use SELECT to change the roll direction.
• Rotate or Condensed Rotate — [ROT] or [CRT] — Use SELECT to
change between the two.
• Scroll — [SCR]
• Snow — [SPC]2
• Sparkle — [SPC]1
• Spray — [SPC]6
• Starburst — [SPC]7
• Switch — [SPC]4
• Twinkle — [SPC]0
• Wipe — [WI↑] — Use SELECT to change the wipe direction.
40
Appendixes: Appendix A — Modes, fonts, colors, and graphics available
BETA BRITE Programming Manual
Fonts available
Fonts are selected by using the FONT and SELECT keys. An example of
each font is shown in the table below:
5-HIGH SANS SERIF FONT (= 5 LED pixels high)
Name
Example
[SS5]
[ST5]
[WD5]
[WS5]
Appendixes: Appendix A — Modes, fonts, colors, and graphics available
41
BETA BRITE Programming Manual
7-HIGH SANS SERIF FONT (= 7 LED pixels high)
Name
Example
[SS7]
[ST7]
[WD7]
[WS7]
[SDS]
[SDS] is a “shadow” font because each letter is composed of two colors
— foreground and shadow — like red and green, amber and red, etc.
42
Appendixes: Appendix A — Modes, fonts, colors, and graphics available
BETA BRITE Programming Manual
7-HIGH SERIF FONT (= 7 LED pixels high)
Name
Example
[SRF]
[STF]
[WDF]
[WSF]
[SDF]
[SDF] is a “shadow” font because each letter is composed of two colors
— foreground and shadow — like red and green, amber and red, etc.
Appendixes: Appendix A — Modes, fonts, colors, and graphics available
43
BETA BRITE Programming Manual
Colors available
Use the COLOR and SELECT keys (or just COLOR) to select one of the
following:
• Red — [RED]
• Light red — [LRD]
• Green — [GRN]
• Light green — [LGN]
• Amber — [AMB]
• Brown — [BRN]
• Orange — [ORG]
• Yellow — [YEL]
• Rainbow 1 — [RB1]
• Rainbow 2 — [RB2]
• Mixed colors — [MIX]
• Autocolor — [ACL]
Graphics available:
Use the MODE and SELECT keys to select one of the following:
• “Welcome” — [SPC]8
• “Thank you” — [SPC]S
• “No smoking” — [SPC]U
• “Don’t drink and drive” — [SPC]V
• Slot machine animation — [SPC]9
• News flash animation — [SPC]A
• Trumpet animation — [SPC]B
• Party balloons animation — [SPC]Y
• Fish animation — [SPC]W
• Fireworks — [SPC]X
• Cherry bomb — [SPC]Z
44
Appendixes: Appendix A — Modes, fonts, colors, and graphics available
BETA BRITE Programming Manual
Appendix B — Sign diagnostic test
Your sign can do a self test to determine if all the LEDs are working
properly:
Step When you do this...
1
Press PROGRAM.
2
Press BACK until SET
TIME appears.
3
Press ADV.
You see this...
PROG TEXT A
SET TIME
SET W/D ,H&M
THEN
MON 2:29 AM
Type TEST
4
5
NOTE:This test deletes all
messages in the
sign. However, if
you type the letter R
immediately after
typing TEST, your
messages will be
preserved.
1:00 AM00
THEN
A series of test displays will appear.
Press PROGRAM to exit the self-test mode.
Appendixes: Appendix B — Sign diagnostic test
45
BETA BRITE Programming Manual
46
Appendixes: