1
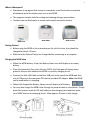
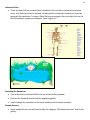
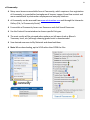
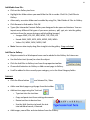
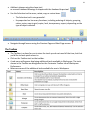
iClick2Engage MOBI and Workspace Beginners Manual MOBI VIEW Your local sales team: Merianne Wininger Kristen Rush Kim Brewer 832.524.6487 [email protected] www.iclick2engage.com eI Tech Support: 888.333.4988 www.einstruction.com Join the eInstruction Community to connect with other educators, find free high quality resources, and learn about the latest best practices and technologies in classroom instruction. Resources are searchable to make finding what you need fast and simple. Plus, check out blogs and discussion boards to find out what other education professionals are talking about. Register today at www.eicommunity.com 1 What is Workspace? Workspace is a program that connects a computer to an EInstruction interactive whiteboard, panel or wireless pad, such as the MOBI. The program includes tools for writing and drawing during a presentation. Teachers can use Workspace to create and conduct interactive lessons. MOBI View MOBI KWIK MOBI Learner Getting Started Before using the MOBI or the interactive pen for the first time, they should be charged for about 12 hours. Make sure the Pad and Pen(s) are charged before connecting to a computer. Charging the MOBI View When the MOBI battery is low, the Battery Status icon will display as an empty battery. Place the Interactive Pen in the Pen slot. NOTE: the View pen will charge when placed in the pen slot whether the MOBI is currently charging or not. Connect the Mini USB Cable to the Mini USB port at the top of the MOBI and then into a USB port on the computer OR into the provided AC adapter. Note: the MOBI can be used while it is charging. When fully charged the Battery Status icon will display a full battery. You may also charge the MOBI View through its personal dock as seen below. Simply place the receiver inside the RF hub holder on the charging stand and then place your MOBI View on the charging stand. Allow approx. 8 hours to fully charge. 2 Installation of Software Ideally, software should be the newest version. Most often this will be found on the website at http://www.einstruction.com/support/downloads. ALL eInstruction DEVICES MUST BE UNPLUGGED FROM THE COMPUTER BEFORE INSTALLATION OF ANY eInstruction SOFTWARE. You will know Interwrite Workspace has installed successfully by the appearance of the eInstruction icon in the System Tray on the Windows Task Bar (if the icon does not appear, restart your computer). This icon indicates that the eInstruction Device Manager is now running in the background. The Device Manager can be opened through the icon menu. Setup and Device Manager Open the Device Manager to observe the MOBI connections. Plug the RF Receiver into a USB port on the computer. The computer will automatically detect the USB device and install the new hardware for use. A blue LED light on the RF Receiver will light up when it is plugged in. Turn on the MOBI. In most cases the computer will automatically find the MOBI and it will be visible in the Device Manager. If it is NOT automatically discovered: o Press the lighted Activation button on the RF Receiver. The blue LED light will start blinking. o Turn on the MOBI View. It should tell you it’s attempting to connect and should pick up the RF signal automatically. o This process can be used to add additional MOBIs to the Device Manager, as in MultiUser mode. Customize your device: o Highlight your device. o Click on Options and select Properties or click on the wrench Properties button. 3 Properties Menu General Tab: Here you can name your device. Type a device name in the Name text field. NOTE: You may also name your device by using the Touch Pad on the MOBI View: click Settings then click Device Name. Enter in a new name, hit the Enter button and then exit out to the main screen. Annotation Tab: Choose the tools to be made available for use as annotation options on the MOBI View. This screen is also accessible when you tap the Customize Tools icon on the MOBI View Annotate screen. A customized Annotate screen on the MOBI View will typically take the place of the Workspace toolbar and will allow you to leave the toolbar minimized on the Workspace screen thus providing more writing area. 4 Favorites Tab: The MOBI View has a Favorites screen. It will allow you to program up to 16 different websites, files or applications. This screen is also accessed by tapping Add Favorites on the Favorites screen of the MOBI View. Check for Updates: Open the Device Manager. Click on the picture of the MOBI. Choose File / Preferences from the menu options. Click the Firmware Update tab and click the Check for Updates box. Click the eInstruction icon in the System Tray of the Windows Task Bar. Select the Check for Updates option. If a new version of the Workspace software is available download it now. 5 The MOBI View Screen The MOBI View Screen displays icons associated with the MOBI’s status The Favorites and Annotate functions are modified within the device manager as noted above. Notes: Creating a new note will save the last note in the MOBI. Use the arrows to move through saved notes. The “a” and arrow icons in the bottom right corner will toggle between using the active writing area of the MOBI for writing notes or for mouse functions. 6 Annotate: The annotate screen works exactly like the toolbar. Press Customize Tools to open device manager and modify the available tool selection. When you choose a tool Workspace will move into Lesson mode. If there was a Workspace page open you will be able to utilize that tool with the page. If something else, such as a web page, is open on the computer screen a screenshot will be taken and the picture will be added as a page in the Workspace lesson. Multiple MOBIs: Use the Device Manager window to connect all devices. Setting up Multi User Mode: o From the Annotate screen tap Multi User. o Choose the number of users/boxes you would like to use. o MOBI View is automatically designated as the “presenter.” o Tap Exit Multi User to close out. Favorites: Scroll through your Favorites list using the arrows. Press Add Favorites to open device manager and modify the favorites list. Keyboard: The keyboard can be used at any time: either in a Workspace lesson or to write in text fields in computer programs or the Internet. If in Workspace, using the keyboard will create a text box on the page. Press Exit to close the keyboard. Reports: If an eInstruction student response system device is connected to the computer and is recognized in the Device Manager student responses to teacher managed questions will be visible in the Reports screen. 7 Questions engaged in student-paced assessment mode will not be visible. There are several different reports accessible by choosing Next Report or Prev Report: Question Status Session Summary Answer Distribution Session Results by Student Response Grid Response per Student 8 Settings: The Interactive Pen The MOBI requires an interactive pen. Tap on the pad with the pen tip to perform the “left click” action of a mouse. Hold the pen just above the surface of the MOBI and press the upper part of the rocker button to perform a “right click.” Hold the pen just above the surface of the MOBI and press the lower part of the rocker button to “double click.” Recharge the pen regularly. o Place the pen firmly in the recharging holder. o A pen and a battery icon will appear on the screen indicating the pen is charging. o Remember to return the pen to the recharging holder when not in use. 9 Using Workspace: Interactive Mode: There are multiple ways to open Interwrite Workspace. o The MOBI View can be set up so that when it is powered on Workspace will auto start. Do this in Settings. o Add Workspace to the Favorites screen and tap it to open when needed. o Click the eInstruction icon in the Windows System Tray and choose Workspace. o Use the desktop icon or: Start / All programs / eInstruction / Interwrite Workspace / Interactive mode. A toolbar will appear near the right hand side of the desktop. It will look thinner than the toolbar shown below. The toolbar will become translucent after a period of non-use. Moving the Toolbar: Position the mouse pointer at the top of the toolbar near the Interwrite icon. Click and drag the toolbar to a new location. Resizing the toolbar: Position the mouse pointer on the edge of the Toolbar until a doubleheaded arrow appears. Click and drag the double-headed arrow to change the size and layout of the Toolbar. Note: this is the default Intermediate toolbar with the 40 x 40 pixel sized icons 10 Setting Workspace Preferences: Dozens of preference changes can be made to the Interwrite Workspace program. 65 different tools are available to be added to a customized toolbar. Three groups of tools are available at all times: o Main Toolbar (always on screen) o Toolbox tools o Right click tools Three default toolbars are provided but may be customized: o Basic o Intermediate o Advanced Recommended Preferences: Click on the Workspace Menu button. Select Preferences. Toolbar Settings Tab: Classic Rectangle will give the greatest available page space or “real estate” within Workspace. Toolbar Button Size in Pixels – the icons are most visible in the 40 x 40 size. Optional Custom Buttons - will allow one click linking to either files or websites. o click on P1 o Type in a description o Use the Application Path and browse to a file (such as a lesson) or program o Use the URL icon and type in a full website address (URL) Options Tab: Annotation Window Options – checking the box will allow you to resize Workspace so it can be utilized side-by-side with another program, such as for note-taking. Cursor Orientation – can be changed for a left-handed individual. Automatically Save Pages Every – will allow the program to save the current activity/lesson at regular intervals. Snap Grid Settings – Snap Objects to Grid is suggested for teachers who might be utilizing graphs. Spacing in Pixels can be set at 30 to allow drawn lines to snap to the premade graph lines on the grid page. 11 New Page Setup Tab: Blank Page – studies have shown that a white page is not the best choice for student viewing. Use Change Background Color to change to off-white or other light color. Grid Page – for graphing purposes check Vertical and Center Grid. Add Title Box if desired. Spacing should be set at 30 Pixels. Language Arts teachers may want to space the horizontal lines further apart to allow for easier writing by the students. Change background color as desired. Transparency & Language Tab: There are no specific suggestions for this tab. Gradient Page Setup Tab: School colors are good choices for the gradient pages. Customize Toolbar Tab: The current toolbar defaults to the pre-made Intermediate toolbar. Advanced and beginner toolbars are also available. The Toolbox is a group of secondary tools readily available by clicking the Toolbox icon in the Main Toolbar during Workspace use. Customize the toolbar by dragging icons from the Available Tools section into the Main Toolbar, Toolbox or Right Click Toolbar. Some popular, but unusual, tools are noted in the picture below: Freehand text Freehand shape Record and Playback Curtain Grid page Timer Hovering the pointer over an icon will provide the tool name. The P1 through P5 icons are only available if the Custom Buttons were created in the Toolbar Settings tab. 12 Main Tools and Descriptions Page Creation Tools: Click to create blank pages for lessons, notes, etc. The screen will now look similar to this: IMPORTANT: The Properties Bar will change depending on the tool being used. The above example shows the Pen tool and its properties: line color, width, transparency, ends, dash styles and the Preview showing the current settings. 13 Annotation Tools: 14 Editing Tools: 15 Extending a Page and Panning: By clicking on either the downward extend button or the right side extend button the default blank page space will be widened or lengthened. Click on the Pan Tool in your toolbar or toolbox (if it was a chosen tool) and then click and drag on the Workspace page to move in any direction across a page that is larger than the current screen size, such as in a PDF. Layers Toolbar: By default, all items are organized in a single layer. To add layers: Locate the Layers Toolbar at the bottom left corner of the Workspace page. To view the layers click on the maximize layers button. Click the Add Layer button. The Layer Toolbar has additional options such as moving layers up/down, selecting layers, showing/hiding layers, editing layers and deleting layers. 16 File Management Tools: 17 See page 39 18 19 The Gallery NOTE: When you first launch the Gallery it must be built. The computer will find the location where the Interwrite Workspace Content was downloaded and you will need to allow it to fill the Gallery. Categories: Select different categories to view pre-existing files organized by subject. Select subject and sub-categories. Click on a resource in the lower window. Use the pen to drag the resource to an existing page in Workspace. Resources from Gallery: There are thousands of images, image pages and Flash files. Most images can be rotated, moved and resized. Files with a dog-eared corner are Image Pages and cannot be manipulated. Flash files are interactive. They can be identified by the blue circle with the “f” inside. They can be found in the Interactive Sims folder. 20 Interwrite Sims: There are over 100 pre-created Flash simulations for use with a variety of curriculum areas. Any Flash tools can be utilized, including those created by students or found on copyright-free websites. To copy a Flash file from a copyright-free site right click on the file (for example, a game) and choose “Save Target As…” Searching for Resources: Type a keyword in the text field at the top of the Gallery window. Click on the Keyword Search button (magnifying glass). Scroll through the resources in the lower window to find search matches. Sample Lessons: Some sample lessons can be found under the category “Workspace Lessons” within the gallery. 21 eI Community: Many more lessons are available from eI Community, which requires a free registration. eI Community is a searchable clearinghouse of lessons, images, ExamView content and more created both by eInstruction employees and everyday teachers. eI Community can be accessed from www.eInstruction.com and through the Interwrite Gallery (File / eI Community Portal). From within eI Community hover over Resources and click Search Resources. Use the Content Format window to choose specific file types. The most results will be returned when options are left open (such as Bloom’s Taxonomy Level, etc.) although choosing grade levels is recommended. Save desired resources to My Materials and download them. Note: When downloading, opt to SAVE rather than OPEN the files. 22 Add Media from File: Click on the Gallery tool icon. Highlight the folder where you would like the file to reside. Click File / Add Files to Gallery. Alternately, an entire folder can be added by using File / Add Folder of Files to Gallery. Click Browse to find media. Click OK. Types (the Interwrite Content Gallery was designed to be open-architecture. You can import many different file types of your own: pictures, .pdf, .ppt, etc. into the gallery and store them for access during or while building lessons). o :Images: BMP, JPG, GIF, EMF, WMF, TIFF, PNG, ICO o Sound: WAV, MP2, MP3, MPA, MPEG, SND, WMA o Video: AVI, WMV, MOV, MPEG, SWF Note: You can also simply drag files straight into the gallery. Drag and drop! Add Files to Gallery: Objects created in a Workspace lesson can be added to the Gallery for future use. Use the Select tool (arrow) to select the object. Click the Add files to Gallery icon from the properties toolbar. Choose Add selection to Gallery or Add current page to Gallery. It will be added to the currently open category, or to the New Category folder. Lessons Click the Menu button and choose File / New Add a new blank page or grid page from the toolbar. Add text to a page using the Text tool o Type text into the text box. o Copy and paste text from existing documents. o Resize text box to desired size. o Use the Split function to break the text into individual words, if desired. Add images, sound files and simulations from the Gallery. 23 Add basic shapes using the shape tool, or convert freehand drawings to shapes with the freehand shape tool. Use the Selection tool to move, rotate, copy or resize items. o The Selection tool is very powerful. o Its properties bar has many functions, including ordering of objects, grouping, colors, notes, snap to grid, copier, lock, transparency, export, depending on the type of object selected. Navigate through lessons using the Previous Page and Next Page arrows. The Toolbox The Toolbox is a place for you to store the tools you do not need all the time, but that you’d like to have quick access to. Click on the Toolbox tool on the toolbar. A sub-menu will appear displaying additional tools available in Workspace. The tools shown in the Toolbox are designated on the Customize Toolbar tab of Workspace Preferences. Below are some of the additional tools available for use in Workspace. 24 25