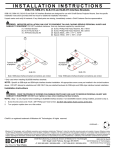
1
Buy Online or Call 1-800-WWW-DELL Search All Dell.com USA Search Advanced Search Desktops Notebooks Servers, Storage & Networking Electronics BACK TO: USA Printers My Account Shopping Order Support My Order Status User Guide Back to Contents Page Using Your Projector: Dell™ 2300MP Projector Control Panel Remote Control On-Screen Display Control Panel Power See "Powering On/Off the Projector." Volume Increase or decrease the speaker volume. Video Mode Switch the display mode within PC Mode, Movie Mode, Game Mode, sRGB Mode, User Mode per your preference. Source Press to step through Analog RGB, Composite, Component-i, S-video, and Analog YPbPr sources when multiple sources are connected to the projector. Resync Press to synchronize the projector to the input source. will not operate if the OSD (On-Screen Display) is displayed. Resync Menu Contact Us Press to activate the OSD. Use the directional keys and Menu button to navigate through the OSD. Four Directional Keys The four directional keys can be used to toggle through the tabs in the OSD. Keystone Adjustment Press or button to adjust image distortion caused by tilting the projector. (±16 degrees) Remote Control Power See "Power On/Off the Projector." Source Press the Source button to switch between Analog RGB, Digital RGB, Composite, Component-i, S-video, and Analog YPbPr sources. Resync Press Resync to synchronize the projector to the input source. Resync will not operate if the OSD (On-Screen Display) is displayed. Directional Keys Use or to select OSD items, use "left" and "right" button to make adjustments. Hide OSD. 4:3/16:9 Press 4:3/16:9 button to switch aspect ratio 1:1, 16:9, 4:3 as described below. Volume +/Press the Vol+ button to increase the volume, press the Vol- button to reduce the volume. Keystone Adjusts image distortion caused by tilting the projector. (±16 degrees) On-Screen Display The projector has a multi-language On-Screen Display (OSD) that can be displayed with or without an input source present. The OSD allows you to make image adjustments and change a variety of settings. If the source is a computer, the OSD allows changes to the Computer Image tab. When using a video source, the OSD allows changes to the Video Image tab. The projector automatically detects the source. When the OSD is on the screen, press or to navigate through the OSD tabs. Example: All Images--> Computer Image--> Audio--> Management--> Language--> Factory Reset. To make a selection in a tab, press on keypad or "Menu" on remote controller. Press or to make a selection and adjust the settings by pressing or on keypad or Left and Right button on the remote controller. When an item is selected, the color of the item will change to dark gray. To exit the OSD, go to "Exit" tab and press button on keypad or "Menu" on remote controller. All Images Menu Brightness Adjust the brightness of the image. Press to darken the image. Press to lighten the image. Contrast Control the degree of difference between the brightest and darkest parts of the picture. Adjusting the contrast changes the amount of black and white in the image. Press to increase the contrast. Color Temp. Adjust the color temperature. With the higher temperature, the screen looks more blue; with the lower temperature, the screen looks more red. User mode activates the values in the "color setting" menu. Color Setting This mode allows for manual adjustment of red, green, and blue color settings. Modifying these values will automatically change the color temperature to "user". Keystone Adjusts image distortion caused by tilting the projector. (±16 degrees) Aspect Ratio Select this function to fit 1:1, 16:9 or 4:3 aspect ratio. In order to use the 1:1 aspect ratio, the input must be a computer signal (through VGA cable) less than XGA (1024 x 768), component 576p/ 480i / 480p, S-Video, or Video (composite). If the input signal is a computer signal greater than XGA or component 1080i / 720p, only 16:9 or 4:3 aspect ratio will be available. When an icon is selected, the color of the icon will change to dark blue. 1:1: The input source will be displayed without scaling. 16:9: The input source will be displayed in wide screen mode (16:9). The source will be scaled to fit the width of the screen. 4:3: The input source will be scaled to fit the screen. Video Mode Select this function to optimize the display image for home use (Movie Mode or Game Mode), conference use (PC Mode) or as user preferable settings (User Mode), or use sRGB mode for more accurate color representation. When an icon is selected, the color of the icon will change to dark blue. Adjusting the settings of White Intensity or Degamma tab, will select User Mode automatically. White Intensity White Intensity can be adjusted between 0 and 10. Setting 10 will maximize the brightness. Setting 0 will maximize color reproduction quality. Degamma Degamma can be adjusted between 1 and 4. Default setting is 3 (Recommended). Adjustment of the setting will change the color performance of the display. Audio Menu Audio Volume Press to decrease the volume. Press to increase the volume. Mute Select the left icon to mute the volume. Select the right icon to un-mute the volume. Management Menu Management Menu Location Select the location of the OSD on the screen. Projection Mode Front Projection-Desktop The default setting. Rear Projection-Desktop The projector reverses the image so you can project from behind a translucent screen. Front Projection-Ceiling Mount The projector turns the image upside down for ceiling-mounted projection. Rear Projection-Ceiling Mount The projector simultaneously reverses and turns the image upside down. You can project from behind a translucent screen with a ceiling-mounted projection. Signal Type Manually select signal type RGB, YCbCr, YPbPr. Lamp Hour Display operating hours since lamp timer reset. Lamp Reset Use this function only after a new lamp is installed in the projector. Select the left Lamp Reset icon (light bulb and arrow under the icon), and press the Enter button to reset the lamp timer. Power Saving Menu Power Saving Use this function to select the power saving delay period. Press "Yes" to go into the "set time" sub menu. Set Time (Min) Set the power saving delay period as you prefer. When the projector is not receiving an input signal for the selected period of time, the projector will automatically enter power saving mode, and turn off the lamp. After a one-minute cooling period, the projector will turn back on with detection of an input signal or by pressing the "Power" button. After two hours the projector will turn off and must be turned on by pressing the power button on the control panel or remote. Auto Source The projector will always automatically search for available input signals when Auto Source is On, which is the default setting. Press the Source button with Auto Source On to automatically search for the next available input signal. Selecting Off will lock on the current input source. Set Auto-Source to Off to step through the different input signals manually. Eco Mode Select On to operate the projector in lower power (150 Watts) for providing longer lamp life and quiter operation with dimmer luminance output on the screen. Select Off to resume the operation in normal power (200 Watts). Language Menu Language Language Press or to select the preferred language. Factory Reset Menu Factory Reset Select Yes to reset the projector to its factory default settings. Reset items include both computer image and video image settings. Computer Image Menu Computer ImageNOTE: This menu is only available with a computer input signal connected. Frequency Change the display data clock frequency to match the frequency of your computer graphics card. If you see a vertical flickering bar, use the frequency control to minimize the bars. This is a coarse adjustment. Tracking Synchronize the phase of the signal of the display with that of the graphic card. If you experience an unstable or flickering image, use the Tracking function to correct it. This is a fine adjustment. NOTE: Adjust the Frequency first and then the Tracking. Hor. Position (Horizontal Position) Press to move the image to the left. Press to move the image to the right. Ver. Position (Vertical Position) Press to move the image down. Press to move the image up. Video Image Menu Video ImageNOTE: This menu is only available with S-video, Video (composite) signal connected. Saturation Adjust a video image from black and white to fully saturated color. Press to decrease the amount of color in the image. Press to increase the amount of color in the image. Sharpness Adjust the sharpness of the image. Press to decrease the sharpness. Press to increase the sharpness. Tint Adjust the color balance of red and green. Press to increase the amount of green in the image. Press to increase the amount of red in the image. Back to Contents Page BACK TO: USA Copyright 1999-2006 Dell Inc. For customers of the 50 United States and the District of Columbia only. Site Terms | Terms and Conditions of Sale | Technical Support Policy | Privacy Policy | About Dell | Contact Us Large Text sn SAP4 Top