1
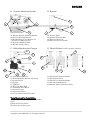
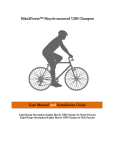
ENGLISH Bike2Power™ Bicycle-mounted USB Charger Kits User Manual and Installation Guide SpinPower S1 SpinPower I3 SpinPower I4 ENGLISH User Manual and Installation Guide SpinPower S1, SpinPower I3, SpinPower I4 Table of Contents Copyright ........................................................................................................................................ 3 Introduction .................................................................................................................................... 3 Safety Instructions ......................................................................................................................... 3 Compatible Devices ........................................................................................................................ 4 Parts and Technical Specifications ................................................................................................ 4 Parts ............................................................................................................................................... 4 Technical Specification .................................................................................................................. 5 Output Power ................................................................................................................................. 5 Installation Manual ........................................................................................................................ 5 Getting to Know Your Kit.............................................................................................................. 5 Tools Required for Installation ..................................................................................................... 6 Mounting Dynamo ......................................................................................................................... 7 Mounting Holder Bracket with Charger ...................................................................................... 8 Connecting Dynamo and Charger ................................................................................................. 8 Attaching a Phone Holder ............................................................................................................. 9 Operating SpinPower Kits ........................................................................................................... 10 Connecting mobile devices........................................................................................................... 10 Charging mobile devices .............................................................................................................. 10 Taking Care of Your Device ......................................................................................................... 10 Limited Warranty ......................................................................................................................... 11 Limitation of Liability .................................................................................................................. 11 Contact Information ..................................................................................................................... 12 2|Page Copyright © 2012 Bike2Power. All rights reserved ENGLISH Copyright Copyright 2012© by Bike2Power. All rights reserved. All brands and product names mentioned herein are the property of their respective owners. Introduction SpinPower Bicycle-mounted Phone Charger Kits allow charging a mobile device that is able to charge via USB while riding a bicycle. The kits are designed to be used with the regular (utility) bicycles. SpinPower S1 Kit is compatible with the majority of the Smart® phones makes and models including androids. SpinPower I3 Kit is compatible with iPhone® 3G/3GS and some older iPhone® models. SpinPower I4 is compatible with iPhone® 4G/4S. Charging with SpinPower Kits begins at as low as walking speeds. Install the entire kit; connect your mobile device to the 2.0 USB charger port using your mobile device USB charging cable, and begin pedaling. Read this guide carefully before installing and using SpinPower Kits. Review the user guide for your bicycle and your mobile device before installing the kit and connecting the mobile device. Safety Instructions (!) CAUTION Obey your local laws. Always keep your hands free to operate the bicycle while cycling. Road safety must be your first concern while cycling. Do not attempt to make or receive calls, or operate your mobile device while cycling. Do not attempt to connect your mobile device to the charger while cycling. Always stop to initiate, modify, or terminate any function on your mobile device or to connect your mobile device to the charger. Only operate the kit if it is safe under the cycling conditions. Do not attempt to remove or adjust any portion of your kit while cycling. Always stop and loosen the bolts or screws to adjust any portion of the kit. Make sure all parts of the kit are secure before resuming your ride. Allowing connector wire to hang loose is dangerous. Always secure the excess loose connector wire away from the moving, steering, or braking parts of the bicycle. When installing the kit, make sure that it does not interfere with or hinder any of the bicycle moving, braking, or steering parts. Make sure that the kit is installed where you cannot come in contact with it in the event of an accident or collision. Always make sure all parts of the kit are securely installed before and after the ride. If you are not sure how to install any portion of the kit, consult or hire a professional installer. Dynamo hub may become warm during operation. Do not touch the dynamo for a few minutes after completing your ride. 3|Page Copyright © 2012 Bike2Power. All rights reserved ENGLISH Incorrect installation of the dynamo may cause it to fall between the wheel spokes and jam the wheel. Always ensure that your dynamo is secure before and after the ride, and every few miles during the longer rides. Incorrect installation of the dynamo may cause an increase in the wear of the bicycle tire. If you are not sure how to install the dynamo, consult or hire a professional installer. The kits are water resistant, but not waterproof. Avoid submerging in water or using in rain or snow without a protective cover. If a kit becomes wet, remove the kit from the bicycle and allow it to dry out before reinstalling and using again. The connectors of this device may contain a small amount of nickel. Persons sensitive to nickel may experience symptom from the prolonged skin contact with the connectors. The kits may contain small parts which may constitute choking hazard. Keep them out of reach of small children. Read the installation instructions carefully. Do not attempt to substitute any parts of the kits. Use the kits only with the compatible mobile devices. Never force the connectors into ports. Make sure that the connectors match a port and that you have positioned them correctly. Never force the groves into the slots. Make sure that the groves match the slots and that you have positioned them correctly. These kits are not suitable for rough terrains, off-road, or trick bicycling. The kits may be affected by extreme temperatures. Always keep the kits between -15◦ C (5 F) and +55◦ C (131 F). Bike2Power is not responsible for any damages or failure to the devices charged using the SpinPower Kits. Bike2Power is not responsible for any damages or failures caused to the bicycle used to mount the SpinPower Kits. Compatible Devices SpinPower Bicycle Phone Charger Kits are compatible with 5v devices able to charge through USB. SpinPower S1 is compatible with the major smartphone makes and models as well as Android® phones. SpinPower I3 is compatible with the iPhone® 3G/3GS and some older iPhone models. SpinPower I4 is compatible with the iPhone® 4/4S. Parts and Technical Specifications Parts* SpinPower Bicycle-mounted Phone Charger Kits contain: A. Dynamo Mounting Bracket B. Dynamo C. Holder Bracket with Charger D. Phone Holder *Product colors and accessories are subject to change without notice 4|Page Copyright © 2012 Bike2Power. All rights reserved ENGLISH Technical Specification* PART DIMENSIONS WEIGHT Dynamo / Mounting Brackets** Charger 40.2 x 94.3 mm (1.6 x 3.7 in) 71 x 33 x 22 mm (2.8 x 1.3 x 0.9 in) 141 x 21 x 25 mm (5.6 x 0.8 x 1.0 in) 800 - 1000 mm (31.5 in – 39.4 in) 250 g w/ brackets (8.8 oz) 190 g w/o brackets (6.7 oz) 46 g (1.6 oz) Phone Holder (typ)*** Connector Wire 11.5 g (0.4 oz) N/A OPERATING TEMPERATURES -15◦ C to +55◦ C (5 F to 131 F) -15◦ C to +55◦ C (5 F to 131 F) -15◦ C to +55◦ C (5 F to 131 F) -15◦ C to +55◦ C (5 F to 131 F) *All dimensions are approximated. ** Mounting bracket fits forks up to 1.25 inches in diameter *** Universal phone holder opens to 1.75 inches to 4.5 inches Output Power* 8.5 (5.3 mi/h) Charging electric current (mA) 100 9.5 (5.9 mi/h) 150 10.5 (6.5 mi/h) 200 13.5 (8.4 mi/h) 250 15 (9.3 mi/h) 300 ≥20 (≥12.4 mi/h) 500 Speed of bicycle (km/h) *Largest output current is 500mA. All values are approximated. Installation Manual Getting to Know Your Kit D C B A A. 5|Page Copyright © 2012 Bike2Power. All rights reserved ENGLISH B. Dynamo Mounting Bracket 4 3 1 Required Tools 2 B. Dynamo 1 a 2 5 a A1 Exterior Dynamo Mounting Bracket 3 4 B1 Friction Roller B2 Bracket Mounting Hole B3 Electrical Wire Port B4 Release Lever (not shown) A2 Interior Mounting Bracket A3 Bracket Bolts (2) and Washers (2) – provided in 2 different sizes A4 Dynamo Adjustment Bolt A5 Bracket Security Screw C. Holder Bracket with Charger D. Phone Holders (each kit includes 1 holder) 10 4 1 Mounting 1 2 9 3 2 6 4 7 8 3 2 5 5 C1 Phone Holder Bracket C2 Mounting Holder Bracket with lining C3 Security Screw C4 Charger C5 USB Port C6 Electrical Wire (Red) C7 Grounding Wire (Black) C8 Connecting wire C9 Adjustment Wheel C10 Phone Holder Installation Slots D1 iPhone® 4 Compatible Holder D2 Installation Groves D3 iPhone® 3 Compatible Holder D4 Size Adjustment Button D5 Smart® Phone (Universal) Holder Tools Required for Installation Wrench 10 mm, regular, socket, or adjustable Pliers Phillips head screw driver Electrical tape and/or zip ties 6|Page Copyright © 2012 Bike2Power. All rights reserved ENGLISH Mounting Dynamo (!) Use only the supplied dynamo. The dynamo may be installed in the two positions shown below. Note that the dynamo release lever must be facing the spokes. Position “2” is recommended whenever a bicycle has the front breaks. The installation steps below can be applied to the installation in the either position, “1” or “2”. Position “1” – L fork facing front Position “2” – R fork facing rear Step 1. Attach dynamo (B) to the exterior mounting bracket (A1) a. Attach dynamo to the exterior mounting bracket (A1) using the provided adjustment bolt (A4) with nut and washer. b. Attach through dynamo mounting hole (B2). c. Tighten the bolt to achieve firm hold. Do not over-tighten. Step 2. Attach the brackets (A1 and A2) to the front bicycle fork a. Attach the mounting brackets (A1 and A2) to the bicycle fork. Interior bracket should be positioned between the fork and the wheel. b. Use the provided bracket bolts and washers (A3). These bolts are provided in two different lengths sizes. Select the length that best accommodates the diameter of your bicycle’s fork. c. Tighten the bolts for the firm hold. Do not over-tighten. Step 3. Adjust dynamo position a. Dynamo’s friction roller (B1) should be firmly touching the middle of the tire at a right angle b. Adjust the friction head’s position to the correct position by slightly loosening the bolts and adjusting the roller’s height, angle, and distance until the correct position is reached. Step 4. Tighten the bolts a. Once the correct position is reached, tighten all bolts to achieve the firm grip. b. Avoid over-tightening. To Remove the Dynamo a. Loosen the bolts and remove the brackets from the fork. 7|Page Copyright © 2012 Bike2Power. All rights reserved ENGLISH To Disengage the Dynamo – the dynamo may be disengaged without removing it while not in use a. Press the release lever down b. The dynamo will snap away from the rim c. Reengage by pressing the release lever and pushing the dynamo toward the tire until it clicks in place Mounting Holder Bracket with Charger (!) Use only the supplied holder bracket with charger Step 1. Attach charger to a handle bar a. Loosen the security screw (C3) to separate the top and bottom of the mounting bracket (C2). b. Wrap the mounting bracket around the handle bar. The charger (C4) should be on the bottom of the handle bar. The phone holder bracket (C1) should be at the top. Remove the lining sheets as necessary to accommodate the diameter of the handlebar. c. Reconnect the top and bottom of the bracket with the security screw. Do not over-tighten. To Remove the Holder Bracket a. Loosen the security screw, unwrap and remove the holder bracket from handle bar Connecting Dynamo and Charger Step 1. Connect the electrical wire (C6) (!) The electrical wire is the red-color wire a. Insert the oval connector at the end of the red electrical wire (C6) into electrical wire port (B3) b. Press firmly until connector is firmly lodged inside the port. 8|Page Copyright © 2012 Bike2Power. All rights reserved ENGLISH Step 2. Connect the grounding wire (C7) (!) The grounding wire is the black-color wire a. Slightly loosen the middle bracket bolt (A3) b. Slide the metal end of the black grounding wire (C7) between the bolt’s head and the exterior bracket (A1) c. Tighten the bolt to achieve firm hold. d. Avoid over-tightening. Step 3. Connector wire (C8) management (!) Because the bicycle sizes are different, you will likely have some excess connector wire (C8) left. You may follow the recommended steps below to secure the excess connector wire. Allowing excess wire to hang loosely is dangerous. Always make sure the excess wire is secured away from the steering, operating, and breaking parts of the bicycle before operating the bicycle. Securing excess wire with electrical tape Step 1. Step 2. Step 3. Gather excess wire and bunch it together. Leave just enough slack allow the electrical wire and grounding wire to stay in place. Secure the bunched up portion of the connector wire with electrical tape by wrapping electrical tape around the gathered up wire. Secure connector wire along the bicycle stem by attaching the wire to the stem with electrical tape Securing excess wire with zip ties Follow Step 1 and Step 2 above. Step 3. Secure connector wire along the bicycle stem by attaching the wire to the stem with zip ties. Step 4. Trim down the zip ties as desired. Attaching a Phone Holder (!) Use only the holder provided Step 1. Install a phone holder (D1, D3, or D5) a. Align the grove on the back of the phone holder (D1, D3, or D5) and the phone holder installation slots (C10) and insert the groves into slots. b. Press in and down firmly until the holder snaps in place. Listen for the clicking sound which indicates that the holder is firmly in place. 9|Page Copyright © 2012 Bike2Power. All rights reserved ENGLISH Step 2. Secure the holder in desired position a. Use adjustment wheel (C9) to secure the holder in a desire position. Rotating adjustment wheel can loosen or secure the angle of the holder’s position. To Remove a Phone Holder a. Slide the holder up and out Operating SpinPower Kits Connecting mobile devices Step 1. Place your mobile device into the phone holder Step 2. Connect mobile device to charger a. Use USB charging cable provided with your mobile device b. Plug the USB end of your charging cable into the charger’s USB port (C5) Charging mobile devices Step 1. Connect the mobile device to the charger Step 2. Begin pedaling faster than 4 miles per hour which typically a walking speed Step 3. If charging does not begin immediately after you start pedaling, do one of the following a. Increase speed b. Stop the bicycle and adjust the dynamo’s position to the correct position c. Stop the bicycle and check all connections including your USB cable d. Stop the bicycle and detach USB charging cable from your mobile device for a few seconds Note: While charging your mobile device, the dynamo output may not be enough to charge your mobile device if you use a Bluetooth® headset with it. Taking Care of Your Device (!) Handle your SpinPower Kits’ devices and accessories with care. Keep the devices dry. Any type of moisture can corrode the electronic circuits. That includes humidity, precipitation, and all types of liquids. If the devices become wet, allow them to dry out completely. Avoid using or storing the devices in the dirty and dusty areas. Moving parts and electronic components of the device can become damaged. Do not attempt to open the devices. Do not bend, drop, or crush the devices. Avoid dropping, knocking, or shaking the devices. Rough handling may result in damage to the mechanical parts of the device. Use only soft, clean, and dry cloth to clean the surfaces of the devices. 10 | P a g e Copyright © 2012 Bike2Power. All rights reserved ENGLISH Do not paint the devices. Painting your device may result in clogging the mobbing parts and ports, and prevent the device from proper operation Recycle your used electronic products, batteries, and packaging materials to the dedicated recycling outlets. Limited Warranty Bike2Power warrants its products to be free from the manufacturer’s defects for 90 (ninety) days from the date of the original purchase. This warranty extends only to the original retail purchaser and covers defects and malfunction occurring in a course of the product’s ordinary use. This warranty does not apply if the product has been damaged, or if malfunction is a result of the unusual wear and tear, or a result of misuse, abuse, alteration, failure to follow direction, or improper installation, or maintenance, or cleaning. Any implied warranties of merchantability or fitness for a particular purpose are limited in duration as stated in the paragraph above. Bike2Power’s sole obligation under the implied warranties is to exchange or repair the entire product or its defective part at Bike2Power sole discretion. To make a warranty claim, please contact us by writing to: Attn: Warranty Claims Bike2Power 1910 W. Washington Blvd., #10 Los Angeles, CA 90018 Please include the following information in your correspondence: Your full name, address, and contact information Your order date and number The description of the product’s malfunction or defect TO THE EXTENT ALLOWED BY LOCAL LAW, NEITHER BIKE2POWER NOR ITS THIRD PARTY SUPPLIERS MAKES ANY OTHER WARRANTY OR CONDITION OF ANY KIND, WHETHER EXPRESS OR IMPLIED WARRANTIES OR CONDITIONS OF MERCHANTABILITY, SATISFACTORY QUALITY, AND FITNESS FOR A PARTICULAR PURPOSE. To the extent that this Limited Warranty is inconsistent with local law, this Statement shall be deemed modified to be consistent with such local law. Under such local law, certain disclaimers and limitations of this Limited Warranty may not apply to the customer. Limitation of Liability TO THE EXTENT ALLOWED BY LOCAL LAW, IN NO EVENT SHALL BIKE2POWER, ITS AFFILIATES, SIBSIDIARIES, RELATED ENTITIES OR THEIR RESPECTIVE OFFICERS, DIRECTORS, OR EMPLOYEES, BE LIABLE FOR INCIDENTAL, CONSEQUENTIAL, PUNITIVE, EXEMPLARY, OR SPECIAL DAMAGES WHETHER BASED ON CONTRACT, TORT, OR ANY OTHER LEGAL THEORY AND WHETHER ADVISED OF THE POSSIBILITY OF SUCH DAMAGES. 11 | P a g e Copyright © 2012 Bike2Power. All rights reserved ENGLISH Contact Information Write to: Bike2Power 26016 Alizia Canyon Drive, Unit B Calabasas, CA 91302 Email to: [email protected] Website: www.bike2power.com Facebook: www.facebook.com/bike2power Twitter: https://twitter.com/#!/bike2power or follow @bike2power 12 | P a g e Copyright © 2012 Bike2Power. All rights reserved