1
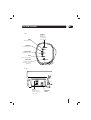
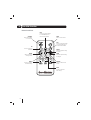
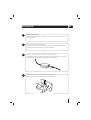
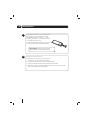
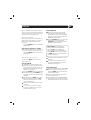
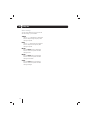
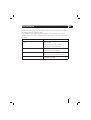
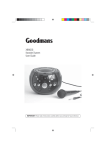
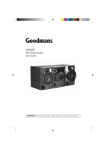
GDSB04BT50
50W Soundbar
User Guide
IMPORTANT: Please read all instructions carefully before use and keep for future reference
Introduction
Thank you for choosing this Goodmans 50W Soundbar
To get the most from your purchase please take a few minutes to read through this instruction manual.
This will help you to become familiar with the connections and settings.
Safety is important
Use of any electrical equipment should be undertaken with care. Please read the safety section on
page 11 before using your portable System. This appliance is for household use only.
What’s in the box
•
Goodmans 50W Soundbar
•
3.5mm LINE IN Cable
•
RCA Cable
•
AC Power Adapter
•
Mains Power Lead
•
Remote Control (1 x CR2025 Battery Supplied)
•
Screws and Mountings for Attaching the Soundbar to the Wall
•
User Guide
Contents
2
01 Your 50W Soundbar .....................3
04 Help and Advice ...........................9
02 Getting Started.............................5
05 Specification/Guarantee .............11
03 Daily use ......................................7
06 Warnings ....................................12
Your 50W Soundbar
SIDE
MODE
Selects the mode
01
STANDBY
Switches the
Soundbar on or
to standby and
selects the mode
VOLUME UP
Increases the volume
VOLUME DOWN
Decreases the volume
MUTE
Mute or restore volume
LINE IN PORT
Connect to external
audio devices such as
MP3 players
REAR
AUX IN
Play music from an
external audio source
such as a TV
AC POWER
SOCKET
3
01 Your 50W Soundbar
REMOTE CONTROL
STANDBY
Switch the Soundbar
on or to standby
BT
Connect a device via
Bluetooth
MUSIC
Select the optimum
setting for music
TREBLE
Increase or decrease
the treble settings
LINE
Connect to a device plugged
in via the LINE IN port on
the side of the Soundbar
MUTE
Mute or restore volume
AUX
Connect to a device plugged
in via the AUX IN ports on
the back of the Soundbar
MOVIE
Select the optimum setting
for movies
VOICE
Select the optimum setting
for dialogue
VOLUME
Increase or decrease the
volume
BASS
Increase or decrease
bass settings
4
Getting started
1
02
Siting Your Soundbar
You can stand your Soundbar on a level surface or attach it to the wall using the screws and
mountings provided.
2
Connecting Up Your Soundbar
Connect the cables provided to the AUX IN ports on the back of the Soundbar and connect
the other ends to the AUX OUT ports on your TV or other device.
3
Connect The AC Power Adaptor To Your Soundbar
Plug the cable from the power adaptor into the AC power socket (see page 3) at the rear of
the Soundbar, then plug the mains power lead into the power adaptor.
4
Connect The AC Power Adaptor To The Mains
Connect the mains plug to the power socket and turn the power on.
5
02 Getting Started
5
Installing the Remote Control Batteries
Open the battery cover of the Remote Control and
insert the battery (supplied) so that the `+’ mark on
the battery matches the `+’ mark inside the remote
control. Replace the battery cover.
To use the Remote Control, simply direct it towards the
front of the Soundbar and press the desired buttons.
DON’T FORGET! When replacing the batteries
make sure that you use the same size and type.
6
Using the Remote Control
Please note that your Remote Control may not function:
1. At a distance or more than 5m from the Soundbar.
2. At an angle of more than 30o from the centre of the Soundbar.
3. If there is an obstacle between the Remote Control and the Soundbar.
4. When direct sunlight, an incandescent lamp, fluorescent lamp or any other strong light
shines on the remote sensor on the Soundbar.
6
Daily use
We have divided this user guide into separate
sections, so that you can find the information you
are looking for easily. This section covers the day
to day functions that you will use most.
03
Selecting LINE IN
Turning On and Off
Connect one end of the 3.5mm LINE IN
cable (supplied) to the LINE OUT output on
the external audio device (for example MP3
player) and the other end of the cable to the
LINE IN port on the Soundbar.
When you apply power to the Soundbar the red
LED illuminates to indicate that it is in standby
mode. To exit standby mode and turn the
Soundbar on:
Press the STANDBY button on the Soundbar,
or alternatively press and release the
STANDBY button on the Remote Control so
that the blue LED is illuminated.
Press the STANDBY button so that the blue
LED illuminates.
Switching the Soundbar to standby
When you have finished using your Soundbar you
can switch it to standby mode to save power.
Press the STANDBY button so that the red
LED illuminates.
Selecting an Input Source
You can use the MODE button to select the
desired input source.
Selecting AUX IN
Make sure that you have plugged one end
of the cable provided to the AUX IN ports on
the Soundbar and the other end to the AUX
OUT ports on the external audio device (for
example TV or DVD player).
Press the STANDBY button on the Soundbar,
or alternatively press the STANDBY button
on the Remote Control so that the blue LED is
illuminated.
Press and release the MODE button on the
Soundbar, or alternatively press the AUX
button on the Remote Control so that the
white LED is illuminated.
Power on the external audio device and use
as normal.
You can increase or decrease the volume
by using the volume buttons on either the
Soundbar or Remote Control.
DON’T FORGET! If the Soundbar is in
Bluetooth mode, the blue LED will flash.
Press the LINE button on the Remote
Control so that the green LED illuminates to
select LINE IN mode, or press and release
the MODE button on the Soundbar until the
green LED is illuminated.
Power on the external audio device and use
as normal.
You can increase or decrease the volume
by using the volume buttons on either the
Soundbar or Remote Control.
Selecting Bluetooth
Turn on the Soundbar and either press the BT
button on the Remote Control or press and
release the MODE button on the Soundbar
until the blue LED flashes.
Turn on the external Bluetooth device and
enter the search mode.
Your Soundbar has the name ‘GDSB04BT50’.
If prompted enter the code ‘0000’ to pair the
external Bluetooth device with your Soundbar.
7
03 Daily use
Other Settings
You can use the Remote Control to turn on and
alter the settings on your Soundbar.
TREBLE
Use the + or - Treble buttons on the Remote
Control to adjust the high frequency Treble
settings as required.
BASS
Use the + or - Bass buttons on the Remote
Control to adjust the low frequency Bass
settings as required.
MUSIC
Press the MUSIC button on the Remote
Control to select the optimum Soundbar
setting for music.
MOVIE
Press the MOVIE button on the Remote
Control to select the optimum Soundbar
setting for movie audio.
VOICE
Press the VOICE button on the Remote
Control to select the optimum Soundbar
setting for dialogue.
8
Help and Advice
04
If a fault occurs, first check the points listed below before taking the Soundbar for repair. Do not dismantle
the Soundbar as there is a risk of electric shock.
If you are unable to rectify a problem by following these hints, consult your dealer or service centre.
WARNING: Under no circumstances should you try to repair the Soundbar yourself, as this will invalidate
the warranty.
Problem
What to do
Soundbar does not respond
(no power).
Check the mains power cable and make sure it is plugged into a
suitable power outlet.
Check that the mains power supply is switched on.
Connect the power to a different power outlet.
No sound.
Check the volume control is not at minimum.
Check that the Soundbar is not set to MUTE.
The Remote Control does not work.
Replace the battery.
Make sure there are no obstacles obscuring the Soundbar.
No sound in Bluetooth mode.
Check that the Soundbar is paired with a Bluetooth device. If
prompted enter the code ‘0000’.
9
04 Help and Advice
General Safety
• This Soundbar has been designed and manufactured to meet European safety standards, but like
any electrical equipment, care must be taken if you are to obtain the best results and safety is to be
assured.
•Do ensure that all electrical connections (including the mains plug, extension leads and interconnections
between pieces of equipment) are properly made in accordance with the manufacturer’s instructions.
• Check that the voltage stated on the mains adapter rating plate corresponds to the mains electrical
supply before plugging in.
• To completely disconnect the Soundbar from the mains electricity supply, remove the plug from the
mains power socket.
• Switch off and remove the mains plug when making or changing any connections.
• Unwind and straighten the adapter cord before use.
• Site the Soundbar so that it is level and does not tilt.
• Do not cover the Soundbar as this will prevent ventilation from taking place. Overheating will cause
damage and shorten the life of the Soundbar.
• Do not expose the Soundbar to humidity, rain, sand or excessive heat caused by heating equipment or
direct sunlight.
• To clean the Soundbar, use a soft dry cloth. Do not use any cleaning agents containing alcohol,
ammonia, benzene or abrasives as these may harm the housing.
• Remove the mains plug from the socket if the Soundbar will not be used for a long period of time.
• Only use attachments and accessories specified by the manufacturer.
• Do not place a naked flame source near the Soundbar.
• Do not attempt to remove any covers. If the power adapter or its lead become damaged, they must be
replaced with components of the same type and rating.
• Repairs must only be performed by the manufacturer or suitably qualified personnel.
• Do not immerse the Soundbar, the power adapter or any accessories in water or any other liquid.
• Make sure that other people in your household are conversant with the Soundbar.
• Do consult your dealer if you are ever in doubt about the operation or safety of your Soundbar.
• Don’t continue to operate the Soundbar if you are ever in doubt about it working normally, or if it is
damaged in any way. Switch it off, remove the plug from the mains and consult your dealer.
10
Specifications
05
TECHNICAL SPECIFICATION
Power Supply
• AC 230 V, 50 Hz.
Power Source of Soundbar
• DC 18V, 3A
AC Adapter
• Input: AC 100-240V~, 50/60 Hz, 1.2A Max
• Output: 18V, 3A
Power Source of Remote Control
• DC 3V, 1 x CR2025 Battery (supplied).
Power Consumption
• > 50W
Audio Power
• Woofer 30W
• Left Channel 10W
• Right Channel 10W
Impedance
• Woofer 8 Ohm, 25W x 2
• Right Channel 4 Ohm, 15W
• Right Channel 4 Ohm, 15W
Guarantee
The Soundbar is guaranteed for twelve months from the date of original purchase. If any defect should
occur due to faulty materials or workmanship, contact Goodmans via the website (www.goodmans.co.uk).
Have your receipt of purchase on hand.
The guarantee is subject to the following provisions:
• It is only valid within the boundaries of the country of purchase.
• The product must be correctly installed and operated in accordance with the instructions contained in
this User Guide.
• The Soundbar must be used solely for domestic purposes.
• The guarantee will be rendered invalid if the Soundbar is re-sold or has been damaged by inexpert
repair.
• The manufacturer disclaims any liability for incidental or consequential damages.
• The guarantee is in addition to, and does not diminish, your statutory or legal rights.
11
06 Warnings
WEEE
This appliance is labelled in accordance with European Directive 2002/96/EG concerning
used electrical and electronic appliances (Waste Electrical and Electronic Equipment
- WEEE). The guideline determines the framework for the return and recycling of used
appliances.
Sound levels
Your hearing is very important to you and to us, so please take care when using this Soundbar. It is
strongly recommended that you follow the listed guidelines in order to prevent possible damage or loss of
hearing.
Establish a safe sound level
Over time your hearing will adapt to continuous loud sounds and will give the impression that the volume
has in fact been reduced. What seems normal to you may in fact be harmful. To guard against this before
your hearing adapts, set the volume to a low level.
Slowly increase the level until you can hear comfortably and clearly and without distortion. Damage to your
hearing is accumulative and is irreversible. Any ringing or discomfort in the ears indicates that the volume
is too loud.
Once you have established a comfortable listening level, do not increase the sound level.
.
www.goodmans.co.uk
12
DCS-JUN13-GDSB04BT50