1
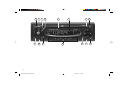
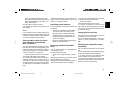
DEUTSCH
Radio / CD
ITALIANO
FRANÇAIS
ENGLISCH
Florida RD 168
San Remo RD 168
PORTUGUÊS
ESPAÑOL
SVENSKA
NEDERLANDS
Operating instructions
1
BA Florida/San RemoRD168 d®
1
14.05.2002, 13:14 Uhr
1
15
2
3
14
13
4
7
6
5
12
11
2
BA Florida/San RemoRD168 d®
2
14.05.2002, 13:14 Uhr
10
8
9
DEUTSCH
Display
Display field 1:
Radio mode
Memory banks and wavebands
Brief indication of preset station (e.g. P1)
Display field 2:
Radio mode
Radio frequency or station name
PTY programme type Clock display
CD mode
Current track
CD mode
CD time (elapsed playback time), CD number and brief indication of function switch,
Clock display
FRANÇAIS
- Stereo
Miscellaneous
Indicates new source and the active
functions (e.g. SCAN)
CD mode
RPT – Repeat function
MIX – Tracks played at random
NEDERLANDS
DSC
Serves as display and input field during
DSC programming Clock display
Radio mode
AF - Alternative Frequency for RDS
PTY - RDS programme type
TA - Priority for traffic information
TP - Traffic programme station
lo - Seek tuning sensitivity
ITALIANO
- CD inserted
LD - Loudness
PORTUGUÊS
ESPAÑOL
DSC
Permanent display for DSC programming.
Graphic representation of the volume level selected.
Display field 3:
Displays active functions
SVENSKA
Audio
Numeric and graphic representation of the
volume and audio settings
ENGLISH
The display consists of three fields and varies according to the operating mode and function.
23
BA Florida/San RemoRD168 gb®
23
14.05.2002, 13:19 Uhr
Contents
Display .......................................... 23
Quick reference ............................ 25
Important notes ............................ 29
What you need to know ........................ 29
Traffic safety ......................................... 29
Installation ............................................. 29
Accessories (optional) .......................... 29
Additional amplifiers ............................. 29
Theft protection system /
Release panel ............................... 30
Detaching the release panel ................. 30
Attaching the release panel .................. 30
Care of the control panel ...................... 30
Fixing the release panel ....................... 30
Selecting the operating mode ..... 31
Radio operation with RDS
(Radio Data System) .................... 31
AF - Alternative frequency .................... 31
REG - regional programme .................. 31
Selecting a waveband .......................... 32
Station tuning ........................................ 32
Automatic seek tuning / ............... 32
Manual tuning with << >> .................. 32
Scrolling through the broadcast networks
(FM only) ............................................... 32
Switching between the memory banks . 32
Storing stations ..................................... 32
Storing stations with the strongest
reception automatically with
Travelstore ............................................ 33
Recalling stored stations ...................... 33
Scanning stations with Radio Scan ...... 33
Changing the scan time ........................ 33
Selecting the automatic tuning
sensitivity .............................................. 33
Switching between Stereo/Mono (FM) . 34
PTY - Programme Type ........................ 34
Programme types ................................. 34
Switching PTY ON/OFF ........................ 34
Checking the programme type of the
station ................................................... 34
Selecting a programme type ................ 34
Storing programme types ..................... 35
Scanning stations with PTY SCAN ...... 35
PTY priority ........................................... 35
CD operation ................................. 37
Traffic programme station
reception with RDS-EON ............. 36
Specifications ............................... 41
Traffic announcement priority on/off .... 36
Warning beep ....................................... 36
Switching the warning beep off ............ 36
Automatic seek tuning start
(CD mode) ............................................ 36
Adjusting the volume for traffic announcements and the warning beep ................ 36
Switching on the CD mode ................... 37
Inserting a CD ....................................... 37
Removing a CD .................................... 37
Selecting a track ................................... 37
CD-MIX operation ................................. 37
CD-PAUSE ........................................... 37
CD-Repeat (RPT) ................................. 38
CD-Scan ............................................... 38
Clock ............................................. 38
Setting the clock ................................... 38
Displaying the clock .............................. 38
Correcting the time after the power has
been disconnected ............................... 38
Deactivating the hour correction
function ................................................. 39
DSC programming ....................... 39
Overview of the DSC factory settings .. 41
Amplifier ................................................ 41
Tuner ..................................................... 41
CD ......................................................... 41
24
BA Florida/San RemoRD168 gb®
24
14.05.2002, 13:19 Uhr
4 Volume adjustment:
6 Display
The display indicates all settings, operating modes and functions.
2 Switching the unit on/off
With the operating panel in place and
the ignition switched on, press the on/
off button in the middle of the volume
knob briefly or insert a CD into the unit.
It will play at the preset volume.
Switching on when the ignition is
off:
It is possible to play the unit with the
ignition turned off (as long as the operating panel is in place): Press the on/
off button in the middle of the volume
knob briefly to switch the unit on.
Radio mode
/
Automatic seek tuning
Up
Down
<< >> Manual seek tuning
<</>> Up/down in short intervals
(for FM only if “AF” is off)
25
BA Florida/San RemoRD168 gb®
25
DEUTSCH
SVENSKA
When the unit is switched on, it will
play at the preset volume. To adjust
the volume, turn the volume control.
Turn the volume control in a clockwise
direction to raise the volume and in a
counter-clockwise direction to lower
the volume.
To lower the volume quickly, press the
on/off button briefly. “Mute” will appear
in the display and the volume will drop
to the mute value set in the DSC
menu.
Press the on/off button again or turn
the volume control to cancel the “mute”
NEDERLANDS
7 Rocker switch
ESPAÑOL
Switching on/off with the ignition:
If the unit has been connected as described in the instructions, it can also be
turned on and off with the vehicle ignition. The unit will switch on in the mode
used last before it was switched off.
5 CD insert
After a CD is inserted with the label facing up, it will automatically be transported to its playing position. The unit
will automatically switch to playback.
ENGLISH
3 Eject
Press this button to eject the CD from
the radio unit.
function. The “mute” function and the
preset volume can be altered, refer to
“DSC programming”.
FRANÇAIS
To prevent the battery from running
down, the system will turn off automatically after approximately one hour of
playback.
PORTUGUÊS
1 Detachable operating panel
Press the “REL” button to release the
detachable operating panel and remove it from the vehicle.
To re-attach the panel, set it into the
guide on the right-hand side of the
chassis. Gently press in the left side of
the panel until it snaps into place.
Be sure not to press or apply any pressure directly on the display.
ITALIANO
Quick reference
14.05.2002, 13:19 Uhr
For FM only:
<</>> Scrolls through the broadcast networks, if AF is on. Example: NDR 1,
2, 4, N-Joy, ...
CD mode
/
>>
<<
Select track:
Up
Down,
If is pressed only once the unit
will return to the beginning of the
track currently playing.
Fast forward, audible (CUE)
Hold >> pressed down for as long
as necessary.
Fast reverse, audible (REVIEW)
Hold << pressed down for as long
as necessary.
Additional rocker switch functions:
For additional settings use
AUD
9
DSC-Mode
8
PTY
4
Important: The corresponding
function must be active.
8 SC-scan/SRC
Radio mode
Stop the CD Scan function:
Press “SC”.
Press “SC” for approximately 2 seconds. You will hear a beep and “SCAN”
will appear in the display, flashing alternately with the station name abbreviation of the station currently being
scanned. All of the FM stations within
reception range will be scanned.
PTY-Scan
PTY-Scan cannot be started unless
“PTY” is switched on (“PTY” is lit up in
the display).
Press “SC” for approximately 2 seconds. You will hear a beep and “PTY
SCAN” will appear in the display,
flashing alternately with the station
name abbreviation of the station currently being scanned.
The stations broadcasting the program
type selected will be scanned.
Stop the Scan/PTY-Scan function:
Press “SC” or the rocker switch briefly.
CD mode
Press “SC” for approximately 2 seconds. You will hear a beep and “SCAN”
will appear in the display. The tracks
on the CD will be scanned.
9 AUD
Use this key to activate the menu for
tone control.
Treble and bass adjustment
Press “AUD” once briefly: “BASS” will
appear in the display and now you adjust this setting as desired by pressing
the rocker switch to the left or the right.
Use the up/down rocker switch keys to
set the treble. “TREBLE” will then appear in the display.
Setting the Balance (left/right) and
the Fader (front/rear):
Press “AUD” twice briefly.
Now use the up/down rocker switch to
adjust the volume between the front
and the rear speakers. “FADER” will
appear in the display.
Use the left/right rocker switch keys to
adjust the volume between the left and
right speakers. “BALANCE” will appear
in the display.
The selected values will appear in the
display. The last setting is stored automatically.
Switch AUD off by pressing the button
again briefly.
26
BA Florida/San RemoRD168 gb®
26
14.05.2002, 13:19 Uhr
BA Florida/San RemoRD168 gb®
27
Recalling stored stations
Select the waveband and, on FM the
memory bank (“I”!, “II”, or “T”) as well.
Then press the corresponding preset
button 1-6 briefly to listen to the station
stored there.
Additional function for the station
preset buttons
Storing and recalling the PTY program
type.
When PTY is active (“PTY” will appear
in the display), then you can store and
recall a program type (e.g. rock, pop,
classical, news, etc.) on each for the
station preset buttons for the FM waveband.
14.05.2002, 13:19 Uhr
27
ENGLISH
DEUTSCH
5/MIX
Press the station preset button marked
5/MIX to switch to MIX playback for the
CD currently playing. The tracks on the
CD will be played in random order.
The current setting is briefly indicated
in the display: “MIX CD” will flash
briefly in the display and “MIX” will appear in display field 3.
Press 5/MIX again to switch this
function off.
FRANÇAIS
4/RPT - Repeat
Press the station preset button marked
4/RPT to repeat the CD track currently
playing.
“REPEAT-T” will appear briefly in the
display. “RPT” will light up in display
field 3.
The track title will repeat until 4/RPT is
pressed again or you press the rocker
switch to select a different track.
ITALIANO
Storing stations
Tune the radio into the station you
would like to store. Press the preset
button on which you want to store this
station (radio will switch to mute) and
hold it down until the radio becomes
audible again and you hear a beep.
3/ -Pause
Press the station preset button marked
3/ to interrupt CD playback. “PAUSE” will appear in the display. Press
button again to resume CD playback.
NEDERLANDS
; Clock display
When the unit is switched on press
“DIS” briefly and the current time will
appear in the display for approximately
8 seconds.
Additional function for clock display:
Press and hold “DIS” until you hear a
beep to display the time permanently.
If you activate another function, the
time will disappear from the display for
approximately 8 seconds.
You can store up to six stations in
each memory bank (I, II, and “T”).
On MW and LW you can also store six
stations each.
SVENSKA
: DSC (Direct Software Control)
Using “DSC” you can adjust programmable basic settings to suit your
own personal preferences.
Refer to the section on “DSC programming” for more information.
CD mode
ESPAÑOL
LD - Loudness
Loudness boosts the bass frequency
at low volume.
Loudness on/off: Press AUD until you
hear a beep.
< Preset buttons 1 to 6
Radio mode
PORTUGUÊS
If you do not make any adjustments to
the tone within 8 seconds, the AUD
mode will quit automatically.
= BA/TS
Switches between the wavebands/memory banks FM I, FM II, TS (Travelstore), MW and LW
Extra function: Travelstore
To store the six most powerful radio
stations in the Travelstore bank:
Press BA/TS until a beep sounds or
“T-STORE” appears in the display.
> PTY
(Programme Type)
With “PTY” the station preset buttons
become programme buttons. You can
select a different programme type on
each of the presets, e.g. news, sport,
rock, pop, education, etc. Using the
rocker switch <</>> it is possible to recall all of the PTY programme types, if
PTY is activated. Press “PTY” briefly
and “PTY” will light up in the display.
Press “PTY” again to switch the
function off.
The radio will use RDS to automatically search for the best radio frequency
offering the same programme.
To switch the “AF” function off press
the “AF” button for approximately 2 seconds and “AF” will disappear in the
display after the beep.
TP
“TP” will appear in the display if the radio station you are currently tuned into
is a traffic information radio station.
TA
“TA” (Traffic Announcement = priority
for traffic messages)
You can only tune into radio stations
that broadcast traffic information.
TA on/off:
Press “AF.TA” briefly: “TA” will appear
in the display, priority for traffic programmes activated.
? AF•TA
Alternative Frequency in RDS mode:
Switch the AF function on/off:
Press the “AF” button for approximately 2 seconds. “AF” will appear in the
display.
28
BA Florida/San RemoRD168 gb®
28
14.05.2002, 13:19 Uhr
What you need to know
Installation
Before using your new car audio system,
please read through the following information carefully.
If you would like to install your new car stereo yourself or add other audio components
to existing ones, then please read the enclosed instructions on installation and connection carefully.
Should the traffic situation become particularly demanding, we advise you not to use
the audio system.
Always make sure that you are still able to
hear any warning signals coming from outside the vehicle, such as police or fire engine sirens, so that you can react accordingly.
FRANÇAIS
ITALIANO
Do not ground the loudspeaker outputs! This
will result in damage to the unit output stages.
Accessories (optional)
NEDERLANDS
Please keep in mind that you travel a distance of 14 m per second at a speed of
only 50 km/h.
In order to ensure that the unit operates properly the positive power supply line must be
connected via the ignition and the permanent +12 V lead.
Use only Blaupunkt-approved accessories
and spare parts. You can use the following
Blaupunkt products with this audio system:
SVENSKA
As the driver of a motor vehicle, it is your
responsibility to pay attention to the traffic
situation at all times. Never use your car
audio system in a way that could distract
you.
Additional amplifiers
All Blaupunkt amplifiers
ESPAÑOL
Traffic safety
ENGLISH
DEUTSCH
Important notes
PORTUGUÊS
Consequently, you should always select a
moderate volume for playing your car audio
system while you are driving.
29
BA Florida/San RemoRD168 gb®
29
14.05.2002, 13:19 Uhr
Theft protection system / Release panel
To best protect your car audio system from
theft, this unit has been equipped with a detachable control panel.
Detaching the release panel
Press the REL button on the top left of the
radio to release the control panel. Then remove the panel. You can remove the panel
regardless of whether the unit is switched
off or on.
Attaching the release panel
Care of the control panel
Fixing the release panel
After you have removed the release panel,
protect it from any form of rough handling.
Make sure it does not come into contact with
any type of fluids. Store it away from direct
sunlight and other sources of heat. The connection contact strip which is visible on the
rear side of the panel must be in perfect
condition to ensure that the system is able
to function properly.
To prevent unauthorised persons from removing the release panel, e. g. from a car
audio systems showroom, you can fix the
release panel to the chassis permanently to
lock it into place. Screw the enclosed bolt
into the hole on the left hand side of the unit
when the release panel is in place, see arrow.
It is highly advisable to store the control
panel in the protective case provided.
Slide the panel into the guide points on the
right of the radio unit and then press the left
side into the locking position gently until it
snaps into place. Make sure that you do not
press directly on the display.
The audio system will switch on in the operating mode last used before the panel was
removed.
30
BA Florida/San RemoRD168 gb®
30
14.05.2002, 13:19 Uhr
The “AF” function makes sure that the radio
always tunes into the strongest frequency
for the currently selected programme automatically.
Press the AF.TA button for approximately 2
seconds, until you hear a beep and “AF”
appears in display field 3.
While searching for the strongest reception
signal, the radio may switch to mute briefly.
If “SEARCH” appears in the display when
the radio is switched on or one of the stored
frequencies recalled, the unit is already automatically searching for an alternative frequency.
BA Florida/San RemoRD168 gb®
31
14.05.2002, 13:19 Uhr
31
DEUTSCH
ENGLISH
FRANÇAIS
Certain radio programmes are split up at
times into regional programmes offering local information. The 1st programme broadcast by NDR, for example, offers programmes with different contents in the northern German states of Schleswig-Holstein,
Hamburg and Lower Saxony at certain times
of the day.
If you are listening to a particular regional
programme and wish to continue doing so,
select “REG ON” in the DSC mode.
If you leave the service area of the regional
programme you are tuned into, or if you
would like to take full advantage of RDS
service, switch to “REG OFF” in the DSC
mode.
The display will briefly indicate whether this
function is switched on or off with “REG ON”
or “OFF” when you switch on the “AF”
function.
ITALIANO
REG - regional programme
NEDERLANDS
AF - Alternative frequency
“SEARCH” will disappear from the display
when the alternative frequency has been
found or after the frequency band has run
through completely.
If the reception quality of the programme
selected deteriorates beyond a certain point,
tune into another station.
SVENSKA
The Radio Data System enhances your enjoyment when you listen to FM radio stations.
More and more radio stations now broadcast RDS information along with their regular programming.
As soon as radio programmes are identified,
the station name including a regional identifier, if applicable, will appear in the display,
for example, NDR1 NDS (regional programme in Lower Saxony, Germany). When RDS
is activated, the preset buttons become programme buttons. You now know exactly
which programme you have tuned into, making it easy to find the desired station quickly.
But RDS also offers you further advantages:
ESPAÑOL
Use the SRC (source) button to select between radio and CD.
The CD mode is not available unless a CD
has been inserted.
Otherwise, “No CD” will appear in the display.
Press SRC to switch between the operating
modes.
Radio operation with RDS (Radio Data System)
PORTUGUÊS
Selecting the operating
mode
Selecting a waveband
The following wavebands are available:
UKW (FM)
87,5 - 108 MHz,
MW
531 - 1602 kHz and
LW
153 - 279 kHz
Press the “BA/TS” button to select the desired waveband.
Station tuning
Automatic seek tuning
/
•
Press / ; the car radio will automatically search for the next station.
If you hold / pressed up or down on the
rocker switch, seek tuning will speed up in
the corresponding direction.
Automatic seek tuning
Up
Down
<</>> Up/down in short intervals
(on FM only if “AF” is switched off)
Manual tuning with << >>
You can also tune into a station manually.
Important: AF and PTY must be switched
off (i.e. the symbols do not light up in the
display).
If necessary, deactivate these function by
pressing “AF.TA” or “PTY”.
Manual tuning:
• Press << >>; the frequency will change
in short intervals in the corresponding
direction.
If you hold << >> pressed to the left or the
right on the rocker switch, the frequency
scan will speed up.
Scrolling through the broadcast
networks (FM only)
You can use the << >> buttons to tune into
stations in your reception area.
If it is possible to receive several programmes in the same broadcast network, you can
scroll through them in the forwards direction by pressing >>, or backwards using the
<< button, e.g. NDR 1, 2, 3, 4, N-JOY, ...
For this to work properly you must have already tuned into the stations at least once
and “AF” must be active (lights up in the display).
To do this, you can start the Travelstore seek
operation:
•
Press “BA/TS” for 2 seconds; the system will start to run through the frequency band.
If “AF” is not lit up,
• Press “AF.TA” until you hear a beep.
It is now possible to select stations using
<< >>.
Switching between the memory
banks (FM)
You can switch between the memory banks
I, II and T in order to store stations and recall them later.
The currently selected memory bank will
appear in the display.
• Press the “BA/TS” button as many
times as necessary until the desired
memory bank lights up in the display.
Storing stations
On FM, you can store six stations on the
preset buttons 1 - 6 for each of the memory
banks (I, II, T).
On MW/LW, you can also store six stations
each.
• Select the appropriate waveband by
pressing BA/TS.
•
Tune into a station with the rocker
switch (either automatically or manually).
32
BA Florida/San RemoRD168 gb®
32
14.05.2002, 13:19 Uhr
You can automatically store the six FM stations with the most powerful signals in your
current reception area sorted according to
their signal strength. This function is particularly convenient on longer trips.
• Press the “BA/TS” button for 2 seconds.
“T-STORE” will appear in the display.
The six strongest FM stations will be automatically stored on the memory bank “T”
(Travelstore). When this process has been
completed, the name of the strongest station will appear in the display and begin to
play.
•
Press the corresponding preset button
briefly to recall the station.
The scan time per radio station can be set
to between 5 and 20 seconds.
For more detailed information, refer to the
section on “DSC programming - SCANTIME”.
Scanning stations with Radio
Scan
Selecting the automatic tuning
sensitivity
You can scan through all of the stations in
your reception area.
To start the Scan function:
• Press “SC” for approximately 2 seconds.
The scanned frequency or the station name
will start flashing in the display.
During the scanning process “FM-SCAN” or
“AM-SCAN” will light up in the display.
You can alter the automatic tuning sensitivity.
If “lo” is displayed, the radio will only pick up
strong, local stations (low sensitivity).
If “lo” does not light up, the radio will also
pick up weaker, more distant stations.
To switch the automatic tuning sensitivity
and program the sensitivity level, refer to the
section on “DSC programming “.
33
BA Florida/San RemoRD168 gb®
33
14.05.2002, 13:19 Uhr
DEUTSCH
ENGLISH
FRANÇAIS
Changing the scan time
ITALIANO
You can recall any stored station at the touch
of a button.
• Select the waveband by pressing BA/
TS. For FM, also choose the corresponding memory bank by pressing
the BA/TS button as many times as
necessary until the desired bank appears in the display.
NEDERLANDS
Storing stations with the strongest reception automatically
with Travelstore
Recalling stored stations
If you want to continue listening to the station which is being scanned, then
• Press “SC” briefly.
This ends the Radio Scan function.
If no station is selected, the scan function
will switch off after the frequency band has
run through. The station selected previously will resume play.
SVENSKA
Note:
If you attempt to store a station which is already stored, the corresponding station and
the station preset will flash in the display if
you are in a different memory bank.
If desired, stations can also be stored manually in the Travelstore bank, refer to the
section on “Storing stations”.
ESPAÑOL
Press the desired preset button until
the radio resumes play after the muting
(takes approximately 2 seconds) or until you hear a beep.
Now the station has been stored.
The display will indicate which station has
been stored.
PORTUGUÊS
•
Switching between Stereo/Mono
(FM)
Programme types
You can switch between Stereo/Mono in the
“DSC” menu. This can be an advantage
when the station reception is poor. The car
audio system will select stereo automatically when it is switched on.
When reception quality deteriorates, the
system will switch to mono playback.
Refer to the section on Stereo/Mono in
“DSC” programming for information on how
to switch from stereo to mono.
The playback mode selected is indicated in
the display.
ton.
Use <</>> to have the last selected programme type displayed and to choose a new one.
You can select any one of the stored types
with the preset buttons 1-6.
The following list indicates some of the programme types which are currently available.
POP
ROCK
WEATHER
CHILDREN
TRAVEL
HOBBIES
JAZZ
OLDIES
NEWS
SPORT
CULTURE
Refer to “DSC programming – PTY Lang”
to find information on switching the language used to display the programme types
between German and English.
PTY - Programme Type
PTY is an RDS service offered by an increasing number of broadcasting stations. This
feature allows you to select FM stations
automatically according to their programme
type. After you have chosen the PTY of your
preference, the corresponding stations can
be selected either by seek tuning or using
the scan function.
Checking the programme type of
the station
Switch “PTY” on by pressing the “PTY” but-
Switching PTY ON/OFF
• Press “PTY”.
When the function is active, the programme
type selected last will briefly appear in the
display and “PTY” will appear permanently.
• Press “PTY” for approximately 2 seconds.
After the beep the display will show the programme type offered by the station currently playing. If “NONE” appears in the display,
the current station has no PTY code.
Selecting a programme type
a) Using the preset buttons
When PTY is switched on, you can use
the preset buttons 1-6 to select the
programme types stored at the factory.
• Press one of the presets 1-6.
The selected programme type will be
displayed for 2 seconds.
•
If you would like to listen to a station
with this PTY, press ??/?? to start the
seek tuning function.
If the radio is unable to find a station offering the selected programme type, the display will show “NO PTY” and a beep will be
emitted. The radio will select the station
which was tuned into before seek tuning was
activated.
You can assign different programme types
to each preset position. Please refer to the
next section on “Storing programme types”.
b) Using the <</>> buttons on the rocker
switch
34
BA Florida/San RemoRD168 gb®
34
14.05.2002, 13:19 Uhr
•
If you would like to listen to a station
with the selected PTY, press / to
start the seek tuning function.
If the radio is unable to find a station offering the selected programme type, the display will show “NO PTY” and a beep will be
emitted. The radio will select the station
which was tuned into before seek tuning was
activated.
Important: “PTY” must appear in the display.
• Press “SC”.
All of the stations in your current reception
area offering the selected programme type
will be scanned.
To switch off PTY-SCAN:
• Press “SC” or the rocker switch again.
Storing programme types
Situation:
PTY is switched on and lights up in the display.
No station offering the selected programme
type can be found currently in your reception range (with seek tuning or scan).
The set will switch back to the station previously tuned into.
Each of the preset buttons 1-6 has been
assigned one programme type at the factory.
If desired, you can also replace these with
other available programme types.
To do so, make sure that “PTY” lights up in
the display.
• If necessary, press the “PTY” button to
switch on the function.
PTY priority
During CD operation, the set will also switch
to the radio programme if the selected PTY
becomes available within the broadcast network.
After the PTY programme has ended the
system will switch back to the previous mode
(radio or CD).
Note:
As already mentioned, these functions are
only supported by a limited number of RDS
stations at the present time.
35
BA Florida/San RemoRD168 gb®
35
14.05.2002, 13:19 Uhr
DEUTSCH
ENGLISH
FRANÇAIS
Scanning stations with PTY
SCAN
ITALIANO
Press << or >> as many times as required.
NEDERLANDS
•
As soon as it is possible to receive a programme in the broadcast network with the
PTY selected, the radio will switch over to
the corresponding station for the duration
of the programme.
Example:
- Station playing: NDR3.
- “PTY” lights up in the display.
- Programme type “POP” selected.
- Seek tuning is started.
- No station with “PTY-POP” can be found.
- The display shows “NO PTY” and
- automatically switches back to NDR3.
- NDR2 airs a “PTY-POP” programme.
- The radio will switch to the linked stati
on NDR2 for the duration of the “POP”
programme.
SVENSKA
During this period press >> (forwards)
or << (backwards) to select the desired
type.
Select a programme type using buttons <</>> and hold down the desired
preset button (1-6) until you hear a
beep.
Now the selected programme type can be
recalled by pressing this preset as long as
“PTY” lights up in the display.
ESPAÑOL
•
•
PORTUGUÊS
When “PTY” is switched on, you can select
a programme type using buttons <</>>.
• Press << or >>; the programme type
selected last will be displayed for 3 seconds.
Traffic programme station reception with RDS-EON
The abbreviation “EON” stands for Enhanced Other Networks, which means that information is exchanged within a radio network.
Many FM radio stations provide their service area with traffic messages at regular
intervals.
Along with their programmes, all traffic programme stations transmit a special carrier
signal, which is decoded by your car radio.
If this signal is identified, “TP” will appear in
the display (Traffic Programme).
In addition to these, there are also stations
which do not actually transmit traffic information themselves, but by using RDS-EON
it is possible for them to forward the traffic
messages broadcast by another traffic programme station in the same radio network.
If you want to have the priority for traffic
announcements activated while listening to
one of these stations (e.g. NDR3), “TA” must
appear on the display panel.
If a traffic announcement is broadcast, the
radio will automatically switch to the linked
traffic programme station (in this case,
NDR2) for the duration of the message and
return to the original programme (NDR3)
afterwards.
Traffic announcement priority
on/off
If the priority for traffic announcement programmes is activated, “TA” will light up in
the display.
To switch the priority on or off:
• Press the “AF.TA” button.
If you press “AF.TA” while a message is
being broadcast, this message only will be
interrupted. The unit will then switch back
to the previous mode. The priority for other
traffic messages remains active.
Please note that several buttons have no
function while a traffic announcement is
broadcast.
Warning beep
If you leave the reception area of the traffic
programme station currently tuned into, you
will hear a warning beep after approximately 30 seconds.
This warning will also be emitted if you press
a preset button for a station which does not
send the traffic programme signal (TP).
Switching the warning beep off
a) Tune into another station offering traffic information:
•
Press the rocker switch or
•
press a preset button which has a traffic programme station allocated to it.
or
b) Switch off the priority for traffic announcements:
•
Press “TA”.
“TA” will disappear from the display.
Automatic seek tuning start
(CD mode)
If you leave the reception area for the traffic
programme station you have tuned into while
you are listening to a CD, the system will
automatically start searching for a new traffic programme.
If no such station is found within approximately 30 seconds, a warning beep will
sound every 30 seconds. To switch the
warning beep off, proceed as described above.
Adjusting the volume for traffic
announcements and the warning
beep
Although this volume was preset at the factory, you can use the DSC function to alter
the setting (see “DSC programming - TA
VOL”).
36
BA Florida/San RemoRD168 gb®
36
14.05.2002, 13:19 Uhr
After you insert a CD, the CD functions will
appear in the display.
/
Select track:
Up
Down
If is pressed only once the unit will
return to the beginning of the track
currently playing.
Switch the car audio system on.
Insert a CD (label facing up) gently into
the CD slot.
The CD will be automatically transported to
its playing position. CD playback will begin.
You can play back the tracks on the CD in
random order. Press “5/MIX” on the station
preset buttons briefly to switch the function
on and off. “MIX” is switched on when “MIX
CD” appears briefly in the display when you
switch audio sources and each time the CD
track changes.
CD-PAUSE
Inserting a CD
•
•
>>
Press the station preset button marked
3/ to interrupt CD playback. “CD-PAUSE”
will appear in the display.
Press this button again to cancel the pause
function. The CD programme will continue
on from where it left off.
Fast forward, audible (CUE)
Hold >> pressed down for as long as
necessary.
37
BA Florida/San RemoRD168 gb®
37
14.05.2002, 13:19 Uhr
ENGLISH
FRANÇAIS
CD-MIX operation
ITALIANO
Selecting a track
The rocker switch acts as a successive
switch, i.e. press it repeatedly to skip over
several tracks.
The number of the track currently selected
will appear beside “T” in the display.
NEDERLANDS
Press the “Eject” button briefly.
The CD will eject.
Do not interfere with the automatic CD insert/eject function in any way as this might
damage the mechanism.
If you do not remove the CD, it will be pulled back into the unit after approximately 30
seconds.
Fast reverse, audible (REVIEW)
Hold << pressed down for as long as
necessary.
SVENSKA
CD is inserted, “CD” lights up in the display.
Press “SCR” to switch the audio source:
• Press “SRC” as often as necessary until the CD functions appear in the display (track number and elapsed playing time).
•
<<
ESPAÑOL
Switching on the CD mode
Removing a CD
PORTUGUÊS
This car audio system is also equipped with
a CD player.
Note:
Use only perfectly circular CDs with a diameter of 12 cm.
CDs with a diameter of 8 cm or CDs manufactured in the shape of a butterfly or a beer
mug, for example, are not suitable for use
with this equipment.
Using such CDs can very likely result in the
destruction of the CD and the CD drive.
We assume no responsibility for damages
caused by using unsuitable CDs.
DEUTSCH
CD operation
Clock
CD-Repeat (RPT)
Press the station preset button marked “4”
during CD playback to repeat the track currently playing.
“REPEAT” will appear briefly in the display
and the track will repeat until you press station button 4/RPT again or press the rocker
switch to select a different track.
CD-Scan
You can scan the tracks on a CD.
To start the SCAN function:
• Press “SC” for approximately 2 seconds. “CD-SCAN” will appear in the display.
The tracks will be scanned briefly one after
the other in ascending order.
To end the SCAN function:
• Press “SC” for approximately 2 seconds.
The track scanned last will begin to play.
This car audio system is equipped within a
built-in clock which automatically takes advantage of RDS to ensure highly accurate
time-keeping (hours, minutes).
For the clock to function properly with RDS,
an RDS station with the CT function (CT –
clock time) must be within reception range.
The automatic correction of the hours can
be switched off. Please be advised that not
all RDS radio stations currently transmit a
time signal (CT – Clock time).
Displaying the clock
Setting the clock
Correcting the time after the power has been disconnected
a) automatically
The clock is set automatically when the
radio is tuned into an RDS station
which has the “CT” function (clock
time).
b) manually with DSC-CLOCKSET
•
Press DSC briefly, the menu will appear in the display. Press / as often
as necessary until “CLOCK SET” appears in the display.
•
Press << >> to set the hours/minutes.
You can move to a different position by
pressing / .
•
After you have set the clock, press
“DSC” briefly to store the new setting.
You can set the clock to permanent display
in both the radio and CD modes.
If another function is selected, the clock display will disappear for approximately 8 seconds and the station selected, for example, will appear in the display.
To switch the display mode:
• Press “DIS” for approximately 2 seconds until you hear a beep.
If the radio has been disconnected from its
power source for any length of time, “0:00”
will appear in the display when it is re-connected.
The time will be set automatically by RDSCT, but can also be adjusted manually if
desired.
You need only set the time manually if it is
not possible to receive an RDS station with
CT (clock time).
38
BA Florida/San RemoRD168 gb®
38
14.05.2002, 13:19 Uhr
BEEP
Acknowledgement tone for
all functions which require a
button to be pressed for
more than one second.
The volume can be adjusted
from between 0 to 9. (0 =
off)
CLOCKSET Sets the clock manually.
Refer to the section on
“Clock”.
CLK. MAN.
Switches off hour correction
function.
Read the information in the
section on “Clock “.
CLK. AUTO Automatic hour correction
using the RDS/CT signal.
Refer to the section on
“Clock”.
39
BA Florida/San RemoRD168 gb®
39
14.05.2002, 13:19 Uhr
DEUTSCH
ENGLISH
FRANÇAIS
ITALIANO
MW OFF - LW, FM only
LW OFF - MW, FM only
AM OFF - FM only
NEDERLANDS
If necessary,
• Press “DSC” briefly and / as often as
required until “CLK MAN/CLK AUTO” appears in the display.
• To deactivate the hour correction
function press <</>> to select “CLK MAN”.
• Press <</>> to set the hours/minutes.
AM ON/OFF It is possible to block out
one or both of the AM wavebands (MW/LW).
This means you will select
only the wavebands you
want when you press “BA/
TS”:
AM ON - all wavebands are
available
SVENSKA
In the DSC menu it is possible to switch off
the hour correction function with “CLK MAN/
CLK AUTO”. An automatic correction for minutes will continue to take place.
This is useful if you would like to display the
time for a different time zone, for example.
The car radio has been equipped with DSC
(Direct Software Control) to allow you to customise certain programmable, basic settings to suit your personal needs and preferences and then store them.
The basic settings for this audio equipment
were made at the factory.
In the following you can find an overview of
these settings, so that you can always reset
to them if desired.
If you wish to alter any of the programming,
• press “DSC”.
Use the rocker switch to select and set the
functions you wish to change. The display
will show you the setting you have selected.
Press / to select the function.
Press << />> on the rocker switch to change or recall the values.
Note:
Whether the settings listed in the following
are available or not depends on the car audio system model and the features with
which it is equipped.
If you cannot select any of the functions listed here, then your car audio system is not
equipped with that feature and it cannot be
adjusted as a result (also see the section
on “Equipment features list”).
PORTUGUÊS
Deactivating the hour correction
function
ESPAÑOL
DSC programming
CLK. 12/24
Switches between 12-h and
24-h clock display.
DISP.
ON/OFF. Here you can set
the clock to permanent display when the audio system
is switched off. The clock
display will remain visible
until the ignition is switched
off.
EQ ON/OFF Switches the equalizer
functions on and off.
HICUT
LO-DX
Reduces interference under
poor reception conditions by
cutting the treble.
Select “NO HI-CUT” or
“HI-CUT 1, 2 or 3”.
3 = cuts the treble the most.
Adjusts seek tuning sensitivity.
“LO” stands for local reception.
“DX” stands for distant reception.
Select “LO 3” if you want to
receive strong stations in
the local area, select “DX 1”
if you want to tune into weaker stations which are further away.
LOUDNESS Loudness boosts the bass
frequencies at low volume.
LOUD 1 - Low boost
LOUD 6 - Max. boost
MUTE
It is possible to lower the audio volume quickly at the
touch of a button. Here you
can program the volume to
which the audio will drop.
PEAK
PEAK ON: Displays the dynamics of the music signal.
PEAK OFF: Permanent display for the volume
PTY LANG
Allows you to select between German and English
for the display of the programme types.
REG
To listen to a regional radio
programme outside of its
RDS transmission range,
switch on “REG ON”.
For full RDS service, switch
to “REG OFF”.
SCANTIME
Use this function to set the
scan time for the radio or
CD player from 5 to 20 seconds.
STEREO
/MONO
TA. VOL
ON VOL
Sets the turn-on volume. If
set to “VOL 0”, the unit will
automatically play at the volume last selected before it
was switched off.
Press “DSC” to save any changes made in
the settings and to quit the “DSC” menu.
40
BA Florida/San RemoRD168 gb®
40
Switches between stereo
and mono manually. The
mode selected will appear
briefly in the display. The
car audio system will select
“STEREO” playback automatically each time it is switched on.
Adjusts the volume for traffic
announcements and the
warning beep.
The message will be heard
at this volume, if the standard volume is lower.
If the standard volume is set
higher than the TA VOL level, then the traffic report
will be played at the standard volume.
14.05.2002, 13:19 Uhr
4 x 25 W RMS
power acc. to DIN
45324 at 14.4 V
4 x 40 W max.
power
Tuner
Wavebands:
FM
MW
LW
87,5 - 108 MHz
531 - 1602 kHz
153 - 279 kHz
FM frequency response:
20 - 16.000 Hz
CD
20 - 20.000 Hz
PORTUGUÊS
ESPAÑOL
SVENSKA
Frequency response:
ENGLISH
Output power:
FRANÇAIS
ON
4
AUTO
24
OFF
2
SENS DX 1
3
15
ON
English
OFF
10
Stereo
30
0
ITALIANO
AM ON/OFF
BEEP
CLK MAN/AUTO
CLK 12/24
DISP ON/OFF
HICUT
LO-DX
LOUDNESS
MUTE LEVEL
PEAK ON/OFF
PTY LANG
REG. ON/OFF
SCANTIME
STEREO/MONO
TA. VOL
T. ON VOL
Amplifier
NEDERLANDS
Overview of the DSC factory settings
DEUTSCH
Specifications
Subject to modification!
41
BA Florida/San RemoRD168 gb®
41
14.05.2002, 13:19 Uhr
Blaupunkt-Werke GmbH
Bosch Gruppe
1/99 MS
BA Florida/San RemoRD168 d®
K7/VKD 8 622 401 540
23
14.05.2002, 13:14 Uhr