1
AastraLink
Pro
160
41-001134-06
Rev 00
User Guide
Release 1.2
Aastra Telecom will not accept liability for any damages and/or long distance charges, which result from
unauthorized and/or unlawful use. While every effort has been made to ensure accuracy, Aastra Telecom will
not be liable for technical or editorial errors or omissions contained within this documentation. The
information contained in this documentation is subject to change without notice.
Copyright 2008 Aastra Telecom. www.aastratelecom.com
All Rights Reserved.
Contents
Chapter 1
Getting Started
What Does the AastraLink Pro 160 Allow Me To Do? ....................................................1-2
.
What Should I Do First? .................................................................................................1-3
.
What Information Do I Need To Use the AastraLink Pro 160 Web UI? ..........................1-4
.
Can I Still Use My Phone UI? .........................................................................................1-6
.
Chapter 2
Operating Your Aastra IP Phone Using the Phone UI
Read Me First .................................................................................................................2-3
.
IP Phone Dial Plan and Star Codes ................................................................................2-4
.
Aastra IP Phone Dialplan ..................................................................................2-6
Plugging in and Starting Your IP Phone ..........................................................................2-7
.
How to Use the IP Phone UI ....................................................................................2-9
.
Idle State Screen ...............................................................................................2-9
Idle State Screen When You Pick Up The Handset .........................................2-10
Idle State Screen When A Call Is Incoming .....................................................2-10
Idle State Screen with Voicemail Messages .................................................... 2-11
Idle State Screen With Additional Softkeys Configured ................................... 2-11
Options Screen ................................................................................................2-13
Services ...........................................................................................................2-16
Preferences ....................................................................................................2-18
Phone Status ...................................................................................................2-20
Administrator Menu .........................................................................................2-22
Restart Phone ..................................................................................................2-23
Phone Lock ......................................................................................................2-23
How to Use IP Phone Hard Keys ...........................................................................2-24
.
How To Use IP Phone Softkeys .............................................................................2-26
.
How to Use Multiple Line and Call Appearances Buttons ......................................2-28
41-001134-06 Rev 00, Rel. 1.2
.
iii
AastraLink Pro 160 IP Phone User Guide
Making Calls .................................................................................................................2-29
.
Dialing A Phone Number ........................................................................................2-29
.
Dialing Using the Handsfree Speakerphone ..........................................................2-30
.
Dialing Using a Headset .........................................................................................2-30
.
Redialing ................................................................................................................2-31
.
Muting a Call ..........................................................................................................2-31
.
Receiving Calls .............................................................................................................2-32
.
Ignoring an Incoming Call ......................................................................................2-33
.
Handling Calls ..............................................................................................................2-34
.
Placing a Call on Hold ............................................................................................2-34
.
Retrieving a Held Call ......................................................................................2-35
Automatic Hold ................................................................................................2-35
Transferring a Call ..................................................................................................2-35
.
Setting Up A Conference Call ................................................................................2-38
.
Creating a New Conference Call .....................................................................2-38
Conferencing Two Active Calls Together .........................................................2-40
Meet-Me Conferencing ...........................................................................................2-40
.
Parking/Picking Up An Incoming Call .....................................................................2-42
.
Picking Up Calls .....................................................................................................2-43
.
Sending an Incoming Call Directly to Voicemail .....................................................2-44
.
Ending Calls ...........................................................................................................2-44
.
Managing Calls .............................................................................................................2-45
.
Using the Recent Callers List .................................................................................2-45
.
Using the Missed Calls Indicator ............................................................................2-46
.
Monitoring Calls Using Busy Lamp Field (BLF) .....................................................2-47
.
Intercepting Calls Using Directed Call Pickup ........................................................2-48
.
Enabling Do Not Disturb .........................................................................................2-49
.
Enabling Call Forwarding .......................................................................................2-50
.
Enabling Find-Me, Follow-Me ................................................................................2-51
.
iv
41-001134-06 Rev 00, Rel. 1.2
AastraLink Pro 160 IP Phone User Guide
Managing Your Voicemail .............................................................................................2-54
.
Checking For New Messages ................................................................................2-56
.
User Groups ....................................................................................................2-56
Operators .........................................................................................................2-57
Accessing Messages Using “Visual Voicemail” ......................................................2-58
.
Accessing Voicemail Remotely ..............................................................................2-60
.
Recording A Custom Voicemail Greeting ...............................................................2-61
.
Configuring Voicemail Options ...............................................................................2-62
.
Using IP Phone Directories ..........................................................................................2-65
.
Adding a Contact ....................................................................................................2-65
.
Deleting a Contact ..................................................................................................2-66
.
Searching for a Contact .........................................................................................2-67
.
Dialing From A Directory ........................................................................................2-68
.
Enabling/Disabling Operator Schedule (if Operator enabled on the phone) ................2-69
.
Setting Duty Status .................................................................................................2-70
.
Setting Schedule Override .....................................................................................2-70
.
Specifying IP Phone Preferences .................................................................................2-72
.
Setting Display .......................................................................................................2-72
.
Changing the Contrast Level ...........................................................................2-72
Changing the Backlight (for models that support backlight) ............................2-73
Setting Audio (not available on 6751i) ...................................................................2-75
.
Setting Audio Mode (not available on 6751i) ...................................................2-75
Setting the Headset Microphone Volume ...............................................................2-77
.
Changing Headset Microphone Volume ..........................................................2-77
Changing the Handset Pairing (CT models only) ...................................................2-78
.
Viewing IP Phone and AastraLink System Information ................................................2-79
.
Viewing AastraLink Information ..............................................................................2-79
.
Viewing the IP Address and MAC Address of Your Phone ....................................2-80
.
Viewing the LAN and PC Port Status on Your Phone ............................................2-81
.
Viewing Firmware Information on Your Phone .......................................................2-82
.
Administrator Menu ......................................................................................................2-83
.
Enabling/Disabling UPnP .......................................................................................2-83
.
Reference ........................................................................................................2-83
Setting Your Phone To Factory Default Settings ....................................................2-84
41-001134-06 Rev 00, Rel. 1.2
.
v
AastraLink Pro 160 IP Phone User Guide
Restarting your IP Phone .............................................................................................2-85
.
Phone Lock ...................................................................................................................2-86
Locking/Unlocking Your IP Phone ..........................................................................2-86
.
.
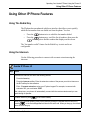
Using Other IP Phone Features ...................................................................................2-87
.
Using The Redial Key ............................................................................................2-87
.
Using the Intercom .................................................................................................2-87
.
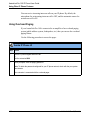
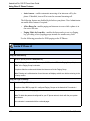
Using Overhead Paging .........................................................................................2-88
.
Intercom as XML Paging Key ..........................................................................2-89
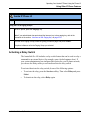
Activating a Relay Switch .......................................................................................2-91
.
Using the Emergency Dial Plan .............................................................................2-92
.
Using Shared Line Appearances (SLA) .................................................................2-93
.
SLA Key Mapping ............................................................................................2-93
SIP phone features for SLA lines ....................................................................2-94
Using AastraLink SLA from the SIP Phones ...................................................2-96
Chapter 3
Operating Your Aastra IP Phone Using the Web UI
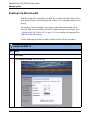
Accessing the AastraLink Web UI ..................................................................................3-2
.
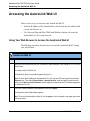
Using Your Web Browser to Access the AastraLink Web UI ....................................3-2
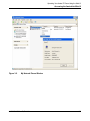
Using Windows Explorer to Access the AastraLink Web UI ....................................3-4
.
.
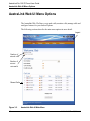
AastraLink Web UI Menu Options ..................................................................................3-6
.
Home Menu ..............................................................................................................3-7
.
References ........................................................................................................3-7
Voicemail Menu ........................................................................................................3-8
.
Reference ..........................................................................................................3-8
Directory Menu .........................................................................................................3-8
.
Reference ..........................................................................................................3-8
Softkey Menu ...........................................................................................................3-9
.
Reference ..........................................................................................................3-9
Preferences Menu ....................................................................................................3-9
.
My Profile ...........................................................................................................3-9
Voicemail .........................................................................................................3-10
vi
41-001134-06 Rev 00, Rel. 1.2
AastraLink Pro 160 IP Phone User Guide
Change Password ...........................................................................................3-10
Reference ........................................................................................................3-10
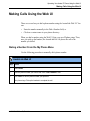
Making Calls Using the Web UI ....................................................................................3-11
.
Dialing a Number From the My Phone Menu .........................................................3-11
.
Dialing From the Phone Directory ..........................................................................3-12
.
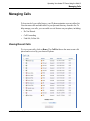
Managing Calls .............................................................................................................3-13
.
Viewing Recent Calls .............................................................................................3-13
.
Calling Back from the Call List .........................................................................3-16
Adding a Caller to Your Directory ...........................................................................3-17
.
Enabling Do Not Disturb .........................................................................................3-18
.
Enabling Call Forwarding .......................................................................................3-19
.
Enabling Find-Me Follow-Me .................................................................................3-20
.
Using Visual Voicemail .................................................................................................3-25
.
Playing Voicemail Messages ..................................................................................3-26
.
Saving Voicemail Messages ..................................................................................3-27
.
Forwarding Voicemail Messages ...........................................................................3-27
.
Deleting Voicemail Messages ................................................................................3-28
.
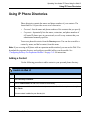
Using IP Phone Directories ..........................................................................................3-29
.
Adding a Contact ....................................................................................................3-29
.
Editing Contact Information ....................................................................................3-30
.
Deleting A Contact .................................................................................................3-30
.
Searching For A Contact ........................................................................................3-31
.
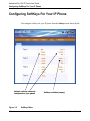
Configuring SoftKeys For Your IP Phone .....................................................................3-32
.
Softkey Types .........................................................................................................3-33
.
Call Settings Softkeys ......................................................................................3-34
Application Softkeys ........................................................................................3-37
Operator Softkeys ............................................................................................3-39
Adding a Softkey ....................................................................................................3-39
.
Editing a Softkey ....................................................................................................3-40
.
Deleting a Softkey ..................................................................................................3-40
.
Configuring Softkeys For Expansion Modules .......................................................3-41
.
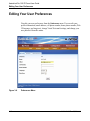
Editing Your User Preferences .....................................................................................3-42
.
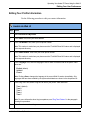
Editing Your Profile Information ..............................................................................3-43
.
Ring Tone Patterns ..........................................................................................3-44
41-001134-06 Rev 00, Rel. 1.2
vii
AastraLink Pro 160 IP Phone User Guide
Specifying Your Visual Voicemail Preferences .......................................................3-45
.
Changing Your Password .......................................................................................3-46
.
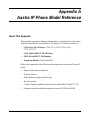
Appendix A
Aastra IP Phone Model Reference
Aastra IP Phone Model 9143i ........................................................................................ A-2
.
9143i IP Phone Features ........................................................................................ A-2
.
9143i Key Pad ......................................................................................................... A-3
.
9143i Key Description ............................................................................................. A-4
.
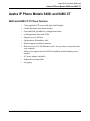
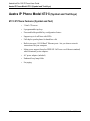
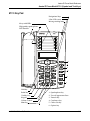
Aastra IP Phone Models 9480i and 9480i CT ............................................................... A-7
9480i and 9480i CT IP Phone Features .................................................................. A-7
.
.
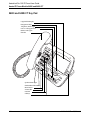
9480i and 9480i CT Key Pad .................................................................................. A-8
.
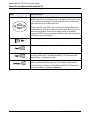
9480i and 9480i CT Key Description ....................................................................... A-9
.
9480i CT Cordless Handset .................................................................................. A-12
.
Aastra IP Phone Model 6730i (Symbol and Text Keys) ............................................... A-13
.
6730i IP Phone Features (Symbol and Text) ........................................................ A-13
.
6730i Key Pad ....................................................................................................... A-14
.
6730i Key Descriptions (Symbol and Text) ........................................................... A-15
.
Aastra IP Phone Model 6731i (Symbol and Text Keys) ............................................... A-18
.
6731i IP Phone Features (Symbol and Text) ........................................................ A-18
.
6731i Key Pad ....................................................................................................... A-19
.
6731i Key Descriptions (Symbol and Text) ........................................................... A-20
.
Aastra IP Phone Model 6751i (Symbol and Text Keys) ............................................... A-23
.
6751i IP Phone Features (Symbol and Text) ....................................................... A-23
.
6751i Key Pad ....................................................................................................... A-24
.
6751i Key Descriptions (Symbol and Text) .......................................................... A-25
.
Aastra IP Phone Model 6753i ...................................................................................... A-27
.
6753i IP Phone Features ...................................................................................... A-27
.
6753i Key Panel .................................................................................................... A-28
.
6753i Key Description ........................................................................................... A-29
.
viii
41-001134-06 Rev 00, Rel. 1.2
AastraLink Pro 160 IP Phone User Guide
Aastra IP Phone Model 6755i ...................................................................................... A-32
.
6755i IP Phone Features ...................................................................................... A-32
.
6755i Key Panel .................................................................................................... A-33
.
6755i Key Description ........................................................................................... A-34
.
Aastra IP Phone Model 6757i and 6757i CT ............................................................... A-37
6757i and 6757i CT IP Phone Features ................................................................ A-37
.
.
6757i and 6757i CT Key Panel ............................................................................. A-38
.
6757i and 6757i CT Key Descriptions ................................................................... A-39
.
6757i CT Cordless Handset .................................................................................. A-42
.
CT Cordless Handsets (9480i CT and 6757i CT) ........................................................ A-43
.
CT Cordless Handset Features ............................................................................. A-43
.
CT Cordless Handset Key Descriptions ................................................................ A-44
.
Cordless Handset Safety Information .................................................................. A-45
.
Cordless Handset and Base Station ............................................................... A-45
Cordless Handset Battery Guidelines ............................................................. A-46
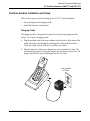
Cordless Handset Installation and Setup .............................................................. A-47
.
Charging Cradle ............................................................................................. A-47
Installing and Charging the Battery ................................................................ A-48
Installing the Belt Clip ..................................................................................... A-49
Using a Headset with your Telephone ............................................................ A-49
Battery Status Icons ........................................................................................ A-50
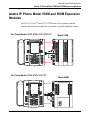
Aastra IP Phone Model 536M and 560M Expansion Modules .................................... A-51
.
536M and 560M Key Panel ................................................................................... A-52
.
Reference ....................................................................................................... A-52
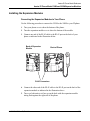
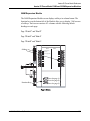
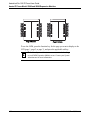
Installing the Expansion Modules .......................................................................... A-53
.
Connecting the Expansion Modules to Your Phone ....................................... A-53
Using the Expansion Modules ............................................................................... A-54
.
536M Expansion Module ................................................................................ A-54
560M Expansion Module ................................................................................ A-55
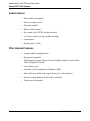
Aastra DECT 420d Handset ........................................................................................ A-57
.
Display .................................................................................................................. A-57
.
Call and Telephony Features ................................................................................ A-57
.
Audio Features ...................................................................................................... A-58
.
Other Handset Features ........................................................................................ A-58
.
41-001134-06 Rev 00, Rel. 1.2
ix
AastraLink Pro 160 IP Phone User Guide
420d Handset Key Descriptions ............................................................................ A-59
.
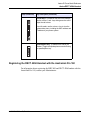
Registering the DECT 420d Handset with the AastraLink Pro 160 ....................... A-61
.
Appendix B
Troubleshooting Solutions
Why is my display blank? ........................................................................................ B-1
.
Why is my speaker phone not working? ................................................................. B-1
.
Why can’t I get a dial tone? ..................................................................................... B-1
.
Why doesn’t my phone ring? ................................................................................... B-2
.
Why is my handset not working? ............................................................................ B-2
.
How Do I Change My User Password? ................................................................... B-2
.
How do I find the IP address of my phone? ............................................................ B-2
.
Appendix C
Remote Office Installation and Configuration of the Phone (Phone -Side)
Configuring Your IP Phone for Remote Office Setup ..................................................... C-2
.
Overview ................................................................................................................. C-2
.
Configuring the remote phone ................................................................................. C-2
.
Pre-staged phones ........................................................................................... C-2
Non Pre-staged phones .................................................................................... C-2
Configuring Routing .......................................................................................... C-3
Connecting Your IP Phone to the
AastraLink Pro 160 Network From a Remote Office ..................................................... C-4
Manually Configuring Port-Forwarding .......................................................................... C-7
Remote Phone Installation and Port-Forwarding Configuration Example ............. C-10
x
.
.
.
41-001134-06 Rev 00, Rel. 1.2
Preface
About This Guide
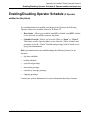
Introduction
This guide describes how to use your Aastra IP phone when it is installed in an
AastraLink Pro 160 IP phone network. Specifically, it describes how to:
•
Start up your IP phone.
•
Use the Phone UI to operate your phone.
•
Use the Web UI to operate your phone.
This guide is intended for the Aastra IP phone end-user.
41-001134-06 Rev 00, Rel. 1.2
xi
AastraLink Pro 160 IP Phone User Guide
About This Guide
Other Documentation
The AastraLink Pro 160 documentation set includes:
•
AastraLink Pro 160 Quick Start User Guide - Describes how to install and
register your phone with the AastraLink Pro 160 on your network.
•
AastraLink Pro 160 Quick Start User Guide - Describes how to initially
install user IP phones on your network, and how to register user IP phones
with the device. Also describes how to use the IP phone UI, or the AastraLink
Web UI, to operate your IP phone.
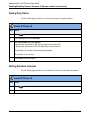
Chapters in This Guide
This guide contains the following chapters:
xii
For
Go to
Overview information about the AastraLink Pro 160
Chapter 1
Operating Your Aastra IP Phone with the Phone UI
Chapter 2
Operating Your Aastra IP Phone with the Web UI
Chapter 3
IP Phone Reference for All Model Aastra IP Phones
Appendix A
Troubleshooting Solutions
Appendix B
Remote Office Configuration of the IP Phone
Appendix C
41-001134-06 Rev 00, Rel. 1.2
Preface
About This Guide
Making Emergency Calls: Important Information!
NOTE: Remote IP phone users should never make emergency calls using the
AastraLink Pro 160, because the location information will be incorrect. E911
regulations in the United States require street address location information be
transmitted to the PSAP. This information is provided by the Telco, using the
location of the analogue line connected to the AastraLink Pro 160 Lifeline port
(for example, FXO Line 1), rather than the address where the remote IP phone is
installed.
Warning: On remote phones connected to the AastraLink Pro 160, the following
emergency related message displays: “E911 calls are not available from this
phone.” The phone user must press DONE to acknowledge the message.
41-001134-06 Rev 00, Rel. 1.2
xiii
Chapter 1
Getting Started
Your system administrator has installed an AastraLink Pro 160 on your IP phone
network. The AastraLink Pro 160 is networking device that connects your local
Aastra IP phone network to the public switched telephone network (PSTN).
The AastraLink Pro 160 also includes network management software that your
administrator uses to manage and maintain your Aastra IP phone network.
The AastraLink Pro 160 is compatible with the following Aastra SIP IP phones
and expansion modules:
•
675xi Series SIP IP Phones: 6730i, 6731i, 6751i, 6753i, 6755i,
6757i, 6757i CT
•
9143i, 9480i, 9480i CT SIP IP Phones
•
MBU 400 and DECT 420d handset
•
Expansion Modules: 536M and 560M
For more information about each specific IP Phone model and Expansion Module,
see Appendix A, “Aastra IP Phone Model Reference.”
41-001134-06 Rev 00, Rel. 1.2
1-1
AastraLink Pro 160 IP Phone User Guide
What Does the AastraLink Pro 160 Allow Me To Do?
What Does the AastraLink Pro 160 Allow Me To
Do?
As an Aastra IP phone user, you can use the AastraLink Pro 160’s Web-based
User Interface (Web UI) to manage calls, and configure features, on your Aastra
IP phone.
Some of the things you can do using the AastraLink Pro 160 Web UI include:
1-2
•
Dial phone numbers from the Callers List
•
Enter a phone number to dial from the AastraLink Pro Web UI
•
View the Call List (calls received) on your phone
•
View number of missed calls
•
View number of voicemails currently on your phone
•
Enable and configure IP phone features like Do Not Disturb, Call Forwarding,
and Find-Me Follow-Me
•
Check and forward voicemail messages
•
Access your personal and corporate phone directory
•
Configure custom softkeys for your IP phone and print softkey labels for
phones that use labels
•
Configure your User preferences (email, cell number, home number,
language, ring tone)
•
Set voicemail notification (notify of voicemails via email or email with
audio-attachment)
•
Set the extension to send the incoming call to
•
Set the number of rings on your phone before sending the call to voicemail
•
Ability to change your User password
41-001134-06 Rev 00, Rel. 1.2
Getting Started
What Should I Do First?
What Should I Do First?
To get started using your IP phone on the AastraLink Pro 160 phone network, do
one of the following actions:
•
If you are installing and initializing your IP phone for the first time, see the
AastraLink Pro 160 Quick Start User’s Guide for instructions.
•
If you or your system administrator has already installed your IP phone and
connected it to the AastraLink IP phone network, and your phone UI displays
an Idle State Screen showing your name and extension (see the example
shown below), then proceed to one of the following chapters:
— Operating My IP Phone Using the Phone UI
— Operating My IP Phone Using the Web UI
Services
L1
201 - B Jones
Your name and extension
Jan 1 12:18 pm
DND
Forward
Directory
41-001134-06 Rev 00, Rel. 1.2
Vmail
Park Call
1-3
AastraLink Pro 160 IP Phone User Guide
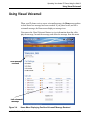
What Information Do I Need To Use the AastraLink Pro 160 Web UI?
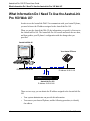
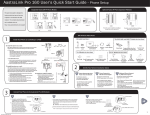
What Information Do I Need To Use the AastraLink
Pro 160 Web UI?
In order to use the AastraLink Web UI to communicate with your Aastra IP phone,
you need to know the IP address assigned to the AastraLink Pro 160.
When you use the AastraLink Web UI, the information you specify is first sent to
the AastraLink Pro 160. The AastraLink Pro 160 records and stores the new data,
and then updates your IP phone’s configuration with the changes that you
specified.
AastraLink Web UI
Your Aastra IP Phone
IP Address 10.50.20.100
IP Address 10.50.20.110
AASTRA
AastraLink Pro 160
IP Address 10.50.20.104
There are two ways you can obtain the IP address assigned to the AastraLink Pro
160.
1-4
•
Your system administrator can provide this information.
•
You can use your Aastra IP phone, and the following procedure, to identify
the address.
41-001134-06 Rev 00, Rel. 1.2
Getting Started
What Information Do I Need To Use the AastraLink Pro 160 Web UI?
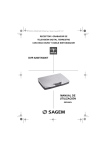
Aastra IP Phone UI
Step
Action
1
Press Options key
on the phone key pad (or the Options key on the Aastra IP phone
models 9143i and 9480i) to bring up the Options list.
2
Use
3
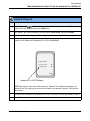
Select AastraLink Info, then press <Show>
4
Press the down <Arrow> until the AastraLink IP Address menu appears (see below). In this
example, the IP Address of the AastraLink Pro 160 is 10.50.20.104
and
to scroll through the list key to select Phone Status, then press <Show>
AastraLink Info
Server Local IP:
10.50.20.104
Done
AastraLink Pro 160 IP Address
NOTE: Each device on the network has a unique IP Address. The IP address assigned to your
AastraLink Pro 160 is going to vary from the one shown in this example. However, it will have the
same format.
5
Write down the IP Address of your AastraLink Pro 160. You need it to access the AastraLink Web UI.
6
Press <Done> to exit.
41-001134-06 Rev 00, Rel. 1.2
1-5
AastraLink Pro 160 IP Phone User Guide
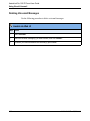
Can I Still Use My Phone UI?
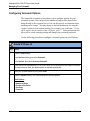
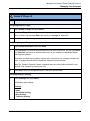
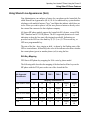
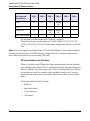
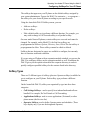
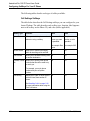
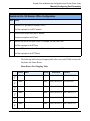
Can I Still Use My Phone UI?
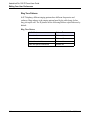
Yes! The table below shows the options available using the AastraLink Web UI
and the Aastra IP phone UI.
Phone Option
Access From
Web UI
Access from
Phone UI
Dial A Number
Manage Your Recent Calls
Manage Your Voicemail
Enable Phone Features
• Do Not Disturb
• Call Forwarding
• Find Me Follow Me
Use Phone Directories
Configure Softkeys
Reset Softkey Defaults
Edit Your User Preferences
• Contact Information
• Voicemail Preference
• Change Password
Set Phone Preferences
• Contrast Level
• Set Audio (only available on models with this
feature)
1-6
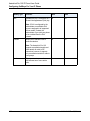
View Phone IP Address
View AastraLink IP Address
View Phone Firmware version
Set Phone To Factory Defaults
Restart Phone
Lock Your Phone
Configure User Profiles (Admin Only)
Configure AastraLink Pro 160 System and Network
Parameters (Admin Only)
Perform AastraLink Pro 160 Maintenance and
Upgrade tasks (Admin Only)
41-001134-06 Rev 00, Rel. 1.2
Chapter 2
Operating Your Aastra IP Phone
Using the Phone UI
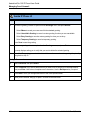
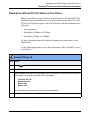
About this Chapter
Introduction
This chapter describes how to use the phone UI to operate your IP phone.
Topics
This chapter covers the following topics:
Topic
Page
Read Me First
page 2-3
IP Phone Dial Plan and Star Codes
page 2-4
Plugging in and Starting Your IP Phone
page 2-7
Making Calls
page 2-29
Receiving Calls
page 2-32
Handling Calls
page 2-34
Managing Calls
page 2-45
Managing Your Voicemail
page 2-54
Using IP Phone Directories
page 2-65
Enabling/Disabling Operator Schedule (if Operator enabled on the phone)
page 2-69
Specifying IP Phone Preferences
page 2-72
Viewing IP Phone and AastraLink System Information
page 2-79
Administrator Menu
page 2-83
Restarting your IP Phone
page 2-85
41-001134-06 Rev 00, Rel. 1.2
2-1
AastraLink Pro 160 IP Phone User Guide
About this Chapter
2-2
Topic
Page
Phone Lock
page 2-86
Using Other IP Phone Features
page 2-87
41-001134-06 Rev 00, Rel. 1.2
Operating Your Aastra IP Phone Using the Phone UI
Read Me First
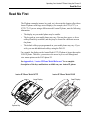
Read Me First
The IP phone examples (menus, key pads, etc.) shown in this chapter reflect those
Aastra IP phones with large screen displays (for example, the 6755i, 6757i, or
6757i CT). If you are using a different model Aastra IP phone, note the following
information:
•
The display on your model phone may be smaller.
•
The key pad on your model phone may vary. You may have more, or fewer
softkeys/hard keys available, and they may be located in a different area on
the phone.
•
The default softkeys preprogrammed on your model phone may vary. If you
wish, you can add additional softkeys using the Web UI.
For example, the display on the Aastra Model 6757i IP phone is larger than on the
9143i IP phone. Therefore, you must use the arrow keys to scroll through and
view menu options on the 9143i phone UI.
See Appendix A, “Aastra IP Phone Model Reference” for a complete
description of the keys and buttons available on your Aastra IP phone.
Aastra IP Phone Model 6757i
Aastra IP Phone Model 9143i
Small Display
Large Display
Save
Con
f
Opti
ons
Dir
ecto
ry
Dele
te
Xfe
r
L3
L2
L1
Mu
Options Key
41-001134-06 Rev 00, Rel. 1.2
te
Options Key
2-3
AastraLink Pro 160 IP Phone User Guide
IP Phone Dial Plan and Star Codes
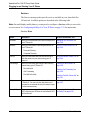
IP Phone Dial Plan and Star Codes
The table below describes the dial plan for your Aastra IP phone. The dial plan is
also summarized in the tree diagram shown in the “Aastra IP Phone Dialplan” on
page 2-6,
For Calls To
Dial the Following Number(s)
Internal extension
3 or 4 digit extension number
An extension located in a peer AastraLink
network.
7 + <access digit>* <extension number>
*Contact your Administrator for the access
digit assigned to the peer AastraLink
network.
External SIP number
8 + <access digit>* <external number>
*Contact your Administrator for the access
digit assigned to the external SIP trunk.
External PSTN number
9 + <number>
Abbreviated number
1 + <00 through 99>
*Contact your Administrator for the
abbreviated digits assigned to a number
Overhead paging system
6000
Relay switch
6001
Fax
6010
6011
Auto-Attendant
6100
Voice-Mail
6101
Conference Moderator
6102
Meet-me conferencing
62XXX
63XXX
64XXX
*XXX is the meet-me number owned by
phone extension 2XXX, 3XXX, or 4XXX
2-4
41-001134-06 Rev 00, Rel. 1.2
Operating Your Aastra IP Phone Using the Phone UI
IP Phone Dial Plan and Star Codes
For Calls To
Dial the Following Number(s)
Ring group
65XXX
*XXX is the ring group number
Paging group
66XXX
*XXX is the paging group number
Parked call
67XX
*XX is the parked call number
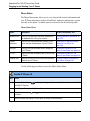
The table below describes the star codes implemented for your Aastra IP phone.
For Calls To
Dial the following star-code
Intercom to extension XXX
*5XXX
Public Address/Overhead paging
*60
Voicemail
*66
Directed Call Pickup of extension XXX
*76XXX
Do Not Disturb
*78
Voice mailbox of extension xxx
**xxx
41-001134-06 Rev 00, Rel. 1.2
2-5
AastraLink Pro 160 IP Phone User Guide
IP Phone Dial Plan and Star Codes
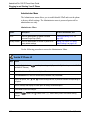
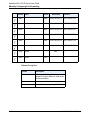
Aastra IP Phone Dialplan
The following are the Aastra IP Phone local dial plan numbers and
directory numbers.
DialPlan Numbers
Directory Numbers
0
0 Operator
1 Abbreviated Dialing
00 through 99
2* Extn
2xx/2xxx SIP Extension
3* Extn
3xx/3xxx SIP Extension
4* Extn
4xx/4xxx SIP Extension
5 Unused
6 Feature Access
0 Local Features
00 Paging
01 Relay
02...09 Unused
10 FXS A
11 FXS B
12 AutoFAX
20...99 Unused
1 Local CallP Features
00 IVR
01 Vmail
02 ConfMod
1 Unused
2* virtual extension
3* virtual extension
4* virtual extension
5...9 Unused
2 Meetme Extn
3 Meetme Extn
4 Meetme Extn
5 Call/Ring Groups
6 Paging/Intercom Groups
7 Call parking
8 Unused
9 Unused
7* AastraLink Trunk
6000
6001
Overhead paging
Activate Relay
6010
6011
6012
FAX/Phone A
FAX/Phone B
FAX A/B Auto selection
6100
6101
6102
Auto-attendant IVR
Voicemail
Conference Moderator
62xxx
63xxx
64xxx
65xxx
66xxx
67xxx
Meet-me owned by 2xxx
Meet-me owned by 3xxx
Meet-me owned by 4xxx
Ring Group xxx
Paging Group xxx
Parked Call xxx
7+ (access digit) + xxx/xxxx
*access digit = 0 - 9 (assigned by the
administrator)
* xxx/xxxx = 3 or 4 digit extn
8* SIP Trunk
8 + (access digit*) + external number
*access digit = 0 - 9 (assigned by the
administrator)
9* PSTN (FXO Access)
2-6
9 external - PSTN line call
41-001134-06 Rev 00, Rel. 1.2
Operating Your Aastra IP Phone Using the Phone UI
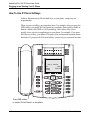
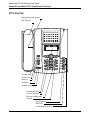
Plugging in and Starting Your IP Phone
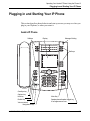
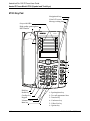
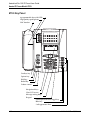
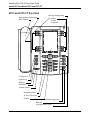
Plugging in and Starting Your IP Phone
This section describes phone behavior and start up screens you may see when you
plug in your IP phone, or when you restart it.
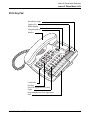
Aastra IP Phone
Softkeys
Display
Message Waiting
Softkeys
Goodbye key
Options key
Hold key
Mute Key
Redial Key
Speakerphone/headset toggle key
Volume control
4 call appearance lines
Navigational keys
41-001134-06 Rev 00, Rel. 1.2
2-7
AastraLink Pro 160 IP Phone User Guide
Plugging in and Starting Your IP Phone
Note: For a description of keys on other model phones, see A, “Aastra IP Phone Model
Reference.”.
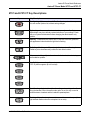
Your IP phone begins the start up sequence as soon as you connect it to your
network and displays the following startup screens:
20%
DHCP Waiting For IP
30%
Auto Discovery
- Skip
Remote -
Your IP phone then checks settings and looks for new configuration and firmware
updates for the phone from the AastraLink Pro 160. This may take a few moments
while the phone downloads the latest updates.
65%
Downloading Configuration
70%
100%
Downloading Language Packs
Done
Note: Important! Do not unplug or remove power to the phone while it is checking or
installing firmware and configuration information.
2-8
41-001134-06 Rev 00, Rel. 1.2
Operating Your Aastra IP Phone Using the Phone UI
Plugging in and Starting Your IP Phone
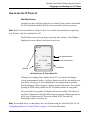
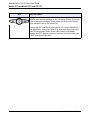
How to Use the IP Phone UI
Idle State Screen
Assuming you have already registered your Aastra IP phone with the AastraLink
Pro 160, your phone displays the Idle screen (see below) when it powers up.
Note: Refer to the AastraLink Pro 160 Quick Start User’s Guide for instructions on registering
your IP phone with the AastraLink Pro 160.
The Idle State screen lists your name, extension, date, and time. Your IP phone
displays this screen whenever the phone is not in use.
Services
L1
201 - B Jones
Jan 1 12:18am
Softkeys
DND
Forward
Directory
Your extension/name
Current date and time
Vmail
Park Call
Softkeys
Idle State Screen (IP Phone Model 57i)
On large screen display phone models like the 57i, your phone also displays
various preprogrammed softkeys. Softkeys function exactly like the hard keys on
your phone, except you, or your administrator, can program them to perform
different functions. When you press a softkey, an action takes place. For example,
pressing the DND softkey enables the Do Not Disturb feature on your phone.
The top left side of your phone UI displays the Services softkey. The bottom of
the phone UI displays the default softkeys that your system administrator has set
up for your IP phone network. These may include DND, Forward (call
forwarding), Vmail (voicemail), etc.
Note: You can add, delete, or edit softkeys for your IP phone using the AastraLink Web UI. See
Configuring SoftKeys For Your IP Phone on page 3-32 for more information.
41-001134-06 Rev 00, Rel. 1.2
2-9
AastraLink Pro 160 IP Phone User Guide
Plugging in and Starting Your IP Phone
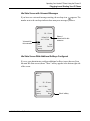
Idle State Screen When You Pick Up The Handset
When you lift the handset, the bottom of the screen changes to display different
set of softkeys, as shown below:
Services
L1
201 - B Jones
Jan 1 12: 20 am
Dial
Conference
Transfer
Dial
Conf
Xfer
Access “more” options
More
Idle State Screen When A Call Is Incoming
When your IP phone receives an incoming call, screen changes to display a
ringing phone icon. Below that are the Answer and Ignore softkeys. If you wish,
you can use these softkeys to answer the call, or ignore the call (the call transfers
to your voicemail). See “Receiving Calls” on page 2-32 for other methods of
answering calls.
Services
Caller name and
extension
L1
201 B Jones
Sue Adams
203
Access
Answer
Ignore
More
2-10
41-001134-06 Rev 00, Rel. 1.2
Operating Your Aastra IP Phone Using the Phone UI
Plugging in and Starting Your IP Phone
Idle State Screen with Voicemail Messages
If you have new voicemail messages waiting, the envelope icon
appears. The
number next to the envelope indicates how many new messages you have.
Services
201 - B Jones
L1
1 Missed Call
Jan 1 12:18am
Voicemail for
this extension
1
DND
Forward
Directory
Shows 1
missed call for this
extension
Vmail
Park Call
Idle State Screen With Additional Softkeys Configured
If you or your administrator configure additional softkeys (more than can fit on
the main Idle State screen) then a “More” softkey appears at the bottom right side
of the screen.
Services
Home
L1
201 - B Jones
Jan 1 12:18am
DND
Forward
Directory
41-001134-06 Rev 00, Rel. 1.2
Vmail
Park Call
More
“More” softkey
2-11
AastraLink Pro 160 IP Phone User Guide
Plugging in and Starting Your IP Phone
Pressing the More softkey allows you to access addition softkeys configured on
your phone. For example, you press the More softkey on Screen 1 to access the
Call List softkey on screen 2.
Screen 2
Screen 1
Services
Services
L1
L1
201 - B Jones
Jan 1 12: 20 am
Jan 1 12:18am
DND
Forward
Directory
2-12
Vmail
Park Call
More
201 - B Jones
Press “More” to access
the next screen
Call List
More
41-001134-06 Rev 00, Rel. 1.2
Operating Your Aastra IP Phone Using the Phone UI
Plugging in and Starting Your IP Phone
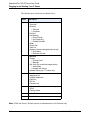
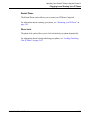
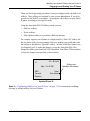
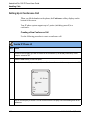
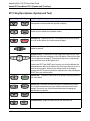
Options Screen
When you press the Option button
on your IP phone keypad (or the
Option key on the Aastra IP Phone Models 9143i and 9480i), the Options screen
appears.
AastraLink Menu
1. Services
2. Preferences
3. Phone Status
4. Administrator Menu
5. Restart Phone
6. Phone Lock
Select
Done
41-001134-06 Rev 00, Rel. 1.2
2-13
AastraLink Pro 160 IP Phone User Guide
Plugging in and Starting Your IP Phone
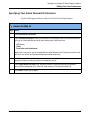
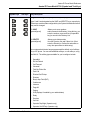
The Options menu selections are shown below.
Option
Description
1
Services
1. Voicemail
2. Directory
1. Personal
2. Corporate
3. Call List
4. Call Settings
1. Do not Disturb
2. Call Forwarding
3. FindMe FollowMe
5. Relay
6. Pickup Call
7. Park List
8. Operator (Operator designated phone only)
1. Duty Status
2. Schedule Override
2
Preference
1. Display
1. Contrast Level
2. Backlight
2. Set Audio (for models that support audio)
1. Audio Mode
2. Headset Mic Volume
3. Handset Pairing (for CT models only)
3
Phone Status
1. AastraLink Info
2. IP&MAC Addresses
3. LAN Port
4. PC Port
5. Firmware Info
4
Administrator Menu (Administrator only)
1. UPnP
2. Factory Default
5
Restart Phone
6
Phone Lock
Note: UPnP and Factory Default options are administrator level functions only.
2-14
41-001134-06 Rev 00, Rel. 1.2
Operating Your Aastra IP Phone Using the Phone UI
Plugging in and Starting Your IP Phone
Use the following procedure to access the Options Menu.
Aastra IP Phone UI
Step
Action
1
Press the Option button
and 9480i IP Phones.)
2
To go to an option, use
the option.
3
Press the Select softkey, the
4
Use the softkeys that display for each option to change a selected option.
5
Press Done to save the changes.
6
Press the
changes.
on the phone key pad. (Or press the Options key on model 9143i
and
button, the
41-001134-06 Rev 00, Rel. 1.2
to scroll through the list, or press the number corresponding to
button, or press the number of the option to select it.
button, or the N button at any time to exit without saving
2-15
AastraLink Pro 160 IP Phone User Guide
Plugging in and Starting Your IP Phone
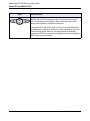
Services
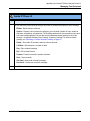
The Services menu provides specific services available in your AastraLink Pro
160 network. Available options are described in the following table.
Note: On small display model phones, you may need to configure a Services softkey to access the
services screen. See Configuring SoftKeys For Your IP Phone on page 3-32 for instructions.
Services Menu
Option
Description
Voicemail
Allows you to access and use visual voicemail from “Managing Your Voicemail” on
your IP Phone UI.
page 2-54.
Directory
Allows you to access the following directories via
your IP Phone UI:
•
Personal Directory
•
Corporate Directory
For more information, see
“Using IP Phone Directories” on
page 2-65.
Call List
Allows you to access and view the current list of
calls that came into your phone using your IP
Phone UI.
“Using the Recent Callers List” on
page 2-45
Call Settings
Allows you to access and configure the following
features using your IP Phone UI:
“Enabling Do Not Disturb” on
page 2-49
•
Do not disturb
•
Call Forwarding
•
Find-Me Follow-Me
“Enabling Call Forwarding” on
page 2-50
“Enabling Find-Me, Follow-Me” on
page 2-51.
Relay
Allows you to enable/disable a relay switch via your “Activating a Relay Switch” on
IP Phone UI. You can use this relay switch as a
page 2-91
command to an external device (for example, open
a locked entrance door).
Pickup Call
“Intercepting Calls Using Directed
Allows you to view a list of directed call pickup
(DCP) calls via your IP Phone UI, and select a DCP Call Pickup” on page 2-48
call from the list.
2-16
41-001134-06 Rev 00, Rel. 1.2
Operating Your Aastra IP Phone Using the Phone UI
Plugging in and Starting Your IP Phone
Option
Description
For more information, see
Park List
Allows you to view a list of parked calls via your IP
Phone UI, and select a parked call from the list.
“Parking/Picking Up An Incoming
Call” on page 2-42
Operator
Allows you to enable or disable the following:
“Enabling/Disabling Operator
Schedule (if Operator enabled on the
phone)” on page 2-69
•
Duty Status - Allows you to specify whether or
not someone is available to answer the phone.
Turns the Operator duty, On or Off.
•
Schedule Override - Allows an operator to
override the current schedule specified. Sets
the Operator schedule to “Open” or “Closed”.
Note: Your administrator must enable your phone
as “Operator” to use these Operator features.
Use the following procedure to access the Services Menu.
Aastra IP Phone UI
Step
Action
1
Press the Option button
and 9480i IP Phones.)
2
Select Services from the Options Menu.
3
To go to an option, use
the option.
4
Use the softkeys that display for each option to change a selected option.
5
Press Done to save the changes.
6
Press the
changes.
on the phone key pad. (Or press the Options key on model 9143i
and
button, the
41-001134-06 Rev 00, Rel. 1.2
to scroll through the list, or press the number corresponding to
button, or the N button at any time to exit without saving
2-17
AastraLink Pro 160 IP Phone User Guide
Plugging in and Starting Your IP Phone
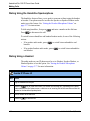
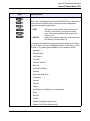
Preferences
The Preferences menu allows you to set the contrast setting for your LCD display,
and the audio settings on your phone. Available options are described in the
following table.
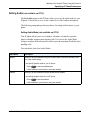
Preferences Menu
Option
Description
For more information, see
Display
Allows you to set the following on your phone:
“Setting Display” on page 2-72.
Set Audio
•
Contrast Level
•
Backlight
Allows you to set the following on your phone:
•
(for models that
support audio) •
Audio Mode
“Setting Audio (not available on
6751i)” on page 2-75.
Headset Mic Volume
Handset Pairing For models 57i CT and 9480i CT, this option allows “Changing the Handset Pairing (CT
you to pair and unpair the handset with the base
models only)” on page 2-78.
phone.
(CT models
only)
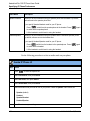
Use the following procedure to access the Preferences Menu.
Aastra IP Phone UI
Step
Action
1
Press the Option button
and 9480i IP Phones.)
2
Select Preferences from the Options Menu.
3
To go to an option, use
the option.
4
Use the softkeys that display for each option to change a selected option.
2-18
on the phone key pad. (Or press the Options key on model 9143i
and
to scroll through the list, or press the number corresponding to
41-001134-06 Rev 00, Rel. 1.2
Operating Your Aastra IP Phone Using the Phone UI
Plugging in and Starting Your IP Phone
Aastra IP Phone UI
Step
Action
5
Press Done to save the changes.
6
Press the
changes.
button, the
41-001134-06 Rev 00, Rel. 1.2
button, or the N button at any time to exit without saving
2-19
AastraLink Pro 160 IP Phone User Guide
Plugging in and Starting Your IP Phone
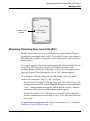
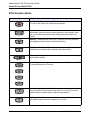
Phone Status
The Phone Status menu allows you to view AastraLink network information and
your IP Phone information, such as IP and MAC addresses and firmware version
currently on the phone. Available options are described in the following table.
Phone Status Menu
Option
Description
For more information, see
AastraLink Info
Allows you to view the IP and MAC addresses of
the AastraLink Pro 160 in your network.
“Viewing AastraLink Information” on
page 2-79
IP&MAC
Addresses
Allows you to view the extension number of your
phone, and the IP addressess of your IP Phone.
“Viewing the IP Address and MAC
Address of Your Phone” on
page 2-80
LAN Port
Allows you to view the status of the LAN port on
your IP Phone
“Viewing the LAN and PC Port
Status on Your Phone” on page 2-81
PC Port
Allows you to view the status of the PC port on your “Viewing the LAN and PC Port
IP Phone.
Status on Your Phone” on page 2-81
Firmware Info
Allows you to view the current firmware information “Viewing Firmware Information on
loaded on your IP Phone.
Your Phone” on page 2-82
Use the following procedure to access the Phone Status Menu.
Aastra IP Phone UI
Step
Action
1
Press the Option button
and 9480i IP Phones.)
2
Select Phone Status from the Options Menu.
3
To go to an option, use
the option.
4
Use the softkeys that display for each option to change a selected option.
2-20
on the phone key pad. (Or press the Options key on model 9143i
and
to scroll through the list, or press the number corresponding to
41-001134-06 Rev 00, Rel. 1.2
Operating Your Aastra IP Phone Using the Phone UI
Plugging in and Starting Your IP Phone
Aastra IP Phone UI
Step
Action
5
Press Done to save the changes.
6
Press the
changes.
button, the
41-001134-06 Rev 00, Rel. 1.2
button, or the N button at any time to exit without saving
2-21
AastraLink Pro 160 IP Phone User Guide
Plugging in and Starting Your IP Phone
Administrator Menu
The Administrator menu allows you to enable/disable UPnP and reset the phone
to factory default settings. The Administrator menu is password protected for
administrator use only.
Administrator Menu
Option
Description
For more information, see
UPnP
Allows an administrator to enable or disable
Universal Plug’n Play (UPnP)
“Enabling/Disabling UPnP” on
page 2-83
Factory Default
Allows an administrator to set the IP phone to its
factory default settings.
“Setting Your Phone To Factory
Default Settings” on page 2-84
Use the following procedure to access the Administrator Menu.
Aastra IP Phone UI
Step
Action
1
Press the Option button
and 9480i IP Phones.)
2
Select Administrator Menu from the Options Menu.
3
In the Password field, enter the administrator password and press Enter.
4
To go to an option, use
the option.
5
Use the softkeys that display for each option to change a selected option.
6
Press Done to save the changes.
7
Press the
changes.
2-22
on the phone key pad. (Or press the Options key on model 9143i
and
button, the
to scroll through the list, or press the number corresponding to
button, or the N button at any time to exit without saving
41-001134-06 Rev 00, Rel. 1.2
Operating Your Aastra IP Phone Using the Phone UI
Plugging in and Starting Your IP Phone
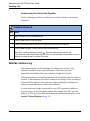
Restart Phone
The Restart Phone option allows you to restart your IP Phone if required.
For information about restarting your phone, see “Restarting your IP Phone” on
page 2-85.
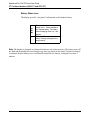
Phone Lock
The phone lock option allows you to lock and unlock your phone dynamically.
For information about locking/unlocking your phone, see “Locking/Unlocking
Your IP Phone” on page 2-86.
41-001134-06 Rev 00, Rel. 1.2
2-23
AastraLink Pro 160 IP Phone User Guide
Plugging in and Starting Your IP Phone
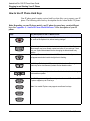
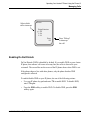
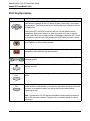
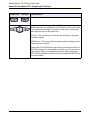
How to Use IP Phone Hard Keys
Your IP phone panel contains various hard keys that allow you to operate your IP
phone. The following table lists key descriptions for the Aastra Model 57i phone.
Note: Depending on your IP phone model, your IP phone key panel may contain different
keys. See Appendix A, “Aastra IP Phone Model Reference” for a description of your IP
phone.
Keys
Key Description for the 57i Model Phone
Goodbye key - Ends an active call. The Goodbye key also exits an open
list, such as the Options List, without saving changes.
Options key - Accesses options to customize your phone. Your System
Administrator may have already customized some of your settings. Check
with your System Administrator before changing the administrator-only
options.
Hold key - Places an active call on hold. To retrieve a held call, press the
call appearance button beside the light that is flashing.
Redial key - Redials up to 100 previously dialed numbers. Pressing the
Redial key twice simultaneously redials the last dialed number.
Volume control key - Adjusts the volume for the handset, headset, ringer,
and handsfree speaker.
L4
Line/Call Appearance key - Connects you to a line or call. The Aastra 57i
IP phone supports up to 4 line keys.
L3
Note: Your model IP phone may support more/fewer line keys.
L2
L1
2-24
41-001134-06 Rev 00, Rel. 1.2
Operating Your Aastra IP Phone Using the Phone UI
Plugging in and Starting Your IP Phone
Keys
Key Description for the 57i Model Phone
Handsfree key - Activates Handsfree for making and receiving calls without
lifting the handset. When the audio mode option is set, this key is used to
switch between a headset and the handsfree speakerphone.
Mute key - Mutes the microphone so that your caller cannot hear you (the
light indicator flashes when the microphone is on mute).
Navigation keys - Pressing the UP and DOWN arrow keys lets you view
different status and text messages on the LCD display (if there is more than
1 line of status/text messages). These buttons also let you scroll through
menu selections, such as the Options List.
Pressing the LEFT and RIGHT arrow keys lets you view the different line/
call appearances. While in the Options List, these keys allow you to exit or
enter the current option. When you are editing entries on the display,
pressing the LEFT arrow key erases the character on the left; pressing the
RIGHT arrow key sets the option.
Softkeys - 12 softkeys on the 57i IP Phone (this number varies, based on
your IP phone model).
•
6 Top Keys: programmable static softkeys (up to 10 programmable
functions)
•
6 Bottom Keys: programmable state-based softkeys (up to 20
programmable functions)
Your system administrator has preprogrammed the default set of softkeys
for your IP phone. You can add additional softkeys, or edit softkeys, using
the Web UI.
41-001134-06 Rev 00, Rel. 1.2
2-25
AastraLink Pro 160 IP Phone User Guide
Plugging in and Starting Your IP Phone
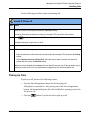
How To Use IP Phone Softkeys
Softkeys function exactly like the hard keys on your phone, except they are
programmable.
When you press a softkey, an action takes place. For example, when you press the
DND softkey, you enable Do Not Disturb on your phone. Some softkeys enable or
disable a feature (like DND or Call Forwarding), while others allow you to
quickly access services or applications on your phone. For example, if you press
the Directory softkey, your phone UI displays your personal and corporate phone
directories. If you press the Voicemail softkey, you access your voicemail account.
L1
201 - B Smith
May 11, 2:40 PM
DND
Forward
Directory
Vmail
Park Call
Press DND softkey
to enable “Do Not Disturb” on this phone.
2-26
41-001134-06 Rev 00, Rel. 1.2
Operating Your Aastra IP Phone Using the Phone UI
Plugging in and Starting Your IP Phone
When you first began using your phone, it was preconfigured with a default set of
softkeys. These softkeys are assigned by your system administrator. If you wish,
you can use the Web UI to customize - or reprogram - the softkeys on your Aastra
IP phone according to your specific needs.
Using the AastraLink Web UI Softkeys menu, you can:
•
Add new softkeys
•
Delete softkeys
•
Edit a default softkey so it performs a different function
For example, suppose your IP phone is configured with a “Park Call” softkey like
the one shown in the previous example. However, perhaps you would rather edit
this softkey to function as a “Speedial” softkey - in order to dial Sue Adams, who
you frequently call. To make this change, you use the AastraLink Web UI to
change the softkey type from Park Call to Speeddial. Your Phone UI then updates
to show the changes you specified, as shown below.
201 - B Smith
L1
May 11, 2:45 PM
DND
Forward
Directory
Softkey now
Speedials Sue Adams
Vmail
Sue Adams
Updated Phone UI
Note: See “Configuring SoftKeys For Your IP Phone” on page 3-32 for instructions on adding,
deleting, or editing softkeys for your IP phone.
41-001134-06 Rev 00, Rel. 1.2
2-27
AastraLink Pro 160 IP Phone User Guide
Plugging in and Starting Your IP Phone
How to Use Multiple Line and Call Appearances Buttons
Your Aastra IP phone has hard line/call appearance buttons, each with a
corresponding status light. These line/call appearance buttons and lights can
represent physical lines, calls for your extension, or calls from a group — of
which your extension is part. The model 6757i phone has 4 hard line/call
appearance buttons, described in the table below. Your model phone may have
more, or fewer, hard line/call appearance buttons.
Line/Call Appearance Light Behavior
Line/Call Appearance Status
Off
Idle line or no call activity
Light flashes quickly
Ringing
Light is solid
Connected
Light flashes slowly
Hold
By pressing a line/call appearance button, you connect to the line or to the call it
represents. The line/call appearance light indicates the status of that line or call.
When the phone is taken off-hook, the phone automatically selects a line for you.
When you have more than one call, you can use the left and right navigation
buttons (3 and 4) to scroll left and right to the different call information. The
Icons 3 and 4 will appear if there is call information to the left, right or both
sides of the current information you are viewing.
The Phone UI shows which line the call information is referring to (L1, L2, L3,
etc.), the Caller ID information (name and number, if available), the call status
(Connected, Ring, Hold etc.) and the timer specific to that call.
2-28
41-001134-06 Rev 00, Rel. 1.2
Operating Your Aastra IP Phone Using the Phone UI
Making Calls
Making Calls
Dialing A Phone Number
Use the following procedure to dial a phone number on your Aastra IP Phone
Aastra IP Phone UI
Step
Action
1
Take the phone off-hook by:
•
lifting the handset
•
pressing a line/call appearance button.
You can also dial a phone number without taking the phone off the hook (on-hook dialing) by pressing
the
key. See “Dialing Using the Handsfree Speakerphone” on page 2-30 for instructions.
2
At the dial tone, enter the number you wish to call. In this example, 203.
If you are unable to make calls within certain area codes, check with your system administrator for
any toll restrictions placed on your extension that may restrict your access to long distance area
codes or dialing prefixes.
Services
L1
201- B Jones
>203
Dial
Conf
Xfer
More
When your party picks up, a timer appears that records the length of your call.
41-001134-06 Rev 00, Rel. 1.2
2-29
AastraLink Pro 160 IP Phone User Guide
Making Calls
Dialing Using the Handsfree Speakerphone
The handsfree feature allows you to speak to someone without using the handset
or headset. Your phone must be in either the Speaker or Speaker/Headset audio
mode to use this feature. See “Setting the Headset Microphone Volume” on
page 2-77 for instructions.
To dial using handsfree, first press
Press
to disconnect the call.
and enter a number at the dial tone.
To switch between handsfree and handset/headset mode, do one of the following
actions:
•
If in speaker audio mode, press
handset.
to switch between handsfree and
•
If in speaker/headset audio mode, press
and headset.
to switch between handsfree
Dialing Using a Headset
The audio mode on your IP phone must be set to Headset, Speaker/Headset, or
Headset/Speaker to use this option. See “Setting the Headset Microphone
Volume” on page 2-77 for more information.
Aastra IP Phone UI
Step
Action
1
Plug the headset into the jack.
2
Press the
key to obtain a dial tone or to answer an incoming call. Depending on the audio
mode selected from the Options menu, a dial tone or an incoming call will be received on either the
headset or the handsfree speakerphone.
3
Enter a number at the dial tone.
4
Press the Nto end the call
2-30
41-001134-06 Rev 00, Rel. 1.2
Operating Your Aastra IP Phone Using the Phone UI
Making Calls
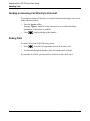
Redialing
Use the following procedure to redial a number.
Aastra IP Phone UI
Step
Action
1
To redial a number, do one of the following actions:
•
Press
to dial the most recent number you dialed from the phone.
•
If you are off-hook and press
the last number you called will be called back.
•
If you are on-hook and press
a Redial Directory list appears on-screen.
The redial list stores up to the last 100 numbers you called. The redial key remembers pause key
presses. The redial list is also accessible during active calls.
2
To use the redial list, do one of the following actions:
•
Scroll through and select the number you wish to redial.
•
Press
to see the second most recently dialed number, or to see the oldest call on your list.
To dial the displayed number press
, or lift the Handset, or press any line key.
Muting a Call
To mute a call, press the
button at any time to mute handset, headset or
handsfree. The speaker light will flash slowly and you can hear the caller, but they
cannot hear you. To switch mute on or off, press
.
Note: If you place a muted call on hold, the phone automatically takes the call off mute when you
reconnect to the call.
41-001134-06 Rev 00, Rel. 1.2
2-31
AastraLink Pro 160 IP Phone User Guide
Receiving Calls
Receiving Calls
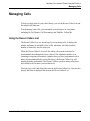
When a call is ringing at your extension, you will see the “Inbound Call”
Screen. The line/call appearance light flashes quickly for the incoming call.
Services
201- B Jones
L1
John Smith
200
Dial
Conf
Xfer
More
Answering an Incoming Call
Aastra IP Phone UI
Step
Action
1
To answer a call, do one of the following actions:
•
Lift the handset for handset operation.
•
For handsfree operation, press
•
Press
•
Press the Answer softkey (only available on large display model phones).
or the line/call appearance button for the incoming call.
for headset operation.
Note: If the phone is already connected to a call, pressing the line/call appearance button for the new
incoming call (or pressing the Answer softkey) automatically places the connected call on hold and
answers the new call. To reconnect to a party, press the line/call appearance button for that call. If
you cannot answer the call, the caller goes to voicemail (if configured).
2
2-32
To end a call, press the Nbutton or replace the handset.
41-001134-06 Rev 00, Rel. 1.2
Operating Your Aastra IP Phone Using the Phone UI
Receiving Calls
Note: The audio mode setting you have selected in the options list under Headset Settings
determines if the call goes to handsfree or headset operation. For more information, see “Setting
the Headset Microphone Volume” on page 2-77
Ignoring an Incoming Call
You can send an incoming call directly to voicemail without answering the call.
To do this, do one of the following actions:
•
Press the Ignore softkey.
•
Press Nwithout picking up the handset.
Your incoming call should go directly to voicemail. Your phone screen displays a
voicemail icon (
) along with the number of waiting messages, if you have
unheard messages (example:
x4).
41-001134-06 Rev 00, Rel. 1.2
2-33
AastraLink Pro 160 IP Phone User Guide
Handling Calls
Handling Calls
Placing a Call on Hold
Use the following procedure to place a call on hold.
Aastra IP Phone UI
Step
Action
1
Connect to the call (if not already connected).
2
Press the
key.
Services
201- B Jones
L1
John Smith
200
Dial
Conf
Xfer
More
The line/call appearance light will begin to flash slowly. After a short time the phone beeps softly to
remind you that you still have a call on hold. The screen displays “Call Held” icon, and the caller’s
name and number.
The phone will not beep to remind you that you still have a call on hold if you are connected to
another call.
To let your caller know that they are still on hold, music plays softly (if this has been set up for your
system). The call/line appearance light for the line you are on remains solid to indicate that you are
still connected.
2-34
41-001134-06 Rev 00, Rel. 1.2
Operating Your Aastra IP Phone Using the Phone UI
Handling Calls
Retrieving a Held Call
When you place a call on hold, only your phone can retrieve the call.
To reconnect to a call press the line/call appearance button where that call is being
held. If you press the call/line appearance button again, you will disconnect from
the call. If you have more than 1 call on hold, you can scroll through the held call
information by pressing (3 and 4) navigation keys.
Automatic Hold
When juggling between calls, you do not have to press the hold button to go from
one call to the next. The phone automatically puts your current call on hold as
soon as you press a new line/call appearance button. If you have more than one
call on hold, you can reconnect to a held call by pressing the line/call appearance
button where that call is being held. Press N to disconnect the call.
Transferring a Call
When you lift the handset on the phone, the Transfer (Xfer) softkey displays on
the bottom of the Idle State screen.
Services
L1
201 - B Jones
Jan 1 12: 20 am
Transfer
Softkey
41-001134-06 Rev 00, Rel. 1.2
Dial
Conf
Xfer
More
2-35
AastraLink Pro 160 IP Phone User Guide
Handling Calls
There are two ways to transfer calls using your Aastra IP phone:
•
Blind Transfer
A blind transfer is when you transfer a call directly to another extension
without consulting with the person receiving the call. To do this, simply
complete the transfer immediately after you have entered the number. The call
goes directly to the extension or outside line you transferred to. If the party
you are transferring the call to does not answer, the transferred call rings back
to your extension.
•
Consultative Transfer
You also can consult with the person you are transferring the call to, before
you complete the transfer. To do this, simply remain on the line until the
receiving party answers the call. After consulting with the receiving party, you
can either complete the transfer, or cancel, and go back to the original call.
Note: The AastraLink Pro 160 supports consultative transfer and blind transfer for calls to SIP
extensions; however, it supports only consultative transfer for calls to user groups.
Use the following procedure to transfer a call:
Aastra IP Phone UI
Step
Action
1
Connect to the call you wish to transfer (if not already connected)
2
Press the Xfer softkey.
2-36
41-001134-06 Rev 00, Rel. 1.2
Operating Your Aastra IP Phone Using the Phone UI
Handling Calls
Aastra IP Phone UI
Step
Action
3
Enter the extension number of the person to which you wish to transfer the call. In this example, Sue
Adams, extension 203.
Services
201- B Jones
L1
Sue Adams
203
Dial
Conf
Xfer
4
More
Do one of the following actions:
•
To abort the transfer, press the line/call appearance button again. This disconnects the new call,
leaving the original call on hold. To go back to the original call, press the line/call appearance
button for this call.
•
To complete the transfer, press the Xfer key again, or disconnect by placing the handset back on
hook, pressing Nor pressing the line/call appearance button for the active call.
Note: To complete a “blind” transfer, press the Xfer Key again before the phone begins dialing. To
complete a consultive transfer, remain on the line to speak with the party, before pressing the Xfer
Key again. To cancel the transfer, select Cancel on the display screen.
41-001134-06 Rev 00, Rel. 1.2
2-37
AastraLink Pro 160 IP Phone User Guide
Handling Calls
Setting Up A Conference Call
When you lift the handset on the phone, the Conference softkey displays on the
bottom of the screen.
Your IP phone system supports up to 3 parties (including yourself) in a
conference.
Creating a New Conference Call
Use the following procedure to create a conference call:
Aastra IP Phone UI
Step
Action
1
Connect to the first party you wish to include in the conference (if not already connected). In this
example, extension 202.
2
Press the Conf softkey. A new line opens.
3
Enter the extension of the person you wish to add to the conference. In this example, extension 203.
Services
201- B Jones
L1
Sue Adams
203
Dial
Conf
Xfer
4
2-38
More
Wait for the new party to answer. You can consult with the new party first before adding them to the
conference.
41-001134-06 Rev 00, Rel. 1.2
Operating Your Aastra IP Phone Using the Phone UI
Handling Calls
Aastra IP Phone UI
Step
Action
5
Do one of the following actions:
•
If you do not wish to add the new party to the conference, press the line/call appearance button
for this call. This disconnects the new party, leaving the original call on hold. To go back to the
original call, press the line/call appearance button for this call.
•
To add the new party to the conference, press the Conf key again. The Phone UI updates and
lists the extensions conferenced together (see below).
•
To drop the new party from the conference, press the Conf key one more time.
Note: You can use
to scroll through and see the numbers and names (if available) of the
parties in the conference call.
Services
L1
201- B Jones
1. 202
2. 203
6
Drop
Xfer
Conf
More
If you wish to exit the conference, disconnect by placing the handset back on-hook or by
pressingN.
Note: Your system administrator can set your conference key to speeddial a specific number.
Contact your system administrator for more information.
41-001134-06 Rev 00, Rel. 1.2
2-39
AastraLink Pro 160 IP Phone User Guide
Handling Calls
Conferencing Two Active Calls Together
Use the following procedure to conference two calls to which you are already
connected.
Aastra IP Phone UI
Step
Action
1
Begin with active calls on two different lines.
2
Press the Conf softkey. A new line opens.
3
Press the line/call appearance button of the call with which you want to conference.
4
Press the Conf key again. The two lines link into a conference call.
Note: When a name is displayed, pressing
drops the displayed party from the call.
If you initiate the conference and later drop out of the call, the conference is terminated; it does not
continue in the background for the other two parties.
Meet-Me Conferencing
This advanced feature of the AastraLink Pro enhances the current 3-way
conference available on the Aastra SIP phones. This feature provides
AastraLink-hosted ad-hoc Meet-me Conference bridges for all users.
Conference bridges are created dynamically by the AastraLink when the feature is
accessed. If the moderator is the first to connect to the bridge, he/she is prompted
to choose a PIN; otherwise, the conference begins immediately with any users
waiting on hold (with music) joined to the conference.
A virtual conference bridge is associated to every SIP extension by adding an
accessor prefix 6 to the users phone number. For example, user 200’s meet-me
bridge is at 6200. (For more information about the conferencing dial plan, see the
Aastra IP Phone Dialplan on page 2-6).
2-40
41-001134-06 Rev 00, Rel. 1.2
Operating Your Aastra IP Phone Using the Phone UI
Handling Calls
A user calling into his/her home extension conference bridge becomes moderator
automatically. If calling from another extension (or externally) the user may
authenticate his/her voicemail credentials to become moderator. More than one
moderator login is permitted in a conference; if no moderator exists (i.e. all
moderators leave the conference) the conference is terminated.
When a moderator dials into a conference from a phone other than the his/her own
phone, the number 6102 must be dialed to allow password authentication of the
moderator. (For more information about the conferencing dial plan, see the
Aastra IP Phone Dialplan on page 2-6)
The moderator can optionally configure a PIN on the conference bridge. If the
PIN is configured, users must enter this PIN before they can be joined into the
conference on the bridge
Note: Any users currently in the hold queue prior to a moderator joining will be added
automatically. To differentiate between a PIN moderated and a non-PIN moderated call, the
moderator will NOT be prompted to create a PIN for a conference if there are already users on
hold waiting. Such a conference shall be considered 'insecure'. The moderator can leave the
conference, and cause it to be terminated, before re-connecting and assigning a PIN.
41-001134-06 Rev 00, Rel. 1.2
2-41
AastraLink Pro 160 IP Phone User Guide
Handling Calls
Parking/Picking Up An Incoming Call
The Park Call/Pickup Call feature allows you to “park” a call on your IP phone,
and “pick it up” at another extension. The following is an example of using park
call/pickup call on the AastraLink Pro 160 network.
Note: In addition to the audible announcement, the Phone UI displays the extension or number of
the parked call on its screen for quick reference.
You are Caller A. Caller B calls your phone. You answer the phone and after
talking with the caller, you decide that Caller B really needs to speak with
Caller C in your office. While your call is active, you press the “Call Park”
softkey on your phone to park the call. The call automatically goes into a “Park
List” stored on the AastraLink, allowing all phones in the same network to see the
parked call in the Park List. Caller C can then goes to the “Park List” on his
phone, scrolls to Caller B’s parked call, and presses the “Retrieve” softkey to
pickup the call.
Caller A
Caller B calls Caller A
Caller B
Caller A parks the call
and calls Caller C to
pickup the call
Caller C
Caller C views the Park List
and selects the parked call.
Services
1. Voicemail
2. Directory
3. Call List
4. Call Settings
5. Relay
6. Pickup Call
7. Park List
8. Operator
2-42
41-001134-06 Rev 00, Rel. 1.2
Operating Your Aastra IP Phone Using the Phone UI
Handling Calls
Use the following procedure to park an incoming call.
Aastra IP Phone UI
Step
Action
1
When you receive an incoming call, press the “Park Call” softkey.
The server announces the extension number (for example, 6701) where the call is parked.
2
Press
N key (or Goodbye on model 9480i phones) to park the call.
The parked call party will get music on hold.
3
To pick up a parked call on another extension, pickup the handset on the phone.
4
Perform one of the following:
•
Enter the extension number where the call was parked (for example (6701) and press the Pickup
softkey.
•
Select Options->Services->Pickup Call, select the call you want to retrieve from the list of
parked calls, then press the Retrieve softkey.
Note: If you leave a parked call unattended for more than 45 seconds, your IP phone starts to ring to
remind you to pick up the call. Your administrator configures the time limit for a parked call.
Picking Up Calls
To pick up a call, do one of the following actions:
•
Press the line/call appearance button for the incoming call.
If the phone is connected to a call, pressing one of the line/call appearance
buttons will automatically place this call on hold before opening up a new line
for the new call
•
Press the Nbutton if you do not wish to pick up a call.
41-001134-06 Rev 00, Rel. 1.2
2-43
AastraLink Pro 160 IP Phone User Guide
Handling Calls
Sending an Incoming Call Directly to Voicemail
To send an incoming call directly to voicemail without answering the call, do one
of the following actions:
•
•
Press the Ignore softkey.
Pressing “Ignore” sends the call to voicemail, or to a call-forward-busy
destination, if this feature is enabled.
Press Nwithout picking up the handset.
Ending Calls
To end a call, do one of the following actions:
•
Press Nor the line/call appearance button of the active call.
•
If connected through the handset, place the handset back on hook.
If your caller is on hold, you first need to reconnect to the call to end it.
2-44
41-001134-06 Rev 00, Rel. 1.2
Operating Your Aastra IP Phone Using the Phone UI
Managing Calls
Managing Calls
To help you keep track of your caller history, you use the Recent Callers List and
the missed calls indicator.
To help manage your calls, you can enable several features on your phone,
including Do Not Disturb, Call Forwarding, and Find-Me, Follow Me.
Using the Recent Callers List
The Recent Callers List is a stored log of your incoming calls. It displays the
number and name (if available) of the caller, when they last called, and the
number of times they tried to reach you.
When the Recent Callers List is full, the oldest call records are deleted to
accommodate the information of new callers. If the telephone number of an
incoming or outgoing call matches a number that you have programmed with a
name (in a programmable key or the Directory), the Recent Callers List will
display the name and number. The Phone UI shows you how many callers have
been added to the list since you last checked it.
You can view, scroll, and delete line items in the Recent Callers List. You can also
directly dial from a displayed line item in the Recent Callers List.
41-001134-06 Rev 00, Rel. 1.2
2-45
AastraLink Pro 160 IP Phone User Guide
Managing Calls
Use the following procedure to access the Recent Callers List.
Aastra IP Phone UI
Step
Action
1
Press the Services softkey, and then select Call List.
or
Press the Options key, then select Services->Call List.
2
Use the
to scroll through the list to select Recent Calls, then press Select.
The Phone UI displays the recent calls list.
Note: To the left of a line item, a
outgoing.
3
4
indicates the call was incoming, a
indicates the call was
Do one of the following actions:
•
To return a call, first select the call from the list, then pick up the handset, press the handsfree
button, or press a line key.
•
To delete an individual call from the list, select the call, then press Delete.
•
To view information (name, date, duration) about the call, press View.
•
To save a phone number to your personal directory, select the call, then press Save.
Press Exit to exit the Recent Calls screen.
Using the Missed Calls Indicator
Your IP phone tracks the number of calls that have not been answered, and
displays the information on the Idle State screen as “<number> Missed Calls”.
For example, the Idle State Screen below shows two missed calls.
The phone numbers associated with the missed calls are stored in the Callers List.
Once you access the Callers List, the “<number> Missed Calls” on the idle screen
is cleared.
2-46
41-001134-06 Rev 00, Rel. 1.2
Operating Your Aastra IP Phone Using the Phone UI
Managing Calls
Services
L1
201 - B Jones
Insert graphic here
Missed Calls
Indicator
2 Missed Calls
Jan 1 12: 20 am
Dial
Conf
Xfer
More
Monitoring Calls Using Busy Lamp Field (BLF)
The BLF feature allows you to use your IP phone to monitor another IP phone
extension for state changes (busy or idle). To use the BLF feature, you configure a
BLF softkey on your phone, and specify the name and extension of the person you
want to monitor.
For example, suppose a Supervisor wants to keep track of how often Bob Jones is
on the phone. The Supervisor configures a BLF softkey to monitor Bob’s
extension. Whenever Bob picks up his phone, a “busy” indicator appears on the
Supervisor’s phone. When Bob ends the call, an “idle” indicator appears.
If your IP phone is already configured with a BLF softkey, then you can tell
whenever the extension is “busy” or “idle” as follows:
•
On the 6755i, 6757i, and 6757i CT, the “busy” and “idle” indicators are icons
that appear next to the BLF softkey. When the extension you are monitoring is
“busy,” a small telephone icon appears with the handset off-hook. When the
extension is “idle,” an icon with the handset on-hook appears.
•
On the 9143i and 6753i, the LED light next to each BLF softkey illuminate
when the extension you are monitoring is “busy”. The LED goes off when the
line is “idle.”
For instructions on configuring a BLF softkey for your phone, see “Configuring
SoftKeys For Your IP Phone”on page 3-32.
41-001134-06 Rev 00, Rel. 1.2
2-47
AastraLink Pro 160 IP Phone User Guide
Managing Calls
Intercepting Calls Using Directed Call Pickup
You can use your IP phone intercept an incoming call to another extension using
the Directed Call Pickup feature. That is, when an incoming call is placed to an
extension you are monitoring, you can intercept the call in one of three ways:
•
Dial *76, followed by the extension you are monitoring. You are connected to
the incoming call.
•
Press the DCP softkey, if one is configured on the IP phone. Then, select from
the list of ringing numbers, and press Pickup. You are connected to the
incoming call.
•
Access the Services menu, and select the Pickup Call option. Then, select
from the list of ringing numbers, and press Pickup. You are connected to the
incoming call.
For example, suppose an Operator wants to monitor and intercept any incoming
calls to John Smith’s extension (200). When an incoming call is received, the
Operator can use Directed Call Pickup to intercept the call in one of three ways:
•
Press *76200 (*76 + John Smith’s extension, which is 200), or
•
Press the DCP softkey on the Operator phone, select extension 200 from the
list of ringing extensions, and then press Pickup.
•
Access the Select menu and choose Pickup Call option, select extension 200
from the list of ringing extensions, and then press Pickup.
If the Operator chooses to use the DCP softkey or Service menu to intercept the
call, the Operator phone UI will display the following menu, showing the current
ringing calls. In this case, the Operator then chooses extension 200 from the list,
and is connected to the incoming call.
2-48
41-001134-06 Rev 00, Rel. 1.2
Operating Your Aastra IP Phone Using the Phone UI
Managing Calls
Select which
call to intercept
Services
Ringing Extensions
1. 200
2. 204
3. 210
Pickup
Exit
Press “Pickup”
to intercept
the call
Enabling Do Not Disturb
Do Not Disturb (DND) is disabled by default. If you enable DND on your Aastra
IP phone, then when a call comes in on any line, the caller is directed to your
voicemail. The second line on the screen of the IP phone shows when DND is set.
If the phone shares a line with other phones, only the phone that has DND
configured is affected.
To enable/disable DND on your IP phone, do one of the following actions:
•
Use your IP phone key pad and enter *78 to enable DND. To disable DND,
enter *78 again.
•
Press the DND softkey to enable DND. To disable DND, press the DND
softkey again.
41-001134-06 Rev 00, Rel. 1.2
2-49
AastraLink Pro 160 IP Phone User Guide
Managing Calls
Enabling Call Forwarding
Call Forwarding is disabled by default. If you enable call forwarding on your
Aastra IP phone, then incoming calls are handled according to the rules that you
specify, and forwarded to another number.
Use the following procedure to enable/disable Call Forwarding on your IP phone.
Aastra IP Phone UI
Step
Action
1
Press the Services softkey, then select Call Settings->Call Forwarding.
or
Press the CFWD softkey.
or
Press the Options key, then select Services->Call Settings->Call Forwarding.
2
Choose one of the following options, and press Select:
•
All Calls- Your IP phone immediately forwards all incoming calls to the specified destination.
•
Busy - Your IP Phone forwards incoming calls if all phone lines are busy (there are no available
free lines).
•
No Answer - Your IP Phone forwards incoming calls if there is no answer.
•
Disable - Call Forwarding is disabled on your IP phone.
3
Specify a destination phone number or extension where received calls are forwarded, then press
Enter.
4
Press Back to save your changes and return to the Call Forward menu. To configure other call
forwarding rules, repeat steps 2-4.
5
To disable Call Forwarding, press the Forward softkey. Then select Disable, and press Select.
All call forwarding is disabled.
2-50
41-001134-06 Rev 00, Rel. 1.2
Operating Your Aastra IP Phone Using the Phone UI
Managing Calls
Enabling Find-Me, Follow-Me
Find-Me, Follow-Me (FMFM) is disabled by default. If you enable Find-Me
Follow-Me on your Aastra IP phone, then incoming calls “follow you” to the
phone numbers you specify.
For example, you can configure your phone so that when an incoming call is
received, both your work phone and your cell phone ring at the same time.
In order to facilitate FMFM, the AastraLink Pro 160 implements a voice-path
detection feature. This feature allows the AastraLink to determine the state of an
answered call by detecting voice signals — something that sounds like human
speech— over the phone line, and then process the call accordingly.
When you answer a call and say “hello,” the AastraLink recognizes that someone
has answered the call, and considers the call “connected.” Once a call is
connected, the AastraLink avoids going to the next FMFM stage. Instead, it
cancels an alternate call (if operating in parallel mode) or does not call a
secondary phone (if operating in sequential mode).
For example, suppose you enable FMFM, operating in parallel mode, on the IP
phone in your office. You specify your office IP phone as the primary phone, and
your cell phone as the secondary phone. If you answer a call and begin speaking
into your cell phone, the AastraLink processes the voice signal and determines
that the call is connected. Your office IP phone stops ringing, because FMFM has
detected that your cell phone has been answered. Therefore, if you answer the
phone without speaking, and/or “mute” the call, the AastraLink may not process
FMFM calls correctly. If the AastraLink cannot determine that a call is connected,
the FMFM 30-second timer continues to run. Then, when the timer expires,
FMFM progresses to the next stage (i.e., in sequential mode, the secondary phone
rings, and the call to the primary phone is terminated.)
41-001134-06 Rev 00, Rel. 1.2
2-51
AastraLink Pro 160 IP Phone User Guide
Managing Calls
Use the following procedure to enable/disable Find-Me Follow-Me on your
phone.
Aastra IP Phone UI
Step
Action
1
Press the Services softkey, then select Call Settings->FindMe FollowMe.
or
Press the Options key, then select Services->Call Settings->FindMe FollowMe.
2
Select Mode, then press Select.
3
Set the Mode field to one of the following options, then press Select:
•
Parallel - The Primary and Secondary phones ring simultaneously.
•
Sequential - The Primary phone rings first. If you do not answer the call, then the Secondary
phone rings.
•
Disable - Disables Find-Me Follow-Me.
Note: You have 30 seconds to answer a call on your primary phone. If you do not answer the call
within this time, Find-Me Follow-Me progresses to the next stage (i.e., your secondary phone rings).
4
Press Continue to return to the Find-Me Follow-Me screen.
5
To specify your primary phone number, select Primary, then press Select. (If you set the Mode
parameter to sequential, the Primary number you specify here rings first.)
6
Do one of the following actions:
7
2-52
•
To use your current phone number (listed in the corporate directory) select Use My Info and
press Select. Press Select again to confirm your choice.
•
To specify a different number, select Enter Number, then use the Backspace key to erase the
current number. Enter a new number and press Enter.
To specify your secondary phone number, select Secondary, then press Select.
41-001134-06 Rev 00, Rel. 1.2
Operating Your Aastra IP Phone Using the Phone UI
Managing Calls
Aastra IP Phone UI
Step
Action
8
Do one of the following actions:
9
•
To use your current phone number (listed in the corporate directory) select Use My Info and
press Select. Press Select again to confirm your choice.
•
To specify a different number, select Enter Number, then use the Backspace key to erase the
current number. Enter a new number and press Enter.
To disable Find-Me Follow Me, do the following actions:
•
press the Services softkey.
•
Select Call Settings, then press Select.
•
Select Find-Me, Follow-Me, then press Select.
•
Select Mode, then press Select.
•
Select Disable, then press Select.
•
Press Continue to save your changes and return to the Services menu.
41-001134-06 Rev 00, Rel. 1.2
2-53
AastraLink Pro 160 IP Phone User Guide
Managing Your Voicemail
Managing Your Voicemail
To connect to the AastraLink voicemail system, use your Aastra IP phone and any
one of the following methods:
•
Press the Vmail softkey
•
Press the Services key, then select the Voicemail option.
•
Press the Options key, then select Services->Voicemail.
Once you access your voicemail account, you can use your Aastra IP phone to
retrieve and manage your voicemail messages (listen to, save, delete, forward,
return a call, etc.) The table on page 2-55 describes the voicemail options that are
available. To access an option, press the corresponding number on your IP phone
keypad.
If you wish, you can also configure a custom greeting for your voicemail account,
and specify various voicemail options. See “Recording A Custom Voicemail
Greeting” on page 2-61 for instructions. For voicemail options, you can specify
the number of rings a caller hears before being directed to the voicemail server, or
specify an extension where incoming calls escape. See “Configuring Voicemail
Options” on page 2-62 for more information.
Note: The AastraLink allows incoming calls to go directly to your voicemail if required, without
the call ringing on the phone. When a call is transferred to voicemail, the caller hears the
"unavailable message", and the callee hears no ring splash.
To transfer a call directly to voicemail, you enter the prefix of ** before the dialed number from
local extensions (for example, **4545). This routes the inbound call to the voicemail prompt of the
users mailbox rather than to the users phone.
2-54
41-001134-06 Rev 00, Rel. 1.2
Operating Your Aastra IP Phone Using the Phone UI
Managing Your Voicemail
Table 2-1.
AastraLink Pro 160 Voicemail Options
•
1 Read voicemail messages
•
1 Play this message
•
* Rewind 3 seconds
•
0 Pause
•
# Skip forward 3 seconds
•
3 Advanced options
•
1 Reply
•
3 Envelope
•
5 Send Message (disabled in rel 1.0)
•
4 Play previous message
•
5 Repeat current message
•
6 Play next message
•
7 Delete/Undelete current message
•
8 Forward message to another mailbox (disabled in
rel 1.0)
•
9 Save message in a folder
•
0 new Messages
•
1 old Messages
•
# cancel
•
* Help
•
# Exit
•
2 Change folders
•
0 Switch to new Messages
•
1 Switch to old Messages
•
# cancel
3 Advanced Options
•
5 Send Message (disabled in rel 1.0)
0 Mailbox options
•
1 Record your unavailable message
•
2 Record your busy message
•
3 Record your name
•
4 Record your temporary message
•
5 Change your password
•
* Return to the main menu
* Help
# Exit voicemail
•
•
•
•
41-001134-06 Rev 00, Rel. 1.2
2-55
AastraLink Pro 160 IP Phone User Guide
Managing Your Voicemail
Checking For New Messages
If you have voicemail, your phone screen displays a voicemail icon, along with
the number of waiting messages, if you have unheard messages (see below).
Services
L1
201 - B Jones
2 Missed Calls
Jan 1 12:18am
2
Shows number
of new voicemail
messages
DND
Forward
Directory
Vmail
Park Call
More
User Groups
A user group is a set of IP phone users whose phones ring at the same time. If you
are part of a user group, then when your group receives a message, your IP phone
UI displays a message showing that a new voicemail message has been received.
Each user group is assigned a specific extension by your administrator, for
example: 300. Your administrator can also set a specific ring tone and number of
rings before transfer on user group phones. When a caller dials this extension, all
IP phones that are members of the group ring simultaneously.
Services
201 - B Jones
L1
65300 : 1 New Msg(s)
Jan 1 12:18am
Shows 1 new
voicemail message
for user gorup “300”
2-56
DND
Forward
Directory
Vmail
Park Call
More
41-001134-06 Rev 00, Rel. 1.2
Operating Your Aastra IP Phone Using the Phone UI
Managing Your Voicemail
Operators
If you are an Operator, then when you receive a new message for the office (that
is, a message intended for the Operator, rather than your personal voicemail
account), your IP phone UI displays a message that a new “Operator” voicemail
message has been received.
Services
L1
200 - J Smith
1 New Operator Msg(s)
Jan 1 12:18am
Shows 1 new
message for
the Operator
41-001134-06 Rev 00, Rel. 1.2
DND
Forward
Directory
Vmail
Park Call
More
2-57
AastraLink Pro 160 IP Phone User Guide
Managing Your Voicemail
Accessing Messages Using “Visual Voicemail”
This section describes how to access your voicemail messages using “Visual
Voicemail” — that is, by pressing the Vmail softkey, or pressing the Services key,
or by pressing the Options key and selecting Services->Voicemail on your IP
phone.
When you use Visual Voicemail, your IP phone UI displays new messages
received, as well as information (name/extension) about the caller. You then use
the various menu options to listen to, and manage, voicemail messages.
Use the following procedure to access voicemail messages using Visual
Voicemail.
Aastra IP Phone UI
Step
Action
1
Press the Vmail softkey.
or
Press Services softkey, then select Voicemail.
or
Press Options, then select Services->Voicemail.
2
If your phone is the Operator phone, or is a User Group, you must select the voice mailbox to access.
For single extension lines, the default mailbox is selected automatically.
3
Enter your voicemail password, then press <Enter>.
4
Select a voicemail message from the voicemail message list.
2-58
41-001134-06 Rev 00, Rel. 1.2
Operating Your Aastra IP Phone Using the Phone UI
Managing Your Voicemail
Aastra IP Phone UI
Step
Action
5
You can select any of the following softkeys and follow the prompts that display for each message:
6
•
Delete - Delete selected voicemail.
•
Options - Displays a list of options for configuring your voicemail (number of rings, escape to
extension, set greetings, set password). The Greetings option allows you to announce your name
with a pre-recorded greeting. You can also record a standard custom greeting for any of the
following - Unavailable Greeting, Busy Greeting, Temporary Greeting). To record a custom
greeting, see “Recording A Custom Voicemail Greeting” on page 61.
•
Details - Show caller ID, duration, and time call was received.
•
Call Back - Dial extension or number of caller.
•
Play - Play voicemail message.
•
Exit - Exit voicemail screen.
•
Forward - Forward voicemail to another extension.
•
Save - Save voicemail.
•
Old Vmail - Access old voicemail messages.
•
New Vmail - Access new voicemail messages.
Press Exit to exit the voicemail screen.
41-001134-06 Rev 00, Rel. 1.2
2-59
AastraLink Pro 160 IP Phone User Guide
Managing Your Voicemail
Accessing Voicemail Remotely
The AastraLink Pro allows a remote caller to retrieve their voicemail messages by
pressing the * key during the voicemail announcement.
Aastra IP Phone UI
Step
Action
1
From a remote phone, dial the extension of your phone at a another location.
Alternatively: Dial the main IVR of the AastraLink Pro and enter extension 6101 at the prompt for
number to dial.
2
When your voicemail greeting is heard, press the “*” key.
Note: Pressing 0 (zero) during a user's voicemail greeting brings the caller to the Operator extension,
or if configured, the users Escape Extension.
3
Enter your voicemail User ID and Password at the appropriate prompts.
4
Once in voicemail, you can listen to your messages as required.
2-60
41-001134-06 Rev 00, Rel. 1.2
Operating Your Aastra IP Phone Using the Phone UI
Managing Your Voicemail
Recording A Custom Voicemail Greeting
When a caller reaches your voicemail, the caller hears a greeting, as well as
instructions for leaving a voicemail message.
If you wish, you can record your name to be played during the standard greeting,
or record a custom greeting for your voicemail account, using the procedure
described below.
Aastra IP Phone UI
Step
Action
1
Press the Vmail softkey.
or
Press Services softkey, then select Voicemail.
or
Press Options, then select Services->Voicemail.
2
If your phone is the Operator phone, or is a User Group, you must select the voice mailbox to access.
For single extension lines, the default mailbox is selected automatically.
3
Enter your voicemail password, then press #.
4
Press 0, to enter the Advanced Options menu.
If required, refer to Table 2-1 “AastraLink Pro 160 Voicemail Options” on page 2-55.
5
Choose one of the following options, then follow the prompts, as required:
6
•
Press 1 to record a custom greeting for when you are unavailable.
•
Press 2 to record a custom greeting for when you are busy.
•
Press 3 to record your name used for the standard greeting.
•
Press 4 to record a temporary greeting.
When you are finished, hang up, or press * to return to the main menu.
41-001134-06 Rev 00, Rel. 1.2
2-61
AastraLink Pro 160 IP Phone User Guide
Managing Your Voicemail
Configuring Voicemail Options
The AastraLink voicemail system allows you to configure options for your
voicemail account. You can specify the number of rings a caller hears before
being directed to the voicemail server. You can also specify an extension where
incoming calls “escape.” You may choose to include instructions for using the
“escape” option in your custom greeting. For example, you could state “ If your
call is urgent, then to transfer to my cell phone, press *.” Voicemail options also
allow you to record custom greetings and change your voicemail password.
Use the following procedure to configure voicemail options on your IP phone.
Aastra IP Phone UI
Step
Action
1
Press the Vmail softkey.
or
Press Services softkey, then select Voicemail.
or
Press Options, then select Services->Voicemail.
2
If your phone is the Operator phone, or is a User Group, you must select the voice mailbox to access.
For single extension lines, the default mailbox is selected automatically.
3
Enter your voicemail password, then press Enter.
4
Press the Options softkey. The screen displays the following options:
Vmail Options
1. Number of Rings
2. Escape to Extension
3. Greetings
4. Password
2-62
41-001134-06 Rev 00, Rel. 1.2
Operating Your Aastra IP Phone Using the Phone UI
Managing Your Voicemail
Aastra IP Phone UI
Step
Action
Configuring Number of Rings
5
Select Number of Rings, then press Select.
6
In the “No of Rings” field, enter the number of rings you want your phone to ring before sending a
call to voicemail, and then press Enter. Vaid values are 1 through 10. Default is 5.
7
Press Back to save your changes and return to the Vmail Options screen.
Configuring Escape to Extension
8
Select Escape to Extension, then press Select.
9
In the “Extension” field, enter a valid extension where the caller is transferred, and then press Enter.
The “Extension” can also be an external number such as your cellphone, if appropriate dialplan
prefix digits are included.
When there is no answer at your phone, and the caller is directed to your voicemail, the caller can
press * to escape voicemail and be automatically transferred to that extension.”
Note: The “Escape to Extension” feature is triggered when an incoming caller is directed to your
voicemail, then “escapes” by pressing the * key.
10
Press Back to save your changes and return to the Vmail Options screen.
Recording/Deleting a Greeting
11
Select Greetings, then press Select.
The following options display:
Greetings
1. Name
2. Unavailable Greeting
3. Busy Greeting
4. Temporary Greeting
41-001134-06 Rev 00, Rel. 1.2
2-63
AastraLink Pro 160 IP Phone User Guide
Managing Your Voicemail
Aastra IP Phone UI
Step
Action
12
To record a greeting, choose an option from the Greetings menu, and press Record.
•
Select Name to record your name used for the standard greeting.
•
Select Unavailable Greeting to record a custom greeting for when you are unavailable.
•
Select Busy Greeting to record a custom greeting for when you are busy.
•
Select Temporary Greeting to record a temporary greeting.
Press Done to save the greeting.
13
To delete a greeting, choose an option from the Greetings menu, and press Delete.
A prompt displays asking you to verify that you want to delete the selected greeting.
14
Press Yes. The greeting you selected is deleted. You can then record another greeting if required by
going back to step 12.
Setting a Password
15
Select Password, then press Select.
16
In the “Password” field, enter a password that you want to use to access your voicemail mailbox,
then press Enter. Valid values are alphanumeric characters. Use the Backspace key if required.
17
Press Back to save your changes and return to the Vmail Options screen.
18
When you are finished, hang up, or press * to return to the main menu.
2-64
41-001134-06 Rev 00, Rel. 1.2
Operating Your Aastra IP Phone Using the Phone UI
Using IP Phone Directories
Using IP Phone Directories
Phone directories contain the names and phone numbers of your contacts. Your IP
phone provides access to two directories:
•
Personal - lists the name and phone numbers of the contacts that you specify.
•
Corporate - dynamically lists the names, extensions, and phone numbers of
all Aastra IP phone users in your network, as well as any contacts that your
administrator manually specifies.
You can search for a contact from either directory. You can edit (add, delete,
change, or move entries) from your personal directory only.
Adding a Contact
Use the following procedure to add a contact to your personal directory.
Aastra IP Phone UI
Step
Action
1
Press the Dir softkey
or
Press the Services key, then select Directory.
or
Press the Options key, then select Services->Directory.
2
Use the arrow keys to select your Personal directory, then press Select.
3
Press the Add softkey.
4
Enter the name of the contact, then press Enter.
5
Use the arrow keys to select which contact number (work, home or cell) you are specifying, then
press Enter.
6
Enter the phone number, then press Enter.
The Phone UI confirms the new entry you just added.
41-001134-06 Rev 00, Rel. 1.2
2-65
AastraLink Pro 160 IP Phone User Guide
Using IP Phone Directories
Aastra IP Phone UI
Step
Action
7
Press Continue.
8
To exit the screen, press Back.
Deleting a Contact
Use the following procedure to delete a contact from your personal directory.
Aastra IP Phone UI
Step
Action
1
Press the Dir softkey
or
Press the Services key, then select Directory.
or
Press the Options key, then select Services->Directory.
2
Use the arrow keys to select your Personal directory, then press Select.
3
Use the arrow keys to select the name of the contact you want to delete, then press Delete.
4
Press the More softkey.
5
Select Yes to confirm your action, then press Select.
The contact is deleted.
6
2-66
Press Continue to return to the personal directory list.
41-001134-06 Rev 00, Rel. 1.2
Operating Your Aastra IP Phone Using the Phone UI
Using IP Phone Directories
Searching for a Contact
Use the following procedure to search for a contact in either your personal, or the
corporate, directory.
Aastra IP Phone UI
Step
Action
1
Press the Dir softkey
or
Press the Services key, then select Directory.
or
Press the Options key, then select Services->Directory.
2
Use the arrow keys to select your Personal or Corporate directory, then press Select.
3
Press Search.
4
Enter the name of the contact you are searching for, then press Enter.
The phone UI lists all contacts that match the name you entered.
Note: To perform a quick search, enter the first letter (s) of the contact’s name, then press Enter. The
phone UI lists all of the names that match your entry. You can then select a contact from the list.
5
Do one of the following actions:
•
Select the name from the list, then press Dial.
•
To view information about a contact, select a name from the list, then press View.
•
To exit the search results screen, press Back.
41-001134-06 Rev 00, Rel. 1.2
2-67
AastraLink Pro 160 IP Phone User Guide
Using IP Phone Directories
Dialing From A Directory
Use the following procedure to dial a contact listed in a directory.
Aastra IP Phone UI
Step
Action
1
Press the Dir softkey
or
Press the Services key, then select Directory.
or
Press the Options key, then select Services->Directory.
2
Use the arrow keys to select Personal or Corporate directory, then press Select.
3
Use the arrow keys to select a contact from the list, then press Dial.
You can also search for a contact by name, then dial directly from the search results list.
2-68
41-001134-06 Rev 00, Rel. 1.2
Operating Your Aastra IP Phone Using the Phone UI
Enabling/Disabling Operator Schedule (if Operator enabled on the phone)
Enabling/Disabling Operator Schedule (if Operator
enabled on the phone)
If your administrator has enabled your phone for an Operator, the following
Operator features are available from your IP Phone UI:
•
Duty Status - Allows you to enable (turn ON) or disable (turn OFF) whether
or not someone is available to answer the phone.
•
Schedule Override - Allows you to set the Office to “Open” or “Closed”.
This feature sets the Operator phone to use either the “Open” schedule and
greetings, or use the “Closed” schedule and greetings, both of which are set
up by your administrator.
Only your administrator can establish/change the following features for an
Operator:
•
day/time schedules
•
holiday schedule
•
open/closed greetings
•
main menu greetings
•
custom key message greetings
•
language greetings
Contact your system administrator for more information about these features.
41-001134-06 Rev 00, Rel. 1.2
2-69
AastraLink Pro 160 IP Phone User Guide
Enabling/Disabling Operator Schedule (if Operator enabled on the phone)
Setting Duty Status
Use the following procedure to set duty status on your Operator phone.
Aastra IP Phone UI
Step
Action
1
Press
2
Select Services, then select Operator.
3
Select Duty Status and press <Select>.
If operator duty was previously ON, the duty status is now turned OFF.
If operator duty was previously OFF, the duty status is now turned ON.
to enter the Options list.
The following is an example of the message that displays:
“The Operator is now off duty.”
4
Press Done to save the change.
Setting Schedule Override
Use the following procedure to set Schedule Override on your Operator phone.
Aastra IP Phone UI
Step
Action
1
Press
2
Select Services, then select Operator.
2-70
to enter the Options list.
41-001134-06 Rev 00, Rel. 1.2
Operating Your Aastra IP Phone Using the Phone UI
Enabling/Disabling Operator Schedule (if Operator enabled on the phone)
Aastra IP Phone UI
Step
Action
3
Select Schedule Override and press <Select>.
If Schedule Override was previously set to Open, the Schedule Override is now set to Closed.
If Schedule Override was previously set to Closed, the Schedule Override is now set to Open.
The following is an example of the message that displays:
“The office is now open.”
4
Press Done to save the change.
41-001134-06 Rev 00, Rel. 1.2
2-71
AastraLink Pro 160 IP Phone User Guide
Specifying IP Phone Preferences
Specifying IP Phone Preferences
You can set the following preferences via the IP Phone UI:
•
Display - Allows you to set the contrast level and backlight on the phone.
(Backlight is applicable to specific models only)
•
Set Audio - Allows you to set the audio mode and headset microphone
volume on the phone.
Setting Display
The following paragraphs provide procedures for setting display features on your
phone.
Changing the Contrast Level
The "Contrast Level" option on the IP phone allows you to set the amount of
light that illuminates the LCD display.
Use the following procedure to change the contrast level (brighter to darker) on
your IP Phone UI.
Aastra IP Phone UI
Step
Action
1
Press
2
Select Preferences, then press Select.
3
Select Display, then press Select.
4
Select Contrast Level, then press Select.
5
Use
2-72
to enter the Options list.
to increase or decrease the contrast setting level (1-8), then press Done.
41-001134-06 Rev 00, Rel. 1.2
Operating Your Aastra IP Phone Using the Phone UI
Specifying IP Phone Preferences
Changing the Backlight (for models that support backlight)
The "Backlight" option on the IP phone allows you to set the backlight status on
the LCD display to the following:
•
Off - Backlight is always OFF.
•
Auto (Default)- Automatically turns ON the backlight when the phone is in
use, and then automatically turns OFF the backlight when the phone is idle
after a specified length of time.
Auto backlighting sets the phone to turn off the backlighting after a period of
inactivity; the idle period is user definable under the Advanced softkey when you
select the Auto mode. In Auto mode, the backlight turns on with a key press or
state change on the phone.
Use the following procedure to set the backlight on your IP Phone.
Aastra IP Phone UI
Step
Action
1
Press
2
Select Preferences, then press Select.
3
Select Display, then press Select.
4
Select Backlight, then press Select.
5
Use
to enter the Options list.
to navigation buttons to select the Backlight status for your phone. Default is "Auto".
Available options are:
6
•
Off
•
Auto (Default)
If you select “Off”, press Done.
If you select “Auto”, press the Advanced softkey and go to step 7.
41-001134-06 Rev 00, Rel. 1.2
2-73
AastraLink Pro 160 IP Phone User Guide
Specifying IP Phone Preferences
Aastra IP Phone UI
Step
Action
7
Using the keypad, enter the amount of seconds you want the phone to stay backlit when the phone is
idle. Valid values are 1 to 7200 seconds (2 hours). Default is 10 seconds. When this period of time is
reached, the phone turns OFF the backlight. Use the "Backspace" and/or "Clear" softkeys to delete
entries if required
8
Press Done to save your changes.
2-74
41-001134-06 Rev 00, Rel. 1.2
Operating Your Aastra IP Phone Using the Phone UI
Specifying IP Phone Preferences
Setting Audio (not available on 6751i)
The Set Audio option on the IP Phone allows you to set the audio mode for your
IP phone. It also allows you to set the volume level of the headset microphone.
The following paragraphs provide procedures for setting audio features on your
phone.
Setting Audio Mode (not available on 6751i)
Your IP phone allows you to use a handset, a headset, or handsfree (speaker
phone) to handle incoming and outgoing calls. You can use the Audio Mode
setting to combine different options in order to provide maximum flexibility when
handling calls.
You can choose from four Audio Modes:
Audio Mode
Description
Speaker
Allows you to switch between using the handset and the handsfree speaker phone.
This is the default setting.
If you specify Speaker mode for your IP phone:
Headset
•
Press
to use the speakerphone.
•
Lift the handset to switch back to using the handset.
Allows you to switch between using a handset and a headset.
If you specify Headset mode for your IP phone:
•
Press
•
Lift the handset to switch back to using the handset.
41-001134-06 Rev 00, Rel. 1.2
to use the headset.
2-75
AastraLink Pro 160 IP Phone User Guide
Specifying IP Phone Preferences
Audio Mode
Description
Speaker/Headset
Allows you to switch between using the speaker phone and a headset. By default,
calls are sent to the speaker phone first.
If you specify Speaker/Headset mode for your IP phone:
Headset/Speaker
•
Press
switch from the speakerphone to the headset. Press
to switch back to speakerphone.
•
Lift the handset to switch back to using the handset.
again
Allows you to switch between using the headset and the handsfree speaker phone.
By default, calls are sent to the headset first.
If you specify Headset/Speaker mode for your IP phone:
•
Press
switch from the headset to the speakerphone. Press
to switch back to headset.
•
Lift the handset to switch back to using the handset.
again
Use the following procedure to select an audio mode on your phone.
Aastra IP Phone UI
Step
Action
1
Press
2
Select Preferences, then press Select.
3
Select Set Audio, then press Select.
4
Select Audio Mode, then press Select.
5
Select the audio mode you want to use on your phone. Default is Speaker. Valid values are:
6
2-76
to enter the Options list.
•
Speaker (default)
•
Headset
•
Speaker/Headset
•
Headset/Speaker
Press Done to save your setting.
41-001134-06 Rev 00, Rel. 1.2
Operating Your Aastra IP Phone Using the Phone UI
Specifying IP Phone Preferences
Setting the Headset Microphone Volume
Your IP Phone accepts headsets through the modular RJ22 jack on the back of the
phone. Contact your telephone equipment retailer or distributor to purchase a
compatible headset.
Note: Customers should read and observe all safety recommendations contained in headset
operating guides when using any headset.
Changing Headset Microphone Volume
Use the following procedure to change the headset microphone volume.
Aastra IP Phone UI
Step
Action
1
Press
2
Select Preferences and then press Select.
3
Select Set Audio, then press Select.
4
Select Headset Mic Volume, then press Select.
5
Select a Volume level (High, Medium, or Low), then press Done.
6
Press Done to save changes and return to the idle screen.
to enter the Options list.
41-001134-06 Rev 00, Rel. 1.2
2-77
AastraLink Pro 160 IP Phone User Guide
Specifying IP Phone Preferences
Changing the Handset Pairing (CT models only)
All handsets must be paired to a CT base before it can be used (i.e, 57i CT handset
pairs to a 57i CT base; 9480i CT handset pairs to a 9480i CT base). This is
performed from both the base and the cordless handset. Successful pairing adds
the handset name to the handset list on the base and synchronizes the handset list
from the base to the newly paired handset. A total of 4 handsets can be paired to a
single CT base.
Note: When performing the handset pairing, it is recommended that the handset be within 3 feet of
the CT base.
Use the following procedure to change the handset pairing for your IP phone.
Aastra IP Phone UI
Step
Action
1
Press
2
Select Preferences, then press Select.
3
Select Handset Paring, then press Select.
4
Select one following options:
5
2-78
to enter the Options list.
—
To pair your CT cordless handset with the CT base station, select Pair, then press Change. On
the handset, press the <Down Arrow> key to navigate to Handset pairing, then press Select.
When the handset pairs to the CT phone base, the phone UI displays a message that states
“Pairing Successful.”
—
To remove a handset pairing, select Remove, then press Change.
Press Done to exit the screen and save your changes.
41-001134-06 Rev 00, Rel. 1.2
Operating Your Aastra IP Phone Using the Phone UI
Viewing IP Phone and AastraLink System Information
Viewing IP Phone and AastraLink System
Information
Viewing AastraLink Information
Use the following procedure to view the networking information assigned to the
AastraLink Pro 160 device on your network.
Aastra IP Phone UI
Step
Action
1
Press
2
Select Phone Status, then press Select.
3
Select AastraLink Info, then press Select.
4
Use the arrow keys to view the following information:
to enter the Options list.
— Phone Number = Extension assigned to your IP Phone
— Server Local IP = IP Address assigned to the AastraLink Pro 160
— Server Remote IP = Remote IP Address assigned to the AastraLink Pro 160
5
Press Done to exit the screen and return to the idle menu.
41-001134-06 Rev 00, Rel. 1.2
2-79
AastraLink Pro 160 IP Phone User Guide
Viewing IP Phone and AastraLink System Information
Viewing the IP Address and MAC Address of Your Phone
Use the following procedure to view the networking information (IP address and
MAC address) assigned to your Aastra IP Phone.
Aastra IP Phone UI
Step
Action
1
Press
2
Select Phone Status, then press Select.
3
Select IP&MAC Addresses, then press Select.
to enter the Options list.
The IP Address and MAC address display on the screen. For example:
IP Address:
0.0.0.0
MAC Address:
00-34-F4-56-00-32
4
2-80
Press Done to exit the screen and return to the idle menu.
41-001134-06 Rev 00, Rel. 1.2
Operating Your Aastra IP Phone Using the Phone UI
Viewing IP Phone and AastraLink System Information
Viewing the LAN and PC Port Status on Your Phone
There are two Ethernet ports on the rear of the IP phones: LAN Port and PC Port.
The Phone Status option allows you to view the current status of these LAN and
PC ports. The IP phones support each of the following methods of transmission on
these ports:
•
Auto-negotiation
•
Half-duplex (10Mbps or 100 Mbps)
•
Full-duplex (10Mbps or 100Mbps)
For more information about the methods of transmission, contact your system
administrator.
Use the following procedure to view the current status of the LAN and PC port on
your IP phone.
Aastra IP Phone UI
Step
Action
1
Press
2
Select Phone Status, then press Select.
3
Select LAN Port or PC Port, then press Select. Use the arrow keys to scroll through the information.
The following is an example of the LAN and PC port display:
to enter the Options list.
Link State: No Link
Negotiation: Auto
Speed: 10M
Duplex: Half
For a description of this information, see your system administrator.
4
Press Done to exit the screen and return to the idle menu.
41-001134-06 Rev 00, Rel. 1.2
2-81
AastraLink Pro 160 IP Phone User Guide
Viewing IP Phone and AastraLink System Information
Viewing Firmware Information on Your Phone
Use the following procedure to view the IP phone firmware version.
Aastra IP Phone UI
Step
Action
1
Press
2
Select Phone Status, then press Select.
3
Select Firmware Info, then press Select. Use the arrow keys to scroll through version information.
4
Press Done to exit the screen and return to the Idle menu.
2-82
to enter the Options list.
41-001134-06 Rev 00, Rel. 1.2
Operating Your Aastra IP Phone Using the Phone UI
Administrator Menu
Administrator Menu
The IP Phone has an administrator menu available for an administrator only.
Access to this menu is password protected.
Available options for an administrator are:
•
UPnP (Universal Plug n’Play) - Allows an administrator to enable/disable
UPnP on the phone
•
Factory Default - Allows an administrator to reset the phone to factory
default settings.
•
Network Address Translation (NAT) - Allows an administrator to set NAT
traversal parameters.
Note: For more information about NAT, see Appendix C, the section, “Configuring Your IP Phone
for Remote Office Setup”.
Enabling/Disabling UPnP
Use the following procedure to enable/disable Universal Plug-n-Play (UPnP) on
your IP phone. When you install and start up an IP phone at a remote office, UPnP
must be enabled on the IP phone and the local Internet router, or manual NAT
must be configured on the phone with static port forwarding on the router (in
order for the phone to communicate with the AastraLink Pro 160 at the central
site).
Aastra IP Phone UI
Step
Action
1
Press
2
Select UPnP, then press Select.
3
Press Change to set the UPnP to Yes/No, then press Done.
to enter the Options list.
Reference
For more information about setting your phone to use UPnP on a remote phone,
see Appendix C, “Remote Office Installation and Configuration of the Phone
(Phone -Side)”.
41-001134-06 Rev 00, Rel. 1.2
2-83
AastraLink Pro 160 IP Phone User Guide
Administrator Menu
Setting Your Phone To Factory Default Settings
Note: If you reset your IP phone to factory default settings, then the IP phone deletes all current
settings. The next time the phone restarts, it will attempt to re-register with the AastraLink Pro
160, and download its configuration from the device.
Use the following procedure to set your IP phone back to its factory default
settings.
Aastra IP Phone UI
Step
Action
1
Press
2
Select Factory Default, then press Select.
3
Enter your password, then press Enter.
4
Press Default to reboot your IP phone, and set your IP phone back to factory default settings.
2-84
to enter the Options list.
41-001134-06 Rev 00, Rel. 1.2
Operating Your Aastra IP Phone Using the Phone UI
Restarting your IP Phone
Restarting your IP Phone
You may want to restart your phone to check for updates on the AastraLink. You
may occasionally need to restart your phone to set changes or updates to your
phone or network settings. You may also need to restart your phone if you have
been asked to do so by your system administrator, or should you experience any
unexpected behavior.
Note: Your phone will be out of service temporarily during the restart and downloading process.
Use the following procedure to restart your IP phone.
Aastra IP Phone UI
Step
Action
1
Press
2
Select Restart Phone then press Select.
3
Confirm that you want to restart your phone by pressing Restart.
enter the Options list.
Your phone restarts. For information about the screens that appear as your phone starts up, refer to
“Plugging in and Starting Your IP Phone” on page 2-7.
41-001134-06 Rev 00, Rel. 1.2
2-85
AastraLink Pro 160 IP Phone User Guide
Phone Lock
Phone Lock
You can lock a phone to prevent it from being used or configured. Once the phone
is locked, you must enter your password to unlock the phone.
Notes:
1.
Using the Phone Lock option, lock/unlocks the phone immediately.
2.
E911 calls are still permitted even when the phone is locked.
Locking/Unlocking Your IP Phone
Use the following procedure to lock your IP phone and prevent it from being used
or configured.
Aastra IP Phone UI
Step
Action
1
Press
1
Select Phone Lock.
2
Do one of the following actions:
2-86
to enter the Options list.
•
Press Lock to confirm your action.
•
To unlock your phone, Press
press Enter. Your phone unlocks.
to enter the Options list. Enter your user password, then
41-001134-06 Rev 00, Rel. 1.2
Operating Your Aastra IP Phone Using the Phone UI
Using Other IP Phone Features
Using Other IP Phone Features
Using The Redial Key
The IP phone has an enhanced redial user interface that allows you to quickly
redial the last number that was dialed out from the phone. You can:
•
Press the
button twice to redial the last number dialed.
•
Press the
button once, scroll the list of numbers, then press the
button again to dial the number that displays on the screen.
The “last number redial” feature for the Redial key is static and is not
configurable.
Using the Intercom
Use the following procedure to connect with a remote extension using the
intercom.
Aastra IP Phone UI
Step
Action
1
To access the intercom, do one of the following actions:
•
Press the Icom key.
•
Press the Intercom softkey. Enter the extension number of the person you wish to intercom or
the BLF softkey for that extension.
•
Enter: *5<remote extension> using your IP phone keypad. For example, to connect with
extension 205, you would enter *5205
After a beep tone, your phone will automatically connect with the remote extension and you can
speak through its speaker.
2
3
To cancel intercom, press Nor the Cancel softkey.
When you are finished speaking, hang up the phone by placing the handset back on-hook or by
pressing N or the line/call appearance button for the active call. When you hang up, the remote
phone will also hang up.
41-001134-06 Rev 00, Rel. 1.2
2-87
AastraLink Pro 160 IP Phone User Guide
Using Other IP Phone Features
You can receive incoming intercom calls on your IP phone. By default, the
microphone for an incoming intercom call is OFF, and the automatic answer for
an intercom call is ON.
Using Overhead Paging
If your AastraLink Pro 160 is connected to an amplifier of an overhead paging
system (public address system, loudspeaker, etc.) then you can use the overhead
paging feature.
Use the following procedure to access the pager.
Aastra IP Phone UI
Step
Action
1
Use the IP phone keypad and enter *60.
or
Dial the extension 6000.
2
When prompted, enter the paging password.
Note: To obtain the password configured for your IP phone network, check with the your system
administrator.
Your extension is connected with the overhead pager.
2-88
41-001134-06 Rev 00, Rel. 1.2
Operating Your Aastra IP Phone Using the Phone UI
Using Other IP Phone Features
Intercom as XML Paging Key
Your Administrator can override the default Intercom key on your phone, and
assign it as a Paging key. Depending on the phone model, the Intercom key is
either a hard key (9480i and 9480i CT) or a softkey (all models except 6751i). The
Paging key displays an XML list of the configured paging groups, for quick
dialing.
The original Intercom functionality is available at the bottom of the Paging key
XML menu. The CT model phones (9480i CT and 6757i CT) have a slightly
different menu due to the base-to-handset intercom feature.
•
Intercom - When selected, displays a screen that presents a text box that
allows you to enter the Paging Group number (for example, 661234). After
dialing the number, the phone initiates the intercom call to the Paging Group.
Note: Entering an invalid extension for an intercom call displays a brief error
before returning to the text entry screen.
•
Page All - When selected, acts as a speeddial key and dials 660 to page all
configured Paging Groups.
•
A List of Configured Paging Groups - Allows you to select a specific
Paging Group for sending a page.
Paging Group(s)
If your Administrator has configured a Paging Group(s) on your AastraLink Pro
network, you can page a group using the 66 prefix before entering the Paging
Groups extension. The dial plan 660 dials all Paging Groups and is always
configured (using the overhead paging PIN for access control) from the PBX
dialplan. Additional Paging Groups can be added by your Administrator with or
without a PIN for access control.
The following features are enabled by default on your phone for a Paging Group.
An Administrator can disable these features if required.
•
Play Warning Tone - enables the warning tone to be heard before a page or
an intercom call on the phone.
•
Microphone Mute - enables the speakerphone to mute when a page or an
intercom call is received by the phone.
41-001134-06 Rev 00, Rel. 1.2
2-89
AastraLink Pro 160 IP Phone User Guide
Using Other IP Phone Features
•
Auto-Answer - enables automatic answering of an intercom call by the
phone. If disabled, icom will be treated as a normal incoming call.
The following features are disabled by default on your phone. Your Administrator
can enable these features if required.
•
Allow Barge-In - enables paging and intercom to occur while a phone is in
the active call state.
•
Paging Mode for Icom Key - enables the Intercom key to act as a Paging
key, providing a list of paging groups instead of a number-entry field.
Use the following procedure for XML paging on the IP Phones:.
Aastra IP Phone UI
Step
Action
Using the Intercom Key
1
On the IP phone press the <Intercom> key.
2
Enter the Paging Group number. For example, 661234, where “66” is the Paging Group dial plan and
“1234” is the Paging Group’s extension.
The phone dials the number and initiates the intercom call to the Paging Group.
Note: Entering an invalid extension for an intercom call displays a brief error before returning to the
text entry screen.
Using the Page All Softkey
1
Press the <Page All> softkey.
The phone dials “660” to page ALL configured Paging Groups on the AastraLink Pro network.\
2
When prompted, enter the paging password.
Note: To obtain the password configured for your IP phone network, check with the your system
administrator.
Your extension is connected with the overhead pager.
2-90
41-001134-06 Rev 00, Rel. 1.2
Operating Your Aastra IP Phone Using the Phone UI
Using Other IP Phone Features
Aastra IP Phone UI
Step
Action
Using the List of Paging Groups
1
On the IP phone, press the <Paging> key.
Note: If your administrator has provisioned the Intercom key to be a paging key, refer to the
information in the section, “Intercom as XML Paging Key” on page 2-89.
2
From the list of Paging Groups, select the group you want to page, and press <Enter>.
The phone initiates a call to the Paging Group you selected.
Activating a Relay Switch
The AastraLink Pro 160 includes a relay switch feature that can be used to relay a
command to an external device (for example, open a locked entrance door). If
your system administrator has configured this option for your IP phone network,
you can use the Relay softkey to activate/deactivate the relay switch.
To activate/deactivate the relay switch, do one of the following options:
•
•
To activate the relay, press the Services softkey. Then select Relay and press
Select.
To deactivate the relay, select Relay again.
41-001134-06 Rev 00, Rel. 1.2
2-91
AastraLink Pro 160 IP Phone User Guide
Using Other IP Phone Features
Using the Emergency Dial Plan
Public telephone networks in countries around the world have a single emergency
telephone number (emergency services number), that allows a caller to contact
local emergency services for assistance when required. The emergency telephone
number may differ from country to country. It is typically a three-digit number so
that it can be easily remembered and dialed quickly. Some countries have a
different emergency number for each of the different emergency services.
The following table describes the default emergency numbers on your IP phone.
Emergency Number
Description
911
An emergency number for the United States
and Canada
080
An emergency number for Mexico
For other important information on making emergency calls, see the Perface of
this document, the section, “Making Emergency Calls: Important Information!”
on page xiii.
2-92
41-001134-06 Rev 00, Rel. 1.2
Operating Your Aastra IP Phone Using the Phone UI
Using Other IP Phone Features
Using Shared Line Appearances (SLA)
Your Administrator can configure a feature for your phone on the AastraLink Pro
called Shared Line Appearances (SLA). SLA is a traditional key system that has
telephones with multiple buttons ("keys") and lights that indicate which lines are
in use. When you want to place a call, the user presses a button to directly select
the external line connected to the telephone company.
All Aastra SIP phone models support the AastraLink SLA feature, except 420d
DECT handsets and 6751i SIP phones. The SLA supported phones use a visual
indication to show the line state (idle/ringing/in-use/hold). Indications are
provided via the LED on a line hard-key (L1, L2, etc.), LCD on a soft-key, or
LED on a programmable key.
The state of the line - busy, ringing or hold - is shown by the flashing state of the
LED or icon indicator, for hard-keys the color of the indicator also shows whether
the current phone (green) or another phone (red) is using the line.
SLA Key Mapping
FXO line to SIP phone key mapping for SLA varies by phone model.
The following table describes the mapping of the hard and soft line keys on the
SIP phone with the FXO ports on the rear of the AastraLink Pro.
SLA Supported
Phone Models
FXO 1
FXO 2
FXO 3
FXO 4
FXO 5
FXO 6
Mapping To AastraLink Pro
9480i / 9480iCT base
L1
L2
L3
L4
Softkey
L5
Softkey
L6
9143i
L1
L2
L3
Softkey
L4
-
-
6757i / 6757iCT base
L1
L2
L3
L4
Softkey
L5
Softkey
L6
As base
As base
As base
As base
As base
As base
L1
L2
L3
L4
Softkey
L5
Softkey
L6
CT handset
6755i
41-001134-06 Rev 00, Rel. 1.2
2-93
AastraLink Pro 160 IP Phone User Guide
Using Other IP Phone Features
SLA Supported
Phone Models
FXO 1
FXO 2
FXO 3
FXO 4
FXO 5
FXO 6
6753i
L1
L2
L3
Softkey
L4
-
-
6751i
-
-
-
-
-
-
L1
L2
Softkey
L3
Softkey
L4
-
-
-
-
-
-
-
-
6730i / 6731i
DECT 420d handset
For all phones, off-hook maps to the "Pool line" operation.
The pool line feature sets the phone to L7 (9480i, 9480i CT, 6757i, 6757i CT,
6755i) or L5 (9143i, 6731i & 53i) in the phone configuration when it is in the idle
state.
Note: SLA is not supported on Model Phones 6751i and 420d Handsets. These phones default to
the line pool operation only. If all FXO lines are configured for SLA, the phone models in the
above table are not able to receive incoming FXO calls.
SIP phone features for SLA lines
When a User dials on an IP Phone, the phone assumes that the line on which the
user is dialing is a Pool line. If SLA is enabled on the phone, the phone changes its
behavior when the User dials out on a line. If SLA is enabled and specific features
on the phone are used (for example, redial, speeddial, transfer), the User must
specifically direct the feature to use the SLA line for the feature to work in that
mode.
The features affected by SLA include:
2-94
•
Redial list
•
Speed-dial softkey
•
3-way conference
•
Call transfer
41-001134-06 Rev 00, Rel. 1.2
Operating Your Aastra IP Phone Using the Phone UI
Using Other IP Phone Features
Redial
To perform a Redial using a Pool line....
press <Redial> then press <Redial> again.
To perform a Redial using an SLA line L1.... press <Redial> then press <L1> key.
Speeddial
To perform a Speeddial using the Pool
line....
press the Speeddial key.
To perform a Speeddial using the SLA line
L1....
press <L1> and then press the Speeddial
key.
Note: Because Pool lines require prefix 9
for outside access, and SLA lines require
direct dialing, the same speeddial key
cannot be used in both modes.
3-Way Conference
Conferencing can be initiated for Pool or SLA incoming calls, but the target of the
conference (the third party being invited to join the call) can only be a Poll line or local
extension.
SLA lines cannot be the invitee of a 3-way conference call.
Call Transfer
The transfer (Xfer) key is a Pool line only feature, and does not operate for incoming SLA
calls.
SLA lines cannot be the target of a call transfer.
41-001134-06 Rev 00, Rel. 1.2
2-95
AastraLink Pro 160 IP Phone User Guide
Using Other IP Phone Features
Using AastraLink SLA from the SIP Phones
If SLA is configured on an FXO port, the following occurs for all phones:
2-96
•
The line indicator flashes quickly when a call comes in, and the phone rings.
•
When the call is connected and answered, the line indicator lights up solid.
For hard-line keys (L1, L2, etc.) it will show green on the answering phone,
and red on all other phones.
•
When the call is placed on hold, the line indicator flashes slowly
For hard-line keys (L1, L2, etc.) it will show green on the holding phone, red
on all other phones.
•
Any phone can pickup a call from the held state.
41-001134-06 Rev 00, Rel. 1.2
Chapter 3
Operating Your Aastra IP Phone
Using the Web UI
About this Chapter
Introduction
This chapter describes how to access the AastraLink Web UI to configure and
manage your IP phone, and describes the available menu options.
Topics
This chapter covers the following topics:
Topic
Page
Accessing the AastraLink Web UI
page 3-2
AastraLink Web UI Menu Options
page 3-6
Making Calls Using the Web UI
page 3-11
Managing Calls
page 3-13
Using Visual Voicemail
page 3-25
Using IP Phone Directories
page 3-29
Configuring SoftKeys For Your IP Phone
page 3-32
Editing Your User Preferences
page 3-42
41-001134-06 Rev 00, Rel. 1.2
3-1
AastraLink Pro 160 IP Phone User Guide
Accessing the AastraLink Web UI
Accessing the AastraLink Web UI
There are two ways you can access the AastraLink Web UI:
•
Enter the IP address of the AastraLink Pro 160 directly into the address field
of your web browser, or
•
Use Universal Plug and Play (UPnP) and Windows Explorer to locate the
AastraLink Pro 160 on your network.
Using Your Web Browser to Access the AastraLink Web UI
The following procedure describes how to access the AastraLink Web UI using
your web browser.
AastraLink Web UI
Step
Action
1
Open your web browser and enter the IP Address or DNS hostname of the AastraLink Pro 160 in the
address field.
For example: http://10.50.20.104
The AastraLink Web UI Login Menu appears (Figure 3-1).
Note: To obtain the IP address of the AastraLink Pro 160, use the IP Phone keypad and press the
<Options> key. Then select Phone Status -> AastraLink Info. Scroll through the options on this
menu until the Server Local IP Address window appears, which shows the IP Address assigned to
the AastraLink Pro 160.
2
Enter your IP phone extension, and password, and click <Login>
The AastraLink Web UI Main Menu appears.
Note: To log out of the AastraLink Web UI, click <Logout>, which is located in the upper right corner
of the main menu.
3-2
41-001134-06 Rev 00, Rel. 1.2
Operating Your Aastra IP Phone Using the Web UI
Accessing the AastraLink Web UI
Current status of AastraLink Pro 160
Figure 3-1.
AastraLink Web UI Login Menu
The current status of the AastraLink Pro 160 displays in the lower left corner of
the screen with an LED.
LED Color
Description
Flashing Green
In service - Ready to use
Flashing Red
System error (contact your administrator)
Alternating Green/Red
Maintenance in progress (try again later)
41-001134-06 Rev 00, Rel. 1.2
3-3
AastraLink Pro 160 IP Phone User Guide
Accessing the AastraLink Web UI
Using Windows Explorer to Access the AastraLink Web UI
The following procedure describes how to use Windows Explorer to access the
AastraLink Web UI.
Note: Prior to using this method to discover the AastraLink on your network, the Windows UPnP
networking component must be installed on your computer.
AastraLink Web UI
Step
Action
1
Click on the Start menu, then click on My Network Places
Providing that your computer is UPnP enabled, the AastraLink Pro 160 device icon appears in the My
Network Places window. The IP Address assigned to the AastraLink device is listed.
If there are multiple AastraLinks in your network, right-click the UPnP device icon and select
Properties. A dialogue box appears that shows the IP address, serial number and hostname (model)
of the selected device (Figure 3-2).
2
To access the AastraLink Web UI, double-click on the AastraLink device icon.
A web browser launches and the AastraLink log in menu appears (Figure 3-1).
3
Enter your IP phone extension, and password, and click <Login>
The AastraLink Web UI Main Menu appears.
3-4
41-001134-06 Rev 00, Rel. 1.2
Operating Your Aastra IP Phone Using the Web UI
Accessing the AastraLink Web UI
Figure 3-2.
My Network Places Window
41-001134-06 Rev 00, Rel. 1.2
3-5
AastraLink Pro 160 IP Phone User Guide
AastraLink Web UI Menu Options
AastraLink Web UI Menu Options
The Aastralink Web UI allows you to make calls, monitor calls, manage calls and
configure features for your Aastra IP phone.
The following sections describe the main menu options in more detail.
Logout
Number of
missed calls
Number of
current
voicemails
Recent Calls
Figure 3-3.
3-6
AastraLink Web UI Main Menu
41-001134-06 Rev 00, Rel. 1.2
Operating Your Aastra IP Phone Using the Web UI
AastraLink Web UI Menu Options
Home Menu
The Home menu displays the current parameter settings for your Aastra IP phone,
and shows recent calls dialed and received on your phone.
The User Home Menu allows you to perform the following:
•
View number of missed calls
•
View number of current voicemails
•
Enter a number to dial from your phone if required
•
Configure current call settings (do not disturb, call forward, find-me
follow-me)
•
View current Call List (calls placed and received by your phone); delete
specific entry or all entries from the Call List; select an entry to call back from
the Call List.
References
For information about dialing from the Web UI, see “Making Calls Using the Web
UI” on page 3-11.
For information about viewing recent calls, do not disturb, call forward, and
find-me follow-me, see “Managing Calls” on page 3-13.
41-001134-06 Rev 00, Rel. 1.2
3-7
AastraLink Pro 160 IP Phone User Guide
AastraLink Web UI Menu Options
Voicemail Menu
The Voicemail Menu allows you to perform the following:
•
View and use visual voicemail (listen to, save, forward, delete your voicemail
messages)
Reference
For information about using voicemail, see “Using Visual Voicemail” on
page 3-25.
Directory Menu
The Directory Menu allows you to perform the following:
•
View your personal and corporate directory; add, delete, and search contacts
as required.
Reference
For information about using the directories (Personal and Corporate), see “Using
IP Phone Directories” on page 3-29.
3-8
41-001134-06 Rev 00, Rel. 1.2
Operating Your Aastra IP Phone Using the Web UI
AastraLink Web UI Menu Options
Softkey Menu
The Softkeys menu allows you to perform the following:
•
Add, edit, and delete the default softkeys that are preconfigured on your
Aastra IP phone.
Reference
For information about configuring softkeys, see “Configuring SoftKeys For Your
IP Phone” on page 3-32.
Preferences Menu
The Preferences Menu allows you to perform the following:
•
Specify your email address, home phone number, cell phone number
•
Specify the language to display in your Web UI session and on your phone.
•
Specify the ring tone that you want your phone to use.
There are three tabs on the Preferences Menu:
•
My Profile
•
Voicemail
•
Change Password
My Profile
The My Profile screen allows you to specify your administrator profile (email
address, cell number, home number, language to use in the Web UI session and on
your phone, and ring tone). The Name and Extension are specified as the user’s
name and the user’s extension.
41-001134-06 Rev 00, Rel. 1.2
3-9
AastraLink Pro 160 IP Phone User Guide
AastraLink Web UI Menu Options
Voicemail
The Voicemail tab allows you to set your voicemail preferences for your user
phone. You can set whether or not you want voicemail notification by email, and
if you want the phone to automatically ring to another extension. You can also set
how many times you want the user phone to ring before it sends the call to
voicemail.
Change Password
The Change Password screen allows you to change your user password if
required.
Reference
For information about configuring your user preferences, see “Editing Your User
Preferences” on page 3-42.
3-10
41-001134-06 Rev 00, Rel. 1.2
Operating Your Aastra IP Phone Using the Web UI
Making Calls Using the Web UI
Making Calls Using the Web UI
There are several ways to dial a phone number using the AastraLink Web UI. You
can:
•
Enter the number manually in the Dial a Number field, or
•
Click on a contact name in your phone directory.
When you dial a number using the Web UI, first your own IP phone rings. Then,
once you pick up the handset, the AastraLink Pro 160 places the call to the
number you dialed.
Dialing a Number From the My Phone Menu
Use the following procedure to manually dial a phone number.
AastraLink Web UI
Step
Action
1
Select Home
2
Enter the phone number you want to dial in the “Dial a Number” field.
3
Click <Dial> to dial the phone number you specified.
Your phone rings. Pickup the handset to complete the call.
41-001134-06 Rev 00, Rel. 1.2
3-11
AastraLink Pro 160 IP Phone User Guide
Making Calls Using the Web UI
Dialing From the Phone Directory
Use the following procedure to dial a phone number for a contact listed in your
phone directory.
AastraLink Web UI
Step
Action
1
Select Directory->Personal or Corporate
2
Click on
for the person you want to call, for example, Sue Adams at ext. 203.
Your phone dials the number you selected.
Click icon to dial number
3-12
41-001134-06 Rev 00, Rel. 1.2
Operating Your Aastra IP Phone Using the Web UI
Managing Calls
Managing Calls
To keep track of your caller history, your IP phone maintains a recent callers list.
You can return calls and add callers to your personal directory from this list. To
help manage your calls, you can enable several features on your phone, including:
•
Do Not Disturb
•
Call Forwarding
•
Find-Me, Follow Me
Viewing Recent Calls
To view recent calls, click on Home. The Call List shows the most recent calls
placed and received by your Aastra IP phone.
41-001134-06 Rev 00, Rel. 1.2
3-13
AastraLink Pro 160 IP Phone User Guide
Managing Calls
The following table identifies the columns in the Call List.
Call List Column
Description
Name
Name associated with the caller.
Number
Number associated with the caller.
Status
Status of the call. Status can be:
• Answered
• Canceled
• Voicemail
Date/Time
Date and time the call was received.
Duration
Duration of time for the active call.
The following table identifies the icons that display in the Call List.
Call List Icons
Description
Incoming call answered
Outgoing call answered
Incoming call not answered
Outgoing call not answered
Voicemail was left in your voicemail or in the
callers voicemail
Allows you to return a call. Clicking on this
icon displays a text box that allows you
confirm the number you are dialing before
you dial it.
3-14
41-001134-06 Rev 00, Rel. 1.2
Operating Your Aastra IP Phone Using the Web UI
Managing Calls
Left message
for this call
This outgoing call to Bob Jones was not answered, however,
a voicemail message was recorded.
41-001134-06 Rev 00, Rel. 1.2
3-15
AastraLink Pro 160 IP Phone User Guide
Managing Calls
Calling Back from the Call List
You can call back a missed or previous call by clicking on
column in the Call List.
in the Number
Use the following procedure to call back a caller from the Call List.
AastraLink Web UI
Step
Action
1
Select Home.
2
In the Call List, click on the
The following prompt displays:
3
If the number in the “Number” field is correct, click <Dial>.
4
If the number in the “Number” field is incorrect, or you need to modify the number by entering a prefix
digit for directing the call over an alternative route (AastraLink trunk (7 prefix), SIP trunk (8 prefix), or
FXO/SLA (9 prefix)), enter the new number in the field and click <Dial>.
for a caller you want to call back.
Your own SIP phone rings first, and when you answer the outgoing call, your phone places the call to
the dialed number.
A message displays at the top of the Call List that indicates the number was dialed.
3-16
41-001134-06 Rev 00, Rel. 1.2
Operating Your Aastra IP Phone Using the Web UI
Managing Calls
Adding a Caller to Your Directory
Use the following procedure to add a recent caller to your personal or corporate
directory.
AastraLink Web UI
Step
Action
1
Select Home.
2
Place a checkmark in the box for an extension of a caller you want to add to your directory.
For example, place a check mark in the box for extension 201.
Checkmark in box
3
Click <Save>.
4
The contact is automatically added to your “Personal Directory”.
The directory updates to reflect the new caller you just added.
41-001134-06 Rev 00, Rel. 1.2
3-17
AastraLink Pro 160 IP Phone User Guide
Managing Calls
Enabling Do Not Disturb
Do Not Disturb (DND) is disabled by default. If you enable DND on your Aastra
IP phone, then when a call comes in on the line, the caller is directed to your
voicemail.
Use the following procedure to enable Do Not Disturb on your Aastra IP phone.
AastraLink Web UI
Step
Action
1
Select Home
2
To enable DND, click on <Off> for the “Do Not Disturb” field.
3
Select On to enable DND, then click on <Save> to save your changes.
The Home menu updates. The “Do Not Disturb” field is set to On.
To disable Do Not Disturb, set the DND parameter to Off, then click Save.
3-18
41-001134-06 Rev 00, Rel. 1.2
Operating Your Aastra IP Phone Using the Web UI
Managing Calls
Enabling Call Forwarding
Call Forwarding is disabled by default. If you enable call forwarding on your
Aastra IP phone, then incoming calls are handled according to the rules that you
specify, and forwarded to another number.
Use the following procedure to enable Call Forwarding on your phone.
AastraLink Web UI
Step
Action
1
Select Home
2
To enable Call Forwarding, click on <OFF> for the “Call Forwarding” field.
3
Set the “Type” field to one or more of the following options:
4
•
All - Your IP phone immediately forwards all incoming calls to the specified destination.
•
Busy - Your IP Phone forwards incoming calls if the line is already in use.
•
No Answer - Your IP Phone forwards incoming calls if there is no answer.
For each Type you select, specify a destination for the call in the “Forward Number” field.
The Forward Number you enter is a phone number or extension where received calls are forwarded,
based on the rules you defined in Step 3.
5
Click on <Save> to save your changes.
The Home menu updates. The Call Forwarding field now shows how incoming calls are forwarded,
based on the rules you specified.
To disable Call forwarding, disable the Type field(s) and click Save.
41-001134-06 Rev 00, Rel. 1.2
3-19
AastraLink Pro 160 IP Phone User Guide
Managing Calls
Enabling Find-Me Follow-Me
Find-Me Follow-Me is disabled by default. If you enable Find-Me Follow-Me on
your Aastra IP phone, then incoming calls “follow you” to the phone numbers you
specify.
For example, you can configure your phone so that when an incoming call is
received, both your work phone and your cell phone ring at the same time. (See
“Enabling Find-Me, Follow-Me” on page 2-51 for a complete description of the
Find-Me Follow Me feature).
Use the following procedure to enable Find-Me Follow-Me on your phone.
AastraLink Web UI
Step
Action
1
Select Home.
2
In the “Find Me Follow Me” field, click on “Off”.
3-20
41-001134-06 Rev 00, Rel. 1.2
Operating Your Aastra IP Phone Using the Web UI
Managing Calls
AastraLink Web UI
Step
Action
3
In the “Mode” field, set the mode to one of the following options:
•
Off - Disables Find-Me Follow-Me.
•
Parallel - The Primary and Secondary phones ring simultaneously.
•
Sequential - The Primary phone rings first. If you do not answer the call, then the Secondary
phone rings.
Note: You have 30 seconds to answer a call on your primary phone. If you do not answer the call
within this time limit, Find-Me Follow-Me progresses to the next stage (i.e., your secondary phone
rings).
4
In the “First Preset” field, select one of the following options:
•
Home
This option displays only if a home phone number is provisioned on the
Preferences->My Profile page. If you have provisioned a home number,
selecting “Home” for this field displays your home number in the
“First Number” field.
•
Cell
This option displays only if a cell phone number is provisioned on the
Preferences->My Profile page. If you have provisioned a cell number,
selecting “Cell” for this field displays your cell number in the
“First Number” field.
•
Extension
This option displays your extension number for your phone in the “First Number”
field.
•
Other
This option allows you to specify a custom phone number in the
“First Number” field.
41-001134-06 Rev 00, Rel. 1.2
3-21
AastraLink Pro 160 IP Phone User Guide
Managing Calls
AastraLink Web UI
Step
Action
5
You enter a phone number or extension In the “First Number” field, depending on your setting
selected in step 4:
•
If you have provisioned a home or cell phone number on the Preferences->My Profile page, and
you selected “Home” or “Cell” in step 4, those numbers automatically display in the “First
Number” field.
•
If you selected “Extension” in step 4, your extension number automatically displays in the “First
Number” field.
•
If you selected “Other” in step 4, enter a phone number you want to use for the Find-me
Follow-me feature.
Note: You can edit the numbers that display in this field as applicable (i.e., add prefixes, etc.)
If an incoming call comes into your phone, the phone number you enter here will ring also.
Note: If the Find-Me Follow-Me mode is set to “Parallel”, the first and second numbers will ring
simultaneously. If the mode is set to “Sequential”, the first number will ring and if there is not answer,
the second number will ring.
6
3-22
In the “Second Preset” field, select one of the following options:
•
Home
This option displays only if a home phone number is provisioned on the
Preferences->My Profile page. If you have provisioned a home number,
selecting “Home” for this field displays your home number in the
“Second Number” field.
•
Cell
This option displays only if a cell phone number is provisioned on the
Preferences->My Profile page. If you have provisioned a cell number,
selecting “Cell” for this field displays your cell number in the
“Second Number” field.
•
Extension
This option displays your extension number for your phone in the
“Second Number” field.
•
Other
This option allows you to specify a custom phone number in the
“Second Number” field.
41-001134-06 Rev 00, Rel. 1.2
Operating Your Aastra IP Phone Using the Web UI
Managing Calls
AastraLink Web UI
Step
Action
7
You enter a phone number or extension In the “Second Number” field, depending on your setting
selected in step 4:
•
If you have provisioned a home or cell phone number on the Preferences->My Profile page, and
you selected “Home” or “Cell” in step 6, those numbers automatically display in the “Second
Number” field.
•
If you selected “Extension” in step 6, your extension number automatically displays in the
“Second Number” field.
•
If you selected “Other” in step 6, enter a phone number you want to use for the Find-me
Follow-me feature.
Note: You can edit the numbers that display in this field as applicable (i.e., add prefixes, etc.)
If an incoming call comes into your phone, the phone number you entered in the “First Number” field
rings first. If there is no answer, the phone number you entered in the “Second Number” field rings..
Note: If the Find-Me Follow-Me mode is set to “Parallel”, the first and second numbers will ring
simultaneously. If the mode is set to “Sequential”, the first number will ring and if there is not answer,
the second number will ring.
41-001134-06 Rev 00, Rel. 1.2
3-23
AastraLink Pro 160 IP Phone User Guide
Managing Calls
AastraLink Web UI
Step
Action
8
Click <Save> to save your changes.
The Find-Me Follow-Me field reflects the rules you specified.
Find-Me Follow-Me set to “Parallel”.
To disable Find-Me, Follow-Me, set the Mode parameter to Off and click Save.
If you need to edit your profile (E-Mail, Cell Number, Home Number, Language, Ring Tone), you can
click <Edit> in the Find-Me Follow-Me dialog box as required. For more information about editing
your profile, see “Editing Your Profile Information” on page 3-43.
Note: For instructions on how to assign Find-Me Follow-Me to a softkey on your Aastra IP phone,
see “Configuring SoftKeys For Your IP Phone” on page 3-32.
3-24
41-001134-06 Rev 00, Rel. 1.2
Operating Your Aastra IP Phone Using the Web UI
Using Visual Voicemail
Using Visual Voicemail
When your IP phone receives a new voicemail message, the Home menu updates
to show that a new message has been recorded. If you placed a call, and left a
voicemail message, the Home menu displays a message icon.
You can use the Visual Voicemail feature to view information about the caller,
play the message, forward the message, and delete the message from this menu.
new message
received
Left voicemail
message
Figure 3-4.
Home Menu Displaying One New Voicemail Message Received
41-001134-06 Rev 00, Rel. 1.2
3-25
AastraLink Pro 160 IP Phone User Guide
Using Visual Voicemail
Playing Voicemail Messages
Use the following procedure to play voicemail messages.
AastraLink Web UI
Step
Action
1
Select Home.
2
Click on the “New Voicemails” setting. For example, click on “1.”
Note: Alternatively, you can select the Voicemail menu.
3
Click <Play> next to the voicemail message you want to hear.
4
Select the media player your browser should to use to play the message. For example,
Windows Media Player.
The voicemail message plays. You can save, forward, or delete the message as described in the
following sections.
3-26
41-001134-06 Rev 00, Rel. 1.2
Operating Your Aastra IP Phone Using the Web UI
Using Visual Voicemail
Saving Voicemail Messages
Use the following procedure to save a voicemail message.
AastraLink Web UI
Step
Action
1
Select Voicemail.
2
Click on the checkbox next to the voicemail message you want to save.
3
Click on <Save>.
The message is saved to the “Old” message box.
Forwarding Voicemail Messages
Use the following procedure to forward voicemail messages to another IP phone.
AastraLink Web UI
Step
Action
1
Select Voicemail.
2
Click on <Fwd> next to the voicemail message you want to forward.
3
Specify destination extension, then click <Forward>. For example, 205.
The message forwards to the extension you specified.
41-001134-06 Rev 00, Rel. 1.2
3-27
AastraLink Pro 160 IP Phone User Guide
Using Visual Voicemail
Deleting Voicemail Messages
Use the following procedure to delete voicemail messages.
AastraLink Web UI
Step
Action
1
Select Voicemail.
2
Select the voicemail message(s) you want to delete, then click <Delete>.
3
To confirm your action and delete the voicemail(s), press <Yes>.
3-28
41-001134-06 Rev 00, Rel. 1.2
Operating Your Aastra IP Phone Using the Web UI
Using IP Phone Directories
Using IP Phone Directories
Phone directories contain the names and phone numbers of your contacts. The
AastraLink Pro 160 provides access to two directories:
•
Personal - lists the name and phone numbers of the contacts that you specify.
•
Corporate - dynamically lists the names, extensions, and phone numbers of
all Aastra IP phone users in your network, as well as any contacts that your
administrator manually specifies.
You access phone directories from the Directory menu. You can also search for a
contact by name, and dial a contact, from this menu.
Note: If you are using an IP phone with an expansion module attached, you can use the Web UI to
download the corporate directory and configure speeddial softkeys on the module. See
“Configuring Softkeys For Expansion Modules” on page 3-41 for instructions.
Adding a Contact
Use the following procedure to add a contact to your personal phone directory.
AastraLink Web UI
Step
Action
1
Select Directory->Personal.
2
Click on <Add Contact> to add a new contact to the directory.
3
Specify the personal information for the contact (name, work, cell, and/or home phone number), then
click <Save>
The new contact is added to your directory list.
41-001134-06 Rev 00, Rel. 1.2
3-29
AastraLink Pro 160 IP Phone User Guide
Using IP Phone Directories
Editing Contact Information
Use the following procedure to edit personal information for a contact listed in
your personal phone directory.
AastraLink Web UI
Step
Action
1
Select Directory->Personal.
2
Click on the name of the person whose information you want to edit. For example: Sue Adams.
3
Click <Edit>.
4
Edit the contact information as necessary, then click <Save>.
Deleting A Contact
Use the following procedure to delete a contact from your personal phone
directory.
AastraLink Web UI
Step
Action
1
Select Directory->Personal.
2
Select the contact(s) that you want to delete from the phone directory.
3
Click <Delete Selected Contacts>.
4
Confirm your choice by clicking <Yes>.
The contact is removed from your personal directory list.
3-30
41-001134-06 Rev 00, Rel. 1.2
Operating Your Aastra IP Phone Using the Web UI
Using IP Phone Directories
Searching For A Contact
Use the following procedure to search for a contact listed in your personal or
corporate phone directory.
AastraLink Web UI
Step
Action
1
Select Directory.
2
Enter the contact name in the “Search” field. For example:
The Web UI displays the contact information for the person you specified.
Note: You can also perform a “quick” search by entering one or more characters in the person’s
name. You then choose from the list of contacts that match the data you specified.
3
To dial a contact, click on the
41-001134-06 Rev 00, Rel. 1.2
icon next to the person’s name.
3-31
AastraLink Pro 160 IP Phone User Guide
Configuring SoftKeys For Your IP Phone
Configuring SoftKeys For Your IP Phone
You configure softkeys for your IP phone from the Softkeys menu shown below.
Default softkeys currently
configured on your phone
Figure 3-5.
3-32
Softkey available (empty)
SoftKeys Menu
41-001134-06 Rev 00, Rel. 1.2
Operating Your Aastra IP Phone Using the Web UI
Configuring SoftKeys For Your IP Phone
The softkeys that appear on your IP phone are the default softkeys assigned by
your system administrator. You use the Web UI to customize — or reprogram —
the softkeys for your Aastra IP phone according to your specific needs.
Using the AastraLink Web UI Softkeys menu, you can:
•
Add new softkeys
•
Delete softkeys
•
Edit a default softkey so it performs a different function. For example, you
may wish to change a Call Forward softkey to a Speedial softkey.
On some model Aastra IP phones, certain softkeys are reserved and cannot be
changed. For example, on the Model 33i, the first four softkeys are
preprogrammed as follows: Options, Directory, Save, Delete.The last softkey is
preprogrammed as Mute. These softkeys cannot be edited or deleted.
Softkeys that are designated as empty are available to configure, but currently
have no function associated with them.
If you are using an IP phone with an expansion module attached, you can use the
Web UI to configure softkeys on the expansion module as well. In addition, the
Web UI gives you the option to download the corporate directory in order to
quickly configure speeddial softkeys for the contacts listed in the directory.
Softkey Types
There are 15 different types of softkeys (plus two Operator softkeys) available for
you to configure on your IP phone. Each softkey type performs a different
function.
On the AastraLink Web UI, softkeys are organized by type into these three
categories:
•
Call Settings Softkeys - used to specify how inbound/outbound calls are
handled. For example, Do Not Disturb or Call Forwarding.
•
Applications Softkeys- used to access applications (Voicemail) or other
phone menus (the Services list).
•
Operator Softkeys- used to define Operator status and schedules. (These
keys display only if you are the designated Operator.)
41-001134-06 Rev 00, Rel. 1.2
3-33
AastraLink Pro 160 IP Phone User Guide
Configuring SoftKeys For Your IP Phone
The following tables describe each type of softkey available.
Call Settings Softkeys
The table below describes the Call Settings softkeys you can configure for your
Aastra IP phone. The table describes each softkey type, function, label (appears
next to the softkey on the Phone UI), and value (where applicable).
Softkey Type
Function
Label
Value
Speed Dial
Allows you to dial a phone number/
extension using a softkey.
The name of the
person you want
to speeddial.
The phone
number or ext to
speeddial.
For example: Dan For example: 285
Jones
Do Not Disturb
Stops your IP phone from ringing
when an incoming call is received.
n/a
n/a
Call Forward
Allows you to forward incoming calls n/a
to another destination.
n/a
Find-Me, Follow- Allows you to specify other phone
Me
numbers that should be used to try
to reach you.
n/a
n/a
Allows you to “park” a call in order to n/a
retrieve it later, from another IP
phone.
n/a
For example, your work phone
number and your cell phone
number.
Call Parking
See“Handling Calls” on page 2-34
for more information about using the
Park Call feature.
3-34
41-001134-06 Rev 00, Rel. 1.2
Operating Your Aastra IP Phone Using the Web UI
Configuring SoftKeys For Your IP Phone
Softkey Type
Function
Label
Value
Directed Call
Pickup
Allows you to intercept - or pickup a call on a monitored extension.
n/a
n/a
When you press the DCP softkey,
your IP phone displays a list of
currently ringing numbers. You
select the call you want to “pickup,“
(intercept) from this list and are
connected to the call.
See “Intercepting Calls Using
Directed Call Pickup” on page 2-48
for instructions on using the Directed
Call Pickup feature.
BLF
Busy Lamp Field. Allows you to
The name of the
monitor a specific extension for state person whose
changes (busy or idle).
extension you are
monitoring
When you configure a BLF softkey,
an indicator (either an icon or a
For example: Joe
LED) displays on your IP phone next Smith
to the softkey. The icon shows
whether the extension you are
monitoring is “busy” (on the phone)
or “idle.”
The phone
number or
extension to
monitor.
For example: 255
See “Monitoring Calls Using Busy
Lamp Field (BLF)” on page 2-47 for
instructions on how to monitor
extensions.
Page All
Indicates the key is configured as a n/a
Paging key. Pressing this key
initiates an immediate multicast RTP
stream to the pre-configured
multicast group address provisioned
by the AastraLink Pro 160.
n/a
Paging
Indicates the key is configured as a n/a
Paging key for XML paging options.
Pressing this key displays a list of
Paging Group you can select from to
initiate a Page.
n/a
41-001134-06 Rev 00, Rel. 1.2
3-35
AastraLink Pro 160 IP Phone User Guide
Configuring SoftKeys For Your IP Phone
Softkey Type
Function
Label
SLA
Indicates the key is configured as a n/a
Shared Line Appearance (SLA) key.
Value
n/a
Note: If SLA is configured by the
administrator, non-editable SLA
keys are assigned to all supported
phone models. Contact the
administrator if you wish your phone
to be excluded from the SLA
network.
Transfer
Allows you to transfer a call to
another extension.
n/a
n/a
n/a
n/a
Note: The AastraLink Pro 160
supports consultative transfer and
blind transfer for calls to SIP
extensions; however, it supports
only consultative transfer for calls to
user groups.
Conference
3-36
Allows you to set up a conference
call between two or more active
calls.
41-001134-06 Rev 00, Rel. 1.2
Operating Your Aastra IP Phone Using the Web UI
Configuring SoftKeys For Your IP Phone
Application Softkeys
The following table describes the Application softkeys you can configure for your
Aastra IP phone.
Softkey Type
Function
Services
Displays the Services list.
From the Services list, you can access these other services and
applications:
Directory
•
Voicemail
•
Directory
•
Calls List
•
Call Settings
•
Relay
•
Pickup Call
•
Park List
•
Operator (if Operator enabled on the phone)
Displays the Directory list.
From the Directory list, you can:
Voicemail
•
Access your Personal directory
•
Access the Corporate directory
•
Search for a contact in either directory
Allows you to connect to Visual Voicemail.
When you press the Vmail softkey, the Visual Voicemail menu appears
on your Phone UI. After you login to your voicemail account, you can
view details about your voicemail messages on your phone UI, play
messages, store/forward/save/delete messages, or manage your
voicemail preferences from this screen.
To configure voicemail rules for your IP phone, see “Using Visual
Voicemail” on page 3-25.
Call List
Allows you to access the Recent Calls list.
41-001134-06 Rev 00, Rel. 1.2
3-37
AastraLink Pro 160 IP Phone User Guide
Configuring SoftKeys For Your IP Phone
3-38
Softkey Type
Function
Intercom
Allows you to connect with a remote extension using the intercom.
Relay
Allows an operator/user to monitor an external device (such as a
locked entrance door), and use a softkey to change the status of the
device (unlock the door) when an alarm is triggered.
41-001134-06 Rev 00, Rel. 1.2
Operating Your Aastra IP Phone Using the Web UI
Configuring SoftKeys For Your IP Phone
Operator Softkeys
The following table describes the Operator softkeys you can configure for your
Aastra IP phone.
Note: You must be a designated Operator to configure Operator softkeys on your IP phone. The
Operator softkeys only display if you are a designated Operator.
Softkey Type
Function
Operator Day/
Night
Allows an operator to override the current schedule specified
(weekends and holidays) and switch to either the Day schedule
or the Night Schedule.
Operator On/Off
Duty
Allows an operator to specify whether or not someone is
available to answer the phone.
•
When Enabled, incoming calls are handled first by an
operator, then by an Auto-attendant.
•
When Disabled, incoming calls are handled first by the
Auto-attendant.
Adding a Softkey
Use the following procedure to add a softkey to your IP phone.
AastraLink Web UI
Step
Action
1
Select SoftKeys.
2
Click <Add SoftKey>.
3
Select the “Softkey Type” from the pull-down menu, then click <Add Softkey>.
The SoftKeys menu updates to show the new softkey you added.
Note: When you add or delete a softkey, the changes to your IP phone are usually dynamic.
However, some softkey types (BLF, for example) require you to restart the phone in order for the
changes to take affect
41-001134-06 Rev 00, Rel. 1.2
3-39
AastraLink Pro 160 IP Phone User Guide
Configuring SoftKeys For Your IP Phone
Editing a Softkey
Use the following procedure to change the softkey type assigned to a softkey
number on your IP phone.
AastraLink Web UI
Step
Action
1
Select SoftKeys.
2
Click on the “Type” field for the softkey you want to edit.
For example, click on Do Not Disturb.
3
Select a new “Softkey Type” from the pull-down menu.
4
Click <Save Changes> to save your changes.
The SoftKeys menu updates to show the new softkey type assigned.
Deleting a Softkey
Use the following procedure to delete a softkey from your IP phone.
AastraLink Web UI
Step
Action
1
Select SoftKeys.
2
Click on the softkey you want to delete.
3
Click <Delete>
The softkey is deleted and reset to <empty>.
Note: When you add or delete a softkey, the changes to your IP phone are usually dynamic.
However, some softkey types (BLF, for example) require you to restart the phone in order for the
changes to take affect
3-40
41-001134-06 Rev 00, Rel. 1.2
Operating Your Aastra IP Phone Using the Web UI
Configuring SoftKeys For Your IP Phone
Configuring Softkeys For Expansion Modules
You add, edit, and delete softkeys for an expansion module attached to your IP
phone the same way you do for the IP phone itself. See “Adding a Softkey” on
page 3-39 for instructions.
In addition, you can use the Web UI to download the corporate directory and
quickly configure softkeys on the module, as described in the following
procedure.
AastraLink Web UI
Step
Action
1
Select Softkeys-> Expansion Module 1.
2
Click Corporate Directory.
The AastraLink begins to download and configure the expansion module with the corporate directory
contacts. When the process complete, a message appears confirming that the download is complete.
If you view the expansion module UI, the corporate directory displays speed dials (user phone) or
BLF's (operator phone) configured for each person listed in the directory.
41-001134-06 Rev 00, Rel. 1.2
3-41
AastraLink Pro 160 IP Phone User Guide
Editing Your User Preferences
Editing Your User Preferences
You edit your user preferences from the Preferences menu. You can edit your
profile information (email address, cell phone number, home phone number, Web
UI language, and ring tone), change Visual Voicemail settings, and change your
user password from this menu.
Figure 3-6.
3-42
Preferences Menu
41-001134-06 Rev 00, Rel. 1.2
Operating Your Aastra IP Phone Using the Web UI
Editing Your User Preferences
Editing Your Profile Information
Use the following procedure to edit your contact information.
AastraLink Web UI
Step
Action
1
Select Preferences->My Profile.
2
In the “Email” field, enter your email address.
3
In the “Cell Number” field, enter your cell phone number.
Note: This number is used when your phone uses the “Find Me/Follow Me” feature and is displayed
in the corporate directory.
4
In the “Home Number” field, enter your home phone number.
Note: This number is used when your phone uses the “Find Me/Follow Me” feature and is displayed
in the corporate directory.
5
In the “Language” field, enter the language to use for Web UI sessions and on the phone. Valid
values are:
•
•
•
English (default)
Spanish
French
Note: Clicking <Save> changes the language in the current Web UI session immediately. Only
languages that have been enabled by the system administrator are shown in the drop-down list.
6
In the “Ring Tone” field, select a ring tone to use on your phone. Valid values are:
•
•
•
•
•
Tone 1 (default)
Tone 2
Tone 3
Tone 4
Tone 5
Note: For more information about ring tone patterns, see “Ring Tone Patterns” in the paragraph
following this procedure.
7
Click <Save> to save the setting.
41-001134-06 Rev 00, Rel. 1.2
3-43
AastraLink Pro 160 IP Phone User Guide
Editing Your User Preferences
Ring Tone Patterns
In IP Telephony, different ringing patterns have different frequencies and
cadences. Ring cadence is the ringing pattern heard by the called party, before
they pick up the call. The IP phones use the following Bellcore-specified tones by
default:
Ring Tone Pattern
3-44
Call Criteria
Bellcore Tones
internal calls
Bellcore-dr2
external calls
Bellcore-dr3
calls with contact list
Bellcore-dr4
calls with specific time frames
Bellcore-dr5
41-001134-06 Rev 00, Rel. 1.2
Operating Your Aastra IP Phone Using the Web UI
Editing Your User Preferences
Specifying Your Visual Voicemail Preferences
Use the following procedure to edit your Visual Voicemail preferences.
AastraLink Web UI
Step
Action
1
Select Preferences->Voicemail.
2
In the “Voicemail Notification” field, select whether or not an email is sent to your email address to
notify you of a voicemail that was left by the incoming caller. Valid values are:
•
•
•
Off (default)
Email
Email with Audio-Attachment
Note: Email is only sent if you have configured your email address in the Preferences section of the
Web UI for your phone, and the administrator has enabled email relay.
3
In the “Escape to Extension” field, enter an extension number (other than your own extension
number) for where you want your phone to automatically ring to.
4
In the “Rings Before Voicemail” field, select the number of rings that you want your phone to
perform before sending the call to voicemail. Valid values are 1 through 6. Default is 5.
5
Click <Save> to save your changes.
41-001134-06 Rev 00, Rel. 1.2
3-45
AastraLink Pro 160 IP Phone User Guide
Editing Your User Preferences
Changing Your Password
Use the following procedure to change your password for your IP phone.
AastraLink Web UI
Step
Action
1
Select Preferences->Change Password.
2
In the “Original Password” field, enter the password you used to login into the current user Web UI
session.
3
In the “New Password” field, enter a new password that you want to use to log into the user Web UI.
Note: Enter numeric characters only for your password. Alpha characters are not supported.
4
In the “Confirm New Password” field, re-enter the new password.
5
Click <Save> to save your new password.
3-46
41-001134-06 Rev 00, Rel. 1.2
Appendix A
Aastra IP Phone Model Reference
About This Appendix
This appendix explains the hardware design and key descriptions for each Aastra
IP phone model that the AastraLink Pro 160 supports. The current models are:
•
675xi Series SIP IP Phones: 6730i, 6731i, 6751i, 6753i, 6755i,
6757i, 6757i CT
•
9143i, 9480i, 9480i CT SIP IP Phones
•
MBU 400 and DECT 420d handset
•
Expansion Modules: 536M and 560M
Refer to this appendix for the following information about your model Aastra IP
phone:
•
Requirements and specifications.
•
IP phone features.
•
Phone hardware and key panel design.
•
Key descriptions.
•
Cordless handset installation instructions (models 9480i CT and 6757i CT).
•
Expansion module installation instructions (models 536M and 560M).
41-001134-06 Rev 00, Rel. 1.2
A-1
AastraLink Pro 160 IP Phone User Guide
Aastra IP Phone Model 9143i
Aastra IP Phone Model 9143i
9143i IP Phone Features
•
•
•
•
•
•
•
•
•
•
•
•
A-2
3-line LCD screen
3 call appearance lines with LEDs
7 programmable keys
Press-and-Hold speeddial key configuration feature
Full-duplex speakerphone for handsfree calls
Supports up to 9 call lines
Headset support (modular connector)
Built-in two-port, 10/100 Ethernet ports - lets you share a connection with
your computer
Inline power support (based on 802.3af standard) which eliminates power
adapters.
AC power adapter (included)
Enhanced busy lamp fields
Set paging
41-001134-06 Rev 00, Rel. 1.2
Aastra IP Phone Model Reference
Aastra IP Phone Model 9143i
9143i Key Pad
Set Indicator Light
Options Key
Backlit Display
Navigational Keys
Handset
Con
f
Xfe
Sav
e
Del
Opt
ion
s
Dir
ect
or y
ete
r
L3
L2
L1
Mu
te
Volume Bar
Dial Pad
Line/Call Appearance Keys and
Lights
Programmable Keys/Line Appearance
Keys
41-001134-06 Rev 00, Rel. 1.2
A-3
AastraLink Pro 160 IP Phone User Guide
Aastra IP Phone Model 9143i
9143i Key Description
Keys
Key Description
Navigation keys - Pressing the UP and DOWN arrow keys lets you view different
status and text messages on the LCD display (if there is more than 1 line of status/
text messages). These buttons also let you scroll through menu selections, such as
the Options List.
Pressing the LEFT and RIGHT arrow keys lets you view the different line/call
appearances. While in the Options List, these keys allow you to exit or enter the
current option. When you are editing entries on the display, pressing the LEFT arrow
key erases the character on the left; pressing the RIGHT arrow key sets the option.
Goodbye key - Ends an active call. The Goodbye key also exits an open list, such
as the Options List, without saving changes.
Hold key - Places an active call on hold. To retrieve a held call, press the call
appearance button beside the light that is flashing.
Volume control key - Adjusts the volume for the handset, headset, ringer, and
handsfree speaker.
Callers List key - Allows you to access the Callers List that stores up to 200 of the
last calls received.
Conf
Xfer
Conference key - Allows you to begin a conference call with up to 3 active call
parties.
Transfer key - Allows you to perform blind or consultative transfer of an active call to
another number. In blind transfer, you transfer the call without waiting for the far end
to answer. In consultative transfer, you wait for the far end to answer before
transferring the call.
Note: The AastraLink Pro 160 supports consultative transfer and blind transfer for
calls to SIP extensions; however, it supports only consultative transfer for calls to
user groups.
A-4
41-001134-06 Rev 00, Rel. 1.2
Aastra IP Phone Model Reference
Aastra IP Phone Model 9143i
Keys
Key Description
Redial key - Redials a previously dialed number. The Redial key stores up to 100
previously dialed numbers that you can select from. Pressing the Redial key twice
simultaneously redials the last dialed number.
L3
Line/Call Appearance key - Connects you to a line or call. The Aastra 9143i IP
Phone supports up to 3 line keys.
L2
L1
Handsfree key - Activates Handsfree for making and receiving calls without lifting
the handset. When the audio mode option is set, this key is used to switch between
a headset and the handsfree speakerphone.
Options key - Accesses options to customize your phone.
Options
Directory
Save
Delete
Directory key - Accesses your Personal and Corporate Phone Directories. You can
enter up to 200 entries into the 9143i Personal Directory by adding them manually,
or by saving the number and name from other lists stored on your phone. Each entry
can contain a maximum of 16 letters and numbers.
Save key - Allows you to save entries when storing numbers and names in
Directory. Also allows you to save Option settings when using the programmable
keys.
Delete key - Allows you to remove entries from the Redial, Directory, or Callers
Lists.
41-001134-06 Rev 00, Rel. 1.2
A-5
AastraLink Pro 160 IP Phone User Guide
Aastra IP Phone Model 9143i
Keys
Key Description
Programmable keys - Allows you to use the feature configured for that key. You can
program up to 6 keys with a specific function.
Your system administrator has preprogrammed the default set of softkeys for your IP
phone. You can add additional softkeys, or edit softkeys, using the Web UI. The
softkey types available for you to configure include:
Mute
A-6
•
Speeddial
•
Do Not Disturb
•
Call Forward
•
Voicemail
•
Find Me Follow Me
•
Park Call
•
Directed Call Pickup
•
Directory
•
Busy Lamp Field (BLF)
•
Conference
•
Intercom
•
Page All
•
Paging
•
SLA (displays if enabled by your administrator)
•
Relay
•
Services
•
Call List
•
Operator Day/Night (Operator only)
•
Operator On/Off Duty (Operator only)
Mute key - Mutes the microphone so that your caller cannot hear you (the light
indicator flashes when the microphone is on mute).
41-001134-06 Rev 00, Rel. 1.2
Aastra IP Phone Model Reference
Aastra IP Phone Models 9480i and 9480i CT
Aastra IP Phone Models 9480i and 9480i CT
9480i and 9480i CT IP Phone Features
•
•
•
•
•
•
•
•
•
•
•
•
5 line graphical LCD screen with large backlit display
6 multi-functional, state-based softkeys
Press-and-Hold speeddial key configuration feature
4 call appearance lines with LEDs
Supports up to 9 call lines
Speakerphone for handsfree calls
Headset support (modular connector)
Built-in-two-port, 10/100 Ethernet switch - lets you share a connection with
your computer.
Inline power support (based on 802.3af standard) which eliminates power
adapters.
AC power adapter (included)
Enhanced busy lamp fields
Set paging
41-001134-06 Rev 00, Rel. 1.2
A-7
AastraLink Pro 160 IP Phone User Guide
Aastra IP Phone Models 9480i and 9480i CT
9480i and 9480i CT Key Pad
Large Backlit Display
Navigational Keys
Telephone Status Light
Line or Call Appearance
Buttons and Lights
Handset
Hold
Red
ia
l
Go
od
b ye
Op
tion
s
35
Xfe
r
Co
n
f
Ico
m
Ser
vic
es
Speaker Status Light
Headset/Handsfree Button
Mute button
Volume Bar
Dial Pad
Softkeys
A-8
41-001134-06 Rev 00, Rel. 1.2
Aastra IP Phone Model Reference
Aastra IP Phone Models 9480i and 9480i CT
9480i and 9480i CT Key Description
Keys
Key Description
Good
oodbye
Goodbye key - Ends an active call. The Goodbye key also exits an open
list, such as the Options List, without saving changes.
Options
Options key - Accesses options to customize your phone. Your System
Administrator may have already customized some of your settings. Check
with your System Administrator before changing the administrator-only
options.
Hold
Hold key - Places an active call on hold. To retrieve a held call, press the
call appearance button beside the light that is flashing.
Redial key - Redials up to 100 previously dialed numbers. Pressing the
Redial key twice simultaneously redials the last dialed number.
Redial
Volume control key - Adjusts the volume for the handset, headset, ringer,
and handsfree speaker.
Handsfree key - Activates Handsfree for making and receiving calls
without lifting the handset. When the audio mode option is set, this key is
used to switch between a headset and the handsfree speakerphone.
Mute key - Mutes the microphone so that your caller cannot hear you (the
light indicator flashes when the microphone is on mute).
Line/Call Appearance key - Connects you to a line or call. The Aastra
9480i and 9480i CT IP phones support up to 4 line keys.
L1
L2
L3
L4
41-001134-06 Rev 00, Rel. 1.2
A-9
AastraLink Pro 160 IP Phone User Guide
Aastra IP Phone Models 9480i and 9480i CT
Keys
Key Description
Navigation keys - Pressing the UP and DOWN arrow keys lets you view
different status and text messages on the LCD display (if there is more than
1 line of status/text messages). These buttons also let you scroll through
menu selections, such as the Options List.
Pressing the LEFT and RIGHT arrow keys lets you view the different line/
call appearances. While in the Options List, these keys allow you to exit or
enter the current option. When you are editing entries on the display,
pressing the LEFT arrow key erases the character on the left; pressing the
RIGHT arrow key sets the option.
Transfer key - Transfers an active call to another number.
Xfer
er
Conference key - Begins a conference call with the active call.
Conf
Icom
Servi
vicces
A-10
Icom key - Begins an intercom call to a remote extension and answers
incoming intercom calls. The 9480i and 9480i CT IP Phones also have
default softkey 4 configured as Icom.
Services key - Displays a list of Services available to your phone, if
specific services have been configured. The available Aastra services
include Directory & Callers Log. The 9480i and 9480i CT IP Phones also
have default softkey 1 configured as Services.
41-001134-06 Rev 00, Rel. 1.2
Aastra IP Phone Model Reference
Aastra IP Phone Models 9480i and 9480i CT
Keys
Key Description
Softkeys - 6 state-based softkeys on the 9480i and 9480i CT IP Phones.
Your system administrator has preprogrammed the default set of softkeys
for your IP phone. You can add additional softkeys, or edit softkeys, using
the Web UI. The softkey types available for you to configure include:
41-001134-06 Rev 00, Rel. 1.2
•
Speeddial
•
Do Not Disturb
•
Call Forward
•
Voicemail
•
Find Me Follow Me
•
Park Call
•
Directed Call Pickup
•
Directory
•
Busy Lamp Field (BLF)
•
Conference
•
Intercom
•
Page All
•
Paging
•
SLA (displays if enabled by your administrator)
•
Relay
•
Services
•
Call List
•
Operator Day/Night (Operator only)
•
Operator On/Off Duty (Operator only)
A-11
AastraLink Pro 160 IP Phone User Guide
Aastra IP Phone Models 9480i and 9480i CT
9480i CT Cordless Handset
For information about the 9480i CT cordless handset, see “CT Cordless Handsets
(9480i CT and 6757i CT)” on page A-43.
A-12
41-001134-06 Rev 00, Rel. 1.2
Aastra IP Phone Model Reference
Aastra IP Phone Model 6730i (Symbol and Text Keys)
Aastra IP Phone Model 6730i (Symbol and Text Keys)
6730i IP Phone Features (Symbol and Text)
•
3-line LCD screen
•
8 programmable top keys
•
Press-and-hold speeddial key configuration feature
•
Supports up to 6 call lines with LEDs
•
Full-duplex speakerphone for handsfree calls
•
AC power adapter (included)
•
Enhanced busy lamp fields
•
Set paging
41-001134-06 Rev 00, Rel. 1.2
A-13
AastraLink Pro 160 IP Phone User Guide
Aastra IP Phone Model 6730i (Symbol and Text Keys)
6730i Key Pad
Navigational keys
3-line LCD screen
8 keys with LEDs
Message waiting lamp
High quality speakerphone
HAC handset
6730 i
6
5
4
3
2
1
Hold key
Redial key
1 - Speakerphone key
Goodbye key
2 - Two call appearance lines
Keypad
3 - Transfer key
Volume Control
4 - Conference key
Mute key
5 - Callers List key
6 - Options key
A-14
41-001134-06 Rev 00, Rel. 1.2
Aastra IP Phone Model Reference
Aastra IP Phone Model 6730i (Symbol and Text Keys)
6730i Key Descriptions (Symbol and Text)
Symbol Keys
Text Keys
Hold
old
Redial
Goodbye
Key Description
Hold key - Places an active call on hold. To retrieve a held call, press the
call appearance button beside the light that is flashing.
Redial key - Redials up to 100 previously dialed numbers. Pressing the
Redial key twice redials the last dialed number.
Goodbye key - Ends an active call. The Goodbye key also exits an open
list, such as the Options List, without saving changes.
Volume control key - Adjusts the volume for the handset, ringer, and
handsfree speaker..
Navigation keys - Pressing the UP and DOWN arrow keys lets you view
different status and text messages on the LCD display (if there is more than
1 line of status/text messages). These buttons also let you scroll through
menu selections, such as the Options List.
Pressing the LEFT and RIGHT arrow keys lets you view the different line/
call appearances. While in the Options List, these keys allow you to exit or
enter the current option. When you are editing entries on the display,
pressing the LEFT arrow key erases the character on the left; pressing the
RIGHT arrow key sets the option.
Speaker
Speaker key - Transfers the active call to the speaker, allowing handsfree
use of the phone.
Options key - Accesses services and options to customize your phone.
Your System Administrator may have already customized some of your
settings. Check with your System Administrator before changing the
administrator-only options.
Callers List key - Accesses the last 200 calls received.
Callers
Conference key - Begins a conference call with the active call.
Conf.
41-001134-06 Rev 00, Rel. 1.2
A-15
AastraLink Pro 160 IP Phone User Guide
Aastra IP Phone Model 6730i (Symbol and Text Keys)
Symbol Keys
Text Keys
Key Description
Transfer key - Transfers the active call to another number.
Transfer
L2
Line/Call Appearance keys - Connect you to a line or call. The Aastra
6730i IP Phone IP phone supports 2 line keys, each with LED indicator
lights.
L1
A-16
41-001134-06 Rev 00, Rel. 1.2
Aastra IP Phone Model Reference
Aastra IP Phone Model 6730i (Symbol and Text Keys)
Symbol Keys
Text Keys
Key Description
Programmable keys - 8 Top Keys - all 8 keys are programmable.
Keys 5 and 6 are designated as the SAVE and DELETE keys, respectively.
These keys must be made configurable by the System Administrator before
they can be changed.
5 - SAVE
(preconfigured)
Allows you to save numbers
and/or names to the Directory. Using this key, you
enter the number, name, and line (or speeddial
key) to record in the Directory List.
6 - DELETE
(preconfigured)
Allows you to delete entries
from the Directory List and Callers List. (Must
enter the Directory or Callers list and select an
entry, then press twice to delete entry).
Your system administrator has preprogrammed the default set of softkeys
for your IP phone. You can add additional softkeys, or edit softkeys, using
the Web UI. The softkey types available for you to configure include:
41-001134-06 Rev 00, Rel. 1.2
•
Speeddial
•
Do Not Disturb
•
Call Forward
•
Voicemail
•
Find Me Follow Me
•
Park Call
•
Directed Call Pickup
•
Directory
•
Busy Lamp Field (BLF)
•
Conference
•
Intercom
•
Page All
•
Paging
•
SLA (displays if enabled by your administrator)
•
Relay
•
Services
•
Call List
•
Operator Day/Night (Operator only)
•
Operator On/Off Duty (Operator only)
A-17
AastraLink Pro 160 IP Phone User Guide
Aastra IP Phone Model 6731i (Symbol and Text Keys)
Aastra IP Phone Model 6731i (Symbol and Text Keys)
6731i IP Phone Features (Symbol and Text)
A-18
•
3-line LCD screen
•
8 programmable top keys
•
Press-and-hold speeddial key configuration feature
•
Supports up to 6 call lines with LEDs
•
Full-duplex speakerphone for handsfree calls
•
Built-in two-port, 10/100 BaseT Ethernet ports - lets you share a network
connection with your computer
•
Inline power support (based on IEEE 802.3af Power-over-Ethernet standard)
which eliminates power adapters.
•
AC power adapter (included)
•
Enhanced busy lamp fields
•
Set paging
41-001134-06 Rev 00, Rel. 1.2
Aastra IP Phone Model Reference
Aastra IP Phone Model 6731i (Symbol and Text Keys)
6731i Key Pad
Navigational keys
3-line LCD screen
8 keys with LEDs
Message waiting lamp
High quality speakerphone
HAC handset
6
5
4
3
2
1
Hold key
Redial key
1 - Speakerphone key
Goodbye key
2 - Two call appearance lines
Keypad
3 - Transfer key
Volume Control
4 - Conference key
Mute key
5 - Callers List key
6 - Options key
41-001134-06 Rev 00, Rel. 1.2
A-19
AastraLink Pro 160 IP Phone User Guide
Aastra IP Phone Model 6731i (Symbol and Text Keys)
6731i Key Descriptions (Symbol and Text)
Symbol Keys
Text Keys
Hold
old
Redial
Goodbye
Key Description
Hold key - Places an active call on hold. To retrieve a held call, press the
call appearance button beside the light that is flashing.
Redial key - Redials up to 100 previously dialed numbers. Pressing the
Redial key twice redials the last dialed number.
Goodbye key - Ends an active call. The Goodbye key also exits an open
list, such as the Options List, without saving changes.
Volume control key - Adjusts the volume for the handset, ringer, and
handsfree speaker..
Navigation keys - Pressing the UP and DOWN arrow keys lets you view
different status and text messages on the LCD display (if there is more than
1 line of status/text messages). These buttons also let you scroll through
menu selections, such as the Options List.
Pressing the LEFT and RIGHT arrow keys lets you view the different line/
call appearances. While in the Options List, these keys allow you to exit or
enter the current option. When you are editing entries on the display,
pressing the LEFT arrow key erases the character on the left; pressing the
RIGHT arrow key sets the option.
Speaker
Speaker key - Transfers the active call to the speaker, allowing handsfree
use of the phone.
Options key - Accesses services and options to customize your phone.
Your System Administrator may have already customized some of your
settings. Check with your System Administrator before changing the
administrator-only options.
Callers List key - Accesses the last 200 calls received.
Callers
Conference key - Begins a conference call with the active call.
Conf.
A-20
41-001134-06 Rev 00, Rel. 1.2
Aastra IP Phone Model Reference
Aastra IP Phone Model 6731i (Symbol and Text Keys)
Symbol Keys
Text Keys
Key Description
Transfer key - Transfers the active call to another number.
Transfer
L2
Line/Call Appearance keys - Connect you to a line or call. The Aastra
6730i IP Phone IP phone supports 2 line keys, each with LED indicator
lights.
L1
41-001134-06 Rev 00, Rel. 1.2
A-21
AastraLink Pro 160 IP Phone User Guide
Aastra IP Phone Model 6731i (Symbol and Text Keys)
Symbol Keys
Text Keys
Key Description
Programmable keys - 8 Top Keys - all 8 keys are programmable.
Keys 5 and 6 are designated as the SAVE and DELETE keys, respectively.
These keys must be made configurable by the System Administrator before
they can be changed.
5 - SAVE
(preconfigured)
Allows you to save numbers
and/or names to the Directory. Using this key, you
enter the number, name, and line (or speeddial
key) to record in the Directory List.
6 - DELETE
(preconfigured)
Allows you to delete entries
from the Directory List and Callers List. (Must
enter the Directory or Callers list and select an
entry, then press twice to delete entry).
Your system administrator has preprogrammed the default set of softkeys
for your IP phone. You can add additional softkeys, or edit softkeys, using
the Web UI. The softkey types available for you to configure include:
A-22
•
Speeddial
•
Do Not Disturb
•
Call Forward
•
Voicemail
•
Find Me Follow Me
•
Park Call
•
Directed Call Pickup
•
Directory
•
Busy Lamp Field (BLF)
•
Conference
•
Intercom
•
Page All
•
Paging
•
SLA (displays if enabled by your administrator)
•
Relay
•
Services
•
Call List
•
Operator Day/Night (Operator only)
•
Operator On/Off Duty (Operator only)
41-001134-06 Rev 00, Rel. 1.2
Aastra IP Phone Model Reference
Aastra IP Phone Model 6751i (Symbol and Text Keys)
Aastra IP Phone Model 6751i (Symbol and Text Keys)
6751i IP Phone Features (Symbol and Text)
•
3-line LCD screen
•
1 call appearance line
•
•
Press-and-Hold speeddial key configuration feature
Supports 1 call line with transfer capabilities
•
Full-duplex speakerphone for hands-free calls
•
Built-in two-port, 10/100 Ethernet ports - lets you share a connection with
your computer
•
AC power adapter (sold separately)
•
Set paging
41-001134-06 Rev 00, Rel. 1.2
A-23
AastraLink Pro 160 IP Phone User Guide
Aastra IP Phone Model 6751i (Symbol and Text Keys)
6751i Key Pad
High quality speakerphone
HAC handset
Goodbye key
Services key
Hold key
Redial Key
Volume control
Navigational keys
3-line LCD screen
Message waiting lamp
Keypad
Speakerphone
Mute key
Save/Delete/Swap Keys
A-24
41-001134-06 Rev 00, Rel. 1.2
Aastra IP Phone Model Reference
Aastra IP Phone Model 6751i (Symbol and Text Keys)
6751i Key Descriptions (Symbol and Text)
Symbol Keys
Text Keys
Key Description
Goodbye key - Ends an active call. The Goodbye key also exits an open
list, such as the Options List, without saving changes.
Servi
vices
es
Hold
old
Redial
Services key - Accesses services and options to customize your phone.
This keys also access the Directory List and Callers List. Your System
Administrator may have already customized some of your settings. Check
with your System Administrator before changing the administrator-only
options.
Hold key - Places an active call on hold. To retrieve a held call, press the
Hold key again.
Redial key - Redials up to 100 previously dialed numbers. Pressing the
Redial key twice simultaneously redials the last dialed number.
Volume control key - Adjusts the volume for the handset, ringer, and
handsfree speaker.
Save
Delete
Swap
Save key - Saves names and numbers to the Directory List. Also saves
names and numbers from the Callers List to the Directory List.
Delete key - Deletes individual or all entries from the Directory List and
Callers List. Deletes all entries from the Redial List. You can also use this
key to backspace and delete a character when entering values for
speeddial softkeys.
Swap key - If you are on an active call and a second call comes in, you can
press the Swap key. This key places the first call on hold and answers the
second call. Pressing the Swap key again toggles between the two active
calls.
The Swap key works with two active calls only. A third call cannot be
accepted.
Speaker
41-001134-06 Rev 00, Rel. 1.2
Speaker key - Activates Handsfree for receiving calls without lifting the
handset. Can be used on active calls to switch from the handset to
handsfree.
A-25
AastraLink Pro 160 IP Phone User Guide
Aastra IP Phone Model 6751i (Symbol and Text Keys)
Symbol Keys
Text Keys
Key Description
Mute key - Mutes the microphone so that your caller cannot hear you.
Mute
Navigation keys - Pressing the UP and DOWN arrow keys lets you view
different status and text messages on the LCD display (if there is more than
1 line of status/text messages). These buttons also let you scroll through
menu selections, such as the Options List.
UP Arrow - This key also acts as a Transfer Key, allowing you to transfer
calls when required.
DOWN Arrow - This key also acts as a Conference Key, allowing you to join
conferences when required.
Pressing the UP and DOWN arrow keys lets you view the lines on the LCD.
While in the Options List, the navigation keys allow you to exit or enter the
current option. When you are editing entries on the display, pressing the
LEFT arrow key erases the character on the left; pressing the RIGHT arrow
key sets the option.
A-26
41-001134-06 Rev 00, Rel. 1.2
Aastra IP Phone Model Reference
Aastra IP Phone Model 6753i
Aastra IP Phone Model 6753i
6753i IP Phone Features
•
3-line LCD screen
•
6 top keys - all 6 keys are programmable
•
Press-and-hold speeddial key configuration feature
•
3 call appearance lines with LEDs
•
Supports up to 9 call lines
•
Full-duplex speakerphone for handsfree calls
•
Headset support (modular connector)
•
Built-in two-port, 10/100 Ethernet ports - lets you share a connection with
your computer
•
Inline power support (based on 802.3af standard) which eliminates power
adapters
•
AC power adapter (included)
•
Enhanced busy lamp fields
•
Set paging
41-001134-06 Rev 00, Rel. 1.2
A-27
AastraLink Pro 160 IP Phone User Guide
Aastra IP Phone Model 6753i
6753i Key Panel
6 programmable keys with LEDs
High quality speakerphone
HAC handset
Goodbye key
Options key
Hold key
Redial Key
Volume control
Navigational keys
3-line LCD screen
Message waiting lamp
Keypad
Speakerphone/headset toggle key
Mute key
3 call appearance lines
A-28
41-001134-06 Rev 00, Rel. 1.2
Aastra IP Phone Model Reference
Aastra IP Phone Model 6753i
6753i Key Description
Keys
Key Description
Goodbye key - Ends an active call. The Goodbye key also exits an open
list, such as the Options List, without saving changes.
Options key - Accesses options to customize your phone. Your System
Administrator may have already customized some of your settings. Check
with your System Administrator before changing the administrator-only
options.
Hold key - Places an active call on hold. To retrieve a held call, press the
call appearance button beside the light that is flashing.
Redial key - Redials up to 100 previously dialed numbers. Pressing the
Redial key twice simultaneously redials the last dialed number.
Volume control key - Adjusts the volume for the handset, headset, ringer,
and handsfree speaker.
L3
Line/Call Appearance key - Connects you to a line or call. The Aastra
6753i IP phone supports up to 3 line keys.
L2
L1
Handsfree key - Activates Handsfree for making and receiving calls
without lifting the handset. When the audio mode option is set, this key is
used to switch between a headset and the handsfree speakerphone.
Mute key - Mutes the microphone so that your caller cannot hear you (the
light indicator flashes when the microphone is on mute).
41-001134-06 Rev 00, Rel. 1.2
A-29
AastraLink Pro 160 IP Phone User Guide
Aastra IP Phone Model 6753i
Keys
Key Description
Navigation keys - Pressing the UP and DOWN arrow keys lets you view
different status and text messages on the LCD display (if there is more
than 1 line of status/text messages). These buttons also let you scroll
through menu selections, such as the Options List.
Pressing the LEFT and RIGHT arrow keys lets you view the different line/
call appearances. While in the Options List, these keys allow you to exit or
enter the current option. When you are editing entries on the display,
pressing the LEFT arrow key erases the character on the left; pressing the
RIGHT arrow key sets the option.
A-30
41-001134-06 Rev 00, Rel. 1.2
Aastra IP Phone Model Reference
Aastra IP Phone Model 6753i
Keys
Key Description
Programmable keys - 6 Top Keys - all 6 keys are programmable.
Keys 1 and 2 are designated as the SAVE and DELETE keys, respectively.
These keys are locked but can be unlocked and made configurable if
required by the System Administrator.
1 - SAVE
2 - DELETE
Allows you to save numbers and/or names to the
Directory. Using this key, you enter the number,
name, and line (or speeddial key) to record in the
Directory List.
Allows you to delete a single entry or all entries from
the Directory List and Callers List.
Your system administrator has preprogrammed the default set of softkeys
for your IP phone. You can add additional softkeys, or edit softkeys, using
the Web UI. The softkey types available for you to configure include:
41-001134-06 Rev 00, Rel. 1.2
•
Speeddial
•
Do Not Disturb
•
Call Forward
•
Voicemail
•
Find Me Follow Me
•
Park Call
•
Directed Call Pickup
•
Directory
•
Busy Lamp Field (BLF)
•
Conference
•
Intercom
•
Page All
•
Paging
•
SLA (displays if enabled by your administrator)
•
Relay
•
Services
•
Call List
•
Operator Day/Night (Operator only)
•
Operator On/Off Duty (Operator only)
A-31
AastraLink Pro 160 IP Phone User Guide
Aastra IP Phone Model 6755i
Aastra IP Phone Model 6755i
6755i IP Phone Features
•
8 line graphical LCD screen (144 x 75 pixels) with white backlight
•
12 programmable keys
— 6 Top keys: Programmable hard keys
— 6 Bottom keys: Programmable state-based softkeys
A-32
•
Press-and-hold speeddial key configuration feature
•
4 call appearance lines with LEDs
•
Supports up to 9 call lines
•
Full-duplex speakerphone for handsfree calls
•
Headset support (modular connector)
•
Built-in-two-port, 10/100 Ethernet switch - lets you share a connection with
your computer.
•
Inline power support (based on 802.3af standard) which eliminates power
adapters.
•
AC power adapter (included)
•
Enhanced busy lamp fields
•
Set paging
41-001134-06 Rev 00, Rel. 1.2
Aastra IP Phone Model Reference
Aastra IP Phone Model 6755i
6755i Key Panel
6 programmable keys with LEDs
High quality speakerphone
HAC handset
Message waiting lamp
6 dynamic
context-sensitive
softkeys
Goodbye key
Options key
Hold key
Redial Key
Volume control
Navigational keys
8-line LCD screen
Keypad
Speakerphone/headset toggle key
Mute key
4 call appearance lines
41-001134-06 Rev 00, Rel. 1.2
A-33
AastraLink Pro 160 IP Phone User Guide
Aastra IP Phone Model 6755i
6755i Key Description
Keys
Key Description
Goodbye key - Ends an active call. The Goodbye key also exits an open
list, such as the Options List, without saving changes.
Options key - Accesses options to customize your phone. Your System
Administrator may have already customized some of your settings. Check
with your System Administrator before changing the administrator-only
options.
Hold key - Places an active call on hold. To retrieve a held call, press the
call appearance button beside the light that is flashing.
Redial key - Redials up to 100 previously dialed numbers. Pressing the
Redial key twice simultaneously redials the last dialed number.
Volume control key - Adjusts the volume for the handset, headset, ringer,
and handsfree speaker.
L4
Line/Call Appearance key - Connects you to a line or call. The Aastra 6755i
IP phone supports up to 4 line keys.
L3
L2
L1
Handsfree key - Activates Handsfree for making and receiving calls without
lifting the handset. When the audio mode option is set, this key is used to
switch between a headset and the handsfree speakerphone.
Mute key - Mutes the microphone so that your caller cannot hear you (the
light indicator flashes when the microphone is on mute).
A-34
41-001134-06 Rev 00, Rel. 1.2
Aastra IP Phone Model Reference
Aastra IP Phone Model 6755i
Keys
Key Description
Navigation keys - Pressing the UP and DOWN arrow keys lets you view
different status and text messages on the LCD display (if there is more than
1 line of status/text messages). These buttons also let you scroll through
menu selections, such as the Options List.
Pressing the LEFT and RIGHT arrow keys lets you view the different line/call
appearances. While in the Options List, these keys allow you to exit or enter
the current option. When you are editing entries on the display, pressing the
LEFT arrow key erases the character on the left; pressing the RIGHT arrow
key sets the option.
Programmable Keys -6 Top Keys: programmable static softkeys (up to 10
programmable functions)
Your system administrator has preprogrammed the default set of softkeys for
your IP phone. You can add additional softkeys, or edit softkeys, using the
Web UI. The softkey types available for you to configure include:
41-001134-06 Rev 00, Rel. 1.2
•
Speeddial
•
Do Not Disturb
•
Call Forward
•
Voicemail
•
Find Me Follow Me
•
Park Call
•
Directed Call Pickup
•
Directory
•
Busy Lamp Field (BLF)
•
Conference
•
Intercom
•
Page All
•
Paging
•
SLA (displays if enabled by your administrator)
•
Relay
•
Services
•
Call List
•
Operator Day/Night (Operator only)
•
Operator On/Off Duty (Operator only)
A-35
AastraLink Pro 160 IP Phone User Guide
Aastra IP Phone Model 6755i
Keys
Key Description
•
Softkeys - 6 Bottom Keys: programmable state-based softkeys (up to 20
programmable functions)
Your system administrator has preprogrammed the default set of softkeys for
your IP phone. You can add additional softkeys, or edit softkeys, using the
Web UI. The softkey types available for you to configure include:
A-36
•
Speeddial
•
Do Not Disturb
•
Call Forward
•
Voicemail
•
Find Me Follow Me
•
Park Call
•
Directed Call Pickup
•
Directory
•
Busy Lamp Field (BLF)
•
Conference
•
Intercom
•
Page All
•
Paging
•
SLA (displays if enabled by your administrator)
•
Relay
•
Services
•
Call List
•
Operator Day/Night (Operator only)
•
Operator On/Off Duty (Operator only)
41-001134-06 Rev 00, Rel. 1.2
Aastra IP Phone Model Reference
Aastra IP Phone Model 6757i and 6757i CT
Aastra IP Phone Model 6757i and 6757i CT
6757i and 6757i CT IP Phone Features
•
11 line graphical LCD screen (144 x 128 pixels) with white backlight
•
12 multi-functional softkeys
— 6 Top Keys: Static softkeys (up to 10 programmable functions)
— 6 Bottom Keys:State-based softkeys (up to 20 programmable functions)
•
Press-and-hold speeddial key configuration feature
•
4 call appearance lines with LEDs
•
Supports up to 9 call lines
•
Full-duplex speakerphone for handsfree calls
•
Headset support (modular connector)
•
Built-in-two-port, 10/100 Ethernet switch - lets you share a connection with
your computer.
•
Inline power support (based on 802.3af standard) which eliminates power
adapters.
•
AC power adapter (included)
•
Enhanced busy lamp fields
•
Set paging
41-001134-06 Rev 00, Rel. 1.2
A-37
AastraLink Pro 160 IP Phone User Guide
Aastra IP Phone Model 6757i and 6757i CT
6757i and 6757i CT Key Panel
High quality speakerphone
HAC handset
Message waiting lamp
12 softkeys
- 6 static
- 6 dynamic
Goodbye key
Options key
Hold key
Redial Key
Volume control
Navigational keys
11-line LCD screen
Keypad
Speakerphone/headset toggle key
Mute key
4 call appearance lines
A-38
41-001134-06 Rev 00, Rel. 1.2
Aastra IP Phone Model Reference
Aastra IP Phone Model 6757i and 6757i CT
6757i and 6757i CT Key Descriptions
Keys
Key Description
Goodbye key - Ends an active call. The Goodbye key also exits an open
list, such as the Options List, without saving changes.
Options key - Accesses options to customize your phone. Your System
Administrator may have already customized some of your settings. Check
with your System Administrator before changing the administrator-only
options.
Hold key - Places an active call on hold. To retrieve a held call, press the
call appearance button beside the light that is flashing.
Redial key - Redials up to 100 previously dialed numbers. Pressing the
Redial key twice simultaneously redials the last dialed number.
Volume control key - Adjusts the volume for the handset, headset, ringer,
and handsfree speaker.
L4
Line/Call Appearance key - Connects you to a line or call. The Aastra
6757i IP phone supports up to 4 line keys.
L3
L2
L1
Handsfree key - Activates Handsfree for making and receiving calls without
lifting the handset. When the audio mode option is set, this key is used to
switch between a headset and the handsfree speakerphone.
Mute key - Mutes the microphone so that your caller cannot hear you (the
light indicator flashes when the microphone is on mute).
41-001134-06 Rev 00, Rel. 1.2
A-39
AastraLink Pro 160 IP Phone User Guide
Aastra IP Phone Model 6757i and 6757i CT
Keys
Key Description
Navigation keys - Pressing the UP and DOWN arrow keys lets you view
different status and text messages on the LCD display (if there is more than
1 line of status/text messages). These buttons also let you scroll through
menu selections, such as the Options List.
Pressing the LEFT and RIGHT arrow keys lets you view the different line/
call appearances. While in the Options List, these keys allow you to exit or
enter the current option. When you are editing entries on the display,
pressing the LEFT arrow key erases the character on the left; pressing the
RIGHT arrow key sets the option.
A-40
41-001134-06 Rev 00, Rel. 1.2
Aastra IP Phone Model Reference
Aastra IP Phone Model 6757i and 6757i CT
Keys
Key Description
Softkeys - 12 softkeys on the 6757i IP Phone, as follows:
•
6 Top Keys: programmable static softkeys (up to 10 programmable
functions)
•
6 Bottom Keys: programmable state-based softkeys (up to 20
programmable functions)
Your system administrator has preprogrammed the default set of softkeys
for your IP phone. You can add additional softkeys, or edit softkeys, using
the Web UI. The softkey types available for you to configure include:
41-001134-06 Rev 00, Rel. 1.2
•
Speeddial
•
Do Not Disturb
•
Call Forward
•
Voicemail
•
Find Me Follow Me
•
Park Call
•
Directed Call Pickup
•
Directory
•
Busy Lamp Field (BLF)
•
Conference
•
Intercom
•
Page All
•
Paging
•
SLA (displays if enabled by your administrator)
•
Relay
•
Services
•
Call List
•
Operator Day/Night (Operator only)
•
Operator On/Off Duty (Operator only)
A-41
AastraLink Pro 160 IP Phone User Guide
Aastra IP Phone Model 6757i and 6757i CT
6757i CT Cordless Handset
For information about the 6757i CT cordless handset, see “CT Cordless Handsets
(9480i CT and 6757i CT)” on page A-43.
A-42
41-001134-06 Rev 00, Rel. 1.2
Aastra IP Phone Model Reference
CT Cordless Handsets (9480i CT and 6757i CT)
CT Cordless Handsets (9480i CT and 6757i CT)
The 9480i CT and 6757i CT phones have cordless handsets. This section
describes the features and keys on the CT cordless handsets.
CT Cordless Handset Features
•
•
•
•
•
•
5 line backlit display screen
2 multi-functional softkeys
Programmable function key supports up to 14 functions
Vibration Alerter
Headset Jack
Desk charging stand
10
1
2
3
4
5
6
5
11
12
7
8
15
9
41-001134-06 Rev 00, Rel. 1.2
13
15
14
16
A-43
AastraLink Pro 160 IP Phone User Guide
CT Cordless Handsets (9480i CT and 6757i CT)
CT Cordless Handset Key Descriptions
A-44
Function #
Function Description
1
Receiver
2
Volume key
During Ringing: Adjusts ringer volume
During a call: Adjusts receiver volume
During text mode (not in a call): Moves cursor right/left
3
Display
4
Features ƒ Key List
Access key to the programmed Feature Key List
Scrolls up when in the various lists
Adds a space during editing
5
Softkeys
Activates feature or option shown on the display above
the keys
6
Call key
Used to obtain dial tone
Also used as a Hold key
7
Dial Pad
8
Mute Key
When used, prevents the caller from hearing you
9
Headset Jack
10
Status Light
11
Release key
To end calls and go on hook
Exits Menu and the various lists
12
Menu Key
Access key to the different Options
Scrolls down when in the various lists
Used as Backspace during editing
13
Redial Key
Displays the last 10 numbers dialed
14
Charging Jack
15
Charging Contacts
16
Microphone
41-001134-06 Rev 00, Rel. 1.2
Aastra IP Phone Model Reference
CT Cordless Handsets (9480i CT and 6757i CT)
Cordless Handset Safety Information
Prior to installing and using the 6757i CT and handset, please read the following
important safety information.
Warning: Any changes or modifications not expressly approved by the party responsible
for compliance could void the user’s authority to operate the equipment.
Warning: This equipment complies with FCC and IC RF radiation exposure limits set forth
for an uncontrolled environment. This device must be operated such that; a minimum
separation distance of at least 20cm is maintained between the radiator (antenna) and the
user’s/nearby people’s body at all times and it must not be co-located or operating in
conjunction with any other antenna or transmitter.
Cordless Handset and Base Station
DO NOT:
•
Use this handset near medical equipment such as pacemakers.
•
Place the handset in areas subject to explosive hazards, flammable liquids or
gases.
•
Set up and use the handset close to devices that emit electromagnetic fields
(i.e. electric motors, household appliances, fluorescent lamps, computers,
radios, televisions, VCR’s, DVD’s etc.) Operation of the handset could be
adversely affected if exposed to such fields and, at minimum, subject to
interference and poorer quality voice communication.
•
Locate the handset and base station near water, moisture, damp areas, heat
sources, direct sunlight, areas with excessive dust, vibration or temperature
extremes.
•
Clean the handset using any chemical or commercial cleaner. Use only an
anti-static or soft moistened cloth to clean the handset. Disconnect the charger
stand prior to cleaning.
Note: Privacy of communications may not be ensured when using this phone. The base
station transmitter, which is built in to the desk phone, must be installed to provide a
separation distance of at least 20 cm from all persons.
41-001134-06 Rev 00, Rel. 1.2
A-45
AastraLink Pro 160 IP Phone User Guide
CT Cordless Handsets (9480i CT and 6757i CT)
Cordless Handset Battery Guidelines
•
Never tamper with or dismantle the battery pack.
•
Avoid touching the battery contacts.
•
If necessary, clean the contacts with a damp cloth.
•
Protect the battery contacts from contact with any metal objects.
•
Never immerse batteries in water or throw them into a fire.
When setting up the phone:
•
Use only the rechargeable batteries supplied with this product.
•
Follow the battery installation instructions included with this guide.
•
Charge the batteries using only the charger stand supplied with this product.
Note: That it takes two to three charging cycles for the batteries to reach their fully charged state.
During operation:
•
It is normal for the batteries to become warm when charging.
•
Discharge the batteries from time to time to prolong their service life.
To do this, do not place the phone back into the charger stand until the
batteries are completely or almost completely discharged. The battery icon
on the display indicates when the batteries are low and an alert tone is
sounded every three minutes.
•
Only use batteries and charging units approved by the manufacturer.
•
If you do not intend to use the phone for an extended period, the batteries
should be removed from the handset.
•
Store batteries at room temperature. Above average temperatures tend to
reduce the service life of batteries.
•
Do not throw away or incinerate used batteries. Take them to an
appropriate collection point for recycling or send them back to your supplier
or distributor.
Note: The batteries included with the 6757i CT handset are designed to provide up to four
hours talk time and ninety six hours standby time. Actual battery performance can be
affected by a wide variety of environmental and user factors.
A-46
41-001134-06 Rev 00, Rel. 1.2
Aastra IP Phone Model Reference
CT Cordless Handsets (9480i CT and 6757i CT)
Cordless Handset Installation and Setup
There are two steps involved in setting up the 6757i CT cordless handset:
•
Set up and plug in the charging cradle.
•
Install the batteries in the handset.
Charging Cradle
The charging cradle is designed to be placed on a desk or any appropriate flat
surface. To set up the charging cradle:
1.
Plug the modular cord of the power adapter into the jack on the bottom of the
cradle. Route the cord through the retaining tabs of the molded cord slot.
Verify the cradle rests on all four feet and does not wobble.
2.
Plug the other end of the power adapter into a non-switched AC outlet. We
recommend that you do not plug the adapter into an electrical power bar. The
adapter should be the only item plugged into the AC outlet.
Non-switched
ACOutlet
41-001134-06 Rev 00, Rel. 1.2
A-47
AastraLink Pro 160 IP Phone User Guide
CT Cordless Handsets (9480i CT and 6757i CT)
Installing and Charging the Battery
The handset is powered by a nickel metal hydride battery pack. To install and
charge the battery:
1.
Place the battery pack in the battery compartment with the connector wires
pointing towards the bottom of the handset.
2.
Connect the battery terminal wire to the charging pins within the battery
compartment.
3.
Slide the cover of the battery compartment from the bottom of the handset
until it locks into place.
4.
Place the handset, face up, in the charging cradle. The handset should easily
slide into the charging cradle. If it does not, check the battery compartment
cover to ensure it is properly closed.
5.
Check the battery icon on the handset screen to confirm that it is blinking, and
that the battery is properly charging.
The cordless handset is automatically “factory paired” to the base station and will
establish contact with the base station once both units are successfully installed.
You can verify this connection by checking for the presence of the Reception
range icon m beside the battery icon b on the handset screen.
A-48
41-001134-06 Rev 00, Rel. 1.2
Aastra IP Phone Model Reference
CT Cordless Handsets (9480i CT and 6757i CT)
Note: The battery must be charged for a minimum of six hours prior to initial use of the handset.
Handset
(face down)
Installing the Belt Clip
To install the belt clip, snap one arm of the clip into the slot on the side of the
handset. Slide the other arm into the slot on the other side of the handset until it
snaps into place.
Using a Headset with your Telephone
The 6757i CT cordless handset accepts headsets through the jack on the bottom of
the handset. Contact your telephone equipment retailer or distributor to purchase a
compatible headset. Customers should read and observe all safety
recommendations contained in headset operating guides when using any headset.
41-001134-06 Rev 00, Rel. 1.2
A-49
AastraLink Pro 160 IP Phone User Guide
CT Cordless Handsets (9480i CT and 6757i CT)
Battery Status Icons
The display provides “at a glance” information on the handset battery:
d
c
b
a
f
The bars indicate the battery
charge level — 4 bars indicates a
fully charged battery. The battery
needs recharging when only 1 bar
appears.
The bars will flash when the
battery is being recharged on the
charger stand.
Note: The handset is designed to recharge the batteries only when necessary. The battery icon will
not flash and the handset does not charge every time it is placed on the stand. If a defective battery
is replaced, then the battery icon is not identified until the new battery is charged for at least 2
minutes.
A-50
41-001134-06 Rev 00, Rel. 1.2
Aastra IP Phone Model Reference
Aastra IP Phone Model 536M and 560M Expansion Modules
Aastra IP Phone Model 536M and 560M Expansion
Modules
The 6753i, 6755i, 6757i and 6757i CT IP Phones offer optional expansion
modules that attach to the right side of the phone to provide additional softkeys.
For Phone Models 6753i, 6755i, 6757i, 6757i CT
For Phone Models 6755i, 6757i, 6757i CT
41-001134-06 Rev 00, Rel. 1.2
Model 536M
Model 560M
A-51
AastraLink Pro 160 IP Phone User Guide
Aastra IP Phone Model 536M and 560M Expansion Modules
536M and 560M Key Panel
The 536M provides 18 softkeys in each column (totaling 36 keys) on the keypad.
Each key provides an LED for indicating call status. The 536M provides a paper
label for convenient key labeling.
The 560M provides 10 softkeys in each column (totaling 20 keys) on the keypad.
The 560M also provides 3 keys at the bottom left of the unit. These keys represent
"Page 1", "Page 2", and "Page 3" of the LCD display. The 560M has 20 keys
available on each page (totaling 60 softkeys). Each key provides an LED for
indicating call status. The 560M provides an LCD for displaying key labels.
Note: Daisy-chained expansion modules are not recognized by the AastraLink Pro 160. The
AastraLink Pro 160 supports a maximum of one expansion module per phone.
Reference
Refer to “Configuring SoftKeys For Your IP Phone” on page 3-32 for more
information about configuring the softkeys on expansion modules.
A-52
41-001134-06 Rev 00, Rel. 1.2
Aastra IP Phone Model Reference
Aastra IP Phone Model 536M and 560M Expansion Modules
Installing the Expansion Modules
Connecting the Expansion Modules to Your Phone
Use the following procedure to connect the 536M or the 560M to your IP phone.
1.
Turn your phone over to show the bottom of the phone.
2.
Turn the expansion module over to show the bottom of the module.
3.
Connect one end of the RJ-45 cable to the RJ-45 port on the back of your
phone as indicated in the illustration below.
Back of Expansion
Module
Back of Phone
RJ-45 Connectors
4.
Connect the other end of the RJ-45 cable to the RJ-45 port on the back of the
expansion module as indicated in the illustration above.
5.
Turn over both units to sit face up on the desk with the expansion module
sitting flush against the right side of the phone.
41-001134-06 Rev 00, Rel. 1.2
A-53
AastraLink Pro 160 IP Phone User Guide
Aastra IP Phone Model 536M and 560M Expansion Modules
Using the Expansion Modules
536M Expansion Module
After configuring the softkeys on the 536M Expansion Module, you can record
the name of the softkey on the paper labels provided with the Expansion Module.
Press the softkey you want to use when applicable.
Softkeys
Lock Phone
BLF Key
Office (speeddial)
A-54
41-001134-06 Rev 00, Rel. 1.2
Aastra IP Phone Model Reference
Aastra IP Phone Model 536M and 560M Expansion Modules
560M Expansion Module
The 560M Expansion Module screen displays softkeys in column format. The
function keys on the bottom left of the Module allow you to display 3 full screens
of softkeys. Each screen consists of 2 columns with the following default
headings on each page:
Page 1"List 1" and "List 2"
Page 2"List 3" and "List 4"
Page 3"List 5" and "List 6".
Softkeys
List 1
List 2
Lock/Unlock
BLF 200
Home (speeddial)
(Press for page 1)
(Press for page 2)
Function Keys
(Press for page 3)
Page 1 Screen
41-001134-06 Rev 00, Rel. 1.2
A-55
AastraLink Pro 160 IP Phone User Guide
Aastra IP Phone Model 536M and 560M Expansion Modules
List 3
List 4
Page 2 Screen
List 5
List 6
Page 3 Screen
To use the 560M, press the function key for the page you want to display to the
LCD (page 1, page2, or page 3), and press the applicable softkey.
Note: Your System Administrator can customize the headings
on each 560M Expansion Module screen. Contact your System
Administrator for more information.
A-56
41-001134-06 Rev 00, Rel. 1.2
Aastra IP Phone Model Reference
Aastra DECT 420d Handset
Aastra DECT 420d Handset
Display
•
128 x 128 pixels, 65K color support, backlight
•
Graphical menu system
Call and Telephony Features
•
12 numerical keys, 5 navigation keys, 2 function keys
•
Auto answer (when handset is lifted from the charger)
•
Key lock option
•
Call forward - all, busy, no answer
•
Call timer
•
Call transfer and call hold (for internal calls)
•
Call waiting indication
•
Caller ID with name from phone book
•
Distinctive ringing
•
Call log of incoming/outgoing/missed calls
•
Call return (from call log)
•
Customizable phone settings
•
Intercom (handset to handset through MBU)
•
Contacts List (up to 200 entries and 4 numbers per entry)
•
Voicemail message support
•
Speeddial support
•
Three-way conferencing (2 handsets)
•
Call hang up (upon return to charging cradle)
•
On-hook dialing (pre-dial numbers before pressing off-hook button)
41-001134-06 Rev 00, Rel. 1.2
A-57
AastraLink Pro 160 IP Phone User Guide
Aastra DECT 420d Handset
Audio Features
•
Mute (disable microphone)
•
Receiver volume control
•
Ring tone melodies
•
Ringer volume control
•
Key sounds (click, DTMF, and special tones)
•
Low battery and out-of-range audible warnings
•
Speakerphone
•
Headset jack (2.5 mm)
Other Handset Features
A-58
•
Separate handset charging station
•
Hearing aid compatible
•
Multi-language support (Danish, German, English, Spanish, French, Italian,
Dutch, Portuguese, Finnish)
•
Li-Ion battery pack
•
Automatic or fixed registration of handset to MBU
•
Status indicators in idle mode (signal, battery level, date and time)
•
Message waiting indicator (missed calls, voicemail)
•
Vibrator mode on handset
41-001134-06 Rev 00, Rel. 1.2
Aastra IP Phone Model Reference
Aastra DECT 420d Handset
420d Handset Key Descriptions
The Aastra 420 handset has a front keypad as well as some side keys. These keys
can be used to customize your handset as well as make and manage calls.
R
1
4
GHI
CLR
2
ABC
3
DEF
5
JKL
6
MNO
TUV
9 WXYZ
7 PQRS 8
*
0
#
The following table describes the keys on the key panel of your 420d handset.
Keys
Key Description
Softkeys - Select from the right and left choices
displayed in the bottom corners of the handset
screen using the softkeys. The handset idle screen
softkeys are Call log (left key) and Options (right
key).
R
41-001134-06 Rev 00, Rel. 1.2
Green Key - Answer an incoming call with the green
key. From idle mode the green key connects to the
primary line (set as Landline or VoIP) and dials the
number you have entered or selected.
A-59
AastraLink Pro 160 IP Phone User Guide
Aastra DECT 420d Handset
Keys (continued)
CLR
z
Key Description (continued)
Red Key - End calls, return to calls placed on hold,
and exit menus using the red key. (Pressing the red
key while within a menu may exit without saving
changes.)
OK Key - Access the Main Menu from idle mode,
and use the OK key to select menu items whenever
the
icon appears at the bottom of the handset
screen.
Navigation Keys - Scroll though menu items using
the left, right, top, and bottom navigational keys.
*
Star Key - Change the input mode while entering text
using the star key. The current input mode displays
on the upper right corner of the screen.
Lock or unlock the keypad from idle mode using the
star key (press * then the Lock or Unlock softkey). A
key appears at the top of the handset display when
the keypad is locked.
#
A-60
Number Key - Toggle on or off the silent mode from
the idle screen by pressing the “#” key, and pressing
the Silence on or Silence off softkey as required
41-001134-06 Rev 00, Rel. 1.2
Aastra IP Phone Model Reference
Aastra DECT 420d Handset
Keys (continued)
+
Key Description (continued)
Volume Keys - (Located on the side of the handset.)
Use the volume + and - keys during an active call to
adjust the call volume.
From idle mode, use the volume + key to view the
system status menu, including the MAC address and
IP address of your phone system.
-
!
Speakerphone Key - (Located on the side of the
handset.) Toggle the speakerphone on and off using
the speakerphone key.
Registering the DECT 420d Handset with the AastraLink Pro 160
For information about registering the MBU 400 and DECT 420d handset with the
AastraLink Pro 160, contact your Administrator.
41-001134-06 Rev 00, Rel. 1.2
A-61
Appendix B
Troubleshooting Solutions
About This Appendix
This Appendix describes solutions to some most commonly occurring problems.
Why is my display blank?
Ensure that power is being provided to your phone. If your network does not
provide inline power over Ethernet, you can obtain an additional accessory, the
Aastra PoE (Power over Ethernet) inline power supply, to provide power over
Ethernet locally to your phone.
Why is my speaker phone not working?
If you press the
button and the speaker light flashes and you do not hear
dial tone through the speaker phone, the Set Audio option in the phone’s Options
list has been set up for headset use. Press
a second time and if the light goes
out, the phone has been set up to be used only with a headset or handset. If the
light stays on steady and you hear dial tone, the phone has been set up so that you
can alternate between the speakerphone and the headset by pressing
.
See “Setting the Headset Microphone Volume” on page 2-77 for instructions on
how to change the Set Audio option.
Why can’t I get a dial tone?
Check for any loose connections and that the phone has been installed properly.
For installation instructions, please refer to the AastraLink Pro 160 Quick Start
User’s Guide.
41-001134-06 Rev 00, Rel. 1.2
B-1
AastraLink Pro 160 IP Phone User Guide
Why doesn’t my phone ring?
Check the ring volume on your phone. It may be turned down or turned off. To
adjust the ringer volume setting, press the volume button when the phone is
on-hook and idle.
Why is my handset not working?
Check to ensure that the handset cord is fully connected to both the phone and
handset.
How Do I Change My User Password?
Use the Web UI to change your password. See the Section entitled “Changing
Your Password” on page 3-46 for instructions.
How do I find the IP address of my phone?
The IP address of your Phone is listed under the Options screen. See “Viewing the
IP Address and MAC Address of Your Phone”on page 2-80 for instructions.
B-2
41-001134-06 Rev 00, Rel. 1.2
Appendix C
Remote Office
Installation and Configuration
of the Phone (Phone -Side)
Introduction
This appendix supplements the AastraLink Pro 160 Quick Start User’s Guide. It
describes how to do the following task:
•
Configuring your phone for remote office setup
•
Connecting your phone to the AastraLink Pro 160 Network from the remote
office
•
Manually configuring port-forwarding (if required)
Topics
This appendix covers the following topic:
Topic
Page
Configuring Your IP Phone for Remote Office Setup
page C-2
Connecting Your IP Phone to the AastraLink Pro 160 Network From a
Remote Office
page C-4
Manually Configuring Port-Forwarding
page C-7
41-001134-06 Rev 00, Rel. 1.2
C-1
AastraLink Pro 160 IP Phone User Guide
Configuring Your IP Phone for Remote Office Setup
Configuring Your IP Phone for Remote Office
Setup
Overview
AastraLink Pro supports the use of IP phones in remote locations, such as home
office or other routable networks, where an insecure network conected via
Network Address Translating (NAT) firewalls, such as the public Internet or
WAN, is used between the central AastraLink server and the remote user.
Using an IP phone in a remote office configuration requires that:
1. The IP phone be correctly configured to connect back to the office router
2. The local router supports NAT traversal (via UPnP or static port-forwarding)
Configuring the remote phone
Pre-staged phones
You can configure IP Phones by pre-staging them. This consists of connecting the
phone on the AastraLink LAN and registering the phone, before taking it to the
remote location. Refer to “Connecting Your IP Phone to the AastraLink Pro 160
Network From a Remote Office” on page C-4.
Non Pre-staged phones
For phones that are not pre-staged, the administrator must manually add the phone
registration details (MAC address, user name and extension number) before the
phone is able to connect. Refer to the administrators guide for additional
information. After the registration details have been entered, connect the phone
using the procedure, “Connecting Your IP Phone to the AastraLink Pro 160
Network From a Remote Office” on page C-4.
C-2
41-001134-06 Rev 00, Rel. 1.2
Remote Office Installation and Configuration of the Phone (Phone -Side)
Configuring Your IP Phone for Remote Office Setup
Configuring Routing
UPnP Supported/Enabled
If the local router is supported by the IP Phone UPnP protocol, the router has its
UPnP services enabled, and the IP phone has been configured (via the
administrator TUI menu) to use UPnP, no further configuration is required. Refer
to the procedure, “Connecting Your IP Phone to the AastraLink Pro 160 Network
From a Remote Office” on page C-4.
UPnP Not Supported/Disabled
If however the UPnP is not supported/disabled, manual port-forwarding on the
remote user router is necessary, and the corresponding NAT port information must
be entered into the phone. Refer to “Manually Configuring Port-Forwarding” on
page C-7, and “Remote Phone Installation and Port-Forwarding Configuration
Example” on page C-10.
41-001134-06 Rev 00, Rel. 1.2
C-3
AastraLink Pro 160 IP Phone User Guide
Connecting Your IP Phone to the AastraLink Pro 160 Network From a Remote Office
Connecting Your IP Phone to the
AastraLink Pro 160 Network From a Remote Office
After your administrator registers your IP phone at the central site, use the
following procedure to connect to the IP phone network from a remote office.
Warning: On remote phones connected to the AastraLink Pro 160, the following emergency
related message displays: “E911 calls are not available from this phone.” Remote IP phone
users should not make emergency calls using the AastraLink Pro 160, because the location
information will be incorrect. E911 regulations in the United States require street address location
information be transmitted to the Public Safety Answering Point (PSAP). This information is
provided by the telco, using the location of the analogue line connected to the AastraLink Pro 160
Lifeline port (FXO Line 1).
Step Action
1
Connect the Aastra IP phone to your Ethernet Hub/Router.
Note: See your AastraLink Pro 160 Quick Start User’s Guide for instructions on setting up and
installing your Aastra IP phone.
Your Aastra IP phone powers up, completes its diagnostics, and searches for the AastraLink
Pro 160 on the network.
2
Select <Remote> to specify that this is a remote IP phone.
Select Skip
Skip
30%
Auto Discovery
Remote
Select Remote
during startup
Note: If for some reason the IP phone is unable to obtain an IP address, then the IP phone UI
displays the message “UPnP Device Not Found.” If you see this message, skip ahead to the
following section “Manually Configuring Port-Forwarding” on page C-7 for instructions.
C-4
41-001134-06 Rev 00, Rel. 1.2
Remote Office Installation and Configuration of the Phone (Phone -Side)
Connecting Your IP Phone to the AastraLink Pro 160 Network From a Remote Office
Step Action
3
Enter the IP Address of the AastraLink Pro 160 that is located at the central site.
For example: 65.215.35.80
Enter server name/IP
65.215.35.80
Backspace
Dot
abc
Cancel
Done
Note: If you do not know the IP address of the AastraLink Pro 160, check with your
administrator.
41-001134-06 Rev 00, Rel. 1.2
C-5
AastraLink Pro 160 IP Phone User Guide
Connecting Your IP Phone to the AastraLink Pro 160 Network From a Remote Office
Step Action
4
Specify the HTTP port the IP phone uses to communicate with the AastraLink Pro 160.
For example: 51510
Enter HTTPS port
51510
Backspace
Dot .
abc
Cancel
Done
Your Aastra IP phone downloads the latest configuration information from the AastraLink Pro
160 and reboots. When the Idle State Screen appears showing your user name and extension
(like the one below), the registration process is complete.
5
Your Aastra IP phone connects to the IP phone network at the central site and is fully
operational.
201 - B Jones
L1
Your name
and extension
May 1 10:15 am
DND
Forward
Directory
Vmail
ParkCall
More
Your IP phone only successfully connects to the AastraLink Pro if its MAC address is
pre-provisioned in the Users List at the location User->User List in the administrator menus.
C-6
41-001134-06 Rev 00, Rel. 1.2
Remote Office Installation and Configuration of the Phone (Phone -Side)
Manually Configuring Port-Forwarding
Manually Configuring Port-Forwarding
Not all routers support Universal Plug & Play (UPnP), and some may need to
have the UPnP support manually enabled. If the Aastra IP phone cannot obtain the
public IP address of the router via UPnP, the phone displays the message “UPnP
device not found.” This condition most often occurs if:
•
The remote Aastra IP phone is not installed behind a UPnP enabled router, or
•
The Aastra IP phone cannot set up minimal port mappings (for example, if
you have multiple devices connected to your router).
So, in order for the Aastra IP phone to communicate with the AastraLink Pro 160,
you must use the instructions in this section to manually enter the port mapping
information that is configured on your router.
Note: If you do not know the port mappings configured on your router, then refer to your router
documentation for more information.
Step Action
1
If your IP phone UI displays the “UPnP Device Not Found” message shown below, press
<Skip> to begin manually configuring port mapping parameters.
80%
UPnP Device Not Found
Retry
Skip
41-001134-06 Rev 00, Rel. 1.2
C-7
AastraLink Pro 160 IP Phone User Guide
Manually Configuring Port-Forwarding
Step
Action
2
Specify the public IP address, or dynamic/static DNS FQDN of your router, then press <Done>.
For example: 65.96.171.130.
Enter NAT IP:
65.96.171.130
Backspace
Dot .
ABC
3
Cancel
Done
Specify the public SIP port (default 51620) for your router, then press <Done>.
Enter NAT SIP Port:
51620
Backspace
C-8
Cancel
Done
41-001134-06 Rev 00, Rel. 1.2
Remote Office Installation and Configuration of the Phone (Phone -Side)
Manually Configuring Port-Forwarding
Step
Action
4
Specify the public RTP starting port (default 51720) for your router, then press <Done>.
Enter NAT RTP Port:
51720
Backspace
5
Cancel
Done
Specify the public HTTP port (default 51510) for your router, then press <Done>.
Enter NAT HTTPS Port:
51510
Backspace
Cancel
Done
Your AastraLink IP Phone reboots and begins the discovery process. Now, go back to the previous
section entitled “Connecting Your IP Phone to the AastraLink Pro 160 Network From a Remote
Office” on page C-4 and complete steps 2-4 to complete the remote registration procedure.
Skip
41-001134-06 Rev 00, Rel. 1.2
30%
Auto Discovery
Retry
C-9
AastraLink Pro 160 IP Phone User Guide
Manually Configuring Port-Forwarding
Remote Phone Installation and Port-Forwarding Configuration
Example
The following is an example of installing and setting up up your remote phone for
port-forwarding.
AastraLink Pro 160 Remote Office Configuration
Step
Action
Configure Port Forwarding
1
Manually setup the required port forwarding on the Home Router.
Note: Refer to the “Home Router Port Mapping Table” on page C-11.
Install the Remote IP Phone (Pre-Stage Phone)
2
Press <Remote> when remote phone is in the Auto-Discovery screen.
If the phone cannot find a UPnP enabled device, it displays “UPnP device not found”. Press <Skip>.
The phone prompts for the NAT IP address.
3
Enter the Home Router WAN-side IP address. For example: 65.96.171.130
The phone prompts for the SIP port.
4
Enter the SIP port for the Home Router. For example, you can enter 51620.
The Phone prompts for an RTP port.
5
Enter the RTP port for the Home Router. For example, you can enter 51720.
The Phone prompts for an HTTPS port.
6
Enter the HTTPS port for Home Router. For example, you can enter 51510.
Install the Remote IP Phone (Non-pre-Stage Phone)
7
Press <Remote> and enter the server external gateway IP address (for example, 65.215.35.80).
The Phone prompts for an HTTP port.
C-10
41-001134-06 Rev 00, Rel. 1.2
Remote Office Installation and Configuration of the Phone (Phone -Side)
Manually Configuring Port-Forwarding
AastraLink Pro 160 Remote Office Configuration
Step
Action
8
Enter the HTTP port start (for example, 51510).
The Phone prompts for a NAT IP address.
9
Enter the Home Router WAN-side IP address.
The phone prompts for the SIP port.
10
Enter the SIP port for the Home Router. For example, you can enter 51620.
The Phone prompts for an RTP port.
11
Enter the RTP port for the Home Router. For example, you can enter 51720.
The Phone prompts for an HTTPS port.
The following table is the port mapping table after a successful UPnP session with
the phone-side Home Router.
Home Router Port Mapping Table
Action
Name
Source
Destination
Allow
WAN, *
LAN, 192.168.1.3
UDP, 5060-51620
Allow
WAN, *
LAN, 192.168.1.3
TCP, 80-51510
Allow
WAN, *
LAN, 192.168.1.3
UDP, 3000-51720
Allow
WAN, *
LAN, 192.168.1.3
UDP, 3001-51721
Allow
WAN, *
LAN, 192.168.1.3
UDP, 3002-51722
Allow
WAN, *
LAN, 192.168.1.3
UDP, 3003-51723
41-001134-06 Rev 00, Rel. 1.2
Protocol
C-11
AastraLink Pro 160 IP Phone User Guide
Manually Configuring Port-Forwarding
Action
Name
Source
Destination
Protocol
Allow
WAN, *
LAN, 192.168.1.3
UDP, 3004-51724
Allow
WAN, *
LAN, 192.168.1.3
UDP, 3005-51725
Allow
WAN, *
LAN, 192.168.1.3
UDP, 3006-51726
Allow
WAN, *
LAN, 192.168.1.3
UDP, 3007-51727
Allow
WAN, *
LAN, 192.168.1.3
UDP, 3008-51728
Allow
WAN, *
LAN, 192.168.1.3
UDP, 3009-51729
Deny
Default
*,*
LAN, *
*, *
Allow
Default
LAN, *
*,*
*,*
Column Descriptions
C-12
Column
Description
Action
Indicates whether or not the phone is
allowed to Ping the WAN port. Valid values
are Allow and Deny.
Name
Indicates a name for the port mapping.
Source
Source of the port mapping (WAN or LAN)
41-001134-06 Rev 00, Rel. 1.2
Remote Office Installation and Configuration of the Phone (Phone -Side)
Manually Configuring Port-Forwarding
Column
Description
Destination
Phone IP address
Protocol
Protocol used for the port mapping.
41-001134-06 Rev 00, Rel. 1.2
•
Phone UDP/TCP port open (3000,
3001,...)
•
Home Router WAN-side UDP/TCP open
(51720, 51721,...etc. These ports are
ready to forward the packets to the
corresponding phone ports in the
mapping.
C-13
Index
Index
Numerics
536M features A-51
560M features A-51
6730i features (symbol and text) A-13
6731i features (symbol and text) A-18
6751i features (symbol and text) A-23
6753i features A-27
6755i features A-32
6757i and 6757i CT features A-37
6757i line settings 2-28
9143i features A-2
9480i and 9480i CT features A-7
9480i features A-7
A
AastraLink
features 1-2
IP Address, viewing 2-79
phone compatibility 1-1
Web UI 3-1
administrator menu 2-22
answering calls 2-32
audio, changing 2-75
B
backlit display A-3, A-8
base station A-45
location of A-47
batteries A-46
battery A-50
BLF softkey 3-35
blind transfer 2-36
busy lamp field (BLF), using 2-47
41-001134-06 Rev 00, Rel. 1.2
C
call forward softkey 3-34
call forwarding
enabling 2-50
call parking softkey 3-34
callers list key A-4, A-15, A-20
calls
answering 2-32
conference calls 2-38
ending 2-44
forwarding 2-50
ignoring 2-33
intercepting 2-47
managing 2-45
parking 2-42
picking up 2-43
placing on hold 2-34
receiving 2-32
sending to voicemail 2-44
transferring 2-35
changing 2-78
conference calls 2-38
conference key A-4, A-15, A-20
conference, meet-me 2-40
configuring
router port mapping B-7
consultative transfer 2-36
contrast level, changing 2-72
CT cordless handset A-43
6757i CT A-42
9480i CT A-12
battery guidelines A-46
battery status icons A-50
installation and setup A-47
installing the belt clip A-49
safety information A-45
Index-1
Index
D
DECT 420d handset
additional features A-58
audio features A-58
call and telephony features A-57
key descriptions A-59
registering A-61
delete key A-5, A-17, A-22, A-31
dialing
a phone number 2-29
muting a call 2-31
pre-dialling a number 2-30
redialing 2-31
using a headset 2-30
using the speakerphone 2-30
directed call pickup softkey 3-35
directed call pickup, using 2-47
directories
searching 2-67
using 2-65
directory key A-5
display, changing 2-72
do not disturb softkey 3-34
Do Not Disturb, enabling 2-49
E
Emergency dial plan, using 2-92
enabling
call forwarding 2-50
Do Not Disturb 2-49
Find-Me Follow Me 2-51
escape to extension, voicemail 2-62
expansion module, 536 and 560M A-51
expansion modules
installing A-53
using A-54
F
factory default setting 2-84
features
AastraLink 1-2
find-me follow-me softkey 3-34
Find-Me, Follow Me, enabling 2-51
firmware version, viewing 2-82
Index-2
G
goodbye key A-4, A-15, A-20
green key A-59
greeting, for voicemail 2-61
H
handset A-3, A-45
handset pairing 2-78
handsfree key A-5
headset
enabling 2-75
using 2-77, A-49
headset mic 2-77
hold feature, using 2-34
hold key A-4
I
ignoring calls 2-33
indicator light A-3
intercepting calls 2-47
intercom, using 2-87
IP Address
AastraLink 1-5, 2-79
IP Address & MAC Address
IP Phone 2-80
IP Phone
IP Address and MAC Address, viewing 2-80
IP phone
directories 2-65
firmware version 2-82
LAN & PC port 2-81
locking/unlocking 2-86
multiple line call appearances, using 2-28
restrarting 2-85
setting to factory defaults 2-84
using headset 2-75
using intercom 2-87
using overhead paging 2-88
using speaker phone 2-75
using the UI 2-1
IP phones
models 1-1
remote office B-4
41-001134-06 Rev 00, Rel. 1.2
L
LAN & PC port, viewing 2-81
LED in GUI 3-3
line keys A-16, A-21
line/call appearance keys A-5
locking, IP phone 2-86
locking/unlocking the phone 2-86
logging in, Web UI 3-2
M
meet-me conferencing 2-40
41-001134-06 Rev 00, Rel. 1.2
messages, voicemail 2-54
missed calls indicator 2-46
muting a call 2-31
Index
K
key description
6730i (symbol and text) A-15
6731i (symbol and text) A-20
6751i (symbol and text) A-25
6753i A-29
6755i A-34
6757i and 6757i CT A-39
9143i A-4
9480i and 9480i CT A-9
CT cordless handset A-44
key pad
6730i A-14
6731i A-19
6751i A-24
6753i A-28
6755i A-33
6757i and 6757i CT A-38
9143i A-3
91480i and 91480i CT A-8
keys
callers list A-15, A-20
conference A-15, A-20
delete A-17, A-22
goodbye A-15, A-20
line A-16, A-21
navigation A-15, A-20
options A-15, A-20
programmable A-17, A-22
redial A-15, A-20
save A-17, A-22
speaker A-15, A-20
transfer A-16, A-21
volume control A-15, A-20
N
navigation keys A-3, A-4, A-15, A-20, A-60
number key A-60
O
OK key A-60
Operator, voicemail 2-57
options key A-3, A-5, A-15, A-20
P
Page All softkey 3-35
Paging softkey 3-35
paging, using 2-88
parking calls 2-42
password, changing 3-46
phone lock 2-23
phone status menu 2-20
picking up calls 2-43
plugging in the phone 2-7
port mapping, router B-7
preferences menu 2-18
Programmable Keys A-3
programmable keys
about A-17, A-22
R
recent callers list 2-45
red key A-60
redial key A-5, A-15, A-20
redialing 2-31
relay switch, activating 2-91
remote office phones, registering B-1
restart phone 2-23
restarting the phone 2-85
S
save key A-5, A-17, A-22, A-31
services menu 2-16
SLA softkey 3-36
Index-3
Index
softkeys A-59
configuring 3-32
types 3-33
speaker key A-15, A-20
speaker phone, enabling 2-75
speakerphone key A-61
speeddial softkey 3-34
star key A-60
starting up the phone 2-7
T
transfer key A-4, A-16, A-21
transfer softkey 3-36
transferring calls 2-35
blind transfer 2-36
consultative 2-36
troubleshooting solutions
How Do I Change My User Password? B-2
How do I find the IP address of my phone? B-2
Why can’t I get a dial tone? B-1
Why doesn’t my phone ring? B-2
Why is my display blank? B-1
Why is my handset not working? B-2
Why is my speakerphone not working? B-1
W
Web UI
enabling call forwarding 3-19
enabling Do Not Disturb 3-18
enabling Find-Me Follow-Me 3-20
making calls 3-11
menu options 3-6
softkeys, configuring 3-32
user preferences, editing 3-42
using 3-1
using phone directories 3-29
using Visual Voicemail 3-25
viewing recent calls 3-13
U
UPnP, enabling 2-83
user groups, for voicemail 2-56
user preferences, editing 3-42
V
voicemail
checking for messages 2-54
connecting 2-54
escape option 2-62
Operator 2-57
options 2-62
recording custom greeting 2-61
user groups 2-56
Visual Voicemail, using 2-58
volume
control keys A-15, A-20
volume key A-3, A-4
volume keys A-61
Index-4
41-001134-06 Rev 00, Rel. 1.2
AastraLink Pro 160
IP Phone User’s Guide
Published in the USA
41-001134-06, REV 00
AastraLink Pro 160 Release 1.2
November 2008