1
OPERATING INSTRUCTIONS FOR GAMBIT DAC2 24Bit / 192kHz D/A CONVERTER
Input Source Connection, Selection and
Synchronization
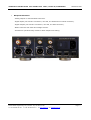
Connect sources with sampling frequencies of
44.1, 48, 88.2, 96, 176.4 or 192kHz to the input
connectors at the back of the unit.
The input source pushbuttons correspond to the
inputs as follows:
- Firewire: Selects the Firewire input, connected to a computer. Either one of the two
Firewire connectors can be used.
- AES/EBU: Selects the XLR input.
- S/PDIF: Selects both RCA and Toslink inputs.
At the first hit of the S/PDIF switch the DAC2
selects the RCA input. If there is no signal recognized at the RCA input it automatically selects
the Toslink input. A second hit on the S/PDIF
switch also selects to Toslink input.
OPERATION
els is repeated when rotating the switch. For
proper level setting proceed as follows:
-
Power up the DAC2, select the appropriate input.
-
Select the level control mode as described above.
-
Switch on the “dim” mode ( Firewire LED
flashing).
-
Connect the DAC2 to the amplifier, play
a music track.
-
-
The sync sources correspond to the respective
input sources per default. The “Weiss Firewire
IO” control panel allows alternative sync source
selection in Firewire input mode. As long as the
DAC2 is connected via Firewire, these sync settings are stored for persistent sync settings
when switching between input modes. As soon
as the DAC2 is disconnected, the default sync
settings apply.
If a valid synchronization signal is present at the
selected input, the LED stays lit.
With the currently selected level settings
the music should be fairly soft. If it is already fairly loud, make sure to turn
down the gain at the amplifier.
Switch off the “dim” mode and make
sure that the volume at the DAC2 is at
maximum. If the music is now playing at
the proper loudness then you are done.
If the music is still too soft (with an appropriate gain setting at your amplifier)
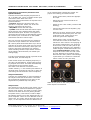
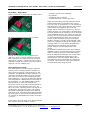
rotate the gain switch shown below one
step counterclockwise. Rotate more
steps if the music is still too soft. There
are four different level settings selectable with the rotary switch. The settings
repeat when you continue to rotate the
switch. There isn’t any end stop.
If the format and/or the sampling frequency is
not valid, the LED flashes. In that case the analog outputs are muted. The DAC2 automatically
synchronizes to the incoming signal.
The states of all buttons are stored in nonvolatile memory, i.e. the actual input selection is
retained when powering the unit off or when disconnecting the unit from the mains completely.
Output Connection
Connect your preamplifier or power amplifier to
the output connectors of the DAC2. Use either
the symmetrical (balanced) lines (XLR) or the
asymmetrical (unbalanced) lines (RCA).
Output Level
The output level can be set by two means, one is
the level control mode described above (digital
domain level control), the other is via the rotary
switch on the back of the unit (analog domain,
see photo below). This switch is used to adapt
the DAC2’s output level to the subsequent pre- or
power amplifier. There are four different levels to
chose from. The rotary switch does not have end
stops, i.e. the sequence of the four different lev-
White arrow points to the rotary switch for the
basic output level selection.
Daniel Weiss Engineering Ltd., Florastr. 42, CH-8610 Uster
+41 44 940 20 06
+41 44 940 22 14
www.weiss.ch
Page 5
[email protected]