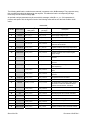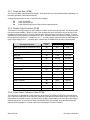
1
Technical Service Bulletin GENERAL DYNAMICS, State College, PA Phone: 814-238-2700 TSB # 60 Fax: 814-238-6243 Per ECR # 11428 Product(s) affected: Outdoor and Antenna Mount SSPAs Description of problem: 12245 Serial I/O Protocol has errors or misleading descriptions in messages 16.55 & 16.5A. Design change to resolve problem: Updated 12245 Serial I/O Protocol to Rev I. Instructions for modification: Use revised document, see attached. Units that must be modified: None. Units that do not need to be modified: Cognizant Engineer: Peter Trippett 7364 Form 4 Date: 8/15/2012 11/6/2001 REVISIONS LTR A B C D E F G H I DESCRIPTION Initial Release Release version 1.4. Release version 1.51 Release version 2.0x Per ECR 5409 Release ver. 2.5x per ECR 5520 ECR 6524 (Ant/DL switch, ver. 2.62) ECR 8161 ECR 10695 ECR 11428 CONTRACT NO. DRAWN BY 5/31/00 TITLE CHECKED BY Serial I/O Protocol for Outdoor and Antenna-Mount SSPAs APPROVED BY Peter B. Trippett Firmware Rev. 3.0x and earlier 6/1/00 SIZE A FILENAME: 12245_I.doc APPROVED PBT PBT PBT PBT PBT RJS MEB SMH PBT PBT 60 Decibel Road, Suite 200 State College, PA 16801 DATE Paul E. Phillips DATE 11/17/99 3/3/00 6/1/00 12/15/00 2/24/03 4/20/04 7/1/05 6/25/07 4/26/11 8/9/12 CAGE CODE 4NN85 DWG. NO. 12245 SHEET 1 OF 39 (Intentionally blank page.) Table of Contents 1 Message Framing Format............................................................................................................................................ 5 1.1 1.2 1.3 1.4 1.5 1.6 1.7 1.8 2 Messages...................................................................................................................................................................... 8 2.1 2.2 2.3 2.4 2.5 3 STX/ETX.............................................................................................................................................................. 5 Count ................................................................................................................................................................... 5 Address................................................................................................................................................................ 5 ACK Response Flag............................................................................................................................................. 5 Message Data...................................................................................................................................................... 6 Checksum ............................................................................................................................................................ 6 Message Handling ............................................................................................................................................... 6 1.7.1 Rejected Messages ............................................................................................................................... 6 1.7.2 Framing Synchronization ....................................................................................................................... 7 1.7.3 Address ................................................................................................................................................. 7 Timing Issues....................................................................................................................................................... 7 1.8.1 Inter-character spacing .......................................................................................................................... 7 1.8.2 Inter-message spacing .......................................................................................................................... 7 1.8.3 ACK Responses .................................................................................................................................... 8 1.8.4 Replies................................................................................................................................................... 8 Message Types.................................................................................................................................................... 9 2.1.1 Status Messages ................................................................................................................................... 9 2.1.2 Control/Configuration Messages............................................................................................................ 9 2.1.3 Command Messages ............................................................................................................................. 9 Data Values ......................................................................................................................................................... 9 2.2.1 Analog Value ....................................................................................................................................... 10 2.2.2 Enumerated Value ............................................................................................................................... 10 2.2.3 Bit Flag Value ...................................................................................................................................... 10 2.2.4 String Value ......................................................................................................................................... 11 2.2.5 Protocol Symbols................................................................................................................................. 11 Programming Issues .......................................................................................................................................... 11 2.3.1 Compatibility ........................................................................................................................................ 11 Instruction Codes ............................................................................................................................................... 12 Message Table .................................................................................................................................................. 12 Message Details ......................................................................................................................................................... 20 3.1 3.2 3.3 3.4 3.5 3.6 3.7 3.8 Reset Microprocessor (04)................................................................................................................................. 20 Get Unit Type (07) ............................................................................................................................................. 20 Get Faults (08) ................................................................................................................................................... 20 3.3.1 “Old” Fault Mask .................................................................................................................................. 20 3.3.2 “New” Fault Mask................................................................................................................................. 21 Clear Service Request (09)................................................................................................................................ 23 Fault Reset (0A)................................................................................................................................................. 23 Self Test (0B) ..................................................................................................................................................... 23 Local Lockout (0E) ............................................................................................................................................. 23 Measured Parameter Data Queries (16) ............................................................................................................ 23 3.8.1 Get Output Power (16 50).................................................................................................................... 24 3.8.2 Get Module Temperature (16 51) ........................................................................................................ 24 3.8.3 Get Module Current (16 52) ................................................................................................................. 24 Document 12245 Rev. I Sheet 3 of 39 3.8.4 3.9 Get Input Voltage (16 53).....................................................................................................................24 3.8.5 Get RF Output Status (16 54) ..............................................................................................................24 3.8.6 Get 1:1 Status (16 55)..........................................................................................................................25 3.8.7 Get Firmware Version Info (16 57).......................................................................................................25 3.8.8 Get Total Amplifier Current (16 58) ......................................................................................................25 3.8.9 Get Specific Fault Info (16 59) .............................................................................................................25 3.8.10 Get Configuration (16 5A)....................................................................................................................28 3.8.11 Get Reflected Measurement (16 5B) ...................................................................................................28 3.8.12 Get Parallel Inputs (16 5C) ..................................................................................................................29 3.8.13 Get Latched Analog Faults (16 5D)......................................................................................................29 3.8.14 Get Module Measurements (16 60) .....................................................................................................29 3.8.15 Get Module Nominal Power (16 6A) ....................................................................................................30 3.8.16 Get Gain Range (16 6B) ......................................................................................................................30 3.8.17 Get Fan Status (16 6D)........................................................................................................................30 Configuration (17) ..............................................................................................................................................30 3.9.1 Power Fault Limits (17 51) ...................................................................................................................30 3.9.2 Unused 1 [Temperature Fault Limit] (17 52) ........................................................................................31 3.9.3 Unused 2 [Current Stage Fault Limit] (17 53).......................................................................................31 3.9.4 Unused 3 [Power Supply Voltage Fault Limit(s)] (17 54) .....................................................................31 3.9.5 Unused 4 [Pout Fault Properties] (17 55).............................................................................................31 3.9.6 Parallel Input Functions (17 56) ...........................................................................................................31 3.9.7 Power-Up State (17 58) .......................................................................................................................32 3.9.8 Parallel Output Functions (17 59) ........................................................................................................32 3.9.9 Output Power Calibration Offset (17 5A) .............................................................................................32 3.9.10 Reflected Power Calibration Offset (17 5B) .........................................................................................33 3.9.11 Local/Remote Settings (17 5F) ............................................................................................................33 3.9.12 Reflected Power Fault Limit (17 61).....................................................................................................34 3.9.13 Reflected Power Fault/Warning (17 62) ...............................................................................................34 3.10 Control (18) ........................................................................................................................................................34 3.10.1 Mute (18 50) ........................................................................................................................................35 3.10.2 Redundancy Mode (18 51) ..................................................................................................................35 3.10.3 Gain Control (18 52) ............................................................................................................................35 3.10.4 Unused Parallel Outputs (18 53)..........................................................................................................35 3.10.5 Power Units (18 54) .............................................................................................................................36 3.10.6 Reflected Measurement Type (18 55)..................................................................................................36 3.11 Commands (19) .................................................................................................................................................36 3.11.1 1:1 Switch Command (19 52)...............................................................................................................36 3.11.2 AntDL Switch Command (19 54)..........................................................................................................37 3.12 RC Panel Message (1C) ....................................................................................................................................37 3.13 Unit Status (20) ..................................................................................................................................................37 4 Faults and Alarms ......................................................................................................................................................38 4.1 4.2 4.3 Reporting of Faults.............................................................................................................................................38 Fault Descriptions ..............................................................................................................................................39 Serial Port Relay Contacts .................................................................................................................................39 Sheet 4 of 39 Document 12245 Rev. I Serial I/O comes as a standard feature. By sending and receiving commands over an RS-232, RS-485 (2-wire), RS-485 (4-wire) or RS-422 port, you can control and monitor most of the SSPA’s functions. 1 Message Framing Format This framing protocol is used for communications between a host and a unit. This is a polling protocol, meaning that units answer ONLY when they receive a correctly formatted message from the host. The same framing protocol is used for all messages to and from a unit. A message from a unit in response to one from the host is referred to as a reply. Byte 1 Byte 2 STX 02 COUNT nn Byte 3 ADDRESS 1 aa 0 Byte 4 A C K 6 bits . .. Byte nn-2 Byte nn-1 Byte nn 3 CHKSUM cc ETX 03 End Body 2A FRAMING HEADER MESSAGE DATA2 FRAMING FOOTER 1 The most significant bit of byte 4 is reserved, and should always be 0. 2 The message data can be of any length from 1 byte (6 bits of byte 4) to 250 bytes (249 if End Body byte is used). Byte values 02 and 03 may not appear in the message data. 3 End Body byte (2A) is optional, and is included for compatibility with earlier protocols. 1.1 STX/ETX All message frames start with the framing byte STX (02) and end with the framing byte ETX (03). 1.2 Count The second byte of the message frame is the count of all bytes in the entire message, including the STX and ETX bytes. The protocol’s framing determines that the smallest valid message possible is 6 bytes. 1.3 Address The third byte of the message frame is the address. Any unit whose address setting matches this byte will accept the message. An address of 00 is used to send a command or control message to all units on the bus. A reply, if any, will contain the unit’s set address. 1.4 ACK Response Flag Bit 6 (with bit 0 being the least significant bit, and bit 7 the most significant bit) of the fourth byte in a message frame is used to request an ACK response. This bit will never be set in a reply. If an ACK response is returned by a unit, it will be sent quickly following receipt of the last byte of the host message, if possible. See section 1.8.3, ACK Responses, for specifications. An ACK response will be returned ONLY if all of the following are true: 1. The address in the host message matches that of the unit. In other words, a unit will send an ACK response to a message addressed to 0 ONLY if its own address is set to 0. 2. The message is not REJECTED for any of the reasons described under section 1.7.1, Rejected Messages. An ACK response is a correctly framed message, with the least significant 6 bits of byte 4 equal to the value 3F. Example ACK response from a unit whose address is 1: Document 12245 Rev. I 02 06 01 3F 40 03 Sheet 5 of 39 1.5 Message Data The actual content of the message starts with the least significant 6 bits of Byte 4, and can be of any length up to 250 bytes (including Byte 4). An optional End Body byte may be placed in the message footer (at the end of the Message Data), in which case the maximum length of the message data is 249 bytes. The optional End Body byte is used for compatibility with earlier protocols, in which the End Body byte was required if the message data contained more bytes than byte 4. Units determine whether to send this byte as follows: 1. A setting in the unit will determine whether replies should contain an End Body byte. Units will be shipped from the factory defaulting to use the End Body byte. 2. If the unit receives a message with more bytes in the message data than byte 4, but not containing an End Body byte, the setting will be changed to NOT use the End Body byte in replies. 3. If the unit receives a message WITH an End Body byte, the setting will be changed to use the End Body byte in replies. Units will always accept correctly formatted messages with or without the End Body byte. The least significant six bits of byte 4 are not allowed to be equal to 02, 03, or 3F and no value in the message data can be equal to 02 or 03. See section 1.7.1, Rejected Messages. The least significant six bits of Byte 4 are normally an instruction code. 1.6 Checksum The checksum is the arithmetic sum of all the bytes starting with the address, and ending with the byte preceding the checksum. The sum is truncated to the least significant byte. The checksum is the second to last byte of a message frame. 1.7 Message Handling 1.7.1 Rejected Messages Messages will be rejected if any of the following are true: 1. The message does not start with an STX (02). 2. A communications (framing) error occurs on any byte. 3. The message COUNT (nn) is less than 6. 4. The last byte of the message, as determined by the COUNT is not an ETX (03). 5. The message ADDRESS does not match the unit’s address, and is not 00. 6. The fourth byte of the message contains a 1 in the most significant bit. 7. The low six bits of the fourth byte are equal to 3F. 8. A byte equal to 02 or 03 is received anywhere in the MESSAGE DATA. 9. The message checksum (CHKSUM) is not equal to the low byte of the arithmetic sum of bytes 3 (ADDRESS) through nn-2 (where nn is the COUNT). 10. The receive buffer has become full, causing the unit to miss bytes of the message. If a message is rejected because of any of these conditions, no ACK response will be returned, if requested in Byte 4 of the message. (As mentioned previously, an ACK response will also not be sent if the global address (00) is used, and the unit address is not set to 00.) AS SOON AS one of the listed problems is detected the unit will immediately begin watching the data stream for the next STX (02) byte. Sheet 6 of 39 Document 12245 Rev. I A message may also be rejected at a higher level, if something is wrong with the MESSAGE DATA itself (e.g. illegal instruction code), but in this case an ACK response will still be sent, if requested. See the protocol document for the equipment you are using to find out more about message data format. 1.7.2 Framing Synchronization A unit not currently receiving a message is watching the message stream for an STX (02) byte. Upon receiving that byte, the unit begins looking for the rest of the message. If a byte value of 02 or 03 is received for the message count, or anywhere in the message data, the unit assumes that it is the end of the message (if 03 is received), or the start of a new message (if 02 is received), and rejects the original message. The STX byte value (02) can legally appear as either an address or a checksum in a message. This has the potential for causing mis-synchronization if a unit starts up in the middle of a message stream. But this is not likely, for the following reasons. A valid CHKSUM of 02 will be followed immediately by the ETX byte (03). Should a unit erroneously interpret a checksum of 02 as being the STX byte of a new message, it will interpret the ETX as the COUNT byte. Because a byte count of 3 is not valid (all messages must have at least 6 bytes), the unit will abort receiving this message, and again start looking for an STX byte. Should a unit erroneously interpret a valid address of 02 as being the STX byte, it will interpret the following byte (Byte 4) as the COUNT, and attempt to receive the address, message data, etc. from the bytes that follow. In this case, the ETX (03) in the actual message stream will terminate this false message, and the interpreted address, checksum, or message content will most likely be invalid; so the false message will be rejected. If you wish to guarantee that all listening units are synchronized, send a string of three ETX (03) bytes. This will terminate all units’ receive sequences, after which they will start looking for the STX (02) byte again. 1.7.3 Address A means is provided on every unit to set its address. In any interface bus in which messages are received by more than one unit, each unit should be assigned a unique address that is not equal to 00. (An address of 00 is used to send a command or control message to all units on the bus.) 1.8 Timing Issues 1.8.1 Inter-character spacing There is no maximum specification on inter-character spacing in messages in either direction. Bytes in messages to units may be spaced as far apart as you wish. However, be aware that if you are using a halfduplex interface and a unit is ready to send an ACK response or reply, it will be watching the receive data stream for an idle period in which to send its message. Generally, there will be no spacing between characters in replies generated by units, but this is not guaranteed. 1.8.2 Inter-message spacing There is no requirement to provide any space between messages. However the following points should be considered if message spacing becomes too short. The receive data buffer of the unit may become full if too many messages are received at once. If this happens, subsequent messages will be rejected until the receive buffer has room. The receive buffer size is dependent upon the RAM available in a particular unit, so there is no global specification available on this. When using a half duplex interface (such as RS-485), ACK responses or replies will be held until the line is idle for a specified time (see next section). Therefore, an idle time should be provided for any message that expects a response. Document 12245 Rev. I Sheet 7 of 39 If an ACK response is requested on every message, the host will know if a message was rejected (for any reason) because it will not receive the quick ACK response. 1.8.3 ACK Responses If requested, an ACK response will be generated as quickly as possible following receipt of the original message. With a full duplex interface, if the unit is already transmitting when it becomes time to send an ACK response, it will send the ACK as soon as it finishes transmitting the existing message. When using a halfduplex interface, a delay of 1 byte time is introduced to allow time for the host to switch from transmitting to receiving. The line must be idle during this time. Another delay of 1 byte time is always introduced when the transmitter is turned on. The timing of the ACK response (after the end of the host message) is as follows: FULL DUPLEX interface: MINIMUM: 1 BYTE TIME MAXIMUM: (1 BYTE TIME + 1 ms), or as soon as the transmitter is done sending a message HALF DUPLEX interface: MINIMUM: 2 BYTE TIMES with idle line MAXIMUM: (2 BYTE TIMES + 1 ms) with idle line NOTE: If the half duplex line is not idle, the unit simply waits for the line to be idle for 1 BYTE TIME, then generates the ACK response. 1.8.4 Replies If a message generates a reply, that reply should start no more than 100 ms after the original host message. With a full duplex interface, if the unit is already transmitting when it becomes time to send a reply, it will send it as soon as the transmitter is finished. If a message generates both a reply and an ACK response, the ACK response will always be first (according to ACK Response specifications), followed by the reply, within its specified time frame. The minimum time for a reply (with no ACK response) is the same as the minimum specification for an ACK response above, depending on the interface. 2 Messages Serial I/O messages are normally sent using the VertexRSI Serial I/O Message Framing Protocol. This protocol imposes the following restrictions on the message content. The message data must contain at least one byte, and at most 249 bytes. The first byte is limited to a six-bit value ranging from 00 to 3E, excluding the values 02 and 03. No byte in the message data can be 02 or 03. MESSAGE DATA Instruction Code (6 bits) ... FRAMING HEADER Sub-Instruction (optional) Message body (optional) End Body 2A ... FRAMING FOOTER Data Value(s) (optional) In this protocol, the first byte of the message data is referred to as the instruction code, which ranges in value from 00 to 20. Normally if there is a reply, it will contain the same instruction code as the host message. Sheet 8 of 39 Document 12245 Rev. I If further data is included, if follows the instruction code and is referred to as the message body. Some instruction codes require a sub-instruction. If required, the sub-instruction is sent as the first byte of the message body. If there is a reply, the reply will contain the same sub-instruction. Data values, if required, are sent in the message body following the instruction code, or the sub-instruction (if it is present). 2.1 Message Types The message type is determined by the instruction code. The message type determines: Whether or not a reply will be sent. Whether or not the reply (if any) contains data. There are three general types of message: Status, Control/Configuration, and Command. 2.1.1 Status Messages Status messages request data without affecting any controls or settings. The unit will generate a response message containing the requested data in the message body. Normally status messages may be used regardless of the operational mode of the unit. 2.1.2 Control/Configuration Messages Control messages set the value of an operational control on the unit, whose value can be either set or queried. Controls usually correspond to some important feature, such as the gain of an amplifier. To set the value of a control, a message is sent containing the desired value. The control will be set, but no reply will be generated. To determine if the control was actually set to the desired value, another message should be sent to query the value of the control. To query the value of the control, a message is sent without any setting value (although some messages do require other data values, which should be sent). A reply will be generated containing the current value of the control. Configuration messages are identical to control messages in their behavior, but the data in them corresponds to some setting, that is usually only used once when the system is set up. There may be conditions under which certain messages will not be obeyed (see the specific equipment manual). Normally the value of any control or configuration setting may be queried regardless of the operational mode of the unit. 2.1.3 Command Messages Command messages cause the device to perform some action or function that can't necessarily be evaluated. Commands may (but don’t have to) contain data in the message body. No message is returned from the unit in response to a command. Command messages are also used for controls that may take a significant amount of time to change. There will be another status message that can be used to determine the value of such controls. There may be conditions under which certain messages will not be obeyed (see the specific equipment manual). 2.2 Data Values Data values are used in the message body to transfer measurements, settings, and other information. Data values are normally represented as ASCII characters, to conform to the limitations imposed by the framing protocol. Document 12245 Rev. I Sheet 9 of 39 Where more than one data value is sent, they are usually separated by some delimiter such as a comma (“,” ASCII code 2C). The following are descriptions of the most commonly used types of data: 2.2.1 Analog Value An analog value represents a numeric measurement, control, or setting such as currents, voltages, gain, etc. Analog values are formatted as an ASCII string containing the numeric value. Analog data can be a floatingpoint value (e.g. “3.12”), or an integer value (e.g. “14”). The data can be signed (preceded by a “+” or “-”) or unsigned (no sign character preceding). The ASCII characters recognized are digits “0” - “9”, the decimal point (“.”), and a sign (“+” or “-”). Only one decimal point may appear, and the sign, if any, must appear at the beginning of the string. Any other character will terminate the number. Exponential notation (“X.XXXE+YY”) is not used. Overrange and underrange values are preceded by a “>“ or “<“ symbol, respectively. If the measurement is unavailable for some reason, a question mark (“?”, ASCII code 3F) will be returned. If more than one data value is included, values will be separated from one another by commas (“,”, ASCII code 2C). In protocol documents, the following symbols will be used to represent analog data being sent in the message body: Nlabel ±Nlabel Ilabel ±Ilabel an unsigned floating point value a signed floating point value an unsigned integer value a signed integer value label will be text representing the function of the value. 2.2.2 Enumerated Value An enumerated value can be represented as one of two or more states. For example, an amplifier may be “ON” or “OFF”. Enumerated values are represented by a single byte. Each possible state is represented by a different value. Usually the ASCII code for “0” (30) is used to represent NO, OFF, FALSE, etc. and the ASCII code for “1” (31) is used to represent YES, ON, TRUE, etc. Other codes may represent other conditions, such as “?” (3F) for “unknown”. In cases where more than one enumerated value is sent, each value is represented by a single byte, with no delimiter between them. However, enumerated values will be separated from other data values by a comma (“,”, ASCII code 2C). In protocol documents, the following symbol is used to represent enumerated values in the message body: A single enumerated value Blabel label will be text representing the function of the value A brief description of the meanings of the values for each byte will follow. 2.2.3 Bit Flag Value Groups of flags representing simple YES/NO or TRUE/FALSE data are represented as bits in a single byte. Bit flag values are transferred in the least significant six bits of a byte (bits 5 through 0), with the most significant two bits being 0 and 1 (bit 7 is 0, bit 6 is 1). In cases where more than six bit flags are needed, more bytes are sent, with no delimiters between them. However, bit flag values will be separated from other data values by a comma (“,”, ASCII code 2C). In protocol documents, the following symbols are used to represent a byte of bit flag value data in the message body: Sheet 10 of 39 Document 12245 Rev. I 01 blb5 0 blb3blb2 1 blb0 lbx will be a label that identifies the function of each bit 0 represents bits that are not used, and that will always be set to 0. 1 represents bits that are not used, and that will always be set to 1. Brief descriptions of the meanings of each bit when it is SET (1) will follow. 2.2.4 String Value Text data, such as the firmware version and mask number, is represented simply as a string of ASCII characters. In cases where more than one string value is needed, the values will be delimited. The delimiter used will be identified in the protocol document for the particular piece of equipment. In protocol documents, the following symbol will be used to represent string data in the message body: “label” label will be text identifying the function of the string value Note that the quotation marks are shown here only to identify a string value, and are NOT actually present in the message body. 2.2.5 Protocol Symbols As shown above, certain symbols are used in protocol documents to represent different types of data values. In addition, other notations have other meanings: 2.3 [ ] Brackets enclose segments of the message body that may or may not be present. The brackets may be nested. ... Ellipses represent that more than one of the same type of value may present in the message body. Programming Issues 2.3.1 Compatibility The contents of any message are subject to change as features and improvements are made to the product line. Therefore, changes to the protocol may be necessary. Wherever possible, the changes will be made in such a way as to maintain compatibility with existing systems, provided the following rules are followed: Make no assumptions as to the range or step size of any analog value. EXAMPLE: If a gain setting can currently be controlled from 0 to 20 dB in 0.1 dB steps, the range may be extended to 30 dB in the future, or the step size may be changed to 0.05 dB. Allow for extra data values to be returned at the end of any message, or at the end of a group of enumerated or bit values delimited from other values. It is not necessary to predict the meanings of such values, but their presence must be tolerated. The original values will be left in the same positions and order in the message body, new ones will be added to the end. EXAMPLE: If a message currently returns 3 Analog Values, a fourth may be added to support a new feature in the future. Allow for extra codes (not currently documented) in enumerated values. Again, it is not necessary to predict the possible meanings of such codes, but code values other than those listed should be tolerated. The meanings of existing codes will be left unchanged. Document 12245 Rev. I Sheet 11 of 39 EXAMPLE: An enumerated control currently has settings for “OFF” (30) and “ON” (31). In the future, a third choice may be added, called “STANDBY” (32). “OFF” and “ON” will retain their same values (30) and (31), and “STANDBY” will use a new code value (32). Make no assumptions about the presence of hardware or options in a particular model. There are messages that can be used to determine the number of power supplies, current stages, etc., and the presence or absence of various pieces of hardware. Use these messages, if necessary, to prevent problems with your software should something be added or removed in a future product release. EXAMPLE: An amplifier currently has 8 current stages, so the message that requests currents returns 8 values. Due to improvements in technology, the same amplifier, purchased at some point in the future, may have been reduced to only 6 current stages, so the same message will return 6 values. 2.4 Instruction Codes All VertexRSI (MAXTECH) equipment uses a common set of instruction codes. Some equipment types do not use all messages. Refer to the specific equipment’s manual for the instruction codes used. Unless otherwise indicated, a reply will contain the same instruction code as the host message. Some of these instruction codes require a sub-instruction that is dependent on the type of equipment. Again, refer to the protocol document from the specific equipment for more information. Instr Code 04 07 08 09 0A 0B 0E 16 17 18 19 1C 20 2.5 Sub instr NO NO NO NO NO NO NO YES YES YES YES NO Type Command Status Status Command Command Command Control Status Configuration Control Command Status/Special Status Description Reset Unit Unit Type Get Faults Clear Service Request Fault Reset Self Tests Local Lockout Get Measured Data Set/Read Configuration Set/Read Controls Unit Commands RC Panel Status/Message Unit Status Message Table The following table summarizes the messages used to control and monitor the amplifier via serial I/O. The first column shows the message instruction code, which is described above. The second column shows the sub-instruction, if one is needed. The third column shows the name of the function performed by the message, and which section you should read in the Message Details for more information. The last column briefly describes the data values sent to or received from the amplifier in that message. Data values in the last column are preceded with a for message being sent to the amplifier, and a for messages being returned by the amplifier. Remember that Control or Configuration messages can either receive a value (if the host computer wishes to change the control or setting) or return a value (if the host computer is just checking to see what the current setting is). In the first case, no response will be returned (other than an ACK, if requested). In this table, the two forms of these messages are represented by showing the Data Values as being optional in both directions. Sheet 12 of 39 Document 12245 Rev. I This protocol was designed to be somewhat compatible with that of earlier SSPA products. Some messages that are not applicable to this type of amplifier were left in, because it is reasonable to assume that they might be routinely sent by already existing code, and some response would be expected. Such messages are marked in this table with gray vertical bars. These messages will return fixed values that should satisfy existing software, as indicated in the table. They are not described in the Function Reference. Message Table Instr 04 SubInstr Data Values Sent to Amplifier Returned by Amplifier Name/(Section) Reset Microprocessor (3.1) None None Resets microprocessor. 07 Get Unit Type (3.2) None BSIO_UNIT_TYPE BSIO_UNIT_TYPE = 34 for amplifiers (outdoor and antenna-mount) using this protocol. 08 Get Faults (3.3) [BNEW_INFO] If BNEW_INFO is not present, or is not equal to 31, the “old style” set of flags (compatible with SSPA v2.xx) will be returned as follows: 01 bLSUM_CURRENT bLSUM_VOLTAGE 0 bLSUM_OUTPUT_POWER bLFLT_BUC_FAIL bLSUM_INPUT 01 000 bLSUM_HARDWARE bLFLT_TEMP_SHDN bLFLT_TEMP_HI 01 bLSUM_HDW_WARNING 0 bLSUM_PREFL_HIGH 000 01 bASUM_CURRENT bASUM_VOLTAGE 0 bASUM_OUTPUT_POWER bAFLT_BUC_FAIL bASUM_INPUT 01 000 bASUM_HARDWARE bAFLT_TEMP_SHDN bAFLT_TEMP_HI 01 bASUM_HDW_WARNING 0 0 bASUM_PREFL_HIGH 000 01 0 bLSUM_FAN bLSUM_RC_FAILURE bLFLT_MAINT_WARN bLFLT_LOCAL_WARN 0 01 0 bASUM_FAN bASUM_RC_FAILURE bAFLT_MAINT_WARN bAFLT_LOCAL_WARN 0 If BNEW_INFO is present and equal to 31, the “new style” set of flags below will be returned: 01 bLFLT_EXT_INH bLFLT_POUT_HI bLFLT_POUT_LO bLSUM_MODULE bLFLT_VINP_HI bLFLT_VINP_LO 01 bAFLT_EXT_INH bAFLT_POUT_HI bAFLT_POUT_LO bASUM_MODULE bAFLT_VINP_HI bAFLT_VINP_LO 01 bLFLT_LOCAL_WARN bLFLT_MAINT_WARN 0 bLFLT_INPR8 bLFLT_INPR7 bLFLT_BUC_FAIL 01 bAFLT_LOCAL_WARN bAFLT_MAINT_WARN 0 bAFLT_INPR8 bAFLT_INPR7 bAFLT_BUC_FAIL 01 bLFLT_INPR6 bLFLT_INPR5 bLFLT_INPR4 bLFLT_INPR3 bLFLT_INPR2 bLFLT_INPR1 01 bAFLT_INPR6 bAFLT_INPR5 bAFLT_INPR4 bAFLT_INPR3 bAFLT_INPR2 bAFLT_INPR1 01 bLFLT_REFL_DET_WARN bLFLT_PREFL_DET_FAULT bLFLT_PREFL_HIGH_WARN bLFLT_PREFL_HI_FAULT bLFLT_TEST_FW_WARN bLFLT_REL_PWR 01 bAFLT_REFL_DET_WARN bAFLT_PREFL_DET_FAULT bAFLT_PREFL_HIGH_WARN bAFLT_PREFL_HI_FAULT bAFLT_TEST_FW_WARN bAFLT_REL_PWR 01 00 bLFLT_ANT_DL_FAIL bLFLT_RC_FAILURE bLFLT_FAN2_WARN bLFLT_FAN1_WARN 01 00 bAFLT_ANT_DL_FAIL bAFLT_RC_FAILURE bAFLT_FAN2_WARN bAFLT_FAN1_WARN bLSUM_xxx = Latched summary fault xxx … bASUM_xxx = Active summary fault xxx … bLFLT_xxx = Latched fault xxx … bAFLT_xxx = Active fault xxx … 09 Clear Service Request (3.4) None None Clears (resets) the Service Request Form ‘C’ contacts. 0A Fault Reset (3.5) None None Resets (clears) any latched faults that are not currently active. If no fault condition still exists, the Service Request contacts will also be cleared. 0B Self Test (3.6) None None Performs self-test. Document 12245 Rev. I Sheet 13 of 39 Message Table Instr SubInstr Local Lockout (3.7) 0E Data Values Sent to Amplifier Returned by Amplifier Name/(Section) To set Local Lockout ON or OFF: BLOC_LOCKOUT_SETTING None To read the current Local Lockout setting: None BLOC_LOCKOUT_SETTING BLOC_LOCKOUT_SETTING = 30 for Local Lockout OFF, or = 31 for Local Lockout ON. The state of local lockout is tracked for protocol compatibility, although it will have no effect on an amplifier without local controls, e.g., an outdoor SSPA without an RCP2001 connected. 16 50 Get Output Power (3.8.1) None [±] NOUTPUT_POWER 16 51 Get Module Temperature (3.8.2) Normal use: None ±NMODULE_TEMPERATURE Compatible with multi-module systems: [ IMODULE_NUMBER ] ±NMODULE_TEMPERATURE [ , IMODULE_NUMBER ] For SSPAs using this protocol, IMODULE must be equal to 31 or not be present, or a 3F will be returned for NMODULE_TEMPERATURE. IMODULE_NUMBER is only returned in the response if it was sent to the unit. 16 52 Get Module Current (3.8.3) Normal use: None NTOTAL_CURRENT Compatible with multi-module systems: [IMODULE_NUMBER ] NTOTAL_CURRENT [ , IMODULE_NUMBER ] IMODULE_NUMBER is returned only if sent. For outdoor SSPAs, IMODULE_NUMBER must be equal to 31 or not be present, or a 3F will be returned for NTOTAL_CURRENT. Compatible with ANT MNT 1.5x (module number, stage number): [ [IMODULE_NUMBER] , ISTAGE_NUMBER ] NTOTAL_CURRENT [ , IMODULE_NUMBER ] , ISTAGE_NUMBER ] IMODULE_NUMBER and ISTAGE_NUMBER are returned only if sent. For SSPAs using this protocol, both IMODULE_NUMBER and ISTAGE_NUMBER must be equal to 31 or not be present, or a 3F (“?”) will be returned for NTOTAL_CURRENT 16 53 Get Input Voltage (3.8.4) None NINPUT_VOLTAGE 16 54 Get RF Output Status (3.8.5) None 01 0 bMUTED:PARIO bMUTED:SERIO bMUTED:LOCAL 00 01 bHICURR_SHTDN bGATEVSHT bBUC_UNLKINH 0 bTH_SHTDN bRF_INHIBIT 01 000 000 01 000 00 bEXT_INH_OR_FAST_MUTE 16 55 Get 1:1 Status (3.8.6) None IUNIT_NUMBER , ISYSTEM_VERSION IUNIT_NUMBER identifies whether this SSPA is Unit #1 or #2 on the 1:1 switch. This value can be “1” (31), “2” (32), or “?” (3F). 3F indicates that the unit number is unknown due to a failure. ISYSTEM_VERSION is “1” (31) for the version of firmware covered by this document, and would change in future versions only if a significant change is made to the operation of the 1:1 system. Sheet 14 of 39 Document 12245 Rev. I Message Table Instr SubInstr Data Values Sent to Amplifier Returned by Amplifier 16 57 Get Firmware Version Info (3.8.7) None “Firmware_Mask_Number” 20 “Firmware_Version” 16 58 Get Total Current (3.8.8) None NTOTAL_CURRENT 16 59 Get Specific Fault Info (3.8.9) [BACTIVE_INFO] BLIST_FAULT … (one code for each reported fault condition) Name/(Section) If BACTIVE_INFO is not present, or is present but not equal to 31, each currently reported fault condition is listed, whether it is currently active or not. If BACTIVE_INFO is present and equal to 31 (to request active fault information), the high bit will be set (add 80) for each code that is still active. See Section 3.8.9 for the complete list of codes. 16 5A Get Configuration (3.8.10) None BOPT_PARALLEL_IO BOPT_1:1 30 BOPT_ANT_DL BOPT_1:1_SW BOPT_BUC 30 31 30 30 30 30 BOPT_REFLECTED PWR 30 30 , 31 , BOPT_FAN_MONITOR BOPT_XXXX = 30 if not present (or if disabled), = 31 if present (or enabled). The option flag for Parallel I/O (BOPT_PARALLEL_IO) corresponds to that for “local” Parallel I/O in previous SSPA versions. Even though the Parallel I/O option is physically located in the RCP-2001, all other serial messages that handle Parallel I/O act as if it is local (when present). The 1:1 option flag (BOPT_1:1) indicates whether 1:1 is enabled in the amplifier. In the original implementation of this protocol, the 1:1 switch flag (BOPT_1:1_SW ) was intended to indicate whether the 1:1 switch was connected or not. However, in all versions of Antenna Mount firmware described by this document, both BOPT_1:1 and BOPT_1:1_SW are set to 31 if the 1:1 option is enabled, or to 30 if it is not. th The 31 in the 8 byte indicates the presence of gain control, a standard feature included in outdoor and antenna-mount SSPAs. th The 31 in the 17 byte [following a comma (2C)], represents the number of current measurements reported by message 16 52, which is always “1” for SSPAs using this protocol. 16 16 5B 5C Get Reflected Measurement (3.8.11) Get Parallel Inputs (3.8.12) None [ [ < ] [ > ] [ ± ] NREFLECTED_PWR ] or [ “U” ] or [ 3F ] The reflected measurement is returned in the currently selected measurement type (power, return loss, or VSWR; see 3.10.6). No sign is returned if measurement type is VSWR, or if measurement type is power and power units are Watts. A leading “<” or “>” symbol may be present (see 3.8.11). A “U” (55) will be returned for “undefined”. A 3F will be returned if the reading is not available because the option is disabled, or because of a detector failure. None [ 01 bPIO_INPUT_R6_ACTIVE bPIO_INPUT_R5_ACTIVE bPIO_INPUT_R4_ACTIVE bPIO_INPUT_R3_ACTIVE bPIO_INPUT_R2_ACTIVE bPIO_INPUT_R1_ACTIVE 01 000 0 bPIO_INPUT_R8_ACTIVE bPIO_INPUT_R7_ACTIVE 01 000 000 01 bPIO_INPUT_R6_LATCHED bPIO_INPUT_R5_LATCHED bPIO_INPUT_R4_LATCHED bPIO_INPUT_R3_LATCHED bPIO_INPUT_R2_LATCHED bPIO_INPUT_R1_LATCHED 01 000 0 bPIO_INPUT_R8_LATCHED bPIO_INPUT_R7_LATCHED 01 000 000 ] if Parallel I/O is present (option available in the RCP-2001); or, [ 3F ] if Parallel I/O is not present. 16 5D Get Latched Analog Faults (3.8.13) Document 12245 Rev. I None 01 000 000 01 000 000 01 0 bLSUM_VOLTAGE 0 000 Sheet 15 of 39 Message Table Instr SubInstr 16 60 Data Values Sent to Amplifier Returned by Amplifier Name/(Section) Get Module Measurements (3.8.14) [IMODULE] [IMODULE , ] “VG” ±NGATE_VOLTAGE [ , “VR” NREGULATED_VOLTAGE ] IMODULE must be equal to 31 or not be present, or a 3F (“?”) will be returned for NGATE_VOLTAGE (and NREGULATED_VOLTAGE if included in the response). IMODULE is only returned in the response if it was sent to the unit. NREGULATED_VOLTAGE is included only for those amplifiers that are capable of measuring the regulated voltage internal to the SSPA. 16 6A Get Module Nominal Power (3.8.15) None NNOMINAL_POWER_WATTS 16 6B Get Gain Range (3.8.16) None IGAIN_RANGE_dB 16 6D Get Fan Status (3.8.17) None [ BFAN_1_STATUS BFAN_2_STATUS ] or [ 3F ] BFAN_X_STATUS = 30 for fan speed too slow (below fault threshold), or = 31 for fan speed above threshold. A single 3F is returned if the Fan Monitoring option is disabled, or if fan status is unavailable for any other reason. After a power-up, fan speed may indicate “too slow” while the fans accelerate. In this case, if this message is sent, the returned value will still be 30, although a fault will not be reported. 17 51 Output Power Limits (3.9.1) To set limits: [<] [±NLOW_POUT_LIMIT] [ , [>] [±NHIGH_POUT_LIMIT] ] None Note: If the preceding “<” or “>” is sent, the corresponding value, if present, will be ignored and that limit will be disabled. To read currently set limits: None [<] ±NLOW_POUT_LIMIT , [>] ±NHIGH_POUT_LIMIT , “0” 17 52 *Unused 1 (3.9.2) None “?” (3F) 17 53 *Unused 2 (3.9.3) [IDUMMY] [IDUMMY , ] 3F , 3F 17 54 *Unused 3 (3.9.4) None 3F , 3F 17 55 *Unused 4 (3.9.5) None “11” (31 31) 17 56 Parallel Input Functions (3.9.6) To set functions: BPIO_INPUT_FUNCTION_R1 [BPIO_INPUT_FUNCTION_R2 [BPIO_INPUT_FUNCTION_R3 [BPIO_INPUT_FUNCTION_R4 [BPIO_INPUT_FUNCTION_R5 [BPIO_INPUT_FUNCTION_R6 [BPIO_INPUT_FUNCTION_R7 [BPIO_INPUT_FUNCTION_R8] ] ] ] ] ] ] None To read currently set functions: None BPIO_INPUT_FUNCTION_R1 BPIO_INPUT_FUNCTION_R2 BPIO_INPUT_FUNCTION_R3 BPIO_INPUT_FUNCTION_R4 BPIO_INPUT_FUNCTION_R5 BPIO_INPUT_FUNCTION_R6 BPIO_INPUT_FUNCTION_R7 BPIO_INPUT_FUNCTION_R8 See Section 3.9.6 for a complete list of available PIO input functions. Sheet 16 of 39 Document 12245 Rev. I Message Table Instr SubInstr 17 58 Name/(Section) Power-Up State (3.9.7) Data Values Sent to Amplifier Returned by Amplifier To set state: BPOWER_UP_SETTING None To read currently set state: None BPOWER_UP_SETTING BPOWER_UP_SETTING = 30 for Muted, = 31 for Operating, = 32 for Previous state 17 59 Parallel Output Functions (3.9.8) To set functions: BPIO_OUTPUT_FUNCTION_R1 [BPIO_OUTPUT_FUNCTION_R2 [BPIO_OUTPUT_FUNCTION_R3 [BPIO_OUTPUT_FUNCTION_R4 [BPIO_OUTPUT_FUNCTION_R5 [BPIO_OUTPUT_FUNCTION_R6 [BPIO_OUTPUT_FUNCTION_R7 [BPIO_OUTPUT_FUNCTION_R8] ] ] ] ] ] ] None To read currently set functions: None BPIO_OUTPUT_FUNCTION_R1 BPIO_OUTPUT_FUNCTION_R2 BPIO_OUTPUT_FUNCTION_R3 BPIO_OUTPUT_FUNCTION_R4 BPIO_OUTPUT_FUNCTION_R5 BPIO_OUTPUT_FUNCTION_R6 BPIO_OUTPUT_FUNCTION_R7 BPIO_OUTPUT_FUNCTION_R8 When setting, send a 3F to leave any particular function unchanged. See Section 3.9.8 for a complete list of available PIO output functions. 17 5A Output Power Calibration Offset (3.9.9) To set value: ±NPOUT_OFFSET None To read currently set value: None ±NPOUT_OFFSET 17 5B Reflected Power Calibration Offset (3.9.10) [ ±NREFLECTED_POWER_CAL_OFFSET ] [ ±NREFLECTED_POWER_CAL_OFFSET ] 17 5F Local/Remote Settings (3.9.11) To set value: BLOCAL_WARNING_SETTING [BREMOTE_DISABLES_LOCAL_SETTING ] None To read currently set value: None BLOCAL_WARNING_SETTING BREMOTE_DISABLES_LOCAL_SETTING BLOCAL_WARNING_SETTING = 30 for Disabled, = 31 for Enabled; send 3F to leave unchanged (when setting). BREMOTE_DISABLES_LOCAL_SETTING = unchanged (when setting). 17 17 18 61 62 50 30 for No, = 31 for Yes; send 3F to leave Reflected Power Fault Limit (3.9.12) [ [ > ] [ ±NREFLECTED_POWER_LIMIT ] ] [ [ > ] ±NREFLECTED_POWER_LIMIT ] Reflected Power Fault/Warning (3.9.13) [ BREFLECTED_POWER_FAULT_WARNING ] [ BREFLECTED_POWER_FAULT_WARNING ] Mute Control (3.10.1) To set mute/operate control: BMUTE_CONTROL None Reflected Power Fault Limit is always represented as a power measurement in the current power units (dBm, dBW, or Watts) regardless of the setting of the Reflected Measurement Type. Send just a “>” to disable the Reflected Power Fault Limit. BREFLECTED_POWER_FAULT_WARNING = 30 for Warning; or = 31 for Fault. To read current setting: None BMUTE_CONTROL Document 12245 Rev. I Sheet 17 of 39 Message Table Instr SubInstr Data Values Sent to Amplifier Returned by Amplifier Name/(Section) BMUTE_CONTROL = 30 for MUTE (Output off), = 31 for OPERATE (Output on) 18 51 Redundancy Mode (3.10.2) To set redundancy mode: BREDUND_MODE None BREDUND_MODE = 30 for MANUAL, = 31 for AUTO, = 32 for SPARE. To read current setting: None BREDUND_MODE1 BREDUND_MODE2 BREDUND_MODE1 = 30 for MANUAL, = 31 for AUTO or SPARE. BREDUND_MODE2 = 30 for MANUAL, = 31 for AUTO, = 32 for SPARE. BREDUND_MODE1 is returned for compatibility with earlier SSPA products. 18 52 Gain Control (3.10.3) To set gain: ±NGAIN None To read current gain setting: None ±NGAIN 18 53 Control Unused Parallel Outputs (3.10.4) To set: BPIO_UNUSED_OUTPUT_CONTROL_R1 [ BPIO_UNUSED_OUTPUT_CONTROL_R2 [ BPIO_UNUSED_OUTPUT_CONTROL_R3 [ BPIO_UNUSED_OUTPUT_CONTROL_R4 [ BPIO_UNUSED_OUTPUT_CONTROL_R5 [ BPIO_UNUSED_OUTPUT_CONTROL_R6 [ BPIO_UNUSED_OUTPUT_CONTROL_R7 [ BPIO_UNUSED_OUTPUT_CONTROL_R8 ] ] ] ] ] ] ] None To read back: None BPIO_UNUSED_OUTPUT_CONTROL_R1 BPIO_UNUSED_OUTPUT_CONTROL_R2 BPIO_UNUSED_OUTPUT_CONTROL_R3 BPIO_UNUSED_OUTPUT_CONTROL_R4 BPIO_UNUSED_OUTPUT_CONTROL_R5 BPIO_UNUSED_OUTPUT_CONTROL_R6 BPIO_UNUSED_OUTPUT_CONTROL_R7 BPIO_UNUSED_OUTPUT_CONTROL_R8 BPIO_UNUSED_OUTPUT_CONTROL_Rx = 18 54 Power Units (3.10.5) 30 to leave unchanged (when setting), 31 for Normally Open, 32 for Normally Closed. To set units of measurement: [BPOWER_UNITS] None To read currently set units of measurement: None [BPOWER_UNITS] BPOWER_UNITS = 30 for dBm, = 31 for dBW, = 32 for Watts 18 19 55 52 Reflected Measurement Type (3.10.6) [ BREFLECTED_MEAS_TYPE ] [ BREFLECTED_MEAS_TYPE] 1:1 Switch Command (3.11.1) B1-1_SW_COMMAND None BREFLECTED_MEAS_TYPE = B1-1_SW_COMMAND = Sheet 18 of 39 30 for Power (in currently set power units, 31 for Return Loss (in dB), 32 for .VSWR (as a numeric ratio :1) 30 to switch this unit on-line 31 to switch the other unit on-line 41 to switch Unit 1 on-line 42 to switch Unit 2 on line. Document 12245 Rev. I Message Table Instr SubInstr Name/(Section) Data Values Sent to Amplifier Returned by Amplifier This command offers two different ways of defining which unit is to be switched online. The first, which is compatible with previous SSPA types, allows you to switch the addressed unit (“this” unit) on or off-line. The second allows you to switch UNIT 1 or 2 on-line. UNIT 1 is identified as the one that connects to PORT 1 of the waveguide switch, and should have the end of the 1:1 cable labeled "1" plugged into it. A switch command will not be obeyed if: (i) the system is in AUTO mode, and (ii) the command would take a good unit off-line, and put a faulted unit on-line. The hardware in the antenna-mount 1:1 system allows each amplifier to be able to switch itself on-line only. A command to an amplifier that switches the other on-line is forwarded over the link to the other amplifier. This means that if the link is broken, or if the other unit has failed in some way, a command to switch it on-line cannot be obeyed. 19 54 AntDL Switch Command (3.11.2) BANT_DL_SW_COMMAND None BANT_DL_SW_COMMAND = 1C RC Panel Message (3.12) 30 to switch to the antenna output 31 to switch to the dummy load. To get RCP Panel status: None BRCP_STATUS … See Section 3.12 for a complete list of RCP Panel Status codes. This message is not answered by the SSPA, but rather by a connected RCP-2001 Remote Control Panel. If the RCP-2001 is not present, or is not powered, this message will receive NO RESPONSE. To reset RCP reported errors: 0A None 20 Unit Status (3.13) None 01 0 bRF_OUTPUT_STATUS_OPERATING bMUTE_CONTROL_MUTED 0 bLSUM_ANY_WARNING bLSUM_ANY_FAULT 01 bOTHER_UNIT_FAULTED bRMODE_AUTO_OR_SPARE bDUMMY_LOAD bANTENNA bTHIS_UNIT_STANDBY bTHIS_UNIT_ONLINE 01 0 bCONTROL_MODE_LOCAL_OR_MAINTENANCE bCONTROL_MODE_REMOTE_OR_MAINTENANCE 0 bOTHER_UNIT_STANDBY bOTHER_UNIT_ONLINE Previously, the summary warning flag indicated that any warning was Active. The distinction between Active and Latched was meaningless, because all warnings in firmware versions prior to 2.50 were not latched. New warnings added in version 2.50 will be latched, so the flag will report when any warning is Latched. If a NonLatched warning occurs, such as LOCAL MODE WARNING, the bLSUM_ANY_WARNING flag will be set while the warning is active, and will be clear when the user exits LOCAL mode. If a Latched warning occurs (such as FAN FAILURE) the flag will be set until faults are reset. For both the THIS_UNIT and the OTHER_UNIT ONLINE/STANDBY flag pairs, if there is a problem reading the 1:1 switch, or if the switch is being changed, both ONLINE and STANDBY flags will be set. If the switch is not connected, both will be clear. (Under normal conditions, only one flag of each pair would be set, and the other would be clear.) For the ANTENNA and the DUMMY_LOAD flags, both are clear if the Ant/DL option is not enabled. Either one being set and the other clear indicates that the switch is in the corresponding position. Both are set for any other condition, such as an Ant/DL fault. Document 12245 Rev. I Sheet 19 of 39 3 Message Details 3.1 Reset Microprocessor (04) This command forces a power-up reset of the microprocessor in the addressed SSPA. If this command is sent with an ACK request, the unit will send its ACK response first, and then reset. Otherwise, there is no response to a RESET command. Normally, a spurious reset would be reported as a CPU fault. If the reset is due to this command being sent, however, a CPU fault will not be reported. Example, RESET command to unit with ACK request: SEND TO UNIT: UNIT RESPONDS: 02 06 01 44 45 03 02 06 01 3F 40 03 (then RESETS) While the units are resetting, no serial I/O communications will be possible. 3.2 Get Unit Type (07) This message requests the module type information from the unit. Outdoor and Antenna-Mount SSPAs using this protocol will return a message with module type “4” (34). 3.3 Get Faults (08) There are two sets of flags maintained for all faults detected by this unit. Single bits in the set of flags represent one possible fault condition. One set of flags is called the Latched Fault Mask, in which a bit (bLSUM_xxx or bLFLT_xxx) being set means that the indicated condition has occurred since the last time the faults were reset. The second set of flags is called the Active Fault Mask, in which a bit (bASUM_xxx or bAFLT_xxx) being set means that the indicated condition still exists. Bits in the Latched Fault Mask are reset by the Fault Reset command (see Section 3.5). Both latched and active fault flags are returned by this message. Note: If you are writing new drivers for this amplifier, it is recommended that you send the BNEW_INFO parameter, which summarizes faults in a manner more appropriate to this amplifier. The BNEW_INFO byte is sent in the message going to the amplifier. If it is not present, or present but not equal to 31, the OLD set of fault masks will be returned; see Section 3.3.1 below. If BNEW_INFO is present and equal to 31, the NEW set of fault masks will be reported; see Section 3.3.2. 3.3.1 “Old” Fault Mask In order to maintain compatibility with existing M&C systems written to communicate with other VertexRSI (MAXTECH) brand SSPAs, the message returns fault masks in which faults detected by this new amplifier are mapped to similar faults that were detected by older amplifiers. In the OLD fault mask, eight bytes containing bit data are returned. Bytes 1, 2, 3, and 7 contain the Latched Fault Mask. Bytes 4, 5, 6, and 8 contain the Active Fault Mask. Both sets of three bytes are identical in the meanings of each bit. See section 3.8.9 for more information on how this amplifier’s faults are mapped to these flags. 01 bLSUM_CURRENT bLSUM_VOLTAGE 0 bLSUM_OUTPUT_POWER bLFLT_BUC_FAIL bLSUM_INPUT 01 000 bLSUM_HARDWARE bLFLT_TEMP_SHDN bLFLT_TEMP_HI 01 bLSUM_HDW_WARNING 0 bLSUM_PREFL_HIGH 000 01 bASUM_CURRENT bASUM_VOLTAGE 0 bASUM_OUTPUT_POWER bAFLT_BUC_FAIL bASUM_INPUT 01 000 bASUM_HARDWARE bAFLT_TEMP_SHDN bAFLT_TEMP_HI 01 bASUM_HDW_WARNING 0 bASUM_PREFL_HIGH 000 01 0 bLSUM_FAN bLSUM_RC_FAILURE bLFLT_MAINT_WARN bLFLT_LOCAL_WARN 0 01 0 bASUM_FAN bASUM_RC_FAILURE bAFLT_MAINT_WARN bAFLT_LOCAL_WARN 0 bxSUM_CURRENT Sheet 20 of 39 This flag is set if any individual current measurement in the amplifier is too low or too high. Document 12245 Rev. I bxSUM_VOLTAGE The Power Supply Voltage fault in older amplifiers. This flag is set if the module’s input voltage is too high or too low. bxSUM_OUTPUT_POWER This flag signaled the output power fault (Pout fault) in older amplifiers. In the Outdoor and Antenna-Mount amplifiers, it is set if the output power is too low or too high, or if it is significantly below that of the other amplifier in a 1:1 system. bxFLT_BUC_FAIL The BUC (optional) has unlocked, lost power, or has become disconnected from the module. bxSUM_INPUT This flag is set if a Fault is generated by any Parallel I/O input programmed to FAULT.L or FAULT.H. bxSUM_HARDWARE This flag is set if any condition indicates a failure of the microprocessor based circuitry, loss of calibration info, or programming error. bxFLT_TEMP_SHDN This flag is set if the module’s temperature became so high that it was necessary to shutdown the amplifier to protect it. bxFLT_TEMP_HI This flag is set if the module’s measured temperature is too high. bxSUM_HDW_WARNING This flag was used to signal a MINOR hardware fault in older SSPA products. In the SSPAs using this protocol, it is used to signal a hardware warning. bxSUM_PREFL_HIGH This flag is set if either a Reflected Power High Fault or Warning exists. bxFLT_MAINT_WARN This flag is set if the Maintenance mode warning is in effect. bxFLT_LOCAL_WARN This flag is set if the Local mode warning is in effect. bxSUM_FAN This flag is set if either fan’s rotational speed is below the fault threshold, and enough time has elapsed since the last reset that the fan should have achieved its normal velocity. bxSUM_RC_FAILURE This flag is set if something is wrong with the “Redundancy Controller” board, which also is used to connect the Reflected Power Detector and the Fan Monitor. This flag is also used to represent the “AntDL” (antenna-dummy load switch) fault, in units equipped with that feature. 3.3.2 “New” Fault Mask The NEW fault mask is returned if the BNEW_INFO byte (equal to 31) is sent in the message going to the amplifier. This mask also contains flags for both latched and active faults. These flags map more appropriately to faults detected by this amplifier. See section 3.8.9 for more information on how this amplifier’s faults are mapped to these flags. 01 bLFLT_EXT_INH bLFLT_POUT_HI bLFLT_POUT_LO bLSUM_MODULE bLFLT_VINP_HI bLFLT_VINP_LO 01 bAFLT_EXT_INH bAFLT_POUT_HI bAFLT_POUT_LO bASUM_MODULE bAFLT_VINP_HI bAFLT_VINP_LO 01 bLFLT_LOCAL_WARN bLFLT_MAINT_WARN 0 bLFLT_INPR8 bLFLT_INPR7 bLFLT_BUC_FAIL 01 bAFLT_LOCAL_WARN bAFLT_MAINT_WARN 0 bAFLT_INPR8 bAFLT_INPR7 bAFLT_BUC_FAIL 01 bLFLT_INPR6 bLFLT_INPR5 bLFLT_INPR4 bLFLT_INPR3 bLFLT_INPR2 bLFLT_INPR1 01 bAFLT_INPR6 bAFLT_INPR5 bAFLT_INPR4 bAFLT_INPR3 bAFLT_INPR2 bAFLT_INPR1 01 bLFLT_REFL_DET_WARN bLFLT_PREFL_DET_FAULT bLFLT_PREFL_HI_WARN bLFLT_PREFL_HI_FAULT bLFLT_TEST_FW_WARN bLFLT_REL_PWR 01 bAFLT_REFL_DET_WARN bAFLT_PREFL_DET_FAULT bAFLT_PREFL_HI_WARN bAFLT_PREFL_HI_FAULT bAFLT_TEST_FW_WARN bAFLT_REL_PWR 01 00 bLFLT_ANT_DL_FAIL bLFLT_RC_FAILURE bLFLT_FAN2_WARN bLFLT_FAN1_WARN Document 12245 Rev. I Sheet 21 of 39 01 00 bAFLT_ANT_DL_FAIL bAFLT_RC_FAILURE bAFLT_FAN2_WARN bAFLT_FAN1_WARN bxFLT_EXT_INH One or more signals that inhibit the RF output have become shorted or disconnected. bxFLT_POUT_HI The output power of the amplifier has risen above the user-set fault limit. bxFLT_POUT_LO The output power of the amplifier has dropped below the user-set fault limit. bxSUM_MODULE Indicates a failure in the main RF module. bxFLT_VINP_HI The voltage input to the amplifier module is too high, which most likely indicates that the supply needs adjustment. bxFLT_VINP_LO The voltage input to the amplifier module is too low, which could indicate a failure of a power supply module, or that the supply has drifted out of adjustment. bxFLT_LOCAL_WARN The Local Mode warning is in effect. bxFLT_MAINT_WARN The Maintenance Mode warning is in effect. bxFLT_INPRn A Fault is generated by the corresponding Parallel I/O Input (n), programmed to either a FAULT.L or FAULT.H. bxFLT_BUC_FAIL The BUC (optional) has unlocked, lost power, or has become disconnected from the module. bxFLT_REFL_DET_WARN Something is wrong with the Reflected Power Detector Module, and Reflected Power Fault/Warning is set for WARNING. bxFLT_PREFL_DET_FAULT Something is wrong with the Reflected Power Detector Module, and Reflected Power Fault/Warning is set for FAULT. bxFLT_PREFL_HI_WARN These flags indicate (i) the reflected power is high (above the fault limit, which is enabled), and (ii) it has been at least 100 ms since the last 1:1 switch change, and (iii) the Reflected Power Fault/Warning is set for WARNING. bxFLT_PREFL_HI_FAULT These flags indicate (i) the reflected power is high (above the fault limit, which is enabled), and (ii) it has been at least 100 ms since the last 1:1 switch change, and (iii) the Reflected Power Fault/Warning is set for FAULT. bxFLT_TEST_FW_WARN The wrong firmware has been installed in the amplifier at the factory. bxFLT_REL_PWR The output power of this amplifier is significantly below that of the other unit in a 1:1 system. bxFLT_ANT_DL_FAIL The Antenna-Dummy Load switch failed to operate, either because the switch is disconnected or the power supply to the switch has failed. bxFLT_RC_FAILURE Something is wrong with the “Redundancy Controller” board, which also is used to connect the Reflected Power Detector and the Fan Monitor. bxFLT_FANn_WARN The corresponding fan’s rotational speed is below the fault threshold, and enough time has elapsed since the last reset that the fan should have achieved its normal velocity. Sheet 22 of 39 Document 12245 Rev. I 3.4 Clear Service Request (09) This command clears a service request, and causes the service request contacts on the serial I/O connector to stop indicating a fault condition. The service request contacts will remain in their non-fault state, unless a new fault occurs. This command differs from the Fault Reset command. This command does not attempt to clear any of the faulting conditions. It simply causes the service request to stop being reported, so that the host does not have to keep responding to an un-clearable fault condition. The service request contacts can also be cleared by sending a Fault Reset (0A) instruction (see section 3.5), if no active faulting condition still exists. 3.5 Fault Reset (0A) This message is used to reset ALL of the latched faults being reported by the unit. Note that if any alarming condition still exists, the fault will not be cleared. If certain CPU faults exist when this command is received, a self-test will automatically be run before clearing faults. Since the self-test delays operation of the SSPA logic for a few seconds, do not issue this command repeatedly while a CPU fault exists. There are no parameters with this command. If no fault condition still exists, the service request contacts will also be cleared. 3.6 Self Test (0B) This command runs the microprocessor diagnostic tests that are normally run on power-up. Any failure will be reported as a CPU (hardware) fault, by the normal fault reporting mechanisms. The self-tests may take a few seconds to run. Many of the operations of the SSPA logic will be suspended during self tests, so make sure that this command is not issued frequently. 3.7 Local Lockout (0E) NOTE: The state of local lockout is tracked for protocol compatibility, although it will have no effect on a device without local controls, such as an outdoor or antenna-mount amplifier without an RCP-2001 connected to it. For devices that have a local (manual operation) display/control panel, this message turns the Local Lockout feature on or off. For outdoor and antenna-mount amplifiers, the optional RCP-2001 Remote Control Panel provides this “local/manual” interface. When Local Lockout is turned ON, the operator will be able to view all setup data and operating parameters, but not change them, from the local control panel. In response to any control panel key press that would normally change data, the display will read “LOCKED” for a few seconds, and then return to the menu from which the attempt to change data was made. A one-byte parameter is sent in the message body: 30: Turns Local Lockout OFF 31: Turns Local Lockout ON; front panel controls are disabled. This command has NO EFFECT on outdoor and antenna-mount amplifiers without an RCP-2001 connected. 3.8 Measured Parameter Data Queries (16) For this series of messages, the message from the host controller must contain a sub-instruction data byte, which immediately follows the instruction code (16). This byte specifies which particular measured parameter you are requesting. The response from the unit will have the same instruction code (16), and will contain a message body whose first byte is the same sub-instruction code. The rest of the message body will contain the data requested by the sub-instruction code. Document 12245 Rev. I Sheet 23 of 39 3.8.1 Get Output Power (16 50) The SSPA’s output power level will be returned as an analog value. The value will be signed if the power units are set for dBm or dBW, and unsigned if the power units are set for Watts. The units will be those selected by front panel controls, or by the serial I/O Power Units message (section 3.10.5). This command can also be used to determine which units are set. A question mark (3F) is returned if the output level A/D converter is not functioning. Out-of-range values will be preceded by a greater than (>) or less than (<) symbol. The output level is measured from PNOM – 30 dB to PNOM + 2 dB (PNOM is the nominal power of the amplifier in dBm; for example, 200 watts is 53.0 dBm). Since the measurement is made with a linear detector, the resolution varies, but will be at least 0.1 dB over the top 15 dB of the measurement range. 3.8.2 Get Module Temperature (16 51) The temperature of the SSPA module’s heatsink is returned as a signed analog value. The heatsink temperature is measured over a range of -40 to +85 C, in 0.5 C steps. An optional module number may be sent to the amplifier. This is to support other model amplifiers in which there is more than one module. If this parameter is sent, it must request the temperature of module number 1. A question mark (3F) is returned if the temperature sensor is not operating properly, or if the module number specified is not 1 (31). Out-of-range values will be preceded by a greater than (>) or less than (<) symbol. 3.8.3 Get Module Current (16 52) For SSPAs using this protocol, version 2.0x or higher, this message returns the TOTAL current drawn by the SSPA, as a single analog value, measured in amps. This value will be the same as returned by the Get Total Amplifier Current message (see section 3.8.8). An optional module number and/or stage number may be sent to the amplifier. This is to support other model amplifiers in which there is more than one module or amplification stage. For the SSPAs using this protocol, if these parameters are sent, they must request the temperature of module number 1 and/or stage number 1. A comma (2C) must be sent between the module number and the stage number. A question mark (3F) is returned for the current value if the SSPA module is not connected, if both the module number and stage number, if present, are not “1” (31), or for values which cannot be read due to a hardware problem. 3.8.4 Get Input Voltage (16 53) The voltage at the supply input of the unit is returned as a single positive analog value, measured in volts. 3.8.5 Get RF Output Status (16 54) The current status of the SSPA output is returned in four bytes containing bit flag data. If all the flags in the first two bytes and the last byte are 0, the SSPA’s output is ON; otherwise the specific reason for the output being off can be determined. The third byte is included for compatibility with other amplifier products. The bit flags returned are as follows: 01 0 bMUTED:PARIO bMUTED:SERIO bMUTED:LOCAL 00 01 bHICURR_SHTDN bGATEVSHT bBUC_UNLKINH 0 bTH_SHTDN bRF_INHIBIT 01 000 000 01 000 00 bEXT_INH_OR_FAST_MUTE The flags in the first byte indicate whether the output has been muted by serial I/O command, or parallel I/O command (if an RCP-2001 is connected with optional Parallel I/O installed), or local (RCP-2001) front panel control, such that it can be turned back on with an UN-MUTE command (see section 3.10.1): bMUTED:PARIO Sheet 24 of 39 Muted by Parallel I/O Document 12245 Rev. I bMUTED:SERIO bMUTED:LOCAL Muted by Serial I/O Muted by local MUTE button (or on power-up if power-up state is set to mute) The flags in the second byte indicate the four conditions that will turn the output OFF (such that it cannot be turned back on with an UN-MUTE command): bHICURR_SHTDN bGATE_V_SHTDN: bTH_SHTDN: bBUC_UNLK_INH bRF_INHIBIT High Current Shutdown Fault Gate Voltage Shutdown Fault Thermal (overtemperature) Shutdown Fault Amplifier has shut down because the (optional) BUC may be unlocked The amplifier is OFF because one or more of the (optional) Parallel I/O inputs, programmed to RF Inhibit, on a connected RCP-2001 is asserted (active). The third byte is used to indicate special conditions that un-mute the SSPA. However, none of these conditions apply to the amplifiers using this protocol, so the six bit flags are all 0: 01 000 000 The fourth byte is used to indicate whether the module has been shut down because the external inhibit control line has been asserted. Although this feature is used in other VertexRSI (MAXTECH) SSPAs, the outdoor or antenna-mount SSPA module’s “external” inhibit control line is located inside the amplifier enclosure and should never be asserted. A fault is reported if this happens. 01 000 00 bEXT_INHIBIT_OR_FASTMUTE If the output status is unknown, a single byte “?” (3F) will be returned. 3.8.6 Get 1:1 Status (16 55) The unit number of this amplifier (1 or 2), and the version number of the system controller are returned as two positive integer values, separated by a comma. The unit number will be “1” or “2”, or it can be “?” if there is a problem that prevents the system from determining the unit number. The system controller version number is “1” for the version of firmware covered by this document, and would change in future versions only if a significant change is made to the operation of the 1:1 system. 3.8.7 Get Firmware Version Info (16 57) The mask number and version number of the firmware installed in the unit are returned as two ASCII strings, separated by a space (20). The lengths of the mask number and version number are variable. Unless some non-standard options are installed, the mask number should be “000”. Example, mask number is “021A” and version number is “2.01”: SEND TO UNIT: UNIT RESPONDS: 02 07 01 16 57 98 03 02 10 01 16 57 30 32 31 41 20 32 2E 30 31 77 03 3.8.8 Get Total Amplifier Current (16 58) Returns the TOTAL current drawn by the SSPA, as a single analog value, measured in amps. For SSPAs using this protocol, version 2.0x and higher, this value will be the same as returned by the Get Module Current message (section 3.8.3). A question mark (3F) is returned if any current stage cannot be read due to a hardware problem. 3.8.9 Get Specific Fault Info (16 59) Enumerated values are returned, one for each fault that has been detected. If no hardware or system faults are detected, 30 (None) is returned. Hardware or system fault codes are cleared by issuing a Fault Reset message (section 3.5). Document 12245 Rev. I Sheet 25 of 39 The following table lists the codes that are returned in response to the 16 59 message. They represent every fault condition that should be detected by the amplifier. The table also lists the corresponding bit flags returned by the Get Faults message (08). An optional one-byte parameter may be sent with this message, called BACTIVE_INFO. If this parameter is present, and equal to 31, the high bit of each of the following codes will be set if the fault condition is still active. Fault Codes 1 2 SIO 08 flag 2 (old style) SIO Code (16 59) Screen Text (RCP-200X) 10 Vinp Lo bXFLT_VINP_LO bXSUM_VOLTAGE Power supply voltage is low. 11 Vinp Hi bXFLT_VINP_HI bXSUM_VOLTAGE Power supply voltage is high. 13 Pout Hi bXFLT_POUT_HI bXSUM_OUTPUT_POWER Output power is above high limit. 14 Pout Lo bXFLT_POUT_LO bXSUM_OUTPUT_POWER Output power is below low limit 15 Ext Inh bXFLT_EXT_INH bXSUM_HARDWARE An internal signal that inhibits RF output is shorted or disconnected. 17 TempShdn bXSUM_MODULE bXFLT_TEMPSHDN Amplifier shutdown due to high temperature. 18 TempHi bXSUM_MODULE bXFLT_TEMPHI Amplifier temperature is too high. 29 GateV Shdn bXSUM_MODULE bXSUM_HARDWARE Amplifier shutdown due to failure of gate supply voltage. 2D BUC Fail bXFLT_BUC_FAIL bXFLT_BUC_FAIL The Block Up-Converter has failed, or has unlocked. 2E Curr Tbl bXSUM_MODULE bXSUM_HARDWARE Current measurement calibration table has been lost. 2F Curr Sig bXSUM_MODULE bXSUM_HARDWARE Current measurement signal has been lost (older amplifiers). 31 Det AD bXSUM_MODULE bXSUM_HARDWARE Output power detector A/D converter has failed. 33 Det Cal bXSUM_MODULE bXSUM_HARDWARE Output power detector calibration table has been lost. 34 Temp Err bXSUM_MODULE bXSUM_HARDWARE Temperature sensor has failed. 36 Gain Cal bXSUM_MODULE bXSUM_HARDWARE Gain calibration table has been lost. 37 RC Fail bXSUM_RC_FAILURE bXFLT_RC_FAILURE The “Redundancy Controller” board, which is also used to connect the Reflected Power Detector and Fan Monitor, has failed. 38 ROM bXSUM_MODULE bXSUM_HARDWARE ROM checksum test has failed. 39 RAM bXSUM_MODULE bXSUM_HARDWARE RAM test has failed. 3A AD bXSUM_MODULE bXSUM_HARDWARE General purpose A/D converter has failed. 3B Inv Int bXSUM_MODULE bXSUM_HARDWARE CPU interrupt hardware failure. 3C StkOvFl bXSUM_MODULE bXSUM_HARDWARE CPU program error (bug). 3D IllglOp bXSUM_MODULE bXSUM_HARDWARE CPU executed an illegal instruction. 40 Curr Lo bXSUM_MODULE bXSUM_CURRENT Amplifier’s current is too low. 41 HiCurr Shdn bXSUM_MODULE bXSUM_CURRENT Amplifier shutdown due to excessive current. Sheet 26 of 39 SIO 08 flag NEW_INFO Description Document 12245 Rev. I Fault Codes SIO Code (16 59) Screen Text 1 (RCP-200X) 42 SIO 08 flag 2 NEW_INFO SIO 08 flag 2 (old style) Local Warn bXFLT_LOCAL_WARN bXFLT_LOCAL_WARN Warning that you have set Local mode (which prevents remote control). 43 Maint Warn bXFLT_MAINT_WARN bXFLT_MAINT_WARN Warning that you have set Maintenance mode. 44 Manl Warn (N/A) (N/A) Reserved (not used at this time) 45 InpR1 bXFLT_INPR1 bXSUM_INPUT Parallel I/O input 1 fault (RCP-200x). 46 InpR2 bXFLT_INPR2 bXSUM_INPUT Parallel I/O input 2 fault (RCP-200x). 47 InpR3 bXFLT_INPR3 bXSUM_INPUT Parallel I/O input 3 fault (RCP-200x). 48 InpR4 bXFLT_INPR4 bXSUM_INPUT Parallel I/O input 4 fault (RCP-200x). 49 InpR5 bXFLT_INPR5 bXSUM_INPUT Parallel I/O input 5 fault (RCP-200x). 4A InpR6 bXFLT_INPR6 bXSUM_INPUT Parallel I/O input 6 fault (RCP-200x). 4B InpR7 bXFLT_INPR7 bXSUM_INPUT Parallel I/O input 7 fault (RCP-200x). 4C InpR8 bXFLT_INPR8 bXSUM_INPUT Parallel I/O input 8 fault (RCP-200x). 4D Vreg Adj bXSUM_MODULE bXSUM_HARDWARE Power supply voltage to RF section is out of range. 4E RelPwr bXFLT_REL_PWR bXSUM_OUTPUT_POWER This amplifier’s output level is significantly lower than the other in a 1:1 system. 50 RefDet Wrn bXFLT_REFL_DET_WARN bXSUM_HDW_WARN Reflected Power Detector has failed (set for Warning). 51 PreflHiWrn bXFLT_PREFL_HI_WARN bXSUM_PREFL_HI Reflected power is too high (set for Warning). 57 AntDL Fail bXFLT_ANT_DL_FAIL bXSUM_RC_FAILURE The Antenna-Dummy Load switch is disconnected or the power supply to the switch has failed. 77 SpurRst bXSUM_MODULE bXSUM_HARDWARE CPU has been unexpectedly reset. 78 EE Data bXSUM_MODULE bXSUM_HARDWARE Control settings have been lost. 79 EE Write bXSUM_MODULE bXSUM_HARDWARE CPU detected an error writing settings to nonvolatile memory. 7A Test Firmw bXFLT_TEST_FW_WARN bXSUM_HDW_WARN The wrong firmware has been loaded into your amplifier. 7B Fan1 Warn bXFLT_FAN1_WARN bXSUM_FAN Fan 1 speed is too slow. 7C Fan2 Warn bXFLT_FAN2_WARN bXSUM_FAN Fan 2 speed is too slow. 7D RefDet Flt bXFLT_REFL_DET_FLT bXSUM_HARDWARE Reflected Power Detector has failed (set for Fault). 7E PreflHiFlt bXFLT_PREFL_HI_FLT bXSUM_PREFL_HI Reflected power is too high (set for Fault). Description 1 “Screen Text” displayed on an attached RCP-200x is included for information only. 2 The notation for the bit flags in the 08 message indicate whether each flag maps directly to a single fault condition (bXFLT_NNNNN) or summarizes more than one fault condition (bXSUM_NNNNN). The X in this notion represents an ‘A’ for the Active fault flags, or an ‘L’ for the Latched fault flags. Document 12245 Rev. I Sheet 27 of 39 3.8.10 Get Configuration (16 5A) This message returns information about the SSPA hardware. The following information is returned: BOPT_PARALLEL_IO BOPT_1:1 30 BOPT_ANT_DL BOPT_1:1_SW BOPT_BUC 30 31 30 30 30 30 BOPT_REFLECTED_PWR 30 30 , 31 , BOPT_FAN_MONITOR The first 15 bytes are flags that indicate whether various options are present (31) or not (30). These flags are present in this message for compatibility with earlier SSPAs, but most are not currently applicable to outdoor and antenna-mount amplifiers using this protocol. The 1st byte indicates the presence (31) or absence (30) of optional Parallel I/O in a connected RCP-2001. The 2nd and 5th bytes, BOPT_1:1 and BOPT_1:1_SW , both indicate whether the 1:1 option is enabled in this amplifier. In the original implementation of this protocol, the 1:1 switch flag (BOPT_1:1_SW) was intended to indicate whether the 1:1 switch was connected or not. However, in all versions of Antenna Mount firmware described by this document, both BOPT_1:1 and BOPT_1:1_SW are set to 31 if the 1:1 option is enabled, or to 30 if it is not. The 6th byte indicates the presence (31) or absence (30) of an optional block upconverter (BUC). The 8th byte is set (31) to indicate the presence of gain control, which is standard in the outdoor and antennamount amplifiers. The 13th byte is used to represent the reflected power detector option being enabled (31) or not (30). The first 15 bytes are followed by a comma (2C), and then a positive integer value representing the number of current stages in the SSPA module, returned in the Get Module Current message (section 3.8.3). For SSPAs using this protocol , this value is always ”1” (31). Finally, following another comma to separate it from the number of current stages, is a flag which is used to represent the Fan Monitor option being enabled (31) or not (30). 3.8.11 Get Reflected Measurement (16 5B) The reflected power of the output of the amplifier will be periodically measured. The Reflected Measurement can be reported as a power level (in the same power units chosen for the Output Power measurement), as Return Loss in dB, or as VSWR. The operator selects this with the Reflected Measurement Type control (see 3.10.6). The output power measurement is used as a reference for Return Loss or VSWR calculation. If one of these measurement types is selected, and the output power is too low to calculate Return Loss or VSWR, “Undefined” will be reported. If the reflected power is out of range low, Return Loss is displayed with a leading “>”, and VSWR is displayed with a leading “<”. If the reflected power is greater than or equal to the output power, and the Reflected Measurement Type is VSWR, it will be reported as “>99.99”. Reflected power will be represented as “?Prefl” if the measurement is unavailable due to failure of the Reflected Power Detector. Via serial I/O, reflected power will be represented as “?” if the measurement is unavailable either because the detector has failed, or because the Reflected Power option is disabled. The range of the reflected power measurement is from the Nominal Power of the amplifier minus 30 dB plus the Reflected Power Calibration Offset, to the Nominal Power of the amplifier plus 2 dB plus the Reflected Power Calibration Offset. Power measurements are displayed to 0.1 dB resolution, although the resolution can be worse when the power readings are low (more than 20 dB down from the Nominal Power of the amplifier). The operator may set a Reflected Power Fault Limit, which, if exceeded, produces a Reflected Power High condition. This condition may be reported as either a Fault, or a Warning, at the operator’s discretion. If reported as a Fault, High Reflected Power will cause a switch in a 1:1 system. Note that the amplifier’s output is NOT turned off in response to a High Reflected Power condition. VertexRSI SSPA amplifiers are capable of operating into an infinite VSWR at full power without damage. Sheet 28 of 39 Document 12245 Rev. I There is also a Reflected Power Calibration offset setting (see 3.9.10), which the operator may use to adjust the readings to agree with other measurement equipment. Doing so involves connecting the output to a short, in order to produce a known and measurable reflected power signal. 3.8.12 Get Parallel Inputs (16 5C) This message returns information about the current state of the eight Parallel I/O Inputs that are optionally available when an RCP-2001 is connected. If Parallel I/O is not present, the message returns a “?” (3F). If Parallel I/O is present, the following bit flag value information is returned: 01 bPIO_INPUT_R6_ACTIVE bPIO_INPUT_R5_ACTIVE bPIO_INPUT_R4_ACTIVE bPIO_INPUT_R3_ACTIVE bPIO_INPUT_R2_ACTIVE bPIO_INPUT_R1_ACTIVE 01 000 0 bPIO_INPUT_R8_ACTIVE bPIO_INPUT_R7_ACTIVE 01 000 000 01 bPIO_INPUT_R6_LATCHED bPIO_INPUT_R5_LATCHED bPIO_INPUT_R4_LATCHED bPIO_INPUT_R3_LATCHED bPIO_INPUT_R2_LATCHED bPIO_INPUT_R1_LATCHED 01 000 0 bPIO_INPUT_R8_LATCHED bPIO_INPUT_R7_LATCHED 01 000 000 The first 2 bytes contain flags that indicate whether the PIO inputs R1 through R8 are active. A 1 bit indicates that the input is HIGH or OPEN; a 0 bit indicates that it is LOW or CLOSED. The fourth and fifth bytes contain flags that indicate whether the PIO inputs R1 through R8 are latched. Inputs that are not assigned any functions may be latched; however, PIO inputs that are assigned any function (see section 3.9.6) are NOT latched. An input is considered latched if it has been high since the last time the state was checked with Serial I/O. Each time the state is checked with Serial I/O, the latched states will be reset for any inputs that are LOW. The third and sixth bytes are present in this message for compatibility with earlier SSPAs but have no meaning for SSPAs using this protocol. 3.8.13 Get Latched Analog Faults (16 5D) This message is used to determine which current stage or power supply was the source of a fault. Although three bytes are returned, only one bit flag applies to the SSPAs using this protocol: 01 000 000 01 000 000 01 0 bLSUM_VOLTAGE 0 000 bLSUM_VOLTAGE: Voltage fault has occurred on module input supply voltage since faults were reset. This flag is reset by a Fault Reset command (see section 3.5), if the condition that caused the fault has cleared. 3.8.14 Get Module Measurements (16 60) The Get Module Measurements command returns other voltage measurements made by this particular model of amplifier. Each measurement is preceded by a two-character descriptor. The amplifier is capable of making two internal voltage measurements: Gate Voltage (“VG”) and Regulated RF Voltage (“VR”). Each voltage is returned as a signed analog value, measured in volts, preceded by the descriptor. Note that some older Antenna-Mount amplifiers were not capable of measuring the Regulated RF Voltage, in which case the only measurement returned by this message will be the Gate Voltage. An optional module number may be sent to the amplifier. This is to support other model amplifiers in which there is more than one module. If this parameter is sent, it must be “1” (31); otherwise, a 3F (“?”) will be returned. Document 12245 Rev. I Sheet 29 of 39 3.8.15 Get Module Nominal Power (16 6A) The Get Module Nominal Power command returns the rated nominal power of the SSPA expressed in watts. For example, a 50-watt (nominal) SSPA will return the value “50” (35 30). 3.8.16 Get Gain Range (16 6B) The Get Gain Range command returns the adjustable range of the gain control, as a positive integer, in dB. Gain can be set anywhere from 0.0 dB down to –(Gain Range) in dB, in 0.1 dB increments. 3.8.17 Get Fan Status (16 6D) The Fan Status indicates whether the speed reported by the fan tachometer signals is above or below the fault limit. If the speed is below the limit, the fan is FAILED. If above the limit, the fan is GOOD. The Get Fan Status command returns 30 for fan speed too slow (FAILED), or 31 for fan speed above threshold (GOOD), for each of two fans. A single 3F is returned if the Fan Monitoring option is disabled, or if fan status is unavailable for any other reason. If the fan status is FAILED, a warning will be reported, except for a period of 20 seconds after a microprocessor reset (or power-up). It is expected that the fans will take no more than this amount of time to get up to speed. Thus, following a microprocessor reset (or power-up), fan speed may indicate “too slow” while the fans accelerate. In this case, if this message is sent, the returned value will still be 30, although a fault will not be reported. 3.9 Configuration (17) CONFIGURATION messages can be used to set or query the state of controls on the unit which are usually used during setup. These controls are not normally adjusted during everyday operation of the unit. Configuration messages can either control a setting, or read the setting back. In general, commands sent to the unit can be one of two forms. The first form will query the value of a particular setting, the second will set the values. Some messages may vary from this format slightly. See the individual message descriptions for more information. The message from the controller to query the value of a setting must contain another data byte, which immediately follows the instruction code (17). This byte is the sub-instruction, and specifies which particular measured parameter you are requesting. Units will respond with a message containing the same instruction code and sub-instruction, and a message body that contains the data in the same format which is used to set the values. The message body used to set a value contains the same sub-instruction, followed by the data for the new setting. The format of the data is described in the sections that follow. Unless an ACK is requested in the instruction byte, there will be no response to a message with this format. It is recommended that an ACK request be sent with messages with this format, to verify that the unit "heard" you. If there is no immediate response, then either there was a communication error, or something was wrong with the message format. 3.9.1 Power Fault Limits (17 51) The output power measurement fault limits may be controlled by this message. When queried, three analog values are returned. The values are signed if the power units are set for dBm or dBW, and unsigned if the power units are set for Watts. In order, the values returned are the low side power limit, the high side power limit, and an unused value that will always be 0. If the low limit is disabled, the value will be preceded by a less-than symbol (‘<’). If the upper limit is disabled, the value will be preceded by a greater-than symbol (‘>’). The three values are separated by commas (2C). Sheet 30 of 39 Document 12245 Rev. I To set the power limits, you need only send the values you wish to change. If you wish to affect only the upper fault limit, send a comma (2C) followed by the new upper limit value. To disable the low fault limit send a less-than symbol (‘<’). To disable the high fault limit send a greater-than symbol (‘>’). 3.9.2 Unused 1 [Temperature Fault Limit] (17 52) NOTE: This message is NOT APPLICABLE to the amplifiers using this protocol. It is included only to be compatible with existing code that would expect some response. This message will return a fixed value (in this case, 3F) that should satisfy existing software. 3.9.3 Unused 2 [Current Stage Fault Limit] (17 53) NOTE: This message is NOT APPLICABLE to the amplifiers using this protocol. It is included only to be compatible with existing code that would expect some response. This message will return a fixed value (in this case, [IDUMMY , ] 3F , 3F) that should satisfy existing software. 3.9.4 Unused 3 [Power Supply Voltage Fault Limit(s)] (17 54) NOTE: This message is NOT APPLICABLE to the amplifiers using this protocol. It is included only to be compatible with existing code that would expect some response. This message will return a fixed value (in this case, 3F , 3F) that should satisfy existing software. 3.9.5 Unused 4 [Pout Fault Properties] (17 55) NOTE: This message is NOT APPLICABLE to the amplifiers using this protocol. It is included only to be compatible with existing code that would expect some response. This message will return a fixed value (in this case, “11” or 31 31) that should satisfy existing software. 3.9.6 Parallel Input Functions (17 56) The functions of the eight inputs on the Parallel I/O module can be read and controlled. The table below lists the functions available. “Serial I/O Code” is the hexadecimal value of the byte that must be sent in the message to select a particular input function, or that is returned when reading back the currently set functions. “Function” is a description of the operation that the input will perform. “Active On” shows the transition edge ( falling, ;or rising, ) or level (L,H) which will cause the function to be executed. To leave a function unchanged when setting other functions, send a “?” (3F). PIO Input Function Serial I/O Code Active On None 30 H Fault.H 32 H Mute 33 Un-mute 34 Mute/Un-mute toggle 35 RF Inhibit.L 36 L RF Inhibit.H 37 H Fault Reset 38 Fault.L 44 Mute.L/Un-Mute.H 46 Document 12245 Rev. I L = Mute, =Un-Mute Sheet 31 of 39 3.9.7 Power-Up State (17 58) The Power Up State setting determines whether, when powered-up, a unit should be Muted, Operating, or in the state it was when it was last switched off. A single enumerated byte is sent or received in this message. 30: 31: 32: Power Up MUTED Power Up with RF ON Power Up with output set as it was when last powered down 3.9.8 Parallel Output Functions (17 59) The functions of the eight outputs on the Parallel I/O module can be read and controlled. The following table lists the functions available. “Serial I/O Code” is the hexadecimal value of the byte that must be sent in the message to select the function, or that is returned when reading back the currently set functions. “Function” describes the overall meaning of the Parallel I/O output. “Contacts” shows the meaning of contact closure for the two positions of the Form ‘C’ contact set; “N.C.” = “normally closed” contacts that are CLOSED when the relay is de-energized; “N.O.” = “normally open” contacts that are OPEN when the relay is de-energized. PIO Output Function Serial I/O Code None (output may be controlled by SIO) Contacts 30 N.C. N.C. N.O. N.O. Output Power Fault (either high or low) 31 Fault No Fault Reflected Power High Fault 32 Fault No Fault Any Fault 35 Fault No Fault Any Warning 36 Warning No Warn Voltage Fault 38 Fault No Fault Remote/Local 39 Local Remote Maintenance Mode 3A Maint Normal Current Fault 3C Fault No Fault RF Inhibit 3D Inhibit Not Inh RF On/Off 3E RF Off RF On Temperature Fault 40 Fault No Fault Mute or Operate 42 Mute Operate BUC Fault 43 Fault No Fault Any Fault or Warning 44 Fault No Fault Fan Failure 45 Fault No Fault 3.9.9 Output Power Calibration Offset (17 5A) The output level is calibrated at a single frequency at the factory. At different frequencies, there may be an error in the Pout reading due to the frequency response of the detector diode and the coupler. The Pout Cal Offset allows the operator to enter a correction factor (in dB) to compensate for this error when operating at different frequencies, or to correct for losses following the SSPA (for example, the power delivered to the antenna can be displayed, if an offset equal to the transmission line loss is entered.) Sheet 32 of 39 Document 12245 Rev. I When queried or set, a signed analog value is passed in this message. This value is the offset (in dB) to get the Pout reading to agree with a power meter connected to the output. Note that this value is in dB, regardless of the Power Units setting. This offset can be set to any value between -6.0 to +6.0 dB, in 0.1 dB steps. 3.9.10 Reflected Power Calibration Offset (17 5B) This offset allows the operator to adjust the reflected power measurement made by the amplifier to agree with more accurate measurement equipment. The reflected power detector is calibrated at a single frequency at the factory. At different frequencies, there may be an error in the Prefl reading due to the frequency response of the detector diode and the coupler. The Prefl Cal Offset allows the operator to enter a correction factor (in dB) to compensate for this error when operating at different frequencies. Normally this would be done by first calibrating the Output Power reading to a power meter attached to the amplifier’s output; and then placing a shorting plate on the amplifier’s output and adjusting the Reflected Power Calibration Offset such that the reflected power reading is equal to the output power reading. This offset is added to the raw reflected power reading from the detector. If the Reflected Measurement Type is set for VSWR or Return Loss, the offset is applied to reflected power BEFORE computing the measurement. If you change the calibration offset, and the Reflected Power Fault Limit now falls outside of its range (based on the new offset), the Reflected Power Fault Limit will be DISABLED. This setting can be set from -6.0 to +6.0 dB, in 0.1 dB increments. This setting defaults to 0.0 dB, and is stored in non-volatile memory. NOTE: VertexRSI SSPA amplifiers are capable of operating into infinite VSWR at full power without damage. 3.9.11 Local/Remote Settings (17 5F) This message controls the value of two distinct functions: “Local Mode Warning” and “Remote Disables Local.” Two enumerated bytes may be sent or received in this message: BLOCAL_WARNING_SETTING = 30 for Disabled 31 for Enabled 3F to leave unchanged (when setting). BREMOTE_DISABLES_LOCAL_SETTING = 30 for No 31 for Yes 3F to leave unchanged (when setting). 3.9.11.1 “Local Mode Warning” Enable/Disable The Local Mode Warning exists to remind the operator to return the amplifier to Remote Mode if they change it while working on the amplifier. Most systems should be run in Remote mode, which allows Serial I/O and optional Parallel I/O control of the amplifier. Local Mode allows an operator to control the amplifier manually from its local control panel. In the case of SSPAs which do not have a built-in control panel, this would be from a connected RCP-2001 Remote Control Panel. (Despite its name, the RCP-2001 is considered “local” to the SSPA.) If you have an RCP-2001 and do not wish to remotely control your amplifier, you may wish to leave it in Local Mode. If you wish to use Local Mode exclusively, you should disable the Local Mode Warning. 3.9.11.2 “Remote Disables Local” Setting You can set the amplifier so that the “local” controls (on a connected RCP-2001 Remote Control Panel) do not function while the amplifier is in Remote Mode. This is called “Remote Disables Local”. If this setting is ON (set to “YES”), the operator may not change anything from the “local” RCP-2001 front panel without first setting the amplifier to Local Mode. Document 12245 Rev. I Sheet 33 of 39 If you turn on Remote Disables Local while the amplifier is in Remote Mode, you will immediately lose the ability to change anything from the RCP-2001 panel. Attempts to edit anything while this setting is ON and the amplifier is in Remote Mode will result in the message *** REMOTE *** being displayed for a few seconds on the RCP-2001 panel. You must return to the Control Mode setting in the Operate Menu, and set Local Mode, before you can do anything else from the RCP-2001. 3.9.12 Reflected Power Fault Limit (17 61) If the measured reflected power exceeds the Reflected Power Fault Limit, a High Reflected Power condition exists. A fault or a warning will be reported, depending on the setting of Reflected Power Fault/Warning (see 3.9.13, below). The Reflected Power Fault Limit is always represented as a power reading, in the current power units (dBm, dBW, or Watts), regardless of the setting Reflected Measurement Type. This fault limit can be disabled by turning it all the way up, such that it is displayed with a leading “>” symbol (or through serial I/O by setting it for “>”). The Reflected Power Fault limit can be set anywhere from 30 dB below the Nominal Power of the amplifier plus the Reflected Power Calibration Offset, to 2 dB above the Nominal Power plus the Reflected Power Calibration Offset, in 0.1 dB increments. This setting changes in 0.1dB increments, even if the power readings are displayed in Watts. Note that by adjusting the calibration offset, when the Reflected Power Fault limit is near one end of the range, it is possible to disable it (if the setting is outside the range after the new calibration offset is set). In a 1:1 system, the Reflected Power Fault High condition is suppressed (ignored) within 100 ms of a switch transition. This setting defaults to DISABLED, and is stored in non-volatile memory. 3.9.13 Reflected Power Fault/Warning (17 62) This setting will allow the condition “High Reflected Power” to be reported as a fault or a warning. It has two settings, FAULT and WARNING. If this setting is FAULT, a fault will be reported if the reflected power is too high, of if the Reflected Power detector hardware fails. The red FAULT lamp on an attached RCP-2001 will be lit, and if the unit is in a 1:1 system, it will be switched off-line. If this setting is WARNING, a warning will be reported if the reflected power is too high, or if the Reflected Power detector hardware fails. The yellow WARNING lamp on an attached RCP-2001 will be lit, and no 1:1 switch will occur. Note that if you change this setting while a high reflected power condition exists, the reported Reflected Power Fault or Warning will be changed as per your request. However, if a fault or warning has already been reported due to a failure of the Reflected Power detector hardware, the reported condition will not change. This setting defaults to WARNING, and is stored in non-volatile memory. 3.10 Control (18) CONTROL messages can be used to set or query the state of various controls on the unit. Control messages can either control a setting or read the setting back. In general, commands sent to the unit can be one of two forms. The first form will query the value of a particular control, the second will set the values. Some messages may vary from this format slightly. See the individual message descriptions for more information. The message from the controller to query the value of a setting must contain another data byte, which immediately follows the instruction code (18). This byte is the sub-instruction, and specifies which particular measured parameter you are requesting. Sheet 34 of 39 Document 12245 Rev. I Units will respond with a message containing the same instruction code and sub-instruction, and a message body that contains the data in the same format which is used to set the values. The message body used to set a value contains the same sub-instruction, followed by the data for the new setting. The format of the data is described in the sections that follow. Unless an ACK is requested in the instruction byte, there will be no response to a message with this format. It is recommended that an ACK request be sent with messages with this format, to verify that the unit "heard" you. If there is no immediate response, then either there was a communication error, or something was wrong with the message format. 3.10.1 Mute (18 50) This message is used to turn the output of the SSPA on or off. This message should be sent with one enumerated value: 30: 31: Turn the output OFF (Mute) Turn the output ON (Un-mute) When queried, the value of the mute control is returned the same way. Note, however, that this instruction only returns the setting of the Mute control, and the output may still be off for another reason. Use the Unit Status message (section 3.13) to determine the true state of the output. While the output is muted, all bias currents will read 0 Amps, and the Pout reading will fall to its out-of-range low value. While muted, no Current Faults or Pout Faults will be generated, but they will not be cleared either. 3.10.2 Redundancy Mode (18 51) This message can be used to control the redundancy mode. To set the mode, send this message with a single, one-byte parameter: 30: 31: 32: Manual Mode Auto Mode Spare Mode When using the message to request the current mode setting, the message is sent with no parameters. The response will contain two one-byte parameters. The first is compatible with older SSPA products, which could be set only for Auto or Manual mode. It will be 30 for Manual Mode; or 31 for Auto or Spare mode. The second parameter will indicate the correct mode, with values identical to those used to set the mode. 3.10.3 Gain Control (18 52) The gain of the SSPA may be controlled using this message. The gain can be set for -20 to 0 dB, in 0.1 dB increments. 0 dB represents the maximum possible setting of the gain control. A single signed analog value is sent to or returned from the SSPA, which represents the gain setting in dB. 3.10.4 Unused Parallel Outputs (18 53) Parallel I/O outputs that are not assigned any function may be independently controlled remotely via Serial I/O. You may switch the contact to either its normally-open or its normally-closed position. BPIO_UNUSED_OUTPUT_CONTROL_Rx = 30 to leave unchanged (when setting), 31 for Normally Open, 32 for Normally Closed. These controls only affect outputs that are not assigned to any function; i.e., if you send a control byte to an output (Rx, x = 1 to 8) which has been assigned to some function with message 17 59, the control byte will be ignored. These outputs will default to their normally-open state upon power-up if no control message is issued. Unused output controls are not stored in non-volatile memory. Document 12245 Rev. I Sheet 35 of 39 Example, set PIO output R5 to the Normally Open position and R6 to the Normally Closed position (assuming neither has previously been assigned to any function with message 17 59), and leaving other outputs unchanged: SEND TO UNIT: 02 0F 01 18 53 30 30 30 30 31 32 30 30 EF 03 There is no response. Unused PIO Output R5 is set to “N.O.” position, and R6 is set to “N.C.” position. 3.10.5 Power Units (18 54) This message controls whether the Pout (output power) is displayed in dBm, dBW, or Watts. This unit setting affects values returned by the Get Output Power command (section 3.8.1). The units are sent or returned as a single enumerated value: 30: 31: 32: dBm dBW Watts 3.10.6 Reflected Measurement Type (18 55) This message controls whether the reflected power is displayed in Power Units (dBm, dBW, or Watts) or as Return Loss (in dB), or as VSWR (numeric ratio, relative to 1). This unit setting affects values returned by the Reflected Measurement command (section 3.8.11). When set for POWER, the Reflected Measurement is represented as a power reading, in the same power units chosen for the Output Power Measurement. When set for RETURN LOSS, the Return Loss is computed as the difference between the output power and the reflected power in dB. When set for VSWR, the VSWR is computed from the output power and reflected power measurements. VSWR is a ratio (nn.nn:1), and thus is a unitless number. If the Output Power is too low, the VSWR is “Undefined”. If the reflected power is greater than or equal to the output power, the VSWR is reported as “>99.99”. This setting defaults to POWER, and is stored in non-volatile memory. 3.11 Commands (19) 3.11.1 1:1 Switch Command (19 52) This command message accepts only one one-byte parameter, which is: 30: 31: 41: 42: Switch this unit on-line Switch the other unit on-line (this one to standby) Switch unit 1 on-line Switch unit 2 on-line Note that this command offers two different ways of defining which unit is to be switched on-line. The first, which is compatible with previous SSPA types, allows you to switch the addressed unit (“this” unit) on or offline. The second allows you to switch UNIT 1 or 2 on-line. UNIT 1 is identified as the one that connects to PORT 1 of the waveguide switch, and should have the end of the 1:1 cable labeled "1" plugged into it. A switch command will not be obeyed if: (i) the system is in AUTO mode, and (ii) the command would take a good unit off-line, and connect a faulted unit on-line. The hardware in the Antenna-Mount 1:1 system allows each amplifier to be able to switch itself on-line only. A command to an amplifier that switches the other on-line is forwarded over the link to the other amplifier. This means that if the link is broken, or if the other unit has failed in some way, a command to switch it on-line cannot be obeyed. Sheet 36 of 39 Document 12245 Rev. I 3.11.2 AntDL Switch Command (19 54) This command message accepts only one one-byte parameter, which is: 30: 31: Switch the RF output to the antenna Switch the RF output to the dummy load The antenna/dummy-load switch can be in one of the following states (as displayed in the AntDL menu on an attached RCP-2001): “Disc”, “Antenna”, “Dummy Load”, “Switching”, “SwPwrFail”, or “?ADL”. The last is used if a problem in the hardware prevents the status of the switch from being determined. 3.12 RC Panel Message (1C) This message is not answered by the SSPA, but rather by a connected RCP-2001 Remote Control Panel. If the RCP-2001 is not present, or is not powered, this message will receive NO RESPONSE. BRCP_STATUS: 30 = RCP-2001 is OK, Link with SSPA is OK. 38 = RCP-2001 ROM failure 39 = RCP-2001 RAM failure 3B = RCP-2001 Invalid Interrupt 3C = RCP-2001 Stack Overflow 3D = RCP-2001 Illegal Opcode 4F = RCP-2001 Cannot communicate with SSPA 6F = RCP-2001 Front Panel failure 72 = RCP-2001 Parallel I/O failure 77 = RCP-2001 Spurious Reset 78 = RCP-2001 EEPROM data corrupt 79 = RCP-2001 EEPROM data write failure To reset RCP reported errors, send message 1C 0A. No response will be generated. 3.13 Unit Status (20) This message requests the major information from the unit in the form of bit flags. The data is returned as three bytes in the message body. The most significant two bits in each byte will be 0 and 1 respectively. The remaining six bits in each of the two bytes will contain the data. 01 0 bRF_OUTPUT_STATUS_OPERATING bMUTE_CONTROL_MUTED 0 bLSUM_ANY_WARNING bLSUM_ANY_FAULT 01 bOTHER_UNIT_FAULTED bRMODE_AUTO_OR_SPARE bDUMMY_LOAD bANTENNA bTHIS_UNIT_STANDBY bTHIS_UNIT_ONLINE 01 0 bCONTROL_MODE_LOCAL_OR_MAINTENANCE bCONTROL_MODE_REMOTE_OR_MAINTENANCE 0 bOTHER_UNIT_STANDBY bOTHER_UNIT_ONLINE Each bit is a flag indicating the following conditions, if set: bRF_OUTPUT_STATUS_OPERATING = RF is ON. bMUTE_CONTROL_MUTED = RF is OFF because the MUTE control (Serial I/O, Parallel I/O or Local) has been asserted. BLSUM_ANY_WARNING = There is an active Latched WARNING. bLSUM_ANY_FAULT = There is an active Latched FAULT. bOTHER_UNIT_FAULTED = Either the other unit is reporting a fault, or there is no communication with the other unit, in a 1:1 system. bRMODE_AUTO_OR_SPARE = The redundancy mode is set for AUTO or SPARE. bTHIS_UNIT_ONLINE = This unit is on line (in a 1:1 system), or there is a problem reading the switch position, or the switch is changing state. bTHIS_UNIT_STANDBY = This unit is in standby (in a 1:1 system), or there is a problem reading the switch position, or the switch is changing state. Document 12245 Rev. I Sheet 37 of 39 bCONTROL_MODE_LOCAL_OR_MAINTENANCE = Control Mode is set to Local or Maintenance. bCONTROL_MODE_REMOTE_OR_MAINTENANCE = Control Mode is set to Remote or Maintenance. bOTHER_UNIT_ONLINE = The other unit (in a 1:1 system) is on line, or there is a problem reading the switch position, or the switch is changing state. bOTHER_UNIT_STANDBY = The other unit (in a 1:1 system) is in standby, or there is a problem reading the switch position, or the switch is changing state. bANTENNA = RF output is directed to the Antenna; or there is a problem with the Ant/DL switch (if bDUMMY_LOAD is also set). bDUMMY_LOAD = RF output is directed to the Dummy Load; or there is a problem with the Ant/DL switch (if bANTENNA is also set). Previously, the summary warning flag indicated that any warning was Active. The distinction between Active and Latched was meaningless, because all warnings in firmware versions prior to 2.50 were not latched. New warnings added in version 2.50 will be latched, so the flag will report when any warning is Latched. If a NonLatched warning occurs, such as LOCAL MODE WARNING, the bLSUM_ANY_WARNING flag will be set while the warning is active, and will be clear when the user exits LOCAL mode. If a Latched warning occurs (such as FAN FAILURE) the flag will be set until faults are reset. For both the THIS_UNIT and the OTHER_UNIT ONLINE/STANDBY flag pairs, if there is a problem reading the 1:1 switch, or if the switch is being changed, both ONLINE and STAND-BY flags will be set. If the switch is not connected, both will be clear. (Under normal conditions, only one flag of each pair would be set, and the other would be clear.) For the ANTENNA and DUMMY_LOAD flag pair, if there is a problem reading the Ant/DL switch, or if the switch is being changed, both flags will be set. If the switch option is not installed, both will be clear. Otherwise, the flag that is set indicates the switch position. 4 Faults and Alarms One of the major functions of the serial I/O port is the reporting of problems to the host controller. A problem is referred to as a fault, and any fault will generate an alarm. These two terms (fault and alarm) are often used interchangeably. 4.1 Reporting of Faults If a fault condition is detected by the SSPA, the following actions are taken: The bit corresponding to the detected condition is set in the Latched Fault Mask. The same bit is set in the Active Fault Mask. The service request relay contact is closed (if the Serial I/O port relay is programmed for “Service Request”; see Section 4.3). The host can detect the fault either by monitoring the service request relay contact, or by polling the unit using the Get Faults message (see section 3.3). The host computer can clear the service request relay contact by issuing a Clear Service Request command (see section 3.4). This contact will not close again unless another fault condition occurs. This command does not disturb the state of any other fault indicators. When the fault condition clears, either because it has been repaired or it went away by itself, the following actions are taken: The Active Fault Mask bit corresponding to the condition is cleared. If the fault is of a non-latched type, the same bit in the Latched Fault Mask is cleared. If all faults in the Latched Fault Mask are cleared, the service request relay contacts are cleared. Sheet 38 of 39 Document 12245 Rev. I After the fault condition has been rectified, bits can be cleared in the Latched Fault Mask by issuing a Fault Reset command (see section 3.5). A latched fault can only be cleared if the faulting condition no longer exists. Latched faults can also be cleared from the front panel, or using a parallel I/O Fault Reset input. When latched faults are reset: All Latched Fault Mask bits that do not have corresponding bits set in the Active Fault Mask are cleared. If all bits are cleared in the Latched Fault Mask, the service request contact is cleared. Also, note that powering the SSPA off will reset any latched faults, so if the unit was switched off to repair a problem, resetting faults may not be necessary. 4.2 Fault Descriptions The many fault conditions that can be detected by the SSPA are reported via the serial I/O fault handing mechanism (see section 3.3). More information about many of these faults can be obtained from other messages. See the SSPA documentation for detailed explanations of the fault conditions. 4.3 Serial Port Relay Contacts A relay contact set available on the serial I/O connector can be programmed to provide a Service Request indicator, which will be actuated (placed in its Fault state) whenever any fault or warning is detected by the amplifier. This contact can be used as a status signal to alert the status monitor system that a condition requires attention. The unit can then be polled to determine the nature of the problem. The Service Request is cleared (relay placed in its normal state) when any one of the following occurs: A Clear Service Request command (section 3.4) is received on the serial port; or All latched or active fault conditions are no longer being reported, due to either non-latched warning conditions clearing, or due to a Fault Reset command (section 3.5) being issued when no active conditions are detected. This relay contact can also be programmed as either Summary Alarm or Active Fault. When it is set for Summary Alarm, the relay is placed in its fault state whenever any latched or active fault or warning is being reported. The Summary Alarm clears when no latched or active fault or warning conditions are being reported. When set for Active Fault, the relay is placed in its fault state whenever any active fault is detected by the amplifier. The Active Fault indication is cleared when there are no longer active faults detected (even if there are still latched faults). Warnings have no effect on the relay in this mode. The Active Fault setting is the default. This setting is ideal for use in a redundant system, controlled by an external controller. Note that the choice of Service Request, Summary Alarm, or Active Fault only affects the behavior of the relay on the serial port of the amplifier itself. The serial port relay on an attached RCP-2001 always behaves as a Service Request. Also, note that in previous versions, warnings could only occur if an RCP-200X were attached to the amplifier, so the distinction between whether a fault or warning would affect the relay contact (with no RCP-200X present) was meaningless. Document 12245 Rev. I Sheet 39 of 39