1
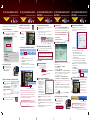
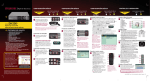
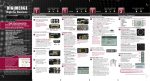
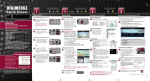
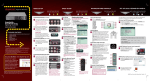
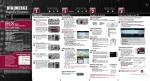
Time Time Time Time under 15 minutes under 15 minutes under 30 minutes SET-UP LOCAL VIEWING ON YOUR PC over 60 minutes under 60 minutes under 15 minutes Time Hand Tools Hardware under 60 minutes over 60 minutes under 15 minutes Hand Tools under 30 minutes Hand Tools Router Router Hi Speed Intermediate easy under 15 minutes under 30 minutes CONTINUED advanced This step relates to remote viewing over the LAN (local area network) by using a PC located on the same network as that of the DVR. Intermediate Time: 30 Minutes Hardware PC/Router Hand Tools Skill Level easy STEP 3 over 60 minutes Skill Level Hardware advanced Retrieve the DVR Information Hardware Hi Speed LO CA L V I E WING INSTALLATION GUIDE Skills - Intermediate under 60 minutes over 60 minutes SET-UP INTERNET REMOTE SECURITY MONITORING REMOTE VIEWING INSTALLATION GUIDE Hand Tools Hardware Hi Speed Router STEP 4 over 60 minutes Skill Level Hardware Time: 60 Minutes Hardware Skill Level PC/Router under 15 minutes Time Intermediate easy under 30 minutes Hand Tools Hi Speed advanced Run CMS-DH Software (LOCALLY): under 15 minutes under 30 minutes under 60 minutes over 60 minutes Hardware Hand Tools Intermediate advanced 1 Hardware Hi Speed Hand Tools STEP 4 5 under 15 minutes The CMS-DH main screen opens. Port: 80 Live Viewing using CMS-DH Software (LOCALLY): 6 _______._______ ._______._______ MAC ADDRESS: _____:_____:_____:_____:_____:_____ 80 PORT: _______ (Required for DDNS registration) 2 Insert the software CD into your computer’s CD/DVD-R drive. At the prompt, run or double-click CMS-DH.exe setup file Computer - not included Install Software (LOCALLY): 3 NOTE: You may receive installation warnings. This is normal. Accept the security warnings to continue. 4 Click Yes to restart the computer when prompted. A shortcut icon appears on your desktop. Hardware Hi Speed Router Intermediate easy easy Service Provider: dns1.digimergeddns.net Domain Name: tomsmith.digimergeddns.net Intermediate advanced User ID: tomsmith Password: (your password) 12 advanced Skill Level easy 2 To add a DVR to CMS-DH: 1. Click Device. 2. Click Scan to locate connected DVRs on the network. 3. Click on the DVR you wish to add to CMS-DH, and then click Apply>OK. • The DVR appears on the left panel. 4. Click on the DVR you want to connect, and click the Offline button. 5. Double-click the name of the DVR to connect to the system. Create Account: 3 ATTENTION: You MUST enter your DDNS information LOCALLY before attempting remote access. 4 Complete New Account Information 1. Open the MAIN MENU and click NETWORK. 2. Select the DDNS tab. 3. Under USE, select DIGIMERGE. 4. Under DOMAIN NAME, enter only the first portion of your DDNS domain from the confirmation email. For example, if your domain name is “[email protected]”, you only need to enter “tomsmith” in the text field. 5. Under USER ID, enter your Digimerge DDNS user name. 6. Under PASSWORD, enter your Digimerge DDNS password. Create Account LOCAL LIVE SITE Double-click to connect to DVR NOTE: To add another DVR from the network, you must click the Online button to disconnect the DVR. Then repeat steps 1-5 to add the new DVR. NOTE: If you have changed the default password of the DVR, you must select the DVR from the list, then manually re-enter the new password in the Password field, and then click Apply and then OK. Congratulations! You have completed Step 3 successfully. You can now view, playback video on your Local Computer via LAN (local area network). 1. Complete the Account Information fields with your personal information. Complete the Warranty Information with your purchase details. 2.Complete the System Information fields. 3.Product License (Code): Select your product model from the Product License drop down menu. (e.g. DH200+ Series) 4.MAC Address: The physical address of your system on your network. 5.URL Request: Enter a unique URL name (e.g. tomsmith). NOTE: URL name should not be more than 15 characters. 6.Click Create New Account to create a new account and save your settings. 7.Your Account information will be sent to you at the email address you provided earlier. Hi Speed under 15 minutes CONTINUED under 15 minutes under 30 minutes under 60 minutes over 60 minutes easy under 30 minutes Skills - Advanced under 60 minutes Hardware over 60 minutes Hi Speed Router Intermediate advanced Adding a DVR using a DDNS Address: Hand Tools Hardware Hi Speed Skill Level ATTENTION: You MUST enter your DDNS information LOCALLY before attempting remote access. DVR should be disconnected from CMS-DH Software. easy Intermediate advanced Router Skill Level easy Intermediate advanced Enter DDNS Set-up on your DVR: 6 Open your web browser (Internet Explorer by default) and enter http://ddns.digimerge.net in the address bar. Click the “Create Account” button. STEP 4 8 Intermediate over 60 minutes Router advanced Skill Level Hardware Time: 60 Minutes Hardware Skill Level PC/Router Time Hand Tools Router advanced 80 Hand Tools Hi Speed http://ddns.digimerge.net CMS-DH Central Management Software (LOCALLY): Follow the installation screen to complete CMS-DH Software installation. CMS-DH is a central management software that allows you to view and manage up to 300 DH200 series DVRs. over 60 minutes under 60 minutes under 60 minutes Time over 60 minutes Hardware under 30 minutes SET-UP INTERNET REMOTE SECURITY MONITORING REMOTE VIEWING INSTALLATION GUIDE Skills - Advanced under 60 minutes DDNS (Dynamic Domain Name System) Set-up: Record the information in the section below: IP ADDRESS: 80 under 30 minutes An automated REGISTRATION CONFIRMATION EMAIL will be sent to your email. Print and Save this confirmation. You will need this information to access your System remotely. advanced EXAMPLE Web under 30 minutes Hand Tools An example of a port forwarding screen is shown for illustration purposes. Intermediate under 15 minutes Registration Email: 5 Router easy under 15 minutes Hi Speed EXAMPLE 1 Time: 60 Minutes Hardware Skill Level PC/Router Time CONTINUED advanced All routers are different. To port forward your router, please refer to your router’s user manual. 1. Double-click the CMS-DH icon on the desktop. Hardware Hand Tools Skill Level To record your IP & MAC Addresses, press the (REWIND) button on the remote control (enter password if required) or 1. Open the MAIN MENU and select SYSTEM. 2. Under the INFO tab, you will find your system’s IP address. over 60 minutes Router Port forward your router first before proceeding with the set-up. You must forward Port: 80 Intermediate under 60 minutes Time Hi Speed Skill Level easy under 30 minutes SET-UP INTERNET REMOTE SECURITY MONITORING REMOTE VIEWING INSTALLATION GUIDE over 60 minutes Router Intermediate easy under 15 minutes Skills - Advanced under 60 minutes Port Forward your Router (manually): Skill Level NOTE: Make sure you have connected the DVR to your network and have the DHCP turned ON. Router Skills - Intermediate under 60 minutes Router easy under 60 minutes Time Hi Speed LO CA L V I E W I N G I N S TA L L AT I O N G U I D E STEP 3 under 30 minutes Time under 30 minutes 1. Click Device 2. In the Device manager window, click Add 3. Beside the Type drop-down menu, select DVR 4. Enter the following into the blank fields: • Name: Enter the DVR name of your choice. • IP/DDNS: Enter the DVR’s DDNS address (for example tomsmith.digimerge.net) • Port: Enter the DVR’s port number (by default, port 80) • User: Enter the DVR’s user name (by default, admin) • Password: Enter the DVR’s password (by default, 000000) NOTE: Obtain your Digimerge DDNS user name and password from the confirmation email. 5. Click Apply>Ok. 6. Click the Offline button to connect to the DVR. Double-click the DVR icon to begin viewing. 9 Live Viewing using CMS-DH Software (REMOTELY): NOTE: Obtain your Digimerge DDNS user name and password from the confirmation email. 7. Under DDNS TEST, select START. You should receive a “GOOD” message. If there is an error, check your network connections; check that you have entered the correct domain name, user ID, and password. 8. Press ENTER to save your settings. Press MENU/ESC to close remaining windows. REMOTE LIVE SITE Once you have added the DVR, you can add multiple DVRs and view them in the tab. To switch DVR, click on the tabs near the top of the window. For Instant Mobile Connectivity using a Smart Phone, refer to the User’s Manual. Make sure to complete Port Forwarding Step 4. Install Software (on your remote computer): 7 Insert the software CD into your computer’s CD/DVD-R drive. At the prompt, run or double-click CMS-DH.exe setup file Refer to Step 3, Section 3 - 5 for software installation. Computer - not included SET-UP LOCAL VIEWING ON YOUR PC Time: 30 Minutes Hardware PC/Router Time Click the tab to switch DVR Congratulations! You have completed Step 4 successfully. You can now connect over the internet to view and playback video. DH200+ Touch Series Quick Setup Guide - English - R1