1
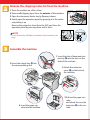
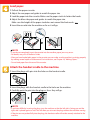
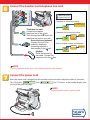
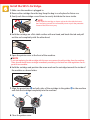
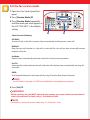
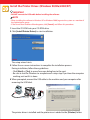
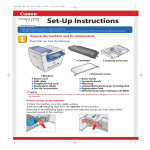
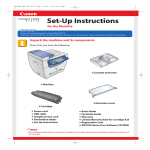
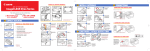
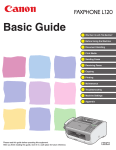
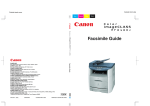
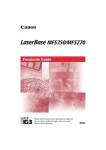
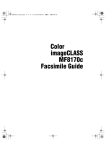
Set-Up Instructions
Thank you for purchasing the Canon FAXPHONE L170.
To get your machine ready for use, please follow the instructions in this document before
referring to any other documentation.
Unpack the machine and its components.
Check that you have the following:
A Machine
B S35 S-Cartridge
C Document output tray
D Output tray
E Cassette extension
F Extension cover
●
●
●
G Handset
NOTE
H Handset cradle
I Plugs with pins (2)
Power cord
Telephone line cord
Documentation
Set-Up Instructions
Basic Guide
Warranty
Warranty for S35 Cartridge
Registration Card (for USA only)
● FAXPHONE L170 Software CD-ROM
● Destination labels
• You need a USB cable (less than 16.4 ft./5 m) to connect your machine to a computer for printing.
• To lift the machine, hold it firmly and level as illustrated.
Remove the shipping materials from the machine.
1 Place the machine on a flat surface.
2 Remove all shipping tapes from the exterior of the machine.
3 Open the document feeder tray by flipping it down.
4 Gently open the operation panel by grasping it at the center
and pulling it up.
Remove the protective sheet from the ADF, and close the
operation panel by pressing down until it clicks.
Document
feeder ADF
tray
Operation panel
NOTE
• Do not remove the USB label on the back of the machine at this
stage.
USB label
Assemble the machine.
5 Insert the output tray D into
the corresponding slots.
1 Insert the tabs of document output tray C into the slots on the
back of the machine.
2 Attach the extension
cover F on the back of
the machine.
4 Insert the paper cassette into the machine.
3 Pull out the paper cassette,
and attach the cassette
extension E to the cassette.
Load paper.
1 Pull out the paper cassette.
2 Adjust the rear paper end guide to match the paper size.
3 Load the paper into the cassette. Make sure the paper stack sits below the hooks.
4 Adjust the blue side paper end guides to match the paper size.
Make sure the height of the paper stack does not exceed the limit marks
.
5 Insert the cassette into the machine as far as it will go.
HOOK
HOOK
NOTE
• If you do not completely insert the cassette into the machine, paper jams may occur.
• For details, see p.4-3 of the Basic Guide.
• After you have loaded plain paper in the cassette, you can make sure the machine is printing properly
by making several copies of a document. For instructions, see Chapter 10, "Making Copies."
• Do not load paper from the rear of the cassette.
Attach the handset cradle to the machine.
1 Insert the plugs with pins into the holes on the handset cradle.
2 Insert the plugs with the handset cradle in the holes on the machine.
3 Carefully push the pins into the plugs as far as they will go.
NOTE
• If you have difficulty inserting the plugs, turn the machine so that the left side is facing you and the
right side is placed against a wall. This will allow you to insert the plugs without the machine moving.
• If the pins are not pushed fully into the plugs, the handset cradle will not be securely attached to the
machine.
Connect the handset and telephone line cord.
Connect external devices as follows:
= Handset jack
= External device jack
= Telephone line jack
• Telephone or answering machine
Telephone or
answering machine
Telephone line cord
Connect the supplied
telephone line to the jack.
Then connect the other end to the
telephone line jack on your wall.
External device (optional)
Connect the cord of an
extension telephone,
answering machine or
data modem to the jack.
Telephone
line
Machine
• Telephone and answering machine
LINE TEL
Telephone
line
Telephone
Answering
machine
Machine
• Built-in computer modem and telephone
LINE TEL
Telephone
Computer
Telephone
line
Handset
Place the handset on
the cradle. Connect the
handset cord to the jack.
Machine
NOTE
• You must complete all the steps in this document to receive faxes properly.
Connect the power cord.
When the power cord is plugged into the machine and into the wall outlet, the machine is turned on.
The LCD displays
you install the toner cartridge.
, then
. The LCD returns to the standby display when
NOTE
• The machine does not have a power switch.
Install the S35 S-Cartridge.
1 Make sure the machine is plugged in.
2 Remove the cartridge from the bag. Keep the bag in a safe place for future use.
3 Gently rock the cartridge several times to evenly distribute the toner inside.
INSTRUCTIONS
NOTE
• Always hold the cartridge as shown so that the side with the instructions are facing upward. Do not forcefully move or push the protective
shutter of the drum in any way.
4 Hold the cartridge on a flat stable surface with one hand, and break the tab and pull
out the seal completely with the other hand.
5 Open the printer cover at the front of the machine.
NOTE
• If you are replacing the old cartridge with the new one, remove the old cartridge from the machine.
Then, discard the old toner cartridge immediately according to the local laws and regulations for disposal of consumables.
6 Hold the cartridge and position the arrow mark on the cartridge towards the inside of
the machine as shown below.
7 Align the projections A on both sides of the cartridge to the guides B in the machine
and slide the cartridge completely into the machine.
A
B
8 Close the printer cover.
B
Set the fax receive mode.
1 Open the One-Touch Speed Dial
panel.
2 Press [Receive Mode] ➊.
3 Press [Receive Mode] repeatedly
until the mode you want appears in
the LCD.“FAX ONLY” is the default
setting.
➊
➋
Select from the following:
FAX ONLY:
Answers all calls as fax calls. It receives faxes automatically and disconnects voice calls.
MANUAL:
Rings for every call, whether it is a fax call or a voice call. For a fax call, you have to manually activate
reception of the fax.
AnsMode:
Receives faxes automatically and routes voice calls to the answering machine.
Fax/Tel:
Automatically switches between fax calls and voice calls. Receives faxes automatically and rings for
voice calls.
DRPD:
To distinguish between fax and voice calls by using Distinctive Ring Pattern Detection.
NOTE
• You will need to subscribe to a DRP Service offered by some telephone companies.
4 Press [Set] ➋.
IMPORTANT
• Before sending a fax, you MUST register the fax number, your name, and the current date and
time in the machine. For details, see p. 3-3 of the Basic Guide.
NOTE
• For details on setting fax receive mode, see p. 7-1 of the Basic Guide.
Install the Printer Driver. (Windows 98/Me/2000/XP)
IMPORTANT
• DO NOT connect the USB cable before installing the software.
NOTE
• When installing the software in Windows XP or Windows 2000, log onto the system as a member of
the Administrator group.
• If the Found New Hardware Wizard appears, click [Cancel], and follow this procedure.
1 Insert the CD-ROM into your CD-ROM drive.
2 Click [Install Printer Driver] to start installation.
The setup wizard starts.
3 Follow the on-screen instructions to complete the installation process.
During installation, follow these guidelines:
• Click [Next] or [Yes] to move from one dialog box to the next.
• Be sure to wait for Windows to complete each setup step. If you hear the computer
working, wait until it is done.
4 When prompted, connect the USB cable to the machine and your computer after
removing the USB label.
USB cable
USB label
USB port
The printer driver is installed and the printer icon is added to the [Printers] folder.
IMPORTANT
• The USB cable must be connected within 90 seconds to your computer port after [Yes] in the
[USB Connection] dialog box is clicked, otherwise the installation will not complete. For more
information on connecting the USB cable, refer to the Basic Guide.
NOTE
• While the printer driver is being installed, a message appears to view the README file.
If you want to view the README file now, click [Yes]. If not, click [No].
5 Select [Restart my computer now], or [Restart my computer later] → click [Exit].
NOTE
• Remember to register your machine to ensure product support. The serial number is located on the
back of the machine.
Part no. FA7-5680 (000)
© 2004 Canon Inc.
Canon is a registered trademark of Canon Inc.
All other products and brand names are registered
trademarks or trademarks of their respective owners.
Specifications subject to change without notice.
PRINTED IN CHINA