1
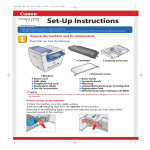
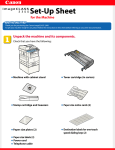
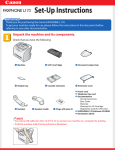
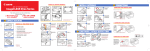
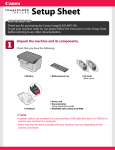
E227ME (MF5770) US2 SI.qxd
2/1/05
12:05 PM
Page 1
Set-Up Instructions
for the Machine
Thank you for purchasing Canon imageCLASS MF5770.
To get your machine ready for use, please follow the instructions in this document before referring to any other documentation.
Unpack the machine and its components.
Check that you have the following:
● Cassette
extension
● Machine
● Extension
cover
● Cartridge
●
●
●
●
●
Power cord
USB cable
Telephone line cord
Destination labels
Set-Up Instructions
●
●
●
●
●
●
Basic Guide
Facsimile Guide
Warranty
Limited Warranty Note for Cartridge X25
Registration Card
MF5700 Series User Software CD-ROM
NOTE
●
The cartridge included with the machine is Cartridge X25 that yields approximately 2,500 pages of printouts (Letter at 4%
dot coverage).
E227ME (MF5770) US2 SI.qxd
2/1/05
12:05 PM
Page 2
Before setting up the machine:
1 Place the machine on a flat, stable surface.
2 Remove all shipping tape from the exterior of the machine.
Referring to the following figure, remove the tape and spacers on both sides of the
cassette housed in the machine.
Install the cartridge.
1 Remove the cartridge from the bag. Keep the
bag in a safe place for future use.
2 Gently rock the cartridge several times to
evenly distribute the toner inside.
3 Hold the cartridge on a flat stable surface with
one hand, and break the tab ➊ and pull out
the seal ➋ completely with the other hand.
4 Pull open the front cover.
E227ME (MF5770) US2 SI.qxd
2/1/05
12:06 PM
Page 3
B
A
5 Hold the cartridge so that the instructions (A)
and the arrow (B) are facing up, and insert it in
the machine horizontally as far as it will go.
6 Close the front cover of the machine.
Assemble the cassette and load paper.
B
A
1 Hold the document feeder (A) with one hand,
and open the document feeder tray (B) with
the other.
2 Pull out the paper cassette completely.
NOTE
●
Pull the cassette straight/forward. Pulling it at an angle
may damage the paper sensing lever inside the
machine.
E227ME (MF5770) US2 SI.qxd
2/1/05
12:06 PM
Page 4
3 Attach the extension to the cassette. The slots
➊ are keyed and must be inserted at a 90°
angle. Once inserted, fold the extension as
shown ➋.
4 Pinch and slide the rear paper end guide to
match the size of paper.
NOTE
●
Confirm that the paper guide is fitted in the paper size
slit correctly.
To load Legal-size paper:
Pull the blue tab ➊ and extend the cassette ➋ as far as it will go. Keep the rear paper end guide to LTR
size mark. If you are not using Legal-size paper, skip to the next step without extending the cassette.
A
5 Load the paper into the cassette. Make sure
the paper stack sits below the hooks (A).
6 Pinch and slide the side paper end guides to
match the size of paper.
E227ME (MF5770) US2 SI.qxd
A
2/1/05
12:06 PM
Page 5
B
7 Even out the edges of the paper stack.
Make sure the height of the stack does not
exceed the limit marks
(A) and that
the side edges of the stack are below the
hooks (B).
8 Insert the paper cassette back into the
machine as far as it will go.
NOTE
●
If you do not completely insert the cassette into the
machine, paper jams may occur.
●
Do not push in the cassette at an angle. Doing so
may damage the paper sensing lever inside the
machine.
IMPORTANT
9 Insert the tabs on the extension cover into the
slots ➊ on the back of the machine,
and carefully lower the cover ➋ until it sits on
the cassette extension beneath it.
IMPORTANT
●
Do not load paper from the back of the machine.
Doing so may damage the paper feeding assembly
inside the machine.
E227ME (MF5770) US2 SI.qxd
2/1/05
12:06 PM
Page 6
Connect the telephone cable and any necessary external device.
Connect the telephone cable
to the wall jack.
Connect external devices as follows:
= Telephone line jack
= External device jack
z Telephone or answering machine
Telephone
line
Machine
Telephone or
answering machine
z Telephone and answering machine
Telephone
line
Machine
LINE TEL
Answering
machine
Telephone
z Built-in computer modem and telephone
You can connect an external
device if necessary (optional).
Telephone
line
Machine
LINE TEL
Computer
Telephone
Connect the power cord.
1
2
Plug the power cord into the rear socket ➊. Then connect the other end to the wall outlet ➋.
Once it is warmed up, the standby display
appears in the LCD.
IMPORTANT
●
For important safety instructions on installation and handling of the machine, see “Important Safety
Instructions” in the Basic Guide.
NOTE
●
Make sure the correct paper size is specified in the machine. For details, see Chapter 2,“Paper Handling,” in the Basic
Guide.
E227ME (MF5770) US2 SI.qxd
2/1/05
12:06 PM
Page 7
Set the receive mode
1
Press [Menu]➊.
2
Press [
(–)] or [
(+)]➋ to select
<FAX SETTINGS> → press [Set] .
3
COPY
SCAN
FAX
Redial /
Pause
Menu
Alarm
Press [
(–)] or [
(+)]➋ to select
<RECEIVE MODE> → press [Set] .
Coded
Dial
Directory
In Use / Memory
Status
Monitor
Clear
Start
Stop/Reset
Set
Hook
4
Press [
(–)] or [
(+)]➋ to select the
receive mode → press [Set] .
You can select from the following:
●
<FaxOnly> to automatically receive faxes, all calls will be answered as fax transmission. Voice calls
will then be disconnected.
●
<FaxTel> to automatically switch between fax and voice calls. Faxes will be received
automatically, and the machine will ring for voice calls.
●
<AnsMode> to receive faxes automatically and route voice calls to an answering machine connected to the machine.
●
<DRPD> to distinguish between fax and voice calls by using Distinctive Ring Pattern Detection.
●
<Manual> for the connected telephone to ring for fax and voice calls. Fax calls must be answered
manually.
5
Press [Stop/Reset] to return to the standby display.
NOTE
●
●
For details on setting fax receive mode, see Chapter 5, "Receiving Faxes," in the Facsimile Guide.
Before using the machine, make sure you have set the correct telephone line type for your telephone line. For details on
setting fax receive mode, see Chapter 2, "Registering Information in Your Machine," in the Facsimile Guide.
E227ME (MF5770) US2 SI.qxd
2/1/05
12:06 PM
Page 8
Congratulations! You have now completed the machine setup.
Where to go from here...
Once you have completed all steps in this document, see the Set-Up Sheet for
Networking and Printing to set up the machine for use in a network and to install driver
software.
For basic operations of all functions of your machine, see the Basic Guide.
For details on sending and receiving faxes, see the Facsimile Guide.
For information on the driver software, see the Software Guide (included in the User
Software CD).
For details on the network function of the machine, see the Network Guide (included in
the User Software CD).
For information on remotely monitoring and controlling machine functions through a
network, see the Remote UI Guide (included in the User Software CD).
NOTE
●
Remember to register your machine to ensure product support. The serial number is located on the back of the
machine.
For installation help and operational instructions, call us at:
1-800-828-4040
1-800 OK CANON
U.S.A. CUSTOMERS
CANADA CUSTOMERS
Part no.FA7-7063 (010)
©2005 Canon Inc.
Canon and imageCLASS are trademarks of Canon Inc.
All other products and brand names are registered
trademarks or trademarks of their respective owners.
Specifications subject to change without notice.
PRINTED IN CHINA