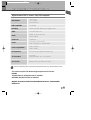
1
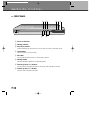
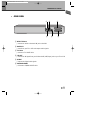
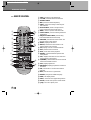
DSD-9520˙¥` 2005.9.14 7:39 PM ˘
` 1
USER’S GUIDE
DSD-9520
Digital PVR
DSD-9520 2005.9.14 7:37 PM ˘
` 1
CONTENTS
CONTENTS
Important Care and Safety Advice ......................................................2~3
Introduction ............................................................................................4
Features .................................................................................................5
Identification of Controls .....................................................................6~8
Front Panel ___________________________________________________________________________________6
Rear Panel____________________________________________________________________________________7
Remote Control ________________________________________________________________________________8
Connecting the PVR.................................................................................9
Setting up your digital PVR with a SCART cable ______________________________________________9
To TV _________________________________________________________________________________________9
To TV & VCR __________________________________________________________________________________10
Basic Operation ....................................................................................12
Using Standby________________________________________________________________________________13
Changing Channels___________________________________________________________________________13
To choose a particular channel _______________________________________________________________13
Using the TV Guide (EPG)_____________________________________________________________________14
Now & Next information_____________________________________________________________________15
Using the Main & Setup Menu’s ______________________________________________________________16
Using your VCR with the Digital PVR ________________________________________________________18
How to Access Topup TV channels____________________________________________________________19
Using interactive TV and Teletext_____________________________________________________________20
Timer Programming __________________________________________________________________________22
Time Shift Recording .............................................................................23
Time Shifting (Pausing Live TV) _______________________________________________________________23
Recording and Playback on Your PVR ...................................................24
Normal Recording ____________________________________________________________________________24
Timer Recording ______________________________________________________________________________24
Playback & Edit ______________________________________________________________________________25
Where to get more help........................................................................26
Product technical specification...............................................................27
1
DSD-9520 2005.9.14 7:37 PM ˘
` 2
IMPORTANT CARE AND SAFETY ADVICE
This Digital PVR has been manufactured to meet international safety standards, but
you must take care to operate it safely.
It is important that you read these safety instructions.
If you have any doubts about the installation, operation, or safety of this Digital PVR,
contact Daewoo, as shown below.
CAUTION
RISK OF ELECTRIC SHOCK
DO NOT OPEN
CAUTION: TO REDUCE THE RISK OF ELECTRIC SHOCK,
DO NOT REMOVE COVER (OR BACK). NO USERSERVICEABLE PARTS INSIDE. REFER SERVICING TO
QUALIFIED SERVICE PERSONNEL.
✔
The lightning flash with arrowhead symbol,
within an equilateral triangle, is intended to
alert the user to the presence of uninsulated
“dangerous voltage” within the product’s
enclosure that may be of sufficient magnitude
to constitute a risk of electric shock.
The exclamation point within an equilateral
triangle is intended to alert the user to the
presence of important operating and servicing
instructions in the literature accompanying the
appliance.
Electrical warning
• Your Digital PVR contains a high voltage which is sufficient to cause a dangerous electric shock.
• Never remove the Digital PVR cover.
• There are no user-serviceable parts inside.
Switch off the power supply from the mains wall socket. before you disconnect any equipment from
the Digital PVR.
• Never push anything into holes, slots or other openings in the case.
✔
Positioning the PVR
• The Digital PVR and cables should be placed so that they not likely to be walked on or pinched by
items placed upon or against them.
• Do not expose your Digital PVR to direct sunlight or to extreme temperatures (above 40°C or
below -5°C), high moisture levels or dust.
• The apparatus shall not be exposed to dripping or splashing and that no objects filled with liquids,
such as vases, shall be placed on the apparatus.
• The ventilation should not be impeded by covering the ventilation openings with items,such as
newspapers,table-cloths,curtains,etc.
• Do not Place the Digital PVR on an unstable surface or on a bed, sofa, rug, or similar surface as this
may block air ventilation and cause it to overheat.
• Never place the Digital PVR over a radiator or in an unventilated cabinet. No naked flame sources,
such as candles, should be placed on the apparatus.
2
DSD-9520 2005.9.14 7:37 PM ˘
` 3
Important Care and Safety Advice
✔
Cleaning
• Cleaning : always disconnect from the mains supply before cleaning. Wipe with a lint-free cloth or
one that has been slightly dampened with clean water. Never use detergents, liquid cleaners.
✔
Unplug when not in use
• When not in use for an extended period, unplug the Digital PVR from the mains outlet. Do not
overload wall outlets and extension adaptors as this can result in a risk of fire or electric shock.
✔
Use only authorised servicing
✔
EARTHING : THE ANTENNA CABLE MUST BE EARTHED.
✔
If any of the following occur
• Any of the cables or plugs are damaged.
• Liquid has spilled onto, or objects have fallen into, the Digital PVR.
• The Digital PVR has been dropped or the casing has been damaged.
• The Ditigal PVR does not operate normally.
✔
Carefully unplug the Digital PVR from the electrical outlet and
• Contact the retailer/ supplier who sold you the Digital PVR
• Call the Daewoo Helpline : 0870 100 2525
Or visit our web site at : [email protected]
End User licence
This hardware and software of this product are licensed to the user as a single product that
cannot be separated.
It is intended as domestic product for the purposes of receiving digital television services; any
other use is done so at the users risk.
In relation to the software the end user is prohibited from copying,transferring to a 3rd party,
modifying or otherwise attempting to derive the source code of any part or whole of the software
in the product.The software is not sold, but licensed for use in the European Union to the owner
of the hardware. New software maybe transmitted to the box by the manufacturer in which case
the licence transfers to the new software.
3
DSD-9520 2005.9.14 7:37 PM ˘
` 4
INTRODUCTION
Thank you for purchasing the Personal Video Recorder (PVR).
Equipped with the latest technology and design, the DSD-9520 is a set-top box ideal for digital
terrestrial broadcast reception. The simple installation and operation, user-friendly threedimensional OSD, Digital audio output with Dolby Digital ready, and advanced video clarity made
for TV and VCR are all designed to enrich the viewer experience.
As a digital set-top box, it can receive TUTV and FTA broadcasts. Outstanding stability and comfort
are its built in features. In addition to delivering more channels with its new highly sensitive tuner,
DSD-9520 boasts the Electronic Program Guide (EPG), for even better program information on all
channels, and information that enables subtitles and teletext for a bounty of useful information on
programs and broadcast signals.
As a PVR, DSD-9520 utilizes the preloaded software functions by incorporating the hard disk drive.
This allows for assorted trick play, diverse formats of recording, and recordings playback,
all through the time shift recording function.
Software upgrade notices are posted periodically on the Internet homepage, and new versions can be
updated through automatic software upgrade service (OAD). With the latest software, viewers are
always sure to enjoy endless hours of extraordinary digital broadcasts and an abundance of data.
If you have any difficulties concerning the operation of your PVR, please refer to the relevant section
of this manual. This manual will provide you with useful information on using the PVR.
PACKAGE CONTENTS
When you open the packaging you should find
1) DAEWOO DIGITAL PVR
2) REMOTE CONTOL
3) SCART CABLE
4) USER’S GUIDE
Remote Control
VOL
Scart Cable
User’s Guide
VOL
• If any parts are missing, do not attempt to install this product.
Please contact the Daewoo Careline on
4
0870 100 2525.
DSD-9520 2005.9.14 7:37 PM ˘
` 5
FEATURES
• Personal Video Recorder
• 80 GB Hard Disk Drive (approx. 40 hours of recording time).
• Pause and play with button during A/V watching.
• Fast Forward & Fast Rewind in various speeds.
• Jump to live program
• Slow Motion to Forward & Backward.
• Time shift recording for 60 minutes.
• Recording live channels and stop.
• Recording reservation in EPG information.
• Recording reservation with setting start time and duration.
• Play back of recorded services with Trick play modes.
• MPEG-2 Digital & Fully DVB-T Compliant.
• Digital Terrestrial Set-Top Box
• Fast Interactivity & Digital Teletext (MHEG 5).
- Allows a split screen combination of your programme plus live text news & sport
information.
- Digital super 'teletext' where you can view up-to-the minute information
• User-friendly EPG (8 days capability).
• Parental control with block on system, all channels and programs by age limitation.
• Multiple Connectivity to Hi-Fi or Home Theatre.
• Channel list mode in both all and favourite groups.
• Channel search in automatic, manual and network search.
• Channel sorting by Channel Number
• Timer Setting Supports automatic Turn-On and Off daily.
• Auto language selection of program for Audio language with user setting in menu.
• Video format in 4:3, 16:9 and letterbox.
• Extended information shows the full program information.
5
DSD-9520 2005.9.14 7:37 PM ˘
` 6
IDENTIFICATION OF CONTROLS
FRONT PANEL
! @ #
POWER/ON
REMOTE
$ % ^
HDD
MENU
Digital Terrestrial Receiver DSD 9520
CH
&
CH
VOL
OK
STANDBY
VOL
*
! Power On indicator
@ Standby indicator
# Hard drive indicator
; will be visable when hard drive is in use ie when in record or time shift mode.
$ Menu Button
; allows access to on screen menu.
% OK button
; can be used to select a menu or confirm menu options.
^ Standby Button
; switches between Operation and Standby modes.
& Channel up/down (+/-) Buttons
; can be used for changing channels or moving up and down Menu screens.
* Volume up/down (+/-) Buttons
; used to control volume on the PVR.
6
DSD-9520 2005.9.14 7:37 PM ˘
` 7
Identification of Controls
REAR PANEL
!
@
#
TV
L
RF IN
R
RF OUT
AUDIO
OUT
VCR
DVD
AUDIO
OUT
$
%
^
! RF IN T V Scart
; connects an aerial to the Aerial IN jack on the PVR.
@ Audio L/R
; connects to your TV or VCR and outputs audio signals.
# T V Scart
; connects a T V SCART cable.
$ RF OUT
; connects an RF signal from your PVR to the RF (ANT )input jack on your TV or VCR.
% S/PDIF
; Outputs the digital audio signals.
^ VCR/DVD SCART
; Connects a VCR/DVD SCART cable.
7
DSD-9520 2005.9.14 7:37 PM ˘
` 8
Identification of Controls
REMOTE CONTROL
!
@
#
$
%
@
6
7
8
#
#
$
9
%
0
“
!
^
&
VOL
VOL
‘
*
(
)
1
2
3
4
5
+
=
Q
q
W
Mute ; Pauses the audio temporarily.
T V/PVR ; Switches between PVR and TV.
Number buttons
EPG ; Pauses the audio temporarily.
Menu ; Choose and change a wide range of
PVR’s features.
^ Arrow buttons ; allows to change channel,
control volume and move through menu ’s.
& BACK ; returns to previous menu and screen.
* Colour buttons ; used for selecting interactive
applications.
( Playback control buttons ; Includes Play,
Fast Forward,Rewind,Pause and Stop.
) Time Shift ; activates time shift function -see
relevant section in this manual)
1 Audio ; displays Audio menu.
2 Record ; initialises the record feature -see
relevant section in this manual.
3 List ; displays a full list of searched channels
4 FAV ; sets favourite TV channels
5 Slow ; starts slow motion playback.
6 Standby ; switches between operation and
stanby modes.
7 Info ; displays information on the current and
next programs on the channel
8 TV/RADIO ; Switches between first TV channel
stored and first Radio channel.
9 Text ; displays digital text.
0 DVR Guide ; Displays progammes recorded on
hard drive.
“ OK ; selects menu or confirms the selected
operation.
‘ EXIT ; exits the menu or guide screen.
+ Subtitle ; changes the subtitle language.
= Wide ; sets display format.
Q Timer ; accesses the timer programming channels
q Pre CH ; switches to the previous channel viewed.
W Jump ; move to a specific point.
8
DSD-9520 2005.9.14 7:37 PM ˘
` 9
CONNECTING THE PVR
SETTING UP YOUR DIGITAL PVR WITH A SCART CABLE
SCART connections offer the best picture and sound quality.
They can also tell your TV when the Digital PVR is switched on and off and whether
widescreen pictures are being broadcast. Therefore this is the way this box has been
designed to be connected.
1. Connect your aerial to the Digital PVR.
• Make sure your TV is switched off, together with any other equipment you are connecting to it.
• Insert the cable from your aerial into the Digital PVR socket marked ‘AERIAL’.
2. Connect the SCART cable.
Choose the option below that best suits your TV (and VCR, if you have one). If you need a longer
SCART cable, you can find one at most TV or electronics retailers.
Ask for a “fully-populated” SCART lead.
Option 1: connecting to a TV only
• Connect the SCART cable between the ‘TV’ socket on your Digital PVR’s rear panel and your
TV’s SCART socket.
• Connect an RF cable between the ‘RF OUT’ output on the Digital PVR and the RF socket on
your TV (where you normally connect the aerial).
TV
AERIAL
SCART Cable
RF Cable
(Not supplied)
TV
L
RF IN
R
RF OUT
AUDIO
OUT
AUDIO
OUT
VCR
DVD
9
DSD-9520 2005.9.14 7:37 PM ˘
` 10
Connecting the PVR
Option 2: connecting to a TV and VCR
TV
AERIAL
RF Cable
(Not supplied)
SCART Cable
TV
L
RF IN
R
RF OUT
AUDIO
OUT
AUDIO
OUT
VCR
DVD
SCART Cable
VCR
• Connect the SCART cable between the VCR socket on your Digital PVR and your VCR’s SCART
IN socket.
• Connect a SCART cable between the SCART TV socket on your Digital PVR and your TV SCART
IN socket.
• Connect an RF cable between the ‘RF OUT’ socket on the Digital PVR and the RF input socket
on your VCR.
• If there isn’t already one in place, connect a second RF cable between the RF output on your
VCR and the RF input socket on your TV.
3. Connect the POWER cable.
10
DSD-9520 2005.9.14 7:37 PM ˘
` 11
connecting the PVR
4. Switch on your TV.
1
Switch on your TV
2
Switch on the mains outlet for the Digital PVR. The PVR’s red light should show.
3
Press POWER on your PVR remote. The PVR’
green light should go on.
4
Your TV should switch to the Digital PVR
automatically. If no, select the AV channel
using the button on your TV remote marked AV,
EXT, TV/AV, O/E or a
symbol, or refer to
your TV manual.
5
Auto Tune
Please ensure your aerial is connected.
Press OK to automatically tune digital
television services.
If you cannot see the picture from the Digital PVR, please refer to the “where to get more help”
section towards the end of this user’s guide.
You are now ready to tune in to the digital TV service.
11
DSD-9520 2005.9.14 7:37 PM ˘
` 12
BASIC OPERATION
Using your Digital PVR for the first time.
The first time you use your Digital PVR, you will see a sceen like the one below. The
Digital PVR now needs to scan for available Digital TV channels.
• Press OK on your Digital PVR’s remote control to
begin searching for digital channels. The search will
take between 2 and 5 minutes, depending on the
digital TV service in your area.
• As channels are found, their names are listed on the
TV screen.
• When the scan has finished, the Digital PVR will
automatically switch to the first channel in the list.
FULL SCAN ADD NEW SERVICES
CN Name
027 Discovery
060 Television X
033 Boomerang
017 UKTV Gold
024 price-drop tv
061 Red Hot
036 Xtraview
047 Teachers’ TV
0%
Provider
NA
NA
NA
NA
NA
NA
NA
NA
Type
TV
TV
TV
TV
TV
TV
TV
TV
100%
Please wait while scanning... 4 minutes remaining
• You can now explore and enjoy the channels available on
your Digital TV service.
• Please read on to find out more about the features offered
by your Digital PVR.
12
DSD-9520 2005.9.14 7:37 PM ˘
` 13
Basic Operation
USING STANDBY
When you are not watching TV, you should set your Digital PVR to ‘Standby’.
To do this:
• Press POWER to switch to STANDBY (red light).
REMOTE
POWER/ON
REMOTE
HDD
MENU
Digital Terrestrial Receiver DSD 9520
CH
CH
VOL
OK
STANDBY
VOL
If you plan to leave your Digital PVR unattended for a long period, switch it off
and unplug it at the mains supply. (Don’t worry - all of your settings will be saved.)
CHANGING CHANNELS
To ‘hop’ through the channels :
• Press
or
on your Digital PVR remote control.
TO CHOOSE A PARTICULAR CHANNEL
• Press one of the buttons 0 to 9, then press OK.
• To select 2 or 3 digit channels (10 to 999), press the number buttons required in succession, then press
OK.
• If you do not press OK, the PVR will change to the selected channel after approximately 1 second.
13
DSD-9520 2005.9.14 7:37 PM ˘
` 14
Basic Operation
USING THE TV GUIDE (EPG)
The TV Guide shows a full list of available channels and programms.
When you choose the TV Guide, the channel you are watching appears as a small
inset screen.
To view the Guide :
1
2
3
4
5
Press EPG.
TV GUIDE
12/06/2005
09:00 - 10:00
News 24 Sunday
Press … or † to scroll through the list of
channels.
To scroll through the programmes press œ and
√.
To scroll forwards and backwards, one day at a
time, press the blue and the yellow colour
buttons.
A weekly look at key news stories and
news makers, presented by Peter
Sissons. [S]
CN
Name
09:30
001
BBC ONE NI
News 24 The Heaven and Ear Call My
12/06
11:30
002
BBC TWO NI
Smile
003
UTV
The Crocodile Celebrity Wrestling Sur
004
Channel 4
006
ITV2
Select
Timer
To preview the highlighted channel, press Info.
To add the selected programme to your Timer, press the RED
colour button.
6
To view the highlighted channel, press OK.
7
To exit the TV Guide without changing channel, press EXIT or EPG .
14
09:49
Sunday Past Times
T4: Popworld
T4: Hollyoaks Omnib
Who Wants To Be A
Scroll
OK To View
- Day
Planet’s Cele
INFO Preview
+ Day
DSD-9520 2005.9.14 7:37 PM ˘
` 15
Basic Operation
NOW AND NEXT INFORMATION
Now and Next gives you information on the current and next programmes on each
channel.
1
2
3
4
To open the Now/Next menu press INFO. This
displays information on the programme
showing Now.
22:00~22:30
News at Ten
MyFavs 1
New
SUB
TXT
CRYP
0
To see information on the programme
showing Next, press √ .
To see more detailed information press INFO
again.
To change the channel you want information
for press … or † .
5
To watch the highlighted channel press OK.
6
001 BBC ONE NOW 22:25 18/08/2005
Info More
Next
Ch+/Ch- OK SELECT
001 BBC ONE NOW 22:25 18/08/2005
22:00~22:30
News at Ten
Joanna Gosling and Philip Hayton with news, sport, weather
and business. With local headlines from your area.
[News and Factual]
To exit the Now/ Next menu without changing
channel, press EXIT .
MyFavs 1
Info Exit
New
Next
SUB
TXT
CRYP
0
Ch+/Ch- OK SELECT
15
DSD-9520 2005.9.14 7:37 PM ˘
` 16
Basic Operation
USING THE MAIN & SETUP MENU’S
The Main menu lets you choose and change a wide range of your Digital PVR’s
features.
MAIN MENU
• To access the Main Menu, press
MENU.
Service Organiser
Favourites
Timer Programming
Setup
Select
OK
Enter Menu
SETUP MENU
THE MENU OPTIONS ARE :
Languages
TV Setup
Parental Control
Service Setup
DVR Setup
Check For Download
Technical Information
CA Information
Select
■ SERVICE ORGANISER
- lets you delete, reorder and rename the channel
line up.
■ FAVOURITES
OK
Enter Menu
- helps you move quickly between your favourite TV
channels.
■ TIMER PROGRAMMING
- lets you set a timer so that the Digital PVR changes to a specific channel at a certain time
(such as when you wish to record a programme).
16
DSD-9520 2005.9.14 7:37 PM ˘
` 17
Basic Operation
■ SETUP - contains the following sub menu’s :
1. Languages -
when a programme is broadcast in multiple languages, this lets you choose
the language you listen to and any on-screen text or subtitles that are
displayed.
2. TV Setup -
lets you change how programmes are displayed on your TV (widescreen
16:9 or normal 4:3).
3. Parental control -
lets you control what can be watched. Please refer to the relevent section
in this guide for more information.
4. Service Setup - to access this feature you are required to enter a PIN “0000”. In this menu
you can scan for new channels etc...
5. DVR Setup -
allows you to format the hard drive.
WARNING! : This will remove all recordings.
6. Check for download -
is an option that allows your Digital PVR to scan the airwaves for a
software update. As updates are handled automatically by your
Digital PVR it is nor recommended that you use this option.
7. Technical Information -
as the name suggests lists the technical specifcation of the PVR.
8. CA Information -
as the name suggests information of Conditional Access.
17
DSD-9520 2005.9.14 7:37 PM ˘
` 18
Basic Operation
USING YOUR VCR WITH THE DIGITAL PVR
■ To record and view a digital channel
• Select the digital channel you want to record.
• Select the Digital PVR channel on your VCR, and press record or set your recording timer.
Please note : your Digital PVR must be set to the channel you wish to record for the full duration
of the recording.
■ To record an analogue channel while watching a digital channel.
You can record an analogue TV channel while watching a digital channel.
• Select the desired analogue channel on your VCR and record as usual.
■ To record a digital channel while watching an analogue channel.
• Select the digital channel you want to record on your Digital VCR.
• Select the correct AV channel on your VCR, and press record or set your recording timer.
• Use your TV remote to switch to your choice of analogue channels.
Please note : like most Digital PVR’s, this product can only receive one digital channel at a time.
This means that you cannot record one digital channel while watching another
digital channel. Please note that your VCR will also record any on-screen displays
shown at the time of recording.
18
DSD-9520 2005.9.14 7:37 PM ˘
` 19
Basic Operation
HOW TO ACCESS TOPUP TV CHANNELS
1
2
Make sure your digital PVR is set up and that it has finished tuning to the digital channels.
Call Top Up TV and register your card (Top Up TV ’s number is on the packaging that came with the
card).
3
Switch off your digital PVR at the mains supply.
4
Insert your Top Up TV card barcode side upwards as shown in the picture below.
5
Switch on your digital PVR at the mains supply and press the POWER button on the remote control
so that the green light appears.
6
If you cannot see all of the Top Up TV channels, you may need to scan for new channels.
It is important that you follow these steps EVERY TIME you insert
your Top Up TV card - not just the first time.
POWER/ON
REMOTE
HDD
MENU
Top
Up TV
1 07 1E61 6 31E 7S
Important system arrow
www.lupyva.com
IMPORTANT
1. Please keep the DVD+HDD
2. Make sure the rating of your
carefully.
3. Read this page and chapter
Setting up your DVD+HDD
Top
Up TV
CH
CH
VOL
OK
STANDBY
VOL
Insert your Top Up TV card with the
barcode side up
Please note : that a TopUp TV card can be obtained from your retailer or by contacting TopUp
TV on 08700
543210 or visiting the TopUp TV website @www.topuptv.com)
19
DSD-9520 2005.9.14 7:37 PM ˘
` 20
Basic Operation
Audio settings
These can be accessed by pressing the [AUDIO] button on the remote. In this
menu you can set speaker options to ensure you get the most out of your PVR.
TV/Radio Feature
This feature can be accessed by pressing [TV/Radio] button, allowing you switch
between radio and TV channels. (Please note that this feature will always transfer
you between the first radio and TV channels stored ie BBC 1 and BBC Radio 1
rather than those previously viewed).
USING INTERACTIVE TV AND TELETEXT
Your Digital PVR gives you full access to Interactive TV and Teletext.
Teletext is available on certain channels, and there is a dedicated Teletext channel - see your TV
Guide for more information.
• To see the Teletext service on the channel you are watching, press the [TEXT] button.
Using parental controls and pin numbers
The Parental Control feature allows you to lock or unlock channels or change the
censorship options (where available) using a PIN number. Please note that this
feature works only when the broadcaster transmits censorship information.
1
Press MENU to access the Setup Menu.
2
Choose the Parental Control option.
20
DSD-9520 2005.9.14 7:37 PM ˘
` 21
Basic Operation
3
4
Type in your PIN - the default PIN is 0000.
Use œ or √ to change the Censorship level. These settings affect the entire service on your
Digital PVR. To lock or unlock individual channels, see below.
When a programme being broadcast is blocked by the parental control setup, you can override
the settings and watch the programme by entering your PIN number.
■ CHANGING YOUR PIN NUMBER
To set or change your PIN, choose the Change PIN option from the Parental
Control menu. The default PIN is 0000.
PIN
1. To change your PIN, highlight the Change PIN
box and type in the PIN you want.
Please enter PIN to
access menu
2. Type it again in the Confirm New PIN box.
- - - Use 0-9
■ LOCK/ UNLOCK INDIVIDUAL CHANNELS
1. On the Parental Control menu, choose the Lock/
Unlock Services option.
2. Use
… or † to highlight the channels you wish
to lock or unlock.
3. Press OK to switch between the Lock/ Unlock
PARENTAL CONTROL
Censorship
OFF
Change PIN
Lock/Unlock Services
Select
Change
setting.
Please note : If you lose your PIN, please call the Daewoo helpline on 0870
100 2525.
21
DSD-9520 2005.9.14 7:37 PM ˘
` 22
Basic Operation
TIMER PROGRAMMING
You can set the Digital PVR’s programme Timer to switch the PVR to any channel
you choose, at any time you choose. So you’ll always see (or be able to record)
your favourite programmes!
For the duration of the timer programme, the Digital
PVR will not respond to the remote control unless
you press EXIT.
If you wish to record a programme make
sure your PVR is set to the Digital channel
and programmed to record at the time
your programme is on.
TIMER PROGRAMMING
CN
---------
Service
---------------------------------
Select
Date
- -/- - - - -/- - - - -/- - - - -/- - - - -/- - - - -/- - - - -/- - - - -/- - - -
14:40 22/08/2005
Start
--:---:---:---:---:---:---:---:--
Delete
Mins
---------
Rep
---------
OK
Sub DVR
-----------------
Edit entry
Please note that you cannot record one digit channel and watch another digital channel at the
same time).
• Timer Programming can be accessed from the Setup Menu by highlighting the option and
pressing OK.
• If Parental Controls are set on the channel, you will be asked to enter your PIN in order to
complete the Timer Programme.
22
DSD-9520 2005.9.14 7:37 PM ˘
` 23
TIME SHIFT
SHIFT RECORDING
RECORDING
TIME
TIME SHIFTING (PAUSING LIVE TV)
This feature will allow you to record live television for a specified amount of
time.
The Recording can be between 1 min and 1hour in length although this will be
dependent on the amount of free disk space
x2
you have.
0
15
30
45
60
The Green recording bar will indicate your
position within the recording.
1
Select the channel you want to record.
2
Press Time Shift button on the remote control.
The PVR will save the programme on air temporarily,
allowing the user to manipulate the saved programme
ie rewind, replay pause etc..
3
The Record info bar will appear on the screen to show length of the recording.
4
Recording time is to a maximum of 1 hour.
– The length of recording will depend on the disk space available on the PVR.
– To stop the recording at anytime press the STOP button on the remote control. This will
remove the time difference so the programme returns to the position currently being aired.
– You can PLAY and MANIPULATE a Timeshift recording whilst the recording is still in progress.
Further features which can be used with a time shifted recording are as follows:
■ SLOW MOTION PLAYBACK & REWIND :
select the Slow motion + or - buttons on the remote control to move the recording in the
desired direction.
■ JUMP :
This feature allows you to move to a specific point in the recording by selecting either the
right or left jump buttons to move the progress bar on the screen to the required location.
23
DSD-9520 2005.9.14 7:37 PM ˘
` 24
RECORDING &
& PLAYBACK
PLAYBACK ON
ON YOUR
YOUR PVR
PVR
RECORDING
NORMAL RECORDING
This feature will allow you to record a programme you are currently watching
without setting the timer. The recording will continue for specified time until
you press STOP button on the remote control or the unit runs out of available
disc space.
• Press REC button on the remote control and select the duration of the recording eg 30 mins
then press OK for recording to begin.
• Recording will automatically stop after specified time. Press STOP button if you want to finish
recording before specified time ends.
TIMER RECORDING
1
To access the Recording Menu, press MENU button on the remote control and then select Timer
programing.
There are a number of slots for set recordings.
2
To select a slot scroll up/down using the arrow buttons on the remote control.
3
To confirm selection, press OK button on the remote control.
4
To set or edit a recording, highlight the option
in the submenu and press OK button.
The date, the start time, the end time,
programme number, Mode and frequency of
recording can all be input and edited.
- To change any of the options, use the arrow
buttons on the remote control.
- To Save, highlight Save and confirm by
pressing OK on the remote control.
TIMER PROGRAMMING
CN
---------
Service
---------------------------------
Select
Date
- -/- - - - -/- - - - -/- - - - -/- - - - -/- - - - -/- - - - -/- - - - -/- - - -
14:40 22/08/2005
Start
--:---:---:---:---:---:---:---:--
Delete
Mins
---------
Rep
---------
OK
Sub DVR
-----------------
Edit entry
- To delete, highlight Delete and confirm by pressing red colour button on the remote control.
5
To exit , press MENU on the remote control.
To select a previously recorded programme to watch, press DVR GUIDE button on the
remote control.
24
DSD-9520 2005.9.14 7:37 PM ˘
` 25
Recording on Your PVR
PLAYBACK & EDIT
■ PLAY
• To view a list of programmes recorded press the DVR GUIDE button on your remote control.
• To select your programm, scroll though the recorded programmes list using the ARROW buttons
on the remote control.
• To play the programme, highlight the option and press OK on the remote control.
■ EDIT
• Press the DVR GUIDE button on your remote and select RENAME.
25
DSD-9520 2005.9.14 7:37 PM ˘
` 26
WHERE TO GET MORE HELP
If you have any problems using your Digital PVR and cannot find a solution in
this user guide:
For general problems contact
Daewoo helpline on 0870 100 25 25
Or visit our website at : [email protected]
If possible when calling, you should be close to your TV and have your
Digital PVR and TV switched on.
For general Freeview reception enquires
Freeview : 08708 80 99 80 or www.freeview.co.uk
Digital TV Group : www.dtg.org.uk
For aerial and signal problems
Euro Aerials on 0870 412 4862 (lines open Monday to Saturday, 8:30am to
5:30pm)
The product referred to in this manual is a Digital Terrestrial PVR,
model DSD9520, supplied by Daewoo Electronics UK,
Rathenraw Ind. Est. 62-82 Greystone Road Antrim, Co. Antrim, BT41 1NU
26
DSD-9520 2005.9.14 7:37 PM ˘
` 27
PRODUCT TECHNICAL SPECIFICATION
Digital terrestrial PVR TV receiver (Fully DVB -compliant)
UHF Channel
Channel 21-69
-75 to -20 dBm
Bandwidth 8 MHz
DVB Compatible
ETS 300 744
Decoding
MPEG2 compatible (DVB/Main profile@Main level)
Video
1.5~15Mb/s (720 x 576)
Audio
MPEG2 - Musicam (layer 1&2)
(32, 44.1, 48kHz)
Symbol rate
2~40 Mbaud
Power
Input Voltage : 240V, 50/60Hz
Power consumption : 8 -18 (HDD) Wmax
Power requirements
18W in operation
10W in standby
RF Connection
IEC connector 169-2 (female),diameter 9.5mm
TV Connection
Two SCART
Composite/ RGB/ S-video + audio (stereo)
Accessories
Remote Control, Scart cable, User’s Guide
Due to continued product improvement,this specification may change without notice.
This product complies with the following European Council Directive
EN60065
73/23/EEC (the Low Voltage Directive) as amended
89/336/EEC (the EMC Directive) as amended
Digital Terrestrial Television Broadcast Receiver and Decoder
MADE IN UK
27
DSD-9520 2005.9.14 7:37 PM ˘
` 28
Disposal of Used Electrical &Electronic Equipment
The meaning of the symbol on the product, its
accessory or packaging indicates that this product
shall not be treated as household waste.
Please, dispose of this equipment at your applicable
collection point for the recycling of electrical &
electronic equipments waste.In the European Union
and Other European countries which there are
separate collection systems for used electrical and electronic products.
By ensuring the correct disposal of this product, you will help prevent
potentially hazardous release to the environment and damage to human
health, which could otherwise be caused by unsuitable waste handling of this
product.
The recycling of materials will help conserve natural resources.
Please do not therefore dispose of your old electrical and electronic equipment
with your household waste.For more detailed information about recycling of
this product, please contact your local city office,your household waste disposal
service or the shop where you purchased the product.
28