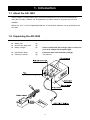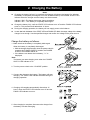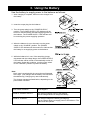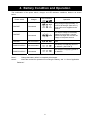
1
WM+PD4000270C
This is a hazard mark (caution mark).
© 2005
No part of this publication may be reproduced, transmitted, transcribed, or
translated into any language in any form by any means without the written
permission of A&D Company Ltd.
The contents of this manual and the specifications of the instrument
covered by this manual are subject to change for improvement without
notice.
Warning Definitions
The warnings described in this manual have the following meanings:
Caution
A potentially hazardous situation which, if not avoided, may result in minor or moderate injury.
It may also be used to alert against unsafe practice.
Note
An important description for proper use of the instrument.
Precautions
Caution
Do not heat the battery, disassemble or dispose of in fire. It may build up heat, explode, or leak and
cause a fire. Follow the local regulations when disposing of a used battery.
Do not allow the battery to become wet. It may build up heat or cause a fire.
Recharge the battery only after the battery has been discharged completely. Charging the battery
repeatedly, with incomplete discharging, may result in heat buildup, generating gases or leaking.
When charging the battery, use the charger provided with the battery. Using a charger other than
the one provided may cause heat buildup and could cause a fire.
The AD-1682 is designed to be used with balances manufactured by A&D. Using the AD-1682 with
products other than specified may cause heat buildup and could cause a fire. Before use, see “1-4
List of Applicable Balances” to check which balances can be powered by the AD-1682.
Keep the battery out of the reach of children.
Do not drop or apply shock to the battery.
Compliance
Compliance with FCC Rules
Please note that this equipment generates, uses and can radiate radio frequency energy. This
equipment has been tested and has been found to comply with the limits of Class A computing device
pursuant to Subpart J of Part 15 of FCC rules. These rules are designed to provide reasonable
protection against interference when the equipment is operated in a commercial environment. If this unit
is operated in a residential area it may cause some interference and under these circumstances the
user would be required to take, at his own expense, whatever measures are necessary to eliminate the
interference.
(FCC = Federal Communications Commission in the U.S.A.)
Compliance with EMC Directives
This device features radio interference suppression in compliance with valid EC
Regulation 89/336/EEC.
1
1. Introduction
1-1 About the AD-1682
The AD-1682 is a rechargeable battery exclusively designed for A&D-manufactured balances.
Using the AD-1682, a balance can be operated in a location where an AC power source is not
available.
Before use, see “1-4 List of Applicable Balances” to check which balances can be powered by the
AD-1682.
1-2 Unpacking the AD-1682
In the carton you should find this manual and the following:
Battery unit
1 pc
800 mA time delay fuse
Battery charger
1 pc
1 pc
Identification label
1 pc
Paste this label onto the battery charger.
Instruction manual
1 pc
This manual
Please confirm that this charger type is correct for
your local voltage and receptacle type.
2
1-3 Specifications
Battery mass
Operating temperature range
Storage temperature range
Operation hours
Charging time
Charging method
External dimensions
Output voltage
Battery type
Output cable length
Approximately 1.3 kg
+5°C to +40°C (+41°F to +104°F)
-20°C to +40°C (-4°F to +104°F)
Approximately 8 hours (when operated continuously using a GX
series balance. Operation hours depend on operating conditions.)
Approximately 15 hours
Charge with timer function for an automatic stop
58 (H) x 96 (W) x 140 (D) mm
12 V (500 mA max.)
Nickel-metal-hydride (Ni-MH) battery
Approximately 1 m
1-4 List of Applicable Balances
Use the AD-1682 only with balances listed below.
Balances
HX series
GP series, GX-K/GF-K series
FC series, FP series, GH series, GR series, GX/GF series,
HM series, HP series, HR-202, HR-300, HR-i series
ET-W series, HF series, HR-60, HR-120, HR-200
EK-G series, EK-H series, EW-G series
HC series, HD series
Continuous operation hours
(Depends on operating conditions)
5 hours
6 hours
8 hours
16 hours
28 hours
66 hours
The AD-1682 can be used for other instruments than balances as shown below.
Instruments
Continuous operation hours
(Depends on operating conditions)
SV series (Viscometer)
AD-8922 (Remote controller)
5 hours
12 hours
Note
In this manual, "balance(s)" refers to the A&D-manufactured products listed in the tables above.
1-5 Notes on Using the AD-1682
The continuous operation hours depend on the operating conditions.
The battery, while it is being charged, will not supply power to the balance.
Do not short-circuit the output plug.
The battery may self-discharge while it is left unused for a long period of time. Charge the
battery after a long period of non-use.
The balance, after the display is turned off using the ON/OFF key, is still consuming power. To
turn the power off completely, disconnect the charger from the battery and turn the power
switch to the “CHARGE” position. (If the charger is connected to the battery under this
condition, the battery will start charging.)
Every time the power switch is turned to the “CHARGE” position with the charger connected to
the battery, the battery will start charging. Charging the battery before it is completely
discharged will shorten the battery life.
3
2. Charging the Battery
Notes
Charging the battery before it is completely discharged will shorten the battery life. Whether
the battery is completely discharged or not can be determined by the POWER SUPPLY LED
indicator when the charger and the battery are disconnected:
Indicator “ON”= The battery has some charge remaining.
Indicator “OFF” =The battery is completely discharged.
Charge the battery fully, until the START LED indicator turns off and the FINISH LED indicator
turns on. This procedure will take about 15 hours.
During the charging operation, the battery will not supply power to the balance.
In case that both indicators of the START LED and FINISH LED blink, the output voltage of the battery
charger is not enough. Use the specified charger and confirm the voltage of the power source.
Charge the battery as follows:
1. Make sure that the battery is completely discharged.
When the battery is completely discharged:
• With the charger disconnected, when the power switch is
turned to the "POWER SUPPLY" position, the POWER
SUPPLY LED indicator will be off.
• If the balance can detect the low battery, "lb" is
displayed.
Note
The battery can start charging even when the POWER
SUPPLY LED indicator is on.
2. Turn the power switch to the “CHARGE” position.
3. Connect the charger to the battery. The battery will start
charging. The START LED indicator will blink during the
charging operation.
4. Charging will complete automatically after about 15
hours, when the START LED indicator turns off and the
FINISH LED indicator turns on.
5. After charging is complete, disconnect the charger from
the battery to avoid recharging.
4
3. Using the Battery
Use the battery to supply power to the balance as follows:
1. After charging is complete, disconnect the charger from
the battery.
2. Insert the output plug into the balance.
3. Turn the power switch to the “POWER SUPPLY”
position. The POWER SUPPLY LED indicator will be
turned on and the battery will start supplying power to
the balance. The POWER SUPPLY LED indicator will
be on during the power supplying operation.
4. When the balance is not to be used, turn the power
switch to the “CHARGE” position. The POWER
SUPPLY LED indicator will be turned off to indicate that
the battery is not supplying power to the balance.
5. While the balance is in use, if the remaining charge
decreases and the voltage drops, the POWER SUPPLY
LED indicator will be turned off automatically to shut off
the battery. Under this condition, turn the power switch
to the “CHARGE” position to protect the battery.
Note
Much care is required with the connection as illustrated
at the right. (The charger and the battery are connected
simultaneously.) Charging may start inadvertently.
The charger operates as listed below, depending on the
power switch condition.
Power switch condition
What happens
Turned to “POWER SUPPLY”
The charger supplies power to the balance.
And the charger does not charge the battery.
Turned to “CHARGE”
The charger charges the battery (recharging).
And the charger does not supply power to the balance. The
balance will not operate.
5
4. Battery Condition and Operation
The combination of the power switch, charger, and LED indicator conditions, leads to as shown
below:
Power switch
Charger
LED indicators
Operation
Connected
Being charged. Approximately 15
hours to full charge. (See note 1).
Power will not be supplied to the
balance.
“CHARGE”
Connected
The output voltage of the battery
charger is not enough. Use the
specified charger and confirm the
voltage of the power source.
“CHARGE”
Not connected
None
“POWER SUPPLY”
Not connected
The battery is supplying power to
the balance. (See note 2).
“POWER SUPPLY”
Connected
The charger is supplying power to
the balance.
“CHARGE”
Note 1:
Charge the battery after it is completely discharged.
Note 2:
About the continuous operation hours using the battery, see “1-4 List of Applicable
Balances”.
6
MEMO
7
MEMO
8